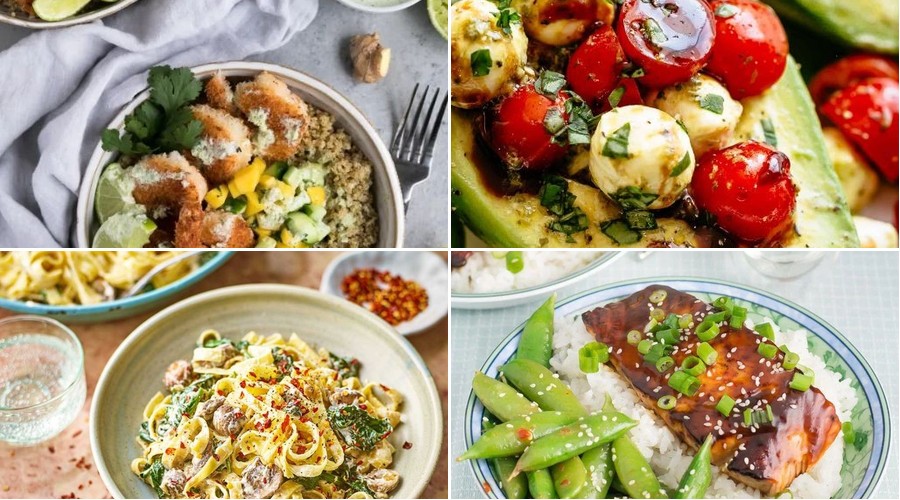
Tired of staring into the fridge after a long day, wondering what to make for dinner? We’ve all been there. That’s why we’ve gathered 20 quick and delicious recipes that come together in just 20 minutes—perfect for those busy weeknights when time is tight but you still want a satisfying meal. Get ready to ditch the stress and discover your new go-to favorites!
Lemon Garlic Chicken with Roasted Broccoli

For those seeking a simple yet impressive weeknight dinner, this lemon garlic chicken with roasted broccoli delivers bright, satisfying flavors with minimal effort. Follow these precise steps to achieve perfectly cooked chicken and beautifully caramelized broccoli every single time.
Ingredients
– 1.5 lbs boneless, skinless chicken breasts
– 1 large head fresh broccoli
– 3 cloves aromatic garlic
– 2 juicy lemons
– 3 tbsp rich extra virgin olive oil
– 1 tsp coarse kosher salt
– ½ tsp freshly cracked black pepper
– ¼ tsp crushed red pepper flakes
Instructions
1. Preheat your oven to 425°F and position one rack in the upper third and another in the lower third.
2. Pat the chicken breasts completely dry with paper towels to ensure proper browning.
3. Cut the broccoli into uniform florets, about 1.5 inches in size for even roasting.
4. Mince the garlic cloves finely to distribute flavor evenly throughout the dish.
5. Zest one lemon using a microplane, then juice both lemons separately.
6. In a large bowl, whisk together 2 tablespoons olive oil, lemon juice, minced garlic, salt, black pepper, and red pepper flakes.
7. Place chicken breasts in a baking dish and pour half the marinade over them, turning to coat completely.
8. Toss broccoli florets in the remaining marinade until evenly coated.
9. Arrange broccoli in a single layer on a parchment-lined baking sheet.
10. Place chicken on the upper rack and broccoli on the lower rack of the preheated oven.
11. Roast for 18-22 minutes until chicken reaches 165°F internally and broccoli edges are crispy and browned.
12. Remove both from oven and let chicken rest for 5 minutes before slicing to retain juices.
13. Sprinkle lemon zest over the finished dish just before serving.
Your chicken will be remarkably tender and juicy while the broccoli develops delightful crispy edges with caramelized tips. The bright lemon cuts through the rich garlic notes beautifully, making this dish equally impressive for casual family dinners or when serving guests. Try serving it over fluffy quinoa or with crusty bread to soak up every bit of the delicious pan juices.
Caprese Stuffed Avocados
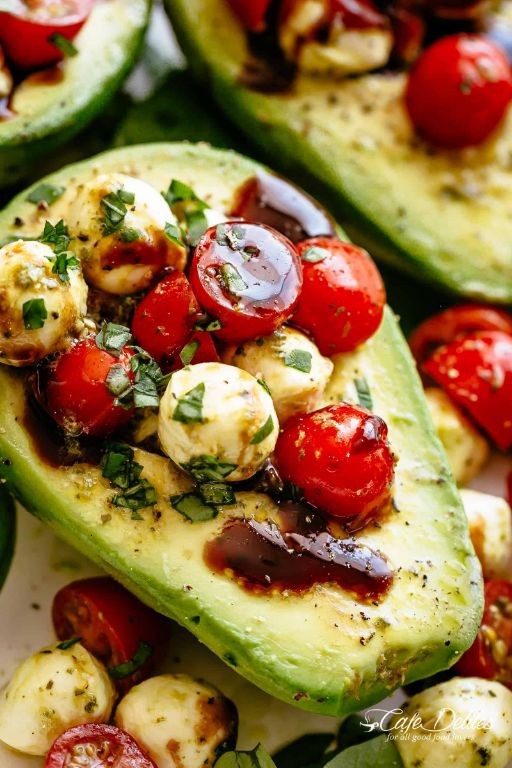
During those busy weeknights when you crave something fresh yet satisfying, these Caprese Stuffed Avocados deliver restaurant-quality appeal with minimal effort. Discover how perfectly ripe avocados become edible bowls for the classic Italian trio of tomatoes, mozzarella, and basil.
Ingredients
– 2 large, perfectly ripe Hass avocados
– 1 cup cherry tomatoes, halved
– 4 ounces fresh mozzarella pearls
– ¼ cup fresh basil leaves, thinly sliced
– 2 tablespoons rich extra virgin olive oil
– 1 tablespoon aged balsamic glaze
– ½ teaspoon flaky sea salt
– ¼ teaspoon freshly cracked black pepper
Instructions
1. Carefully slice each large, perfectly ripe Hass avocado in half lengthwise and remove the pit. 2. Use a spoon to slightly enlarge each avocado half’s cavity, scooping about 1 tablespoon of flesh into a medium mixing bowl. 3. Add 1 cup halved cherry tomatoes, 4 ounces fresh mozzarella pearls, and ¼ cup thinly sliced fresh basil leaves to the bowl with the scooped avocado. 4. Drizzle 2 tablespoons rich extra virgin olive oil over the mixture and gently toss to combine. 5. Evenly divide the filling among the four avocado halves, mounding it slightly. 6. Drizzle 1 tablespoon aged balsamic glaze in zigzag patterns over the stuffed avocados. 7. Sprinkle ½ teaspoon flaky sea salt and ¼ teaspoon freshly cracked black pepper evenly across all servings. Zesty and creamy with pops of juicy tomato, these stuffed avocados offer a satisfying contrast between the smooth avocado base and the fresh, tangy filling. For a stunning presentation, serve them on a bed of peppery arugula or alongside grilled crusty bread to soak up every last drop of the olive oil and balsamic glaze.
Easy Teriyaki Salmon with Snap Peas
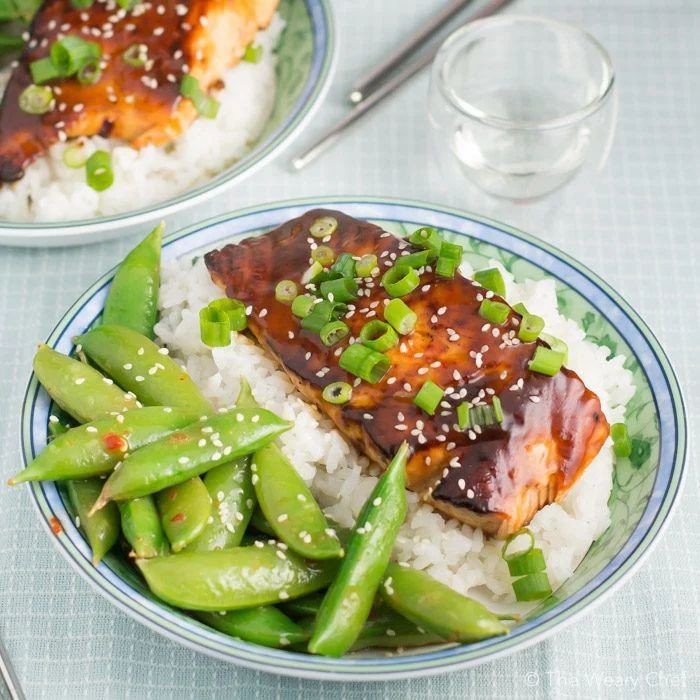
Here’s a simple, foolproof method for creating restaurant-quality teriyaki salmon right in your own kitchen. This approach breaks down the process into manageable steps that ensure perfectly cooked fish every time, even for those new to cooking seafood.
Ingredients
- 4 (6-ounce) fresh salmon fillets with skin on
- 1/2 cup rich soy sauce
- 1/4 cup sweet honey
- 2 tablespoons freshly grated ginger
- 3 cloves aromatic garlic, minced
- 1 tablespoon toasted sesame oil
- 1 tablespoon cornstarch
- 2 tablespoons cold water
- 8 ounces crisp sugar snap peas
- 2 tablespoons vegetable oil
- 1 tablespoon toasted sesame seeds
- 2 thinly sliced green onions
Instructions
- Pat the fresh salmon fillets completely dry with paper towels to ensure proper searing.
- Whisk together the rich soy sauce, sweet honey, freshly grated ginger, minced aromatic garlic, and toasted sesame oil in a small bowl until fully combined.
- Transfer half of the teriyaki sauce mixture to a separate bowl and set aside for serving later.
- Create a slurry by mixing 1 tablespoon cornstarch with 2 tablespoons cold water in the remaining sauce bowl until smooth.
- Heat a large skillet over medium-high heat and add 1 tablespoon vegetable oil until shimmering, about 2 minutes.
- Place salmon fillets skin-side up in the hot skillet and cook undisturbed for 4-5 minutes until a golden-brown crust forms.
- Flip salmon carefully using a spatula and cook skin-side down for 3 minutes.
- Pour the cornstarch-thickened teriyaki sauce over the salmon and reduce heat to medium-low.
- Simmer the salmon in the sauce for 4-5 minutes, spooning sauce over the fillets occasionally.
- Add crisp sugar snap peas to the skillet around the salmon and cook for 2 minutes until bright green but still crisp.
- Remove skillet from heat and transfer salmon and snap peas to serving plates.
- Drizzle reserved teriyaki sauce over the finished dish.
- Sprinkle with toasted sesame seeds and thinly sliced green onions as garnish.
Each bite delivers flaky salmon that practically melts in your mouth, complemented by the satisfying crunch of barely-cooked snap peas. The glossy teriyaki glaze clings beautifully to every surface, creating a perfect balance of savory and sweet flavors. For a complete meal, serve alongside steamed jasmine rice to soak up the extra sauce, or try it over a bed of zucchini noodles for a lighter option.
Greek Yogurt Chicken Salad Wraps
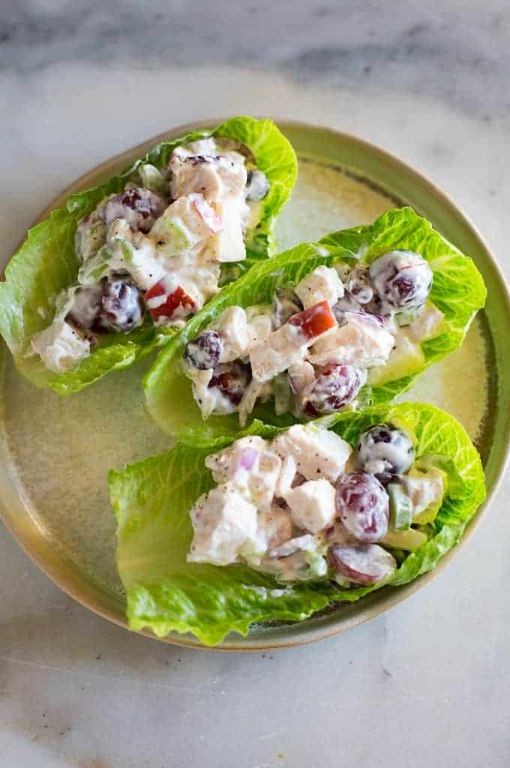
Versatile and protein-packed, these Greek Yogurt Chicken Salad Wraps offer a refreshing twist on a classic lunch. Perfect for meal prep or quick weekday meals, they combine creamy textures with crisp vegetables in an easy-to-assemble package. Follow these simple steps to create a satisfying wrap that’s both nutritious and delicious.
Ingredients
– 2 cups cooked, shredded rotisserie-style chicken
– 1/2 cup thick, creamy plain Greek yogurt
– 1/4 cup finely chopped crisp celery
– 1/4 cup sweet, crunchy red grapes, halved
– 2 tbsp finely minced fresh dill
– 1 tbsp tangy Dijon mustard
– 1 tsp bright lemon juice
– 1/2 tsp aromatic garlic powder
– 1/4 tsp fine sea salt
– 4 large, pliable whole wheat tortillas
– 2 cups fresh, crisp butter lettuce leaves
Instructions
1. Place 2 cups of cooked, shredded rotisserie-style chicken in a large mixing bowl.
2. Add 1/2 cup thick, creamy plain Greek yogurt to the bowl. Tip: Greek yogurt provides creaminess with less fat than traditional mayonnaise.
3. Mix in 1/4 cup finely chopped crisp celery for crunch.
4. Fold in 1/4 cup sweet, crunchy red grapes, halved, to add bursts of freshness.
5. Stir in 2 tbsp finely minced fresh dill for herbal brightness.
6. Incorporate 1 tbsp tangy Dijon mustard for depth of flavor.
7. Squeeze in 1 tsp bright lemon juice to balance the creaminess.
8. Season with 1/2 tsp aromatic garlic powder and 1/4 tsp fine sea salt. Tip: Season while mixing to ensure even distribution.
9. Combine all ingredients thoroughly until the chicken is evenly coated.
10. Lay out 4 large, pliable whole wheat tortillas on a clean surface.
11. Arrange 1/2 cup fresh, crisp butter lettuce leaves in the center of each tortilla. Tip: The lettuce creates a moisture barrier to prevent soggy wraps.
12. Divide the chicken salad mixture evenly among the tortillas, spreading it over the lettuce.
13. Fold the bottom edge of each tortilla over the filling, then roll tightly from one side to form secure wraps.
14. Slice each wrap diagonally for easy handling and presentation.
Plump with creamy chicken salad and crisp vegetables, these wraps deliver a satisfying contrast of textures in every bite. The tangy Greek yogurt base lets the sweet grapes and fresh dill shine, making them ideal for picnics or sliced into pinwheels for parties. For an extra crunch, serve with a side of kettle-cooked potato chips or carrot sticks.
Thai Basil Beef with Jasmine Rice
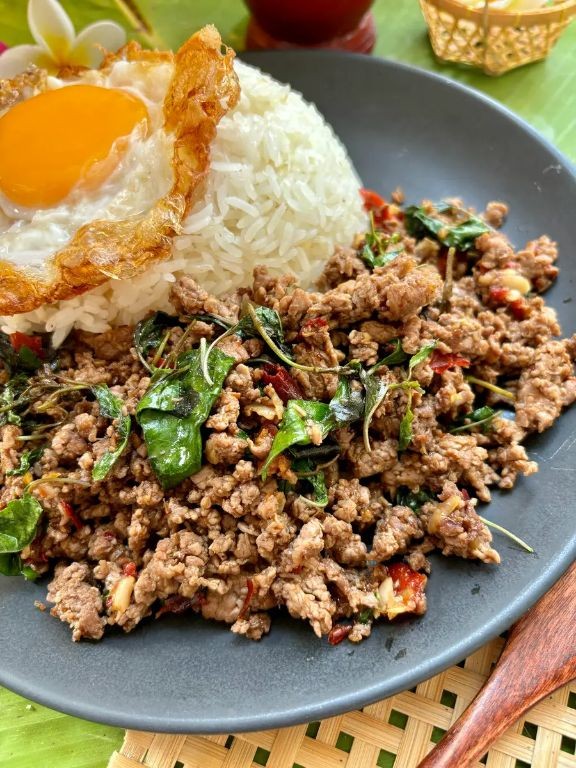
Many home cooks feel intimidated by Thai cuisine, but this flavorful basil beef comes together in under 30 minutes with ingredients you can find at most grocery stores. Mastering this dish will give you restaurant-quality results right in your own kitchen.
Ingredients
– 1 cup jasmine rice
– 1 ½ cups water
– 1 lb thinly sliced beef sirloin
– 3 tbsp rich fish sauce
– 2 tbsp fragrant oyster sauce
– 1 tbsp sweet brown sugar
– 2 tbsp neutral vegetable oil
– 4 cloves aromatic garlic, minced
– 2 fiery Thai chilies, thinly sliced
– 1 large sweet onion, thinly sliced
– 1 colorful red bell pepper, julienned
– 1 cup fresh Thai basil leaves
Instructions
1. Rinse 1 cup jasmine rice under cold water until water runs clear to remove excess starch.
2. Combine rinsed rice with 1 ½ cups water in a medium saucepan over high heat.
3. Bring rice to a boil, then immediately reduce heat to low and cover with a tight-fitting lid.
4. Simmer rice for 15 minutes without peeking to ensure proper steam absorption.
5. Remove rice from heat and let stand covered for 10 minutes to finish steaming.
6. Whisk together 3 tbsp fish sauce, 2 tbsp oyster sauce, and 1 tbsp brown sugar in a small bowl.
7. Heat 2 tbsp vegetable oil in a large wok or skillet over high heat until shimmering.
8. Add 4 cloves minced garlic and 2 sliced Thai chilies, stir-frying for 30 seconds until fragrant.
9. Add 1 lb thinly sliced beef sirloin, spreading pieces in a single layer for proper browning.
10. Cook beef undisturbed for 2 minutes to develop a golden sear on one side.
11. Flip beef and cook for 1 additional minute until no pink remains.
12. Add 1 sliced onion and 1 julienned red bell pepper, stir-frying for 3 minutes until slightly softened.
13. Pour sauce mixture over ingredients, tossing to coat everything evenly.
14. Remove from heat and stir in 1 cup fresh Thai basil leaves until just wilted.
15. Fluff cooked rice with a fork to separate grains before serving.
Perfectly cooked jasmine rice provides a fluffy base that soaks up the savory-sweet sauce, while the beef remains tender against crisp-tender vegetables. The Thai basil adds a distinctive licorice-like aroma that makes this dish truly authentic—try serving it in lettuce cups for a refreshing low-carb alternative.
Avocado and Egg Toast with Chili Flakes

Let’s create the perfect avocado and egg toast that will transform your morning routine into a culinary delight. Learning to master this simple yet sophisticated dish will give you a restaurant-quality breakfast in just minutes, with creamy textures and vibrant flavors that awaken the senses. This method ensures your toast stays crisp while the eggs achieve that ideal runny yolk consistency everyone craves.
Ingredients
– 2 slices of artisan sourdough bread
– 1 ripe Hass avocado
– 2 farm-fresh large eggs
– 1 tablespoon of rich extra virgin olive oil
– 1/2 teaspoon of flaky sea salt
– 1/4 teaspoon of freshly cracked black pepper
– 1/2 teaspoon of vibrant red chili flakes
Instructions
1. Preheat your oven to 375°F and place both slices of sourdough bread directly on the middle rack.
2. Toast the bread for exactly 8 minutes until golden brown and crisp around the edges.
3. While the bread toasts, heat a non-stick skillet over medium heat and add the rich extra virgin olive oil.
4. Crack both farm-fresh large eggs directly into the heated skillet, being careful not to break the yolks.
5. Cook the eggs for 3-4 minutes until the whites are completely set but the yolks remain runny.
6. Remove the perfectly toasted sourdough bread from the oven and place on a cutting board.
7. Cut the ripe Hass avocado in half, remove the pit, and scoop the flesh into a small bowl.
8. Mash the avocado with a fork until slightly chunky but spreadable.
9. Divide the mashed avocado evenly between both slices of toasted sourdough bread.
10. Sprinkle the flaky sea salt evenly over both avocado-covered toasts.
11. Add the freshly cracked black pepper across both toasts in an even layer.
12. Carefully transfer one cooked egg onto each avocado toast using a spatula.
13. Generously sprinkle the vibrant red chili flakes over both eggs and avocado.
14. Serve immediately while the toast remains crisp and the eggs are warm.
This combination creates a wonderful textural contrast between the crisp sourdough and creamy avocado, while the runny egg yolk acts as a rich sauce that brings all the elements together. The chili flakes provide just enough heat to balance the richness, making each bite complex and satisfying. Try serving it with a side of cherry tomatoes or a simple arugula salad for a complete meal that feels both nourishing and indulgent.
Sheet Pan Sausage and Veggies

Often, the best weeknight dinners are those that come together with minimal fuss and maximum flavor. Our sheet pan sausage and veggies delivers exactly that—a complete, satisfying meal roasted to perfection on a single pan. One of the secrets to its success is cutting the vegetables into uniform pieces so they cook evenly and develop those beautifully caramelized edges.
Ingredients
– 1 pound fresh Italian sausage links
– 1 pound baby potatoes, halved
– 2 cups fresh broccoli florets
– 1 large red bell pepper, sliced into 1-inch strips
– 1 medium red onion, cut into 1-inch wedges
– 3 tablespoons rich extra virgin olive oil
– 1 teaspoon coarse kosher salt
– ½ teaspoon freshly cracked black pepper
– 1 teaspoon aromatic garlic powder
– 1 teaspoon dried Italian seasoning
Instructions
1. Preheat your oven to 400°F and line a large rimmed baking sheet with parchment paper for easy cleanup.
2. Place halved baby potatoes in a large mixing bowl and toss with 1 tablespoon of rich extra virgin olive oil, ½ teaspoon coarse kosher salt, and ¼ teaspoon freshly cracked black pepper.
3. Spread the seasoned potatoes in a single layer on one half of the prepared baking sheet.
4. Roast the potatoes at 400°F for 15 minutes to give them a head start since they take longer to cook than the other vegetables.
5. While the potatoes roast, combine fresh broccoli florets, sliced red bell pepper, and red onion wedges in the same mixing bowl.
6. Drizzle the vegetables with the remaining 2 tablespoons of rich extra virgin olive oil and sprinkle with aromatic garlic powder, dried Italian seasoning, and the remaining salt and pepper.
7. Toss the vegetables thoroughly until they’re evenly coated with oil and seasonings.
8. Remove the baking sheet from the oven after 15 minutes and arrange the seasoned vegetables on the empty half of the sheet.
9. Place fresh Italian sausage links in the center of the pan between the potatoes and vegetables.
10. Return the baking sheet to the oven and roast everything together at 400°F for 25 minutes.
11. Flip the sausage links and stir the vegetables halfway through cooking to ensure even browning.
12. Check for doneness—the sausage should register 160°F on an instant-read thermometer, and the potatoes should be tender when pierced with a fork.
13. Let the sheet pan rest for 5 minutes before serving to allow the juices to redistribute.
Last night’s dinner becomes tomorrow’s delicious lunch when you serve this sheet pan meal over fluffy quinoa or tucked into warm tortillas. The Italian sausage releases its savory juices into the vegetables during roasting, creating an incredibly flavorful combination where each bite offers tender potatoes, crisp-tender broccoli, and sweet caramelized peppers. Leftovers taste even better the next day as the flavors continue to meld together beautifully.
BBQ Chicken Flatbread Pizza

When you’re craving pizza but want something lighter and quicker than traditional dough, this BBQ chicken flatbread delivers all the satisfaction with minimal effort. With just a few quality ingredients and straightforward steps, you’ll have a restaurant-worthy meal ready in minutes. Let’s walk through this simple process together, perfect for busy weeknights or last-minute entertaining.
Ingredients
– 2 pre-made flatbreads
– 1 cup shredded cooked chicken
– 1/2 cup tangy BBQ sauce
– 1 cup shredded mozzarella cheese
– 1/4 cup thinly sliced red onion
– 2 tablespoons fresh cilantro leaves
– 1 tablespoon extra virgin olive oil
Instructions
1. Preheat your oven to 425°F and position a rack in the center.
2. Brush both sides of each flatbread with extra virgin olive oil using a pastry brush.
3. Place the oiled flatbreads directly on the oven rack and bake for 3 minutes until lightly crisped.
4. Remove the partially baked flatbreads from the oven using oven mitts.
5. Spread 1/4 cup of tangy BBQ sauce evenly over each flatbread, leaving a 1/2-inch border around the edges.
6. Sprinkle 1/2 cup of shredded mozzarella cheese over the sauce on each flatbread.
7. Distribute 1/2 cup of shredded cooked chicken evenly over the cheese on each flatbread.
8. Scatter thinly sliced red onion over the chicken on both flatbreads.
9. Return the assembled flatbreads to the oven and bake for 8-10 minutes until the cheese is fully melted and bubbly.
10. Remove the flatbreads from the oven and let them rest for 2 minutes on a cutting board.
11. Sprinkle fresh cilantro leaves over the hot flatbreads just before serving.
12. Use a pizza cutter to slice each flatbread into 4 equal pieces.
My favorite thing about this flatbread is how the crisp base contrasts with the tender chicken and gooey cheese. The sweet-smoky BBQ sauce paired with the sharp red onion creates a perfect balance of flavors that will have everyone asking for seconds. Try serving these alongside a simple green salad for a complete meal that feels special but comes together effortlessly.
Balsamic Glazed Pork Chops with Asparagus
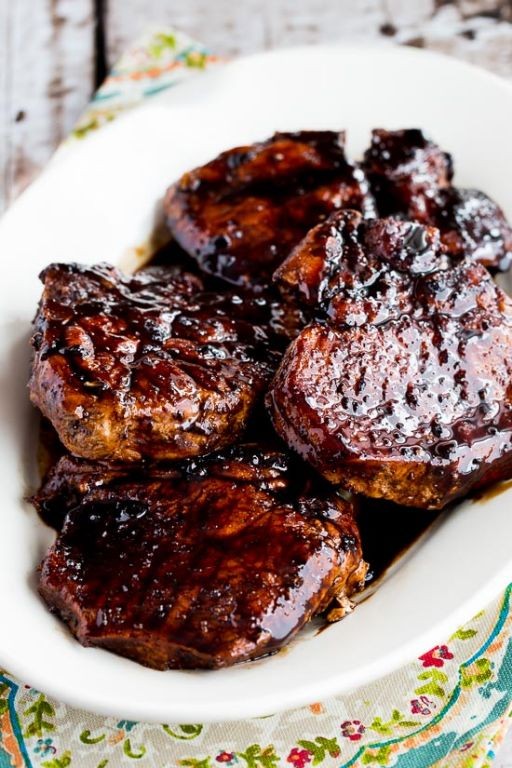
You’re about to master a restaurant-quality dinner that comes together beautifully in under 30 minutes. This balsamic glazed pork chops with asparagus recipe delivers impressive flavor with straightforward techniques perfect for weeknight cooking.
Ingredients
– 4 thick-cut bone-in pork chops (about 1-inch thick)
– 1 pound fresh asparagus spears with firm, bright green stalks
– 3 tablespoons rich extra virgin olive oil
– 1/4 cup aged balsamic vinegar with complex sweetness
– 2 tablespoons golden honey
– 2 cloves aromatic garlic, minced
– 1 teaspoon coarse kosher salt
– 1/2 teaspoon freshly cracked black pepper
– 1 tablespoon cold unsalted butter
Instructions
1. Pat the thick-cut bone-in pork chops completely dry with paper towels to ensure proper browning.
2. Season both sides of the pork chops evenly with coarse kosher salt and freshly cracked black pepper.
3. Heat 2 tablespoons of rich extra virgin olive oil in a large skillet over medium-high heat until shimmering.
4. Place the pork chops in the hot skillet and sear for 4-5 minutes until a golden-brown crust forms.
5. Flip the pork chops using tongs and cook for another 4-5 minutes on the second side.
6. Transfer the pork chops to a clean plate and tent loosely with foil to rest.
7. While the pork rests, trim the tough ends from the fresh asparagus spears.
8. Add the remaining 1 tablespoon of rich extra virgin olive oil to the same skillet over medium heat.
9. Add the trimmed asparagus spears to the skillet and cook for 5-6 minutes, turning occasionally.
10. Push the asparagus to one side of the skillet and reduce heat to medium-low.
11. Add the minced aromatic garlic to the empty side and cook for 30 seconds until fragrant.
12. Pour in the aged balsamic vinegar and golden honey, stirring constantly to combine.
13. Simmer the glaze for 2-3 minutes until it thickens slightly and coats the back of a spoon.
14. Return the pork chops and any accumulated juices to the skillet, spooning the glaze over them.
15. Add the cold unsalted butter to the glaze and swirl until melted and incorporated.
16. Cook everything together for 1-2 minutes to warm through and coat evenly.
17. Remove from heat and arrange the pork chops and asparagus on serving plates.
This dish achieves a wonderful contrast between the savory, juicy pork and the sweet-tangy glaze that caramelizes beautifully. The asparagus maintains a satisfying crisp-tender bite while soaking up the flavorful sauce. Try serving these glazed pork chops over creamy polenta or alongside roasted baby potatoes to make it a complete, company-worthy meal.
Mediterranean Tuna Salad Bowls
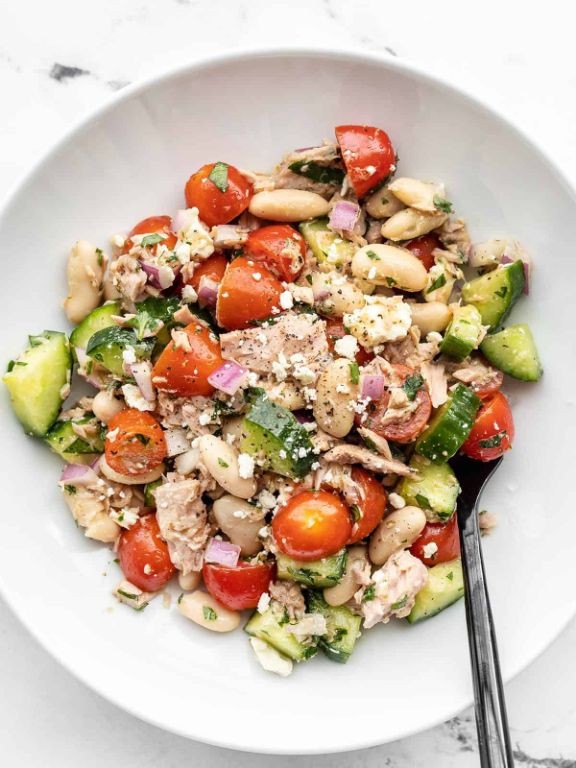
You’ll find these Mediterranean tuna salad bowls come together beautifully with just a bit of methodical preparation. Let’s walk through each step together to create a vibrant, satisfying meal that’s perfect for lunch or a light dinner.
Ingredients
- 2 cans (5 oz each) of high-quality solid white tuna in olive oil, drained
- 1 cup of crisp English cucumber, diced into ¼-inch pieces
- 1 cup of sweet cherry tomatoes, halved
- ½ cup of briny Kalamata olives, pitted and sliced
- ¼ cup of red onion, finely diced
- 2 tablespoons of fresh lemon juice, freshly squeezed
- 3 tablespoons of rich extra virgin olive oil
- 1 teaspoon of dried oregano, fragrant and crushed between your fingers
- ½ teaspoon of coarse sea salt
- ¼ teaspoon of freshly ground black pepper
- 4 cups of mixed baby greens, thoroughly washed and dried
- ½ cup of creamy feta cheese, crumbled
Instructions
- Place the drained tuna in a medium mixing bowl and flake it with a fork until no large chunks remain.
- Add the diced cucumber, halved cherry tomatoes, sliced olives, and finely diced red onion to the bowl with the tuna.
- In a small bowl, whisk together the fresh lemon juice, extra virgin olive oil, dried oregano, coarse sea salt, and freshly ground black pepper until fully emulsified.
- Pour the dressing over the tuna and vegetable mixture, then gently toss everything together until evenly coated.
- Divide the mixed baby greens evenly among four serving bowls, creating a bed for the tuna salad.
- Spoon the tuna mixture over the greens in each bowl, distributing it evenly.
- Sprinkle the crumbled feta cheese generously over the top of each bowl.
Serve immediately to enjoy the wonderful contrast between the creamy tuna mixture and the crisp fresh greens. The briny olives and tangy feta create a perfect Mediterranean flavor profile that’s both refreshing and satisfying. For an extra touch, try serving with warm pita bread or over cooked quinoa for a heartier meal.
Quick Coconut Lime Shrimp with Quinoa

Now, let’s create a vibrant, tropical-inspired dish that comes together in under 30 minutes. Nothing beats the combination of sweet coconut and zesty lime with perfectly cooked shrimp over fluffy quinoa – it’s a complete meal that feels both nourishing and indulgent.
Ingredients
– 1 cup uncooked white quinoa
– 1 ¾ cups canned coconut milk
– 1 pound raw large shrimp, peeled and deveined
– 2 tablespoons virgin coconut oil
– 3 cloves fresh garlic, minced
– 1 tablespoon freshly grated ginger
– 2 tablespoons fresh lime juice
– 1 teaspoon finely ground sea salt
– ½ teaspoon cracked black pepper
– ¼ cup chopped fresh cilantro
– 1 lime, cut into wedges
Instructions
1. Rinse 1 cup of uncooked white quinoa under cold running water in a fine-mesh strainer for 1 minute to remove any bitterness.
2. Combine the rinsed quinoa and 1 ¾ cups canned coconut milk in a medium saucepan over medium-high heat.
3. Bring the mixture to a boil, then immediately reduce heat to low and cover the saucepan.
4. Simmer the quinoa for exactly 15 minutes until all liquid is absorbed and grains are tender with visible “tails.”
5. Remove the cooked quinoa from heat and let it stand covered for 5 minutes to steam.
6. While quinoa cooks, pat 1 pound of raw large shrimp completely dry with paper towels.
7. Season the shrimp evenly with 1 teaspoon finely ground sea salt and ½ teaspoon cracked black pepper.
8. Heat 2 tablespoons virgin coconut oil in a large skillet over medium-high heat until shimmering.
9. Add the seasoned shrimp to the hot skillet in a single layer, cooking for 2 minutes per side until pink and opaque.
10. Transfer the cooked shrimp to a clean plate, leaving any oil in the skillet.
11. Reduce skillet heat to medium and add 3 cloves minced fresh garlic and 1 tablespoon freshly grated ginger.
12. Sauté the aromatics for 30 seconds until fragrant but not browned.
13. Return the cooked shrimp to the skillet and pour 2 tablespoons fresh lime juice over everything.
14. Toss the shrimp gently to coat with the lime-garlic-ginger mixture for 30 seconds.
15. Fluff the rested quinoa with a fork and divide it among serving plates.
16. Top each portion with the coconut lime shrimp and garnish with ¼ cup chopped fresh cilantro.
17. Serve immediately with lime wedges for squeezing over the finished dish.
Gently fluffing the quinoa after steaming creates the perfect light texture to soak up the creamy coconut sauce. The shrimp remain juicy and tender with a bright citrus kick from the fresh lime, while the cilantro adds a fresh herbal note that balances the richness. For an extra tropical twist, serve this over a bed of fresh spinach or alongside grilled pineapple slices.
Cheesy Broccoli and Rice Casserole

Zesty and comforting, this cheesy broccoli and rice casserole brings together simple ingredients for a satisfying meal that’s perfect for busy weeknights. Let’s walk through each step together to create this creamy, golden-brown masterpiece that will have everyone asking for seconds.
Ingredients
- 1 cup long-grain white rice
- 2 cups fresh broccoli florets
- 1 medium yellow onion, finely diced
- 2 cloves garlic, minced
- 2 tablespoons unsalted butter
- 2 tablespoons all-purpose flour
- 1 ½ cups whole milk
- 1 cup sharp cheddar cheese, shredded
- ½ cup sour cream
- ½ teaspoon smoked paprika
- ¼ teaspoon freshly ground black pepper
- ½ teaspoon kosher salt
Instructions
- Preheat your oven to 375°F and lightly grease a 9×13-inch baking dish.
- Cook 1 cup long-grain white rice according to package directions until tender, then fluff with a fork.
- Steam 2 cups fresh broccoli florets for 4-5 minutes until bright green and slightly tender, then immediately transfer to an ice bath to stop the cooking process.
- Melt 2 tablespoons unsalted butter in a large skillet over medium heat.
- Sauté 1 medium finely diced yellow onion for 5-6 minutes until translucent and fragrant.
- Add 2 cloves minced garlic and cook for 1 minute until aromatic.
- Sprinkle 2 tablespoons all-purpose flour over the onion mixture and whisk continuously for 2 minutes to cook out the raw flour taste.
- Gradually pour in 1 ½ cups whole milk while whisking constantly to prevent lumps from forming.
- Cook the sauce for 3-4 minutes until thickened enough to coat the back of a spoon.
- Remove the skillet from heat and stir in 1 cup shredded sharp cheddar cheese until completely melted and smooth.
- Fold in ½ cup sour cream, ½ teaspoon smoked paprika, ¼ teaspoon freshly ground black pepper, and ½ teaspoon kosher salt.
- Combine the cooked rice, steamed broccoli, and cheese sauce in a large bowl, mixing gently until evenly distributed.
- Transfer the mixture to your prepared baking dish and spread into an even layer.
- Bake at 375°F for 20-25 minutes until the edges are bubbly and the top develops golden spots.
- Let the casserole rest for 5 minutes before serving to allow the sauce to thicken slightly.
Juicy broccoli florets provide fresh contrast against the creamy, cheesy rice base, while the smoked paprika adds subtle warmth that complements the sharp cheddar beautifully. For a delightful textural variation, try topping individual servings with buttery breadcrumbs or serving alongside crisp apple slices to cut through the richness.
Spicy Peanut Noodles with Cucumber
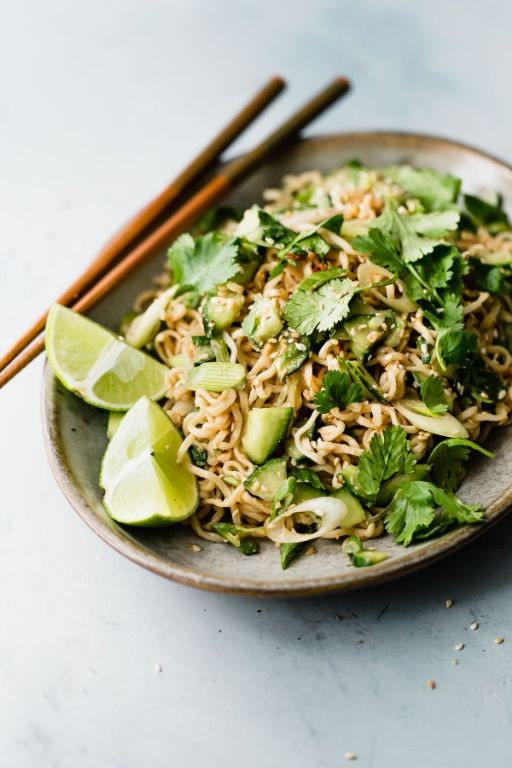
Getting weeknight dinners on the table doesn’t have to be complicated, especially when you have a flavorful, no-cook sauce and fresh ingredients ready to go. This spicy peanut noodle dish comes together in minutes and delivers a satisfying balance of heat, creaminess, and crunch. Follow these steps closely for a foolproof meal that feels both comforting and vibrant.
Ingredients
- 8 ounces dried linguine pasta
- 1 large English cucumber, thinly sliced into half-moons
- ½ cup creamy natural peanut butter
- 3 tablespoons low-sodium soy sauce
- 2 tablespoons rice vinegar
- 1 tablespoon toasted sesame oil
- 2 teaspoons sriracha sauce
- 2 cloves fresh garlic, minced
- 1 teaspoon freshly grated ginger
- ¼ cup hot tap water
- 2 tablespoons chopped roasted peanuts
- 2 thinly sliced scallions
Instructions
- Bring a large pot of salted water to a rolling boil over high heat.
- Add 8 ounces dried linguine pasta to the boiling water and cook for exactly 9 minutes, stirring occasionally to prevent sticking.
- While the pasta cooks, combine ½ cup creamy natural peanut butter, 3 tablespoons low-sodium soy sauce, 2 tablespoons rice vinegar, 1 tablespoon toasted sesame oil, 2 teaspoons sriracha sauce, 2 cloves minced fresh garlic, and 1 teaspoon freshly grated ginger in a medium bowl.
- Gradually whisk in ¼ cup hot tap water until the sauce is smooth and pourable. Tip: Using hot water helps the peanut butter incorporate more easily into the sauce.
- Drain the cooked pasta in a colander and immediately rinse under cold running water for 1 full minute to stop the cooking process and cool the noodles.
- Transfer the cooled noodles to a large serving bowl.
- Pour the prepared peanut sauce over the noodles and toss thoroughly until every strand is coated.
- Gently fold in 1 large thinly sliced English cucumber. Tip: For extra crunch, add the cucumber just before serving to maintain its crisp texture.
- Sprinkle the noodles with 2 tablespoons chopped roasted peanuts and 2 thinly sliced scallions. Tip: Reserve a few peanuts and scallions for garnish to add visual appeal at the table.
You’ll love the contrast between the cool, crisp cucumber and the creamy, slightly spicy peanut sauce clinging to each noodle. For a fun twist, serve it chilled in lettuce cups or top with shredded rotisserie chicken to make it a heartier meal.
Summary
Whether you’re juggling work, family, or both, these 20-minute recipes are here to save your busy nights. We hope you find new favorites that make dinnertime easier and more delicious. Give them a try, leave a comment with your top picks, and don’t forget to share this roundup on Pinterest to help other busy cooks!