Get ready to celebrate spring’s arrival with these 18 fresh April recipes! As the days grow longer and farmers’ markets burst with new produce, we’ve gathered vibrant, seasonal dishes perfect for home cooks. From quick weeknight dinners to show-stopping weekend meals, these recipes will help you make the most of spring’s bounty. Keep reading to discover your new seasonal favorites!
Lemon Garlic Roasted Asparagus

Evenings like these call for something simple yet transformative, where humble ingredients become something quietly spectacular. There’s a particular comfort in roasting vegetables that feels both ancient and immediate, a ritual that fills the kitchen with warmth and anticipation. This lemon garlic asparagus captures that gentle magic perfectly.
Ingredients
– 1 pound fresh asparagus spears with tight, vibrant green tips
– 2 tablespoons rich extra virgin olive oil
– 3 cloves aromatic garlic, minced
– 1 medium bright yellow lemon
– ½ teaspoon coarse kosher salt
– ¼ teaspoon freshly cracked black pepper
Instructions
1. Preheat your oven to 400°F and position a rack in the center for even heating.
2. Rinse the asparagus spears under cool water and pat completely dry with clean kitchen towels.
3. Hold each asparagus spear at both ends and gently bend until the tough woody end snaps off naturally.
4. Arrange the trimmed asparagus in a single layer on a large rimmed baking sheet.
5. Drizzle the olive oil evenly over the asparagus, using your hands to coat each spear thoroughly.
6. Sprinkle the minced garlic, kosher salt, and black pepper evenly across the oiled asparagus.
7. Use a microplane or fine grater to zest the entire yellow lemon directly over the asparagus.
8. Cut the zested lemon in half and squeeze the juice from one half over the arranged spears.
9. Toss everything gently with your hands to ensure even distribution of all ingredients.
10. Roast in the preheated oven for 12-15 minutes until the spears are tender-crisp and lightly caramelized at the tips.
11. Remove from the oven and immediately squeeze the remaining lemon half over the hot asparagus.
Sometimes the simplest preparations yield the most memorable flavors—the asparagus emerges tender yet crisp, with garlicky notes mellowed by roasting and bright lemon cutting through the richness. Serve it warm alongside roasted chicken or flaky fish, or let it cool to room temperature and toss with pasta and Parmesan for a quick weeknight meal.
Strawberry Spinach Salad
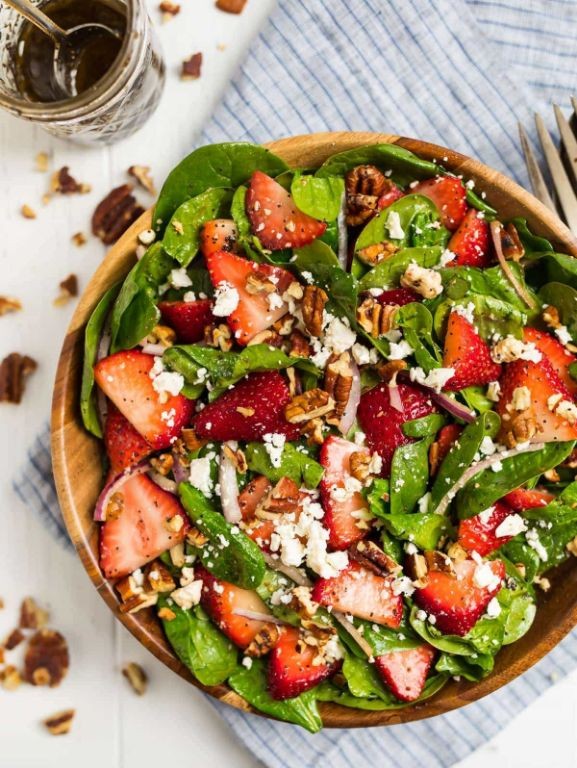
Zestful moments often arrive unexpectedly, like the gentle rustle of fresh greens meeting a ceramic bowl, reminding me how simple ingredients can weave together into something quietly extraordinary. This strawberry spinach salad feels like a whispered secret between seasons, where sweet berries meet earthy leaves in a dance of textures and flavors that settles the soul.
Ingredients
– 6 cups fresh baby spinach leaves, tender and deeply green
– 1 pint ripe strawberries, ruby-red and fragrant
– 1/2 cup crumbled feta cheese, creamy and tangy
– 1/4 cup sliced almonds, lightly toasted
– 2 tablespoons rich extra virgin olive oil
– 1 tablespoon golden honey
– 1 tablespoon freshly squeezed lemon juice, bright and zesty
– 1/4 teaspoon fine sea salt
– 1/8 teaspoon freshly cracked black pepper
Instructions
1. Rinse 6 cups of fresh baby spinach leaves under cold running water for 30 seconds to remove any grit.
2. Gently pat the spinach dry using a clean kitchen towel or salad spinner to prevent a watery dressing.
3. Hull 1 pint of ripe strawberries by removing the green tops with a paring knife.
4. Slice the strawberries into 1/4-inch thick pieces using a sharp knife for even distribution.
5. Combine the dried spinach and sliced strawberries in a large mixing bowl.
6. Sprinkle 1/2 cup of crumbled feta cheese evenly over the spinach and strawberries.
7. Toast 1/4 cup of sliced almonds in a dry skillet over medium heat for 3-4 minutes until golden brown and fragrant, stirring frequently to prevent burning.
8. Scatter the toasted almonds over the salad mixture.
9. Whisk together 2 tablespoons of rich extra virgin olive oil, 1 tablespoon of golden honey, and 1 tablespoon of freshly squeezed lemon juice in a small bowl until emulsified.
10. Stir in 1/4 teaspoon of fine sea salt and 1/8 teaspoon of freshly cracked black pepper until fully incorporated.
11. Drizzle the dressing over the salad just before serving to maintain crispness.
12. Toss the salad gently with salad tongs until all ingredients are lightly coated with dressing.
Remarkably, each forkful delivers a symphony of contrasts—the juicy burst of strawberries against the creamy feta, the crisp spinach yielding to crunchy almonds. Consider serving it alongside grilled chicken for a complete meal, or enjoy it as a standalone meditation in textures where sweet, salty, and earthy notes linger long after the last bite.
Radish and Butter Sandwich
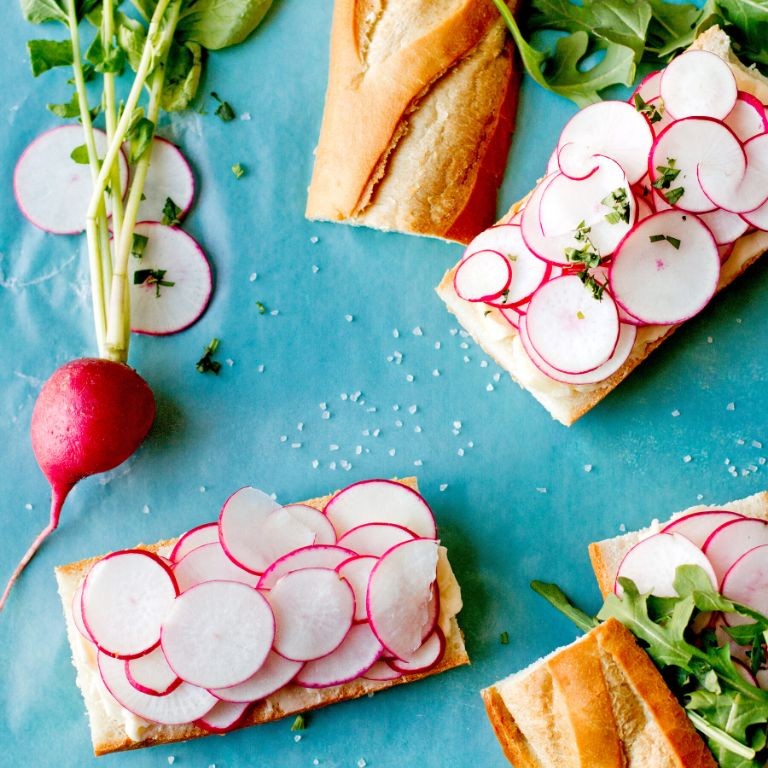
Under the soft morning light, I find myself returning to this simplest of pleasures, where crisp freshness meets creamy richness in a quiet moment of kitchen meditation. There’s something profoundly comforting about the way sharp radishes yield to sweet butter, creating a harmony that feels both rustic and refined. This sandwich whispers of spring mornings and uncomplicated joys, a gentle reminder that sometimes the most satisfying creations require the least effort.
Ingredients
– 4 slices of crusty artisan bread
– 3 tablespoons of rich European-style butter, softened at room temperature
– 6-8 vibrant red radishes, thinly sliced
– ½ teaspoon of flaky sea salt
– ¼ teaspoon of freshly cracked black pepper
Instructions
1. Remove 3 tablespoons of rich European-style butter from refrigeration and let it soften at room temperature for 30 minutes until spreadable but not melted.
2. Thoroughly wash 6-8 vibrant red radishes under cool running water, scrubbing gently to remove any dirt from their crevices.
3. Using a mandoline or sharp chef’s knife, slice the radishes into paper-thin rounds approximately ⅛-inch thick, creating uniform pieces that will layer evenly.
4. Evenly spread the softened European-style butter across all 4 slices of crusty artisan bread, covering each slice completely from edge to edge.
5. Arrange the thinly sliced radishes in a single, overlapping layer across two of the buttered bread slices, covering the surface entirely.
6. Sprinkle ½ teaspoon of flaky sea salt evenly over the radish-covered bread slices, allowing the crystals to catch in the butter pockets.
7. Distribute ¼ teaspoon of freshly cracked black pepper across the same slices, creating a balanced seasoning that enhances both the radish’s bite and butter’s creaminess.
8. Carefully place the remaining two buttered bread slices on top of the radish-covered ones, butter-side down, creating two complete sandwiches.
9. Using a serrated knife, slice each sandwich diagonally from corner to corner, creating four triangular halves that showcase the beautiful layered interior.
10. Serve immediately while the bread retains its crisp texture and the radishes maintain their refreshing crunch.
Perhaps what makes this combination so magical is the way the crisp radish slices provide satisfying resistance against the creamy butter, creating a textural conversation in every bite. The peppery sharpness of the radishes mellows beautifully against the rich dairy, while the flaky salt crystals offer occasional bursts of salinity that brighten the entire experience. For a lovely variation, try serving these open-faced on toasted bread with a sprinkle of fresh chives, allowing each component to shine independently while still creating that perfect harmony.
Spring Vegetable Stir-Fry
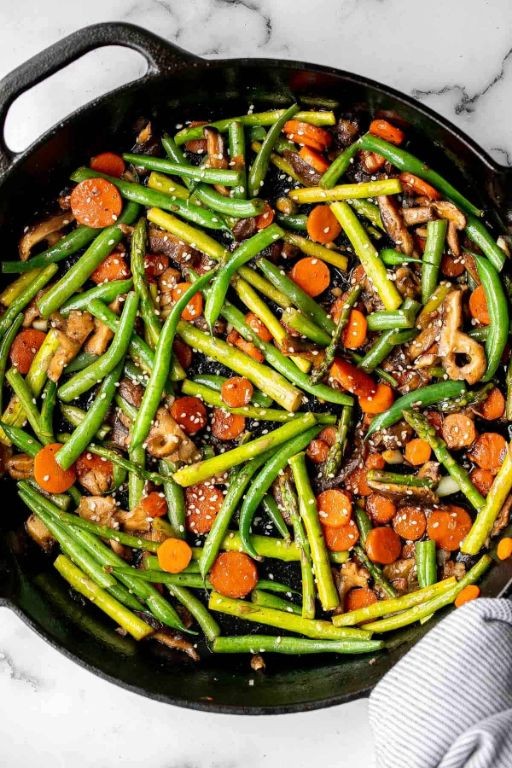
Considering how the light catches the steam rising from the pan, I find myself returning to this simple stir-fry whenever spring’s tender offerings appear at the market. There’s something quietly comforting about watching vibrant colors soften and mingle in the heat, creating a dish that feels both nourishing and deeply personal. This recipe has become my seasonal ritual, a gentle transition from winter’s heartier fare to the delicate flavors awakening outside.
Ingredients
– 2 tablespoons fragrant toasted sesame oil
– 1 tablespoon rich soy sauce
– 1 teaspoon sweet honey
– 2 cloves aromatic garlic, minced
– 1 teaspoon freshly grated ginger
– 1 cup crisp snap peas, trimmed
– 1 bunch tender asparagus, cut into 2-inch pieces
– 1 bright red bell pepper, thinly sliced
– 2 slender green onions, chopped
– 1 tablespoon toasted sesame seeds
Instructions
1. Heat a large skillet or wok over medium-high heat until a drop of water sizzles and evaporates immediately.
2. Pour 2 tablespoons of fragrant toasted sesame oil into the hot skillet, swirling to coat the surface evenly.
3. Add 2 cloves of minced aromatic garlic and 1 teaspoon of freshly grated ginger, stirring constantly for exactly 30 seconds until fragrant but not browned.
4. Tip: Keep the garlic moving to prevent burning, which can create bitter flavors.
5. Add 1 cup of crisp snap peas and 1 bunch of tender asparagus pieces, spreading them in a single layer.
6. Cook undisturbed for 2 minutes to develop light caramelization on one side.
7. Add 1 bright red bell pepper, thinly sliced, and 2 chopped slender green onions.
8. Toss all vegetables together and continue cooking for 3 more minutes, until peppers begin to soften but still retain some crispness.
9. Tip: Listen for the characteristic sizzle—if it becomes too quiet, increase the heat slightly.
10. Drizzle 1 tablespoon of rich soy sauce and 1 teaspoon of sweet honey over the vegetables.
11. Toss vigorously to coat every piece, cooking for 1 final minute until the sauce glazes the vegetables.
12. Tip: The honey will create a beautiful glossy coating that helps the seasonings cling to each vegetable.
13. Remove from heat and sprinkle with 1 tablespoon of toasted sesame seeds.
14. Gently toss one more time to distribute the seeds evenly.Under the gentle sheen of the honey-soy glaze, the vegetables maintain their individual textures—the snap peas still pop with freshness while the asparagus yields to a tender crispness. I sometimes serve this over jasmine rice to catch the savory sauce, or fold it into warm tortillas for an unexpected spring wrap that celebrates each vegetable’s unique contribution to the whole.
Apricot Glazed Ham
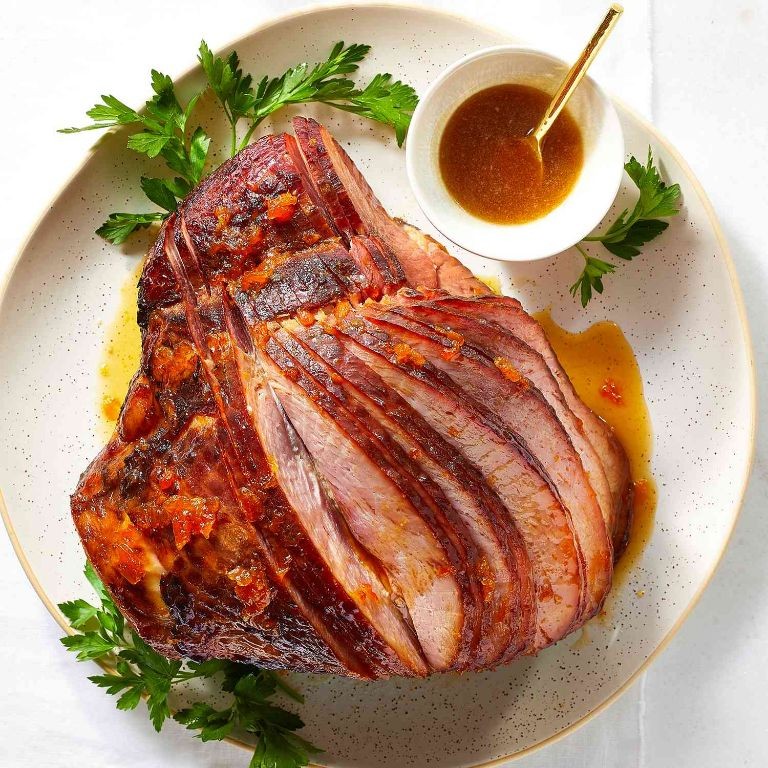
Folding back the foil on this apricot-glazed ham feels like uncovering a cherished family secret, one that fills the kitchen with the gentle warmth of sweet fruit and savory spices. There’s a quiet comfort in watching the glossy apricot preserve slowly caramelize over the gently scored surface, each bubble whispering of holidays and slow Sunday afternoons. This recipe invites you to move with intention, to let the ham rest and absorb the flavors, transforming a simple meal into a tender, memorable centerpiece.
Ingredients
- 1 (8-10 pound) fully cooked bone-in ham
- 1 cup smooth apricot preserves
- 1/4 cup pure maple syrup
- 2 tablespoons Dijon mustard with whole grains
- 1 tablespoon freshly squeezed lemon juice
- 1/2 teaspoon fragrant ground cinnamon
- 1/4 teaspoon freshly grated nutmeg
Instructions
- Preheat your oven to 325°F and position a rack in the lower third of the oven.
- Remove all packaging from the ham and place it cut-side down in a large roasting pan.
- Using a sharp knife, score the ham fat in a 1-inch diamond pattern, cutting about 1/4-inch deep.
- Cover the ham completely with aluminum foil, tenting it loosely so the foil doesn’t touch the surface.
- Bake the ham for 1 hour and 30 minutes, until the internal temperature reaches 110°F when tested with an instant-read thermometer inserted into the thickest part without touching bone.
- While the ham bakes, combine apricot preserves, maple syrup, Dijon mustard, lemon juice, cinnamon, and nutmeg in a small saucepan over medium heat.
- Whisk the glaze mixture constantly for 3-4 minutes until it becomes smooth and slightly thickened.
- Remove the ham from the oven and carefully peel back the foil.
- Brush half of the warm apricot glaze evenly over the entire surface of the ham, making sure it drips into the scored lines.
- Return the ham to the oven, uncovered, and bake for another 30 minutes.
- Brush the remaining glaze over the ham and continue baking for 15-20 minutes until the internal temperature reaches 140°F and the glaze is deeply caramelized and sticky.
- Transfer the ham to a cutting board and let it rest for 20 minutes before slicing against the grain.
Draped in that sticky, jewel-toned glaze, each slice offers a perfect balance—the salty-sweet crust giving way to impossibly tender, juicy meat that falls apart with the gentlest pressure. The apricot’s bright fruitiness cuts through the richness, while the warm spices linger like a soft echo. Consider serving thick slices over creamy polenta or with roasted root vegetables to soak up every last bit of that glorious pan sauce.
Chilled Cucumber Avocado Soup

Zestful summer afternoons call for meals that cool both body and spirit, where the gentle hum of the blender becomes a quiet meditation. This chilled cucumber avocado soup is that peaceful pause, a creamy embrace that requires no heat at all, just patience and the freshest of garden gifts. It’s a recipe born from the desire to slow down and savor each simple, vibrant ingredient.
Ingredients
– 2 large English cucumbers, peeled and roughly chopped
– 2 ripe Hass avocados, pitted and scooped
– 1 cup plain whole-milk Greek yogurt, thick and tangy
– 1/4 cup fresh dill fronds, loosely packed and fragrant
– 3 tablespoons fresh lemon juice, brightly acidic
– 2 tablespoons extra virgin olive oil, rich and fruity
– 1 small garlic clove, minced finely
– 1 teaspoon fine sea salt
– 1/2 teaspoon freshly cracked black pepper
– 1/4 cup cold water, for thinning
Instructions
1. Combine the peeled, roughly chopped English cucumbers, scooped Hass avocados, thick Greek yogurt, fragrant dill fronds, bright lemon juice, rich olive oil, minced garlic, fine sea salt, and cracked black pepper in a high-speed blender.
2. Blend on high speed for 60 seconds, or until the mixture is completely smooth and pale green, scraping down the sides once with a spatula to incorporate any stubborn bits.
3. Add the 1/4 cup cold water and blend for another 15 seconds to achieve a silky, pourable consistency. Tip: For an even smoother texture, strain the soup through a fine-mesh sieve to remove any tiny seeds or fibers.
4. Transfer the soup to an airtight container and refrigerate for at least 2 hours, or until thoroughly chilled to 40°F. Tip: Press a piece of plastic wrap directly onto the surface of the soup to prevent oxidation and keep the vibrant green color.
5. Stir the soup gently before serving to recombine any separation. Tip: Chill your serving bowls in the freezer for 10 minutes beforehand to keep the soup extra cold at the table.
6. Ladle the soup into chilled bowls and garnish with additional dill fronds, a drizzle of olive oil, and a crack of black pepper. Here, the soup unfolds with a velvety texture that coats the spoon, while the bright lemon and grassy cucumber cut through the avocado’s subtle richness. Serve it alongside grilled shrimp or crusty bread for a complete, refreshing meal that feels like a quiet gift on a warm day.
Strawberry Rhubarb Pie
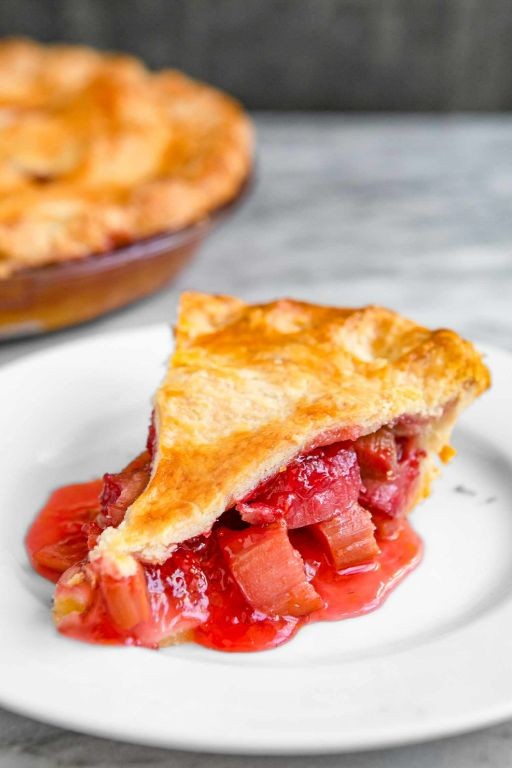
Dappled afternoon light filters through the kitchen window, and I find myself drawn to the quiet ritual of pie-making, where tart rhubarb and sweet strawberries create their own gentle poetry in the filling.
Ingredients
- 2 cups thinly sliced fresh rhubarb stalks
- 3 cups ripe, juicy strawberries, hulled and halved
- 1 cup granulated white sugar
- ¼ cup cornstarch
- 1 tablespoon freshly squeezed lemon juice
- 1 teaspoon pure vanilla extract
- ½ teaspoon finely ground cinnamon
- ¼ teaspoon freshly grated nutmeg
- 2 prepared pie crusts, chilled
- 1 large egg, lightly beaten
- 1 tablespoon coarse sparkling sugar
Instructions
- Preheat your oven to 400°F and position a rack in the lower third.
- Combine the thinly sliced fresh rhubarb stalks and ripe, juicy strawberries in a large mixing bowl.
- Sprinkle the granulated white sugar, cornstarch, freshly squeezed lemon juice, pure vanilla extract, finely ground cinnamon, and freshly grated nutmeg over the fruit.
- Gently toss the mixture until every piece of fruit is coated evenly, taking care not to crush the berries.
- Fit one chilled prepared pie crust into a 9-inch pie dish, letting the edges drape over the sides.
- Pour the fruit filling into the bottom crust, mounding it slightly higher in the center.
- Place the second chilled prepared pie crust over the filling.
- Crimp the edges together firmly with your fingers or a fork to seal.
- Cut four 2-inch slits in the top crust to allow steam to escape during baking.
- Brush the top crust lightly with the beaten egg using a pastry brush.
- Sprinkle the coarse sparkling sugar evenly over the egg-washed crust.
- Place the pie on a baking sheet to catch any potential drips.
- Bake at 400°F for 20 minutes until the crust begins to show color.
- Reduce the oven temperature to 350°F and continue baking for 45-50 minutes.
- Remove the pie from the oven when the filling is bubbling vigorously through the slits and the crust is deep golden brown.
- Transfer the pie to a wire cooling rack and let it rest completely for at least 4 hours.
Holding this warm pie, I love how the filling settles into a jewel-like thickness between flaky layers. Serve each slice with a dollop of softly whipped cream, letting the sweet-tart berries and rhubarb shine against the buttery crust in every comforting bite.
Grilled Salmon with Dill Sauce

Now, as the afternoon light settles across the kitchen counter, I find myself thinking about how some meals feel like quiet conversations—the kind where you don’t need many words, just good, honest ingredients and a little patience. Grilled salmon with dill sauce is one of those dishes, simple yet deeply satisfying, a gentle reminder of how elemental flavors can be when treated with care.
Ingredients
- 1 ½ pounds wild-caught salmon fillets, skin-on and glistening
- 2 tablespoons rich extra virgin olive oil
- 1 teaspoon coarse sea salt, for a subtle crunch
- ½ teaspoon freshly cracked black pepper, fragrant and bold
- ½ cup full-fat Greek yogurt, creamy and tangy
- ¼ cup fresh dill fronds, finely chopped and aromatic
- 1 tablespoon fresh lemon juice, bright and zesty
- 1 small garlic clove, minced to a fine paste
- ¼ teaspoon honey, for a whisper of sweetness
Instructions
- Preheat your grill to medium-high heat, aiming for 400°F, and lightly oil the grates to prevent sticking.
- Pat the salmon fillets dry with paper towels to ensure a crisp skin and even sear.
- Brush both sides of the salmon with olive oil, then sprinkle evenly with salt and pepper.
- Place the salmon skin-side up on the grill and cook for 4–5 minutes, until grill marks appear and the flesh releases easily.
- Flip the salmon carefully using a spatula and grill for another 4–5 minutes, until the internal temperature reaches 125°F for medium-rare.
- While the salmon cooks, whisk together the Greek yogurt, dill, lemon juice, garlic, and honey in a small bowl until smooth.
- Let the salmon rest off the heat for 3 minutes to allow the juices to redistribute evenly.
- Serve the grilled salmon topped with a generous dollop of the dill sauce.
Oh, the way the flaky salmon melts against the cool, herby sauce—it’s a dance of textures, with the crisp-edged skin giving way to tender flesh. For a lovely twist, try it alongside roasted asparagus or spooned over a bed of quinoa, letting the sauce mingle with every bite.
Spring Greens Frittata

Even the simplest mornings deserve a moment of quiet celebration, and this spring greens frittata feels like a gentle whisper of new beginnings. There’s something deeply comforting about watching eggs transform into something nourishing, each ingredient contributing its own quiet story to the final dish. It’s the kind of meal that makes you pause and appreciate the small, beautiful moments in an ordinary day.
Ingredients
– 8 large farm-fresh eggs
– 1/4 cup rich whole milk
– 2 tablespoons golden extra virgin olive oil
– 1 small sweet yellow onion, thinly sliced
– 2 cups tender baby spinach leaves
– 1/2 cup fresh chopped dill
– 1/4 cup crumbled creamy feta cheese
– 1/2 teaspoon fine sea salt
– 1/4 teaspoon freshly cracked black pepper
Instructions
1. Preheat your oven to 375°F and position the rack in the center.
2. Crack 8 large farm-fresh eggs into a medium mixing bowl.
3. Add 1/4 cup rich whole milk to the eggs.
4. Whisk the eggs and milk vigorously for 45 seconds until fully combined and slightly frothy.
5. Stir in 1/2 teaspoon fine sea salt and 1/4 teaspoon freshly cracked black pepper.
6. Heat 2 tablespoons golden extra virgin olive oil in a 10-inch oven-safe skillet over medium heat for 90 seconds.
7. Add 1 small sweet yellow onion, thinly sliced, and cook for 4-5 minutes until translucent and fragrant.
8. Add 2 cups tender baby spinach leaves and cook for 2 minutes until just wilted.
9. Tip: Spread the vegetables evenly across the skillet bottom for consistent cooking.
10. Pour the egg mixture evenly over the vegetables in the skillet.
11. Sprinkle 1/2 cup fresh chopped dill evenly across the surface.
12. Distribute 1/4 cup crumbled creamy feta cheese over the frittata.
13. Cook undisturbed on the stovetop for 3 minutes until edges begin to set.
14. Tip: Gently lift the edges with a spatula to allow uncooked egg to flow underneath.
15. Transfer the skillet to the preheated oven and bake for 12-14 minutes until the center is fully set.
16. Tip: The frittata is done when it springs back lightly to the touch and shows no liquid egg when gently jiggled.
17. Remove from oven and let rest for 5 minutes before slicing.
18. Slice into 6 wedges using a sharp knife. A final sprinkle of fresh dill over the warm frittata brings out its delicate herbal notes, while the creamy feta provides little pockets of salty richness throughout. Serve it alongside toasted sourdough with a drizzle of olive oil, or pack a wedge cold for a satisfying picnic lunch that tastes even better as the flavors meld together.
Lemon Lavender Shortbread Cookies
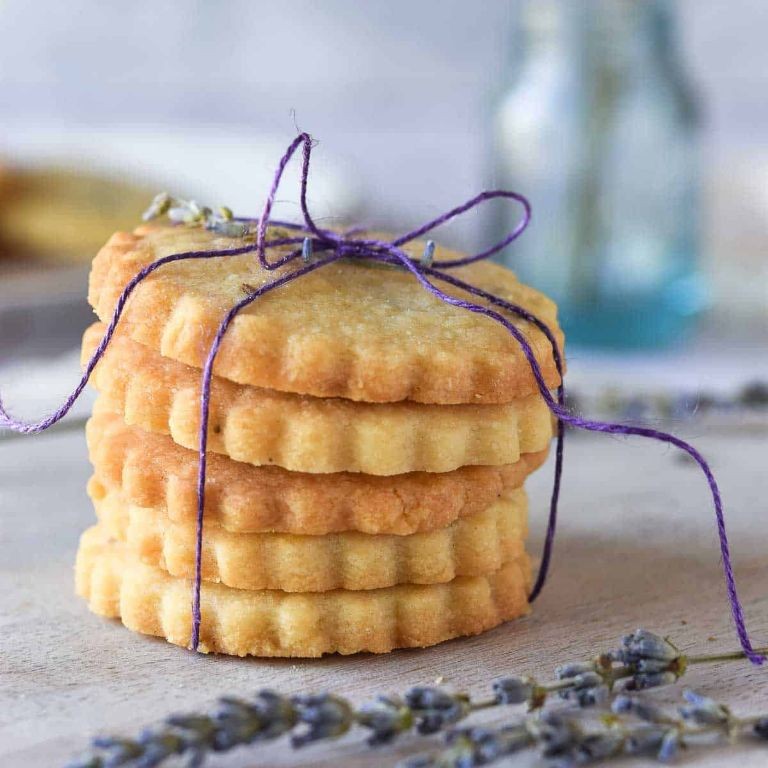
Remembering how the light falls through the kitchen window this time of year, I find myself reaching for flavors that hold both brightness and comfort. There’s something quietly magical about combining the sunny tang of lemon with the delicate floral notes of lavender in a simple shortbread—a cookie that feels like a gentle pause in the middle of a busy day.
Ingredients
– 1 cup (2 sticks) of cold, high-quality unsalted butter, cubed
– 1/2 cup of fine, powdery confectioners’ sugar
– 2 cups of soft, all-purpose flour
– 2 tablespoons of freshly grated lemon zest from bright, sunny lemons
– 1 tablespoon of culinary-grade dried lavender buds, lightly crushed to release their floral fragrance
– 1/4 teaspoon of fine sea salt
Instructions
1. Preheat your oven to 325°F and line a baking sheet with parchment paper.
2. In a large mixing bowl, combine the cold, cubed butter and powdery confectioners’ sugar.
3. Use an electric mixer on medium speed to cream the butter and sugar together for about 3 minutes, until pale and fluffy.
4. Add the soft all-purpose flour, freshly grated lemon zest, crushed lavender buds, and fine sea salt to the bowl.
5. Mix on low speed just until the dough comes together and no dry streaks remain, being careful not to overmix.
6. Tip: For tender cookies, handle the dough as little as possible once the flour is incorporated.
7. Turn the dough out onto a lightly floured surface and gently shape it into a log about 2 inches in diameter.
8. Wrap the log tightly in plastic wrap and chill in the refrigerator for exactly 30 minutes to firm up.
9. Tip: Chilling the dough prevents spreading and helps the cookies hold their shape during baking.
10. Remove the dough from the refrigerator and unwrap it carefully.
11. Use a sharp knife to slice the log into 1/4-inch thick rounds, rotating the log slightly between cuts to maintain a circular shape.
12. Arrange the rounds on the prepared baking sheet, spacing them about 1 inch apart.
13. Bake for 15-18 minutes, until the edges are just beginning to turn a very pale golden color.
14. Tip: The cookies will continue to firm up as they cool, so remove them when they still look slightly soft in the center.
15. Let the cookies cool on the baking sheet for 5 minutes before transferring them to a wire rack to cool completely.
You’ll notice the cookies have a delicate crumb that melts on the tongue, with the lavender’s floral notes unfolding slowly behind the bright lemon zest. They’re lovely alongside a cup of Earl Grey tea or crumbled over vanilla bean ice cream for a simple, elegant dessert.
Garlic Scape Pesto Pasta
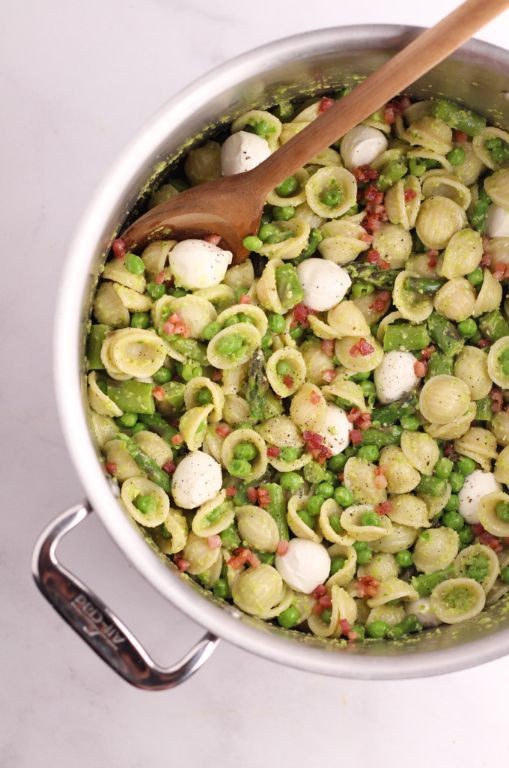
Kind of quietly, as summer begins its slow fade, I find myself reaching for these curly green tendrils that appear so briefly at the market. They carry the gentle, less-biting promise of garlic, a whisper of the bulb to come, and turning them into a pesto feels like capturing a fleeting season in a jar.
Ingredients
– 8 ounces of dried linguine pasta
– 1 cup of roughly chopped, vibrant green garlic scapes
– 1/2 cup of freshly grated, nutty Parmesan cheese
– 1/3 cup of rich, golden extra virgin olive oil
– 1/4 cup of toasted pine nuts, with their delicate, buttery fragrance
– A generous pinch of flaky sea salt
– The fresh juice from half a small, bright lemon
Instructions
1. Bring a large pot of generously salted water to a rolling boil over high heat.
2. Add the 8 ounces of dried linguine pasta to the boiling water and cook for exactly 9 minutes, or until it is al dente with a firm bite.
3. While the pasta cooks, combine the 1 cup of chopped garlic scapes, 1/4 cup of toasted pine nuts, and a generous pinch of flaky sea salt in the bowl of a food processor.
4. Pulse the mixture about 10 times until the ingredients are coarsely chopped, scraping down the sides of the bowl once with a spatula to ensure even processing.
5. With the food processor running on low, slowly drizzle in the 1/3 cup of rich extra virgin olive oil through the feed tube until the pesto emulsifies and becomes a vibrant green paste.
6. Turn off the processor and add the 1/2 cup of freshly grated Parmesan cheese and the fresh juice from half a small lemon, then pulse 3-4 times just until incorporated, being careful not to overmix.
7. Reserve 1/2 cup of the starchy pasta water before draining the cooked linguine.
8. Immediately transfer the hot, drained pasta back into the warm pot.
9. Pour the vibrant green pesto over the hot pasta and toss vigorously with tongs, adding 2 tablespoons of the reserved pasta water at a time until the sauce clings silkily to each strand.
Creamy and clinging, the pesto coats the pasta in a way that is both lush and light. The flavor is a gentle hum of garlic, brightened by the lemon and grounded by the nutty cheese, perfect simply as it is or topped with a few seared scallops for a special weeknight meal.