
Bring the vibrant flavors of China right into your kitchen with these authentic recipes that are surprisingly easy to master. Whether you’re craving quick weeknight dinners, comforting classics, or impressive dishes for guests, this collection has something for every home cook. Get ready to explore 20 delicious Chinese favorites that will transform your cooking and delight your taste buds!
Kung Pao Chicken
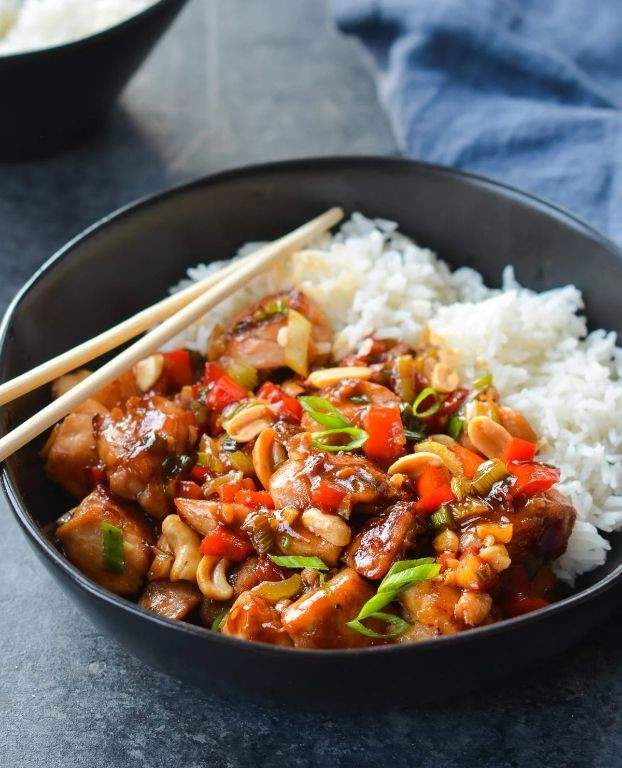
Unbelievably addictive and dangerously delicious, Kung Pao Chicken is that fiery flirt at the party who keeps you coming back for more—despite the spicy consequences. This Sichuan stunner delivers a knockout punch of heat, sweetness, and crunch that’ll have you questioning every bland chicken dinner you’ve ever endured. Seriously, why settle for snooze-when you can sizzle?
Ingredients
- Chicken breast – 1 lb
- Soy sauce – 3 tbsp
- Cornstarch – 2 tbsp
- Vegetable oil – 2 tbsp
- Dried red chilies – 8
- Roasted peanuts – ½ cup
- Rice vinegar – 1 tbsp
- Brown sugar – 1 tbsp
- Garlic – 3 cloves
- Ginger – 1 tbsp
Instructions
- Cut 1 lb chicken breast into 1-inch cubes.
- Combine chicken with 2 tbsp cornstarch and 1 tbsp soy sauce in a bowl, mixing until evenly coated—this creates a crispy exterior when fried.
- Heat 2 tbsp vegetable oil in a wok or large skillet over medium-high heat until shimmering, about 350°F.
- Add chicken and cook for 5–7 minutes, stirring occasionally, until golden brown and internal temperature reaches 165°F.
- Remove chicken and set aside, keeping oil in the wok.
- Add 8 dried red chilies to the hot oil and stir for 30 seconds until fragrant but not burnt.
- Mince 3 garlic cloves and 1 tbsp ginger, then add to the wok and stir for 1 minute until golden.
- Return chicken to the wok along with ½ cup roasted peanuts.
- Pour in 2 tbsp soy sauce, 1 tbsp rice vinegar, and 1 tbsp brown sugar, stirring to coat everything evenly.
- Cook for 2–3 minutes until sauce thickens and clings to the chicken. Tip: For extra heat, crush a few chilies before adding them to release more spice.
- Serve immediately over rice or noodles. Tip: Garnish with sliced scallions for a fresh contrast to the rich sauce.
Ready to dive into a plate of pure magic? The tender chicken practically melts against the crunchy peanuts, while that sweet-spicy sauce dances on your tongue like a culinary tango. Try stuffing it into lettuce cups for a low-carb crunch fest, or pile it high on fluffy jasmine rice—either way, your taste buds will throw a party and forget to invite the neighbors.
Mapo Tofu

Just when you thought tofu couldn’t get any more exciting, along comes this Sichuan stunner that’ll make your taste buds do a happy dance. Mapo Tofu is the spicy, saucy, utterly addictive dish that proves comfort food doesn’t need to play it safe—it’s basically a flavor party in a bowl, and everyone’s invited!
Ingredients
– Soft tofu – 14 oz
– Ground pork – ½ lb
– Sichuan peppercorns – 2 tsp
– Garlic – 3 cloves
– Ginger – 1 tbsp
– Green onions – 3 stalks
– Doubanjiang – 2 tbsp
– Soy sauce – 1 tbsp
– Chicken broth – 1 cup
– Cornstarch – 1 tbsp
– Water – 2 tbsp
– Vegetable oil – 2 tbsp
Instructions
1. Cut the soft tofu into 1-inch cubes.
2. Mince the garlic cloves.
3. Grate the ginger.
4. Slice the green onions, separating white and green parts.
5. Heat vegetable oil in a wok over medium-high heat until it shimmers.
6. Add Sichuan peppercorns and toast for 30 seconds until fragrant.
7. Remove the toasted peppercorns and set aside.
8. Add ground pork to the wok and cook for 4 minutes, breaking it up with a spatula.
9. Stir in doubanjiang and cook for 1 minute until the oil turns red.
10. Add minced garlic, grated ginger, and white parts of green onions.
11. Cook for 1 minute until aromatic.
12. Pour in chicken broth and soy sauce.
13. Bring the mixture to a boil.
14. Gently slide in tofu cubes.
15. Reduce heat to medium and simmer for 5 minutes.
16. Mix cornstarch with water in a small bowl.
17. Slowly drizzle the cornstarch slurry into the wok while stirring.
18. Cook for 2 minutes until the sauce thickens.
19. Crush the toasted Sichuan peppercorns.
20. Sprinkle crushed peppercorns and green parts of green onions over the dish.
21. Serve immediately in bowls.
Prepare for a textural symphony where silky tofu cubes swim in a fiery, numbing sauce that clings perfectly to every grain of rice. The magic happens when that mala tingle from the Sichuan peppercorns dances with the rich pork and fermented bean paste—it’s comfort food with serious personality. Try serving it over steamed jasmine rice or, for maximum drama, in individual stone bowls that keep it sizzling hot at the table!
Peking Duck
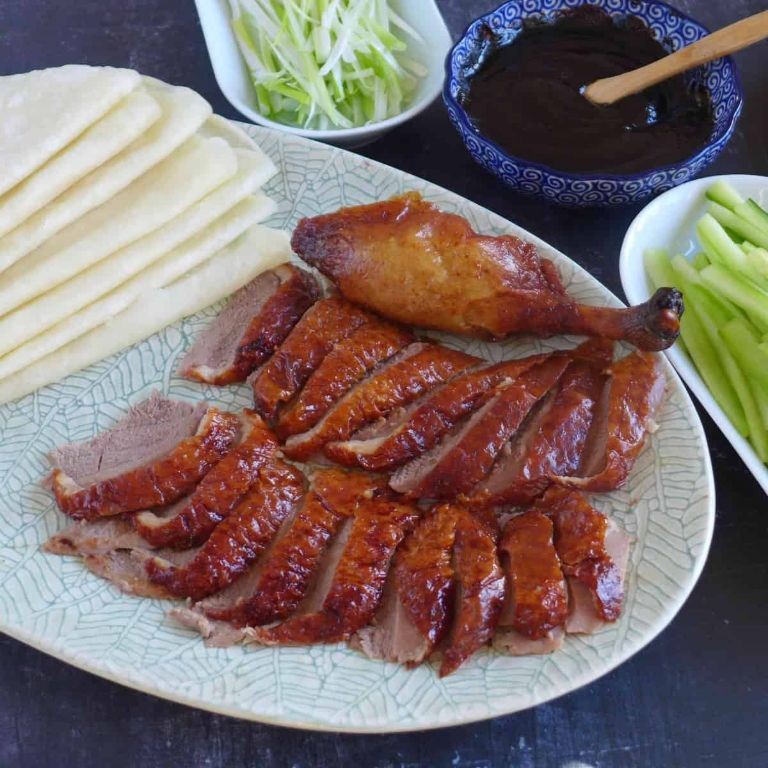
Ladies and gentlemen, prepare your taste buds for a crispy, crackly adventure that’s basically the superhero of the duck world—Peking Duck! This isn’t just dinner; it’s a flavor explosion wrapped in a pancake, ready to make you feel like royalty without the crown (but maybe a napkin). Get ready to impress your friends and confuse your neighbors with this showstopper.
Ingredients
Whole duck – 1 (5-6 lbs)
Salt – 2 tbsp
Honey – ¼ cup
Hot water – 1 cup
Scallions – 6, cut into 2-inch lengths
Cucumber – 1, julienned
Mandarin pancakes – 12
Hoisin sauce – ½ cup
Instructions
1. Rinse the duck inside and out under cold running water, then pat it completely dry with paper towels.
2. Rub the salt evenly all over the duck’s skin and inside the cavity.
3. Place the duck on a wire rack set over a baking sheet and refrigerate uncovered for 12 hours to air-dry the skin.
4. Whisk together the honey and hot water in a small bowl until fully combined.
5. Brush the honey mixture evenly over the entire surface of the duck.
6. Let the duck air-dry at room temperature for 1 hour until the skin feels tacky.
7. Preheat your oven to 350°F and position a rack in the center.
8. Roast the duck for 1 hour, then increase the oven temperature to 400°F.
9. Continue roasting for 30-40 minutes until the skin is deep golden brown and crispy.
10. Remove the duck from the oven and let it rest for 15 minutes before carving.
11. Carve the duck into thin slices, including both skin and meat.
12. Warm the mandarin pancakes according to package directions.
13. Spread about 1 teaspoon of hoisin sauce onto each pancake.
14. Top with 2-3 slices of duck, a few scallion pieces, and some cucumber julienne.
15. Roll up the pancake tightly and serve immediately.
That first bite delivers an epic crunch from the lacquered skin, followed by tender, juicy meat that’s subtly savory. Try serving these rolls with a side of pickled radishes for a tangy contrast, or go full DIY and let everyone build their own masterpiece at the table—it’s interactive, delicious, and guaranteed to spark conversation.
Hot and Sour Soup
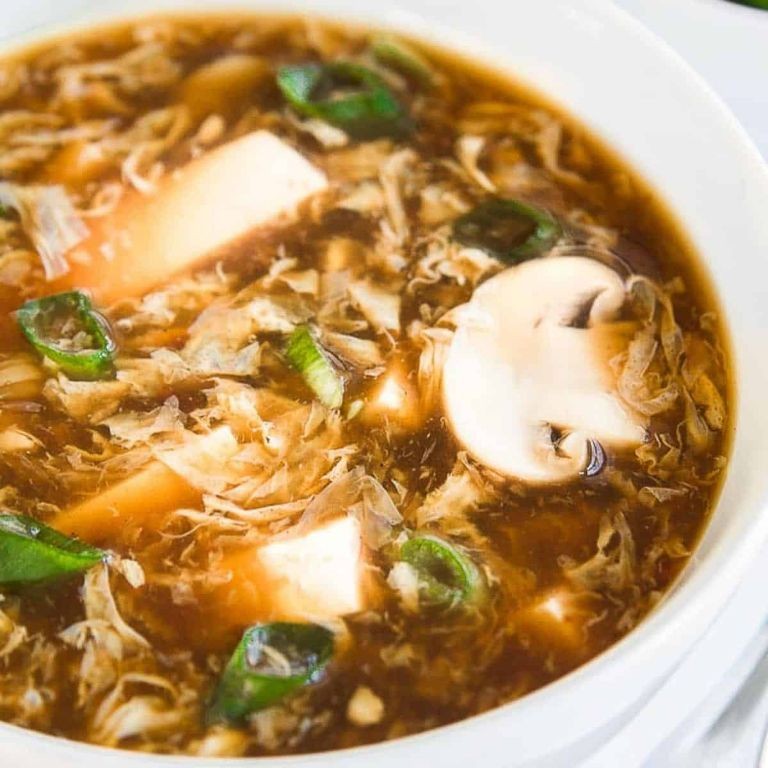
Mmm, nothing quite warms the soul—and clears the sinuses—like a bowl of hot and sour soup that packs more personality than your average reality TV star. This zesty, tangy concoction is the culinary equivalent of a surprise party for your taste buds, guaranteed to banish blandness forever.
Ingredients
– Chicken broth – 4 cups
– White vinegar – ¼ cup
– Soy sauce – 2 tbsp
– Cornstarch – 3 tbsp
– Eggs – 2
– Firm tofu – 8 oz, cubed
– Shiitake mushrooms – 4 oz, sliced
– White pepper – ½ tsp
– Sesame oil – 1 tsp
Instructions
1. Pour 4 cups of chicken broth into a large pot and bring it to a boil over high heat.
2. Add 8 oz of cubed firm tofu and 4 oz of sliced shiitake mushrooms to the boiling broth.
3. Reduce the heat to medium and simmer the mixture for 5 minutes, or until the mushrooms soften.
4. Whisk 3 tbsp of cornstarch with ¼ cup of cold water in a small bowl until no lumps remain.
5. Slowly pour the cornstarch slurry into the soup while stirring continuously to prevent clumping.
6. Cook the soup for 2 more minutes, or until it thickens slightly and becomes glossy.
7. Beat 2 eggs in a separate bowl until the yolks and whites are fully combined.
8. Slowly drizzle the beaten eggs into the soup in a thin, steady stream while stirring the soup in one direction.
9. Add ¼ cup of white vinegar, 2 tbsp of soy sauce, ½ tsp of white pepper, and 1 tsp of sesame oil to the pot.
10. Stir the soup gently for 1 minute to evenly distribute all the ingredients and flavors.
11. Ladle the hot and sour soup into bowls and serve immediately.
So, what’s the final verdict? You’ll love the silky ribbons of egg swirling through the savory, tangy broth, with tender tofu and earthy mushrooms adding just the right chew. Serve it alongside some crispy egg rolls for a textural showdown, or simply slurp it straight from the bowl when no one’s watching—we won’t judge.
Char Siu (Chinese BBQ Pork)
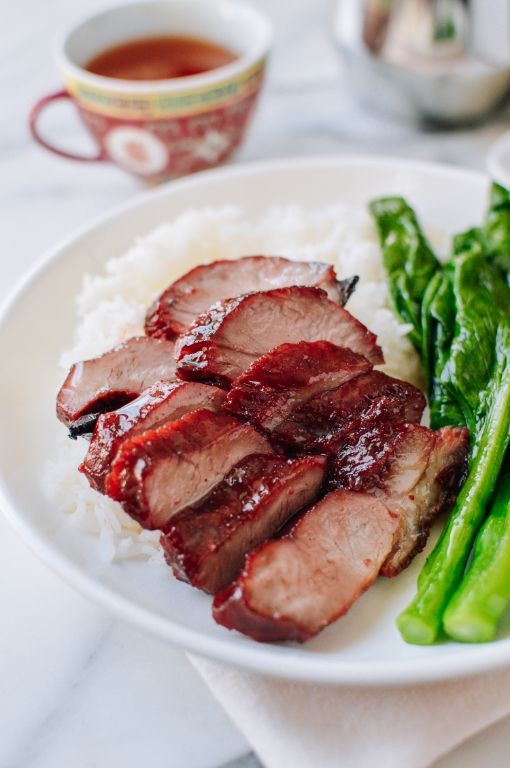
Hang onto your chopsticks, folks, because we’re about to transform your humble pork shoulder into the glistening, crimson-hued superstar of Chinese takeout dreams—Char Siu! This sticky-sweet, savory marvel is so ridiculously good, it’ll have you questioning every life choice that didn’t involve slathering meat in honey and hoisin.
Ingredients
Pork shoulder – 2 lbs
Hoisin sauce – ¼ cup
Soy sauce – 2 tbsp
Honey – 3 tbsp
Five-spice powder – 1 tsp
Red food coloring – ½ tsp
Garlic – 3 cloves, minced
Instructions
1. Preheat your oven to 375°F. 2. Pat the pork shoulder completely dry with paper towels. 3. In a medium bowl, whisk together hoisin sauce, soy sauce, honey, five-spice powder, red food coloring, and minced garlic until smooth. 4. Place the pork shoulder in a large zip-top bag and pour in the marinade. 5. Seal the bag tightly, removing all air, and massage the marinade evenly over the pork. 6. Marinate in the refrigerator for at least 4 hours or overnight for maximum flavor penetration. 7. Line a baking sheet with aluminum foil and place a wire rack on top. 8. Remove the pork from the marinade, letting excess drip off, and place it on the wire rack. 9. Reserve the remaining marinade in a small saucepan. 10. Roast the pork in the preheated oven for 25 minutes. 11. Brush the pork generously with reserved marinade. 12. Reduce oven temperature to 325°F and roast for another 20 minutes. 13. Brush again with marinade and roast until the internal temperature reaches 145°F, about 15–20 more minutes. 14. Let the pork rest on a cutting board for 10 minutes before slicing thinly against the grain. Now, that glossy, crackly-edged pork is ready to steal the show—tender enough to melt on your tongue, with a sticky-sweet glaze that’ll have you licking your fingers shamelessly. Nestle it into fluffy steamed buns, pile it high over rice, or heck, just eat it straight from the cutting board like the triumphant carnivore you are.
Dan Dan Noodles
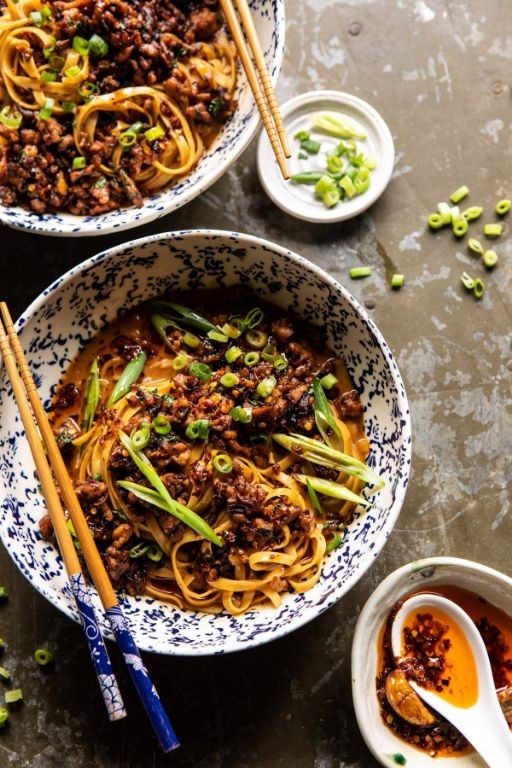
Jazz up your noodle game with these Dan Dan Noodles—they’re the spicy, saucy, soul-warming hug your Tuesday desperately needs. Think of them as the culinary equivalent of finding $20 in your winter coat pocket: unexpected, delightful, and instantly improving your entire day. Let’s dive into the delicious chaos!
Ingredients
Ground pork – ½ lb
Soy sauce – 3 tbsp
Sichuan peppercorns – 1 tsp
Chili oil – 2 tbsp
Garlic – 2 cloves, minced
Fresh Chinese wheat noodles – 8 oz
Chicken broth – 1 cup
Green onions – 2, sliced
Instructions
1. Bring a large pot of water to a rolling boil over high heat.
2. Add the fresh Chinese wheat noodles to the boiling water and cook for exactly 4 minutes, stirring once to prevent sticking.
3. Drain the noodles immediately in a colander and rinse under cold running water for 30 seconds to stop the cooking process.
4. Heat a large skillet over medium-high heat until a drop of water sizzles and evaporates on contact.
5. Add the ground pork to the dry skillet and cook for 5 minutes, breaking it up with a spatula until no pink remains.
6. Stir in the minced garlic and cook for 1 minute until fragrant.
7. Add the Sichuan peppercorns and toast for 30 seconds, stirring constantly to prevent burning.
8. Pour in the soy sauce and chicken broth, scraping the bottom of the skillet to release any browned bits.
9. Simmer the sauce for 3 minutes until slightly thickened.
10. Remove the skillet from heat and stir in the chili oil.
11. Divide the rinsed noodles evenly between two bowls.
12. Pour the hot pork and sauce mixture over the noodles.
13. Top with sliced green onions.
Brace yourself for the glorious tangle of chewy noodles swimming in that numbing, spicy sauce—it’s a flavor party where your mouth is the VIP guest. Serve it with extra chili oil for the brave souls, or pair with crisp cucumber slices to cool the fire. Either way, your taste buds will be sending thank-you notes.
Xiaolongbao (Soup Dumplings)

Gather ’round, brave culinary adventurers, because we’re about to tackle the deliciously deceptive world of soup-filled pockets that will either make you feel like a kitchen wizard or give your steam facial a run for its money. These little flavor bombs are basically edible magic tricks that somehow contain liquid gold inside delicate dough purses. Just remember: the first rule of soup dumpling club is don’t talk about burning your tongue on the molten broth!
Ingredients
Flour – 2 cups
Water – ¾ cup
Ground pork – 1 lb
Gelatin – 2 tbsp
Soy sauce – 2 tbsp
Ginger – 1 tbsp, minced
Green onions – ¼ cup, chopped
Salt – 1 tsp
Instructions
1. Combine 2 cups flour and ¾ cup water in a mixing bowl.
2. Knead the dough on a floured surface for 8 minutes until smooth and elastic.
3. Cover the dough with a damp cloth and let it rest for 30 minutes at room temperature.
4. Mix 1 lb ground pork, 2 tbsp gelatin, 2 tbsp soy sauce, 1 tbsp minced ginger, ¼ cup chopped green onions, and 1 tsp salt in a separate bowl.
5. Chill the filling mixture in the refrigerator for 1 hour to allow the gelatin to firm up.
6. Divide the rested dough into 24 equal pieces using a sharp knife.
7. Roll each dough piece into a 3-inch circle using a rolling pin, keeping the edges thinner than the center.
8. Place 1 tablespoon of the chilled filling in the center of each dough circle.
9. Pleat the edges of the dough together, twisting at the top to seal completely – this is where your origami skills pay off!
10. Arrange the formed dumplings in a steamer basket lined with parchment paper, leaving 1 inch between each.
11. Steam the dumplings over boiling water for 10 minutes until the wrappers turn translucent.
12. Carefully remove the steamer from the heat using oven mitts. But seriously, these little guys pack a piping hot surprise inside their delicate shells. The gelatin melts into that signature broth during steaming, creating the magical soup effect that will either impress your friends or test your patience as you wait for them to cool enough to eat. Always serve immediately after steaming for the ultimate soup explosion experience.
Brace yourself for that first bite – the delicate wrapper gives way to an explosive burst of savory broth that’ll make you wonder how soup got trapped in there. The tender pork filling soaks up all that ginger-kissed liquid gold, creating a textural party in your mouth that’s both comforting and exciting. Serve these with black vinegar for dipping and watch as your dinner guests attempt to eat them without spilling the precious contents – it’s basically a delicious coordination test!
Twice-Cooked Pork
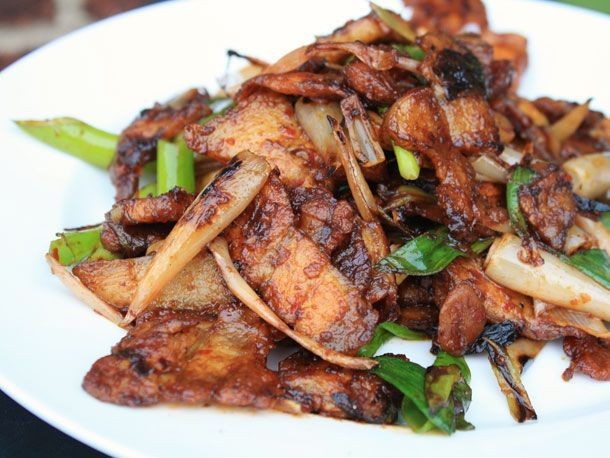
Pork shoulder, meet your destiny—this twice-cooked wonder transforms humble meat into crispy, caramelized glory that’ll make your taste buds throw a party. We’re talking tender pork boiled to perfection, then sliced thin and fried until the edges sing with golden-brown crispiness. Get ready to turn your kitchen into a flavor factory where patience pays off in every addictive bite.
Ingredients
Pork shoulder – 1 lb
Water – 4 cups
Vegetable oil – 2 tbsp
Soy sauce – 2 tbsp
Sugar – 1 tsp
Instructions
1. Place 1 lb pork shoulder and 4 cups water in a large pot.
2. Bring the water to a rolling boil over high heat.
3. Reduce heat to medium-low, cover the pot, and simmer for 45 minutes until the pork is fork-tender.
4. Remove the pork from the pot and let it cool to room temperature for 20 minutes.
5. Slice the cooled pork into ¼-inch thick pieces.
6. Heat 2 tbsp vegetable oil in a large skillet over medium-high heat until shimmering.
7. Arrange pork slices in a single layer in the skillet.
8. Cook for 4 minutes until the bottoms are golden brown and crispy.
9. Flip each slice and cook for another 4 minutes until both sides are evenly browned.
10. Add 2 tbsp soy sauce and 1 tsp sugar to the skillet.
11. Toss the pork continuously for 2 minutes until each piece is coated and the sauce glazes the meat.
12. Remove from heat and transfer to a serving plate immediately.
Dive into that irresistible contrast—tender meat inside, crackling edges outside, all glazed in salty-sweet perfection. Serve it over steamed rice to catch every drop of that glossy sauce, or stuff it into bao buns for a handheld flavor explosion that’ll disappear faster than your willpower around potato chips.
Braised Pork Belly (Hong Shao Rou)
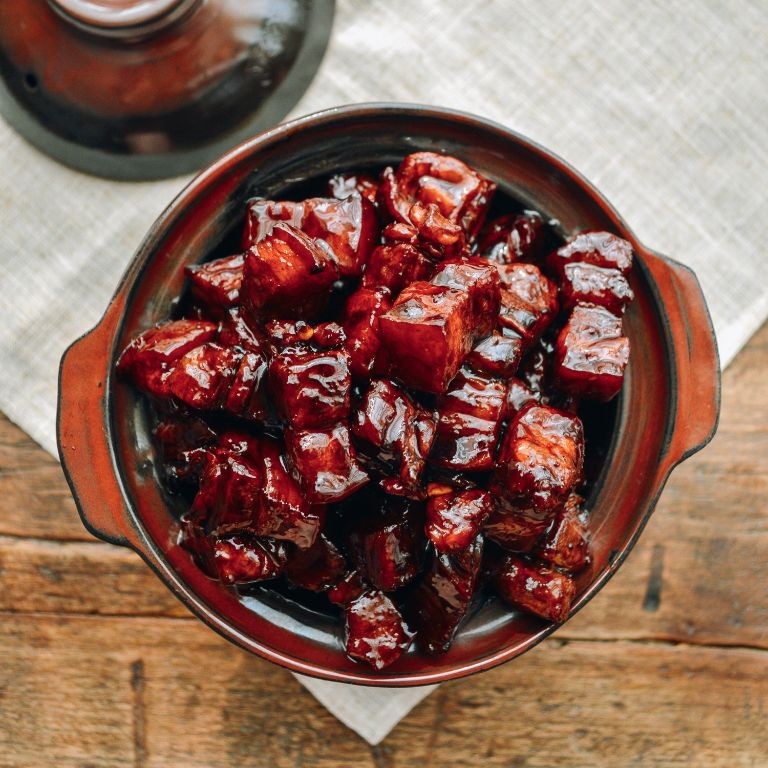
Hear that? That’s the sound of your taste buds preparing for their new favorite obsession. Braised pork belly, or Hong Shao Rou if you’re feeling fancy, is basically a warm, savory hug for your soul—the kind that makes you forget you ever settled for boring dinners. This Chinese classic transforms humble pork into a melt-in-your-mouth masterpiece that’ll have you questioning all your previous life choices.
Ingredients
Pork belly – 2 lbs
Soy sauce – ½ cup
Shaoxing wine – ¼ cup
Sugar – 3 tbsp
Ginger – 2 inch piece
Scallions – 4
Water – 2 cups
Instructions
- Cut 2 lbs pork belly into 1-inch cubes.
- Place pork cubes in a pot and cover with cold water.
- Bring water to a boil over high heat and cook for 5 minutes to remove impurities.
- Drain pork and rinse under cold water—this step ensures your final dish won’t be cloudy.
- Heat a dry wok or heavy pot over medium heat.
- Add 3 tbsp sugar and cook until it melts and turns amber-colored, about 3-4 minutes.
- Add blanched pork belly and stir to coat every piece in caramelized sugar.
- Pour in ½ cup soy sauce and ¼ cup Shaoxing wine—the sizzle means you’re doing it right.
- Slice 2-inch ginger into thin coins and add to pot.
- Cut 4 scallions into 2-inch lengths and add to pot.
- Pour in 2 cups water until pork is just covered.
- Bring liquid to a boil, then reduce heat to low and cover.
- Simmer for 1.5 hours, checking occasionally to ensure it’s at a gentle bubble—aggressive boiling will toughen the meat.
- Remove lid and increase heat to medium to reduce sauce for 15 minutes until thickened.
- Serve immediately while hot and glorious.
Rich, glossy, and unapologetically indulgent, this pork belly emerges so tender it practically dissolves on your tongue. The caramelized exterior gives way to layers of fat that have magically transformed into silky goodness, while the sauce clings to each piece like a savory security blanket. Try serving it over steamed rice to catch every drop of that incredible sauce, or get fancy and stuff it into bao buns for the ultimate handheld luxury.
Scallion Pancakes

Ready to transform humble pantry staples into crispy, flaky perfection that will make your takeout order jealous? Scallion pancakes are the ultimate savory treat that somehow manages to be both impressively fancy and ridiculously simple to whip up—no culinary degree required, just a healthy appetite for deliciousness.
Ingredients
- All-purpose flour – 2 cups
- Hot water – ¾ cup
- Salt – 1 tsp
- Scallions – 1 cup chopped
- Vegetable oil – ¼ cup
Instructions
- Combine 2 cups all-purpose flour and 1 tsp salt in a large mixing bowl.
- Pour ¾ cup hot water (about 180°F) into the flour mixture while stirring with a fork. Pro tip: The hot water creates a more pliable dough that’s easier to roll out later.
- Knead the mixture on a floured surface for 5 minutes until smooth and elastic.
- Cover the dough with a damp cloth and let it rest for 30 minutes at room temperature.
- Divide the rested dough into 4 equal portions using a sharp knife.
- Roll one portion into a thin circle about 8 inches in diameter.
- Brush the entire surface with 1 tbsp vegetable oil using a pastry brush.
- Sprinkle ¼ cup chopped scallions evenly over the oiled surface.
- Roll the circle tightly into a long log shape, trapping the scallions inside.
- Coil the log into a spiral shape, tucking the end underneath. Pro tip: This coiling technique creates those beautiful flaky layers when cooked.
- Roll the coiled dough into a 6-inch circle, applying even pressure.
- Heat 2 tbsp vegetable oil in a non-stick skillet over medium heat (350°F).
- Cook the pancake for 3-4 minutes until golden brown and crispy on the bottom.
- Flip the pancake using a spatula and cook for another 3-4 minutes until both sides are evenly browned. Pro tip: Don’t rush the cooking—medium heat ensures the inside cooks through without burning the outside.
- Transfer to a paper towel-lined plate to drain excess oil.
- Repeat steps 6-15 with remaining dough portions.
Fresh from the skillet, these pancakes deliver the most satisfying crackle when you bite through the shatteringly crisp exterior. Flaky, savory layers give way to the gentle oniony sweetness of perfectly cooked scallions, creating a texture symphony in every bite. For maximum enjoyment, slice them into wedges and serve immediately with your favorite dipping sauce—though we won’t judge if you skip the plate and eat them straight from the cutting board.
Wonton Soup
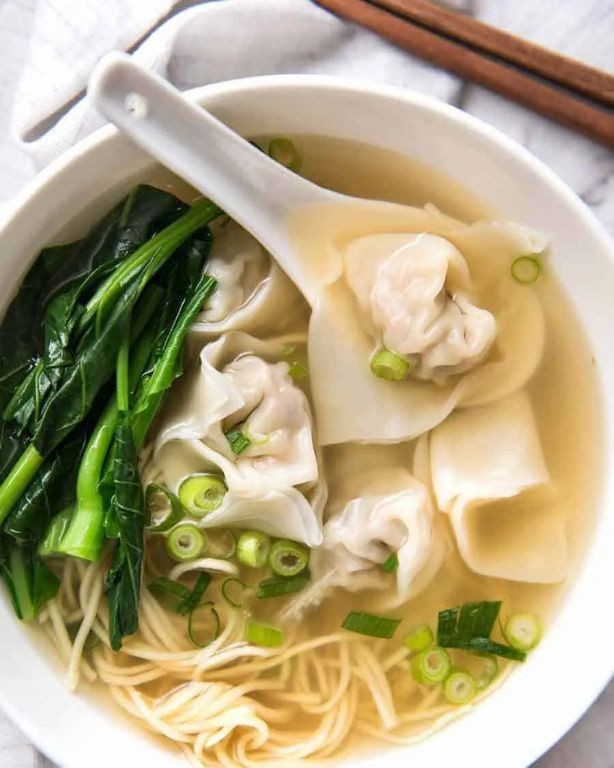
Perfectly plump, steaming, and slurp-worthy, this wonton soup is the ultimate hug in a bowl—because sometimes you need more than just a pat on the back to get through the week.
Ingredients
- Wonton wrappers – 24 pieces
- Ground pork – ½ lb
- Green onions – 2 tbsp, finely chopped
- Soy sauce – 1 tbsp
- Sesame oil – 1 tsp
- Chicken broth – 4 cups
- Ginger – 1 tsp, grated
- Baby spinach – 1 cup
Instructions
- In a medium bowl, combine ground pork, green onions, soy sauce, and sesame oil until fully mixed.
- Place 1 teaspoon of the pork mixture in the center of a wonton wrapper.
- Moisten the edges of the wrapper with water using your fingertip.
- Fold the wrapper in half to form a triangle, pressing edges firmly to seal. (Tip: Press out any air bubbles to prevent bursting during cooking.)
- Bring chicken broth and grated ginger to a boil in a pot over high heat.
- Reduce heat to medium and gently drop wontons into the simmering broth.
- Cook wontons for 4-5 minutes until they float to the surface and the filling is cooked through.
- Add baby spinach to the broth and cook for 1 minute until just wilted. (Tip: Don’t overcook the spinach—it should stay vibrant green for the best texture.)
- Ladle soup into bowls, distributing wontons and spinach evenly. (Tip: Serve immediately to keep the wonton wrappers from becoming soggy.)
And just like that, you’ve got a bowl of pure comfort. The silky wonton wrappers give way to a savory pork filling, while the ginger-kissed broth wraps it all up in warmth. Amp up the fun by adding a drizzle of chili oil or squeezing fresh lime over the top for a zesty kick.
Steamed Fish with Ginger and Scallions
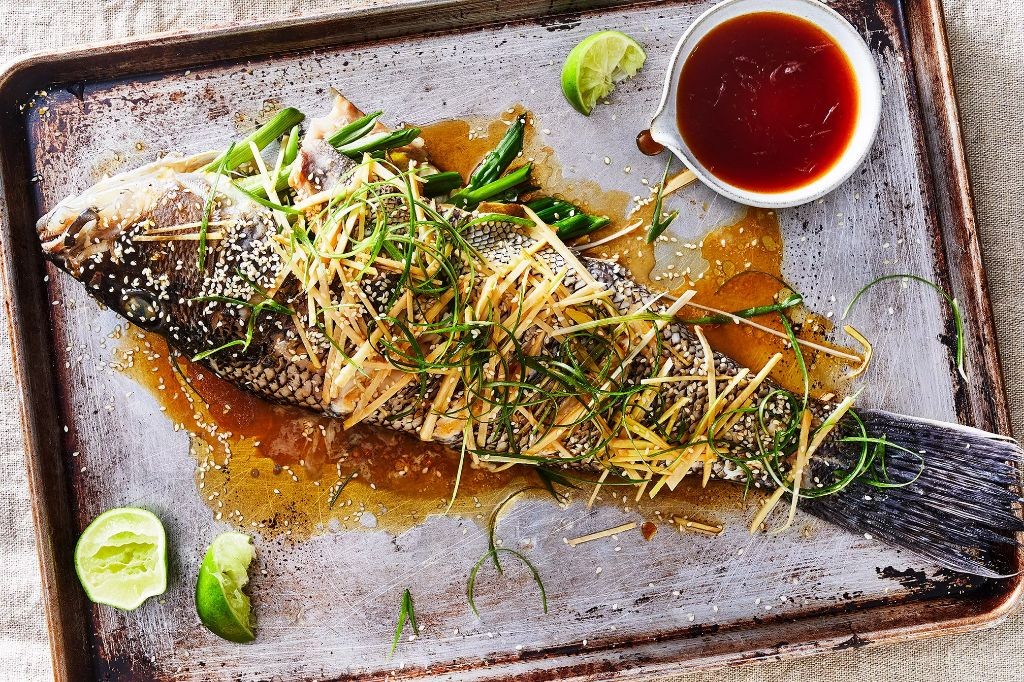
Unbelievably simple yet ridiculously impressive, this steamed fish will have your dinner guests thinking you secretly trained under a Cantonese master chef—all while you barely broke a sweat. The magic happens when fresh fish meets the dynamic duo of ginger and scallions in a steamy embrace that transforms basic ingredients into restaurant-worthy perfection. Get ready to become the star of your next potluck without the stress of complicated techniques or a mountain of dirty pans.
Ingredients
Whole white fish (such as sea bass or tilapia) – 1 (about 1.5 lbs)
Fresh ginger – 2-inch piece
Scallions – 4
Soy sauce – 3 tbsp
Vegetable oil – 2 tbsp
Salt – ½ tsp
Instructions
1. Rinse the whole white fish under cold running water for 30 seconds and pat completely dry with paper towels.
2. Use a sharp knife to make three diagonal slashes on each side of the fish, cutting about ¼-inch deep into the flesh.
3. Rub the salt evenly over both sides of the fish and inside the cavity.
4. Peel the ginger and slice half into thin matchsticks and the other half into coins.
5. Cut the scallions into 2-inch lengths, then slice them lengthwise into thin strips.
6. Place the ginger coins in the bottom of a heatproof plate that fits inside your steamer basket.
7. Lay the fish on top of the ginger coins and scatter the ginger matchsticks over the fish.
8. Fill a wok or large pot with 2 inches of water and bring to a rolling boil over high heat.
9. Carefully place the plate with the fish into the steamer basket, cover with a tight-fitting lid, and steam for 12 minutes exactly.
10. Check for doneness by inserting a fork into the thickest part of the fish—the flesh should flake easily and be completely opaque.
11. While the fish steams, heat the vegetable oil in a small saucepan over medium-high heat until it shimmers, about 2 minutes.
12. Carefully remove the steamed fish from the steamer using oven mitts and pour off any accumulated liquid from the plate.
13. Arrange the scallion strips in a neat layer over the top of the fish.
14. Drizzle the soy sauce evenly over the fish and scallions.
15. Immediately pour the hot oil over the scallions, which will sizzle and wilt them slightly.
16. Serve the fish immediately while still piping hot.
Velvety and delicate, the fish flakes apart at the slightest touch of your fork while the ginger-scallion topping provides a bright, aromatic kick that cuts through the richness. Try serving it over jasmine rice to soak up every last drop of that savory soy-ginger sauce, or go full banquet-style by pairing it with stir-fried vegetables for a complete Asian-inspired feast that feels fancy but requires minimal effort.
Ants Climbing a Tree (Ma Yi Shang Shu)
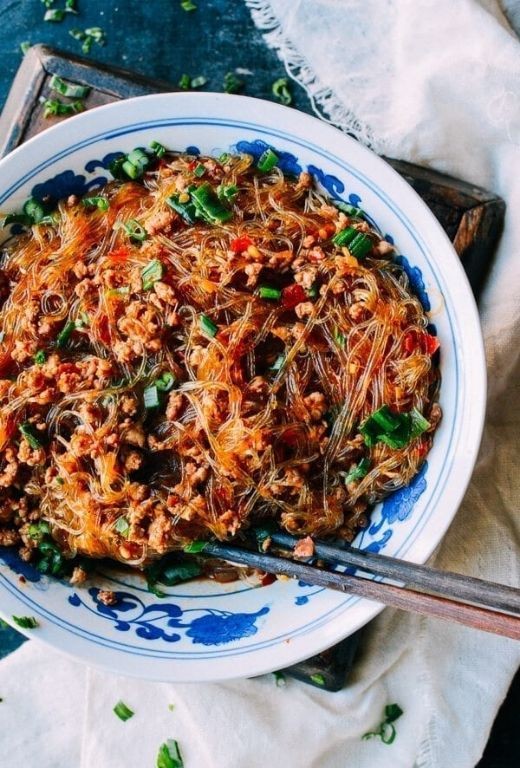
Hilariously named but seriously delicious, Ants Climbing a Tree proves that Chinese cuisine has the best sense of humor. This Sichuan classic features ground pork clinging to glass noodles like tiny insects scaling branches—don’t worry, no actual ants were harmed in the making! Get ready for a dish that’s as fun to make as it is to say with a mouthful.
Ingredients
Ground pork – ½ lb
Glass noodles – 4 oz
Soy sauce – 2 tbsp
Chicken broth – 2 cups
Scallions – 3
Garlic – 2 cloves
Ginger – 1 inch
Vegetable oil – 1 tbsp
Instructions
1. Place glass noodles in a large bowl and cover with warm water for 15 minutes until pliable.
2. Finely chop scallions, keeping white and green parts separate.
3. Mince garlic cloves and grate ginger using a microplane.
4. Heat vegetable oil in a large skillet over medium-high heat until shimmering.
5. Add ground pork and cook for 5 minutes, breaking it up with a spatula until no pink remains.
6. Stir in chopped scallion whites, minced garlic, and grated ginger, cooking for 1 minute until fragrant.
7. Pour in soy sauce and chicken broth, scraping any browned bits from the bottom of the pan.
8. Drain soaked glass noodles and add to the skillet, ensuring they’re fully submerged in liquid.
9. Reduce heat to medium-low, cover, and simmer for 8 minutes until noodles absorb most of the liquid.
10. Remove lid and cook uncovered for 2 more minutes until sauce thickens slightly.
11. Sprinkle with chopped scallion greens and serve immediately.
For perfectly chewy noodles, don’t oversoak them—they should be flexible but still firm before cooking. Freshly grated ginger releases more aromatic oils than pre-minced, giving your dish that authentic Sichuan kick. When browning the pork, resist stirring too frequently to develop those delicious caramelized bits that add depth to your sauce.
Firm yet slippery noodles create the perfect vehicle for the savory, slightly spicy pork mixture that clings to every strand. The texture contrast between the chewy noodles and tender pork makes each bite excitingly dynamic. Serve this beauty family-style with extra scallions for garnish, or pack it for lunch and watch your coworkers swarm like, well, you know.
Stir-Fried Green Beans with Minced Pork
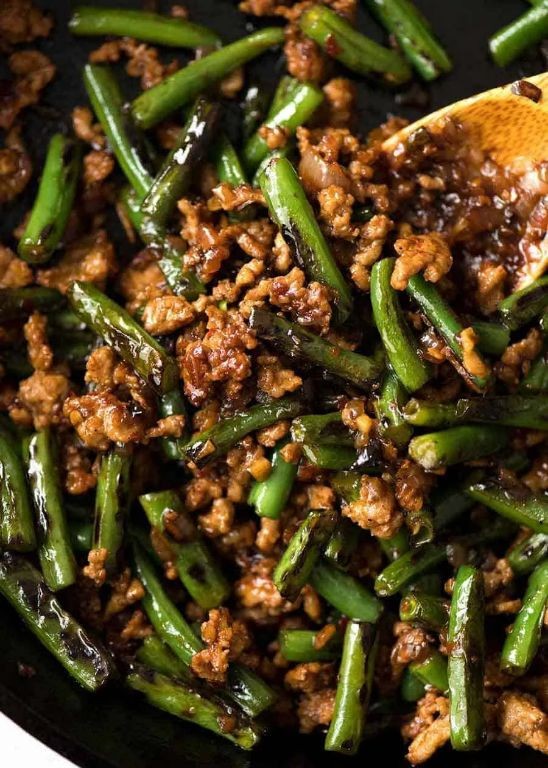
Let’s be real—most green bean recipes are about as exciting as watching paint dry, but this stir-fry? It’s the sassy, flavor-packed side dish that’ll have you ditching sad salads forever. Loaded with savory minced pork and a garlicky kick, it’s the weeknight hero you never knew you needed.
Ingredients
Green beans – 1 lb
Minced pork – ½ lb
Garlic – 3 cloves
Soy sauce – 2 tbsp
Vegetable oil – 2 tbsp
Salt – ½ tsp
Instructions
1. Trim the ends off 1 lb green beans and cut them into 2-inch pieces.
2. Mince 3 cloves of garlic finely.
3. Heat 2 tbsp vegetable oil in a large skillet over medium-high heat until it shimmers.
4. Add the green beans to the hot skillet and stir-fry for 5 minutes until they develop light char marks. (Tip: Don’t overcrowd the pan—work in batches if needed for even browning.)
5. Push the green beans to one side of the skillet and add ½ lb minced pork to the empty space.
6. Cook the pork for 4 minutes, breaking it up with a spatula until no pink remains.
7. Stir in the minced garlic and cook for 1 minute until fragrant.
8. Combine the pork and green beans, then add 2 tbsp soy sauce and ½ tsp salt.
9. Toss everything together and cook for 2 more minutes until the sauce coats the ingredients evenly. (Tip: Taste and adjust salt only at the end to avoid over-seasoning.)
10. Remove from heat and let it rest for 1 minute before serving. (Tip: For extra crispiness, spread the beans on a baking sheet after cooking to prevent steaming.)
Now, let’s talk results: you’ve got tender-crisp beans with juicy pork that’s soaked up all that umami goodness. Serve it over fluffy jasmine rice or stuff it into lettuce wraps for a low-carb twist—either way, it’s a flavor party in your mouth.
Egg Fried Rice

Crispy, comforting, and ridiculously easy to whip up, egg fried rice is the ultimate “I forgot to meal prep” lifesaver that somehow always hits the spot. Seriously, who knew scrambled eggs and leftover rice could throw such a flavorful party in your mouth? Let’s turn those pantry staples into a dish that’ll have you questioning why you ever ordered takeout.
Ingredients
Cooked rice – 3 cups
Eggs – 3 large
Soy sauce – 2 tbsp
Vegetable oil – 2 tbsp
Green onions – ¼ cup, chopped
Instructions
1. Heat a large skillet or wok over medium-high heat and add 1 tablespoon of vegetable oil.
2. Crack 3 eggs directly into the hot skillet and scramble vigorously with a spatula for 1 minute until fluffy but still slightly wet.
3. Push eggs to one side of the skillet and add remaining 1 tablespoon of oil to the empty space.
4. Add 3 cups of cooked rice to the oiled area, breaking up any clumps with your spatula.
5. Cook rice undisturbed for 2 minutes to develop a crispy bottom layer—this is the secret to perfect texture!
6. Toss rice and eggs together until fully combined.
7. Drizzle 2 tablespoons of soy sauce evenly over the mixture and stir continuously for 1 minute to coat everything evenly.
8. Add ¼ cup chopped green onions and cook for 30 seconds just until slightly wilted.
9. Remove from heat immediately to prevent overcooking.
Absolutely magical how those simple ingredients transform into a savory, satisfying meal with just the right balance of fluffy eggs and slightly crispy rice. Try piling it high in a bowl and topping with a fried egg for extra decadence, or fold it into lettuce cups for a low-carb twist that still delivers all the comfort.
Beef Chow Fun
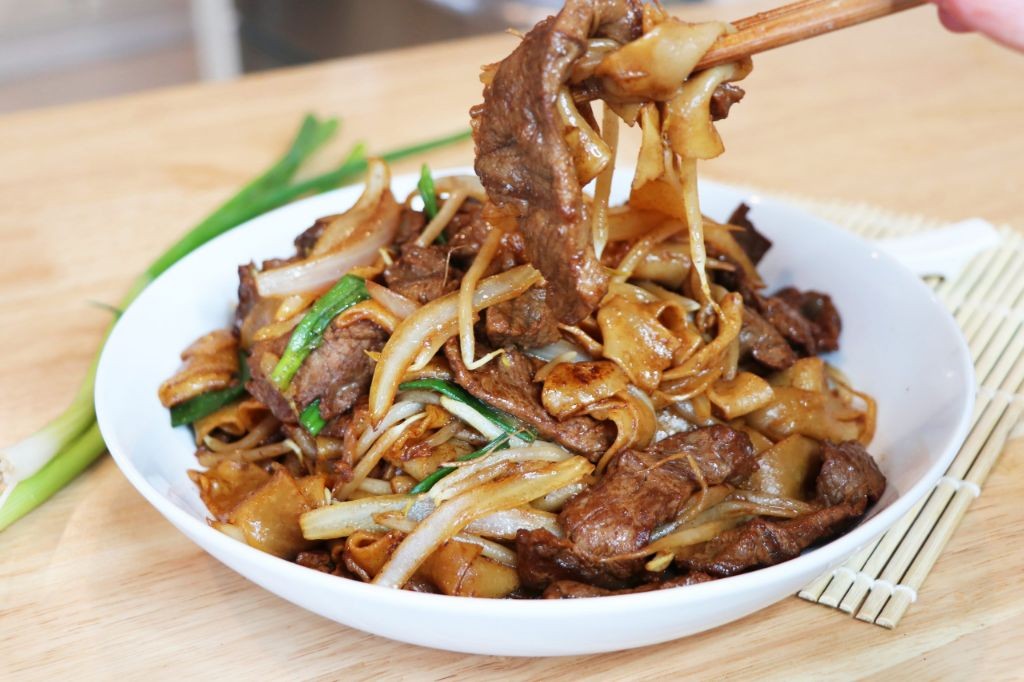
Ridiculously satisfying and secretly simple, Beef Chow Fun is that glorious wok-kissed noodle dish that makes you feel like a takeout hero without the delivery fee drama. This Cantonese classic delivers wide rice noodles, tender beef, and savory sauce in a package so delicious you’ll want to high-five your wok. Get ready to impress your taste buds and maybe even your mother-in-law.
Ingredients
Beef – 8 oz
Rice noodles – 12 oz
Vegetable oil – 2 tbsp
Soy sauce – 3 tbsp
Oyster sauce – 2 tbsp
Sugar – 1 tsp
Green onions – 4 stalks
Instructions
1. Slice 8 oz beef against the grain into ¼-inch thick strips.
2. Soak 12 oz rice noodles in warm water for 15 minutes until pliable but not mushy.
3. Heat 2 tbsp vegetable oil in a wok over high heat until shimmering (about 400°F).
4. Add beef strips and sear for 90 seconds, stirring constantly until no pink remains.
5. Push beef to one side of the wok and add drained noodles to the empty space.
6. Cook noodles undisturbed for 60 seconds to develop a slight char on one side.
7. Flip noodles and cook for another 60 seconds until both sides have light browning.
8. Combine beef and noodles, then add 3 tbsp soy sauce, 2 tbsp oyster sauce, and 1 tsp sugar.
9. Toss everything vigorously for 2 minutes until sauce coats every strand evenly.
10. Chop 4 stalks green onions into 1-inch pieces and add to wok.
11. Toss for 30 more seconds until green onions wilt slightly but remain vibrant.
12. Remove from heat and serve immediately.
Every bite delivers that perfect chew from the wide noodles against the tender beef, with the savory-sweet sauce clinging to every surface like it means business. Try serving it with a fried egg on top for extra richness, or pack it cold for next-day lunches that’ll make coworkers genuinely jealous.
Red Braised Beef Noodle Soup
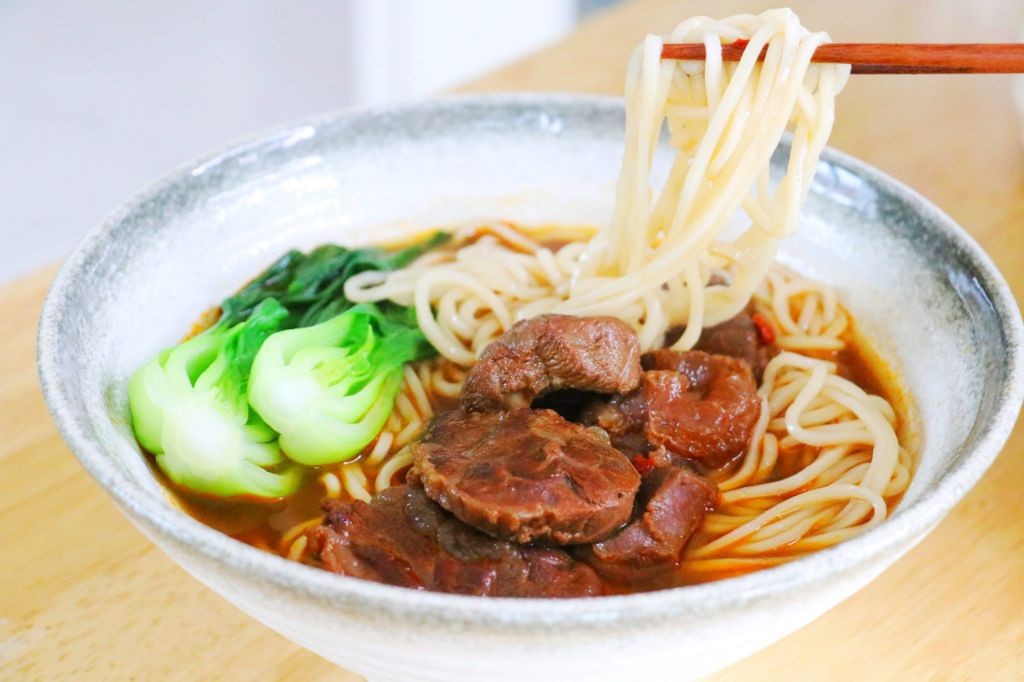
Ready to transform your kitchen into a Taiwanese night market? This red braised beef noodle soup is basically a warm hug in a bowl, if that hug came with complex spices and melt-in-your-mouth beef that’ll make you question every other soup you’ve ever had.
Ingredients
- Beef shank – 2 lbs
- Beef broth – 8 cups
- Soy sauce – ½ cup
- Rice wine – ¼ cup
- Rock sugar – 2 tbsp
- Star anise – 3 pieces
- Cinnamon stick – 1 piece
- Ginger – 2 inch piece, sliced
- Garlic – 5 cloves, smashed
- Green onions – 4, cut into 2-inch pieces
- Wheat noodles – 12 oz
- Bok choy – 2 heads
Instructions
- Cut the beef shank into 2-inch cubes against the grain.
- Bring a large pot of water to a rolling boil at 212°F.
- Add beef cubes and boil for 5 minutes to remove impurities.
- Drain the beef and rinse under cold water. Tip: This blanching step ensures a clearer, cleaner broth.
- Heat 2 tablespoons of oil in a large Dutch oven over medium-high heat until shimmering.
- Sear beef cubes for 3 minutes per side until deeply browned.
- Add ginger, garlic, and green onions to the pot.
- Cook for 2 minutes until fragrant.
- Pour in soy sauce and rice wine, scraping up any browned bits from the bottom.
- Add beef broth, star anise, cinnamon stick, and rock sugar.
- Bring to a boil, then reduce heat to maintain a gentle simmer at 190°F.
- Cover and simmer for 2.5 hours until beef is fork-tender. Tip: Don’t rush the simmer—low and slow is key for that fall-apart texture.
- Remove and discard the star anise and cinnamon stick.
- Bring a separate pot of salted water to a boil for the noodles.
- Cook wheat noodles according to package directions until al dente, about 6-8 minutes.
- Blanch bok choy in the noodle water for 2 minutes until bright green and tender-crisp.
- Drain noodles and divide among 4 bowls. Tip: Rinsing noodles stops the cooking and prevents mushiness.
- Ladle the braised beef and broth over the noodles.
- Top each bowl with blanched bok choy.
Kick back and behold your masterpiece—the beef should shred at the slightest nudge, swimming in that deep, aromatic broth that’s equal parts savory and subtly sweet. Those wheat noodles provide the perfect chewy contrast to the tender meat, making each slurp a textural adventure. For maximum drama, serve with extra green onions and a drizzle of chili oil that’ll make your taste buds do a happy dance.
Steamed Pork Buns (Baozi)
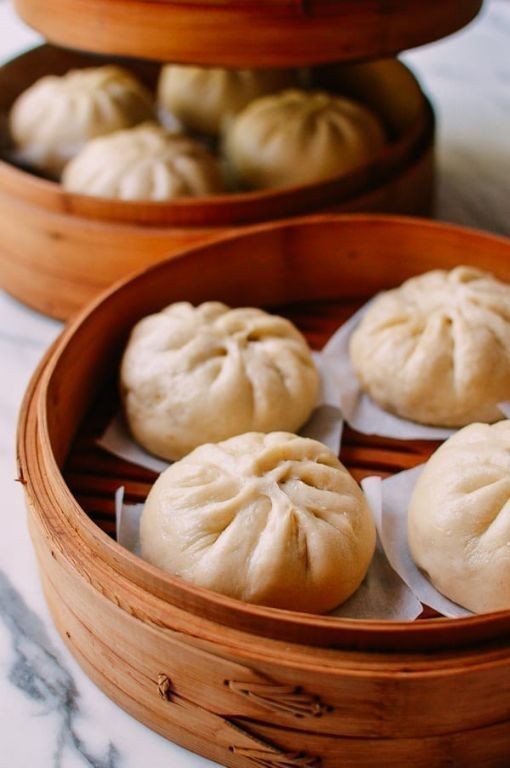
Fabulous, fluffy, and frankly irresistible—these steamed pork buns are the ultimate cozy carb hug you didn’t know you needed, delivering a warm, savory surprise in every pillowy bite that’ll make your kitchen smell like a dim sum dream. Forget takeout; these homemade bao are your new weekend flex, ready to impress even your pickiest foodie friends with their from-scratch magic and juicy, flavorful filling that’s pure comfort in a doughy package. Trust me, once you master these, you’ll be the star of every potluck, armed with buns so good, they might just start a friendly feud over who gets the last one—no regrets, only delicious victories!
Ingredients
Flour – 2 cups
Water – ¾ cup
Yeast – 1 tsp
Sugar – 1 tbsp
Salt – ½ tsp
Ground pork – 1 lb
Soy sauce – 2 tbsp
Ginger – 1 tsp, minced
Green onions – 2, chopped
Instructions
1. In a large bowl, combine flour, yeast, sugar, and salt, then gradually add water while stirring with a wooden spoon until a shaggy dough forms. Tip: Use warm water (about 110°F) to activate the yeast faster for a fluffier rise—test it on your wrist; it should feel comfortably warm, not hot.
2. Knead the dough on a floured surface for 8-10 minutes until smooth and elastic, then place it in a greased bowl, cover with a damp cloth, and let it rise in a warm spot for 1 hour or until doubled in size.
3. While the dough rises, mix ground pork, soy sauce, ginger, and green onions in a medium bowl until well combined, then refrigerate for 30 minutes to let the flavors meld and make it easier to handle.
4. Punch down the risen dough to release air, then divide it into 8 equal pieces and roll each into a ball.
5. Flatten each dough ball into a 4-inch circle with slightly thicker edges, place 2 tablespoons of the pork mixture in the center, and pleat the edges upward to seal tightly, twisting the top to close. Tip: Keep unused dough covered with a cloth to prevent drying out—it makes shaping smoother and less frustrating.
6. Arrange the filled buns on parchment-lined trays, cover with a cloth, and let them proof for 30 minutes until puffy.
7. Bring water to a boil in a steamer, then place the buns in the steamer basket, ensuring they’re spaced 1 inch apart to allow for expansion.
8. Steam the buns over high heat for 15 minutes, then turn off the heat and let them rest in the steamer for 5 minutes before removing. Tip: Avoid opening the steamer lid during cooking to prevent the buns from collapsing—patience pays off with perfectly puffed bao!
Kick back and admire your handiwork: these buns boast a soft, cloud-like exterior that gives way to a juicy, savory pork center, with hints of ginger and soy that dance on your tongue. Serve them fresh from the steamer for that authentic tear-and-share moment, or get creative by dipping them in a spicy chili oil for an extra kick—either way, they’re so addictive, you might just skip the main course and call it a bun bonanza!
Salt and Pepper Shrimp
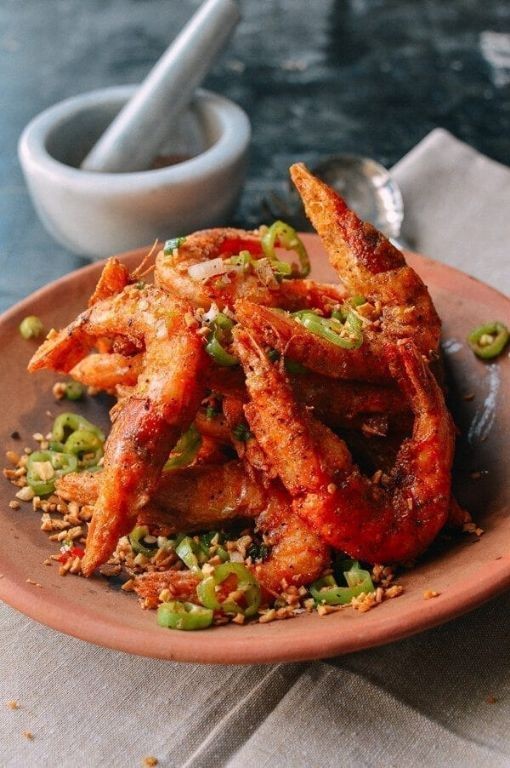
Zesty, zingy, and zero percent boring—this salt and pepper shrimp is about to become your weeknight superhero. Forget complicated recipes that require a culinary degree and a small fortune in ingredients. We’re talking crispy, flavorful shrimp that come together faster than you can say “takeout emergency.”
Ingredients
– Raw shrimp – 1 lb
– Cornstarch – ¼ cup
– Vegetable oil – 3 tbsp
– Salt – 1 tsp
– Black pepper – ½ tsp
Instructions
1. Pat the shrimp completely dry with paper towels.
2. Toss the shrimp with cornstarch until evenly coated.
3. Heat vegetable oil in a large skillet over medium-high heat until it shimmers.
4. Add shrimp to the hot oil in a single layer without crowding.
5. Cook shrimp for 2 minutes until the bottoms turn pink and crispy.
6. Flip each shrimp using tongs.
7. Cook for another 2 minutes until opaque throughout.
8. Sprinkle salt and black pepper evenly over the shrimp while still in the pan.
9. Toss shrimp gently to distribute seasoning.
10. Transfer shrimp to a paper towel-lined plate to drain excess oil.
Oh my goodness, that crispy exterior gives way to tender, juicy shrimp with just the right kick of pepper. Serve these beauties over steamed rice, stuff them into tacos, or—honestly—just eat them straight from the skillet while nobody’s looking.
Summary
Now you have everything you need to bring authentic Chinese flavors right into your kitchen! We hope this collection inspires you to try these delicious recipes. Let us know which dishes become your favorites in the comments below, and don’t forget to share this roundup on Pinterest so other home cooks can discover these amazing recipes too!