Whether you’re looking for quick weeknight dinners, healthy snacks, or impressive party appetizers, besan flour is your secret weapon in the kitchen. This versatile ingredient transforms into everything from crispy fritters to savory pancakes and decadent desserts. Get ready to discover 20 mouthwatering recipes that will make besan flour your new pantry staple—perfect for every occasion and sure to delight your family and friends!
Besan Chilla (Savory Chickpea Pancakes)
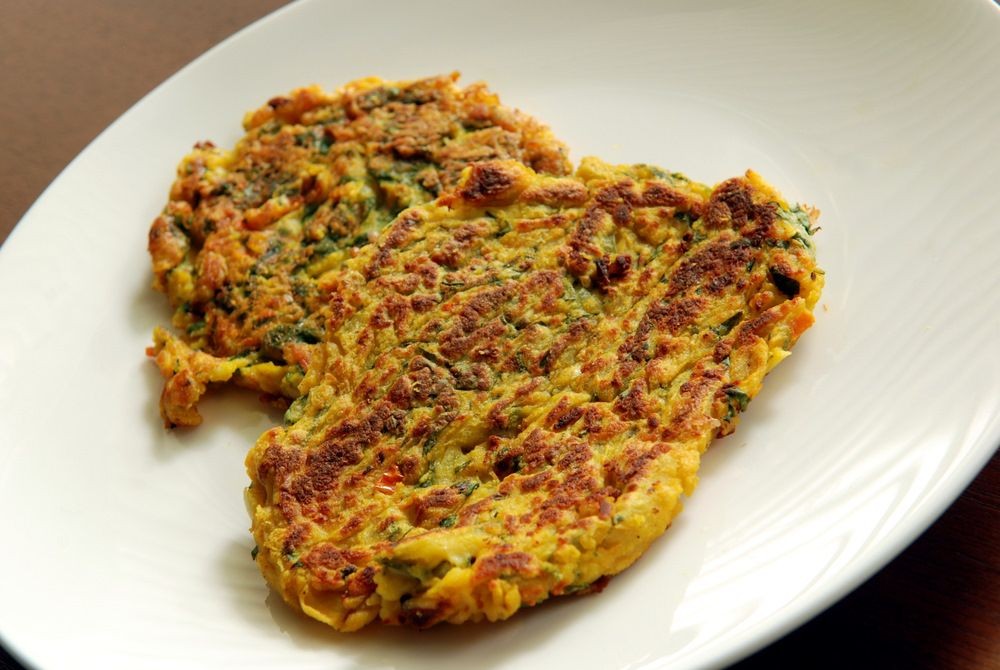
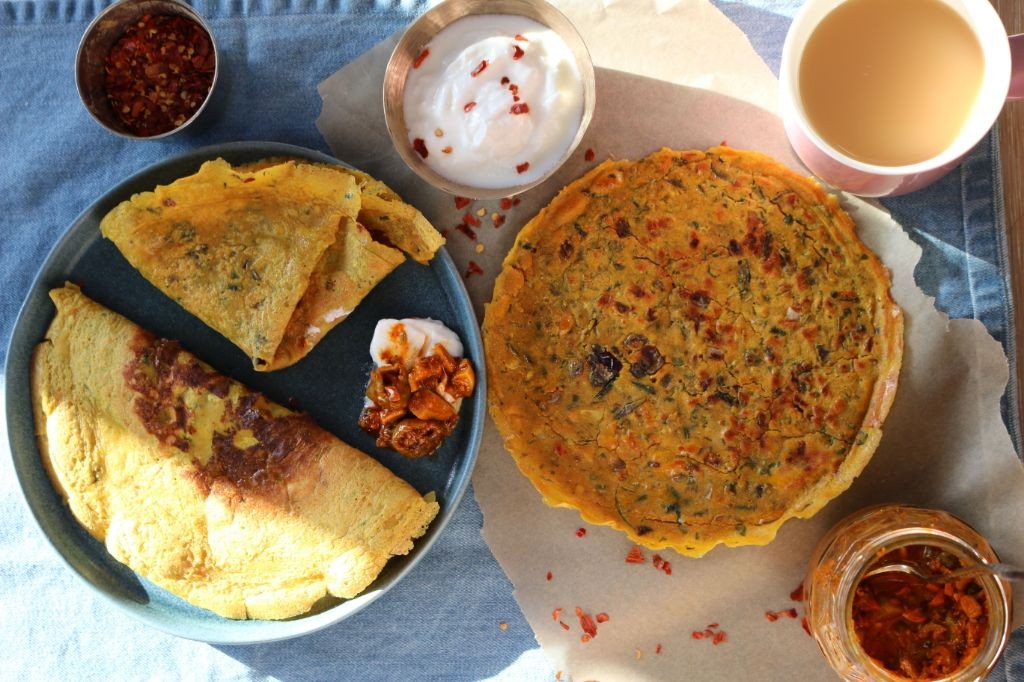
Remember those lazy weekend mornings when you want something wholesome but don’t feel like putting in hours of effort? That’s exactly when my Besan Chilla obsession began—these savory chickpea pancakes come together in minutes yet feel like a proper meal, satisfying that craving for something both light and substantial.
Ingredients
– 1 cup besan (chickpea flour) – I always keep this stocked for impromptu meals
– ¾ cup water – room temperature blends smoother with the flour
– ½ cup finely chopped red onion – the purple bits add such pretty color
– ¼ cup chopped fresh cilantro – my garden cilantro makes all the difference
– 1 finely chopped green chili – remove seeds if you’re heat-sensitive like me
– 1 teaspoon cumin seeds – toasty little flavor bombs
– ½ teaspoon turmeric powder – for that golden sunshine color
– ¼ teaspoon red chili powder – just enough for gentle warmth
– 2 tablespoons vegetable oil – my trusty cast iron loves this
– Salt to taste – I use about ¾ teaspoon
Instructions
1. Place 1 cup besan in a medium mixing bowl.
2. Gradually add ¾ cup water while whisking continuously to prevent lumps from forming.
3. Whisk the batter for exactly 1 minute until completely smooth and the consistency of heavy cream.
4. Stir in ½ cup chopped red onion, ¼ cup cilantro, 1 chopped green chili, 1 teaspoon cumin seeds, ½ teaspoon turmeric, ¼ teaspoon red chili powder, and salt.
5. Let the batter rest for 10 minutes – this allows the flour to fully hydrate.
6. Heat a non-stick skillet over medium heat and add ½ tablespoon vegetable oil.
7. Pour ¼ cup batter into the center of the pan and immediately swirl to form a 6-inch circle.
8. Cook for 2-3 minutes until the edges look dry and the surface appears matte.
9. Drizzle ½ teaspoon oil around the edges and flip carefully using a thin spatula.
10. Cook the second side for 2 minutes until golden brown spots appear.
11. Transfer to a plate and repeat with remaining batter, adding oil between each chilla.
You’ll love how the edges get delightfully crisp while the center stays soft and almost custardy. Yesterday I served these folded around some avocado slices and hot sauce for the perfect breakfast wrap—they’re equally fantastic with a dollop of yogurt or chutney for dipping.
Besan Cheela with Spicy Mint Chutney

Perfect for those busy mornings when you want something savory and satisfying but don’t have hours to spend in the kitchen, this Besan Cheela with Spicy Mint Chutney has become my go-to breakfast hack. I first discovered this gem during a chaotic week when my usual oatmeal routine felt too bland, and now it’s my secret weapon for impressing weekend guests with minimal effort.
Ingredients
- 1 cup besan (gram flour) – I always sift mine first to avoid lumps, trust me on this!
- ½ cup finely chopped red onion – the vibrant color makes such a difference
- ¼ cup chopped fresh cilantro – my garden overflows with it in summer
- 1 chopped green chili – adjust based on your heat tolerance, I use serrano
- ½ tsp turmeric powder – for that gorgeous golden hue
- ½ tsp cumin seeds – toasted lightly first for maximum aroma
- ¾ cup water – room temperature works best for smooth batter
- 2 tbsp vegetable oil – divided for cooking, I use avocado oil for its high smoke point
- 1 cup fresh mint leaves – packed, from my windowsill herb garden
- ½ cup plain yogurt – full-fat gives the creamiest texture
- 1 small garlic clove – because everything’s better with garlic
- 1 tbsp lemon juice – freshly squeezed, never bottled
- ¼ tsp salt – fine sea salt dissolves perfectly
Instructions
- Combine besan, red onion, cilantro, green chili, turmeric, and cumin seeds in a medium bowl.
- Gradually add water while whisking continuously until you achieve a smooth, lump-free batter with pancake-like consistency.
- Let the batter rest for 10 minutes – this hydrates the flour and prevents tearing during cooking.
- Meanwhile, blend mint leaves, yogurt, garlic, lemon juice, and salt in a food processor until completely smooth, about 45 seconds.
- Transfer chutney to a small bowl and refrigerate while cooking the cheelas.
- Heat 1 teaspoon oil in a non-stick skillet over medium heat until shimmering, about 2 minutes.
- Pour ¼ cup batter into the center of the skillet and immediately swirl to form a 6-inch circle.
- Cook for 2-3 minutes until the edges lift easily and the surface appears dry with small bubbles.
- Flip carefully using a thin spatula and cook for another 1-2 minutes until golden brown spots appear.
- Transfer to a plate and repeat with remaining batter, adding remaining oil between batches.
But what truly makes this dish special is the textural contrast between the slightly crispy edges and soft center of the cheela against the cool, creamy chutney. I love serving these stacked high with extra chutney for dipping, though they’re equally delicious rolled up burrito-style for an on-the-go breakfast that feels anything but rushed.
Besan Barfi (Chickpea Flour Fudge)
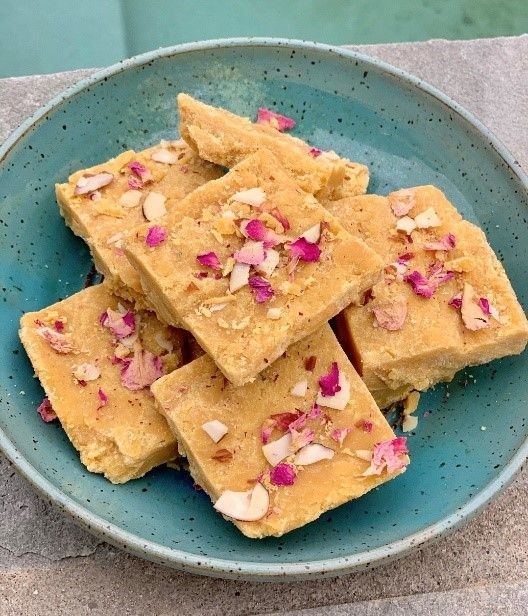
Every time I make this traditional Indian sweet, it takes me right back to my grandmother’s kitchen during Diwali celebrations. She’d always have a batch of besan barfi cooling on the counter, filling the entire house with the warm, nutty aroma of roasting chickpea flour. I’ve since adapted her recipe to my own kitchen habits, and it’s become my go-to dessert when I want something sweet but not overly rich.
Ingredients
- 2 cups besan (chickpea flour) – I always buy the fine-textured variety for smoother barfi
- 1 cup ghee – clarified butter gives that authentic richness, though you could use unsalted butter in a pinch
- 1 cup granulated sugar – I find this gives the perfect sweetness without being cloying
- ½ cup whole milk – room temperature works best for even mixing
- ¼ cup chopped pistachios – these add such a lovely color contrast and crunch
- 1 teaspoon cardamom powder – freshly ground makes all the difference in aroma
Instructions
- Heat a heavy-bottomed pan over medium-low heat (around 300°F) and add the ghee.
- Once the ghee melts completely, add the besan and begin roasting, stirring continuously with a wooden spatula.
- Cook the besan mixture for 12-15 minutes, until it turns golden brown and releases a nutty fragrance – this slow roasting is crucial for developing flavor.
- Add the sugar to the roasted besan and mix thoroughly until well combined.
- Pour in the milk gradually while stirring constantly to prevent lumps from forming.
- Continue cooking the mixture for another 8-10 minutes, stirring continuously, until it thickens and starts to pull away from the sides of the pan.
- Mix in the cardamom powder and stir for 1 minute to distribute the flavor evenly.
- Quickly transfer the hot mixture to a greased 8×8 inch square pan and spread it evenly with a spatula.
- Sprinkle the chopped pistachios evenly over the surface and press them gently into the barfi.
- Let the barfi cool completely at room temperature for about 2 hours until firm to the touch.
- Cut the cooled barfi into 1-inch squares using a sharp knife for clean edges.
You’ll love the firm yet melt-in-your-mouth texture of these golden squares, with the cardamom’s floral notes balancing the earthy chickpea flour perfectly. I sometimes serve them alongside masala chai for an afternoon treat, or arrange them on a platter with other Indian sweets when we have guests over. They keep beautifully in an airtight container for up to a week – if they last that long in your house!
Besan Puda (Spicy Chickpea Flour Pancakes)
Last week, I was craving something savory and satisfying but didn’t want to spend hours in the kitchen—that’s when I remembered my grandmother’s brilliant Besan Puda recipe. These spicy chickpea flour pancakes come together in minutes and always hit the spot when I need a quick, flavorful meal that feels both comforting and exciting.
Ingredients
– 1 cup chickpea flour (I always sift mine first to avoid lumps—it makes such a difference in texture)
– ¾ cup water (room temperature works best for smooth batter)
– 1 small onion, finely chopped (I love the sweet crunch it adds)
– 1 green chili, minced (adjust to your heat preference—I usually go for one medium one)
– 2 tablespoons fresh cilantro, chopped (fresh from my little herb garden when possible)
– ½ teaspoon turmeric powder (for that gorgeous golden color)
– ½ teaspoon red chili powder (this gives it that signature kick)
– ½ teaspoon cumin seeds (toasting them lightly first really amplifies the flavor)
– ¼ teaspoon baking soda (my secret for extra fluffiness)
– Salt to taste (I start with ½ teaspoon and adjust)
– 2 tablespoons vegetable oil (for cooking—avocado oil works great too)
Instructions
1. Combine chickpea flour, turmeric powder, red chili powder, cumin seeds, baking soda, and salt in a medium mixing bowl.
2. Gradually add water while whisking continuously until you achieve a smooth, lump-free batter with a pouring consistency similar to heavy cream.
3. Fold in the chopped onion, minced green chili, and fresh cilantro until evenly distributed throughout the batter.
4. Let the batter rest for 10 minutes at room temperature—this allows the flour to fully hydrate and results in more tender pancakes.
5. Heat a non-stick skillet or griddle over medium heat (350°F) and lightly brush with ½ tablespoon of vegetable oil.
6. Pour ¼ cup of batter onto the hot skillet and immediately spread it into a 6-inch circle using the back of your ladle.
7. Cook for 2-3 minutes until the edges appear dry and small bubbles form across the surface.
8. Drizzle ½ teaspoon of oil around the edges of the pancake.
9. Flip the pancake carefully using a wide spatula and cook for another 2 minutes until golden brown spots appear on the second side.
10. Transfer to a plate and repeat with remaining batter, adding more oil to the skillet as needed between batches.
Nothing beats the crisp edges giving way to that soft, savory interior packed with aromatic spices. I love serving these piping hot with a dollop of cool yogurt or tangy tamarind chutney for the perfect temperature contrast—they’re equally fantastic rolled up with fresh salad greens for a quick wrap lunch.
Besan Sheera (Chickpea Flour Sweet Porridge)
Very few desserts transport me back to my grandmother’s kitchen like this golden-hued Indian sweet. I first tasted Besan Sheera during Diwali celebrations at my neighbor’s house, and the warm, nutty aroma instantly won me over. Now I make it whenever I need a quick comfort food fix that feels both exotic and familiar.
Ingredients
– 1 cup chickpea flour (I always sift mine first to avoid lumps)
– ½ cup ghee (the good quality clarified butter makes all the difference)
– ¾ cup granulated sugar (adjust based on your sweet tooth)
– 2 cups whole milk (room temperature blends better)
– ¼ cup chopped almonds (toasted for extra crunch)
– ¼ cup golden raisins (plump ones work best)
– ½ teaspoon cardamom powder (freshly ground if possible)
– Pinch of saffron strands (my secret for that gorgeous color)
Instructions
1. Heat a heavy-bottomed pan over medium-low heat for 2 minutes until evenly warm.
2. Add ½ cup ghee to the pan and let it melt completely, about 1 minute.
3. Pour 1 cup chickpea flour into the melted ghee, stirring immediately with a whisk.
4. Roast the flour mixture for 12-15 minutes, stirring constantly, until it turns golden brown and releases a nutty fragrance.
5. Slowly pour 2 cups whole milk into the roasted flour while whisking vigorously to prevent lumps.
6. Cook the mixture for 8-10 minutes, stirring frequently, until it thickens to pudding consistency.
7. Sprinkle ¾ cup granulated sugar into the thickened mixture and stir until fully dissolved, about 2 minutes.
8. Add ¼ cup chopped almonds, ¼ cup golden raisins, ½ teaspoon cardamom powder, and a pinch of saffron strands.
9. Continue cooking for 3-4 more minutes until the sheera pulls away from the pan sides.
10. Remove from heat and let rest for 5 minutes before serving.
Creamy yet granular, this sheera delivers the most comforting texture that melts on your tongue. The cardamom and saffron create this beautiful floral note that plays perfectly against the nutty chickpea base. I love serving it warm in small clay pots topped with extra toasted almonds for that perfect crunch contrast.
Besan Sabzi (Chickpea Flour Stir-Fry)
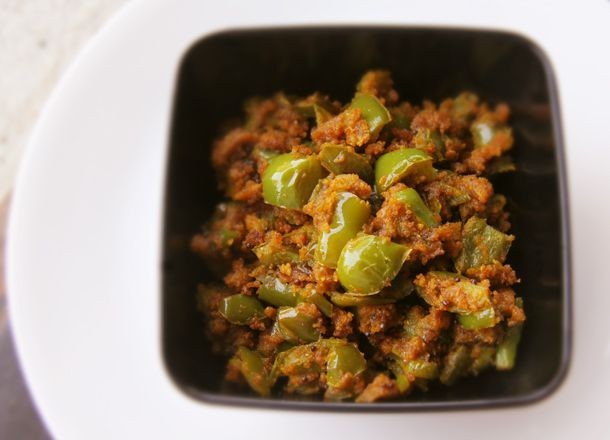
Yesterday, I was craving something quick, flavorful, and vegetarian for lunch, and this Besan Sabzi totally hit the spot. It’s a simple Indian stir-fry where chickpea flour transforms into these incredible, savory nuggets—so satisfying and ready in under 30 minutes.
Ingredients
– 1 cup besan (chickpea flour)—I always sift mine to avoid lumps, a little trick from my grandma.
– 1 medium yellow onion, finely chopped—I like the sweetness it adds when cooked slowly.
– 2 tablespoons vegetable oil—my trusty cast-iron skillet loves this for even heating.
– 1 teaspoon cumin seeds—toasting them first makes the kitchen smell amazing.
– 1/2 teaspoon turmeric powder—for that warm, golden color.
– 1/2 teaspoon red chili powder—adjust based on your heat preference, but I keep it mild for my kids.
– 1/2 cup water—room temp works best to avoid clumping.
– Salt, 1 teaspoon—I use fine sea salt for even distribution.
Instructions
1. Heat 2 tablespoons of vegetable oil in a large skillet over medium heat (around 350°F).
2. Add 1 teaspoon of cumin seeds and toast for 30 seconds until fragrant and slightly darker.
3. Tip: Swirl the pan gently to prevent burning—this unlocks their nutty flavor.
4. Add 1 finely chopped medium yellow onion and sauté for 5–7 minutes until soft and translucent.
5. Stir in 1/2 teaspoon turmeric powder and 1/2 teaspoon red chili powder, cooking for 1 minute to bloom the spices.
6. Gradually sprinkle 1 cup of sifted besan into the skillet, stirring constantly to coat with the onion-spice mixture.
7. Tip: Use a whisk here to break up any flour clumps for a smoother texture.
8. Cook the besan for 4–5 minutes, stirring frequently, until it turns golden brown and smells nutty.
9. Slowly pour in 1/2 cup of room temperature water while stirring to form a thick, lump-free paste.
10. Add 1 teaspoon of salt and mix thoroughly until combined.
11. Reduce heat to low, cover the skillet, and let it cook for 8–10 minutes, stirring halfway through.
12. Tip: The sabzi is done when it pulls away from the sides of the pan and holds its shape.
13. Remove from heat and let it rest for 2 minutes before serving.
Hearty and crumbly, this sabzi has a cozy, nutty flavor with a hint of spice from the cumin. I love scooping it up with warm roti or pairing it with steamed rice for a simple, comforting meal that feels like a hug in a bowl.
Besan Puri (Deep-Fried Chickpea Flour Bread)
Crispy, golden, and impossibly addictive—these besan puris have become my go-to snack whenever I crave something savory and satisfying. I first discovered them during a friend’s Diwali celebration last year, and after one bite of that flaky, spiced goodness, I knew I had to master making them at home. Now they’re my secret weapon for impressing guests or treating myself on a lazy weekend afternoon.
Ingredients
– 2 cups chickpea flour (I always sift mine first—it makes the dough so much smoother)
– 1/4 cup whole wheat flour (this helps create that perfect crispy-yet-tender texture)
– 1 teaspoon cumin seeds (toasted lightly for maximum aroma)
– 1/2 teaspoon red chili powder (adjust based on your heat preference)
– 1/4 teaspoon turmeric powder (for that beautiful golden color)
– 1/2 teaspoon ajwain seeds (my secret ingredient for digestive ease)
– 3 tablespoons vegetable oil (plus extra for deep frying—I keep my oil at 350°F)
– 1/2 cup warm water (approximately—the dough tells you when it’s enough)
– Salt to taste (I use about 1 teaspoon)
Instructions
1. Combine 2 cups sifted chickpea flour, 1/4 cup whole wheat flour, 1 teaspoon cumin seeds, 1/2 teaspoon red chili powder, 1/4 teaspoon turmeric powder, 1/2 teaspoon ajwain seeds, and 1 teaspoon salt in a large mixing bowl.
2. Add 3 tablespoons vegetable oil to the dry ingredients and rub between your palms until the mixture resembles coarse breadcrumbs.
3. Gradually add 1/2 cup warm water while kneading, stopping when the dough comes together without sticking to your hands.
4. Cover the dough with a damp cloth and let it rest for 20 minutes at room temperature.
5. Heat vegetable oil in a deep pan to 350°F, verified using a kitchen thermometer.
6. Divide the dough into 12 equal portions and roll each into smooth balls.
7. Roll each ball into a 3-inch circle about 1/8-inch thick on a lightly floured surface.
8. Carefully slide one puri into the hot oil—it should sizzle immediately upon contact.
9. Fry for 30 seconds, then gently press down with a slotted spoon to help it puff.
10. Flip the puri after 45 seconds when the bottom turns golden brown.
11. Fry the second side for another 45 seconds until evenly golden and crisp.
12. Remove with a slotted spoon and drain on paper towels.
13. Repeat with remaining dough balls, maintaining oil temperature at 350°F.
Just out of the fryer, these puris are sheer perfection—crisp exteriors giving way to tender, spiced interiors that practically melt in your mouth. I love serving them stacked high with tangy tamarind chutney for dipping, though they’re equally fantastic crumbled over yogurt or paired with a steaming cup of masala chai for the ultimate comfort snack.
Besan Chutney (Spicy Chickpea Flour Dip)
Oh my goodness, you guys—I first tried this incredible Besan Chutney at my friend Priya’s Diwali party last year, and I’ve been obsessed ever since. It’s that magical dip that disappears within minutes, leaving everyone asking for the recipe. Honestly, it’s become my go-to for potlucks because it’s so easy to whip up and always impresses.
Ingredients
– 1 cup besan (chickpea flour) – I always sift mine first to avoid lumps, a little trick I picked up from my mom.
– 2 tablespoons vegetable oil – nothing fancy, just your basic neutral oil works perfectly here.
– 1 teaspoon cumin seeds – toasting these lightly beforehand really wakes up their flavor.
– 2-3 dried red chilies, broken into pieces – adjust based on your heat tolerance; I like it spicy so I go for three.
– 1/2 teaspoon turmeric powder – it gives such a warm, golden hue to the dip.
– 1/2 cup plain yogurt – I use full-fat for creaminess, but Greek yogurt works too if you want it thicker.
– 1 1/2 cups water – room temperature is best to prevent the besan from seizing up.
– 1 teaspoon salt – I find this amount balances the spices nicely, but you can tweak it later.
– 1 tablespoon lemon juice – fresh-squeezed is key here; it brightens everything up.
– 2 tablespoons chopped fresh cilantro – I toss in a little extra because I love the fresh, herby kick.
Instructions
1. Heat 2 tablespoons of vegetable oil in a medium saucepan over medium heat.
2. Add 1 teaspoon of cumin seeds and sauté for 30 seconds until they start to sizzle and become fragrant.
3. Stir in 2-3 broken dried red chilies and cook for another 30 seconds to release their spiciness.
4. Reduce the heat to low and gradually whisk in 1 cup of besan, toasting it for 3-4 minutes while stirring constantly until it turns light golden and smells nutty—this prevents a raw flour taste.
5. Mix in 1/2 teaspoon of turmeric powder and 1 teaspoon of salt, stirring for 30 seconds to combine evenly.
6. Slowly pour in 1 1/2 cups of water while whisking continuously to avoid lumps forming.
7. Increase the heat to medium and cook the mixture for 5-7 minutes, stirring often, until it thickens to a gravy-like consistency.
8. Remove the saucepan from the heat and let it cool for 5 minutes to prevent the yogurt from curdling.
9. Whisk in 1/2 cup of plain yogurt until smooth and fully incorporated.
10. Stir in 1 tablespoon of lemon juice and 2 tablespoons of chopped fresh cilantro.
11. Transfer the chutney to a serving bowl and let it sit for 10 minutes to allow the flavors to meld.
Now that creamy, spicy dip is ready to steal the show. Nothing beats that silky texture with a kick from the chilies and the freshness of cilantro. Try it as a bold spread on sandwiches or dolloped over grilled veggies—it’s seriously versatile.
Besan Ladoo with Nuts and Raisins
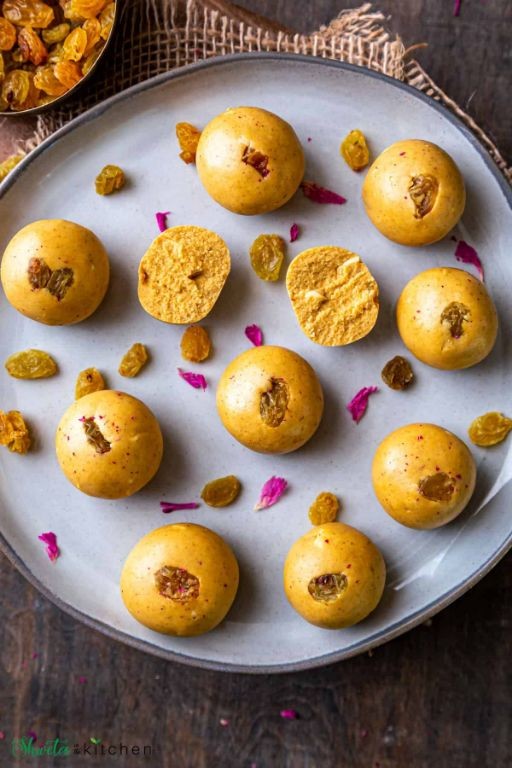
Unexpectedly, this Besan Ladoo recipe became my go-to comfort sweet during those chilly autumn evenings when I crave something warm and nutty. My grandmother would always say the secret was in roasting the flour just right—not too pale, not too dark—and I’ve carried that wisdom with me ever since.
Ingredients
– 2 cups besan (chickpea flour) – I always use the fine-textured variety for that melt-in-mouth quality
– 1 cup ghee – clarified butter gives it that authentic richness, and I prefer the homemade kind when I have time
– 1 cup powdered sugar – sifting is key here to avoid any lumps
– 1/4 cup chopped almonds – I like to toast them lightly first for extra crunch
– 1/4 cup chopped cashews – these add such a lovely buttery note
– 2 tbsp golden raisins – they plump up beautifully during cooking
– 1/2 tsp cardamom powder – freshly ground makes all the difference
Instructions
1. Heat a heavy-bottomed pan over medium-low heat for 2 minutes until evenly warm.
2. Add 2 cups besan to the dry pan and begin roasting, stirring continuously with a wooden spatula.
3. Roast for 8-10 minutes until the flour turns golden brown and releases a nutty aroma—this is the most crucial step for flavor development.
4. Add 1 cup ghee to the roasted besan and mix thoroughly until well combined.
5. Continue cooking the mixture over low heat for 12-15 minutes, stirring constantly to prevent burning.
6. Cook until the ghee begins to separate from the sides of the pan and the mixture darkens to a deep golden color.
7. Remove the pan from heat and let the mixture cool for 20 minutes until warm but not hot to touch.
8. Add 1 cup powdered sugar to the cooled mixture and mix until fully incorporated.
9. Stir in 1/4 cup chopped almonds, 1/4 cup chopped cashews, 2 tbsp golden raisins, and 1/2 tsp cardamom powder.
10. Take small portions of the mixture and shape into round ladoos using your palms while the mixture is still warm.
11. Let the ladoos cool completely at room temperature for 1 hour before serving.
These ladoos have the most beautiful crumbly texture that just melts in your mouth, with the toasted nuts providing wonderful contrast. The cardamom and ghee create this warm, aromatic flavor that’s perfect with afternoon chai, and I love storing them in an airtight container—they actually get better after a day when the flavors have fully melded together.
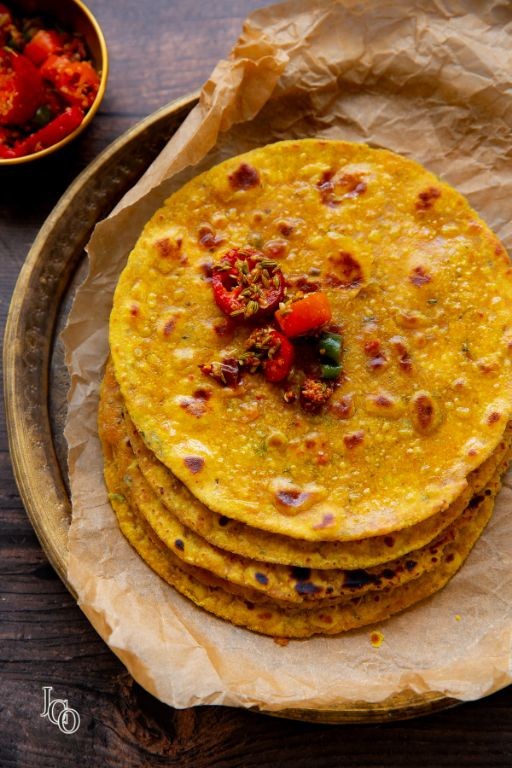
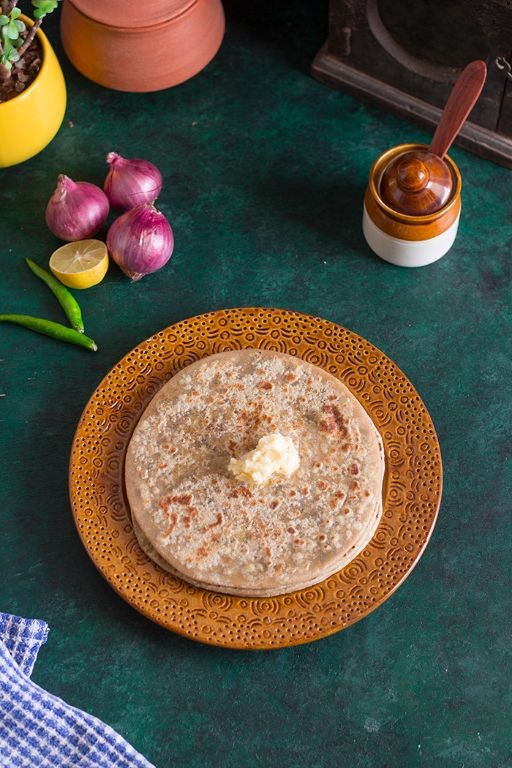
Besan Paratha (Stuffed Chickpea Flour Flatbread)
Nothing transports me back to my grandmother’s kitchen quite like the earthy aroma of besan parathas sizzling on the griddle. I remember watching her deft hands stuff the dough with that golden chickpea flour mixture, creating these incredible flatbreads that were crispy outside yet soft within. Even now, making them fills my tiny apartment with the same comforting smells that make me feel instantly at home.
Ingredients
- 2 cups whole wheat flour (I always use organic—it gives the best texture)
- 1 cup chickpea flour (besan—make sure it’s fresh for that nutty flavor)
- 1 teaspoon cumin seeds (toasted lightly first for maximum aroma)
- 1 finely chopped green chili (remove seeds if you prefer less heat like I do)
- 2 tablespoons chopped fresh cilantro (from my little windowsill herb garden)
- 1/2 teaspoon turmeric powder (for that beautiful golden color)
- 1/2 teaspoon red chili powder (adjust to your preferred spice level)
- Salt to taste (I use about 1 teaspoon for balanced flavor)
- 3/4 cup warm water (around 110°F—warm but not hot to the touch)
- 4 tablespoons ghee or oil for cooking (ghee gives that authentic richness)
Instructions
- Combine 2 cups whole wheat flour with 1/2 cup warm water in a large mixing bowl.
- Knead the mixture for 5 minutes until it forms a smooth, pliable dough ball that springs back when pressed.
- Cover the dough with a damp kitchen towel and let it rest for 20 minutes at room temperature.
- While dough rests, mix 1 cup chickpea flour, 1 teaspoon cumin seeds, 1 chopped green chili, 2 tablespoons cilantro, 1/2 teaspoon turmeric, 1/2 teaspoon red chili powder, and 1 teaspoon salt in a separate bowl.
- Add remaining 1/4 cup warm water to the chickpea flour mixture and stir until it forms a thick, spreadable paste.
- Divide the rested dough into 8 equal portions and roll each into smooth balls.
- Take one dough ball and flatten it into a 4-inch disc using your palms.
- Place 2 tablespoons of the chickpea filling in the center of the disc, leaving a 1/2-inch border empty.
- Gather the edges of the disc and pinch them together to completely enclose the filling, forming a sealed ball.
- Gently flatten the stuffed ball with your palm, being careful not to tear the dough.
- Lightly dust your work surface with dry flour and roll the stuffed disc into a 7-inch circle about 1/8-inch thick.
- Heat a cast-iron skillet or tawa over medium heat until a drop of water sizzles immediately (about 350°F).
- Place one rolled paratha on the hot skillet and cook for 90 seconds until small bubbles appear on the surface.
- Flip the paratha using a spatula and cook the other side for another 90 seconds.
- Spread 1/2 tablespoon ghee evenly over the surface of the paratha.
- Flip again and cook for 60 seconds, pressing gently with the spatula to ensure even browning.
- Spread another 1/2 tablespoon ghee on the second side and cook for final 60 seconds until golden brown spots appear.
- Transfer the cooked paratha to a plate and repeat the cooking process with remaining stuffed discs.
Perfectly cooked besan parathas should have that satisfying crisp exterior that gives way to a soft, flavorful interior with the chickpea filling distributed evenly throughout. I love serving them hot off the griddle with a dollop of cool yogurt and some tangy mango pickle—the contrast of temperatures and flavors makes each bite absolutely irresistible. Sometimes I’ll even crumble one over a fresh salad for an unexpected crunchy element that transforms an ordinary lunch into something special.
Besan Sev (Crunchy Chickpea Flour Noodles)

Sometimes the most satisfying snacks come from the simplest ingredients, and that’s exactly what I discovered when I first tried making besan sev at home. I remember watching my friend’s grandmother effortlessly press these golden noodles through a sev maker while telling stories of her childhood in India, and I knew I had to learn this magical technique myself. Now it’s become my go-to crunchy snack for movie nights and gatherings—far superior to any store-bought version.
Ingredients
– 2 cups chickpea flour (I always sift mine first to avoid lumps)
– 1/4 cup rice flour (this is my secret for extra crispiness)
– 1 teaspoon turmeric powder (for that beautiful golden color)
– 1/2 teaspoon red chili powder (adjust based on your heat preference)
– 1 teaspoon carom seeds (ajwain – these add such a distinctive aroma)
– 1/2 cup warm water (I test it with my finger – should be comfortably warm)
– 3 tablespoons vegetable oil (plus extra for frying)
– 1/2 teaspoon baking soda (my trick for lighter texture)
– Salt to taste (I use about 1 1/2 teaspoons)
Instructions
1. Sift 2 cups chickpea flour and 1/4 cup rice flour into a large mixing bowl.
2. Add 1 teaspoon turmeric powder, 1/2 teaspoon red chili powder, 1 teaspoon carom seeds, 1/2 teaspoon baking soda, and salt to the flour mixture.
3. Mix all dry ingredients thoroughly with a whisk until evenly combined.
4. Drizzle 3 tablespoons vegetable oil into the dry mixture while stirring continuously.
5. Rub the oil into the flour mixture with your fingertips until it resembles coarse breadcrumbs.
6. Gradually add 1/2 cup warm water while kneading to form a stiff, smooth dough.
7. Cover the dough with a damp cloth and let it rest for 15 minutes.
8. Heat 4 cups of vegetable oil in a deep kadai or heavy-bottomed pot to 350°F.
9. Fill a sev maker with the dough using the plate with medium-sized holes.
10. Press the sev maker directly over the hot oil in circular motions to form noodle shapes.
11. Fry the besan sev for 2-3 minutes until they turn golden brown and stop sizzling.
12. Use a slotted spoon to remove the fried seh sev from the oil.
13. Drain the besan sev on paper towels to remove excess oil.
14. Let the besan sev cool completely to room temperature before storing.
15. Break the cooled besan sev into smaller pieces if desired.
Perfectly crisp and lightly spiced, these golden noodles deliver an addictive crunch that keeps you reaching for more. I love sprinkling them over chaat or simply enjoying them straight from the bowl while they’re still slightly warm. They store beautifully in airtight containers and make the most satisfying snack for those late-night cravings.
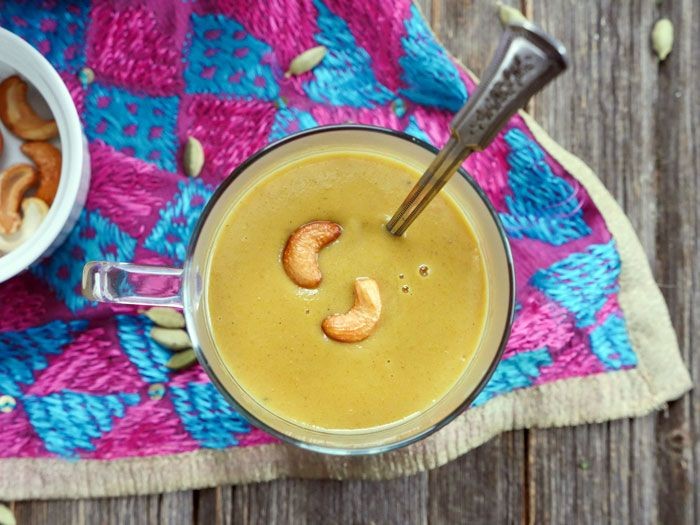
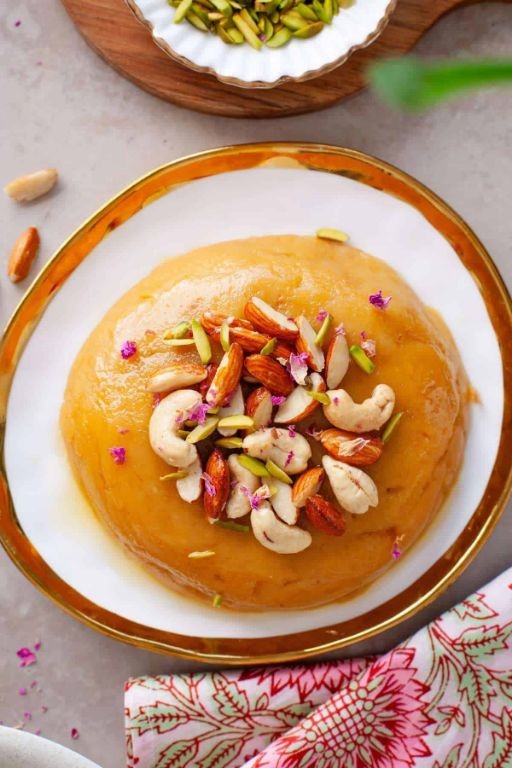
Besan Halwa with Cardamom and Saffron
Perfect for chilly autumn evenings, this Besan Halwa has become my go-to comfort dessert ever since my neighbor shared her family recipe last Diwali. There’s something magical about how simple chickpea flour transforms into such a luxurious, fragrant treat that fills your kitchen with the most incredible aroma.
Ingredients
- 1 cup besan (chickpea flour) – I always look for the fine-textured variety, which gives the halwa that velvety smoothness I love
- ½ cup ghee – my grandmother swore by homemade ghee, but good quality store-bought works beautifully too
- ¾ cup granulated sugar – I sometimes reduce this slightly if I want it less sweet
- 1 cup whole milk – room temperature milk prevents any curdling when you add it to the hot mixture
- ½ tsp cardamom powder – I freshly grind the pods for the most intense floral notes
- ¼ tsp saffron strands – soak these in 1 tbsp warm milk first to really release their golden color and aroma
- 2 tbsp sliced almonds – for that satisfying crunch contrast
- 2 tbsp chopped pistachios – I keep some extra for garnish because they make the halwa look so festive
Instructions
- Heat the ghee in a heavy-bottomed pan over medium-low heat (about 300°F) until melted.
- Add the besan to the pan and begin roasting, stirring continuously with a wooden spoon to prevent burning.
- Continue roasting the besan for 12-15 minutes until it turns golden brown and releases a nutty aroma – this is the most crucial step for developing flavor.
- Gradually pour in the milk while stirring constantly to prevent lumps from forming.
- Cook the mixture for 3-4 minutes, stirring continuously, until it thickens slightly.
- Add the sugar and mix thoroughly until completely dissolved.
- Stir in the cardamom powder and saffron-infused milk mixture.
- Continue cooking for 5-7 minutes, stirring frequently, until the halwa pulls away from the sides of the pan and forms a soft mass.
- Remove from heat and let it rest for 2 minutes to allow the flavors to meld.
- Garnish with sliced almonds and chopped pistachios before serving.
Fragrant and comforting, this halwa develops the most wonderful fudge-like texture as it cools slightly. The cardamom and saffron create this beautiful floral symphony that pairs perfectly with the nutty besan base – I love serving it warm in small clay bowls with an extra sprinkle of pistachios for that restaurant-worthy presentation.
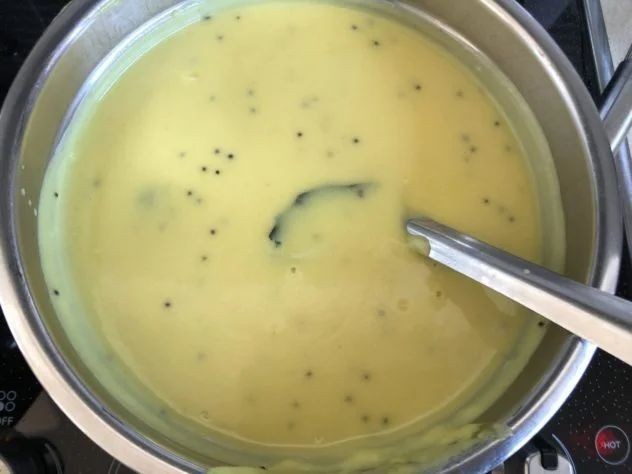
Besan Dosa (Chickpea Flour Crepes)

Remember that time I was craving dosas but didn’t have time to ferment traditional batter? That’s when I discovered besan dosas – these chickpea flour crepes have become my weekday breakfast savior, ready in minutes and packed with protein that keeps me full until lunch.
Ingredients
– 1 cup besan (chickpea flour) – I love Bob’s Red Mill brand for its fine texture
– ¾ cup water – room temperature works best for smooth batter
– ¼ cup finely chopped red onion – the purple color makes these so pretty
– 1 chopped green chili – remove seeds if you’re heat-sensitive like me
– 2 tbsp chopped cilantro – fresh from my little kitchen herb garden
– ½ tsp cumin seeds – toasted lightly first for maximum aroma
– ¼ tsp turmeric powder – just enough for that golden hue
– 2 tbsp vegetable oil – divided for cooking, I use avocado oil for its high smoke point
– Salt to taste – I prefer about ¾ tsp for balanced flavor
Instructions
1. Combine 1 cup besan, ¾ cup water, ¼ tsp turmeric, and ¾ tsp salt in a medium bowl.
2. Whisk vigorously for 2 minutes until completely smooth with no lumps.
3. Stir in ¼ cup chopped red onion, 1 chopped green chili, 2 tbsp cilantro, and ½ tsp cumin seeds.
4. Let the batter rest for 10 minutes – this helps the flour hydrate properly.
5. Heat a non-stick skillet over medium heat until water droplets sizzle immediately.
6. Lightly grease the pan with ½ tsp oil using a paper towel.
7. Pour ¼ cup batter into the center and quickly swirl to form a 6-inch circle.
8. Drizzle ½ tsp oil around the edges and cook for 2-3 minutes until the surface looks dry.
9. Flip carefully using a thin spatula when the bottom is golden brown with crisp edges.
10. Cook the second side for 1-2 minutes until lightly spotted.
11. Transfer to a plate and repeat with remaining batter, greasing pan between each dosa.
Light and lacy with crispy edges, these besan dosas have a subtle nutty flavor that pairs beautifully with coconut chutney or even just a squeeze of lime. I sometimes roll them up with avocado slices for a quick lunch wrap – the possibilities are endless with this versatile base!