Everyone deserves a little indulgence, and what better way to treat yourself than with rich, creamy fudge? Whether you’re a seasoned candy maker or trying your hand at homemade sweets for the first time, these decadent recipes promise to satisfy your sweet tooth. From classic chocolate to inventive flavor twists, get ready to discover your new favorite treat. Let’s dive into these irresistible fudge creations!
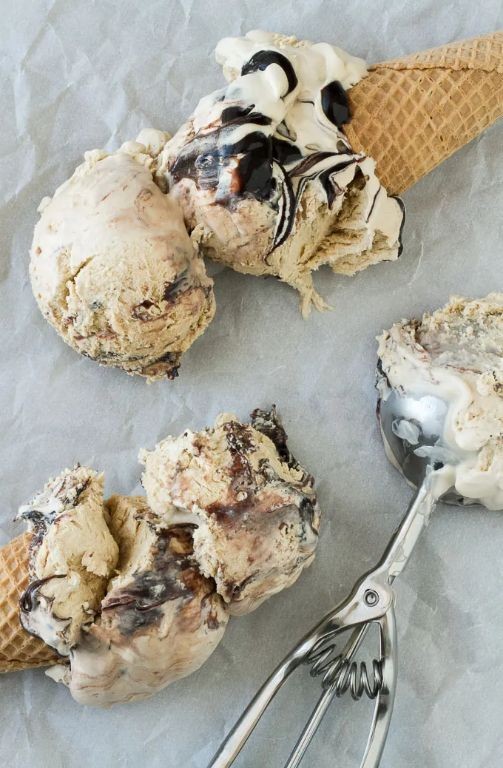
Classic Chocolate Walnut Fudge
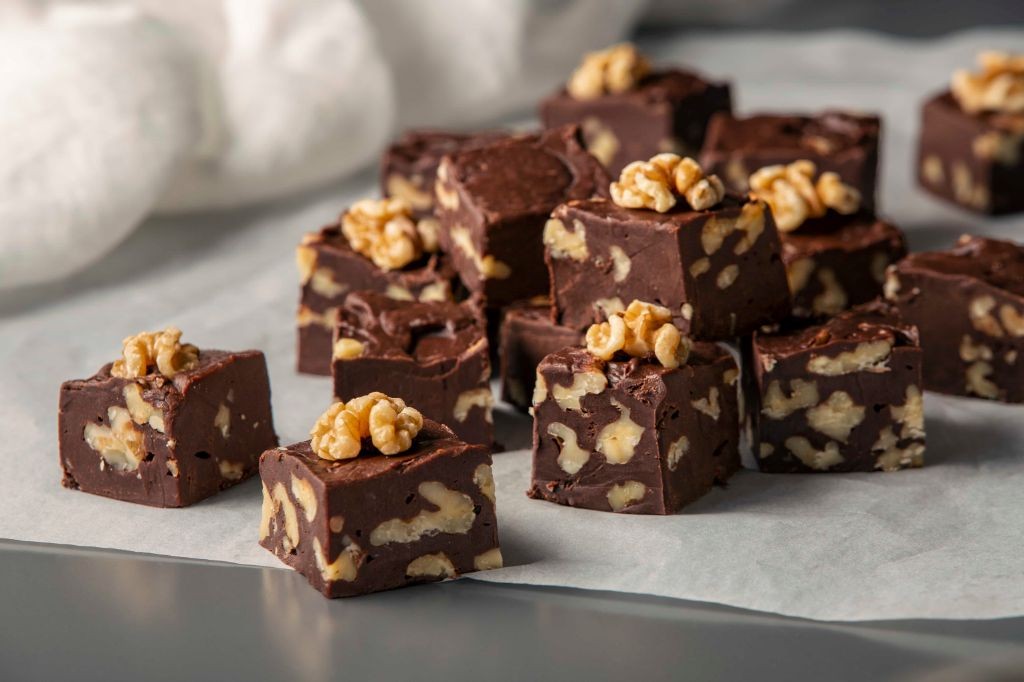
Beneath the quiet hum of the kitchen, there’s something deeply comforting about melting chocolate, about the slow transformation of simple things into something rich and shared. This fudge feels like a quiet afternoon preserved in sweetness, a small indulgence that asks for nothing but patience and a gentle hand. It’s the kind of treat that fills the house with warmth, one careful step at a time.
Ingredients
– 3 cups granulated white sugar
– ¾ cup rich European-style butter
– ⅔ cup creamy evaporated milk
– 12 ounces high-quality semi-sweet chocolate chips
– 1 jar (7 ounces) velvety marshmallow crème
– 1 teaspoon pure vanilla extract
– 1 cup freshly toasted walnut pieces
Instructions
1. Line an 8×8-inch baking pan with parchment paper, allowing the edges to overhang for easy removal later.
2. Combine 3 cups granulated white sugar, ¾ cup rich European-style butter, and ⅔ cup creamy evaporated milk in a heavy-bottomed saucepan.
3. Place the saucepan over medium heat and stir continuously with a wooden spoon until the butter melts completely and the sugar dissolves, about 4–5 minutes.
4. Attach a candy thermometer to the side of the pan, ensuring the tip does not touch the bottom.
5. Bring the mixture to a rolling boil without stirring and cook until the thermometer reads 234°F (soft-ball stage), which should take about 8–10 minutes.
6. Remove the saucepan immediately from the heat and add 12 ounces high-quality semi-sweet chocolate chips, stirring gently until the chocolate is fully melted and the mixture is smooth.
7. Fold in 1 jar velvety marshmallow crème and 1 teaspoon pure vanilla extract until no white streaks remain.
8. Gently stir in 1 cup freshly toasted walnut pieces until evenly distributed throughout the fudge.
9. Pour the fudge into the prepared pan and spread it into an even layer with a spatula.
10. Let the fudge cool at room temperature for 2 hours until set but still slightly soft to the touch.
11. Chill the fudge in the refrigerator for 1 additional hour to firm up completely before slicing.
12. Use the parchment paper to lift the fudge from the pan and cut it into 1-inch squares with a sharp knife wiped clean between cuts for neat edges.
Glistening with a satin sheen, each square yields under gentle pressure, revealing a dense, melt-in-the-mouth texture that carries the deep, resonant notes of chocolate. The walnuts provide a welcome crunch, their toasty flavor cutting through the sweetness like autumn leaves underfoot. For a thoughtful touch, layer these squares between sheets of wax paper in a tin, or crumble them over vanilla ice cream while still slightly chilled, letting the fudge soften into a decadent sauce.
Peanut Butter Swirl Fudge
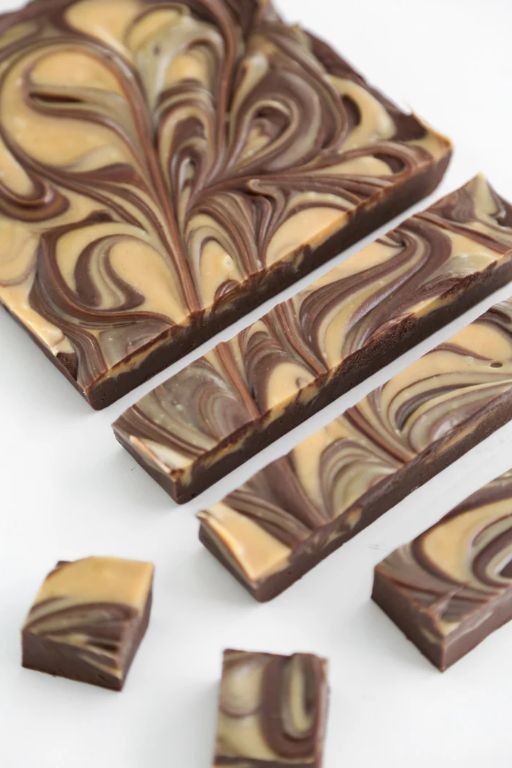
Musing on the quiet comfort that only homemade sweets can bring, I find myself returning to this peanut butter swirl fudge time and again. There’s something deeply soothing about watching those two rich flavors slowly dance together in the pan, then set into something you can hold in your hands. It feels like a small, sweet pause in the middle of a busy week.
Ingredients
– 3 cups of high-quality white granulated sugar
– ¾ cup of European-style salted butter, cold and cubed
– ⅔ cup of heavy whipping cream, fresh and chilled
– 1 cup of smooth, creamy peanut butter
– 1 teaspoon of pure vanilla extract, fragrant and warm
– 7 ounces of marshmallow crème, fluffy and light
– 1 cup of semi-sweet chocolate chips, rich and glossy
Instructions
1. Line an 8×8-inch baking pan with parchment paper, ensuring the paper hangs over two opposite sides for easy removal later.
2. Combine 3 cups of white granulated sugar, ¾ cup of cubed salted butter, and ⅔ cup of heavy whipping cream in a heavy-bottomed saucepan.
3. Place the saucepan over medium heat and stir continuously with a wooden spoon until the butter fully melts and the sugar dissolves completely, about 5–7 minutes.
4. Attach a candy thermometer to the side of the pan, making sure the tip does not touch the bottom, and bring the mixture to a boil without stirring.
5. Cook until the thermometer reads 234°F (soft-ball stage), which typically takes 8–10 minutes; the syrup will bubble vigorously and thicken slightly.
6. Remove the pan from heat immediately and stir in 1 cup of smooth peanut butter and 1 teaspoon of pure vanilla extract until fully incorporated and glossy.
7. Tip: Work quickly here to prevent the fudge from setting too soon, but be careful—the mixture is extremely hot.
8. Fold in 7 ounces of marshmallow crème gently until no white streaks remain and the mixture is smooth and pale.
9. Pour two-thirds of the peanut butter fudge into the prepared pan and spread it evenly with a spatula.
10. Melt 1 cup of semi-sweet chocolate chips in a microwave-safe bowl in 30-second intervals, stirring between each, until completely smooth and fluid.
11. Tip: Avoid overheating the chocolate, as it can seize and become grainy; if needed, add a teaspoon of vegetable oil to restore silkiness.
12. Pour the melted chocolate over the peanut butter layer in the pan and swirl gently with a knife to create marbled patterns.
13. Spread the remaining one-third of peanut butter fudge over the chocolate swirl layer, using the spatula to create a smooth top.
14. Let the fudge cool at room temperature for 30 minutes, then refrigerate for at least 2 hours until firm to the touch.
15. Tip: For clean cuts, use a sharp knife warmed under hot water and wiped dry between slices.
16. Lift the fudge from the pan using the parchment overhang and cut into 1-inch squares. Buttery and dense, this fudge melts slowly on the tongue with waves of salty peanut butter and deep chocolate. I love crumbling it over vanilla ice cream or wrapping squares in wax paper for a thoughtful homemade gift.
Salted Caramel Fudge
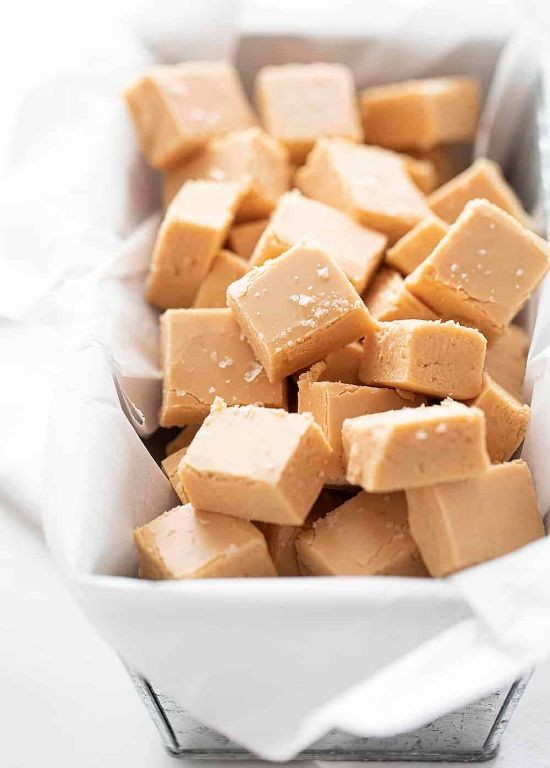
Pausing here in the quiet kitchen, I find myself drawn to the slow, deliberate art of fudge-making, where sugar transforms into something deeply comforting and rich with memory. There’s a particular magic in salted caramel fudge, a sweet that feels both nostalgic and wonderfully indulgent, perfect for quiet afternoons or sharing with someone dear.
Ingredients
– 2 cups granulated white sugar
– 1/2 cup rich, unsalted butter
– 1 cup velvety heavy cream
– 1 teaspoon pure vanilla extract
– 1/2 cup smooth, creamy caramel sauce
– 1 teaspoon flaky sea salt
Instructions
1. Line an 8×8-inch baking pan with parchment paper, ensuring the paper overhangs the edges for easy removal later.
2. Combine 2 cups granulated white sugar, 1/2 cup rich, unsalted butter, and 1 cup velvety heavy cream in a heavy-bottomed saucepan over medium heat.
3. Stir continuously with a wooden spoon until the butter melts completely and the sugar dissolves, about 3–4 minutes.
4. Attach a candy thermometer to the side of the pan, ensuring it does not touch the bottom.
5. Cook the mixture without stirring until the thermometer reads 235°F (soft-ball stage), which typically takes 10–12 minutes.
6. Remove the pan from heat immediately and let it cool undisturbed until the temperature drops to 110°F, about 30–40 minutes.
7. Add 1 teaspoon pure vanilla extract and beat vigorously with a wooden spoon until the mixture thickens, loses its gloss, and becomes lighter in color, about 5–7 minutes.
8. Pour half of the fudge mixture into the prepared pan and spread it evenly with a spatula.
9. Drizzle 1/2 cup smooth, creamy caramel sauce over the fudge layer in an even pattern.
10. Sprinkle 1 teaspoon flaky sea salt evenly over the caramel layer.
11. Carefully spread the remaining fudge mixture over the top, sealing the edges to encase the caramel and salt.
12. Refrigerate the pan for at least 4 hours, or until the fudge is firm to the touch.
13. Lift the fudge from the pan using the parchment overhang and place it on a cutting board.
14. Cut into 1-inch squares with a sharp knife wiped clean between cuts for neat edges.
Gently breaking a piece reveals its firm yet yielding texture, with the sweet caramel and flaky salt creating a beautiful balance on the tongue. Consider serving these squares slightly chilled alongside a dark roast coffee or crumbling them over vanilla bean ice cream for a simple, decadent treat.
White Chocolate Raspberry Fudge
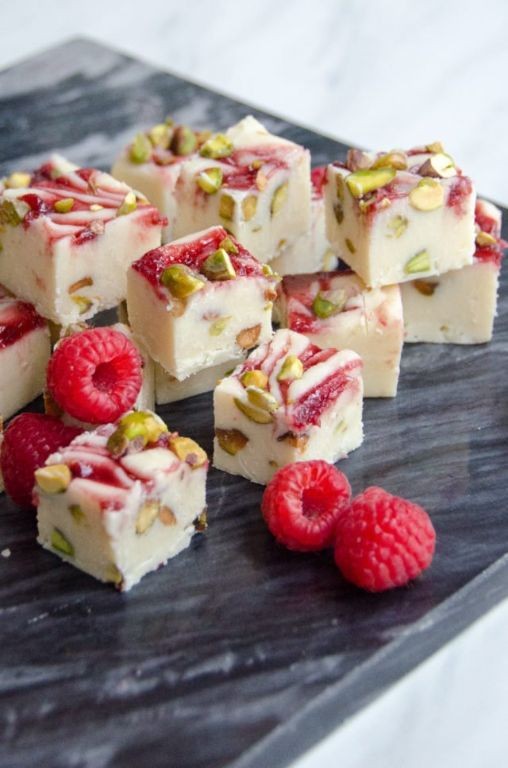
Wandering through the kitchen on this quiet afternoon, I found myself craving something sweet yet delicate, something that would melt on the tongue like a whispered secret. White chocolate raspberry fudge came to mind—a confection that balances creamy richness with the bright, tart kiss of summer berries. It’s the kind of treat that feels both indulgent and gentle, perfect for savoring slowly with a cup of tea or sharing with a dear friend.
Ingredients
– 3 cups high-quality white chocolate chips
– 1 can (14 ounces) sweetened condensed milk
– 1 teaspoon pure vanilla extract
– 1 cup freeze-dried raspberries, lightly crushed
– 1/4 teaspoon fine sea salt
Instructions
1. Line an 8×8-inch baking pan with parchment paper, allowing excess to hang over the edges for easy removal later.
2. Combine the white chocolate chips and sweetened condensed milk in a medium saucepan.
3. Heat the mixture over low heat, stirring constantly with a silicone spatula until the chocolate is fully melted and the consistency is smooth, about 5–7 minutes.
4. Remove the saucepan from the heat immediately once melted to prevent scorching.
5. Stir in the pure vanilla extract and fine sea salt until fully incorporated.
6. Gently fold in the lightly crushed freeze-dried raspberries, being careful not to overmix to maintain some texture.
7. Pour the fudge mixture into the prepared pan, spreading it evenly into all corners with the spatula.
8. Tap the pan lightly on the counter 2–3 times to release any air bubbles.
9. Chill the fudge in the refrigerator for at least 2 hours, or until firm to the touch.
10. Use the parchment paper overhang to lift the fudge from the pan onto a cutting board.
11. Cut into 1-inch squares with a sharp knife wiped clean between cuts for neat edges.
Just out of the fridge, the fudge breaks with a satisfying soft snap, giving way to a velvety interior that dissolves on the tongue. The raspberries offer little bursts of tartness that cut through the sweetness, making each piece feel like a tiny celebration. For a whimsical touch, serve these squares alongside fresh berries or crumble them over vanilla ice cream for an instant dessert upgrade.
Rocky Road Fudge
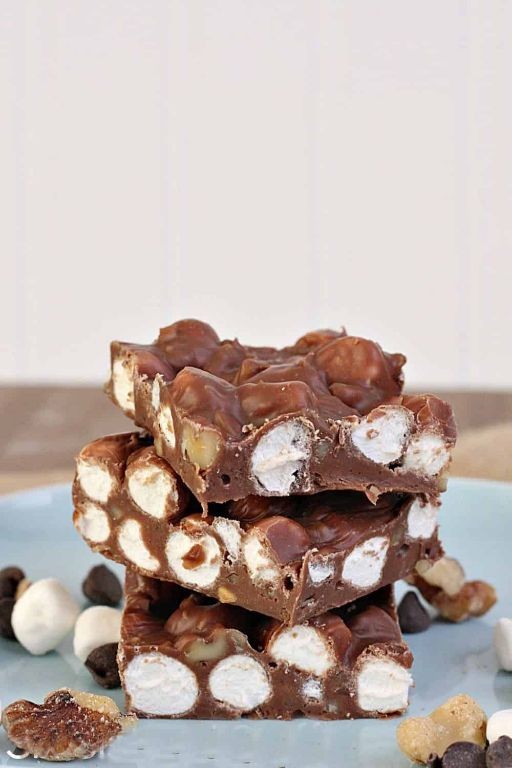
Now, as the afternoon light softens, I find myself craving something deeply comforting, something that holds both sweetness and texture in perfect balance. This rocky road fudge feels like a quiet indulgence, a treat that remembers its humble beginnings while offering pure delight.
Ingredients
– 3 cups high-quality semisweet chocolate chips
– 1 can (14 ounces) sweetened condensed milk with its velvety richness
– 2 cups miniature marshmallows, fluffy and white
– 1 cup roasted salted peanuts, crunchy and fragrant
– 1 teaspoon pure vanilla extract with its warm aroma
– 1/8 teaspoon fine sea salt to enhance the flavors
Instructions
1. Line an 8×8-inch baking pan with parchment paper, letting the edges overhang for easy removal later.
2. Combine the semisweet chocolate chips and sweetened condensed milk in a medium saucepan.
3. Heat the mixture over low heat, stirring constantly with a silicone spatula until the chocolate is fully melted and the mixture is smooth and glossy, about 5–7 minutes. (Tip: Keep the heat low to prevent the chocolate from seizing.)
4. Remove the saucepan from the heat and stir in the pure vanilla extract and fine sea salt until fully incorporated.
5. Gently fold in the miniature marshmallows and roasted salted peanuts until they are evenly distributed throughout the fudge base.
6. Transfer the fudge mixture to the prepared baking pan, spreading it into an even layer with the spatula.
7. Press down lightly on the surface to compact the mixture and ensure the add-ins are nestled in.
8. Let the fudge cool at room temperature for 30 minutes to set the exterior slightly. (Tip: This prevents condensation if refrigerating.)
9. Cover the pan with plastic wrap and refrigerate for at least 2 hours, or until the fudge is firm to the touch. (Tip: For clean slices, chill overnight.)
10. Use the parchment paper overhangs to lift the fudge from the pan and place it on a cutting board.
11. Cut the fudge into 1-inch squares with a sharp knife wiped clean between cuts for neat edges.
Perhaps what I love most is how each square offers a different experience—sometimes you bite into a soft marshmallow, other times a crunchy peanut, all wrapped in that deep chocolate embrace. Serve it slightly chilled with a cup of black coffee to contrast the sweetness, or crumble it over vanilla ice cream for a decadent sundae topping.
Maple Pecan Fudge
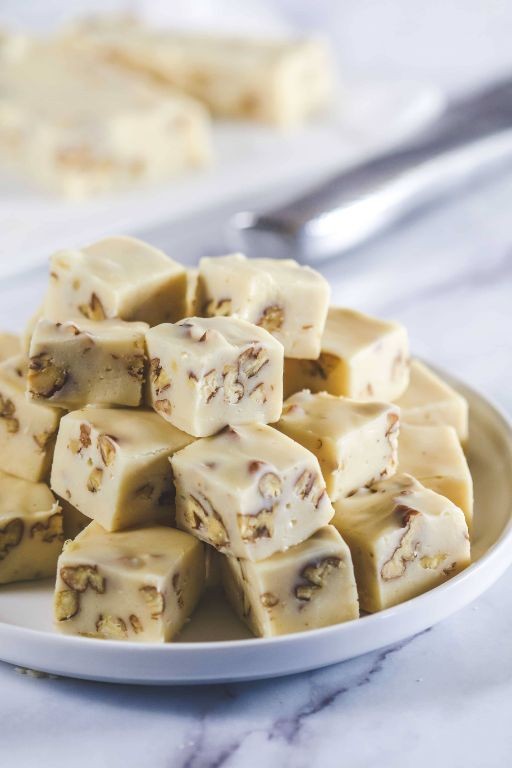
Beneath the quiet hum of the kitchen, there’s something deeply comforting about stirring a pot of something sweet, watching sugar and cream transform into something magical. This maple pecan fudge feels like a warm hug on a crisp afternoon, a simple indulgence that slows the world down for just a moment. It’s the kind of treat that asks for nothing more than your patience and a little bit of stirring.
Ingredients
– 2 cups pure maple syrup
– 1 cup heavy whipping cream
– 1/2 cup unsalted butter, cut into small cubes
– 1 teaspoon vanilla extract
– 1/4 teaspoon fine sea salt
– 1 1/2 cups toasted pecans, roughly chopped
Instructions
1. Line an 8×8-inch baking pan with parchment paper, allowing the paper to hang over two opposite sides for easy removal later.
2. In a heavy-bottomed saucepan, combine 2 cups pure maple syrup and 1 cup heavy whipping cream over medium heat.
3. Stir continuously with a wooden spoon until the mixture comes to a gentle boil, about 5–7 minutes. Tip: Use a heavy-bottomed pan to prevent scorching and ensure even heat distribution.
4. Attach a candy thermometer to the side of the pan, making sure the tip does not touch the bottom.
5. Continue cooking without stirring until the thermometer reads 235°F (soft-ball stage), which should take about 15–20 minutes.
6. Remove the pan from the heat and carefully stir in 1/2 cup cubed unsalted butter until fully melted and incorporated.
7. Let the mixture cool undisturbed until the thermometer reads 110°F, about 30–40 minutes. Tip: Avoid stirring during this cooling phase to allow the fudge to set up with a smooth texture.
8. Add 1 teaspoon vanilla extract and 1/4 teaspoon fine sea salt, then beat vigorously with a wooden spoon for 5–7 minutes until the mixture loses its gloss and thickens noticeably.
9. Fold in 1 1/2 cups toasted pecans until evenly distributed throughout the fudge.
10. Quickly transfer the fudge to the prepared pan and spread it into an even layer with a spatula. Tip: Work swiftly here, as the fudge will begin to set quickly once the pecans are added.
11. Let the fudge cool completely at room temperature for at least 2 hours before slicing into 1-inch squares.
Kindly patient, this fudge rewards you with a texture that’s both firm and meltingly tender, each square studded with the buttery crunch of pecans. The deep, caramel-like sweetness of maple unfolds slowly, leaving a whisper of warmth on the tongue. Serve it nestled in a small ceramic dish with a pot of Earl Grey tea, or wrap individual pieces in wax paper for a thoughtful homemade gift.
Cookies and Cream Fudge
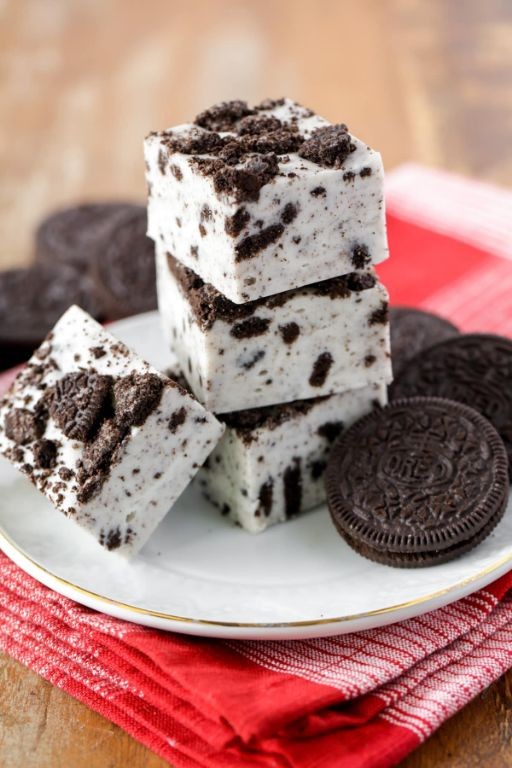
Perhaps there are moments when only something both nostalgic and decadent will do—when the memory of childhood treats calls for a more grown-up, indulgent interpretation. That’s when I find myself dreaming of fudge, but not just any fudge; this one, with its creamy base and cookie crunch, feels like a quiet celebration.
Ingredients
- 3 cups high-quality white chocolate chips, velvety and smooth
- 1 (14-ounce) can sweetened condensed milk, rich and syrupy
- 1 teaspoon pure vanilla extract, fragrant and warm
- 20 crème-filled chocolate sandwich cookies, coarsely crushed with filling intact
Instructions
- Line an 8×8-inch baking pan with parchment paper, allowing a slight overhang on two sides for easy removal later.
- Combine the white chocolate chips and sweetened condensed milk in a medium, heavy-bottomed saucepan.
- Place the saucepan over low heat, stirring constantly with a silicone spatula to prevent scorching, until the chocolate is fully melted and the mixture is perfectly smooth, about 5–7 minutes.
- Immediately remove the saucepan from the heat and stir in the pure vanilla extract until just incorporated.
- Gently fold in the coarsely crushed chocolate sandwich cookies, reserving 2 tablespoons for topping, until they are evenly distributed throughout the fudge base.
- Tip: Work quickly once off the heat to maintain a smooth, spreadable consistency before the fudge begins to set.
- Transfer the fudge mixture to the prepared pan, spreading it into an even layer with the spatula.
- Tip: Lightly wet your fingers or the back of a spoon to press and smooth the top without sticking.
- Sprinkle the reserved crushed cookies evenly over the surface, pressing them gently into the fudge.
- Refrigerate the pan, uncovered, for at least 4 hours or until the fudge is completely firm to the touch.
- Tip: For clean cuts, use a sharp knife warmed under hot water and wiped dry between slices.
- Lift the fudge from the pan using the parchment overhang and cut into 1-inch squares.
My favorite part is the contrast—the cool, creamy melt of the fudge against the satisfying crunch of cookie pieces. It’s lovely arranged on a vintage plate for a casual gathering, or simply savored one square at a time with a cup of black tea.
Dark Chocolate Mint Fudge
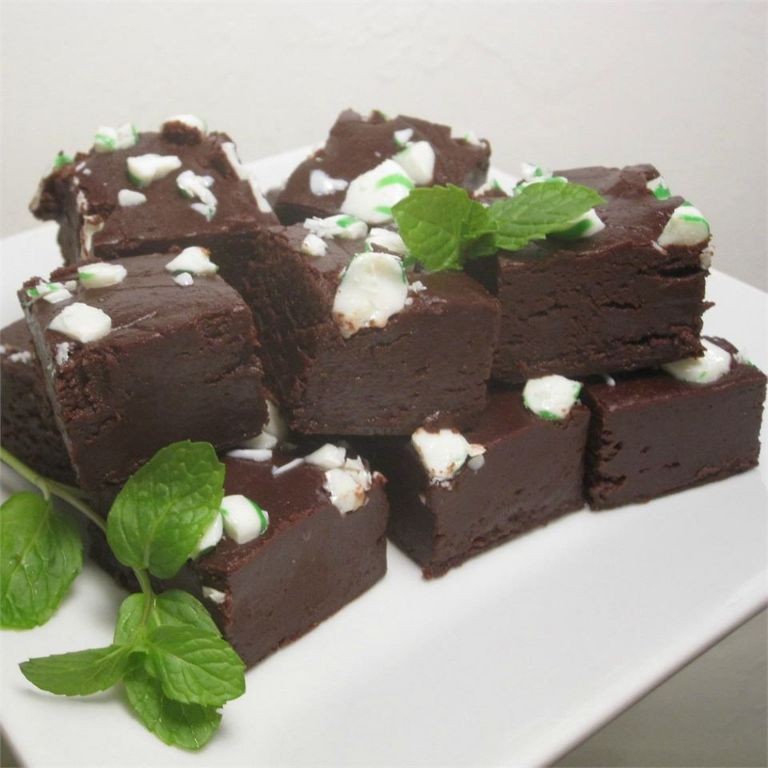
Lately, I’ve been craving something that bridges the gap between a comforting treat and a moment of quiet indulgence, something that feels both decadent and soothingly familiar. This dark chocolate mint fudge is exactly that—a simple pleasure that cools the soul as much as it delights the palate.
Ingredients
– 3 cups of high-quality semi-sweet chocolate chips
– 1 can (14 ounces) of rich, velvety sweetened condensed milk
– 1/4 cup of unsalted European-style butter
– 1 teaspoon of pure peppermint extract
– A generous pinch of flaky sea salt
Instructions
1. Line an 8×8-inch baking pan completely with parchment paper, allowing the paper to overhang on two opposite sides for easy removal later.
2. Combine the 3 cups of semi-sweet chocolate chips, the entire can of sweetened condensed milk, and the 1/4 cup of unsalted European-style butter in a medium, heavy-bottomed saucepan.
3. Place the saucepan over low heat, stirring constantly with a silicone spatula to prevent the chocolate from scorching on the bottom of the pan.
4. Continue heating and stirring for about 5–7 minutes, until the chocolate chips have fully melted and the mixture is completely smooth and glossy.
5. Immediately remove the saucepan from the heat and stir in the 1 teaspoon of pure peppermint extract until it is evenly distributed throughout the fudge base.
6. Pour the warm fudge mixture into the prepared parchment-lined pan, using the spatula to spread it into an even layer.
7. Sprinkle the generous pinch of flaky sea salt evenly over the entire surface of the fudge while it is still warm and soft.
8. Let the fudge cool at room temperature for 30 minutes to set the top slightly before transferring it.
9. Cover the pan loosely with plastic wrap and refrigerate the fudge for at least 3 hours, or until it is completely firm to the touch.
10. Use the overhanging parchment paper to lift the entire block of fudge out of the pan and onto a cutting board.
11. Slice the fudge into 1-inch squares using a sharp knife wiped clean between cuts for neat edges.
The fudge settles into a dense, velvety texture that melts slowly on the tongue, releasing waves of deep chocolate followed by that crisp, cooling mint. Try serving a square slightly chilled alongside a cup of black coffee, where the bitterness beautifully offsets the sweet creaminess.
Espresso Swirl Fudge
Zigzagging through my thoughts this quiet afternoon, I find myself drawn to the comforting ritual of making something sweet and caffeinated, a treat that bridges the gap between dessert and that much-needed afternoon pick-me-up. There’s something deeply satisfying about watching dark chocolate melt into glossy pools and swirling in the bold intensity of espresso, creating a confection that feels both indulgent and thoughtfully crafted. It’s a simple pleasure, really, one that fills the kitchen with the warm, inviting aromas of cocoa and coffee, promising a moment of quiet delight.
Ingredients
– 2 cups of granulated white sugar
– 3/4 cup of rich heavy cream
– 1/2 cup of unsalted European-style butter
– 12 ounces of high-quality dark chocolate, finely chopped
– 1 teaspoon of pure vanilla extract
– 2 tablespoons of finely ground espresso powder
– 1/4 teaspoon of flaky sea salt
Instructions
1. Line an 8×8-inch baking pan with parchment paper, allowing the paper to overhang on two opposite sides for easy removal later.
2. Combine 2 cups of granulated white sugar, 3/4 cup of rich heavy cream, and 1/2 cup of unsalted European-style butter in a medium, heavy-bottomed saucepan.
3. Place the saucepan over medium heat and stir continuously with a wooden spoon until the butter fully melts and the sugar dissolves completely, which should take about 4–5 minutes.
4. Attach a candy thermometer to the side of the saucepan, ensuring the tip does not touch the bottom, and bring the mixture to a boil without stirring.
5. Cook the mixture until the candy thermometer reads 235°F (soft-ball stage), which typically takes 8–10 minutes; this precise temperature is crucial for achieving the ideal fudge texture.
6. Remove the saucepan from the heat immediately and let it cool undisturbed for 10 minutes to prevent graininess in the final fudge.
7. Add 12 ounces of finely chopped high-quality dark chocolate and 1 teaspoon of pure vanilla extract to the slightly cooled mixture.
8. Stir vigorously with a wooden spoon until the chocolate is completely melted and the mixture becomes smooth and glossy.
9. Pour half of the fudge mixture into the prepared baking pan and spread it into an even layer with a spatula.
10. Stir 2 tablespoons of finely ground espresso powder into the remaining fudge mixture in the saucepan until fully incorporated.
11. Dollop the espresso-infused fudge over the plain layer in the pan, then use a knife or skewer to gently swirl the two layers together for a marbled effect.
12. Sprinkle 1/4 teaspoon of flaky sea salt evenly over the top of the swirled fudge.
13. Refrigerate the pan for at least 2 hours, or until the fudge is completely firm and set.
14. Lift the fudge out of the pan using the parchment overhang and place it on a cutting board.
15. Use a sharp knife to slice the fudge into 1-inch squares, wiping the blade clean between cuts for neat edges.
Heavenly in its simplicity, this fudge offers a velvety, melt-in-your-mouth texture that contrasts beautifully with the occasional crunch of sea salt. Each bite unfolds with the deep, bittersweet notes of dark chocolate, followed by the robust, aromatic kick of espresso that lingers pleasantly on the palate. For a creative twist, serve these squares alongside a glass of cold milk or crumble them over vanilla bean ice cream to elevate a simple dessert into something truly memorable.
Coconut Almond Fudge
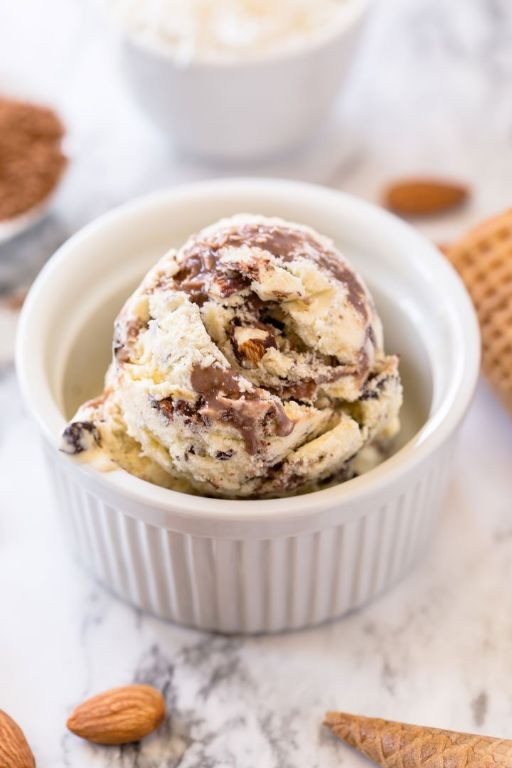
Beneath the quiet hum of the afternoon, there’s something deeply comforting about surrendering to the slow, deliberate process of making fudge, where rich ingredients transform into something magical. Today, I’m drawn to the gentle sweetness of coconut and the earthy crunch of almonds, a pairing that feels like a warm embrace on a cool day. This coconut almond fudge is my little escape, a treat that whispers of simplicity and care.
Ingredients
– 2 cups of granulated white sugar, fine and crystalline
– 1/2 cup of unsalted butter, rich and creamy
– 1/2 cup of whole milk, fresh and velvety
– 1 cup of sweetened shredded coconut, lightly toasted and fragrant
– 1/2 cup of raw almonds, roughly chopped and nutty
– 1 teaspoon of pure vanilla extract, warm and aromatic
– A pinch of fine sea salt, to balance the sweetness
Instructions
1. Line an 8×8-inch baking pan with parchment paper, ensuring it overhangs the edges for easy removal later.
2. In a medium, heavy-bottomed saucepan, combine the granulated white sugar, unsalted butter, and whole milk over medium heat.
3. Stir continuously with a wooden spoon for about 5-7 minutes, until the sugar fully dissolves and the mixture becomes smooth and bubbly. Tip: Use a heavy-bottomed pan to prevent scorching and ensure even heat distribution.
4. Attach a candy thermometer to the side of the pan, making sure it doesn’t touch the bottom, and cook without stirring until the temperature reaches 235°F (soft-ball stage), which should take 10-15 minutes.
5. Remove the saucepan from the heat immediately and let it cool undisturbed for 5 minutes, until the bubbling subsides. Tip: Allowing the mixture to cool slightly before adding other ingredients helps prevent graininess in the fudge.
6. Stir in the pure vanilla extract and fine sea salt until fully incorporated.
7. Beat the mixture vigorously with a wooden spoon for 2-3 minutes, until it thickens, loses its gloss, and becomes creamy.
8. Fold in the sweetened shredded coconut and raw almonds until evenly distributed throughout the fudge.
9. Quickly pour the mixture into the prepared baking pan and spread it into an even layer with a spatula. Tip: Work swiftly here, as the fudge sets fast; a quick spread ensures a smooth top.
10. Let the fudge cool at room temperature for 1 hour, then refrigerate for at least 2 hours, or until firm to the touch.
11. Lift the fudge out using the parchment overhang, place it on a cutting board, and slice it into 1-inch squares with a sharp knife.
And just like that, you have a batch of fudge that melts on the tongue with a creamy, yielding texture, punctuated by the gentle crunch of almonds and the tropical whisper of coconut. Arrange these squares on a rustic platter for a cozy gathering, or simply savor one with a cup of tea, letting the flavors linger like a quiet moment of peace.
Red Velvet Fudge
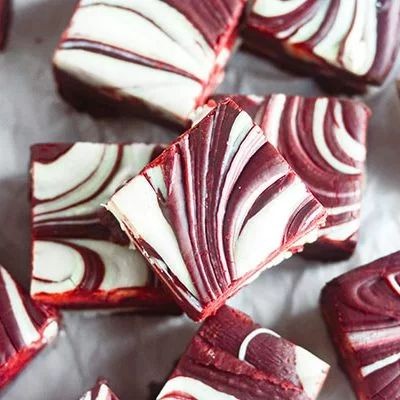
Gently, as the afternoon light softens across the kitchen counter, I find myself drawn to the quiet magic of making something sweet and deeply comforting. There’s a particular solace in the slow, deliberate process of creating red velvet fudge, a treat that feels like a whispered secret between cocoa and cream. It’s a small, crimson-hued indulgence that holds the warmth of nostalgia in every velvety bite.
Ingredients
– 3 cups of high-quality white chocolate chips
– 1 (14-ounce) can of sweet, creamy condensed milk
– 1 teaspoon of pure, aromatic vanilla extract
– 2 tablespoons of rich, Dutch-process cocoa powder
– 1 tablespoon of vibrant red gel food coloring
– A generous pinch of fine, flaky sea salt
Instructions
1. Line an 8×8-inch baking pan with parchment paper, ensuring the paper overhangs the edges for easy removal later.
2. Combine the white chocolate chips and creamy condensed milk in a medium, heavy-bottomed saucepan.
3. Place the saucepan over low heat, stirring constantly with a silicone spatula until the chocolate is fully melted and the mixture is smooth, which should take about 5–7 minutes.
4. Remove the saucepan from the heat immediately once smooth to prevent the chocolate from seizing.
5. Stir in the pure vanilla extract, rich cocoa powder, vibrant red gel food coloring, and generous pinch of fine sea salt until the color is uniform and no streaks remain.
6. Pour the fudge mixture into the prepared pan, spreading it evenly into all corners with the spatula.
7. Tap the pan firmly on the counter 2–3 times to release any air bubbles for a denser, smoother texture.
8. Let the fudge cool at room temperature for 30 minutes, then cover it loosely with plastic wrap.
9. Refrigerate the fudge for at least 4 hours, or until it is firm to the touch and easily slices.
10. Use the parchment paper overhang to lift the fudge from the pan, then cut it into 1-inch squares with a sharp knife wiped clean between cuts for neat edges.
Perhaps what I love most is the way it melts so tenderly on the tongue, the cocoa’s subtle bitterness playing against the sweet creaminess. For a lovely twist, crumble a square over vanilla ice cream or layer it between cookies for an decadent, homemade sandwich.
Pumpkin Spice Fudge
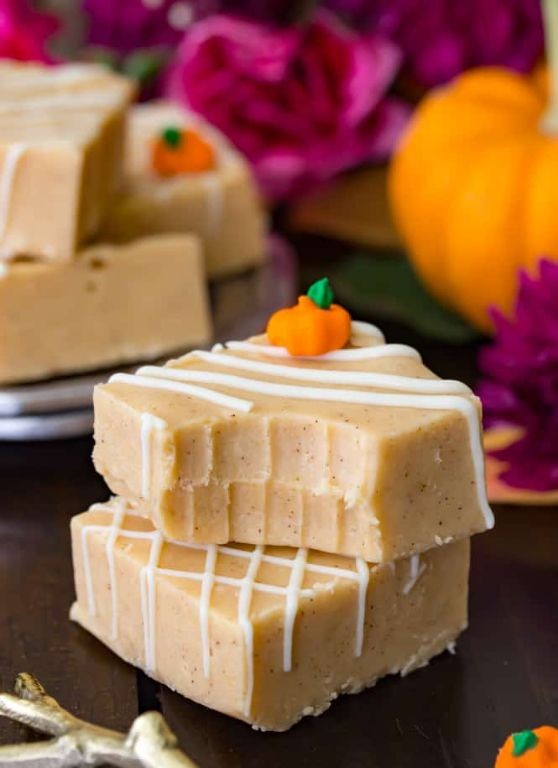
Gently, as the autumn light filters through my kitchen window, I find myself drawn to creating something that captures the season’s quiet magic. There’s a particular comfort in transforming simple ingredients into this velvety pumpkin spice fudge, each step feeling like a slow, deliberate meditation on fall’s fleeting beauty.
Ingredients
– 3 cups granulated white sugar
– ¾ cup rich European-style butter
– ⅔ cup velvety evaporated milk
– ½ cup creamy pumpkin puree
– 12 ounces smooth white chocolate chips
– 7 ounces fluffy marshmallow creme
– 1 teaspoon warm ground cinnamon
– ½ teaspoon fragrant ground nutmeg
– ¼ teaspoon earthy ground ginger
– ⅛ teaspoon spicy ground cloves
– 1 teaspoon pure vanilla extract
Instructions
1. Line an 8×8-inch baking pan with parchment paper, ensuring the paper overhangs on two opposite sides for easy removal later.
2. Combine 3 cups granulated white sugar, ¾ cup rich European-style butter, ⅔ cup velvety evaporated milk, and ½ cup creamy pumpkin puree in a heavy-bottomed saucepan.
3. Cook over medium heat, stirring constantly with a wooden spoon until the butter fully melts and the mixture becomes smooth, about 3-4 minutes.
4. Bring the mixture to a full rolling boil while continuing to stir constantly to prevent scorching on the bottom.
5. Once boiling, set a timer for exactly 5 minutes and maintain a steady boil, stirring continuously until the timer sounds.
6. Remove the saucepan immediately from heat and add 12 ounces smooth white chocolate chips, stirring vigorously until the chocolate completely melts and the mixture becomes uniform.
7. Add 7 ounces fluffy marshmallow creme, working quickly to incorporate it before the mixture begins to cool.
8. Sprinkle in 1 teaspoon warm ground cinnamon, ½ teaspoon fragrant ground nutmeg, ¼ teaspoon earthy ground ginger, and ⅛ teaspoon spicy ground cloves, stirring until the spices are evenly distributed throughout the fudge.
9. Stir in 1 teaspoon pure vanilla extract until just combined, being careful not to overmix at this stage.
10. Pour the warm fudge mixture into the prepared pan, using a spatula to spread it evenly into all corners.
11. Let the fudge cool at room temperature for 2 hours until firm to the touch but still slightly yielding when pressed gently.
12. Transfer the pan to the refrigerator and chill for another 2 hours until completely set and firm throughout.
13. Use the parchment paper overhang to lift the fudge block from the pan and place it on a cutting board.
14. Cut into 1-inch squares using a sharp knife wiped clean between cuts for neat edges. What emerges is a fudge that melts luxuriously on the tongue, the creamy white chocolate base giving way to warm pumpkin spice notes that linger like the last golden hours of autumn daylight. I love serving these squares slightly chilled alongside strong coffee, or crumbling them over vanilla ice cream for an unexpected textural contrast that feels both nostalgic and new.
Nutella Hazelnut Fudge
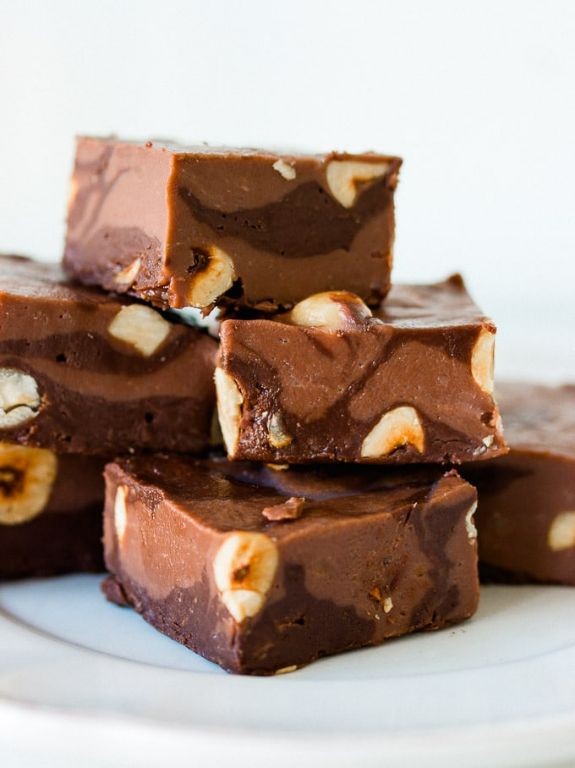
Folding this spoon through the silken chocolate mixture feels like stirring melted dreams, each swirl releasing the comforting aroma of toasted hazelnuts that promises simple sweetness waiting just a few hours away.
Ingredients
– 1 cup creamy Nutella spread
– 1/2 cup rich heavy whipping cream
– 2 cups finely chopped toasted hazelnuts
– 1/4 teaspoon flaky sea salt
– 1 teaspoon pure vanilla extract
Instructions
1. Line an 8×8-inch baking dish with parchment paper, allowing 2-inch overhangs on two opposite sides for easy removal later.
2. Pour 1 cup creamy Nutella spread into a medium heatproof bowl, scraping the jar clean with a rubber spatula.
3. Heat 1/2 cup rich heavy whipping cream in a small saucepan over medium heat until small bubbles form around the edges and steam rises, about 3-4 minutes—do not boil.
4. Slowly pour the hot cream over the Nutella while whisking continuously until the mixture becomes smooth and glossy.
5. Stir in 1 teaspoon pure vanilla extract until fully incorporated, which enhances the chocolate flavor.
6. Fold in 1 1/2 cups of the finely chopped toasted hazelnuts, reserving the remaining 1/2 cup for topping.
7. Sprinkle 1/4 teaspoon flaky sea salt evenly across the bottom of the prepared baking dish before pouring in the fudge mixture.
8. Spread the fudge evenly with an offset spatula, reaching all corners and creating a smooth surface.
9. Press the reserved 1/2 cup chopped hazelnuts gently into the top of the fudge, creating an even layer.
10. Cover the dish tightly with plastic wrap and refrigerate for at least 4 hours, or until completely firm to the touch.
11. Lift the fudge from the dish using the parchment overhangs and transfer to a cutting board.
12. Use a sharp knife warmed under hot water to cut into 1-inch squares, wiping the blade clean between cuts for neat edges.
13. Store the fudge squares in an airtight container between layers of parchment paper to prevent sticking. Keeping this fudge chilled maintains its firm, sliceable texture while allowing the Nutella to slowly melt on your tongue. The toasted hazelnuts provide satisfying crunch against the velvety chocolate, perfect for pairing with strong coffee or crumbling over vanilla ice cream for an indulgent sundae.
Cherry Vanilla Fudge

Yesterday, as the afternoon light softened across my kitchen counter, I found myself craving something that held both childhood nostalgia and grown-up elegance. There’s something about cherry vanilla fudge that feels like a whispered secret between seasons, where summer’s brightness meets winter’s comfort. The process itself becomes a gentle meditation, each step unfolding like pages in a quiet story.
Ingredients
– 3 cups granulated white sugar
– ¾ cup rich European-style butter
– ⅔ cup heavy whipping cream
– 12 ounces plump maraschino cherries, thoroughly drained and patted dry
– 1 teaspoon pure vanilla extract with visible bean specks
– 7 ounces velvety marshmallow crème
– 12 ounces premium white chocolate chips
Instructions
1. Line an 8×8 inch baking pan with parchment paper, allowing excess to hang over two opposite edges for easy removal later.
2. Combine 3 cups granulated white sugar, ¾ cup rich European-style butter, and ⅔ cup heavy whipping cream in a heavy-bottomed saucepan.
3. Cook over medium heat while stirring constantly with a wooden spoon until the butter fully melts and the mixture becomes smooth, about 4-5 minutes.
4. Attach a candy thermometer to the saucepan, ensuring it doesn’t touch the bottom, and bring the mixture to a rolling boil without stirring.
5. Continue boiling until the thermometer reads precisely 234°F (soft-ball stage), which typically takes 8-10 minutes—watch for tiny bubbles covering the entire surface.
6. Immediately remove the saucepan from heat and gently stir in 1 teaspoon pure vanilla extract with visible bean specks using a folding motion.
7. Add 7 ounces velvety marshmallow crème and 12 ounces premium white chocolate chips all at once, stirring vigorously until completely melted and smooth.
8. Fold in 12 ounces plump maraschino cherries until they’re evenly distributed throughout the fudge mixture.
9. Quickly pour the fudge into your prepared pan, using a spatula to spread it evenly into all corners.
10. Let the fudge cool at room temperature for 2 hours until the top loses its shine and feels firm to a light touch.
11. Refrigerate the pan for exactly 1 hour to fully set the fudge’s structure without making it too hard.
12. Use the parchment paper handles to lift the fudge block from the pan onto a cutting board.
13. Cut into 1-inch squares using a sharp knife wiped clean between cuts for neat edges. During those quiet hours of setting, the fudge transforms into something magical—the creamy white chocolate base cradling jewel-like cherries, each bite offering a burst of fruity brightness against the vanilla’s warmth. I love serving these squares slightly chilled alongside strong black coffee, where the contrast between cool sweetness and bitter warmth creates its own kind of poetry.
Toasted Marshmallow Fudge
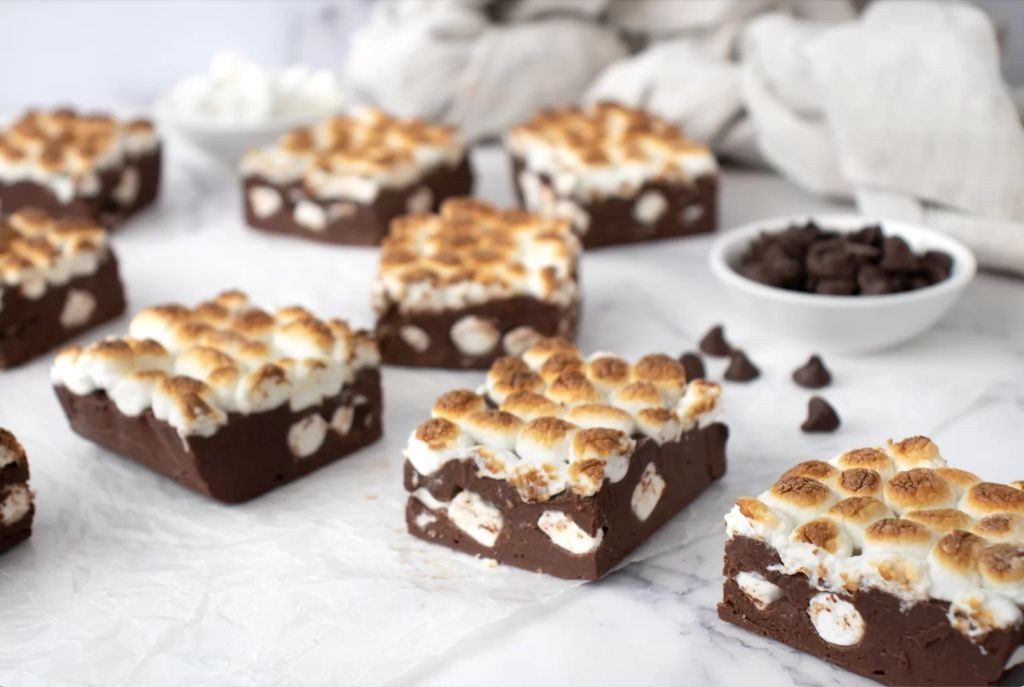
Unwrapping the memory of campfire evenings, this toasted marshmallow fudge captures that gentle char and gooey sweetness in a rich, sliceable treat that feels like nostalgia made edible.
Ingredients
– 3 cups granulated white sugar
– 1 cup rich heavy cream
– 3/4 cup creamy unsalted butter
– 1 teaspoon pure vanilla extract
– 12 ounces silky semi-sweet chocolate chips
– 1 cup fluffy miniature marshmallows
– 1/4 cup golden honey
Instructions
1. Line an 8×8-inch baking pan with parchment paper, ensuring the paper overhangs on two opposite sides for easy removal.
2. Combine 3 cups granulated white sugar, 1 cup rich heavy cream, and 3/4 cup creamy unsalted butter in a heavy-bottomed saucepan.
3. Cook the mixture over medium heat, stirring constantly with a wooden spoon until the sugar fully dissolves and the butter melts completely, about 5-7 minutes.
4. Attach a candy thermometer to the saucepan, ensuring it doesn’t touch the bottom, and continue cooking without stirring until the mixture reaches 235°F (soft-ball stage).
5. Remove the saucepan immediately from heat and let it cool undisturbed until the thermometer reads 110°F, about 45-60 minutes.
6. Add 1 teaspoon pure vanilla extract and beat vigorously with a wooden spoon until the mixture loses its gloss and thickens to a fudge consistency, about 5-8 minutes.
7. Quickly fold in 12 ounces silky semi-sweet chocolate chips until just incorporated, leaving some visible streaks for texture variation.
8. Gently fold in 1 cup fluffy miniature marshmallows and 1/4 cup golden honey, being careful not to overmix and deflate the marshmallows.
9. Spread the fudge evenly into the prepared pan using an offset spatula, creating a smooth top surface.
10. Use a kitchen torch to lightly toast the marshmallows on the surface, moving the flame constantly until they develop golden-brown spots, about 30-45 seconds.
11. Chill the fudge in the refrigerator for at least 4 hours until completely firm and sliceable.
12. Using the parchment paper overhang, lift the fudge from the pan and cut into 1-inch squares with a sharp knife warmed under hot water.
Momentarily, the crisp toasted marshmallow top gives way to the creamy fudge beneath, where pockets of melted chocolate create dark rivers through the sweet matrix. Serve these squares slightly chilled alongside strong coffee, or crumble them over vanilla ice cream for a decadent sundae topping that plays with temperature and texture.
Bourbon Pecan Fudge
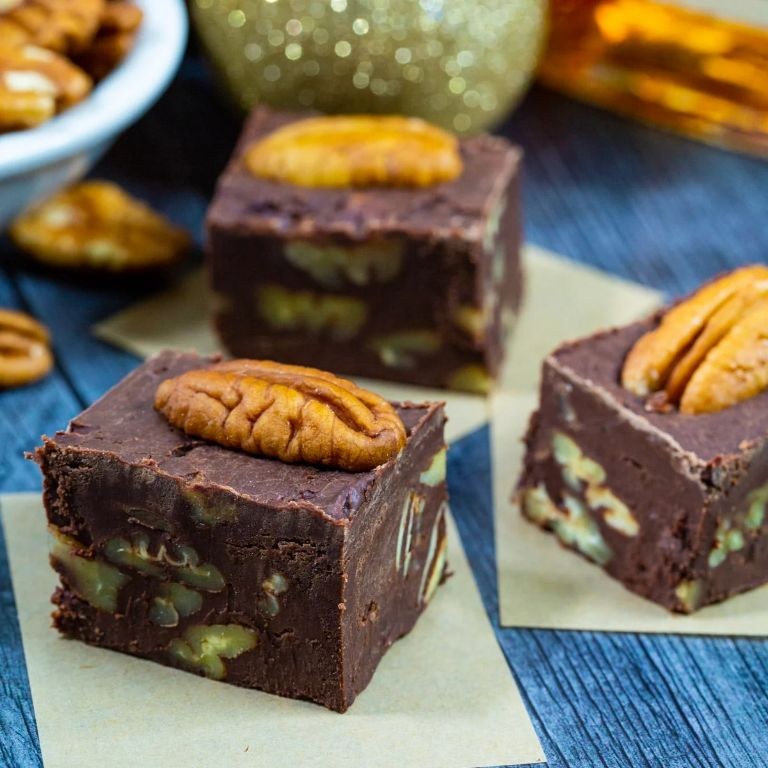
Lately, I’ve been craving something that holds both warmth and nostalgia, the kind of treat that feels like a quiet afternoon wrapped in sweetness. This bourbon pecan fudge is just that—a rich, comforting indulgence with a gentle kick of whiskey and the earthy crunch of toasted nuts.
Ingredients
– 3 cups granulated sugar
– ¾ cup rich, unsalted butter
– ⅔ cup velvety evaporated milk
– 12 ounces high-quality semisweet chocolate chips
– 7 ounces smooth marshmallow crème
– 1 cup chopped, toasted pecans
– 3 tablespoons bold bourbon whiskey
– 1 teaspoon pure vanilla extract
Instructions
1. Line an 8×8-inch baking pan with parchment paper, allowing some overhang on two sides for easy removal later.
2. In a large, heavy-bottomed saucepan, combine the granulated sugar, rich unsalted butter, and velvety evaporated milk over medium heat.
3. Stir continuously with a wooden spoon until the butter melts completely and the mixture is smooth, about 3–4 minutes.
4. Attach a candy thermometer to the side of the pan, ensuring it doesn’t touch the bottom, and bring the mixture to a full boil.
5. Cook without stirring until the thermometer reads 234°F (soft-ball stage), which should take about 5–7 minutes; a tip: avoid scraping the sides of the pan to prevent graininess.
6. Remove the saucepan from the heat immediately and stir in the high-quality semisweet chocolate chips until fully melted and glossy.
7. Add the smooth marshmallow crème, stirring vigorously until no white streaks remain and the mixture is uniform.
8. Fold in the chopped, toasted pecans, bold bourbon whiskey, and pure vanilla extract until evenly distributed.
9. Pour the fudge into the prepared pan, spreading it into an even layer with a spatula.
10. Let the fudge cool at room temperature for 2 hours until set, then refrigerate for another hour to firm up completely; a tip: for clean cuts, use a sharp knife warmed under hot water and wiped dry before slicing.
11. Lift the fudge from the pan using the parchment overhang and cut into 1-inch squares.
Here, the fudge yields a dense, melt-in-your-mouth texture with the subtle warmth of bourbon weaving through each bite. Serve it alongside a strong cup of coffee to balance the sweetness, or gift it in a rustic box tied with twine for a heartfelt homemade touch.
Lemon Blueberry Fudge
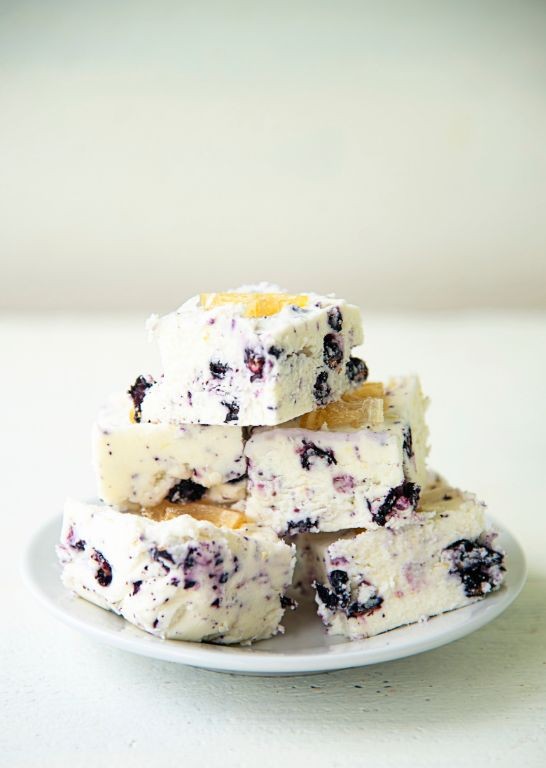
Gently, I find myself drawn to the quiet alchemy of transforming simple ingredients into something unexpectedly beautiful. There’s a particular magic in this lemon blueberry fudge—a sweet escape that feels both nostalgic and wonderfully new, like discovering a forgotten summer memory in the middle of November.
Ingredients
– 3 cups granulated white sugar
– ¾ cup rich European-style butter
– ⅔ cup heavy whipping cream
– 12 ounces high-quality white chocolate chips
– 7 ounces smooth marshmallow crème
– 1 tablespoon pure lemon extract
– 1 teaspoon finely grated lemon zest
– 1 cup fresh plump blueberries
– ¼ cup vibrant blueberry jam
Instructions
1. Line an 8×8-inch baking pan with parchment paper, allowing extra paper to hang over two opposite edges for easy removal later.
2. Combine 3 cups granulated white sugar, ¾ cup rich European-style butter, and ⅔ cup heavy whipping cream in a heavy-bottomed saucepan.
3. Cook over medium heat, stirring constantly with a wooden spoon until the butter melts completely and the sugar dissolves—this should take about 4-5 minutes.
4. Attach a candy thermometer to the side of the pan, making sure the tip doesn’t touch the bottom.
5. Bring the mixture to a rolling boil without stirring and cook until the thermometer reads 235°F (soft-ball stage), which typically takes 8-10 minutes.
6. Immediately remove the saucepan from heat and stir in 12 ounces high-quality white chocolate chips until completely melted and smooth.
7. Gently fold in 7 ounces smooth marshmallow crème until no white streaks remain.
8. Add 1 tablespoon pure lemon extract and 1 teaspoon finely grated lemon zest, stirring just until incorporated.
9. Carefully fold in 1 cup fresh plump blueberries and ¼ cup vibrant blueberry jam, being gentle to avoid crushing the berries.
10. Pour the fudge mixture into the prepared pan and spread evenly with a spatula.
11. Let the fudge cool at room temperature for 2 hours until firm to the touch.
12. Refrigerate for another hour to fully set before cutting.
13. Use the parchment paper handles to lift the fudge block from the pan.
14. Cut into 1-inch squares with a sharp knife wiped clean between cuts for neat edges.
Remember how the creamy texture melts on your tongue, releasing bursts of tart lemon and sweet blueberry in perfect harmony. Resting these squares on a vintage cake stand makes them feel like discovered treasures, each bite carrying the warmth of summer even as the days grow shorter.
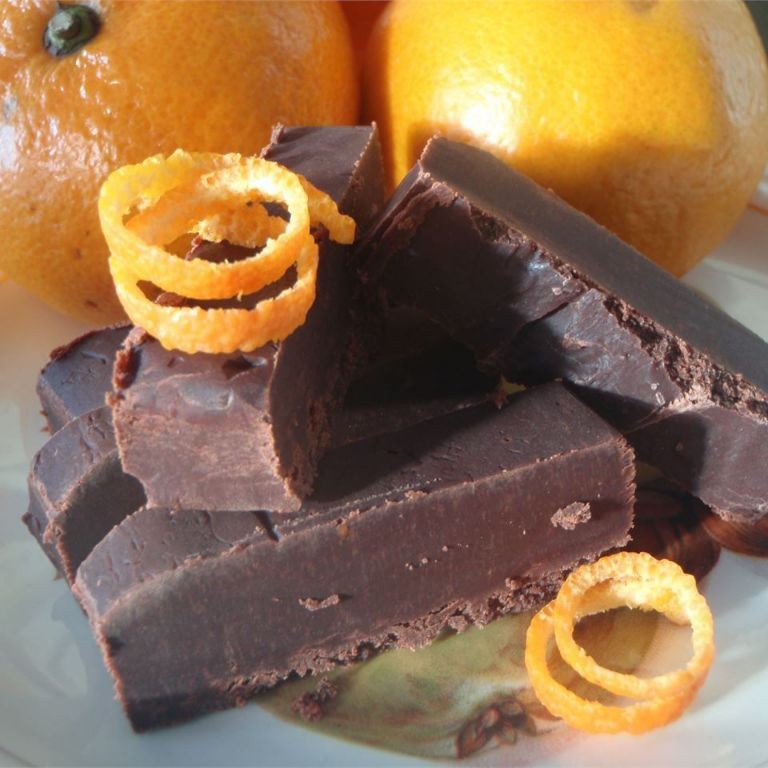
Chocolate Orange Fudge
Remembering how the chill of late autumn used to settle in my grandmother’s kitchen, I find myself drawn to the quiet comfort of melting chocolate and the bright perfume of citrus, a small ritual that feels like wrapping my hands around a warm mug on a cold afternoon. There’s something deeply soothing about the way rich dark chocolate and zesty orange come together in this fudge, a simple indulgence that slows the world down for just a moment. It’s a treat that doesn’t ask for much—just a little patience and a gentle stir—to transform everyday ingredients into something softly magical.
Ingredients
– 3 cups high-quality granulated sugar
– 3/4 cup rich European-style butter
– 2/3 cup creamy evaporated milk
– 12 ounces finely chopped bittersweet chocolate
– 1 jar (7 ounces) velvety marshmallow creme
– 1 teaspoon pure vanilla extract
– 2 tablespoons freshly grated orange zest
Instructions
1. Line an 8×8-inch baking pan with parchment paper, allowing the paper to overhang two opposite sides for easy removal later.
2. Combine 3 cups high-quality granulated sugar, 3/4 cup rich European-style butter, and 2/3 cup creamy evaporated milk in a heavy-bottomed saucepan over medium heat.
3. Stir the mixture continuously with a wooden spoon until the butter fully melts and the sugar dissolves completely, about 4–5 minutes.
4. Attach a candy thermometer to the side of the pan, ensuring the tip does not touch the bottom.
5. Bring the mixture to a rolling boil over medium-high heat, stirring occasionally to prevent scorching.
6. Cook until the candy thermometer reads 234°F (soft-ball stage), which should take about 8–10 minutes; the syrup will thicken slightly and form a soft ball when dropped into cold water.
7. Remove the pan from heat immediately and let it rest for 1 minute to allow bubbling to subside.
8. Add 12 ounces finely chopped bittersweet chocolate and 1 jar velvety marshmallow creme to the hot syrup, stirring gently until completely smooth and glossy.
9. Stir in 1 teaspoon pure vanilla extract and 2 tablespoons freshly grated orange zest until evenly distributed throughout the fudge.
10. Pour the fudge mixture into the prepared pan, spreading it into an even layer with a spatula.
11. Let the fudge cool at room temperature for 2 hours until firm to the touch.
12. Use the parchment paper overhang to lift the fudge from the pan, then cut it into 1-inch squares with a sharp knife wiped clean between cuts for neat edges.
Velvety and dense, this fudge breaks with a satisfying snap, revealing a melt-in-your-mouth texture that carries the deep, resonant notes of dark chocolate. The orange zest weaves through each bite like a bright thread, cutting the richness with its citrusy perfume. For a thoughtful touch, layer the squares in a small gift box lined with wax paper, or crumble them over vanilla bean ice cream while they’re still slightly warm.
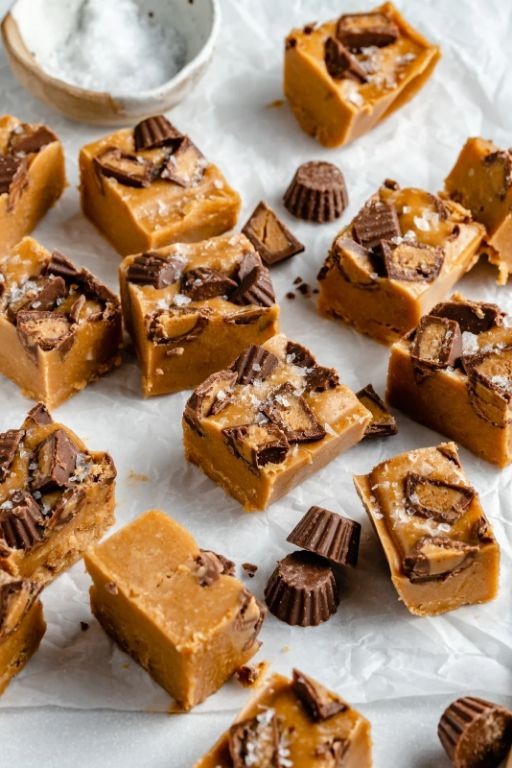
Peanut Butter Cup Fudge
Beneath the soft glow of the kitchen light, there’s something deeply comforting about melting chocolate and swirling peanut butter together, creating a treat that feels like a warm hug in dessert form. This peanut butter cup fudge is my quiet escape, a simple indulgence that brings back memories of childhood afternoons and shared smiles. It’s a little piece of sweetness to savor slowly, one rich square at a time.
Ingredients
– 2 cups creamy, smooth peanut butter
– 1 cup unsalted butter, rich and softened
– 1 teaspoon pure vanilla extract, fragrant and warm
– 4 cups powdered sugar, finely sifted
– 1 ½ cups semi-sweet chocolate chips, glossy and bittersweet
– ½ cup heavy cream, velvety and cold
Instructions
1. Line an 8×8-inch baking pan with parchment paper, ensuring the paper overhangs the edges for easy removal later.
2. Combine 2 cups creamy, smooth peanut butter and 1 cup unsalted butter, rich and softened, in a large microwave-safe bowl.
3. Microwave the peanut butter and butter mixture on high for 1 minute, then stir until fully melted and smooth.
4. Stir in 1 teaspoon pure vanilla extract, fragrant and warm, until evenly incorporated.
5. Gradually add 4 cups powdered sugar, finely sifted, to the mixture, stirring constantly to prevent lumps.
6. Press the peanut butter mixture firmly into the prepared pan, using a spatula to create an even layer.
7. Place 1 ½ cups semi-sweet chocolate chips, glossy and bittersweet, and ½ cup heavy cream, velvety and cold, in a separate microwave-safe bowl.
8. Microwave the chocolate and cream on high for 45 seconds, then stir until the chocolate is completely melted and the ganache is glossy.
9. Pour the chocolate ganache over the peanut butter layer, spreading it gently with a spatula to cover the surface entirely.
10. Refrigerate the fudge for at least 2 hours, or until it is firm to the touch and easily slices.
11. Lift the fudge from the pan using the parchment overhang and place it on a cutting board.
12. Cut the fudge into 1-inch squares with a sharp knife, wiping the blade clean between cuts for neat edges.
Let the fudge settle at room temperature for 10 minutes before serving, allowing the flavors to bloom fully. Its texture is wonderfully creamy, with a melt-in-your-mouth quality that balances the nutty peanut butter and deep chocolate notes. For a playful twist, crumble a square over vanilla ice cream or pair it with a cup of strong coffee to highlight its richness.
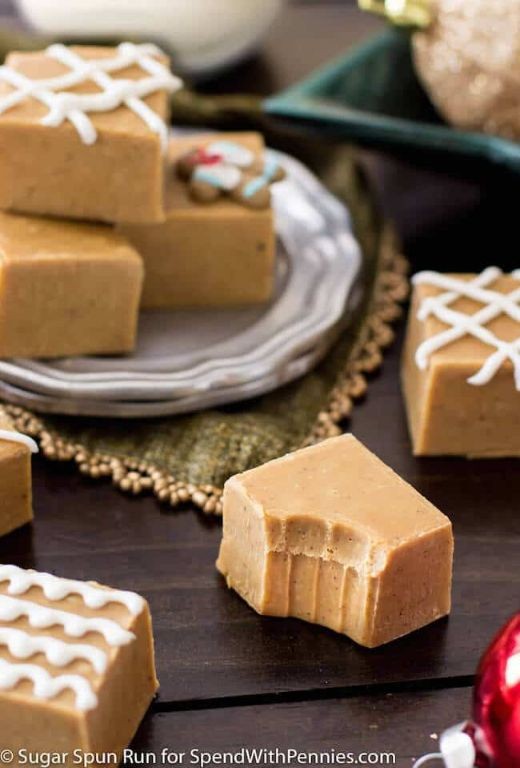
Gingerbread Spice Fudge
Kindling memories of winter evenings, this gingerbread spice fudge wraps the kitchen in warmth, each square holding the gentle comfort of molasses and spice. It’s a quiet indulgence, one that invites you to slow down and savor the moment, much like tracing the patterns on a frosted windowpane.
Ingredients
– 3 cups high-quality white chocolate chips, with a smooth, creamy melt
– 1 (14-ounce) can sweetened condensed milk, rich and velvety
– 1/4 cup robust, dark molasses
– 1 teaspoon pure vanilla extract, fragrant and warm
– 1 1/2 teaspoons ground ginger, finely powdered and aromatic
– 1 teaspoon ground cinnamon, sweet and woody
– 1/4 teaspoon ground cloves, deeply pungent
– 1/4 teaspoon freshly grated nutmeg, earthy and bright
– 1/8 teaspoon fine sea salt, to balance the sweetness
Instructions
1. Line an 8×8-inch baking pan with parchment paper, allowing excess to hang over two opposite sides for easy removal later.
2. Combine the white chocolate chips, sweetened condensed milk, and molasses in a medium, heavy-bottomed saucepan.
3. Place the saucepan over low heat, stirring constantly with a silicone spatula to prevent scorching, until the chocolate is fully melted and the mixture is smooth, about 5–7 minutes.
4. Remove the saucepan from the heat immediately once smooth to avoid overheating the chocolate.
5. Stir in the vanilla extract, ground ginger, cinnamon, cloves, nutmeg, and fine sea salt until the spices are evenly distributed and no streaks remain.
6. Pour the fudge mixture into the prepared pan, using the spatula to spread it into an even layer.
7. Gently tap the pan on the counter 2–3 times to release any air bubbles and create a flat surface.
8. Let the fudge cool at room temperature for 30 minutes to set the top slightly.
9. Cover the pan loosely with plastic wrap and refrigerate for at least 4 hours, or until the fudge is firm to the touch.
10. Use the parchment paper overhangs to lift the fudge block from the pan onto a cutting board.
11. Slice the fudge into 1-inch squares with a sharp knife wiped clean between cuts for neat edges.
Soft and yielding, each piece melts slowly on the tongue, releasing waves of molasses and warm spice. Serve it nestled in a small ceramic dish with a dusting of cinnamon, or crumble it over vanilla ice cream for a cozy, textured dessert that feels like a hug from the inside.
Summary
These twenty decadent fudge recipes offer something for every sweet tooth and occasion. Whether you’re a traditionalist or an adventurous baker, you’ll find irresistible treats to create and share. We’d love to hear which recipes become your favorites—leave a comment below and pin your top picks to Pinterest to spread the fudge love!