Just when you thought weeknight dinners had to be boring, Blue Apron comes to the rescue with these 20 flavorful recipes designed for busy schedules. From quick skillet meals to comforting classics with a twist, each dish brings excitement back to your table without the stress. Ready to transform your evenings? Dive into this delicious collection and discover your new go-to favorites.
Garlic Butter Steak with Roasted Potatoes
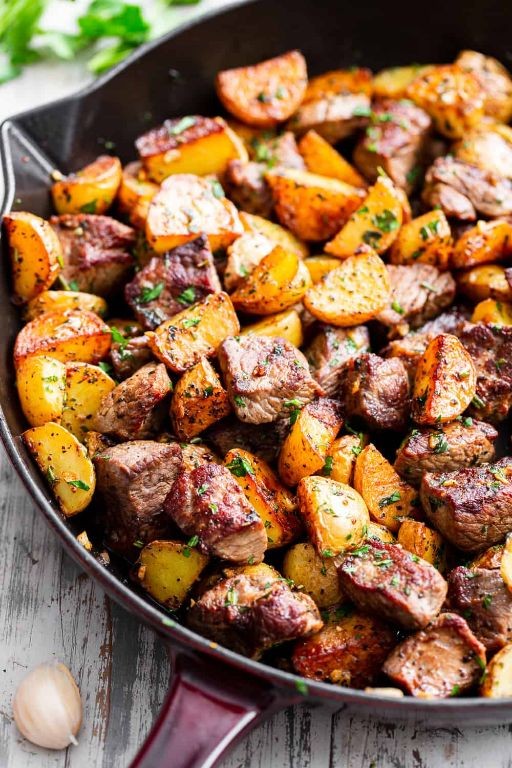
A quiet evening calls for something deeply comforting, the kind of meal that fills the kitchen with warm, inviting aromas and promises simple, honest satisfaction on a plate. It’s in these moments I find myself returning to the classic pairing of steak and potatoes, a duo that feels like a gentle, familiar embrace.
Ingredients
- 1 ½ pounds well-marbled ribeye steak
- 1 ½ pounds golden baby potatoes, halved
- 4 tablespoons rich, unsalted butter
- 4 large cloves of fresh garlic, minced
- 2 tablespoons golden extra virgin olive oil
- 1 teaspoon coarse kosher salt
- ½ teaspoon freshly cracked black pepper
- 1 tablespoon finely chopped fresh parsley
Instructions
- Preheat your oven to 400°F (200°C).
- Place the halved golden baby potatoes on a large baking sheet.
- Drizzle the potatoes with 1 tablespoon of golden extra virgin olive oil and season with ½ teaspoon of coarse kosher salt and ¼ teaspoon of freshly cracked black pepper.
- Toss the potatoes by hand until they are evenly coated in oil and seasoning.
- Arrange the potatoes in a single layer on the baking sheet, cut-side down.
- Roast the potatoes in the preheated oven for 25-30 minutes, until the bottoms are golden brown and crisp. (Tip: Placing them cut-side down helps achieve a wonderfully crispy crust.)
- While the potatoes roast, pat the well-marbled ribeye steak completely dry with paper towels.
- Rub the remaining ½ teaspoon of coarse kosher salt and ¼ teaspoon of freshly cracked black pepper evenly over all sides of the steak.
- Heat the remaining 1 tablespoon of golden extra virgin olive oil in a heavy cast-iron skillet over medium-high heat until it shimmers.
- Carefully place the seasoned steak in the hot skillet.
- Sear the steak for 4-5 minutes without moving it, until a deep brown crust forms.
- Flip the steak and cook for another 4-5 minutes for medium-rare. (Tip: For a perfect medium-rare, the internal temperature should read 130-135°F when checked with an instant-read thermometer.)
- Reduce the heat to low and add the rich, unsalted butter and minced fresh garlic to the skillet.
- Tilt the skillet slightly and, using a spoon, continuously baste the steak with the foaming garlic butter for 1-2 minutes. (Tip: Basting infuses the steak with incredible garlic flavor and keeps it exceptionally juicy.)
- Transfer the steak to a cutting board and let it rest for 5-10 minutes.
- Remove the roasted potatoes from the oven.
- Slice the rested steak against the grain into ½-inch thick strips.
- Arrange the sliced steak and crispy roasted potatoes on a warm platter.
- Pour the garlic butter from the skillet over the steak and potatoes.
- Sprinkle the finished dish with the finely chopped fresh parsley.
Luxuriously tender, the steak melts away with each bite, its rich juices mingling with the fragrant, nutty garlic butter. The potatoes offer a delightful contrast, their crisp exteriors giving way to fluffy, soft centers. For a quiet celebration, serve it straight from the skillet at the table, letting everyone help themselves to the buttery sauce pooled at the bottom.
Spicy Shrimp Tacos with Lime Crema

Unfolding the soft tortilla to reveal plump, spice-kissed shrimp feels like opening a gift on a quiet afternoon. There’s something deeply comforting about the way the creamy lime sauce cools the gentle heat, creating a dance of flavors that slows time for just a moment. This recipe came to me during one of those golden-hour kitchen experiments where everything simply falls into place.
Ingredients
– 1 pound fresh wild-caught medium shrimp, peeled and deveined
– 2 tablespoons vibrant smoked paprika
– 1 teaspoon earthy cumin
– ½ teaspoon fragrant garlic powder
– ¼ teaspoon cayenne pepper for subtle heat
– 2 tablespoons rich extra virgin olive oil
– 8 small corn tortillas, warmed
– ½ cup cool sour cream
– 2 tablespoons fresh lime juice
– 1 teaspoon lime zest for brightness
– ¼ cup finely chopped fresh cilantro
– 1 cup crisp shredded purple cabbage
– ½ cup diced ripe avocado
Instructions
1. Pat the shrimp completely dry with paper towels to ensure proper searing.
2. In a medium bowl, combine smoked paprika, cumin, garlic powder, and cayenne pepper.
3. Toss the shrimp in the spice mixture until evenly coated.
4. Heat olive oil in a large skillet over medium-high heat until shimmering.
5. Arrange shrimp in a single layer without crowding the pan.
6. Cook shrimp for 2 minutes until the bottoms turn pink and develop a light crust.
7. Flip each shrimp carefully using tongs.
8. Cook for another 1-2 minutes until opaque throughout and slightly curled.
9. Remove shrimp from heat immediately to prevent overcooking.
10. Warm corn tortillas in a dry skillet for 30 seconds per side until pliable.
11. Combine sour cream, lime juice, and lime zest in a small bowl, whisking until smooth.
12. Place 3-4 shrimp in the center of each warm tortilla.
13. Drizzle generously with lime crema using a spoon.
14. Top with shredded purple cabbage for crunch.
15. Sprinkle with fresh cilantro leaves.
16. Add diced avocado pieces evenly across the tacos.
You’ll notice how the creamy lime sauce mingles with the spicy shrimp, creating pockets of cool and heat in every bite. The cabbage provides a satisfying crunch against the tender shrimp, while the warm tortillas hold everything together like a soft embrace. Sometimes I like to serve these with extra lime wedges for squeezing over the top, letting each person customize their perfect balance of tang and spice.
Lemon Herb Chicken with Couscous

Dusk settles softly outside my kitchen window, the golden light filtering through the glass as I prepare this simple, comforting meal that always feels like coming home after a long day. There’s something quietly beautiful about the way lemon and herbs mingle in the air, promising a dinner that nourishes both body and spirit. This lemon herb chicken with couscous has become my gentle ritual, a dish that asks for little but gives so much in return.
Ingredients
– 4 boneless, skinless chicken breasts, patted dry with paper towels
– 2 tablespoons golden extra virgin olive oil
– 3 cloves fragrant garlic, minced
– 1 fresh lemon, zested and juiced
– 1 tablespoon finely chopped fresh rosemary
– 2 teaspoons chopped fresh thyme leaves
– 1 cup pearled couscous
– 1 ¼ cups simmering chicken broth
– ½ teaspoon coarse sea salt
– ¼ teaspoon freshly cracked black pepper
– 2 tablespoons cold unsalted butter, cut into small cubes
– 2 tablespoons freshly chopped Italian parsley
Instructions
1. Pat the chicken breasts completely dry with paper towels to ensure proper browning.
2. Season both sides of the chicken evenly with coarse sea salt and freshly cracked black pepper.
3. Heat golden extra virgin olive oil in a large skillet over medium-high heat until it shimmers, about 2 minutes.
4. Place chicken breasts in the hot skillet and cook undisturbed for 5-6 minutes until deeply golden brown.
5. Flip the chicken and cook for another 5-6 minutes until the internal temperature reaches 165°F on an instant-read thermometer.
6. Transfer the cooked chicken to a clean plate and tent loosely with foil to rest.
7. Reduce the heat to medium and add minced garlic to the same skillet, cooking for 30 seconds until fragrant.
8. Add pearled couscous to the skillet and toast for 2 minutes, stirring constantly, until lightly golden.
9. Pour in simmering chicken broth, scraping up any browned bits from the bottom of the pan.
10. Bring the mixture to a gentle boil, then reduce heat to low, cover, and simmer for 8-10 minutes until couscous is tender and liquid is absorbed.
11. Remove the skillet from heat and stir in lemon zest, lemon juice, chopped rosemary, and thyme leaves.
12. Add cold unsalted butter cubes and stir continuously until melted and creamy.
13. Fold in freshly chopped Italian parsley until evenly distributed.
14. Slice the rested chicken against the grain into ½-inch thick pieces.
Gently spoon the fluffy couscous onto warm plates, arranging the sliced chicken over the top. The couscous absorbs all the beautiful pan juices, becoming tender yet maintaining a delightful slight chew, while the chicken remains remarkably juicy from proper resting. For a beautiful presentation, scatter extra parsley leaves and lemon slices around the plate, letting the bright citrus notes cut through the rich herbal flavors in the most satisfying way.
Teriyaki Salmon with Jasmine Rice

Perhaps some evenings call for simplicity, for the quiet comfort of a meal that feels both nourishing and effortless, where the gentle sizzle of salmon meeting heat fills the kitchen with a promise of something deeply satisfying.
Ingredients
- 2 (6-ounce) skin-on salmon fillets
- 1/2 cup rich soy sauce
- 1/4 cup sweet mirin
- 2 tablespoons golden honey
- 2 teaspoons freshly grated ginger
- 2 cloves garlic, finely minced
- 1 tablespoon toasted sesame oil
- 1 cup fragrant jasmine rice
- 1 1/2 cups cold water
- 1 tablespoon thinly sliced green onions
- 1 teaspoon toasted sesame seeds
Instructions
- Rinse 1 cup of fragrant jasmine rice under cold running water until the water runs clear to remove excess starch.
- Combine the rinsed rice and 1 1/2 cups of cold water in a small saucepan.
- Bring the rice to a boil over high heat, then immediately reduce the heat to low and cover the saucepan tightly.
- Simmer the rice for 15 minutes, then remove from heat and let it steam, covered, for 10 more minutes without peeking.
- While the rice cooks, whisk together 1/2 cup rich soy sauce, 1/4 cup sweet mirin, 2 tablespoons golden honey, 2 teaspoons freshly grated ginger, and 2 finely minced garlic cloves in a small bowl to create the teriyaki glaze.
- Pat 2 (6-ounce) skin-on salmon fillets completely dry with paper towels to ensure a crisp skin.
- Heat 1 tablespoon toasted sesame oil in a large non-stick skillet over medium-high heat until shimmering.
- Place the salmon fillets skin-side down in the hot skillet and press gently with a spatula for 10 seconds to prevent curling.
- Cook the salmon skin-side down for 5-6 minutes until the skin is golden and crispy.
- Flip the salmon fillets carefully using a thin spatula.
- Cook the salmon flesh-side down for 2 minutes until lightly browned.
- Pour the prepared teriyaki glaze over the salmon in the skillet.
- Reduce the heat to medium and simmer the salmon in the glaze for 3-4 minutes, spooning the glaze over the fillets repeatedly until the sauce thickens and coats the salmon evenly.
- Remove the skillet from heat when the salmon reaches an internal temperature of 125°F for medium-rare or 135°F for medium.
- Fluff the steamed jasmine rice with a fork to separate the grains.
- Divide the jasmine rice between two warm serving bowls.
- Place one teriyaki salmon fillet over the rice in each bowl.
- Drizzle the remaining glaze from the skillet over the salmon and rice.
- Sprinkle 1 tablespoon thinly sliced green onions and 1 teaspoon toasted sesame seeds over each serving.
The tender salmon flakes apart with gentle pressure, its sweet-savory glaze soaking into the fluffy jasmine rice beneath. Try serving it with quick-pickled cucumbers on the side to cut through the richness, or pack any leftovers cold for a delightful next-day lunch that tastes even better as the flavors meld.
BBQ Pulled Pork Sandwiches
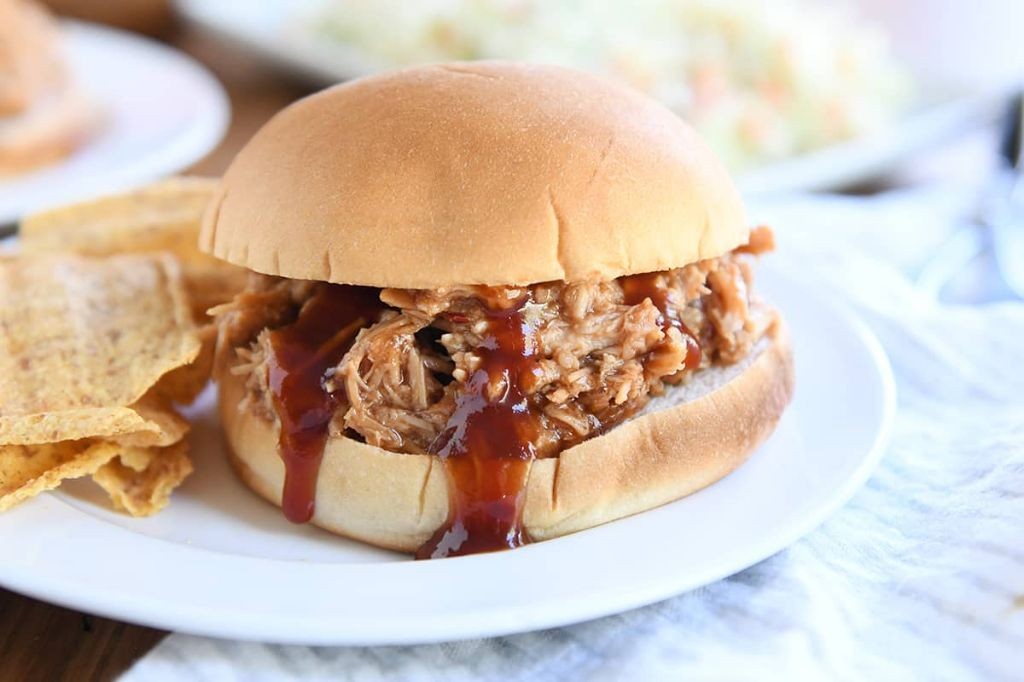
Beneath the gentle warmth of the afternoon sun, there’s something quietly comforting about the slow transformation of pork into tender, smoky shreds—a process that feels almost meditative, each hour deepening the flavors until they melt into memory. It’s in these unhurried moments that simple ingredients weave together into a meal that feels like a soft embrace, perfect for gathering loved ones or savoring solitude. This pulled pork, with its rich, caramelized edges and subtle sweetness, invites you to pause and appreciate the beauty of slow cooking.
Ingredients
– 4 pounds boneless pork shoulder, trimmed of excess fat
– 1/4 cup dark brown sugar, packed with molasses warmth
– 2 tablespoons smoked paprika, earthy and robust
– 1 tablespoon garlic powder, finely ground and aromatic
– 1 tablespoon onion powder, sweet and pungent
– 1 teaspoon coarse kosher salt, for balanced seasoning
– 1/2 teaspoon freshly cracked black pepper, with bold flecks
– 1 cup apple cider vinegar, tangy and bright
– 1/2 cup ketchup, sweet and tomato-rich
– 2 tablespoons Worcestershire sauce, deeply umami
– 1 tablespoon Dijon mustard, sharp and smooth
– 8 soft brioche buns, lightly toasted and buttery
Instructions
1. Preheat your oven to 300°F, ensuring even, low heat for tenderizing the pork.
2. In a small bowl, combine the dark brown sugar, smoked paprika, garlic powder, onion powder, coarse kosher salt, and freshly cracked black pepper to create a fragrant dry rub.
3. Pat the boneless pork shoulder completely dry with paper towels to help the rub adhere better.
4. Massage the spice rub evenly over all sides of the pork shoulder, pressing gently to form a crust.
5. Place the seasoned pork shoulder in a Dutch oven or oven-safe pot with a tight-fitting lid.
6. In a separate bowl, whisk together the apple cider vinegar, ketchup, Worcestershire sauce, and Dijon mustard until smooth.
7. Pour the vinegar mixture around the pork shoulder in the pot, avoiding washing off the rub.
8. Cover the pot tightly with its lid to trap steam and moisture during cooking.
9. Transfer the pot to the preheated oven and bake for 4 hours, until the pork shreds easily with a fork.
10. Carefully remove the pot from the oven using oven mitts, as it will be very hot.
11. Transfer the pork shoulder to a large cutting board, reserving the cooking liquid in the pot.
12. Use two forks to pull the pork apart into shreds, discarding any large fat pieces.
13. Skim excess fat from the reserved cooking liquid with a spoon for a cleaner sauce.
14. Return the shredded pork to the pot and stir to coat thoroughly with the sauce.
15. Toast the soft brioche buns in a dry skillet over medium heat for 1-2 minutes per side, until golden.
16. Spoon the saucy pulled pork generously onto the bottom halves of the toasted buns.
17. Top with the remaining bun halves and serve immediately. On quiet evenings, these sandwiches offer a tender, juicy bite with a subtle smoky sweetness that clings to the soft buns, while the tangy sauce cuts through the richness for a balanced finish. For a creative twist, pile the pork atop crispy potato skins or fold it into warm tortillas with pickled onions, letting the flavors shift and settle in new, delightful ways.
Mushroom and Spinach Risotto
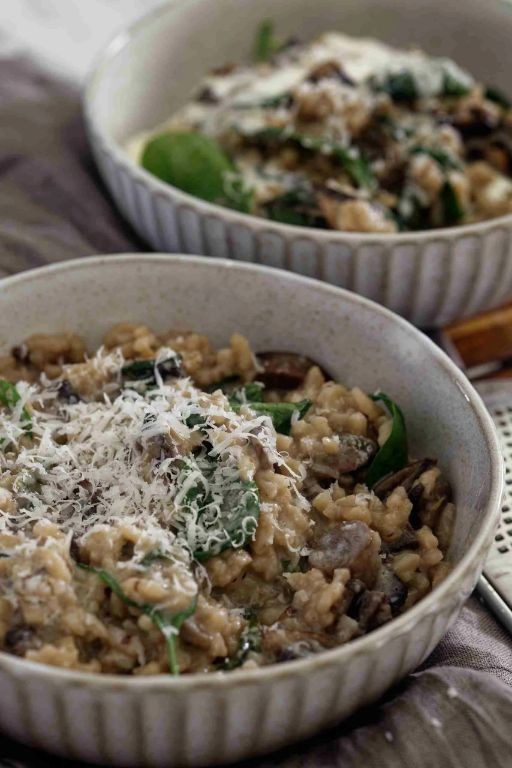
Perhaps there’s something deeply comforting about standing at the stove, the steady rhythm of stirring becoming a quiet meditation. This creamy mushroom and spinach risotto feels like that kind of peaceful kitchen ritual, where simple ingredients transform into something wonderfully nourishing and complex.
Ingredients
– 1 ½ cups arborio rice
– 8 ounces cremini mushrooms, sliced
– 4 cups warm chicken broth
– 1 cup fresh spinach leaves
– ½ cup dry white wine
– 1 small yellow onion, finely diced
– 3 cloves garlic, minced
– ½ cup grated Parmesan cheese
– 2 tablespoons unsalted butter
– 2 tablespoons rich extra virgin olive oil
– 1 teaspoon fresh thyme leaves
Instructions
1. Heat 2 tablespoons of rich extra virgin olive oil in a large, heavy-bottomed pot over medium heat for 2 minutes until shimmering.
2. Add 8 ounces of sliced cremini mushrooms and cook for 6-8 minutes, stirring occasionally, until they release their liquid and turn golden brown.
3. Transfer the cooked mushrooms to a clean plate, leaving any remaining oil in the pot.
4. Add 1 small finely diced yellow onion to the same pot and cook for 4-5 minutes until translucent and fragrant.
5. Stir in 3 cloves of minced garlic and cook for 1 minute until aromatic but not browned.
6. Add 1 ½ cups of arborio rice to the pot and toast for 2 minutes, stirring constantly, until the grains turn slightly translucent around the edges.
7. Pour in ½ cup of dry white wine and cook while stirring for 2-3 minutes until the liquid is fully absorbed.
8. Begin adding 4 cups of warm chicken broth one ladleful at a time, waiting until each addition is completely absorbed before adding the next, which should take about 20-25 minutes total.
9. Stir in the reserved cooked mushrooms and 1 teaspoon of fresh thyme leaves during the last 5 minutes of cooking.
10. Fold in 1 cup of fresh spinach leaves and cook for 2 minutes until just wilted.
11. Remove the pot from heat and stir in ½ cup of grated Parmesan cheese and 2 tablespoons of unsalted butter until fully incorporated and creamy.
For the creamiest texture, let the risotto rest for 2 minutes before serving. Finished risotto should flow slowly when spooned—this “all’onda” or wavy consistency indicates perfect doneness. Freshly grated Parmesan melts more evenly than pre-shredded, creating a silkier sauce. For a beautiful presentation, top with extra thyme sprigs and a drizzle of olive oil just before serving.
Chickpea and Kale Curry

Venturing into the kitchen on this quiet afternoon feels like unfolding a well-loved story, one where humble ingredients transform into something deeply comforting and nourishing for both body and soul. This simple curry has become my gentle refuge, a dish that simmers patiently and fills the home with the kind of warmth that lingers long after the meal is done.
Ingredients
– 2 tablespoons of golden, fragrant coconut oil
– 1 large yellow onion, finely diced
– 3 cloves of fresh garlic, minced
– 1 tablespoon of freshly grated ginger root
– 1 tablespoon of vibrant, aromatic curry powder
– 1 (14.5-ounce) can of rich, creamy coconut milk
– 1 (15-ounce) can of plump, tender chickpeas, drained and rinsed
– 4 cups of fresh, dark green kale leaves, stems removed and roughly chopped
– 1 cup of homemade or low-sodium vegetable broth
– 1 teaspoon of coarse kosher salt
– 1/2 teaspoon of freshly cracked black pepper
Instructions
1. Heat the golden, fragrant coconut oil in a large, heavy-bottomed pot over medium heat until it shimmers, about 2 minutes.
2. Add the finely diced yellow onion and cook, stirring occasionally, until it turns soft and translucent, about 5–7 minutes.
3. Stir in the minced fresh garlic and freshly grated ginger root, cooking for 1 minute until fragrant.
4. Sprinkle the vibrant, aromatic curry powder over the onion mixture and toast for 30 seconds to deepen its flavor.
5. Pour in the rich, creamy coconut milk and 1 cup of homemade or low-sodium vegetable broth, stirring to combine.
6. Add the plump, tender chickpeas, 1 teaspoon of coarse kosher salt, and 1/2 teaspoon of freshly cracked black pepper.
7. Bring the mixture to a gentle simmer, then reduce the heat to low, cover the pot, and let it cook for 15 minutes to allow the flavors to meld.
8. Stir in the fresh, dark green kale leaves and cook uncovered for 5–7 minutes, until the kale has wilted and turned bright green.
9. Remove the pot from the heat and let the curry rest for 5 minutes before serving to allow the flavors to settle.
Creamy and gently spiced, this curry cradles the tender chickpeas and silky kale in a broth that’s both light and deeply satisfying. Consider serving it over a bed of fluffy basmati rice or with warm, torn pieces of naan to soak up every last drop, making each bite a quiet moment of comfort.
Balsamic Glazed Chicken Thighs
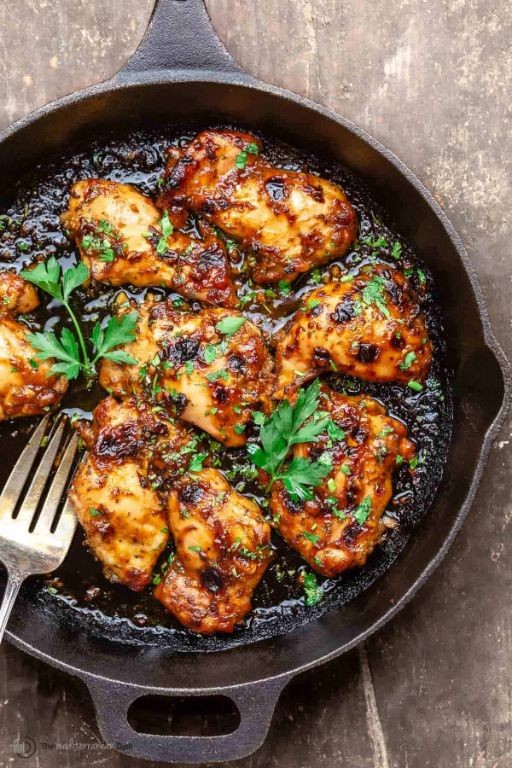
Kind of like finding an old photograph in a worn leather album, some recipes carry the quiet weight of memory in their simplest ingredients. This one unfolds slowly in the kitchen, the sharp, sweet scent of vinegar and herbs filling the air with a deep, autumnal comfort, a gentle ritual for a quiet evening.
Ingredients
– 8 bone-in, skin-on chicken thighs
– 3 tablespoons rich extra virgin olive oil
– 1 teaspoon coarse kosher salt
– 1/2 teaspoon finely ground black pepper
– 3 cloves of aromatic garlic, minced
– 1/2 cup of complex, aged balsamic vinegar
– 1/4 cup of golden, raw honey
– 2 sprigs of fresh, woody rosemary
Instructions
1. Pat the chicken thighs completely dry with paper towels to ensure the skin crisps beautifully.
2. Season both sides of the chicken generously with the coarse kosher salt and finely ground black pepper.
3. Heat the rich extra virgin olive oil in a large, heavy-bottomed oven-safe skillet over medium-high heat until it shimmers, about 2 minutes.
4. Carefully place the chicken thighs in the hot skillet, skin-side down, arranging them so they aren’t crowded.
5. Sear the chicken without moving it for 6-8 minutes, until the skin is deeply golden brown and releases easily from the pan.
6. Flip the chicken thighs and cook for an additional 4 minutes to lightly brown the other side.
7. Transfer the entire skillet to a preheated 400°F oven and roast for 15 minutes.
8. While the chicken roasts, combine the aged balsamic vinegar, raw honey, and minced aromatic garlic in a small saucepan.
9. Simmer the glaze over medium-low heat for 8-10 minutes, stirring occasionally, until it thickens enough to coat the back of a spoon.
10. Remove the skillet from the oven and carefully pour off all but one tablespoon of the rendered fat.
11. Pour the prepared glaze over the chicken thighs in the skillet, using a brush to coat them evenly.
12. Add the fresh rosemary sprigs to the skillet around the chicken.
13. Return the skillet to the 400°F oven and roast for another 5-7 minutes, until the glaze is sticky and caramelized. Heirloom china seems to hold this dish best, its glossy, lacquered skin giving way to impossibly tender, juicy meat beneath. The sweet-tart intensity of the glaze, infused with woody rosemary and mellow garlic, clings to every bite, creating a beautiful contrast against the savory, crispy skin, perfect for serving over a bed of creamy polenta to catch every last drop.
Thai Basil Beef with Rice Noodles
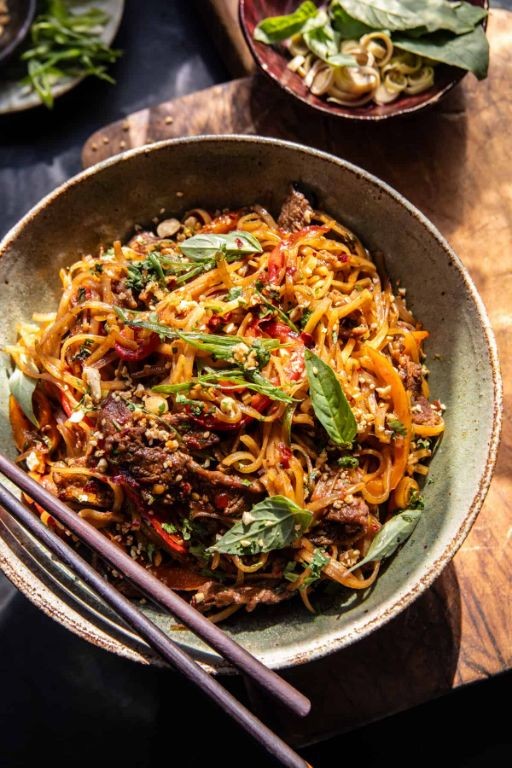
Mulling over the quiet moments in my kitchen today, I find myself drawn to the fragrant memories of street food stalls and the comforting warmth of a well-loved wok. There’s something deeply soothing about the rhythm of preparing this dish, each step a gentle meditation that fills the home with the most inviting aromas.
Ingredients
– 8 ounces thin rice noodles
– 1 pound grass-fed ground beef
– 3 tablespoons rich toasted sesame oil
– 4 cloves aromatic fresh garlic, minced
– 1 medium sweet yellow onion, thinly sliced
– 2 fresh red bell peppers, julienned
– 1 cup fragrant fresh Thai basil leaves
– 3 tablespoons savory fish sauce
– 2 tablespoons sweet honey
– 1 tablespoon bright lime juice
– 1 teaspoon fiery red pepper flakes
– 2 delicate green onions, sliced
Instructions
1. Place 8 ounces of thin rice noodles in a large bowl and cover completely with hot tap water, letting them soak for exactly 15 minutes until pliable but still firm.
2. Heat a large wok or skillet over medium-high heat until a drop of water sizzles and evaporates immediately.
3. Add 1 tablespoon of rich toasted sesame oil to the hot wok, swirling to coat the surface evenly.
4. Add 1 pound of grass-fed ground beef, breaking it apart with a wooden spoon and cooking for 6-8 minutes until browned and crumbled.
5. Transfer the cooked beef to a clean plate, leaving the rendered fat in the wok.
6. Add the remaining 2 tablespoons of rich toasted sesame oil to the wok.
7. Sauté 4 cloves of minced aromatic fresh garlic for 30 seconds until fragrant but not browned.
8. Add 1 thinly sliced medium sweet yellow onion and cook for 4 minutes until translucent and softened.
9. Incorporate 2 julienned fresh red bell peppers and cook for 3 more minutes until slightly tender but still crisp.
10. Drain the soaked rice noodles thoroughly and add them to the wok.
11. Pour in 3 tablespoons of savory fish sauce, 2 tablespoons of sweet honey, and 1 tablespoon of bright lime juice, tossing everything together gently.
12. Return the cooked beef to the wok and sprinkle in 1 teaspoon of fiery red pepper flakes.
13. Cook everything together for 2-3 minutes, tossing continuously until the noodles are tender and have absorbed the sauces.
14. Remove the wok from heat and stir in 1 cup of fragrant fresh Thai basil leaves until just wilted.
15. Garnish with 2 sliced delicate green onions before serving.
Beyond the immediate satisfaction of that first bite, what stays with you is the beautiful contrast between the tender rice noodles and the slight resistance of the crisp-tender vegetables. The savory depth from the fish sauce marries so gracefully with the honey’s subtle sweetness, while the Thai basil leaves release their distinctive aroma that lingers in the air long after the meal is finished. I love serving this in shallow bowls with extra lime wedges for squeezing over, watching the citrus brighten each component in the most delightful way.
Mediterranean Stuffed Peppers
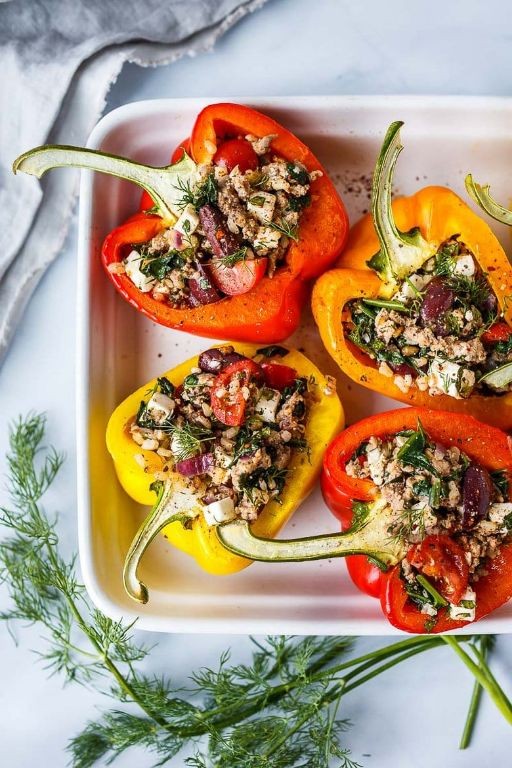
Beneath the soft glow of the kitchen light, I find myself drawn to the quiet ritual of preparing these Mediterranean stuffed peppers, a dish that feels like a gentle embrace after a long day, filled with the warmth of sun-soaked ingredients and comforting aromas that slowly fill the room.
Ingredients
– 4 large, vibrant bell peppers (mixed colors for visual appeal)
– 1 cup fluffy, long-grain white rice
– 1 lb lean ground lamb
– 1 small, finely diced yellow onion
– 2 cloves fragrant, minced garlic
– 1/2 cup rich, extra virgin olive oil
– 1/4 cup freshly squeezed lemon juice
– 1 tsp aromatic, dried oregano
– 1/2 tsp flaky sea salt
– 1/4 tsp finely ground black pepper
– 1/2 cup crumbled, tangy feta cheese
– 1/4 cup chopped, fresh parsley
Instructions
1. Preheat your oven to 375°F to ensure even cooking from the start.
2. Carefully slice the tops off the bell peppers and remove all seeds and membranes for a clean cavity.
3. In a large skillet, heat 2 tablespoons of olive oil over medium heat until it shimmers lightly.
4. Add the diced onion and sauté for 5 minutes until it turns translucent and fragrant.
5. Stir in the minced garlic and cook for 1 more minute to release its aroma without browning.
6. Crumble the ground lamb into the skillet and cook for 8–10 minutes until fully browned, breaking it up with a spoon.
7. Mix in the uncooked rice, dried oregano, sea salt, and black pepper, stirring to coat everything evenly.
8. Gradually pour in 1 1/2 cups of water, bring to a simmer, then cover and cook for 15 minutes until the rice is tender and has absorbed the liquid.
9. Remove the skillet from heat and fold in the feta cheese and parsley for a creamy, herby finish.
10. Spoon the filling generously into the prepared bell peppers, packing it down lightly to prevent gaps.
11. Arrange the stuffed peppers upright in a baking dish and drizzle with the remaining olive oil and lemon juice.
12. Cover the dish tightly with foil and bake for 30 minutes to steam the peppers until tender.
13. Remove the foil and bake for another 10–15 minutes until the pepper edges are lightly charred and the filling is golden.
14. Let the peppers rest for 5 minutes before serving to allow the flavors to meld. You’ll love how the peppers soften into silky vessels, their sweetness balancing the savory, spiced lamb and tangy feta, with the rice absorbing every bit of juice. Try serving them alongside a simple Greek salad or with a dollop of cool yogurt for a refreshing contrast that makes each bite feel like a quiet celebration.
Cajun Shrimp and Sausage Skillet
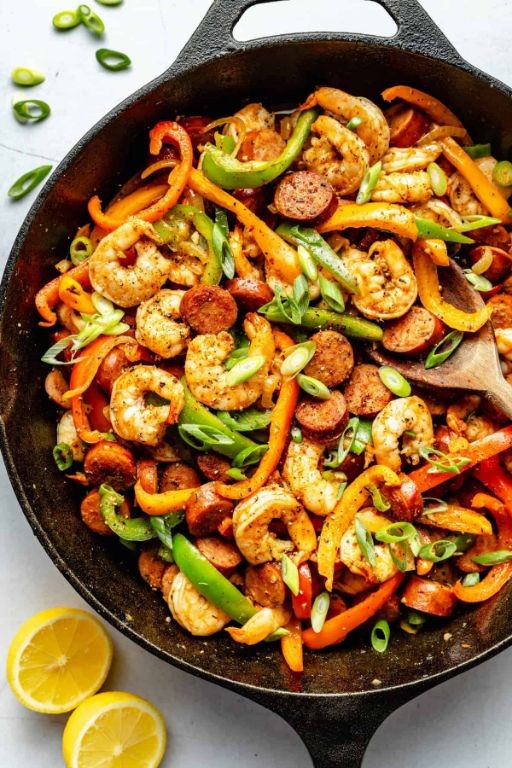
Evenings like this call for something that simmers and fills the kitchen with warmth, something that feels both hearty and deeply comforting, like this skillet dish that brings together the bold flavors of the South in one pan. It’s the kind of meal that slows time, inviting you to stir and savor as the aromas weave through the air, a simple yet soulful creation for quiet nights.
Ingredients
- 1 pound of large, wild-caught shrimp, peeled and deveined
- 12 ounces of smoked Andouille sausage, sliced into hearty coins
- 1 large yellow onion, finely diced
- 1 vibrant green bell pepper, chopped into crisp pieces
- 2 stalks of fresh celery, thinly sliced
- 3 plump garlic cloves, minced
- 1 tablespoon of rich extra virgin olive oil
- 1 teaspoon of aromatic smoked paprika
- 1/2 teaspoon of earthy dried oregano
- 1/4 teaspoon of fiery cayenne pepper
- 1/2 cup of rich chicken broth
- 1/4 cup of freshly chopped parsley
- 1/2 teaspoon of coarse sea salt
- 1/4 teaspoon of freshly cracked black pepper
Instructions
- Heat 1 tablespoon of rich extra virgin olive oil in a large cast-iron skillet over medium-high heat until it shimmers, about 2 minutes.
- Add 12 ounces of smoked Andouille sausage, sliced into hearty coins, and cook for 4–5 minutes, turning occasionally, until lightly browned and fragrant.
- Stir in 1 large yellow onion, finely diced, 1 vibrant green bell pepper, chopped into crisp pieces, and 2 stalks of fresh celery, thinly sliced, and sauté for 6–7 minutes until the vegetables soften and the onion turns translucent.
- Add 3 plump garlic cloves, minced, and cook for 1 minute until fragrant, being careful not to burn it to avoid bitterness.
- Sprinkle in 1 teaspoon of aromatic smoked paprika, 1/2 teaspoon of earthy dried oregano, 1/4 teaspoon of fiery cayenne pepper, 1/2 teaspoon of coarse sea salt, and 1/4 teaspoon of freshly cracked black pepper, stirring for 30 seconds to toast the spices and deepen their flavors.
- Pour in 1/2 cup of rich chicken broth, scraping the bottom of the skillet to lift any browned bits for added depth.
- Simmer the mixture for 3–4 minutes until the liquid reduces by half, creating a glossy, cohesive sauce.
- Gently nestle 1 pound of large, wild-caught shrimp, peeled and deveined, into the skillet in a single layer and cook for 2–3 minutes per side until they turn pink and opaque, flipping once for even cooking.
- Remove the skillet from the heat and stir in 1/4 cup of freshly chopped parsley for a burst of freshness.
Rich and smoky from the sausage, with a subtle heat that lingers, the shrimp stay tender against the crisp-tender vegetables. Serve it straight from the skillet over fluffy rice or with crusty bread to soak up every bit of the spiced broth, letting the flavors mingle in each comforting bite.
Korean Beef Bibimbap
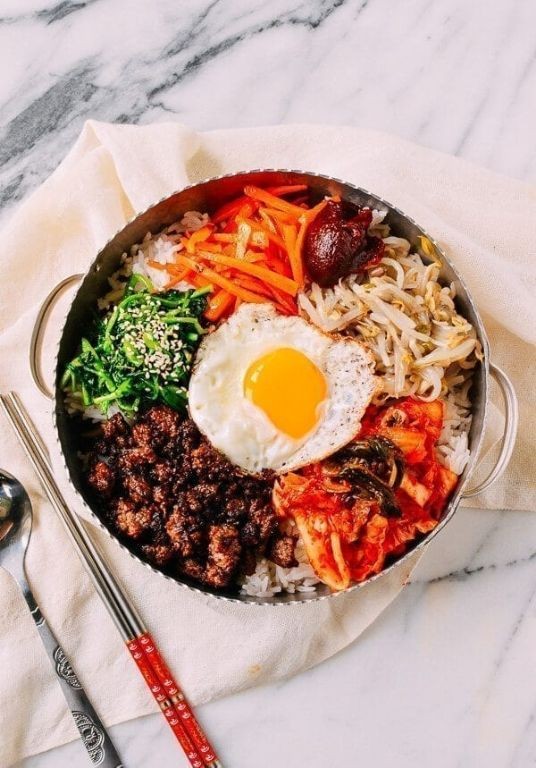
Just thinking about how some meals feel like coming home, even when they’re from faraway places. Korean beef bibimbap is one of those dishes for me—a vibrant bowl that somehow manages to be both comforting and exciting, like finding familiar warmth in unexpected colors. Each component tells its own story before coming together in one harmonious mix.
Ingredients
– 1 pound thinly sliced ribeye beef
– 2 tablespoons toasted sesame oil
– 3 tablespoons soy sauce
– 1 tablespoon honey
– 3 cloves minced garlic
– 2 cups cooked short-grain white rice
– 2 cups fresh spinach leaves
– 1 cup julienned carrots
– 1 cup sliced shiitake mushrooms
– 4 sunny-side-up eggs
– 1 tablespoon gochujang paste
– 1 teaspoon toasted sesame seeds
Instructions
1. Combine 1 pound thinly sliced ribeye beef with 2 tablespoons toasted sesame oil, 3 tablespoons soy sauce, 1 tablespoon honey, and 3 cloves minced garlic in a medium bowl.
2. Marinate the beef mixture for 15 minutes at room temperature to allow flavors to penetrate.
3. Heat a large skillet over medium-high heat until a drop of water sizzles immediately.
4. Cook the marinated beef for 3-4 minutes, stirring constantly, until no pink remains.
5. Transfer the cooked beef to a clean plate using tongs.
6. Wipe the skillet clean with a paper towel and return to medium heat.
7. Sauté 1 cup julienned carrots for 2 minutes until slightly softened but still crisp.
8. Add 1 cup sliced shiitake mushrooms and cook for 3 minutes until tender and lightly browned.
9. Blanch 2 cups fresh spinach leaves in boiling water for 30 seconds, then immediately transfer to ice water.
10. Squeeze excess water from the blanched spinach using your hands.
11. Divide 2 cups cooked short-grain white rice among four serving bowls.
12. Arrange the cooked beef, carrots, mushrooms, and spinach in separate sections over the rice.
13. Fry 4 sunny-side-up eggs in a non-stick skillet over medium heat until whites are set but yolks remain runny.
14. Place one fried egg in the center of each bowl.
15. Drizzle each bowl with 1 tablespoon gochujang paste and sprinkle with 1 teaspoon toasted sesame seeds.
16. Mix all components thoroughly before eating to distribute the runny egg yolk and seasonings evenly. Maybe what I love most is how the crisp vegetables play against the tender beef, while the gochujang brings just enough heat to make everything feel alive. Sometimes I’ll serve it in a hot stone bowl for that satisfying sizzle, watching the rice develop a golden crust at the bottom that cracks beautifully when mixed.
Caprese Stuffed Chicken
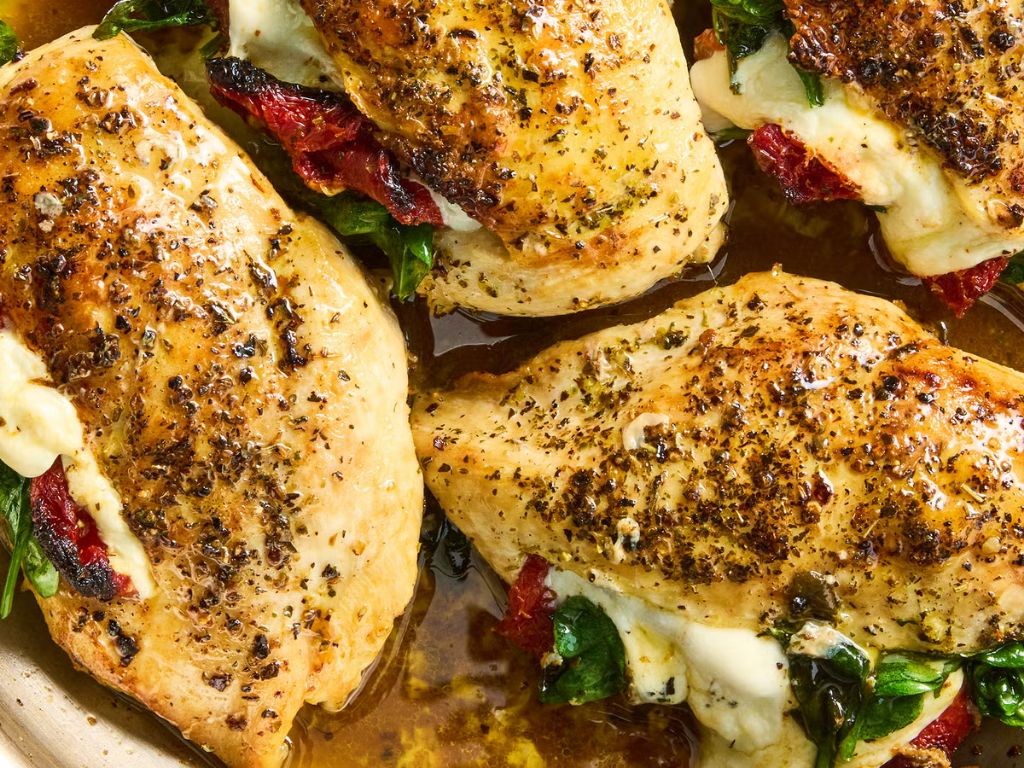
Under the soft glow of the kitchen light, I find myself returning to this recipe—a simple transformation of humble ingredients into something that feels both comforting and elegant, like a quiet conversation with an old friend.
Ingredients
– 4 boneless, skinless chicken breasts (about 6 ounces each)
– 1 cup fresh mozzarella pearls, drained
– 1 cup sun-ripened cherry tomatoes, halved
– 1/4 cup fresh basil leaves, thinly sliced
– 2 tablespoons rich extra virgin olive oil
– 1 teaspoon coarse sea salt
– 1/2 teaspoon finely ground black pepper
– 1/2 teaspoon aromatic garlic powder
Instructions
1. Preheat your oven to 375°F and lightly grease a 9×13-inch baking dish with olive oil.
2. Using a sharp knife, carefully slice a deep pocket horizontally into each chicken breast, being careful not to cut all the way through.
3. In a medium bowl, gently combine the fresh mozzarella pearls, sun-ripened cherry tomatoes, and thinly sliced fresh basil leaves.
4. Evenly divide the mozzarella and tomato mixture, stuffing it into each chicken breast pocket.
5. Secure the openings with 2-3 toothpicks to prevent filling from leaking during baking.
6. Drizzle the stuffed chicken breasts with rich extra virgin olive oil, coating all surfaces.
7. In a small bowl, mix together the coarse sea salt, finely ground black pepper, and aromatic garlic powder.
8. Evenly sprinkle the seasoning mixture over all sides of each chicken breast.
9. Place the chicken breasts in the prepared baking dish, ensuring they don’t touch for even cooking.
10. Bake at 375°F for 25-30 minutes, until the internal temperature reaches 165°F and the cheese is melted and bubbly.
11. Remove from oven and let rest for 5 minutes before carefully removing toothpicks.
Heavenly in its simplicity, the chicken emerges tender and juicy while the melted mozzarella creates creamy pockets that burst with sweet tomato and fresh basil. Serve it sliced over a bed of lemony arugula or alongside roasted potatoes that can catch the delicious pan juices.
Moroccan Spiced Lamb Chops

Remembering how the spices would linger in my grandmother’s kitchen, I find myself drawn to this comforting ritual of preparing lamb chops, the warm aromas wrapping around me like a familiar blanket on a quiet evening.
Ingredients
– 8 thick-cut lamb chops with beautiful marbling
– 2 tablespoons rich extra virgin olive oil
– 4 cloves fragrant garlic, minced
– 1 tablespoon sweet smoked paprika
– 2 teaspoons warm ground cumin
– 1 teaspoon earthy ground coriander
– ½ teaspoon fiery cayenne pepper
– 1 teaspoon floral dried oregano
– 1 teaspoon coarse sea salt
– ½ teaspoon freshly cracked black pepper
– 2 tablespoons fresh lemon juice from bright yellow lemons
– 2 tablespoons chopped fresh mint leaves
Instructions
1. Pat the lamb chops completely dry with paper towels to ensure proper browning.
2. In a small bowl, whisk together the olive oil, minced garlic, paprika, cumin, coriander, cayenne, oregano, salt, and black pepper until a thick paste forms.
3. Rub the spice mixture evenly over all surfaces of the lamb chops, covering every inch.
4. Let the lamb chops rest at room temperature for 30 minutes to allow the flavors to penetrate deeply.
5. Preheat a cast-iron skillet over medium-high heat until a drop of water sizzles and evaporates immediately.
6. Place the lamb chops in the hot skillet without crowding, working in batches if necessary.
7. Sear the chops for 3-4 minutes until a deep golden-brown crust forms on the bottom.
8. Flip the chops using tongs and cook for another 3-4 minutes for medium-rare, or until internal temperature reaches 135°F on an instant-read thermometer.
9. Transfer the cooked chops to a clean plate and drizzle with fresh lemon juice.
10. Let the lamb chops rest undisturbed for 5 minutes to allow the juices to redistribute evenly.
11. Sprinkle the chopped fresh mint over the rested chops just before serving.
Zesty and aromatic, these lamb chops emerge with a crackling spice crust giving way to tender, pink-centered meat that practically melts on the tongue. The fresh mint brightens each rich bite, making them perfect served over creamy couscous that soaks up the spiced pan juices, or alongside roasted vegetables that caramelize in the same vibrant flavors.
Caramelized Onion and Goat Cheese Flatbread

Dappled afternoon light spills across the kitchen counter as I find myself drawn again to this simple comfort, the kind of meal that asks for patience and rewards it generously with deep, sweet flavors and creamy textures that feel like a quiet embrace. There’s something almost meditative in the slow transformation of humble onions into something rich and complex, a process that mirrors the gentle unfolding of an unhurried day. This flatbread, with its crisp edges and melting cheese, has become my go-to when I need a moment of calm creation and a warm, satisfying bite.
Ingredients
– 1 large yellow onion, thinly sliced into half-moons
– 2 tablespoons rich extra virgin olive oil
– 1 teaspoon golden honey
– 1 pre-made pizza dough ball, at room temperature
– 4 ounces creamy goat cheese, crumbled
– 1/4 cup fresh thyme leaves
– 1/2 teaspoon flaky sea salt
– Freshly cracked black pepper
Instructions
1. Heat 2 tablespoons of rich extra virgin olive oil in a large skillet over medium-low heat until it shimmers.
2. Add 1 large thinly sliced yellow onion and cook slowly, stirring occasionally, for 25-30 minutes until the onions turn deep golden brown and become jammy.
3. Drizzle 1 teaspoon of golden honey over the caramelized onions and stir to combine, then remove from heat.
4. Preheat your oven to 425°F and place a baking sheet inside to heat up.
5. On a lightly floured surface, stretch the room temperature pizza dough ball into a 12-inch oval about 1/4-inch thick.
6. Carefully remove the hot baking sheet from the oven and transfer the stretched dough directly onto it.
7. Spread the caramelized onion mixture evenly over the dough, leaving a 1/2-inch border around the edges.
8. Sprinkle 4 ounces of crumbled creamy goat cheese across the onions in an even layer.
9. Scatter 1/4 cup of fresh thyme leaves over the cheese and onions.
10. Season the entire flatbread with 1/2 teaspoon of flaky sea salt and several turns of freshly cracked black pepper.
11. Bake at 425°F for 12-15 minutes until the crust is golden brown and the cheese has softened and begun to bubble at the edges.
12. Remove from the oven and let rest for 3 minutes before slicing.
What emerges from the oven is a beautiful contrast of textures—the crisp, chewy crust giving way to the velvety sweet onions and tangy, melted goat cheese. The fresh thyme perfumes each bite with earthy notes that play beautifully against the honey-kissed caramelization. Consider serving it alongside a simple arugula salad dressed with lemon vinaigrette, or slice it into slender strips for elegant appetizers at your next gathering.
Summary
Finally, these 20 Blue Apron recipes make busy weeknights deliciously simple. With pre-portioned ingredients and clear instructions, you can create restaurant-quality meals without the stress. We’d love to hear which recipes become your family favorites—drop a comment below and share this roundup on Pinterest to help other home cooks discover these flavorful solutions!