Let’s be honest—your Breville appliance is a kitchen superhero, and it’s time to unlock its full potential! Whether you’re craving quick weeknight dinners, impressive weekend brunches, or cozy comfort food, we’ve gathered 20 mouthwatering recipes perfect for any occasion. Get ready to be inspired and discover new favorites that’ll make cooking a joy. Dive in and let’s get delicious!
Breville Juicer Fresh Orange Carrot Juice

Brimming with vibrant color and fresh flavor, this orange carrot juice has become my morning ritual ever since I discovered how my Breville juicer transforms humble produce into liquid sunshine. There’s something magical about watching those bright orange hues swirl together that makes even the earliest mornings feel celebratory.
Ingredients
– 4 large navel oranges, peeled and segmented
– 6 medium organic carrots, scrubbed and trimmed
– 1 tablespoon fresh ginger root, peeled
– 1 cup filtered ice water
– Fresh mint sprigs for garnish
Instructions
1. Thoroughly scrub 6 medium organic carrots under cold running water using a vegetable brush to remove any residual soil.
2. Peel 4 large navel oranges completely, ensuring all white pith is removed to prevent bitterness in the final juice.
3. Segment the peeled oranges by cutting between membrane walls, collecting the flesh in a bowl.
4. Peel 1 tablespoon of fresh ginger root using the edge of a spoon for precise removal of the thin skin.
5. Cut carrots into 2-inch segments that will fit comfortably through your Breville juicer’s feed chute.
6. Turn on your Breville juicer to its highest speed setting for maximum juice extraction from fibrous vegetables.
7. Alternate feeding carrot segments and orange segments through the juicer to help push through pulp efficiently.
8. Add the peeled ginger root last to ensure its potent flavor permeates the entire juice mixture.
9. Immediately pour the fresh juice through a fine-mesh strainer to remove any remaining pulp particles.
10. Stir in 1 cup of filtered ice water to slightly dilute the intensity and chill the juice to approximately 40°F.
11. Pour the strained juice into chilled glasses and garnish each with fresh mint sprigs.
Nothing compares to the velvety smooth texture that glides across your palate while the sweet citrus notes dance with earthy carrot undertones. I love serving this in frosty mason jars with colorful striped straws for weekend brunches, or sometimes I’ll add a splash of sparkling water for a refreshing spritzer variation that delights unexpected guests.
Breville Smart Oven Roasted Garlic Parmesan Potatoes
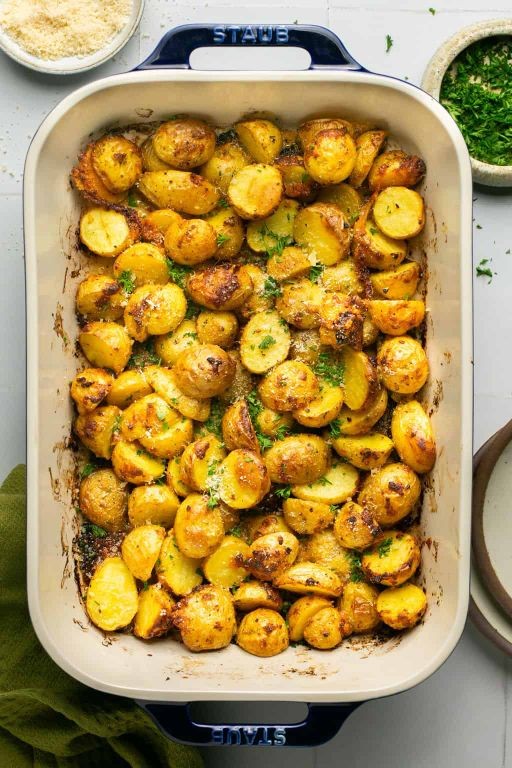
Zesty aromas of garlic and Parmesan have become the unofficial soundtrack to my Sunday meal preps ever since I discovered this Breville Smart Oven method—it turns humble potatoes into crispy-edged, tender-centered perfection with minimal effort, leaving my kitchen smelling like an Italian trattoria. There’s something deeply satisfying about pulling a tray of these golden beauties from the oven, especially after a long week when comfort food feels non-negotiable. I’ve tweaked this recipe over countless batches to nail that ideal balance of crunch and fluffiness, and now it’s my go-to for everything from weeknight dinners to impressing guests without the stress.
Ingredients
– 2 pounds Yukon Gold potatoes, cut into 1-inch cubes
– 3 tablespoons extra-virgin olive oil
– 4 cloves garlic, finely minced
– 1/2 cup freshly grated Parmesan cheese
– 1 teaspoon dried oregano
– 1/2 teaspoon freshly cracked black pepper
– 1/2 teaspoon fine sea salt
– 2 tablespoons unsalted butter, melted
– 1 tablespoon fresh parsley, finely chopped
Instructions
1. Preheat the Breville Smart Oven to 425°F on the “Bake” setting for 15 minutes.
2. Place the cubed Yukon Gold potatoes in a large mixing bowl.
3. Drizzle the extra-virgin olive oil over the potatoes, tossing thoroughly to coat each piece evenly.
4. Add the finely minced garlic, freshly grated Parmesan cheese, dried oregano, freshly cracked black pepper, and fine sea salt to the bowl.
5. Toss the mixture until the potatoes are uniformly coated with the seasoning blend.
6. Transfer the seasoned potatoes to a parchment-lined baking sheet, spreading them in a single layer with space between each piece.
7. Roast the potatoes in the preheated oven for 25 minutes, or until the edges begin turning golden brown.
8. Remove the baking sheet from the oven and drizzle the melted unsalted butter evenly over the potatoes.
9. Use a spatula to flip each potato piece, ensuring all sides crisp evenly.
10. Return the baking sheet to the oven and roast for an additional 10–12 minutes, or until the potatoes are deeply golden and fork-tender.
11. Tip: For extra crispiness, avoid overcrowding the baking sheet—this allows hot air to circulate freely around each potato cube.
12. Sprinkle the finely chopped fresh parsley over the hot potatoes immediately after removing them from the oven.
13. Tip: Grate the Parmesan cheese yourself rather than using pre-shredded varieties, as it melts more evenly and avoids anti-caking agents that can affect texture.
14. Tip: Let the potatoes rest for 5 minutes after roasting to allow the flavors to meld and the exterior to set for optimal crispness.
Seriously, these potatoes emerge with a crackling exterior that gives way to a cloud-like interior, infused with the nutty richness of Parmesan and the gentle kick of garlic. I love serving them alongside grilled chicken or folding them into breakfast hash the next day—they’re so versatile that they rarely last long in my fridge, but when they do, they reheat beautifully for a quick, satisfying snack.
Breville Food Processor Homemade Basil Pesto
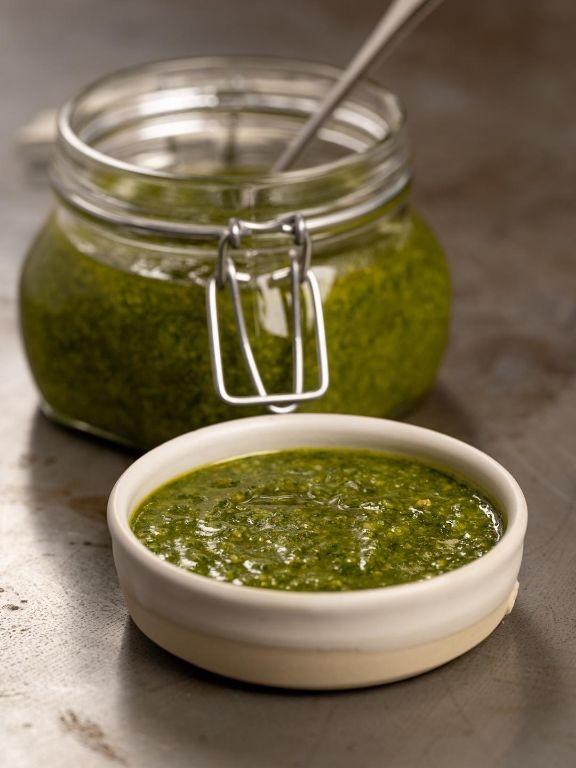
Creating homemade pesto in my Breville food processor has become my go-to solution for transforming ordinary weeknight dinners into something special. There’s something magical about watching fresh basil leaves, pine nuts, and Parmesan cheese emulsify into that vibrant green sauce that tastes infinitely better than anything from a jar. I actually keep my food processor on the counter specifically for pesto emergencies—those nights when dinner needs to happen fast but still feel luxurious.
Ingredients
– 3 cups fresh basil leaves, tightly packed
– ½ cup extra virgin olive oil
– ⅓ cup pine nuts, lightly toasted
– 2 garlic cloves, peeled and smashed
– ½ cup Parmigiano-Reggiano cheese, freshly grated
– 2 tablespoons unsalted butter, softened
– 1 teaspoon fine sea salt
– ¼ teaspoon freshly cracked black pepper
Instructions
1. Place the pine nuts in a dry skillet over medium heat and toast for 3-4 minutes, shaking the pan frequently until golden brown and fragrant.
2. Transfer the toasted pine nuts to a plate and allow them to cool completely to room temperature, about 10 minutes.
3. Insert the metal S-blade into your Breville food processor bowl and add the cooled pine nuts, garlic cloves, and fine sea salt.
4. Pulse the mixture 8-10 times in 1-second bursts until the ingredients are coarsely chopped, scraping down the sides with a spatula after 5 pulses.
5. Add the tightly packed basil leaves to the processor bowl and secure the lid firmly in place.
6. Process the basil mixture on medium speed for 15 seconds while slowly drizzling the extra virgin olive oil through the feed tube.
7. Stop the processor and scrape down the sides thoroughly to ensure even incorporation of all ingredients.
8. Add the freshly grated Parmigiano-Reggiano cheese, softened unsalted butter, and freshly cracked black pepper to the mixture.
9. Process the complete mixture on high speed for 20-25 seconds until a smooth, emulsified paste forms with a consistent texture.
10. Transfer the finished pesto to an airtight container and press plastic wrap directly against the surface to prevent oxidation. Here’s where that vibrant green pesto really shines—the texture should be luxuriously smooth with tiny specks of basil, while the flavor bursts with fresh herbal notes balanced by nutty richness. I love tossing it with fresh pasta, but it’s equally stunning as a sandwich spread or swirled into creamy soups for an instant flavor boost.
Breville Blender Creamy Avocado Smoothie
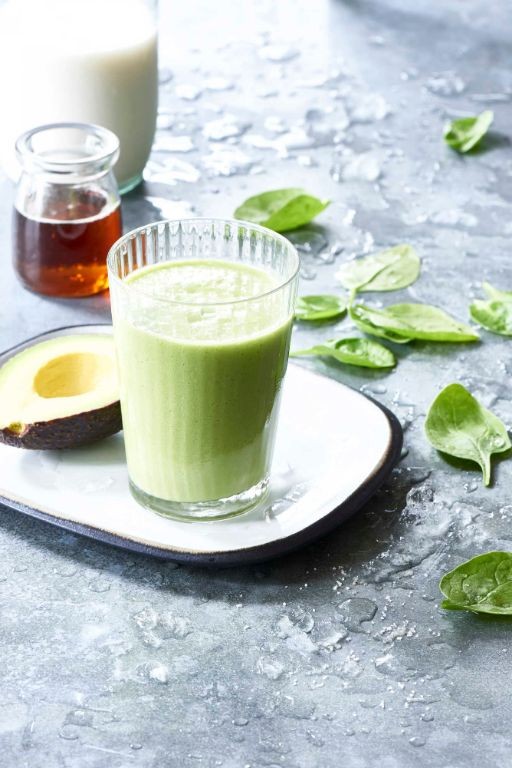
Yesterday morning, I found myself staring at three perfectly ripe avocados that needed immediate attention—my Breville blender was calling my name for this creamy creation that’s become my go-to breakfast. There’s something magical about how effortlessly it whips up a velvety, nutrient-packed smoothie that keeps me full until lunch.
Ingredients
- 1 large Hass avocado, peeled and pitted
- 1 cup frozen banana chunks
- 1/2 cup plain Greek yogurt
- 1 tablespoon raw honey
- 1 cup unsweetened almond milk
- 1/2 teaspoon pure vanilla extract
- 1 cup ice cubes
Instructions
- Place the peeled and pitted Hass avocado into the Breville blender pitcher.
- Add 1 cup of frozen banana chunks to the pitcher.
- Measure and pour 1/2 cup of plain Greek yogurt into the blender.
- Drizzle 1 tablespoon of raw honey over the other ingredients.
- Pour 1 cup of unsweetened almond milk into the pitcher.
- Add 1/2 teaspoon of pure vanilla extract to the mixture.
- Secure the blender lid tightly onto the pitcher.
- Select the “Smoothie” function on the Breville blender and process for 45 seconds, or until completely smooth and creamy.
- Remove the lid and add 1 cup of ice cubes to the blended mixture.
- Replace the lid and blend on high speed for an additional 30 seconds, until the smoothie is thick and frosty.
- Pour the smoothie immediately into a chilled glass.
Velvety and luxuriously thick, this smoothie delivers a rich avocado base complemented by the natural sweetness of banana and honey. For an elegant twist, serve it in a hollowed-out avocado half or garnish with a sprinkle of chia seeds and a mint sprig—it’s a refreshing, restaurant-worthy treat you can enjoy any time of day.
Breville Panini Press Grilled Chicken Caprese Sandwich

Very few kitchen gadgets earn their permanent counter space like my trusty Breville panini press, which transforms simple ingredients into something spectacular—like this grilled chicken Caprese sandwich that tastes like summer on a plate. I first fell in love with this combination during a trip to Italy, and now it’s my go-to quick lunch that feels anything but ordinary. There’s something magical about how the press melds the flavors together while creating those beautiful grill marks we all crave.
Ingredients
– 2 boneless, skinless chicken breasts (6 oz each), pounded to ½-inch thickness
– 4 slices artisanal sourdough bread (½-inch thick)
– 4 oz fresh mozzarella di bufala, sliced into ¼-inch rounds
– 2 ripe heirloom tomatoes, sliced into ¼-inch rounds
– 8 fresh basil leaves
– 2 tbsp extra virgin olive oil
– 1 tbsp balsamic glaze
– ½ tsp flaky sea salt
– ¼ tsp freshly cracked black pepper
Instructions
1. Preheat Breville panini press to 375°F according to manufacturer’s temperature settings.
2. Brush both sides of chicken breasts with 1 tablespoon olive oil and season evenly with salt and pepper.
3. Place chicken breasts on preheated press and close lid, cooking for 6-8 minutes until internal temperature reaches 165°F and grill marks are deeply defined.
4. Remove chicken to cutting board and slice diagonally against the grain into ½-inch strips.
5. Brush one side of each sourdough slice with remaining olive oil, creating a moisture barrier for optimal crisping.
6. Arrange sliced chicken evenly on unoiled sides of two bread slices, ensuring coverage extends to edges.
7. Layer mozzarella slices over chicken, followed by tomato rounds in slightly overlapping pattern.
8. Distribute basil leaves evenly over tomatoes, then drizzle with balsamic glaze in zigzag pattern.
9. Top with remaining bread slices, oiled sides facing outward for maximum contact with press surfaces.
10. Place assembled sandwiches on press and close lid firmly, applying gentle pressure for 3-4 minutes until bread is golden-brown and cheese visibly melts around edges.
11. Transfer sandwiches to wire rack for 1 minute to prevent sogginess before slicing diagonally. For that perfect crust, don’t overcrowd the press—cook one sandwich at a time if your model allows. Freshly cracked pepper releases more aromatic oils than pre-ground, making all the difference. Letting the sandwich rest briefly ensures the cheese sets properly without making the bread soggy.
Finally, that first bite delivers incredible textural contrast—the crackle of pressed sourdough giving way to creamy mozzarella and juicy tomatoes, while the basil provides bright herbal notes that cut through the richness. I love serving these sliced into triangles with a simple arugula salad dressed in lemon vinaigrette for a complete meal that always impresses guests.
Breville Slow Cooker Beef Bourguignon

Gathering around the slow cooker on a chilly afternoon always feels like the ultimate kitchen win—especially when the reward is this deeply comforting Beef Bourguignon. I first fell for this dish during a rainy weekend when my Breville slow cooker transformed humble ingredients into something truly magical, and now it’s my go-to for effortless elegance.
Ingredients
- 2 pounds beef chuck roast, cut into 1-inch cubes
- 4 slices thick-cut applewood smoked bacon, diced
- 1 large yellow onion, finely diced
- 2 medium carrots, peeled and cut into ½-inch coins
- 8 ounces cremini mushrooms, quartered
- 3 cloves garlic, minced
- 2 tablespoons tomato paste
- 1½ cups full-bodied Pinot Noir
- 1 cup beef stock, preferably homemade
- 1 bouquet garni (3 sprigs fresh thyme, 2 bay leaves, and 4 parsley stems tied with kitchen twine)
- 2 tablespoons clarified butter
- 1 tablespoon all-purpose flour
- 1 teaspoon fine sea salt
- ½ teaspoon freshly cracked black pepper
- 2 tablespoons chopped fresh flat-leaf parsley for garnish
Instructions
- Pat the beef chuck cubes completely dry with paper towels and season evenly with fine sea salt and freshly cracked black pepper.
- Set your Breville slow cooker to the sauté function and heat 2 tablespoons of clarified butter until shimmering.
- Sear the beef cubes in a single layer for 3–4 minutes per side until a deep brown crust forms, working in batches to avoid overcrowding.
- Transfer the seared beef to a clean plate, leaving any rendered fat in the slow cooker.
- Add the diced applewood smoked bacon to the slow cooker and cook for 5–7 minutes until crisp and the fat has rendered.
- Stir in the finely diced yellow onion and cook for 4 minutes until translucent.
- Add the minced garlic and cook for 1 minute until fragrant.
- Stir in 2 tablespoons of tomato paste and cook for 2 minutes until it darkens slightly.
- Sprinkle 1 tablespoon of all-purpose flour over the mixture and cook for 1 minute while stirring constantly.
- Deglaze the slow cooker with 1½ cups of full-bodied Pinot Noir, scraping up any browned bits from the bottom.
- Pour in 1 cup of beef stock and bring the liquid to a simmer.
- Return the seared beef and any accumulated juices to the slow cooker.
- Add the carrot coins, quartered cremini mushrooms, and the bouquet garni, submerging them in the liquid.
- Cover the slow cooker and set it to the low setting for 8 hours.
- After 8 hours, carefully remove the bouquet garni and discard it.
- Ladle the Beef Bourguignon into warm bowls and garnish with 2 tablespoons of chopped fresh flat-leaf parsley.
What emerges is a dish where the beef shreds at the slightest touch, having absorbed the wine’s fruity depth and the smoky bacon’s richness. I love serving it over creamy polenta to catch every drop of the glossy sauce, or with crusty bread for a rustic touch that makes the whole house feel like a French bistro.
Breville Rice Cooker Coconut Jasmine Rice

Aromatic jasmine rice has become my go-to side dish ever since I discovered how perfectly my Breville rice cooker transforms it into fluffy perfection. As someone who used to constantly burn rice on the stovetop, this appliance has been a game-changer for busy weeknights when I want something special without the stress. The addition of coconut milk creates this incredible tropical twist that makes ordinary meals feel like vacation dining.
Ingredients
– 1 ½ cups premium jasmine rice, thoroughly rinsed
– 1 ¼ cups full-fat coconut milk
– ¾ cup filtered water
– 1 tablespoon virgin coconut oil
– ½ teaspoon fine sea salt
– 2 tablespoons toasted coconut flakes
– 1 tablespoon fresh cilantro, finely chopped
Instructions
1. Place 1 ½ cups thoroughly rinsed jasmine rice into the Breville rice cooker’s inner cooking pot.
2. Pour 1 ¼ cups full-fat coconut milk and ¾ cup filtered water directly over the rice.
3. Add 1 tablespoon virgin coconut oil and ½ teaspoon fine sea salt to the liquid mixture.
4. Gently stir the ingredients with a silicone spatula until the coconut oil dissolves completely, being careful not to overmix.
5. Close the rice cooker lid securely and press the “White Rice” function button to begin the cooking cycle.
6. Allow the rice to cook undisturbed until the appliance automatically switches to “Keep Warm” mode, approximately 25 minutes.
7. Let the rice rest with the lid closed for an additional 10 minutes to allow steam to redistribute evenly throughout the grains.
8. Fluff the cooked rice gently with a rice paddle, using a cutting motion rather than stirring to maintain grain integrity.
9. Fold in 2 tablespoons toasted coconut flakes and 1 tablespoon finely chopped fresh cilantro until evenly distributed.
10. Serve immediately while maintaining optimal texture and temperature.
Zesty with tropical notes and luxuriously creamy, this coconut jasmine rice boasts separate, tender grains that hold their structure beautifully. The subtle floral aroma pairs exceptionally well with grilled shrimp marinated in lime and ginger, or try it as an unexpected base for coconut curry bowls topped with quick-pickled vegetables for contrasting crunch.
Breville Toaster Cinnamon Raisin French Toast

There’s something magical about transforming humble cinnamon raisin bread into a decadent breakfast masterpiece that feels both nostalgic and sophisticated. I discovered this technique during a sleepy Sunday morning when my usual toast routine needed a serious upgrade, and now it’s become my go-to for impressing weekend guests without sacrificing that cozy, home-cooked vibe.
Ingredients
– 4 thick slices artisanal cinnamon raisin bread
– 2 large pasture-raised eggs, lightly beaten
– 1/2 cup heavy cream
– 1 tablespoon pure maple syrup
– 1 teaspoon Madagascar bourbon vanilla extract
– 1/4 teaspoon fine sea salt
– 2 tablespoons clarified butter
– Freshly grated nutmeg for finishing
Instructions
1. Preheat your Breville smart toaster to 375°F using the “A Bit More” function setting.
2. In a shallow baking dish, thoroughly whisk together the lightly beaten pasture-raised eggs, heavy cream, pure maple syrup, Madagascar bourbon vanilla extract, and fine sea salt until completely emulsified.
3. Arrange the 4 thick slices of artisanal cinnamon raisin bread in a single layer within the egg mixture.
4. Let the bread soak for exactly 90 seconds, then carefully flip each slice using a thin spatula. Tip: This precise timing prevents sogginess while ensuring thorough custard absorption.
5. Soak the second side for another 90 seconds until the bread appears evenly saturated but still maintains structural integrity.
6. Melt 1 tablespoon of clarified butter in the preheated Breville toaster, ensuring it coats the entire cooking surface.
7. Place 2 soaked bread slices in the toaster, closing the lid to begin the cooking cycle.
8. Cook for 4 minutes until the bottom develops a deep golden-brown crust with visible caramelization around the raisins.
9. Carefully flip the French toast using a heat-resistant spatula. Tip: The clarified butter’s high smoke point prevents burning while creating that perfect crispy exterior.
10. Cook the second side for 3-4 minutes until uniformly bronzed and the internal temperature reaches 165°F.
11. Transfer the cooked slices to a wire rack and repeat the cooking process with remaining bread and clarified butter.
12. Grate fresh nutmeg directly over the hot French toast just before serving. Tip: Adding nutmeg at this stage preserves its aromatic oils for maximum flavor impact.
Amazingly crisp edges give way to a custard-soft interior where the plumped raisins burst with warm spice notes. The clarified butter creates this incredible shatter-crust texture that contrasts beautifully with the creamy center, making each bite both luxurious and comforting. I love serving these stacked high with a drizzle of warm maple syrup and a dollop of whipped crème fraîche for that perfect sweet-tangy balance that makes breakfast feel like a special occasion.
Breville Air Fryer Crispy Buffalo Cauliflower Bites

Vividly spicy and satisfyingly crunchy, these buffalo cauliflower bites have become my go-to game day snack ever since I discovered how perfectly crispy they get in the air fryer. I used to struggle with soggy baked versions until my Breville transformed my cauliflower game completely—now I make these weekly for my family, who devour them faster than I can plate them!
Ingredients
– 1 large head cauliflower, cut into 1-inch florets
– ¾ cup all-purpose flour
– ¾ cup cold filtered water
– 1 teaspoon garlic powder
– 1 teaspoon smoked paprika
– ½ teaspoon fine sea salt
– ¼ teaspoon freshly ground black pepper
– ¾ cup Frank’s RedHot sauce
– 2 tablespoons unsalted butter, melted
– 1 tablespoon raw honey
– Avocado oil spray
– ½ cup crumbled blue cheese
– ¼ cup whole milk Greek yogurt
– 2 tablespoons buttermilk
– 1 tablespoon fresh chives, finely minced
Instructions
1. Preheat your Breville air fryer to 400°F for 3 minutes.
2. Whisk together all-purpose flour, cold filtered water, garlic powder, smoked paprika, fine sea salt, and freshly ground black pepper in a large mixing bowl until smooth.
3. Dip each cauliflower floret into the batter, allowing excess to drip off before placing in a single layer in the air fryer basket.
4. Lightly spray coated cauliflower florets with avocado oil spray using an even, sweeping motion.
5. Air fry at 400°F for 12 minutes, flipping florets halfway through cooking time.
6. Whisk together Frank’s RedHot sauce, melted unsalted butter, and raw honey in a separate bowl until fully emulsified.
7. Transfer partially cooked cauliflower florets to the sauce bowl, tossing gently to coat each piece evenly.
8. Return sauced cauliflower to air fryer basket, arranging in a single layer without overcrowding.
9. Air fry at 400°F for an additional 6-8 minutes until edges appear deeply caramelized and crispy.
10. Combine crumbled blue cheese, whole milk Greek yogurt, buttermilk, and finely minced fresh chives in a small bowl, whisking until creamy.
Extraordinarily crispy with a perfect balance of heat and tang, these bites achieve that ideal texture where the exterior shatters while the interior remains tender. The blue cheese dressing provides a cool, creamy contrast that makes them utterly addictive—I love serving them piled high on a wooden board with extra sauce for dipping and crisp celery sticks for crunch.
Breville Espresso Machine Caramel Macchiato

Last week, I was rushing through my morning routine when I realized my usual coffee just wasn’t cutting it anymore—I needed something with more pizzazz, something that felt like a treat but didn’t require a trip to the coffee shop. That’s when I dusted off my Breville espresso machine and created this caramel macchiato recipe that’s become my new go-to. Honestly, it’s so good that my neighbor texted asking what that amazing smell was!
Ingredients
- 2 shots of freshly brewed espresso
- 1 cup whole milk, cold
- 2 tablespoons caramel sauce, premium quality
- 1 tablespoon vanilla syrup
- Whipped cream, for garnish
- Sea salt flakes, for finishing
Instructions
- Preheat your Breville espresso machine to 200°F.
- Portion 18 grams of freshly ground espresso beans into the portafilter.
- Tamp the grounds with 30 pounds of pressure to ensure even extraction.
- Brew two 1-ounce shots of espresso directly into a warmed 12-ounce mug.
- Pour 1 tablespoon of premium vanilla syrup into the hot espresso.
- Steam 1 cup of cold whole milk using the steam wand until it reaches 150°F and develops microfoam with a velvety texture.
- Tip: Angle the pitcher slightly to create a whirlpool effect for smoother foam.
- Slowly pour the steamed milk over the back of a spoon into the mug to layer it atop the espresso.
- Drizzle 2 tablespoons of caramel sauce in a circular motion over the milk foam.
- Tip: Warm the caramel sauce slightly for easier drizzling and better flavor integration.
- Top with a generous dollop of freshly whipped cream.
- Finish with a delicate sprinkle of sea salt flakes to balance the sweetness.
- Tip: Serve immediately to preserve the distinct layers and temperature contrast.
Just one sip reveals the beautiful marriage of bitter espresso and sweet caramel, with the sea salt cutting through the richness perfectly. The velvety microfoam creates a luxurious mouthfeel that makes this feel like a professional café creation. I love serving this in clear glass mugs to showcase those gorgeous layers, or pairing it with a buttery shortbread cookie for the ultimate afternoon indulgence.
Breville Waffle Maker Belgian Liege Waffles
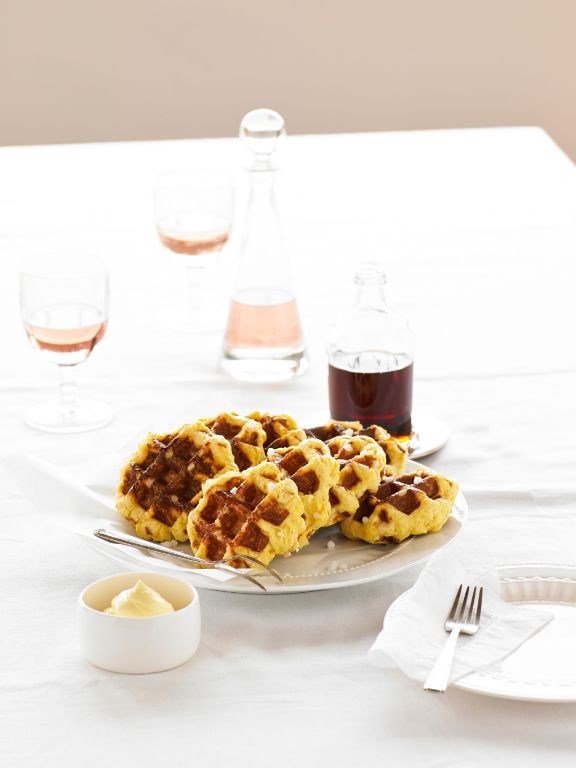
Oof, there’s nothing quite like the scent of pearl sugar caramelizing in a hot waffle iron to transport me right back to that chilly morning in Brussels. I’d been hunting for that perfect Belgian waffle recipe ever since, and after countless experiments with my Breville waffle maker, I’ve finally nailed these gloriously chewy, caramel-kissed Liege waffles that taste like they’re straight from a European street vendor.
Ingredients
– 2 cups bread flour
– ¼ cup granulated sugar
– 2¼ teaspoons instant yeast
– ½ teaspoon fine sea salt
– 2 large pasture-raised eggs, lightly beaten
– ½ cup European-style unsalted butter, softened
– 2 teaspoons pure vanilla extract
– ⅔ cup Belgian pearl sugar
Instructions
1. Combine 2 cups bread flour, ¼ cup granulated sugar, 2¼ teaspoons instant yeast, and ½ teaspoon fine sea salt in the bowl of a stand mixer fitted with a dough hook attachment.
2. Pour in 2 large pasture-raised eggs, lightly beaten, and 2 teaspoons pure vanilla extract, then mix on low speed for 2 minutes until a shaggy dough forms.
3. Add ½ cup European-style unsalted butter, softened, in three additions, mixing for 4 minutes after each addition until the dough becomes smooth and elastic.
4. Cover the bowl with plastic wrap and let the dough rise in a warm place for 1 hour 30 minutes until doubled in size.
5. Gently knead ⅔ cup Belgian pearl sugar into the risen dough until just incorporated, being careful not to crush the sugar crystals.
6. Divide the dough into 8 equal portions and roll each into a smooth ball, then cover with a damp kitchen towel and rest for 15 minutes.
7. Preheat your Breville waffle maker to setting 4, which reaches approximately 375°F, and lightly brush both plates with clarified butter.
8. Place one dough ball in the center of the bottom plate and close the lid, applying gentle pressure for 3 seconds to spread the dough.
9. Cook for 3-4 minutes until the waffle is deep golden brown and pearl sugar has created caramelized pockets across the surface.
10. Use silicone-tipped tongs to carefully transfer the waffle to a wire rack, repeating with remaining dough balls. Perfect waffles emerge with a crisp, sugar-crusted exterior that gives way to a tender, slightly dense interior reminiscent of brioche. The caramelized pearl sugar creates delightful crunchy bits throughout, making these sublime served warm with nothing more than a dusting of powdered sugar or alongside fresh berries and whipped crème fraîche.
Breville Grill Smoky BBQ Pulled Pork Sliders

Aren’t those lazy weekend afternoons just made for slow-cooked comfort food that fills the house with incredible aromas? I’ve been perfecting this pulled pork recipe for years, tweaking it each season until it became my go-to for game day gatherings and casual family dinners alike. There’s something magical about how the smoke-infused pork just falls apart after hours of gentle cooking.
Ingredients
– 4 pounds bone-in pork shoulder, trimmed of excess fat
– 2 tablespoons smoked paprika
– 1 tablespoon garlic powder
– 1 tablespoon onion powder
– 2 teaspoons freshly cracked black pepper
– 1/4 cup dark brown sugar, firmly packed
– 2 teaspoons kosher salt
– 1 cup apple cider vinegar
– 1/2 cup Worcestershire sauce
– 1/4 cup Dijon mustard
– 1 cup ketchup
– 2 tablespoons molasses
– 1 tablespoon liquid smoke
– 12 slider buns, lightly toasted
– 1 cup homemade coleslaw
Instructions
1. Pat the pork shoulder completely dry with paper towels to ensure proper crust formation.
2. Combine smoked paprika, garlic powder, onion powder, black pepper, brown sugar, and kosher salt in a small bowl.
3. Rub the spice mixture evenly over all surfaces of the pork shoulder, pressing gently to adhere.
4. Place the seasoned pork shoulder in the Breville Grill, fat side up, and close the lid.
5. Set the Breville Grill to 225°F and cook for 6 hours until the internal temperature reaches 195°F.
6. While the pork cooks, whisk together apple cider vinegar, Worcestershire sauce, Dijon mustard, ketchup, molasses, and liquid smoke in a saucepan.
7. Simmer the sauce over medium-low heat for 15 minutes until slightly thickened, stirring occasionally.
8. Transfer the cooked pork shoulder to a large cutting board and let rest for 30 minutes to redistribute juices.
9. Using two forks, shred the pork by pulling against the grain until completely separated.
10. Toss the shredded pork with three-quarters of the prepared barbecue sauce until evenly coated.
11. Arrange the toasted slider buns on a serving platter.
12. Spoon the sauced pulled pork onto the bottom halves of the buns.
13. Top each slider with approximately 2 tablespoons of homemade coleslaw.
14. Drizzle the remaining barbecue sauce over the coleslaw before placing the bun tops.
Every bite delivers that perfect contrast between the tender, smoke-kissed pork and the crisp, refreshing coleslaw. The pork maintains incredible moisture while developing those beautiful caramelized edges that barbecue lovers crave. For an extra flavor boost, I sometimes serve these with pickled red onions or a side of spicy baked beans to complement the smoky sweetness.
Breville Sous Vide Perfect Medium-Rare Steak

Just last weekend, I finally perfected my sous vide steak technique after years of inconsistent results from traditional methods—there’s something magical about that precise temperature control that takes the guesswork out of achieving restaurant-quality results every single time.
Ingredients
– 2 (12-ounce) prime ribeye steaks, 1.5 inches thick
– 3 tablespoons clarified butter
– 4 fresh rosemary sprigs
– 6 garlic cloves, thinly sliced
– 2 teaspoons flaky sea salt
– 1 teaspoon freshly cracked black peppercorns
Instructions
1. Set your Breville sous vide immersion circulator to 129°F for medium-rare doneness.
2. Pat steaks completely dry with paper towels to ensure proper searing later.
3. Season both sides of steaks evenly with flaky sea salt and freshly cracked black peppercorns.
4. Vacuum-seal steaks individually with 2 rosemary sprigs and 3 sliced garlic cloves per bag.
5. Submerge sealed bags in water bath, ensuring steaks are fully immersed and not touching.
6. Cook for precisely 2 hours to allow collagen breakdown while maintaining moisture.
7. Remove bags from water bath and transfer steaks to wire rack, reserving bag juices.
8. Heat cast iron skillet over high heat until smoking hot, about 5 minutes.
9. Add clarified butter to skillet, swirling to coat surface evenly.
10. Sear steaks for 45 seconds per side until deep golden-brown crust forms.
11. Use tongs to sear steak edges for 15 seconds each to render fat caps.
12. Baste steaks continuously with hot butter for final 30 seconds using remaining rosemary and garlic.
13. Rest steaks on cutting board for exactly 8 minutes to redistribute juices evenly.
14. Slice against the grain into ½-inch thick portions.
15. Drizzle reserved bag juices over sliced steak as natural au jus. Our steaks emerge with a crust that audibly crackles under the knife, giving way to uniformly pink interior that melts at tongue temperature. The garlic-infused butter amplifies the beef’s natural umami, while that precise sous vide cook ensures each bite maintains perfect juiciness from first slice to last.
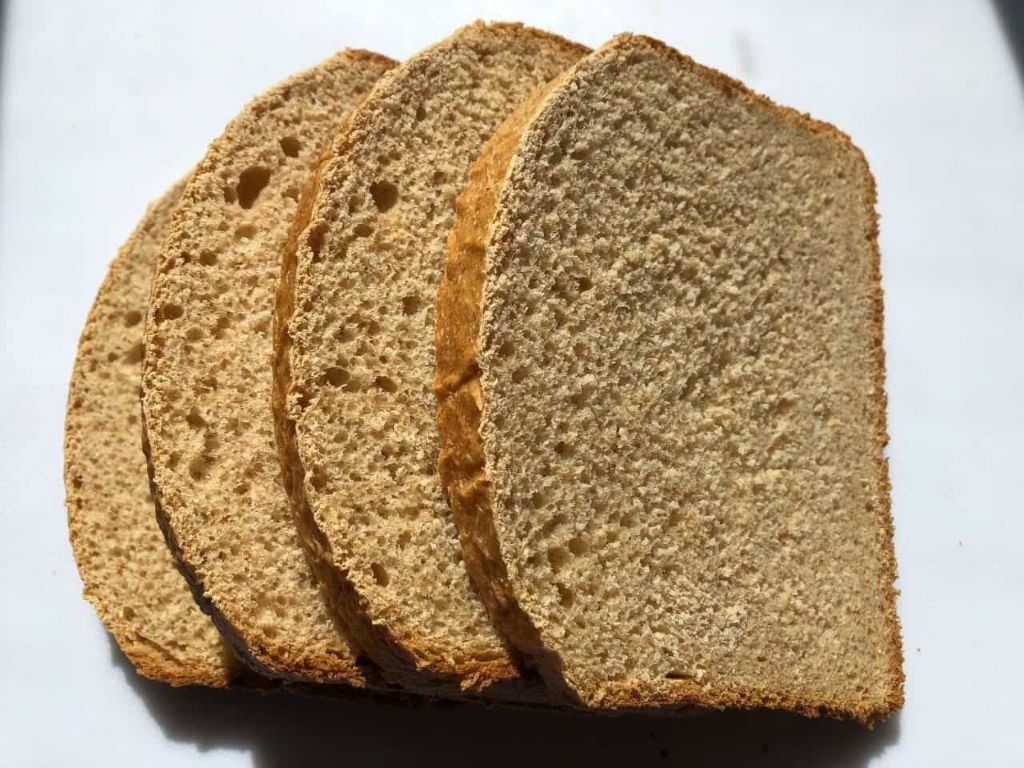
Breville Bread Maker Honey Whole Wheat Loaf
Trying to bake wholesome bread at home used to feel like a weekend project I never quite mastered—until my Breville bread maker entered the kitchen. This honey whole wheat loaf has become my weekly ritual, filling the house with that unmistakable warm, yeasty aroma that makes even Monday mornings feel cozy.
Ingredients
- 2 ¼ cups stone-ground whole wheat flour
- ¾ cup unbleached bread flour
- 1 ¼ cups lukewarm filtered water (110°F)
- 3 tablespoons raw wildflower honey
- 2 tablespoons cold-pressed extra virgin olive oil
- 1 ¼ teaspoons fine sea salt
- 2 ¼ teaspoons active dry yeast
- 1 large pasture-raised egg, lightly beaten for egg wash
Instructions
- Combine 2 ¼ cups stone-ground whole wheat flour and ¾ cup unbleached bread flour in a large mixing bowl.
- Whisk the flours for 30 seconds to aerate and combine thoroughly.
- Measure 1 ¼ cups lukewarm filtered water using a digital thermometer to ensure it reaches exactly 110°F.
- Pour the warmed water into the bread maker pan first to prevent flour clumping.
- Add 3 tablespoons raw wildflower honey to the water, stirring gently until partially dissolved.
- Drizzle 2 tablespoons cold-pressed extra virgin olive oil around the edges of the pan.
- Sprinkle 1 ¼ teaspoons fine sea salt in one corner of the pan, keeping it separate from the yeast.
- Carefully add the combined flour mixture to the pan, leveling the surface with a spatula.
- Create a small well in the center of the flour and add 2 ¼ teaspoons active dry yeast.
- Select the Whole Wheat cycle on your Breville bread maker and press start.
- During the final rise cycle, gently brush the loaf surface with 1 large pasture-raised egg, lightly beaten, using a pastry brush.
- Bake until the internal temperature reaches 190°F on an instant-read thermometer, about 3 hours total.
- Immediately remove the loaf from the pan and transfer to a wire cooling rack.
- Allow the bread to cool completely for 2 hours before slicing to prevent gumminess.
But this honey whole wheat loaf truly shines when sliced thick and toasted until golden. The subtle sweetness from the wildflower honey complements the nutty whole wheat flavor perfectly, while the crumb remains remarkably tender despite being 100% whole grain. I love serving it with cultured butter and flaky sea salt for breakfast, or using day-old slices for an exceptional bread pudding layered with caramelized apples.
Breville Pressure Cooker Spicy Black Bean Soup

Last week, when the autumn chill finally settled in, I found myself craving something deeply comforting yet vibrant—the kind of dish that warms you from the inside out without weighing you down. That’s when I turned to my trusty Breville pressure cooker and whipped up this spicy black bean soup, a recipe that’s become my go-to for busy weeknights because it’s hearty, fast, and packed with flavor.
Ingredients
- 1 pound dried black beans, rinsed and sorted
- 2 tablespoons extra-virgin olive oil
- 1 large yellow onion, finely diced
- 4 cloves garlic, minced
- 1 jalapeño pepper, seeded and finely chopped
- 1 teaspoon ground cumin
- 1/2 teaspoon smoked paprika
- 6 cups vegetable broth
- 1/4 cup freshly squeezed lime juice
- 1/2 cup fresh cilantro, chopped
- 1 teaspoon fine sea salt
- 1/2 teaspoon freshly ground black pepper
Instructions
- Select the “Sauté” function on your Breville pressure cooker and heat the extra-virgin olive oil until it shimmers, about 2 minutes.
- Add the finely diced yellow onion and cook, stirring frequently, until translucent and lightly golden, approximately 5 minutes.
- Stir in the minced garlic and finely chopped jalapeño pepper, and sauté for 1 minute until fragrant.
- Sprinkle in the ground cumin and smoked paprika, toasting the spices for 30 seconds to deepen their flavor.
- Tip: Toasting spices briefly unlocks their essential oils, enhancing the soup’s aromatic profile.
- Add the rinsed and sorted dried black beans to the pot, followed by the vegetable broth, ensuring the beans are fully submerged.
- Secure the lid, set the pressure cooker to high pressure for 25 minutes, and allow a natural pressure release for 10 minutes after cooking.
- Tip: Natural release helps the beans retain their structure and prevents them from becoming mushy.
- Carefully open the lid and stir in the freshly squeezed lime juice, chopped fresh cilantro, fine sea salt, and freshly ground black pepper.
- Use an immersion blender to partially puree the soup until it reaches a creamy yet chunky consistency, about 5–7 pulses.
- Tip: For a smoother texture, blend longer; for more texture, leave it as is.
- Ladle the soup into bowls and serve immediately.
Outrageously creamy with a subtle heat from the jalapeño, this soup boasts a velvety base punctuated by tender beans. I love topping it with a dollop of Greek yogurt and extra cilantro for a cool contrast, or serving it alongside toasted crusty bread for dipping—it’s the ultimate cozy meal that feels both nourishing and indulgent.
Breville Mixer Classic Chocolate Chip Cookies

There’s something magical about that moment when the Breville mixer first starts whipping up cookie dough—the hum of the motor, the swirl of ingredients coming together, it’s my little kitchen therapy session after a hectic week. These classic chocolate chip cookies have become my go-to for everything from school bake sales to cozy movie nights, and I love how the Breville ensures perfect consistency every single time.
Ingredients
– 2 ¼ cups all-purpose flour
– 1 teaspoon baking soda
– 1 teaspoon fine sea salt
– 1 cup European-style unsalted butter, softened to 68°F
– ¾ cup granulated sugar
– ¾ cup packed dark brown sugar
– 2 large pasture-raised eggs, lightly beaten
– 2 teaspoons pure vanilla extract
– 2 cups high-quality dark chocolate chunks (70% cacao)
– 1 cup toasted walnut pieces
Instructions
1. Preheat your oven to 375°F and line two baking sheets with parchment paper.
2. Whisk together the all-purpose flour, baking soda, and fine sea salt in a medium bowl until fully incorporated.
3. In your Breville mixer fitted with the paddle attachment, cream the European-style unsalted butter with granulated sugar and packed dark brown sugar on medium speed for exactly 3 minutes until pale and fluffy.
4. Tip: Scrape down the bowl sides halfway through creaming to ensure even mixing and maximum air incorporation.
5. Add the lightly beaten pasture-raised eggs one at a time, mixing for 30 seconds after each addition until fully emulsified.
6. Mix in the pure vanilla extract until just combined, about 15 seconds.
7. Gradually add the dry ingredients to the wet mixture on low speed, mixing just until no flour streaks remain, approximately 45 seconds.
8. Tip: Avoid overmixing once flour is added to prevent gluten development and tough cookies.
9. Fold in the high-quality dark chocolate chunks and toasted walnut pieces by hand using a spatula until evenly distributed.
10. Using a #20 cookie scoop (about 3 tablespoons), portion dough onto prepared baking sheets, spacing 2 inches apart.
11. Tip: Chill scooped dough for 15 minutes before baking for thicker, chewier cookies with less spread.
12. Bake at 375°F for 10-12 minutes until edges are golden brown but centers still appear slightly underdone.
13. Cool on baking sheets for 5 minutes before transferring to wire racks to complete cooling.
Golden and crisp at the edges with decadently soft centers, these cookies achieve that perfect chew-to-crunch ratio I’m always chasing. The deep cocoa notes from the high-percentage chocolate chunks pair beautifully with the toasty walnuts, making them sophisticated enough for dinner parties yet comforting enough for midnight snack raids straight from the cookie jar.
Breville Pasta Maker Fresh Spinach Fettuccine

Diving into homemade pasta always feels like a special occasion in my kitchen, especially when I break out the Breville pasta maker for this vibrant spinach fettuccine that never fails to impress dinner guests with its brilliant green color and delicate texture.
Ingredients
– 2 cups 00 flour
– 3 large pasture-raised eggs, lightly beaten
– 4 ounces fresh spinach leaves, thoroughly washed
– 1 tablespoon extra virgin olive oil
– 1 teaspoon fine sea salt
– Semolina flour for dusting
Instructions
1. Place fresh spinach leaves in a steamer basket over boiling water and steam for exactly 2 minutes until wilted but still vibrant green.
2. Immediately transfer steamed spinach to an ice water bath for 1 minute to stop the cooking process and preserve color.
3. Squeeze all excess moisture from the cooled spinach using a clean kitchen towel until it forms a tight ball.
4. Combine 2 cups 00 flour and 1 teaspoon fine sea salt in the bowl of a food processor.
5. Add the squeezed spinach and 3 lightly beaten pasture-raised eggs to the food processor.
6. Pulse the mixture for 30 seconds until it forms coarse crumbs that hold together when pressed.
7. Add 1 tablespoon extra virgin olive oil and process for another 15 seconds until the dough begins to form a ball.
8. Turn the dough out onto a lightly floured surface and knead by hand for 8 minutes until smooth and elastic.
9. Wrap the dough tightly in plastic wrap and rest at room temperature for exactly 30 minutes to relax the gluten.
10. Divide the rested dough into 4 equal portions, keeping unused portions covered.
11. Set the Breville pasta maker to the widest setting and feed one portion through the rollers.
12. Fold the sheet into thirds and feed through the widest setting again, repeating this process 3 times to develop the pasta’s structure.
13. Gradually decrease the roller setting by one notch each pass until reaching the second-thinnest setting.
14. Switch to the fettuccine cutter attachment and feed the thin sheet through to create ribbons.
15. Dust the cut fettuccine generously with semolina flour to prevent sticking.
16. Bring a large pot of heavily salted water to a rolling boil at 212°F.
17. Cook the fresh pasta for exactly 90 seconds until al dente, tasting one strand to confirm doneness.
18. Drain immediately, reserving 1/4 cup pasta water for sauce incorporation.
The silky texture of these emerald-green ribbons pairs beautifully with simple browned butter and sage, allowing the fresh spinach flavor to shine through without competing sauces. I love how the delicate folds catch just enough sauce in each bite, making this pasta perfect for elegant dinner parties or surprisingly simple weeknight meals when you want something special.
Breville Deep Fryer Crispy Beer-Battered Fish

A perfectly crispy beer-battered fish has been my ultimate comfort food since childhood fishing trips with my grandfather—there’s something magical about that golden crunch giving way to flaky white fish. After testing countless methods, I’ve perfected this Breville deep fryer version that delivers restaurant-quality results every single time, with minimal mess and maximum flavor. The secret lies in both the batter consistency and maintaining that precise 375°F oil temperature the Breville excels at controlling.
Ingredients
– 1 ½ pounds fresh cod fillets, skinless and cut into 4-ounce portions
– 1 ½ cups all-purpose flour, divided
– 1 teaspoon fine sea salt
– ½ teaspoon freshly ground black pepper
– 1 teaspoon smoked paprika
– 1 large pasture-raised egg, lightly beaten
– 12 ounces ice-cold lager-style beer
– 6 cups peanut oil for frying
– 1 lemon, cut into wedges
Instructions
1. Pat the cod fillets completely dry with paper towels.
2. Combine ½ cup flour with sea salt, black pepper, and smoked paprika in a shallow dish.
3. Dredge each fish portion in the seasoned flour mixture, shaking off excess.
4. Place the remaining 1 cup flour in a medium mixing bowl.
5. Whisk the lightly beaten egg into the flour until just combined.
6. Gradually pour the ice-cold lager into the flour mixture while whisking continuously.
7. Mix until the batter reaches the consistency of heavy cream with small lumps remaining.
8. Pour peanut oil into the Breville deep fryer up to the maximum fill line.
9. Set the temperature control to 375°F and preheat until the indicator light signals readiness.
10. Dip one floured fish portion into the batter, allowing excess to drip off for 3 seconds.
11. Carefully lower the battered fish into the hot oil using tongs.
12. Fry for 4-5 minutes until golden brown and crispy, flipping halfway through.
13. Remove with a slotted spoon and drain on a wire rack over a baking sheet.
14. Repeat the battering and frying process with remaining fish portions.
15. Maintain oil temperature at 375°F between batches by allowing it to reheat for 2 minutes.
16. Serve immediately with lemon wedges.
Keeping that ethereal crispiness requires immediate service—the contrast between the feather-light crust and moist, steaming fish is pure magic. I love serving these with malt vinegar for traditional fish and chips, or getting creative with tacos using cabbage slaw and chipotle crema. The Breville’s consistent temperature control ensures every bite maintains that satisfying audible crunch that makes this recipe truly special.
Breville Tea Maker Earl Grey Lavender Iced Tea
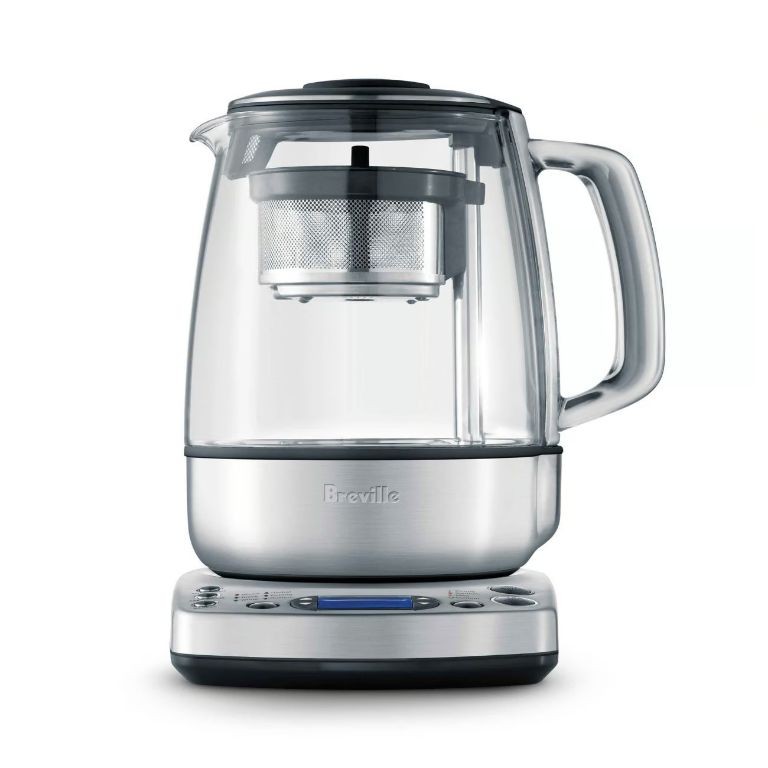
Gosh, I never thought I’d become someone who gets genuinely excited about iced tea, but my Breville tea maker has completely transformed my summer beverage game. There’s something almost magical about watching those tea leaves dance in the automated basket while the perfect temperature water works its magic—it’s become my favorite kitchen ritual during these warm afternoons. Today’s creation combines the classic bergamot notes of Earl Grey with delicate lavender blossoms for a sophisticated twist that feels both refreshing and elegant.
Ingredients
- 4 high-quality Earl Grey tea bags with visible bergamot oil sheen
- 2 tablespoons culinary-grade dried lavender blossoms
- 4 cups filtered water at 200°F
- 1/4 cup organic cane sugar syrup
- 1 fresh lemon, thinly sliced into 1/8-inch rounds
- 2 cups ice cubes made from filtered water
- Fresh mint sprigs for garnish
Instructions
- Place 4 Earl Grey tea bags and 2 tablespoons dried lavender blossoms into the Breville tea maker’s mesh basket.
- Program the tea maker to steep at 200°F for precisely 4 minutes using the “black tea” setting.
- Pour 4 cups filtered water into the tea maker reservoir and initiate the brewing cycle.
- While the tea brews, prepare 1/4 cup organic cane sugar syrup by dissolving sugar in equal parts hot water.
- Transfer the freshly brewed tea to a heatproof glass pitcher using a fine-mesh strainer to capture any loose lavender particles.
- Immediately stir in the prepared sugar syrup until fully incorporated.
- Allow the sweetened tea to cool to room temperature, approximately 45 minutes, before refrigeration.
- Refrigerate the tea for exactly 2 hours until it reaches 40°F throughout.
- Fill four 16-ounce glasses with 1/2 cup ice cubes each, creating a solid ice foundation.
- Pour the chilled tea over the ice, leaving 1 inch of headspace in each glass.
- Garnish each serving with 2 thin lemon slices and 1 fresh mint sprig arranged artfully against the glass.
Dazzlingly smooth with just the right balance of floral and citrus notes, this iced tea achieves that perfect clarity where you can actually see the lemon slices shimmering through the amber liquid. The lavender doesn’t overpower but rather whispers through each sip, creating a sophisticated complexity that makes this feel more like a crafted cocktail than simple iced tea. I love serving it in tall Collins glasses with extra mint sprigs for that photogenic touch that always impresses guests during summer gatherings.
Summary
Hooray! You’ve now got 20 amazing Breville recipes for any occasion. Whether you’re hosting a party or cooking a quiet family dinner, these dishes will impress. We’d love to hear which recipes become your favorites—leave a comment below! Don’t forget to share this collection with fellow food lovers by pinning it on Pinterest. Happy cooking!