Bite-sized bliss awaits! Whether you’re planning a party, craving a sweet treat, or just love getting creative in the kitchen, these cake ball recipes are your new best friend. From festive holiday delights to everyday indulgences, we’ve gathered 20 irresistible ideas that are sure to impress. Get ready to roll up your sleeves and discover your next favorite dessert—you won’t want to stop at just one!
Chocolate Peanut Butter Cake Balls
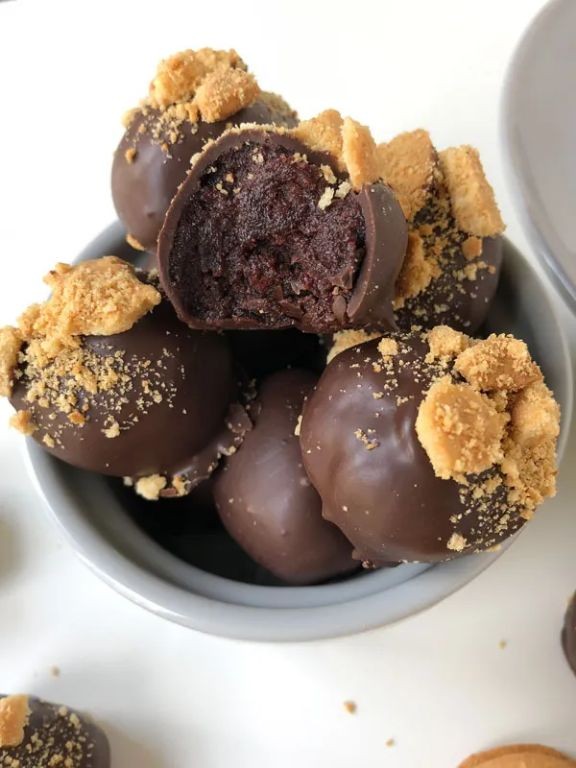
Years have a way of folding into themselves, and today I find myself remembering how these little chocolate peanut butter cake balls first came together in my kitchen—a quiet afternoon experiment that somehow captured everything comforting about both flavors in one bite-sized treat.
Ingredients
– 1 box chocolate cake mix
– 1 cup water
– ½ cup vegetable oil
– 3 large eggs
– 1 cup creamy peanut butter
– 2 cups semi-sweet chocolate chips
– 2 tablespoons coconut oil
Instructions
1. Preheat your oven to 350°F and grease a 9×13-inch baking pan.
2. In a large bowl, combine the chocolate cake mix, water, vegetable oil, and eggs until smooth.
3. Pour the batter into the prepared pan and bake for 28–32 minutes, or until a toothpick inserted into the center comes out clean.
4. Allow the cake to cool completely on a wire rack, about 1 hour.
5. Crumble the cooled cake into fine crumbs using your hands or a fork.
6. Mix in the creamy peanut butter until the crumbs hold together when pressed.
7. Roll the mixture into 1-inch balls and place them on a parchment-lined baking sheet.
8. Chill the balls in the refrigerator for 30 minutes to firm up.
9. In a microwave-safe bowl, combine the semi-sweet chocolate chips and coconut oil.
10. Microwave the mixture in 30-second intervals, stirring after each, until fully melted and smooth.
11. Using a fork, dip each chilled cake ball into the melted chocolate, tapping gently to remove excess.
12. Return the coated balls to the parchment-lined sheet and let them set at room temperature for 1 hour.
Rich, fudgy cake mingles with the salty-sweet creaminess of peanut butter, all cloaked in a crisp chocolate shell. Rolling them in crushed peanuts or drizzling with white chocolate adds playful texture, while storing them in the fridge keeps that satisfying snap intact.
Red Velvet Cake Balls with Cream Cheese Frosting
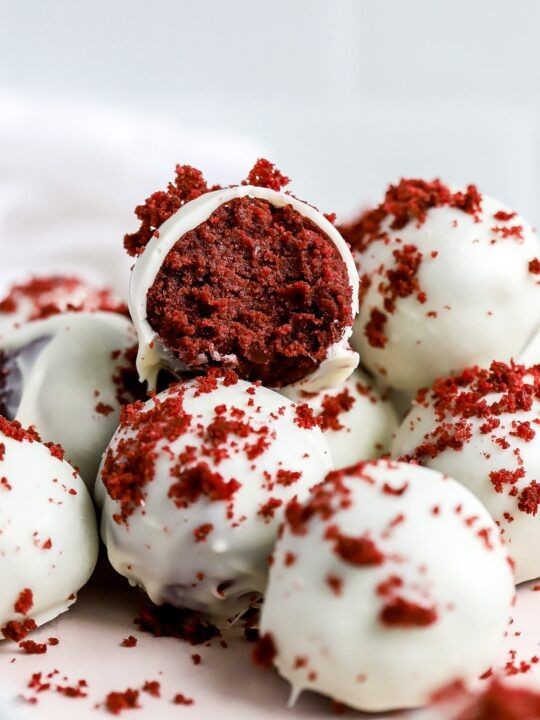
Baking these red velvet cake balls feels like uncovering a hidden treasure in my grandmother’s recipe box, where crimson crumbs and sweet cream cheese mingle in perfect harmony. Sometimes the simplest transformations create the most magical treats, turning humble cake scraps into elegant bite-sized indulgences that melt on the tongue with nostalgic warmth. There’s something deeply comforting about rolling these little spheres between my palms, knowing each one carries the rich history of Southern baking traditions.
Ingredients
– 1 box red velvet cake mix
– 3 large eggs
– 1/2 cup vegetable oil
– 1 cup water
– 8 oz cream cheese, softened
– 4 cups powdered sugar
– 1 tsp vanilla extract
– 12 oz white chocolate chips
– 1 tbsp coconut oil
Instructions
1. Preheat your oven to 350°F and grease a 9×13 inch baking pan.
2. Combine the red velvet cake mix, eggs, vegetable oil, and water in a large mixing bowl.
3. Beat the mixture on medium speed for 2 minutes until smooth and fully incorporated.
4. Pour the batter into the prepared pan and spread evenly with a spatula.
5. Bake for 28-32 minutes until a toothpick inserted in the center comes out clean.
6. Cool the cake completely in the pan on a wire rack for 1 hour.
7. Crumble the cooled cake into fine crumbs using your fingers or a food processor.
8. In a separate bowl, beat the softened cream cheese with an electric mixer until fluffy.
9. Gradually add powdered sugar to the cream cheese, mixing on low speed between additions.
10. Blend in vanilla extract until the frosting becomes smooth and spreadable.
11. Combine the cake crumbs with the cream cheese frosting until the mixture holds together when pressed.
12. Roll tablespoon-sized portions of the mixture into 1-inch balls and place on a parchment-lined baking sheet.
13. Chill the formed balls in the refrigerator for 30 minutes to firm up.
14. Melt white chocolate chips and coconut oil in a double boiler over simmering water, stirring constantly.
15. Dip each chilled cake ball into the melted chocolate using a fork, tapping off excess coating.
16. Return the coated balls to the parchment-lined sheet and let set at room temperature for 1 hour.
17. Store the finished cake balls in an airtight container in the refrigerator until serving. Only now do these crimson gems reveal their true character, with the crisp white chocolate shell giving way to that signature velvety crumb that practically dissolves on the tongue. Their subtle tang from the cream cheese frosting balances the sweetness beautifully, making them perfect for holiday gatherings or simply enjoying with afternoon tea when you need a moment of quiet indulgence.
Lemon Blueberry Cake Balls
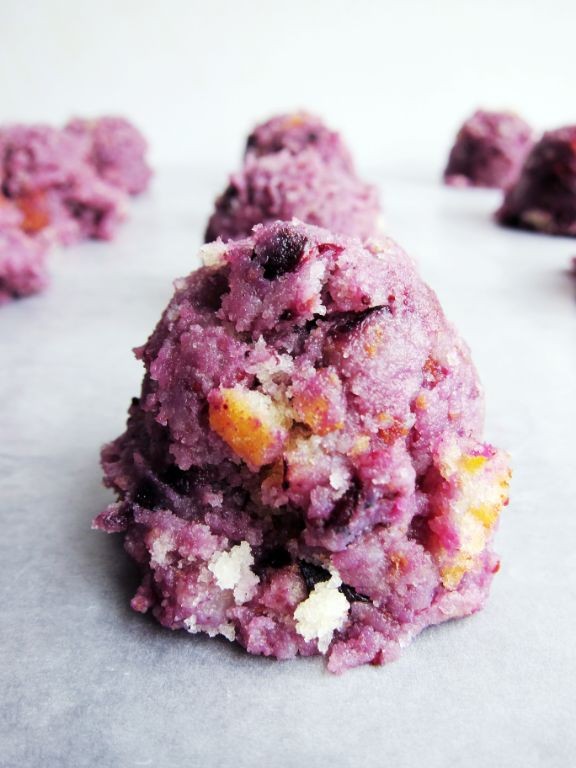
Vividly, I remember the first time I tasted these lemon blueberry cake balls—how the bright citrus notes danced with the sweet burst of berries, creating a moment of pure, quiet joy in my kitchen. There’s something deeply comforting about rolling these little spheres between your palms, each one a tiny promise of sunshine and sweetness. Making them feels like a gentle meditation, a slow unfolding of flavors that culminate in these perfect, bite-sized treats.
Ingredients
– 1 box lemon cake mix
– 3 large eggs
– 1/2 cup vegetable oil
– 1 cup water
– 1 cup fresh blueberries
– 8 oz cream cheese, softened
– 2 cups powdered sugar
– 1 tbsp lemon zest
– 2 tbsp lemon juice
– 12 oz white chocolate chips
– 1 tsp vegetable shortening
Instructions
1. Preheat your oven to 350°F and grease a 9×13-inch baking pan.
2. In a large bowl, combine the lemon cake mix, eggs, vegetable oil, and water until smooth.
3. Gently fold in the fresh blueberries, being careful not to crush them.
4. Pour the batter into the prepared pan and bake for 25-30 minutes, or until a toothpick inserted into the center comes out clean.
5. Allow the cake to cool completely in the pan on a wire rack for 1 hour.
6. Crumble the cooled cake into fine crumbs in a large mixing bowl.
7. Add the softened cream cheese, powdered sugar, lemon zest, and lemon juice to the cake crumbs.
8. Mix with your hands until the mixture comes together into a uniform dough.
9. Roll tablespoon-sized portions of the dough into smooth balls and place them on a parchment-lined baking sheet.
10. Chill the cake balls in the refrigerator for 30 minutes to firm up.
11. Melt the white chocolate chips and vegetable shortening together in a microwave-safe bowl in 30-second intervals, stirring between each, until smooth.
12. Dip each chilled cake ball into the melted chocolate using a fork, tapping off any excess.
13. Return the coated cake balls to the parchment-lined sheet and let them set at room temperature for 1 hour.
14. Store the finished cake balls in an airtight container in the refrigerator. Each bite reveals a moist, tender crumb that melts on the tongue, with the zesty lemon cutting through the richness of the cream cheese and white chocolate. For a whimsical twist, serve them nestled in mini cupcake liners with a dusting of edible gold glitter, or arrange them on a rustic wooden board alongside fresh blueberries and lemon slices for a stunning dessert display.
Cookies and Cream Cake Balls

Baking these cookies and cream cake balls feels like revisiting childhood afternoons spent at the kitchen counter, where the simple joy of crushing cookies between your fingers and mixing them into something new brought a quiet sense of accomplishment. There’s something deeply comforting in transforming humble ingredients into these rich, bite-sized treats, each one holding the familiar crunch of Oreos swirled through soft vanilla cake. Making them is a slow, mindful process—one that rewards patience with little spheres of nostalgia you can share or savor alone.
Ingredients
– 1 box vanilla cake mix
– 3 large eggs
– 1/2 cup vegetable oil
– 1 cup water
– 1 package (14.3 oz) Oreo cookies
– 1 package (8 oz) cream cheese, softened
– 1 package (12 oz) white chocolate melting wafers
– 1 tablespoon vegetable shortening
Instructions
1. Preheat your oven to 350°F and grease a 9×13-inch baking pan.
2. In a large bowl, combine the vanilla cake mix, eggs, vegetable oil, and water until smooth.
3. Pour the batter into the prepared pan and bake for 25–30 minutes, or until a toothpick inserted into the center comes out clean.
4. Let the cake cool completely in the pan on a wire rack for 1 hour.
5. Crumble the cooled cake into fine crumbs using your hands or a fork.
6. Crush the Oreo cookies into small pieces, reserving 2 tablespoons of crumbs for garnish.
7. In a separate bowl, beat the softened cream cheese with a hand mixer until smooth.
8. Gently fold the cake crumbs and crushed Oreos into the cream cheese until fully combined.
9. Roll the mixture into 1-inch balls and place them on a parchment-lined baking sheet.
10. Chill the balls in the refrigerator for 30 minutes to firm up.
11. Melt the white chocolate wafers and vegetable shortening in a microwave-safe bowl in 30-second intervals, stirring between each, until smooth.
12. Dip each chilled ball into the melted chocolate using a fork, tapping off excess coating.
13. Return the coated balls to the parchment-lined sheet and sprinkle with reserved Oreo crumbs.
14. Refrigerate for another 15 minutes until the chocolate sets. What makes these cake balls so special is the contrast between the crisp Oreo bits and the velvety cream cheese binding, with the white chocolate shell adding a sweet snap. They’re perfect for gifting in little boxes tied with ribbon or simply enjoyed with a cold glass of milk, each bite a reminder that the simplest creations often hold the most warmth.
Salted Caramel Chocolate Cake Balls
Cradling a warm mug of tea, I find myself thinking about how some of the most comforting treats are born from simple transformations. These salted caramel chocolate cake balls are a perfect example, turning humble cake into decadent, bite-sized indulgences that feel like a quiet celebration.
Ingredients
– 1 box chocolate cake mix
– 3 large eggs
– 1/2 cup vegetable oil
– 1 cup water
– 1 cup salted caramel sauce
– 16 ounces dark chocolate melting wafers
– 1 teaspoon flaky sea salt
Instructions
1. Preheat your oven to 350°F.
2. Combine the chocolate cake mix, eggs, vegetable oil, and water in a large mixing bowl.
3. Beat the mixture on medium speed for 2 minutes until smooth and well-combined.
4. Pour the batter into a greased 9×13-inch baking pan.
5. Bake at 350°F for 28-32 minutes, or until a toothpick inserted into the center comes out clean.
6. Cool the cake completely on a wire rack for 1 hour.
7. Crumble the cooled cake into fine crumbs using your hands in a large bowl.
8. Mix in 3/4 cup of the salted caramel sauce until the crumbs hold together when pressed.
9. Roll the mixture into 1-inch balls and place them on a parchment-lined baking sheet.
10. Freeze the cake balls for 30 minutes to firm them up, which prevents crumbling during coating.
11. Melt the dark chocolate wafers in a microwave-safe bowl in 30-second intervals, stirring between each, until completely smooth.
12. Dip each frozen cake ball into the melted chocolate using a fork, tapping off the excess.
13. Return the coated balls to the parchment-lined sheet.
14. Drizzle the remaining 1/4 cup salted caramel sauce over the chocolate-coated balls while the chocolate is still wet.
15. Sprinkle immediately with flaky sea salt before the chocolate sets.
16. Let the cake balls sit at room temperature for 1 hour until the chocolate coating is fully set.
The contrast between the crisp chocolate shell and the soft, fudgy interior is pure magic, with the salted caramel creating little pockets of gooey sweetness throughout. They’re lovely arranged on a wooden board for guests, or simply kept in the fridge for when you need a moment of quiet indulgence.
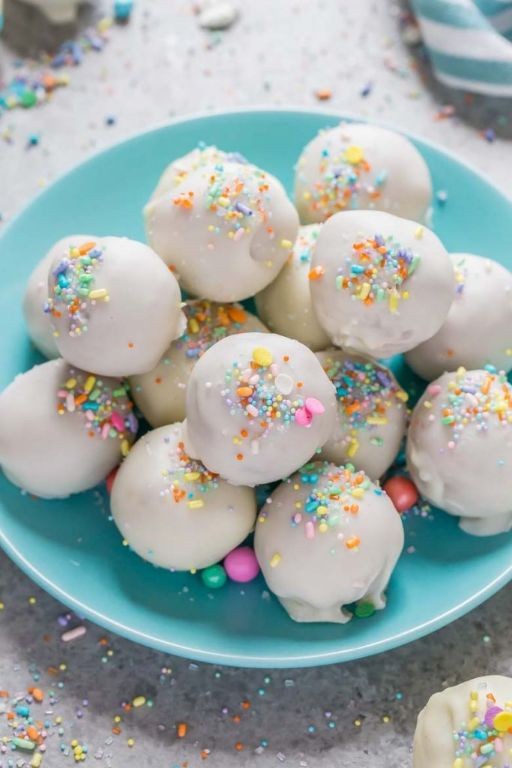
Funfetti Cake Balls with Vanilla Glaze
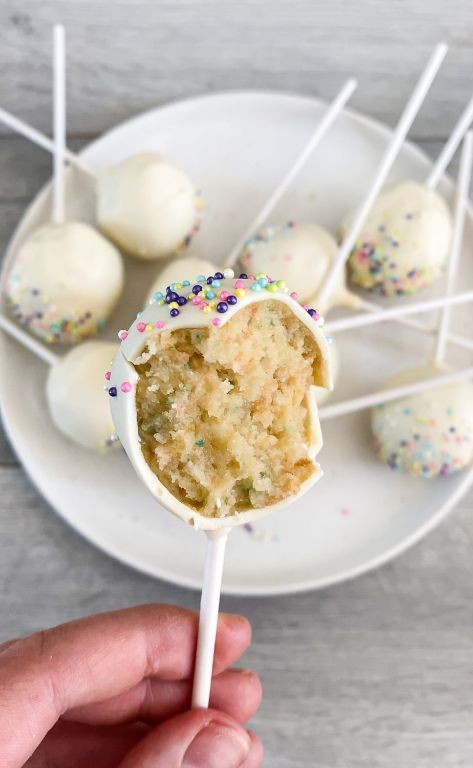
Nostalgia drifts through the kitchen like morning light, settling gently around the simple joy of transforming leftover cake into something new. These funfetti cake balls carry that quiet magic, each bite a soft celebration of color and sweetness, perfect for slow afternoons when time feels expansive. The process itself becomes a meditation, hands shaping memories into tiny, edible treasures.
Ingredients
– 3 cups crumbled funfetti cake
– 1/2 cup cream cheese frosting
– 2 cups powdered sugar
– 3 tablespoons whole milk
– 1 teaspoon vanilla extract
– 1/4 cup rainbow sprinkles
Instructions
1. Crumble the funfetti cake into fine crumbs in a large bowl using your fingers, ensuring no large chunks remain.
2. Add the cream cheese frosting to the cake crumbs and mix with a spatula until fully combined and the mixture holds together when pressed.
3. Scoop 1 tablespoon portions of the mixture and roll between your palms to form smooth, round balls, placing them on a parchment-lined baking sheet.
4. Chill the cake balls in the refrigerator for 30 minutes to firm up, which prevents cracking when glazing.
5. Whisk the powdered sugar, whole milk, and vanilla extract in a medium bowl until the glaze is smooth and drips slowly from the whisk.
6. Dip each chilled cake ball into the vanilla glaze, allowing excess to drip back into the bowl for a thin, even coating.
7. Immediately sprinkle rainbow sprinkles over the glazed cake balls before the glaze sets to ensure they adhere properly.
8. Let the cake balls rest at room temperature for 1 hour until the glaze hardens completely. They offer a tender crumb that melts against the crisp vanilla shell, with sprinkles adding playful texture. Try stacking them in a clear jar as a gift, or pairing with cold milk for that childhood comfort feeling.
Strawberry Shortcake Balls
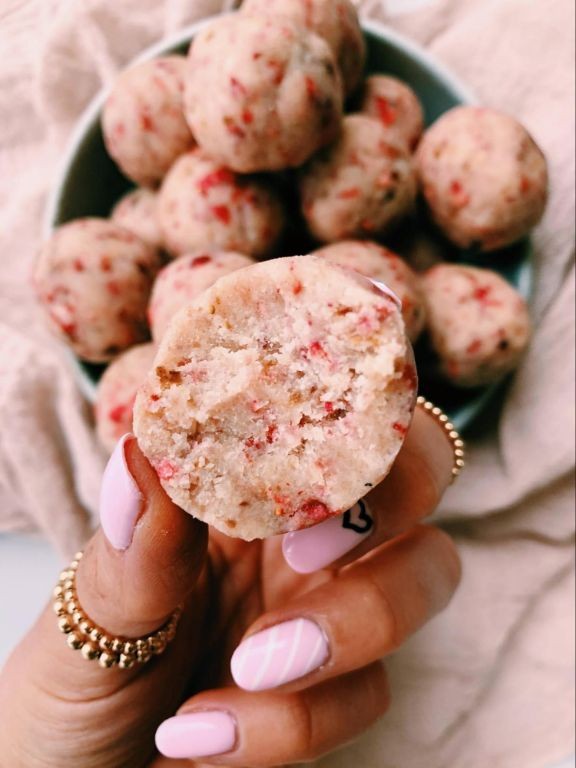
Remembering how my grandmother would slice strawberries on her sunlit porch, I find myself drawn to this simpler interpretation. These strawberry shortcake balls capture that same nostalgic sweetness in bite-sized form, perfect for quiet afternoons when you want something sweet without ceremony. They require little more than gentle hands and patience, transforming humble ingredients into delicate treats that hold summer’s memory.
Ingredients
– 2 cups fresh strawberries
– 1 ½ cups all-purpose flour
– ½ cup granulated sugar
– ¼ cup unsalted butter
– ¼ cup heavy cream
– 1 teaspoon vanilla extract
– ½ teaspoon baking powder
– ¼ teaspoon salt
Instructions
1. Preheat your oven to 350°F and line a baking sheet with parchment paper.
2. Hull 2 cups fresh strawberries and chop them into ¼-inch pieces.
3. Pat the strawberry pieces dry with paper towels to remove excess moisture.
4. In a medium bowl, whisk together 1 ½ cups all-purpose flour, ½ cup granulated sugar, ½ teaspoon baking powder, and ¼ teaspoon salt until fully combined.
5. Cut ¼ cup unsalted butter into small cubes and add to the dry ingredients.
6. Use your fingertips to rub the butter into the flour mixture until it resembles coarse crumbs.
7. Pour in ¼ cup heavy cream and 1 teaspoon vanilla extract.
8. Gently stir with a spatula until a soft dough begins to form.
9. Fold in the chopped strawberries until evenly distributed throughout the dough.
10. Scoop tablespoon-sized portions of dough and roll them into smooth balls between your palms.
11. Arrange the balls 2 inches apart on the prepared baking sheet.
12. Bake for 18-22 minutes until the bottoms are golden brown and the tops spring back lightly when touched.
13. Transfer the baked balls to a wire rack and let them cool completely for 30 minutes.
They emerge from the oven with tender, cake-like interiors that give way to juicy strawberry pockets, while the subtle vanilla warmth balances the fruit’s natural tartness. Try serving them alongside chilled lemonade for a refreshing contrast, or crumble them over morning yogurt for a sweet start to the day.
Pumpkin Spice Cake Balls
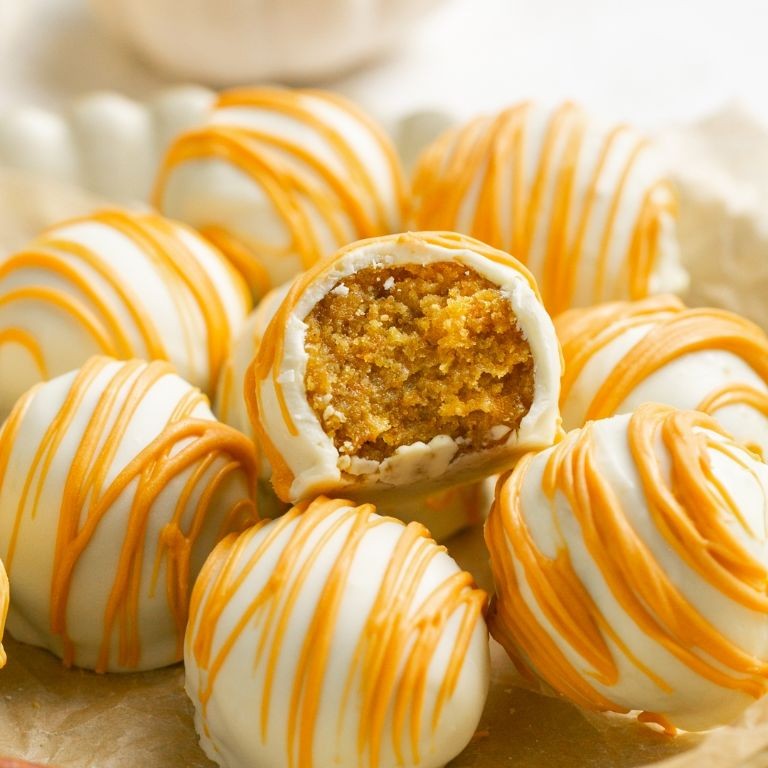
Just thinking about how the crisp autumn air seems to beg for something sweet and warmly spiced, I found myself drawn to the kitchen today, wanting to create little bites of comfort that capture the very essence of the season. These pumpkin spice cake balls are my quiet answer to that craving, a simple project for a reflective afternoon.
Ingredients
– 1 box spice cake mix
– 1 cup canned pumpkin puree
– 2 large eggs
– 1/3 cup vegetable oil
– 1/4 cup water
– 1/2 teaspoon ground cinnamon
– 1/4 teaspoon ground nutmeg
– 12 ounces vanilla candy melts
– 1 teaspoon coconut oil
Instructions
1. Preheat your oven to 350°F and generously grease a 9×13-inch baking pan.
2. In a large mixing bowl, combine the spice cake mix, canned pumpkin puree, eggs, vegetable oil, and water.
3. Use an electric mixer on medium speed to beat the ingredients for 2 minutes, until the batter is smooth and no dry streaks remain.
4. Pour the batter into the prepared pan and spread it into an even layer with a spatula.
5. Bake for 28-32 minutes, until a toothpick inserted into the center comes out clean.
6. Place the pan on a wire rack and allow the cake to cool completely to room temperature, about 1 hour.
7. Crumble the cooled cake into fine crumbs in a large bowl using your fingers.
8. Sprinkle the ground cinnamon and nutmeg over the cake crumbs and mix thoroughly with a fork.
9. Roll tablespoon-sized portions of the spiced cake mixture into tightly packed 1-inch balls, placing them on a parchment-lined baking sheet.
10. Chill the formed balls in the refrigerator for 30 minutes to firm up, which prevents crumbling during coating.
11. Melt the vanilla candy melts with coconut oil in a microwave-safe bowl, heating in 30-second intervals and stirring between each until completely smooth.
12. Use a fork to dip each chilled cake ball into the melted coating, tapping gently against the bowl’s rim to remove excess.
13. Return the coated balls to the parchment-lined sheet and immediately sprinkle with decorations before the coating sets.
14. Let the cake balls set at room temperature for about 20 minutes until the coating is firm. Beyond their soft, almost brownie-like interior, these cake balls carry the gentle warmth of pumpkin and spice in every bite. I love serving them arranged on a wooden board with cups of chai tea, or tucked into little gift boxes lined with wax paper for a sweet autumn surprise.
Tiramisu-Inspired Cake Balls
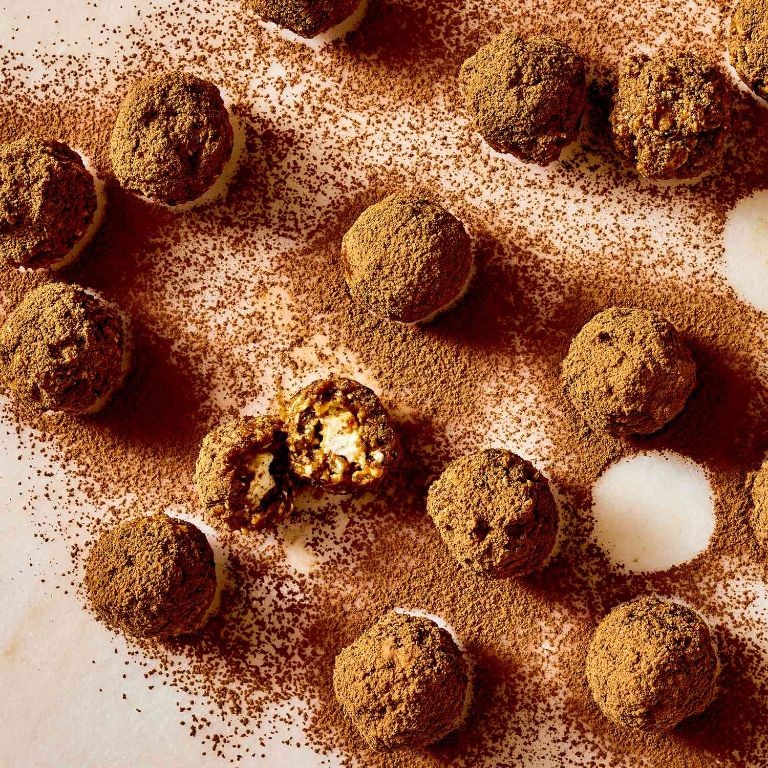
Years of enjoying classic tiramisu led me to this quiet kitchen experiment, where I wanted to capture that same comforting essence in a more playful, handheld form. These cake balls hold the soul of the Italian dessert—coffee-kissed sponge, creamy mascarpone, and that hint of cocoa—but in bite-sized morsels you can savor slowly. Sometimes the simplest transformations bring the deepest satisfaction, like finding new ways to cherish old flavors.
Ingredients
– 1 box vanilla cake mix
– 1 cup strong brewed coffee, cooled
– 8 ounces mascarpone cheese, softened
– 1 cup powdered sugar
– 1 teaspoon vanilla extract
– 2 cups semi-sweet chocolate chips
– 2 tablespoons coconut oil
– ¼ cup cocoa powder
Instructions
1. Preheat your oven to 350°F and grease a 9×13-inch baking pan.
2. Prepare the vanilla cake mix according to package directions, replacing the water called for with 1 cup of strong brewed coffee.
3. Pour the batter into the prepared pan and bake for 25–30 minutes, until a toothpick inserted into the center comes out clean.
4. Allow the cake to cool completely in the pan on a wire rack, about 1 hour.
5. Crumble the cooled cake into fine crumbs in a large mixing bowl using your hands or a fork.
6. In a separate bowl, beat 8 ounces of softened mascarpone cheese, 1 cup of powdered sugar, and 1 teaspoon of vanilla extract with an electric mixer on medium speed until smooth and creamy.
7. Gently fold the mascarpone mixture into the cake crumbs until fully combined and the mixture holds together when pressed.
8. Roll the mixture into 1-inch balls and place them on a parchment-lined baking sheet.
9. Chill the cake balls in the freezer for 30 minutes to firm up, which helps prevent cracking when dipped.
10. Melt 2 cups of semi-sweet chocolate chips and 2 tablespoons of coconut oil in a microwave-safe bowl in 30-second intervals, stirring between each, until smooth.
11. Using a fork, dip each chilled cake ball into the melted chocolate, tapping gently against the bowl’s edge to remove excess coating.
12. Place the dipped balls back on the parchment-lined sheet and immediately dust with ¼ cup of cocoa powder using a fine-mesh sieve for even coverage.
13. Refrigerate the cake balls for at least 1 hour to set the chocolate coating before serving.
Crafted with care, these treats offer a soft, melt-in-your-mouth crumb wrapped in a delicate chocolate shell, the cocoa dusting echoing tiramisu’s traditional finish. Consider serving them alongside espresso shots for a cozy afternoon pick-me-up, or arrange them on a rustic platter for gatherings where hands reach for comfort. Each bite unfolds slowly—first the rich chocolate, then the coffee-infused cake, and finally the velvety mascarpone lingering like a sweet memory.
Coconut Lime Cake Balls

Holding this coconut lime cake ball in my palm feels like cupping a tiny tropical escape, the way the afternoon light filters through the kitchen window and the quiet hum of the refrigerator is the only sound. It’s a simple pleasure, born from leftover cake and a few bright ingredients, that somehow manages to feel both grounding and a little magical.
Ingredients
– 2 cups vanilla cake crumbs
– 1/2 cup cream cheese, softened
– 1/4 cup sweetened shredded coconut
– 2 tbsp lime juice
– 1 tsp lime zest
– 1 cup white chocolate chips
– 1 tsp coconut oil
Instructions
1. Combine 2 cups of vanilla cake crumbs, 1/2 cup of softened cream cheese, 1/4 cup of sweetened shredded coconut, 2 tablespoons of lime juice, and 1 teaspoon of lime zest in a large mixing bowl.
2. Mix the ingredients with your hands until they form a uniform, pliable dough that holds together when pressed.
3. Roll tablespoon-sized portions of the dough between your palms to form smooth, 1-inch balls.
4. Place the formed balls on a parchment-lined baking sheet and freeze them for 20 minutes to firm up, which prevents cracking when coated.
5. Melt 1 cup of white chocolate chips with 1 teaspoon of coconut oil in a microwave-safe bowl in 30-second intervals, stirring between each until completely smooth.
6. Use a fork to dip each chilled cake ball into the melted white chocolate, tapping gently against the bowl’s rim to remove excess coating.
7. Return the coated cake balls to the parchment-lined sheet and immediately sprinkle with additional shredded coconut before the chocolate sets.
8. Let the cake balls sit at room temperature for 1 hour until the chocolate coating is fully hardened.
Upon biting in, the initial snap of the white chocolate gives way to a wonderfully soft, moist interior that melts on the tongue. The bright, citrusy lime cuts through the sweetness beautifully, while the toasted coconut adds a subtle crunch and tropical aroma—they’re delightful served slightly chilled alongside a cup of herbal tea or as a whimsical finish to a summer brunch.
Banana Pudding Cake Balls
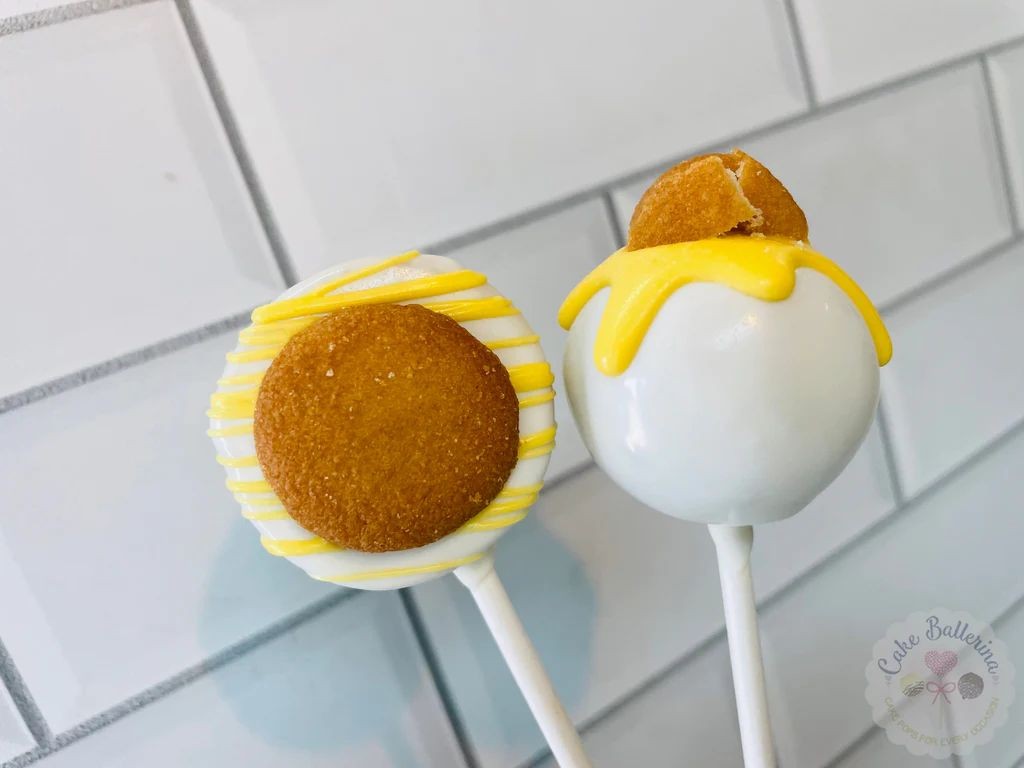
Evenings like this, with the kitchen quiet and the world outside hushed, I find myself drawn to recipes that feel like edible memories. Banana pudding cake balls capture that nostalgic comfort in bite-sized form, perfect for when you need a little sweetness without ceremony.
Ingredients
– 1 box vanilla cake mix
– 3 large eggs
– 1/2 cup vegetable oil
– 1 cup water
– 2 cups vanilla pudding
– 1 cup mashed ripe bananas
– 1/2 cup crushed vanilla wafers
– 12 oz white chocolate chips
– 1 tbsp coconut oil
Instructions
1. Preheat your oven to 350°F and grease a 9×13 inch baking pan.
2. Combine the vanilla cake mix, eggs, vegetable oil, and water in a large mixing bowl until smooth.
3. Pour the batter into the prepared pan and bake for 25-30 minutes until golden and a toothpick inserted in the center comes out clean.
4. Cool the cake completely on a wire rack for 1 hour—this prevents crumbling when shaping.
5. Crumble the cooled cake into fine crumbs in a large bowl using your hands.
6. Add the vanilla pudding and mashed bananas to the cake crumbs, mixing until fully incorporated.
7. Chill the mixture in the refrigerator for 30 minutes to firm it up for easier handling.
8. Roll the chilled mixture into 1-inch balls and place them on a parchment-lined baking sheet.
9. Freeze the balls for 15 minutes to prevent them from falling apart during coating.
10. Melt the white chocolate chips and coconut oil together in a microwave-safe bowl in 30-second intervals, stirring between each until smooth.
11. Dip each frozen ball into the melted chocolate using a fork, allowing excess to drip off.
12. Immediately sprinkle the crushed vanilla wafers over the coated balls before the chocolate sets.
13. Return the finished balls to the parchment-lined sheet and refrigerate for 20 minutes until firm. On quiet afternoons, these cake balls offer a creamy interior that melts like pudding, with the gentle crunch of wafers adding texture. They’re lovely arranged in a shallow bowl with extra banana slices, catching the light like little moons.
Mint Chocolate Chip Cake Balls
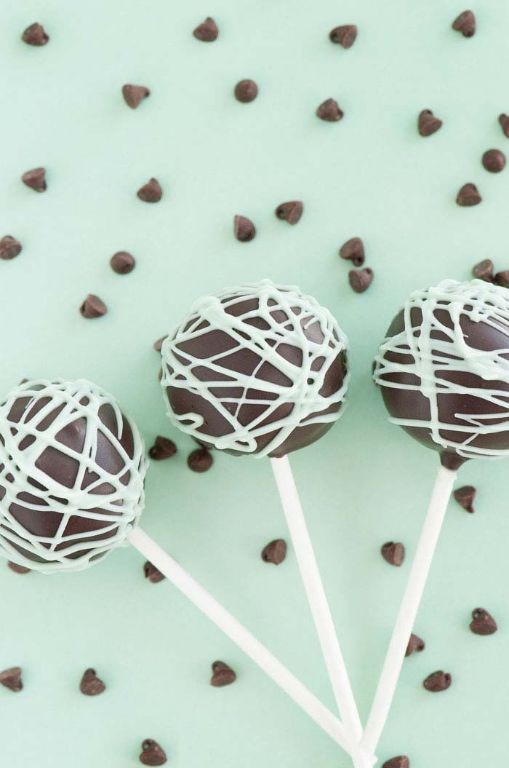
Nestled in the quiet of my kitchen, I find myself drawn to the gentle rhythm of baking, where mint and chocolate can dance together in these simple cake balls. There’s something quietly comforting about transforming humble ingredients into these delicate, bite-sized treats that hold both freshness and richness in every mouthful.
Ingredients
– 1 box chocolate cake mix
– 3 large eggs
– 1/2 cup vegetable oil
– 1 cup water
– 8 oz cream cheese, softened
– 2 cups powdered sugar
– 1 tsp peppermint extract
– 12 oz dark chocolate chips
– 1 tbsp coconut oil
– 1/4 cup crushed candy canes
Instructions
1. Preheat your oven to 350°F and grease a 9×13 inch baking pan.
2. In a large bowl, combine the chocolate cake mix, eggs, vegetable oil, and water until smooth.
3. Pour the batter into the prepared pan and bake for 28-32 minutes until a toothpick inserted in the center comes out clean.
4. Allow the cake to cool completely on a wire rack, about 1 hour.
5. Crumble the cooled cake into fine crumbs using your hands or a food processor.
6. In a separate bowl, beat the softened cream cheese with an electric mixer until smooth.
7. Gradually add the powdered sugar and peppermint extract, mixing until fully incorporated.
8. Combine the cream cheese mixture with the cake crumbs until a uniform dough forms.
9. Roll the mixture into 1-inch balls and place them on a parchment-lined baking sheet.
10. Chill the cake balls in the refrigerator for 45 minutes until firm.
11. Melt the dark chocolate chips and coconut oil together in a double boiler over simmering water, stirring constantly until smooth.
12. Using a fork, dip each chilled cake ball into the melted chocolate, tapping gently to remove excess coating.
13. Immediately sprinkle the tops with crushed candy canes before the chocolate sets.
14. Return the coated cake balls to the parchment-lined sheet and refrigerate for 30 minutes until the chocolate hardens.
Unwrapping one of these chilled delights reveals a wonderful contrast—the crisp chocolate shell gives way to a soft, almost truffle-like interior that melts on the tongue. The cool mint lingers subtly beneath the rich chocolate, creating a refreshing finish that makes these perfect for serving alongside coffee or as a sophisticated ending to dinner parties. For a playful twist, try stacking them into a miniature cake tower or crumbling one over vanilla ice cream.
Carrot Cake Balls with Cream Cheese Coating
Mellow autumn afternoons always stir something sweet in my soul, something that calls for simple comforts and the gentle rhythm of hands shaping something nourishing. These carrot cake balls feel like little edible hugs, capturing all the warmth of the season in bite-sized morsels that require no oven, just patience and care. They’re the kind of treat that makes you pause, breathe deeply, and remember that sometimes the sweetest things come in the simplest packages.
Ingredients
– 2 cups grated carrots
– 1 cup almond flour
– 1/2 cup pitted dates
– 1/4 cup shredded coconut
– 1 tsp ground cinnamon
– 1/4 tsp ground nutmeg
– 1/4 tsp salt
– 4 oz cream cheese
– 1/4 cup powdered sugar
– 1/2 tsp vanilla extract
Instructions
1. Place grated carrots between two clean kitchen towels and press firmly to remove excess moisture.
2. Combine almond flour, dates, shredded coconut, cinnamon, nutmeg, and salt in a food processor.
3. Pulse the dry ingredients for 30 seconds until the dates are finely chopped.
4. Add the dried grated carrots to the food processor.
5. Process the mixture for 1 minute until it forms a sticky dough that holds together when pressed.
6. Scoop 1 tablespoon of the carrot mixture and roll it into a tight ball between your palms.
7. Repeat with remaining mixture to form 16 balls.
8. Arrange the balls on a parchment-lined baking sheet.
9. Refrigerate the balls for 30 minutes to firm up.
10. Combine cream cheese, powdered sugar, and vanilla extract in a small bowl.
11. Whisk the cream cheese mixture for 2 minutes until completely smooth and lump-free.
12. Dip each chilled carrot ball into the cream cheese coating, turning to cover completely.
13. Return the coated balls to the parchment-lined baking sheet.
14. Refrigerate the finished balls for 1 hour until the coating is set.
15. Store the carrot cake balls in an airtight container in the refrigerator. Lightly spiced and wonderfully textured, these little spheres offer the perfect balance between the earthy sweetness of carrots and the tangy richness of cream cheese. Last night I served them arranged on a wooden board with tiny forks, watching how their cream cheese shells glistened under the kitchen lights like miniature moons.
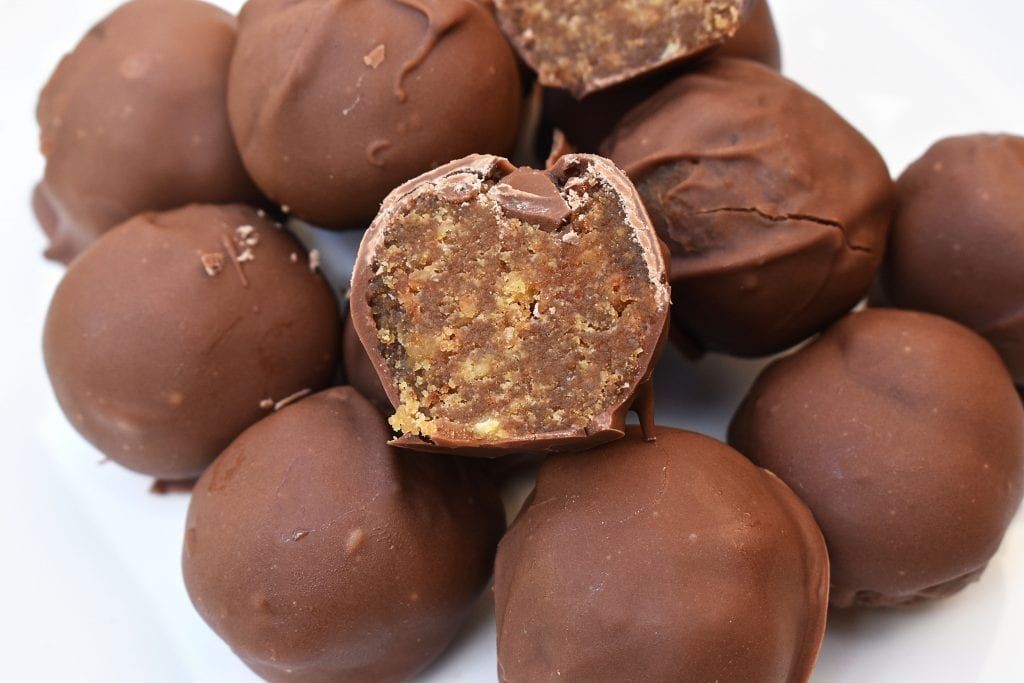
Oreo-Stuffed Cake Balls

Evenings like this, when the kitchen grows quiet and the world outside slows its pace, I find myself drawn to recipes that feel like small comforts—like these Oreo-stuffed cake balls, which are less about perfection and more about the gentle, messy joy of making something sweet with your own hands.
Ingredients
- 1 box chocolate cake mix
- 3 large eggs
- 1/2 cup vegetable oil
- 1 cup water
- 16 Oreo cookies
- 8 oz cream cheese, softened
- 2 cups semi-sweet chocolate chips
- 1 tbsp coconut oil
Instructions
- Preheat your oven to 350°F and grease a 9×13-inch baking pan lightly with non-stick spray.
- In a large mixing bowl, combine the chocolate cake mix, eggs, vegetable oil, and water, stirring just until no dry streaks remain—overmixing can make the cake dense.
- Pour the batter into the prepared pan and bake for 28–32 minutes, or until a toothpick inserted into the center comes out clean.
- Let the cake cool completely in the pan on a wire rack, about 1 hour, to avoid crumbling when handled.
- Crumble the cooled cake into fine crumbs using your hands or a fork, ensuring no large chunks remain.
- Add the softened cream cheese to the cake crumbs and mix until fully incorporated and the mixture holds together when pressed.
- Take about 1 tablespoon of the cake mixture and flatten it into a small disc in your palm.
- Place one Oreo cookie in the center of the disc and gently wrap the cake mixture around it, sealing edges completely to prevent leaking.
- Roll each stuffed ball between your palms to form smooth, round shapes, and place them on a parchment-lined baking sheet.
- Freeze the balls for 20 minutes to firm up, which helps the coating set neatly later.
- In a microwave-safe bowl, combine the chocolate chips and coconut oil, microwaving in 30-second intervals, stirring between each, until fully melted and smooth.
- Using a fork or dipping tool, dip each chilled cake ball into the melted chocolate, tapping gently to remove excess coating.
- Return the coated balls to the parchment-lined sheet and let them set at room temperature for about 1 hour, or until the chocolate is firm.
As you bite into one, the crisp chocolate shell gives way to a fudgy cake center, with that hidden Oreo adding a satisfying crunch. Arrange them on a rustic platter with a dusting of cocoa powder, or simply enjoy them straight from the fridge with a cup of tea on a quiet afternoon.
White Chocolate Raspberry Cake Balls
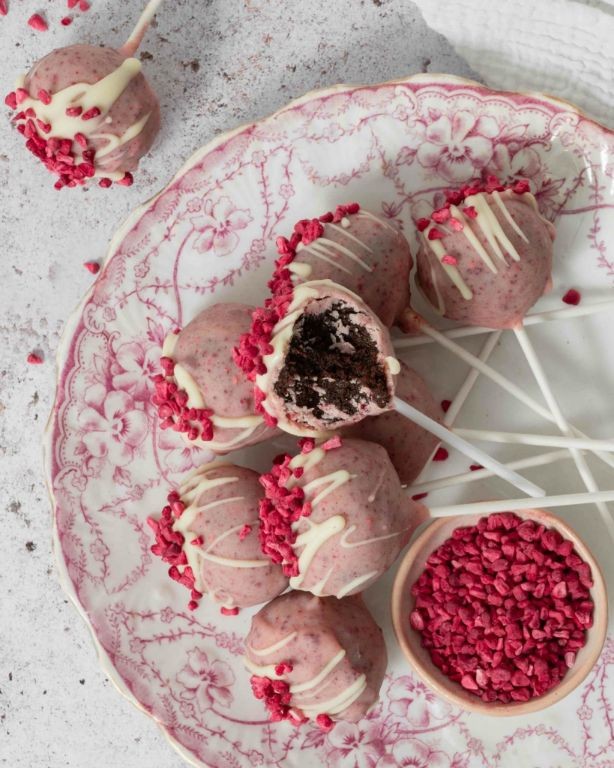
There’s something quietly magical about transforming simple ingredients into these delicate confections, the way white chocolate and raspberry seem destined to find each other in sweet harmony. Today felt like the perfect afternoon to lose myself in the gentle rhythm of baking, measuring, and melting, creating these little spheres of comfort that hold both memory and promise. Each cake ball becomes a tiny treasure, wrapped in glossy chocolate and carrying the subtle tartness of raspberry through its tender crumb.
Ingredients
– 1 box white cake mix
– 3 large eggs
– 1/2 cup vegetable oil
– 1 cup water
– 1/2 cup seedless raspberry jam
– 16 ounces white chocolate chips
– 1 teaspoon coconut oil
– 1/4 cup freeze-dried raspberries
Instructions
1. Preheat your oven to 350°F and generously grease a 9×13 inch baking pan.
2. Combine the white cake mix, eggs, vegetable oil, and water in a large mixing bowl, stirring until no dry streaks remain—be careful not to overmix, as this keeps the cake tender.
3. Pour the batter into your prepared pan and bake for 25-30 minutes, until the top springs back lightly when touched and a toothpick inserted in the center comes out clean.
4. Let the cake cool completely in the pan on a wire rack for about 1 hour—patience here prevents crumbling later.
5. Crumble the cooled cake into fine crumbs using your fingers or a fork in a large bowl.
6. Add the raspberry jam to the cake crumbs and mix thoroughly until the mixture holds together when pressed.
7. Roll tablespoon-sized portions of the cake mixture into smooth, compact balls and place them on a parchment-lined baking sheet.
8. Chill the formed cake balls in the refrigerator for 30 minutes to firm up, which makes dipping much easier.
9. Melt the white chocolate chips and coconut oil together in a microwave-safe bowl in 30-second intervals, stirring gently between each until completely smooth.
10. Dip each chilled cake ball into the melted chocolate using a fork, letting excess chocolate drip back into the bowl.
11. Return the coated cake balls to the parchment-lined sheet and immediately sprinkle with crushed freeze-dried raspberries before the chocolate sets.
12. Allow the chocolate to fully harden at room temperature for about 1 hour, or refrigerate for 15 minutes if you’re eager to taste them.
Here, the contrast between the crisp white chocolate shell and the soft, jam-infused interior creates a lovely textural dance. The raspberry’s bright acidity cuts through the sweetness in the most satisfying way, making these perfect for gifting in little paper cups or serving alongside afternoon tea.
German Chocolate Cake Balls

Evenings like this, when the kitchen grows quiet and the world outside slows its pace, I find myself drawn to recipes that feel like small, edible treasures. German chocolate cake balls capture that perfect balance of nostalgia and indulgence, transforming familiar flavors into bite-sized delights that invite you to pause and savor each moment.
Ingredients
– 1 box German chocolate cake mix
– 1 cup water
– 1/2 cup vegetable oil
– 3 large eggs
– 1 can sweetened condensed milk
– 1 cup evaporated milk
– 3 large egg yolks
– 1/2 cup unsalted butter
– 1 cup granulated sugar
– 1 teaspoon vanilla extract
– 1 cup chopped pecans
– 1 cup sweetened shredded coconut
– 16 ounces semi-sweet chocolate chips
– 2 tablespoons coconut oil
Instructions
1. Preheat your oven to 350°F and grease a 9×13 inch baking pan.
2. Combine the German chocolate cake mix, water, vegetable oil, and 3 eggs in a large mixing bowl.
3. Beat the cake batter on medium speed for 2 minutes until smooth and well-combined.
4. Pour the batter into the prepared pan and spread it evenly with a spatula.
5. Bake for 28-32 minutes until a toothpick inserted in the center comes out clean.
6. Cool the cake completely on a wire rack for 1 hour.
7. Crumble the cooled cake into fine crumbs using your hands or a fork.
8. Combine sweetened condensed milk, evaporated milk, 3 egg yolks, butter, and sugar in a saucepan over medium heat.
9. Cook the coconut-pecan filling for 12-15 minutes, stirring constantly, until it thickens and coats the back of a spoon.
10. Remove the filling from heat and stir in vanilla extract, pecans, and shredded coconut.
11. Cool the filling to room temperature, about 30 minutes.
12. Mix 1 cup of the coconut-pecan filling into the cake crumbs until fully incorporated.
13. Roll the mixture into 1-inch balls and place them on a parchment-lined baking sheet.
14. Chill the cake balls in the refrigerator for 30 minutes to firm up.
15. Melt semi-sweet chocolate chips and coconut oil together in a double boiler over simmering water.
16. Stir the chocolate mixture until completely smooth and glossy.
17. Dip each chilled cake ball into the melted chocolate using a fork, allowing excess to drip off.
18. Return the coated balls to the parchment-lined sheet.
19. Drizzle the remaining coconut-pecan filling over the chocolate-coated balls.
20. Refrigerate the finished cake balls for 15 minutes until the chocolate sets.
These little spheres hold such wonderful contrasts—the crisp chocolate shell giving way to that moist, coconut-laced interior that melts on the tongue. They’re perfect arranged on a vintage cake stand for afternoon tea, or tucked into small paper cups for gifting to neighbors who appreciate handmade sweetness.
Maple Bacon Cake Balls
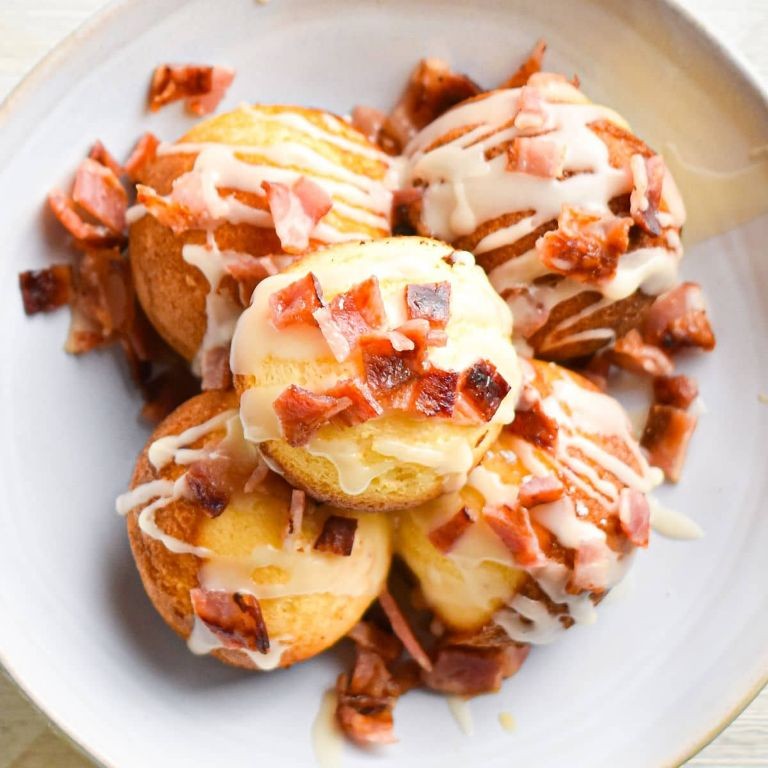
Vaguely, as autumn light filters through the kitchen window, I find myself drawn to the quiet alchemy of transforming humble ingredients into something that holds both sweetness and smoke, a treat that feels like Sunday morning captured in a single bite.
Ingredients
– 1 cup all-purpose flour
– 1/2 cup granulated sugar
– 1/4 cup pure maple syrup
– 1/2 cup cooked bacon, finely chopped
– 1/2 cup unsalted butter, softened
– 2 large eggs
– 1 tsp baking powder
– 1/4 tsp salt
– 8 oz cream cheese, softened
– 2 cups powdered sugar
– 12 oz white chocolate melting wafers
Instructions
1. Preheat your oven to 350°F and line a baking sheet with parchment paper.
2. In a medium bowl, whisk together 1 cup all-purpose flour, 1/2 cup granulated sugar, 1 tsp baking powder, and 1/4 tsp salt until fully combined.
3. Add 1/2 cup softened unsalted butter, 1/4 cup pure maple syrup, and 2 large eggs to the dry ingredients, mixing just until the batter comes together without overmixing—this keeps the cake tender.
4. Fold in 1/2 cup finely chopped cooked bacon until evenly distributed throughout the batter.
5. Spread the batter evenly onto the prepared baking sheet and bake at 350°F for 18–20 minutes, or until the edges are golden and a toothpick inserted into the center comes out clean.
6. Let the baked cake cool completely on a wire rack, about 1 hour, to prevent crumbling when handled.
7. Crumble the cooled cake into fine crumbs using your hands or a fork in a large bowl.
8. Add 8 oz softened cream cheese and 2 cups powdered sugar to the cake crumbs, mixing with a spatula until a uniform dough forms that holds together when pressed.
9. Roll the mixture into 1-inch balls, placing them on a parchment-lined tray, and chill in the refrigerator for 30 minutes to firm up for easier coating.
10. Melt 12 oz white chocolate melting wafers in a microwave-safe bowl in 30-second intervals, stirring between each, until smooth and fluid.
11. Dip each chilled cake ball into the melted chocolate using a fork, tapping off excess to avoid pooling at the base.
12. Place the coated balls back on the parchment-lined tray and sprinkle with any remaining bacon bits for garnish before the chocolate sets.
13. Allow the chocolate to fully set at room temperature, about 1 hour, before serving. Here, the cake balls reveal a soft, fudgy interior that contrasts with the crisp bacon bits, while the maple whispers through each layer. Heat them slightly for a gooey treat or pair with strong coffee to balance the smoky sweetness.
Matcha Green Tea Cake Balls
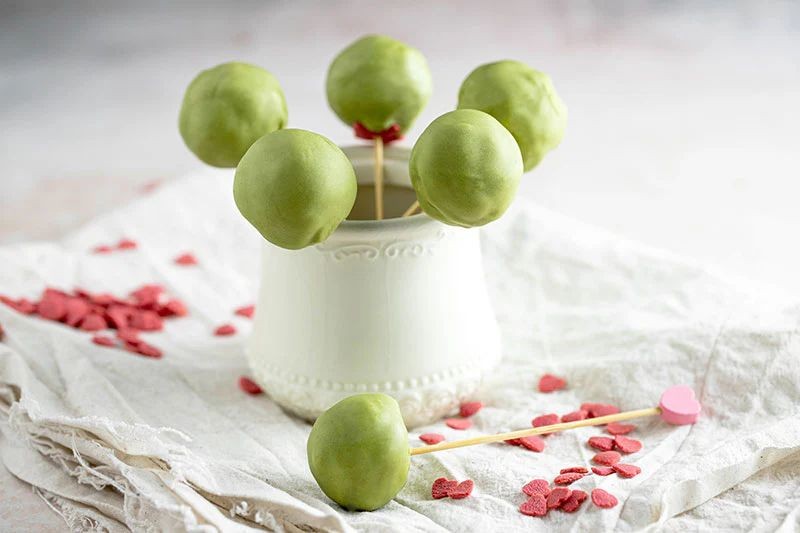
Tucked away in my kitchen this quiet afternoon, I find myself drawn to the gentle art of making something sweet and simple. There’s a particular comfort in creating these matcha cake balls, each one a tiny sphere of calm in a hurried world. The vibrant green powder dusting my counter promises both flavor and a moment of mindfulness.
Ingredients
– 1 box vanilla cake mix
– 3 large eggs
– 1/2 cup vegetable oil
– 1 cup water
– 8 oz cream cheese, softened
– 4 cups powdered sugar
– 2 tbsp matcha powder
– 1 cup white chocolate chips
– 1 tsp coconut oil
Instructions
1. Preheat your oven to 350°F and grease a 9×13 inch baking pan.
2. Combine the vanilla cake mix, eggs, vegetable oil, and water in a large mixing bowl until smooth.
3. Pour the batter into the prepared pan and bake for 28-32 minutes, until a toothpick inserted in the center comes out clean.
4. Cool the cake completely on a wire rack for 1 hour, then crumble it into fine crumbs using your hands.
5. Beat the softened cream cheese in a separate bowl until fluffy, about 2 minutes.
6. Gradually add the powdered sugar to the cream cheese, mixing until fully incorporated.
7. Sift the matcha powder into the cream cheese mixture and stir until evenly green with no streaks.
8. Combine the matcha cream cheese mixture with the cake crumbs until a dough forms.
9. Roll tablespoon-sized portions of the dough into smooth balls and place them on a parchment-lined baking sheet.
10. Chill the balls in the refrigerator for 30 minutes to firm up, which prevents cracking when dipped.
11. Melt the white chocolate chips and coconut oil together in a microwave-safe bowl in 30-second intervals, stirring between each until smooth.
12. Dip each chilled cake ball into the melted chocolate using a fork, tapping gently to remove excess coating.
13. Return the coated balls to the parchment-lined sheet and refrigerate for 15 minutes until the chocolate sets.
14. Store the finished cake balls in an airtight container in the refrigerator. Creating these treats yields a delicate crumb that melts against the creamy matcha filling, while the white chocolate shell adds a satisfying snap. Consider serving them alongside chilled jasmine tea or arranged on a wooden board with fresh berries for a beautiful contrast.
Black Forest Cake Balls
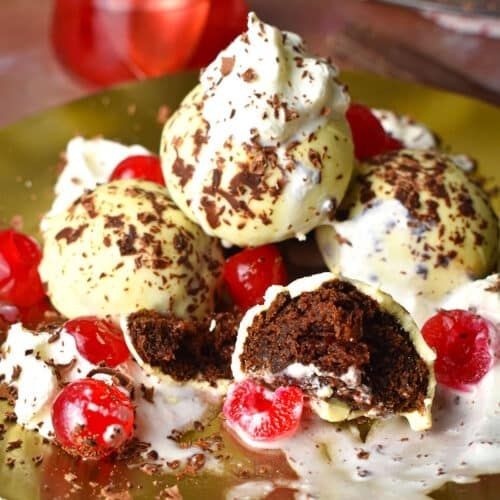
Years of autumn afternoons have taught me that some of the most comforting creations begin with humble ingredients and quiet moments in the kitchen. These Black Forest cake balls capture that gentle magic, transforming simple chocolate cake into decadent, bite-sized treasures that feel like a warm embrace on a crisp November day.
Ingredients
– 1 box chocolate cake mix
– 3 large eggs
– 1/2 cup vegetable oil
– 1 cup water
– 1 cup cherry pie filling
– 16 oz cream cheese, softened
– 4 cups semi-sweet chocolate chips
– 2 tbsp vegetable shortening
Instructions
1. Preheat your oven to 350°F and grease a 9×13 inch baking pan.
2. In a large mixing bowl, combine the chocolate cake mix, eggs, vegetable oil, and water until smooth.
3. Pour the batter into the prepared pan and bake for 28-32 minutes, until a toothpick inserted in the center comes out clean.
4. Allow the cake to cool completely to room temperature, about 1 hour.
5. Crumble the cooled cake into fine crumbs using your hands or a food processor.
6. Add the softened cream cheese and cherry pie filling to the cake crumbs.
7. Mix thoroughly until the mixture forms a uniform dough that holds together when pressed.
8. Roll the mixture into 1-inch balls and place them on a parchment-lined baking sheet.
9. Chill the balls in the refrigerator for 30 minutes to firm up.
10. Combine the chocolate chips and vegetable shortening in a microwave-safe bowl.
11. Microwave in 30-second intervals, stirring between each, until completely melted and smooth.
12. Using a fork, dip each chilled cake ball into the melted chocolate, coating completely.
13. Tap the fork gently against the bowl’s edge to remove excess chocolate.
14. Return the coated balls to the parchment-lined sheet.
15. Refrigerate for another 20 minutes until the chocolate shell is firm and set.
For the richest flavor, let these sit at room temperature for about 10 minutes before serving—the chocolate shell will have a satisfying snap while the interior remains wonderfully fudgy. Their deep chocolate intensity balanced by tart cherry notes makes them perfect for stacking in a rustic wooden bowl or arranging on vintage dessert plates for an intimate gathering.
Snickerdoodle Cake Balls with Cinnamon Drizzle
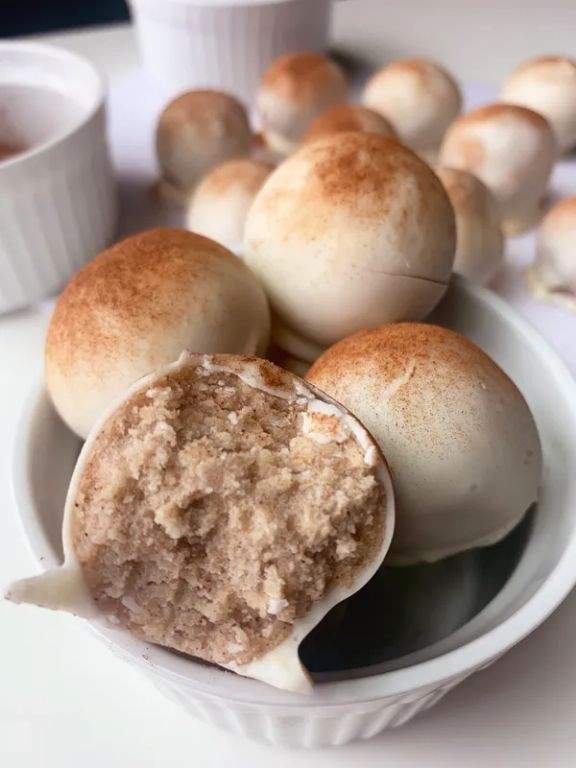
Gently, as the afternoon light softens across the kitchen counter, I find myself drawn to the quiet comfort of baking, to the simple alchemy of transforming humble ingredients into these tender snickerdoodle cake balls, each one a small, sweet promise of cinnamon-spiced warmth. There’s a particular solace in the rhythm of mixing and rolling, a slow, deliberate process that feels like a gentle exhale at the end of a long day, wrapping the familiar, buttery-cinnamon scent of a classic cookie into a soft, bite-sized cake. It’s a recipe that doesn’t rush, inviting you to move at your own pace, to savor the quiet moments of creation as much as the final, drizzled delight.
Ingredients
– 1 box vanilla cake mix
– 3 large eggs
– 1/2 cup vegetable oil
– 1 cup water
– 1/2 cup unsalted butter, softened
– 4 cups powdered sugar
– 1/4 cup milk
– 2 tsp ground cinnamon
– 1/2 tsp vanilla extract
Instructions
1. Preheat your oven to 350°F and grease a 9×13-inch baking pan.
2. In a large bowl, combine the vanilla cake mix, eggs, vegetable oil, and water, stirring until the batter is smooth and no dry streaks remain.
3. Pour the batter into the prepared pan and bake for 25-30 minutes, or until a toothpick inserted into the center comes out clean.
4. Allow the cake to cool completely in the pan on a wire rack for 1 hour.
5. Crumble the cooled cake into fine crumbs in a large bowl using your fingers or a fork.
6. Add 1/2 cup of the powdered sugar and 1 teaspoon of the ground cinnamon to the cake crumbs, mixing until fully incorporated.
7. Roll the mixture into 1-inch balls, placing them on a parchment-lined baking sheet; for easier handling, chill the balls in the refrigerator for 20 minutes to firm up.
8. In a medium bowl, beat the softened butter with the remaining powdered sugar, milk, remaining 1 teaspoon ground cinnamon, and vanilla extract until a smooth, drizzle-consistency glaze forms.
9. Drizzle the cinnamon glaze over the chilled cake balls using a spoon or piping bag, aiming for an even, decorative pattern.
10. Let the glaze set at room temperature for 15-20 minutes before serving. Cozy and inviting, these cake balls offer a soft, melt-in-your-mouth texture with a nostalgic cinnamon-sugar flavor that pairs beautifully with a hot cup of coffee or as a sweet ending to a family dinner. For a festive twist, try rolling them in extra cinnamon sugar before drizzling, or serve them alongside a scoop of vanilla ice cream to highlight their warm, spiced notes.
Summary
Joyful baking awaits with these 20 cake ball recipes perfect for any celebration! Whether you’re hosting a party or craving a sweet treat, there’s something here for everyone. We’d love to hear which recipes become your favorites—leave a comment below and don’t forget to share these delicious ideas on Pinterest for your next baking adventure!