Picture this: you’re surrounded by nature, the campfire crackles nearby, and dinner is ready in minutes. These 20 easy camp stove recipes turn outdoor cooking into pure joy, from quick one-pot wonders to comforting classics. Whether you’re a camping newbie or a seasoned pro, get ready to discover delicious meals that’ll make your next adventure even more memorable. Let’s dive in!
One-Pot Campfire Chili
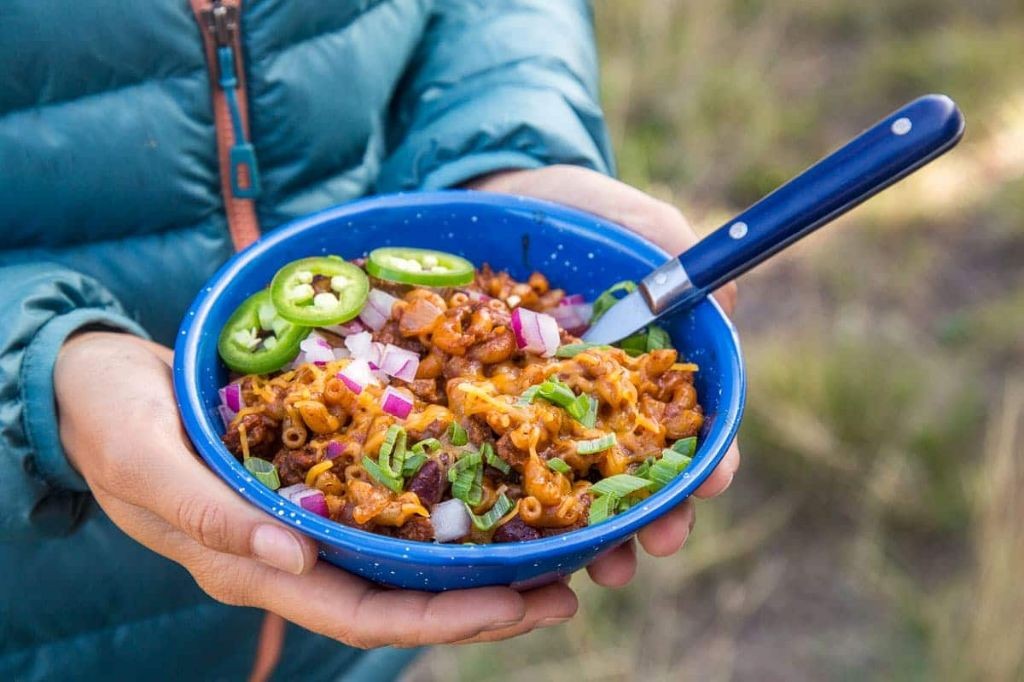
There’s nothing quite like a warm bowl of chili after a day outdoors, and this one-pot version makes campfire cooking a breeze. You’ll love how everything comes together in a single pot with minimal cleanup, delivering that classic chili flavor with smoky campfire notes. It’s the perfect hearty meal to share around the fire with friends and family.
Ingredients
For the base:
– 1 tbsp olive oil
– 1 lb ground beef
– 1 medium yellow onion, diced
– 2 cloves garlic, minced
For the chili mixture:
– 1 (15 oz) can kidney beans, drained and rinsed
– 1 (15 oz) can diced tomatoes
– 1 (6 oz) can tomato paste
– 2 cups beef broth
– 2 tbsp chili powder
– 1 tsp ground cumin
– 1/2 tsp smoked paprika
– 1/2 tsp salt
Instructions
1. Place a large cast iron Dutch oven over your campfire grate and heat it for 5 minutes until hot.
2. Add 1 tbsp olive oil to the hot Dutch oven and swirl to coat the bottom evenly.
3. Add 1 lb ground beef and cook for 8-10 minutes, breaking it up with a wooden spoon until no pink remains.
4. Add the diced onion and minced garlic, cooking for 4-5 minutes until the onion becomes translucent and fragrant.
5. Stir in 2 tbsp chili powder, 1 tsp ground cumin, 1/2 tsp smoked paprika, and 1/2 tsp salt, toasting the spices for 1 minute until aromatic.
6. Add 1 (6 oz) can tomato paste and cook for 2 minutes, stirring constantly to coat the meat mixture.
7. Pour in 1 (15 oz) can diced tomatoes with their juices and 2 cups beef broth, scraping any browned bits from the bottom of the pot.
8. Add 1 (15 oz) can drained and rinsed kidney beans, stirring to combine all ingredients.
9. Bring the chili to a boil over high heat, then reduce to a simmer by moving the pot to a cooler part of the fire.
10. Cover the Dutch oven and simmer for 45 minutes, stirring every 15 minutes to prevent sticking.
11. Remove the lid and continue simmering for another 15 minutes until the chili thickens to your desired consistency.
12. Remove from heat and let rest for 5 minutes before serving.
Zesty and deeply satisfying, this chili develops a wonderful smoky complexity from the campfire cooking. The beans stay firm while the ground beef becomes incredibly tender, creating a perfect texture balance. Try serving it over campfire-toasted cornbread or topping it with shredded cheese and chopped onions for extra flavor layers.
Grilled Foil Packet Vegetables
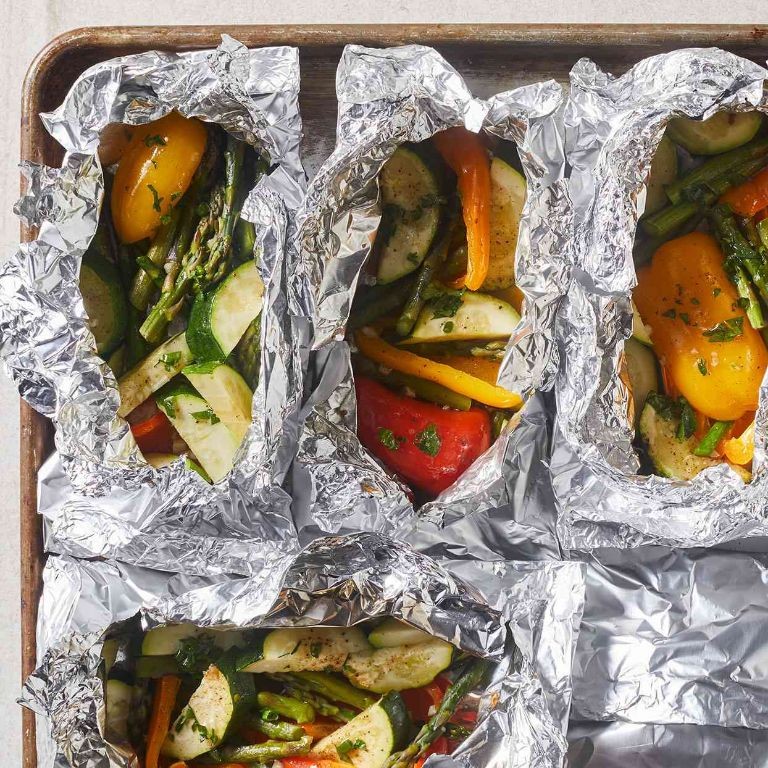
Kind of amazing how a simple foil packet can transform basic veggies into something so delicious, right? You just toss everything together, seal it up, and let the grill work its magic. It’s the perfect low-effort side dish for summer barbecues or busy weeknights.
Ingredients
For the vegetable base:
– 2 cups chopped zucchini (1-inch pieces)
– 1½ cups chopped yellow squash (1-inch pieces)
– 1 cup chopped red bell pepper (1-inch pieces)
– 1 cup chopped red onion (1-inch pieces)
For the seasoning mixture:
– 2 tablespoons olive oil
– 1 teaspoon garlic powder
– 1 teaspoon dried Italian seasoning
– ½ teaspoon salt
– ¼ teaspoon black pepper
Instructions
- Preheat your grill to medium-high heat (400°F).
- Place the chopped zucchini, yellow squash, red bell pepper, and red onion in a large bowl.
- Drizzle the olive oil over the vegetables.
- Sprinkle the garlic powder, dried Italian seasoning, salt, and black pepper over the vegetables.
- Toss everything together until the vegetables are evenly coated with oil and seasonings.
- Cut four 12×12-inch squares of heavy-duty aluminum foil.
- Divide the vegetable mixture evenly among the four foil squares.
- Bring the opposite edges of each foil square together over the vegetables.
- Fold the edges down in ½-inch increments, creating a tight seal along the top.
- Fold the short ends of each packet inward to completely seal the vegetables inside. Tip: Make sure your packets are tightly sealed to trap steam, which helps the vegetables cook evenly and stay tender.
- Place the foil packets directly on the preheated grill grates.
- Close the grill lid and cook for 15 minutes. Tip: Don’t peek during the first 10 minutes—keeping the lid closed maintains consistent heat for proper cooking.
- Carefully flip each packet using tongs.
- Close the lid and cook for another 10 minutes.
- Remove one packet from the grill using tongs.
- Carefully open one corner of the packet to check if the vegetables are tender when pierced with a fork.
- If the vegetables aren’t tender, reseal the packet and cook for 5 more minutes. Tip: The vegetables should be soft but still hold their shape—overcooking can make them mushy.
- Remove all packets from the grill when the vegetables are tender.
- Let the packets rest for 2 minutes before opening fully.
Each vegetable keeps its distinct texture while soaking up those herby, garlicky flavors from the steam. The zucchini and squash turn wonderfully tender, while the bell peppers add a slight crunch and sweetness. Excellent served straight from the packet with grilled chicken or stirred into pasta for an easy vegetarian meal.
Quick Camp Stove Pasta Primavera
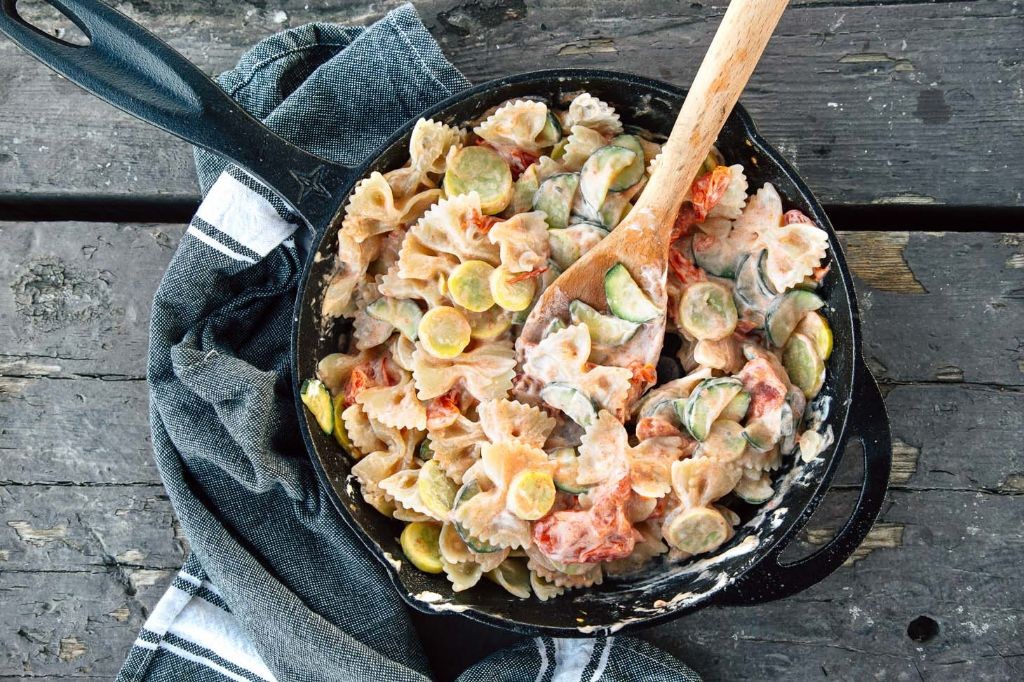
Picture this: you’re out in the woods, stomach rumbling, and craving something fresh and satisfying. This quick camp stove pasta primavera comes together in one pot with minimal fuss. You’ll have a vibrant, veggie-packed meal ready faster than you can set up your camping chair.
Ingredients
- For the pasta:
- 8 oz penne pasta
- 4 cups water
- 1 tsp salt
- For the vegetables:
- 1 tbsp olive oil
- 2 cloves garlic, minced
- 1 cup cherry tomatoes, halved
- 1 cup broccoli florets
- 1 zucchini, sliced
- For finishing:
- 1/4 cup grated Parmesan cheese
- 2 tbsp fresh basil, chopped
Instructions
- Place your camp stove on a level, stable surface and light it to medium-high heat.
- Combine 8 oz penne pasta, 4 cups water, and 1 tsp salt in a large pot.
- Bring the mixture to a rolling boil, stirring occasionally to prevent sticking.
- Cook for 8 minutes, stirring every 2 minutes to ensure even cooking.
- Drain the pasta completely, reserving 1/2 cup of pasta water, then return the empty pot to the stove.
- Add 1 tbsp olive oil to the hot pot and swirl to coat the bottom.
- Sauté 2 cloves minced garlic for 30 seconds until fragrant but not browned.
- Add 1 cup cherry tomatoes, 1 cup broccoli florets, and 1 sliced zucchini to the pot.
- Cook vegetables for 4 minutes, stirring frequently, until broccoli turns bright green and zucchini softens slightly.
- Return the drained pasta to the pot with the vegetables.
- Pour in 1/4 cup of the reserved pasta water and stir to combine everything.
- Sprinkle 1/4 cup grated Parmesan cheese over the pasta and stir until melted and creamy.
- Remove from heat and fold in 2 tbsp chopped fresh basil.
Enjoy the delightful contrast between the al dente pasta and tender-crisp vegetables in every bite. The garlic and Parmesan create a simple but rich coating that lets the fresh veggies shine. Try serving it straight from the pot with extra Parmesan for a truly rustic camping meal that feels gourmet despite the simple setup.
Camp Stove Pancakes with Maple Syrup

Venturing into the great outdoors doesn’t mean sacrificing delicious breakfasts. You can whip up these fluffy camp stove pancakes in minutes, and that warm maple syrup makes everything taste like home, even when you’re miles from civilization.
Ingredients
For the Dry Mix:
- 1 cup all-purpose flour
- 2 tbsp granulated sugar
- 1 tsp baking powder
- 1/2 tsp salt
For the Wet Mix:
- 3/4 cup whole milk
- 1 large egg
- 2 tbsp melted butter
For Cooking & Serving:
- 2 tbsp vegetable oil
- 1/2 cup pure maple syrup
Instructions
- Combine 1 cup all-purpose flour, 2 tbsp granulated sugar, 1 tsp baking powder, and 1/2 tsp salt in a large ziplock bag.
- Seal the bag tightly and shake vigorously for 30 seconds to mix all dry ingredients evenly.
- Pour 3/4 cup whole milk into a separate camp bowl.
- Crack 1 large egg directly into the milk.
- Add 2 tbsp melted butter to the milk and egg mixture.
- Whisk the wet ingredients together until fully combined and slightly frothy.
- Pour the dry mixture from the ziplock bag into the wet ingredients.
- Stir gently with a spatula until just combined, leaving some small lumps. Tip: Overmixing makes pancakes tough, so stop as soon as the flour disappears.
- Heat a camp stove griddle or large skillet over medium heat (approximately 350°F).
- Test the griddle temperature by sprinkling a few water drops – they should sizzle and evaporate quickly.
- Pour 2 tbsp vegetable oil onto the hot griddle and spread it evenly with a paper towel.
- Scoop 1/4 cup portions of batter onto the oiled griddle. Tip: Leave space between pancakes so they don’t merge while cooking.
- Cook for 2-3 minutes until bubbles form across the entire surface and edges look set.
- Flip each pancake carefully using a spatula.
- Cook for another 1-2 minutes until the second side is golden brown. Tip: Lift an edge to check color – golden brown means perfectly cooked.
- Transfer cooked pancakes to a plate and repeat with remaining batter.
- Warm 1/2 cup pure maple syrup in a small pan over low heat for 1-2 minutes.
- Drizzle warm maple syrup over the stack of pancakes.
Ready to dig in? These pancakes come out wonderfully fluffy with crisp golden edges that hold up beautifully to the rich maple syrup. Try topping them with fresh berries you foraged on your hike or crumbled bacon for a sweet-savory twist that’ll make this camp breakfast unforgettable.
Beef and Potato Foil Packets

Wondering what to make for dinner that’s easy, delicious, and requires minimal cleanup? These beef and potato foil packets are your answer. You just toss everything together, wrap it up, and let the oven do the work.
Ingredients
For the beef and vegetables:
– 1 lb ground beef
– 4 medium russet potatoes, cut into ½-inch cubes
– 1 medium onion, diced
– 1 green bell pepper, diced
– 2 tbsp olive oil
For the seasoning:
– 1 tsp garlic powder
– 1 tsp paprika
– ½ tsp salt
– ¼ tsp black pepper
For serving:
– ½ cup shredded cheddar cheese
– 2 tbsp chopped fresh parsley
Instructions
1. Preheat your oven to 400°F.
2. Tear off four 12×12-inch sheets of heavy-duty aluminum foil.
3. In a large bowl, combine the cubed potatoes, diced onion, and diced bell pepper.
4. Drizzle the olive oil over the potato mixture and toss to coat evenly.
5. Add the garlic powder, paprika, salt, and black pepper to the bowl.
6. Mix all ingredients thoroughly until the vegetables are evenly coated with oil and seasonings.
7. Divide the seasoned vegetable mixture equally among the four foil sheets.
8. Crumble the ground beef into small pieces over the vegetables on each foil sheet.
9. Tip: Don’t press the beef down too firmly—this helps it cook evenly and stay tender.
10. Bring the opposite ends of each foil sheet together over the food.
11. Fold the edges down in a series of tight, ½-inch folds to create a sealed packet.
12. Leave some air space inside each packet to allow for steam circulation.
13. Tip: Make sure your foil seals are completely tight to lock in moisture and flavor.
14. Place the foil packets on a baking sheet to catch any potential drips.
15. Bake at 400°F for 30 minutes.
16. Carefully open one packet to check if the potatoes are fork-tender and the beef is fully cooked.
17. If needed, reseal and bake for 5-10 more minutes until everything is cooked through.
18. Tip: Use oven mitts when opening packets—the steam inside is extremely hot.
19. Sprinkle each packet with shredded cheddar cheese and fresh parsley.
20. Let rest for 2-3 minutes until the cheese melts slightly.
Flavorful and satisfying, these foil packets deliver tender potatoes and juicy beef with a wonderful smoky paprika aroma. The cheese melts into everything for that perfect creamy finish. Try serving them right in the foil for a fun campfire-style meal, or pair with a crisp green salad for a complete dinner that everyone will love.
Campfire Mac and Cheese
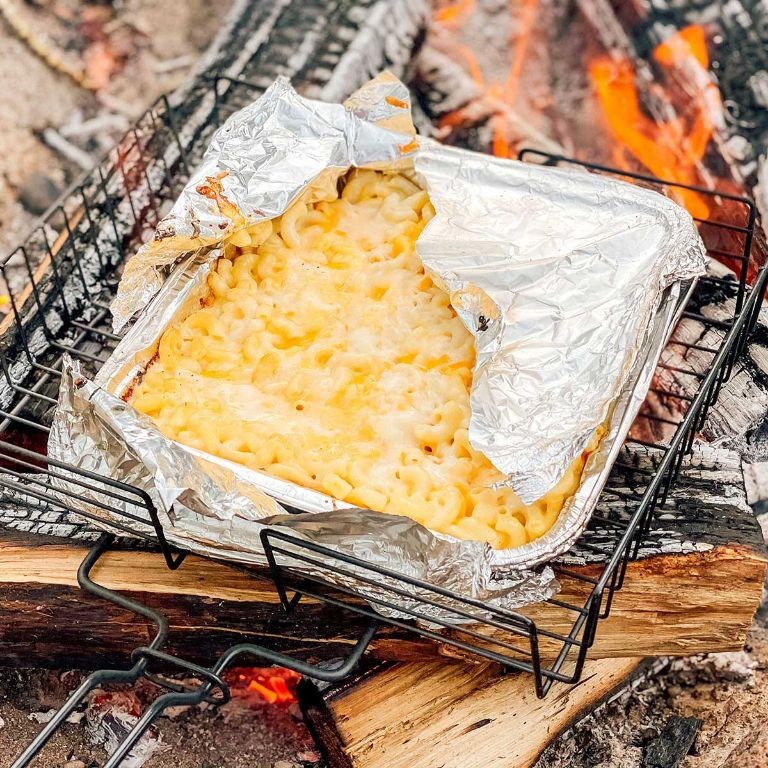
Just imagine creamy, cheesy pasta with that irresistible campfire smokiness—it’s the ultimate comfort food that feels like a hug in a bowl. You’ll love how easy it is to whip up this cozy classic, and the best part? No actual campfire required. Let’s get cooking!
Ingredients
– For the pasta: 8 oz elbow macaroni, 4 cups water, 1 tsp salt
– For the sauce: 2 tbsp unsalted butter, 2 tbsp all-purpose flour, 1 cup whole milk, 1 cup shredded sharp cheddar cheese, 1/2 cup shredded smoked gouda, 1/4 tsp smoked paprika, 1/4 tsp black pepper
– For the topping: 1/4 cup panko breadcrumbs, 1 tbsp melted butter
Instructions
1. Bring 4 cups of water and 1 tsp salt to a boil in a large pot over high heat.
2. Add 8 oz elbow macaroni to the boiling water and cook for 8 minutes, stirring occasionally to prevent sticking.
3. Drain the macaroni in a colander and set it aside.
4. Melt 2 tbsp unsalted butter in the same pot over medium heat.
5. Whisk in 2 tbsp all-purpose flour and cook for 1 minute until golden and bubbly.
6. Gradually pour in 1 cup whole milk while whisking constantly to avoid lumps.
7. Cook the sauce for 3-5 minutes, stirring frequently, until it thickens enough to coat the back of a spoon.
8. Remove the pot from heat and stir in 1 cup shredded sharp cheddar, 1/2 cup shredded smoked gouda, 1/4 tsp smoked paprika, and 1/4 tsp black pepper until the cheese is fully melted and smooth.
9. Tip: For extra creaminess, let the sauce sit off heat for 1 minute before adding cheese—this prevents grainy texture.
10. Fold the drained macaroni into the cheese sauce until evenly coated.
11. Transfer the mac and cheese to a greased 8×8-inch baking dish.
12. In a small bowl, mix 1/4 cup panko breadcrumbs with 1 tbsp melted butter until combined.
13. Sprinkle the breadcrumb mixture evenly over the mac and cheese.
14. Bake at 375°F for 15-20 minutes, or until the topping is golden brown and the edges are bubbly.
15. Tip: Place the dish on the middle oven rack for even browning—avoid the top shelf to prevent burning.
16. Let the mac and cheese rest for 5 minutes before serving to allow the sauce to set.
17. Tip: For a crispier top, broil for the last 1-2 minutes, watching closely to avoid scorching.
So creamy and rich with that smoky gouda twist, this mac and cheese is pure comfort in every bite. Serve it straight from the baking dish for a family-style meal, or pair it with a simple green salad to balance the richness. It’s so good, you might just pretend you’re gathered around a crackling fire!
Easy Camp Stove Stir-Fry

Kicking back at the campsite doesn’t mean you’re stuck with boring food. You can whip up this delicious stir-fry in just one pan over your camp stove. It’s packed with flavor and comes together faster than you can set up your tent.
Ingredients
For the stir-fry:
– 1 tbsp vegetable oil
– 1 lb chicken breast, cut into 1-inch pieces
– 1 red bell pepper, sliced
– 1 cup broccoli florets
– 2 carrots, sliced
For the sauce:
– 1/4 cup soy sauce
– 2 tbsp honey
– 1 tbsp rice vinegar
– 2 cloves garlic, minced
– 1 tsp grated ginger
Instructions
1. Heat 1 tbsp vegetable oil in a large skillet over medium-high heat on your camp stove.
2. Add 1 lb chicken pieces and cook for 5-6 minutes, stirring occasionally, until the chicken is no longer pink.
3. Tip: Make sure your pan is hot before adding the chicken to get a nice sear.
4. Add the sliced bell pepper, broccoli florets, and sliced carrots to the skillet.
5. Cook the vegetables for 4-5 minutes, stirring frequently, until they begin to soften but still have some crunch.
6. Tip: Cut all your vegetables into similar-sized pieces so they cook evenly.
7. In a small bowl, whisk together 1/4 cup soy sauce, 2 tbsp honey, 1 tbsp rice vinegar, minced garlic, and grated ginger.
8. Pour the sauce mixture over the chicken and vegetables in the skillet.
9. Cook for 2-3 minutes, stirring constantly, until the sauce thickens and coats everything evenly.
10. Tip: Have your sauce ingredients measured and ready before you start cooking to make the process smoother.
11. Remove the skillet from the heat immediately once the sauce has thickened.
Vibrant and satisfying, this stir-fry delivers crisp-tender vegetables alongside juicy chicken in a perfectly balanced sweet-savory sauce. Try serving it over instant rice or wrapping it in warm tortillas for a fun camping twist that’ll have everyone asking for seconds around the campfire.
Grilled Campfire Sandwiches
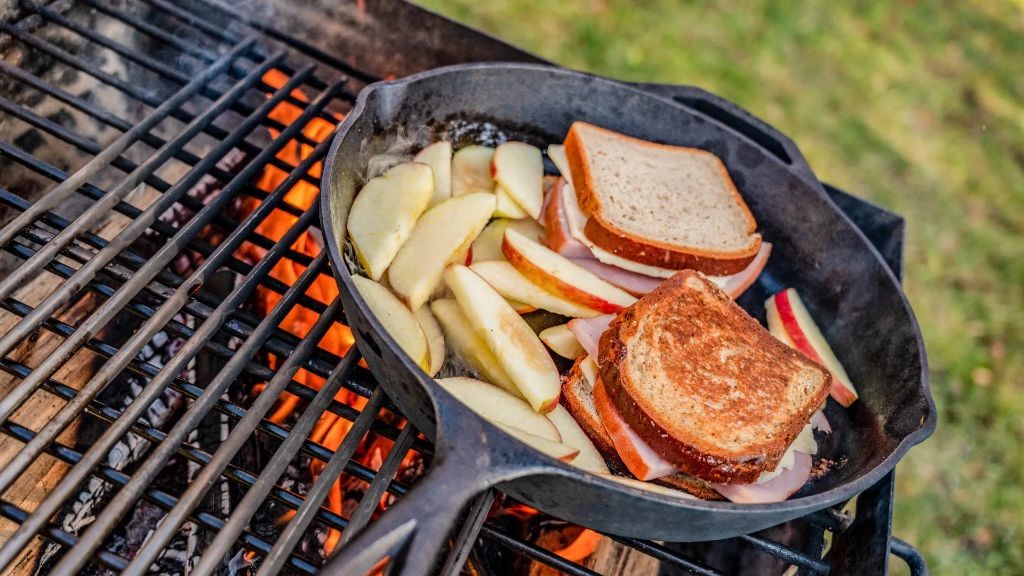
Grilled campfire sandwiches are the ultimate cozy meal that brings all the warmth of outdoor cooking right to your kitchen. You get that perfect crispy bread with melty cheese and savory fillings that just hit the spot on chilly evenings. They’re surprisingly simple to make but feel like a special treat every single time.
Ingredients
– For the sandwiches: 8 slices sourdough bread, 2 tbsp softened butter, 8 slices cheddar cheese, 1 lb thinly sliced ham, 1 large tomato sliced into 8 rounds
– For serving: 1 cup dill pickle slices
Instructions
1. Preheat your grill pan or skillet over medium heat (350°F) for 5 minutes until hot.
2. Spread ½ tablespoon of softened butter evenly on one side of each bread slice.
3. Place 4 bread slices buttered-side down on the hot grill pan.
4. Layer 2 slices of cheddar cheese, ¼ lb of ham, and 2 tomato slices on each bread slice in the pan.
5. Top each sandwich with the remaining bread slices, buttered-side facing up.
6. Cook for 4-5 minutes until the bottom bread is golden brown with visible grill marks.
7. Carefully flip each sandwich using a spatula.
8. Cook for another 4-5 minutes until the second side is golden brown and cheese is completely melted.
9. Remove sandwiches from heat and let rest for 2 minutes before cutting.
10. Slice each sandwich diagonally and serve immediately with dill pickle slices on the side.
What makes these sandwiches so satisfying is the contrast between the crispy, buttery bread and the gooey melted cheese that oozes out with every bite. The ham adds savory depth while the tomato brings a fresh brightness that cuts through the richness. Try serving them with a side of tomato soup for dipping, or pack them up for your next picnic—they travel surprisingly well and taste just as good at room temperature.
Dutch Oven Cornbread
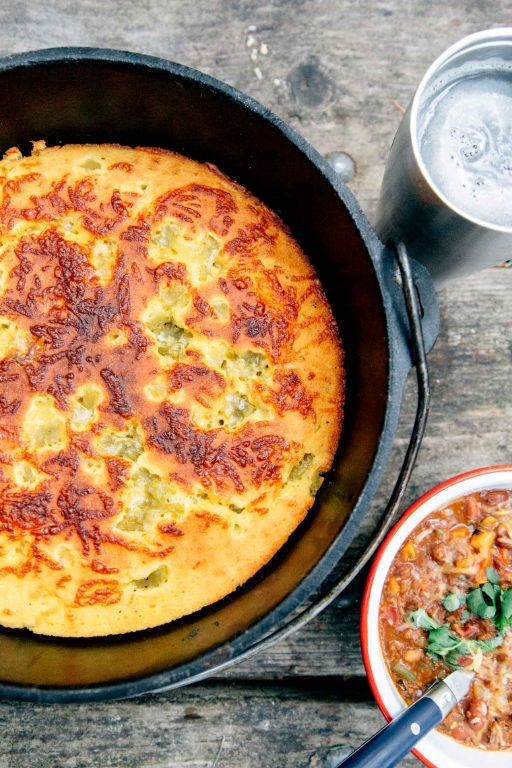
Wondering how to make the most comforting cornbread you’ve ever tasted? You’re about to discover the magic of baking it in a Dutch oven. This method gives you that perfect golden crust and tender crumb that’ll have everyone asking for seconds.
Ingredients
For the dry ingredients:
– 1 ½ cups yellow cornmeal
– ½ cup all-purpose flour
– 2 tsp baking powder
– 1 tsp salt
– ¼ cup granulated sugar
For the wet ingredients:
– 1 cup buttermilk
– 2 large eggs
– ¼ cup unsalted butter, melted
For baking:
– 2 tbsp vegetable oil
Instructions
1. Preheat your oven to 375°F and place your Dutch oven inside to heat up for 20 minutes.
2. Whisk together 1 ½ cups cornmeal, ½ cup flour, 2 tsp baking powder, 1 tsp salt, and ¼ cup sugar in a large bowl.
3. In a separate bowl, beat 2 eggs until frothy, about 1 minute.
4. Pour 1 cup buttermilk and ¼ cup melted butter into the beaten eggs, whisking until fully combined.
5. Pour the wet ingredients into the dry ingredients, stirring just until no dry spots remain – don’t overmix!
6. Carefully remove the hot Dutch oven from the oven using oven mitts.
7. Pour 2 tbsp vegetable oil into the hot Dutch oven, swirling to coat the bottom and sides evenly.
8. Immediately pour the batter into the hot Dutch oven – you should hear a satisfying sizzle.
9. Cover with the lid and bake at 375°F for 20 minutes.
10. Remove the lid and continue baking for another 15-20 minutes until the top is golden brown and a toothpick inserted in the center comes out clean.
11. Let the cornbread cool in the Dutch oven for 10 minutes before slicing.
Crackling with that signature crust and boasting a moist, tender interior, this cornbread strikes the perfect balance between sweet and savory. Serve it warm with a pat of melting butter, crumbled over chili, or alongside your favorite barbecue – it’s versatile enough to shine at any meal.
Camp Stove Shakshuka
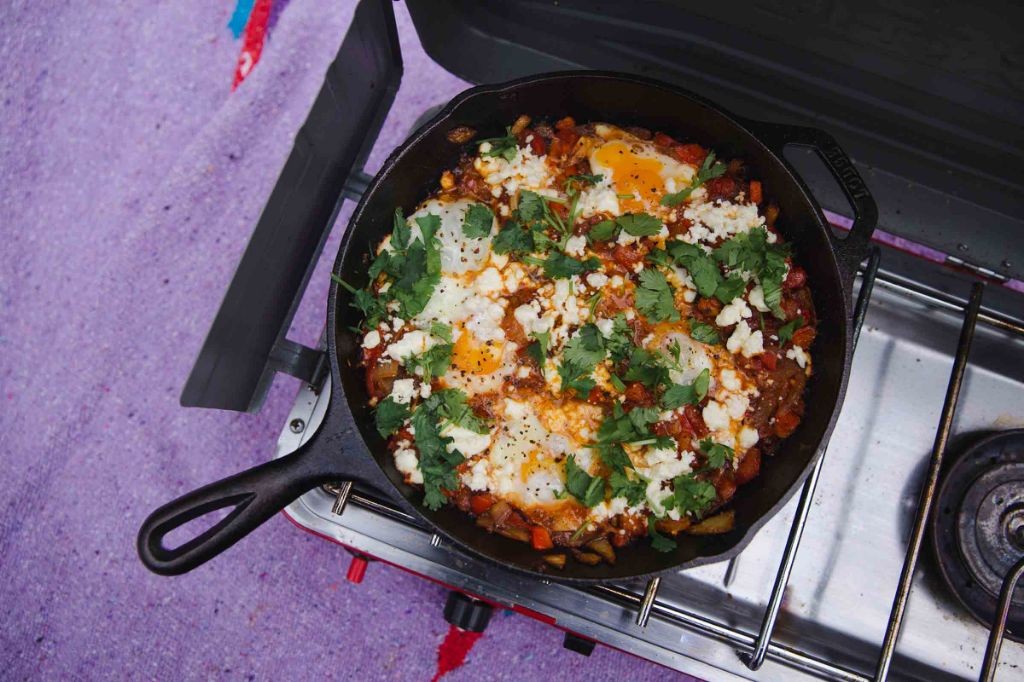
Friendly campers, you’re about to make the most incredible one-pan breakfast over an open flame. Forget complicated camping meals—this shakshuka comes together with minimal effort and maximum flavor, perfect for fueling your outdoor adventures. You’ll love how the eggs poach right in the spicy tomato sauce, creating a hearty meal that feels gourmet but cooks in one skillet.
Ingredients
For the sauce:
– 2 tablespoons olive oil
– 1 medium yellow onion, diced
– 2 cloves garlic, minced
– 1 red bell pepper, diced
– 1 (28-ounce) can crushed tomatoes
– 1 teaspoon smoked paprika
– 1/2 teaspoon cumin
– 1/4 teaspoon red pepper flakes
– 1 teaspoon salt
For finishing:
– 4 large eggs
– 1/4 cup crumbled feta cheese
– 2 tablespoons chopped fresh parsley
Instructions
1. Place a 10-inch cast iron skillet on your camp stove over medium heat.
2. Pour 2 tablespoons olive oil into the heated skillet.
3. Add 1 diced yellow onion and cook for 5 minutes, stirring occasionally, until translucent.
4. Stir in 2 minced garlic cloves and cook for 1 minute until fragrant.
5. Add 1 diced red bell pepper and cook for 4 minutes until slightly softened.
6. Sprinkle in 1 teaspoon smoked paprika, 1/2 teaspoon cumin, 1/4 teaspoon red pepper flakes, and 1 teaspoon salt.
7. Cook the spices for 30 seconds to toast them, which deepens their flavor.
8. Pour in the 28-ounce can of crushed tomatoes and stir to combine.
9. Bring the sauce to a simmer, then reduce heat to low and cook for 10 minutes until slightly thickened.
10. Use the back of a spoon to create 4 small wells in the sauce for the eggs.
11. Crack 4 large eggs directly into the wells you created.
12. Cover the skillet with a lid or aluminum foil and cook for 6-8 minutes until egg whites are set but yolks are still runny.
13. Remove from heat and sprinkle with 1/4 cup crumbled feta cheese and 2 tablespoons chopped fresh parsley.
Outdoor mornings just got better with this vibrant dish. The creamy egg yolks mingle beautifully with the smoky, spiced tomato sauce, while the feta adds salty bursts throughout. Serve it straight from the skillet with crusty bread for dipping, or spoon it over campfire toast for the ultimate rustic breakfast experience.
Foil Packet Garlic Butter Shrimp

Kind of craving something delicious but don’t want to deal with a mountain of dishes afterward? You’re in luck because foil packet garlic butter shrimp is about to become your new favorite weeknight hero. It’s seriously so easy and packed with flavor.
Ingredients
For the shrimp:
– 1 pound large raw shrimp, peeled and deveined
– 1 tablespoon olive oil
– 1/2 teaspoon salt
– 1/4 teaspoon black pepper
For the garlic butter sauce:
– 1/2 cup unsalted butter, melted
– 4 cloves garlic, minced
– 2 tablespoons fresh lemon juice
– 1 tablespoon chopped fresh parsley
– 1/4 teaspoon red pepper flakes
Instructions
1. Preheat your oven to 400°F.
2. Toss the shrimp with olive oil, salt, and black pepper in a medium bowl.
3. Combine melted butter, minced garlic, lemon juice, parsley, and red pepper flakes in a separate small bowl.
4. Tear off four 12-inch squares of heavy-duty aluminum foil.
5. Divide the seasoned shrimp evenly among the four foil squares, arranging them in a single layer.
6. Pour the garlic butter sauce evenly over the shrimp in each packet.
7. Fold the foil over the shrimp and crimp the edges tightly to create sealed packets.
8. Place the foil packets on a baking sheet.
9. Bake at 400°F for exactly 12 minutes.
10. Carefully open one packet to check if the shrimp are opaque and pink.
11. Let the packets rest for 2 minutes before fully opening.
12. Transfer the shrimp and sauce to serving plates.
Cooking tip: Use heavy-duty foil to prevent tearing and ensure the packets stay sealed during baking. Cooking tip: Don’t overcrowd the shrimp in the packets—they need space to cook evenly. Cooking tip: Let the packets rest for a couple minutes after baking so the shrimp finish cooking in the residual heat.
Creamy, buttery sauce clings to each tender shrimp, with just enough garlic kick to keep things interesting. Try serving it over a bed of zucchini noodles for a low-carb feast, or spoon everything over creamy polenta to soak up every last drop of that incredible sauce.
Campfire Sausage and Peppers
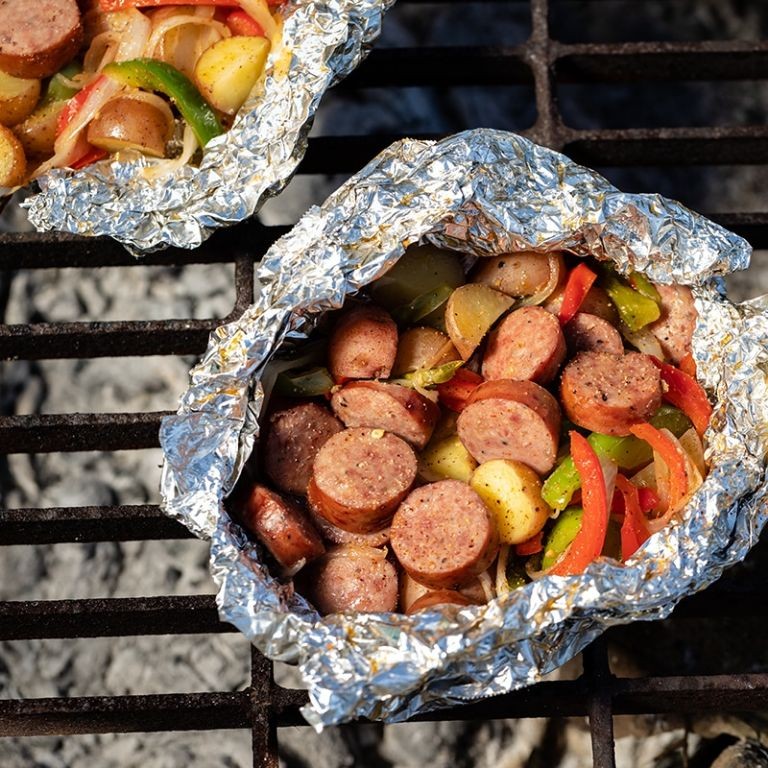
Picture this: you’re gathered around a crackling fire with friends, the air filled with that incredible smoky aroma of sizzling sausage and sweet peppers. This campfire sausage and peppers recipe brings all those cozy outdoor vibes right to your kitchen—no actual campfire required. It’s the kind of simple, satisfying meal that feels like a warm hug after a long day.
Ingredients
- For the sausage and vegetables:
- 1 lb Italian sausage links
- 2 large bell peppers (1 red, 1 green), sliced into 1-inch strips
- 1 large yellow onion, sliced into ½-inch wedges
- 2 tbsp olive oil
- For seasoning:
- 2 cloves garlic, minced
- 1 tsp dried oregano
- ½ tsp red pepper flakes
- ½ tsp salt
- ¼ tsp black pepper
Instructions
- Preheat your oven to 400°F and line a large baking sheet with aluminum foil.
- Place the Italian sausage links on one side of the prepared baking sheet, spacing them about 1 inch apart.
- In a large bowl, combine the sliced bell peppers, onion, and 2 tablespoons of olive oil, tossing until evenly coated.
- Spread the pepper and onion mixture in a single layer on the other side of the baking sheet, keeping them separate from the sausages.
- Sprinkle the minced garlic, dried oregano, red pepper flakes, salt, and black pepper evenly over the vegetables.
- Roast in the preheated oven for 20 minutes, then remove the baking sheet using oven mitts.
- Flip each sausage link with tongs and stir the vegetables with a spatula to ensure even cooking.
- Return the baking sheet to the oven and roast for another 15–20 minutes, until the sausages reach an internal temperature of 160°F and the peppers are tender with slightly charred edges.
- Transfer the sausages to a cutting board and let them rest for 3 minutes before slicing into 1-inch pieces.
- Combine the sliced sausage with the roasted peppers and onions in a serving dish, tossing gently to mix.
Everything comes together with juicy sausage, sweet caramelized peppers, and a hint of garlicky spice that’s just irresistible. Serve it piled high on crusty rolls for the ultimate sandwich, or spoon it over creamy polenta for a comforting bowl—either way, you’ll be making this again soon.
One-Pot Camp Stove Jambalaya
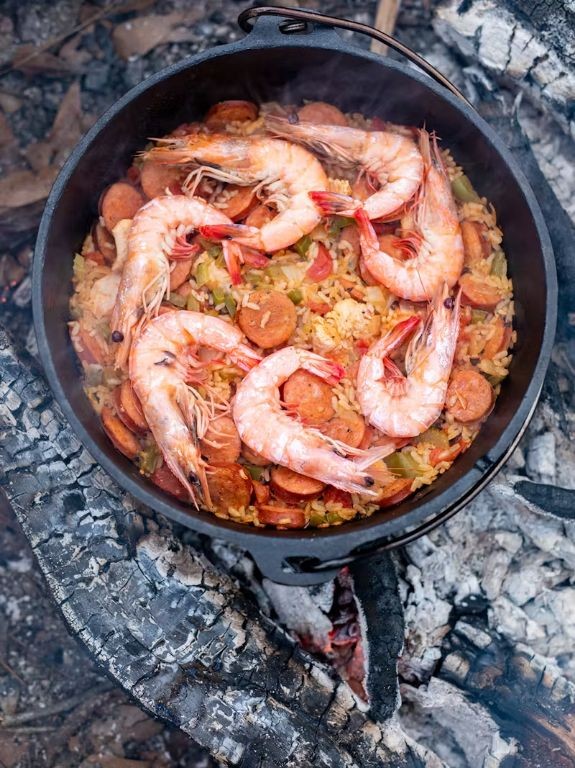
You know those camping trips where you want something hearty and flavorful without fussing over multiple pots? This one-pot jambalaya delivers big flavor with minimal cleanup, making it perfect for your next outdoor adventure. It’s packed with smoky sausage, tender shrimp, and just the right kick of spice to warm you up after a day in the great outdoors.
Ingredients
– For the base: 1 tbsp olive oil, 1 lb smoked andouille sausage (sliced into ½-inch rounds), 1 large yellow onion (diced), 1 green bell pepper (diced), 2 celery stalks (diced), 3 garlic cloves (minced)
– For the rice and liquid: 1½ cups long-grain white rice, 3 cups chicken broth, 1 (14.5 oz) can diced tomatoes (undrained), 1 tsp smoked paprika, ½ tsp dried oregano, ¼ tsp cayenne pepper
– For finishing: 1 lb large raw shrimp (peeled and deveined), 2 green onions (sliced)
Instructions
1. Heat 1 tbsp olive oil in a large, heavy-bottomed pot or Dutch oven over your camp stove set to medium-high heat.
2. Add 1 lb sliced andouille sausage and cook for 4–5 minutes, stirring occasionally, until lightly browned.
3. Stir in the diced onion, bell pepper, and celery, and cook for 5–6 minutes until the vegetables soften.
4. Add 3 minced garlic cloves and cook for 1 minute until fragrant.
5. Tip: Toasting the rice before adding liquid helps prevent a gummy texture.
6. Stir in 1½ cups long-grain white rice and cook for 2 minutes, stirring constantly.
7. Pour in 3 cups chicken broth, the can of diced tomatoes (with juices), 1 tsp smoked paprika, ½ tsp dried oregano, and ¼ tsp cayenne pepper.
8. Bring the mixture to a boil, then reduce the heat to low, cover the pot, and simmer for 20 minutes.
9. Tip: Avoid lifting the lid during simmering to keep steam trapped for even cooking.
10. Uncover the pot and arrange 1 lb raw shrimp in an even layer over the rice.
11. Re-cover and cook for 5–7 minutes until the shrimp turn pink and opaque.
12. Tip: Let the jambalaya rest off the heat for 5 minutes before serving to allow the rice to absorb any excess liquid.
13. Fluff the jambalaya gently with a fork and stir in the sliced green onions.
Vividly spiced and satisfyingly hearty, this jambalaya boasts tender rice grains that soak up the smoky tomato broth, with plump shrimp and robust sausage in every bite. Serve it straight from the pot with crusty bread for dipping, or spoon it into bowls and top with extra green onions for a fresh finish. It’s the kind of meal that makes campfire evenings even more memorable.
Campfire Grilled Cheese with Bacon

Unexpectedly, there’s something magical about grilled cheese cooked over a campfire—that smoky flavor just hits different. You’ll love this version with crispy bacon that makes it feel like a gourmet camp meal. It’s the perfect comfort food after a day of hiking or just hanging around the fire.
Ingredients
For the sandwich assembly:
- 4 slices sourdough bread
- 4 slices sharp cheddar cheese
- 6 slices cooked bacon
- 2 tablespoons softened butter
Instructions
- Build your campfire and let it burn down to hot embers, about 45-60 minutes after lighting.
- Place a cast iron skillet over the embers and preheat for 5 minutes until hot.
- Butter one side of each bread slice generously with the softened butter.
- Place two bread slices butter-side down in the preheated skillet.
- Layer two slices of cheddar cheese on each bread slice in the skillet.
- Arrange three bacon slices evenly over the cheese on each sandwich.
- Top each with the remaining bread slices, butter-side facing up.
- Cook for 3-4 minutes until the bottom bread is golden brown and crispy.
- Carefully flip both sandwiches using a spatula.
- Cook for another 3-4 minutes until the second side is golden brown and cheese is completely melted.
- Remove sandwiches from the skillet and let rest for 1 minute before cutting.
Really, that crispy, buttery bread gives way to oozy melted cheese and smoky bacon in every bite. The campfire adds this incredible charred flavor you just can’t get from a stovetop. Try serving it with a cold beer or dipping it in tomato soup for the ultimate cozy camp meal.
Camp Stove Veggie Tacos

Outdoor cooking just got way more exciting with these veggie-packed tacos that come together in minutes over your camp stove. You’ll love how the smoky charred veggies and warm tortillas make you forget you’re not in a fancy kitchen. Perfect for those nights when you want something delicious without the cleanup hassle.
Ingredients
For the veggie filling:
– 2 tbsp olive oil
– 1 red bell pepper, sliced into 1/4-inch strips
– 1 medium zucchini, cut into 1/2-inch half-moons
– 1 small red onion, thinly sliced
– 1 tsp chili powder
– 1/2 tsp cumin
– 1/2 tsp salt
For assembly:
– 8 small corn tortillas
– 1 cup shredded Monterey Jack cheese
– 1/2 cup fresh cilantro leaves
– 1 lime, cut into wedges
Instructions
1. Heat 2 tablespoons olive oil in a large cast iron skillet over medium-high heat on your camp stove.
2. Add sliced red bell pepper, zucchini, and red onion to the hot skillet.
3. Cook vegetables for 6-8 minutes, stirring every 2 minutes, until peppers are slightly softened and edges are charred.
4. Sprinkle 1 teaspoon chili powder, 1/2 teaspoon cumin, and 1/2 teaspoon salt over the vegetables.
5. Stir seasoning into vegetables and cook for 1 more minute until fragrant.
6. Remove skillet from heat and transfer vegetables to a clean plate.
7. Wipe the skillet clean with a paper towel.
8. Return skillet to medium heat and warm 2 corn tortillas at a time for 30 seconds per side.
9. Flip tortillas when they develop light brown spots and become pliable.
10. Place warmed tortillas on individual plates.
11. Divide cooked vegetables evenly among the 8 tortillas.
12. Sprinkle 1/8 cup shredded Monterey Jack cheese over vegetables on each taco.
13. Top each taco with fresh cilantro leaves.
14. Serve immediately with lime wedges for squeezing.
Unbelievably satisfying, these tacos deliver a wonderful contrast between the tender, smoky vegetables and the crisp-edged tortillas. The Monterey Jack melts slightly from the residual heat, creating a creamy texture that balances the fresh cilantro and bright lime juice. Try stacking them open-faced for easy camp eating, or wrap them in foil to keep warm while you make the next batch.
Easy Campfire Pizza
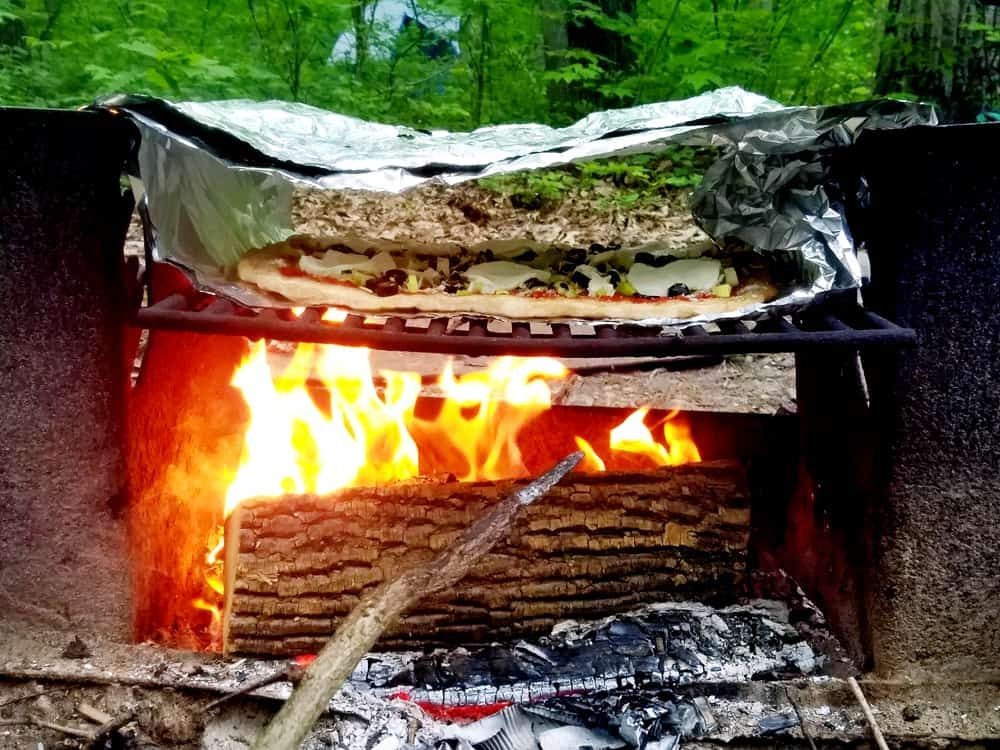
Oof, there’s nothing quite like pizza after a long day of hiking, right? You can make this campfire version with minimal gear and maximum flavor. It’s the perfect way to end an outdoor adventure with something warm and cheesy.
Ingredients
For the crust:
– 1 cup all-purpose flour
– 1 tsp baking powder
– 1/2 tsp salt
– 1/3 cup water
– 2 tbsp olive oil
For the sauce and toppings:
– 1/2 cup pizza sauce
– 1 cup shredded mozzarella cheese
– 1/4 cup sliced pepperoni
Instructions
1. Mix 1 cup all-purpose flour, 1 tsp baking powder, and 1/2 tsp salt in a medium bowl.
2. Add 1/3 cup water and 2 tbsp olive oil to the dry ingredients.
3. Stir until a shaggy dough forms, then knead for 2 minutes until smooth.
4. Roll the dough into a 10-inch circle on a floured surface.
5. Place the dough circle directly on a greased cast iron skillet.
6. Spread 1/2 cup pizza sauce evenly over the dough, leaving a 1-inch border.
7. Sprinkle 1 cup shredded mozzarella cheese over the sauce.
8. Arrange 1/4 cup sliced pepperoni evenly over the cheese.
9. Cover the skillet with a lid or aluminum foil.
10. Place the covered skillet over medium-hot coals (approximately 400°F).
11. Cook for 12-15 minutes until the crust bottom is golden brown.
12. Remove the lid and cook for 2 more minutes to crisp the top.
13. Let the pizza rest for 3 minutes before slicing.
And just like that, you’ve got bubbly, golden pizza with a crisp crust and melty cheese. The smoky campfire flavor makes this taste even better than delivery. Try serving it with a cold drink while watching the sunset for the perfect camping meal.
Summary
Hopefully this collection of easy camp stove recipes has inspired your next outdoor cooking adventure! From hearty breakfasts to satisfying dinners, these dishes prove camp cooking can be delicious and stress-free. We’d love to hear which recipes become your favorites—drop us a comment below and share this roundup on Pinterest to help fellow campers discover these tasty ideas!