Venturing into candida-friendly cooking doesn’t mean sacrificing flavor or satisfaction! If you’re looking to support your gut health while enjoying delicious, nourishing meals, you’ve come to the right place. We’ve gathered 18 mouthwatering recipes that are as tasty as they are beneficial. Get ready to transform your kitchen and your well-being—let’s dive into these gut-loving dishes!
Garlic Roasted Brussels Sprouts with Coconut Oil

Keeping things simple in the kitchen is my motto, especially when it comes to side dishes. You’ll love how these garlic roasted Brussels sprouts come together with just a few ingredients. They’re the perfect way to make vegetables exciting again.
Ingredients
Brussels sprouts – 1 lb
Garlic – 3 cloves
Coconut oil – 2 tbsp
Salt – ½ tsp
Black pepper – ¼ tsp
Instructions
1. Preheat your oven to 400°F.
2. Trim the stem ends off the Brussels sprouts and remove any yellow outer leaves.
3. Cut larger Brussels sprouts in half lengthwise, keeping smaller ones whole for even cooking.
4. Mince the garlic cloves finely.
5. Place Brussels sprouts in a large mixing bowl.
6. Drizzle coconut oil over the Brussels sprouts.
7. Add minced garlic, salt, and black pepper to the bowl.
8. Toss everything together until Brussels sprouts are evenly coated.
9. Spread Brussels sprouts in a single layer on a baking sheet.
10. Roast for 20 minutes at 400°F.
11. Check for browning and shake the pan to redistribute after 10 minutes.
12. Continue roasting until edges are crispy and caramelized, about 10 more minutes.
13. Remove from oven when sprouts are tender when pierced with a fork.
14. Serve immediately while hot.
Perfectly caramelized edges give these sprouts a delightful crunch that contrasts with their tender centers. The garlic becomes mellow and sweet during roasting, while the coconut oil adds a subtle tropical note. Try serving them over creamy polenta or alongside roasted chicken for a complete meal that feels both comforting and sophisticated.
Turmeric Cauliflower Rice with Fresh Herbs
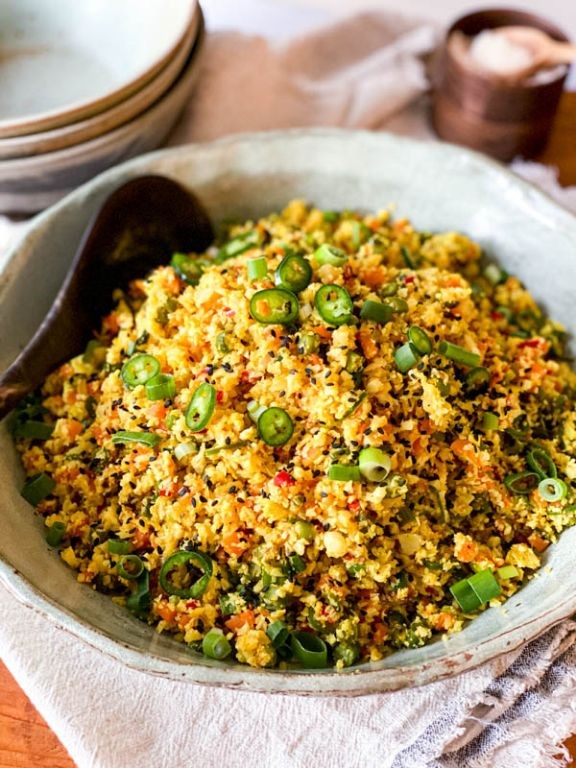
Gosh, you know those days when you want something healthy but still packed with flavor? This turmeric cauliflower rice is your answer. It comes together in minutes and makes any meal feel special.
Ingredients
Cauliflower – 1 medium head
Turmeric – 1 tsp
Olive oil – 2 tbsp
Fresh parsley – ¼ cup
Fresh cilantro – ¼ cup
Lemon juice – 1 tbsp
Salt – ½ tsp
Instructions
1. Cut the cauliflower into florets, removing the tough core.
2. Working in batches, pulse the cauliflower in a food processor until it reaches a rice-like texture, about 10-15 pulses per batch. Tip: Don’t over-process or it will become mushy.
3. Heat the olive oil in a large skillet over medium heat.
4. Add the cauliflower rice to the skillet and cook for 5 minutes, stirring occasionally.
5. Stir in the turmeric and salt until evenly distributed.
6. Continue cooking for another 3-5 minutes until the cauliflower is tender but still has a slight bite.
7. Remove the skillet from heat and stir in the chopped parsley, cilantro, and lemon juice. Tip: Adding herbs off the heat preserves their fresh flavor and bright color.
8. Taste and adjust seasoning if needed. Tip: For extra flavor, let it sit for 2 minutes before serving to allow the flavors to meld.
Each bite gives you that perfect fluffy texture with a subtle earthy warmth from the turmeric. The fresh herbs really pop against the golden rice, making it beautiful enough for company. Try it alongside grilled chicken or stuffed into bell peppers for a complete meal.
Avocado and Kale Salad with Pumpkin Seeds
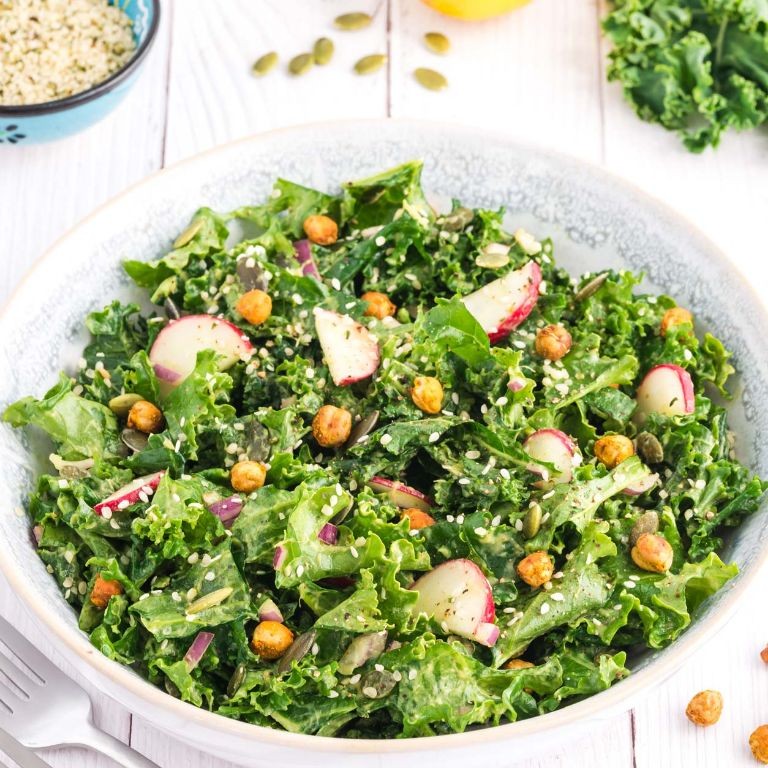
Ever find yourself staring at the fridge, wanting something fresh but not sure where to start? You’re in luck because this vibrant salad comes together in minutes. It’s the perfect mix of creamy, crunchy, and totally satisfying.
Ingredients
- Avocado – 1 large, ripe
- Kale – 4 cups, chopped
- Pumpkin seeds – ¼ cup
- Lemon juice – 2 tbsp
- Olive oil – 1 tbsp
- Salt – ½ tsp
Instructions
- Place the chopped kale in a large bowl.
- Drizzle 1 tablespoon of olive oil over the kale.
- Massage the kale with your hands for 2 minutes until it turns darker green and softens slightly—this reduces bitterness and improves texture.
- Cut the avocado in half, remove the pit, and scoop the flesh into the bowl.
- Add 2 tablespoons of lemon juice to the bowl to prevent the avocado from browning.
- Mash the avocado gently with a fork, mixing it into the kale until evenly coated.
- Sprinkle ¼ cup of pumpkin seeds over the salad.
- Add ½ teaspoon of salt and toss everything together thoroughly.
- Let the salad sit for 5 minutes to allow the flavors to meld—this resting time enhances the overall taste.
- Toast the pumpkin seeds in a dry skillet over medium heat for 3–4 minutes, shaking the pan frequently, until lightly golden and fragrant for extra crunch.
Zesty lemon brightens the creamy avocado, while toasted pumpkin seeds add a nutty crunch to each bite. Try serving it alongside grilled chicken or stuffed into a wrap for a quick lunch—the textures hold up beautifully without getting soggy.
Coconut Flour Pancakes with Cinnamon

Dreading another boring breakfast? These coconut flour pancakes with cinnamon will change your morning routine. They’re fluffy, satisfying, and come together in minutes.
Ingredients
Coconut flour – ½ cup
Eggs – 4 large
Milk – ½ cup
Cinnamon – 1 tsp
Baking powder – 1 tsp
Salt – ¼ tsp
Butter – 2 tbsp
Instructions
1. Crack 4 large eggs into a medium mixing bowl.
2. Whisk the eggs vigorously for 30 seconds until frothy and well-combined.
3. Add ½ cup milk to the egg mixture and whisk for another 15 seconds.
4. Measure ½ cup coconut flour and add it to the wet ingredients.
5. Sprinkle in 1 tsp cinnamon, 1 tsp baking powder, and ¼ tsp salt.
6. Whisk the batter for 1 full minute until completely smooth with no lumps.
7. Let the batter rest for 5 minutes to allow the coconut flour to absorb moisture.
8. Preheat a non-stick skillet over medium heat for 3 minutes.
9. Melt 1 tbsp butter in the skillet, swirling to coat the surface evenly.
10. Pour ¼ cup batter onto the skillet to form each pancake.
11. Cook for 2-3 minutes until bubbles form on the surface and edges look set.
12. Flip each pancake carefully using a thin spatula.
13. Cook for another 1-2 minutes until golden brown on both sides.
14. Transfer cooked pancakes to a plate and repeat with remaining batter, adding more butter as needed.
These pancakes have a wonderfully tender, cake-like texture with warm cinnamon notes throughout. Drizzle them with maple syrup or top with fresh berries for a breakfast that feels special but comes together effortlessly.
Steamed Broccoli with Olive Oil and Sea Salt

Keeping things simple in the kitchen doesn’t mean sacrificing flavor. You can whip up this steamed broccoli in minutes, and it’s the perfect healthy side for any meal. It’s so easy, you’ll make it again and again.
Ingredients
Broccoli – 1 head
Olive oil – 2 tbsp
Sea salt – ½ tsp
Instructions
- Cut the broccoli head into florets that are about 1 to 2 inches in size.
- Fill a pot with 1 inch of water and place a steamer basket inside.
- Bring the water to a boil over high heat.
- Place the broccoli florets in the steamer basket in a single layer.
- Cover the pot with a lid and steam the broccoli for 5 minutes.
- Check the broccoli by piercing a floret with a fork; it should be tender but still bright green.
- Immediately transfer the steamed broccoli to a bowl to stop the cooking process.
- Drizzle the olive oil evenly over the hot broccoli.
- Sprinkle the sea salt over the broccoli and toss gently to coat.
Zesty and vibrant, this broccoli has a tender-crisp bite that holds up beautifully. The olive oil adds a smooth richness, while the sea salt enhances its natural sweetness. Try serving it over quinoa with a squeeze of lemon or as a colorful addition to grain bowls for extra texture.
Baked Cod with Lemon and Thyme
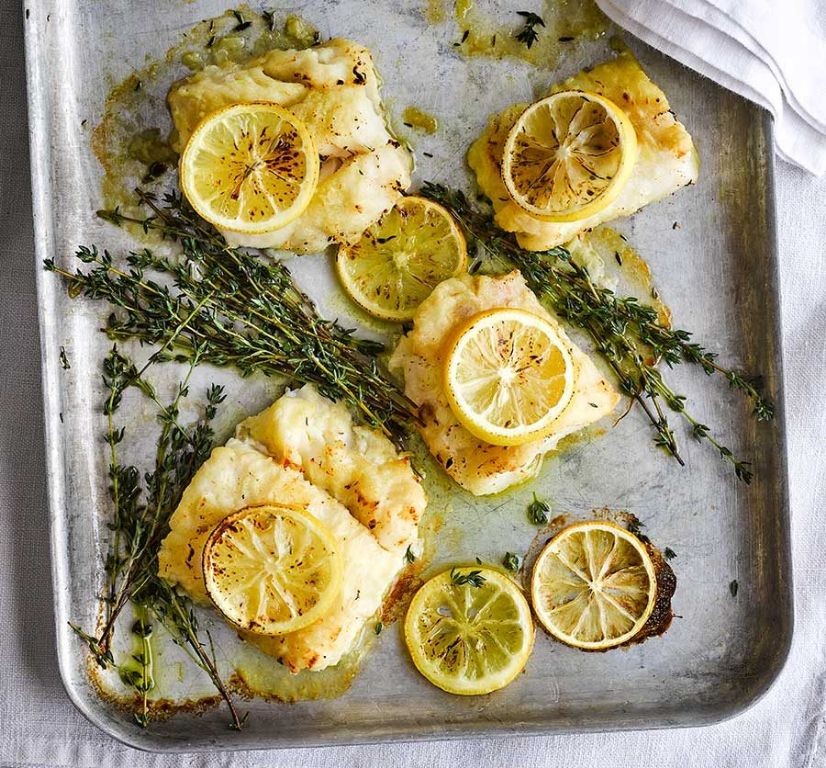
Diving into a simple yet impressive dinner? This baked cod comes together with minimal effort but delivers maximum flavor. You’ll love how the bright lemon and earthy thyme transform this mild fish into something truly special.
Ingredients
Cod fillets – 1 ½ lbs
Olive oil – 2 tbsp
Lemon – 1
Fresh thyme – 2 tbsp
Salt – 1 tsp
Black pepper – ½ tsp
Instructions
1. Preheat your oven to 400°F.
2. Pat the cod fillets completely dry with paper towels—this helps them brown nicely instead of steaming.
3. Place the cod fillets in a single layer on a parchment-lined baking sheet.
4. Drizzle 2 tablespoons of olive oil evenly over the fillets.
5. Rub the oil to coat both sides of each fillet.
6. Sprinkle 1 teaspoon of salt and ½ teaspoon of black pepper evenly over the fish.
7. Zest the entire lemon directly over the cod fillets.
8. Cut the zested lemon in half and squeeze the juice from both halves over the fish.
9. Strip the fresh thyme leaves from their stems to get 2 tablespoons.
10. Sprinkle the thyme leaves evenly over the cod.
11. Bake at 400°F for 12-15 minutes until the fish flakes easily with a fork and reaches 145°F internally.
12. Remove from the oven and let rest for 2 minutes before serving.
Expect tender, flaky cod with a bright citrus kick from the lemon and aromatic earthiness from the thyme. The high heat creates a slightly crisp edge while keeping the interior moist and delicate. Try serving it over creamy polenta or with roasted asparagus for a complete meal that feels restaurant-worthy.
Stir-Fried Bok Choy with Garlic and Coconut Aminos
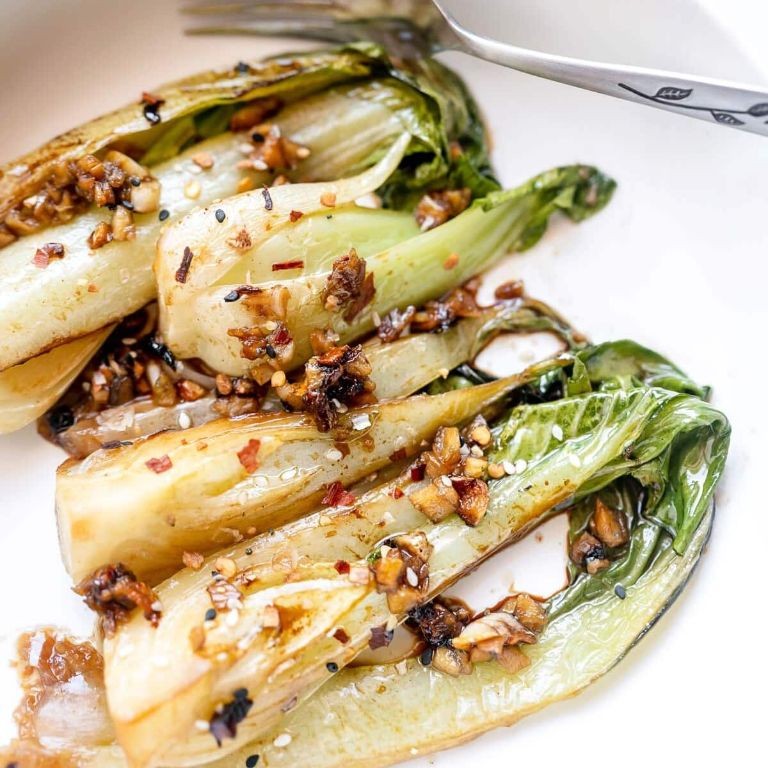
Just when you need a quick, healthy side dish that comes together in minutes, this stir-fried bok choy hits all the right notes. You’ll love how the garlic and coconut aminos create a savory-sweet sauce that clings to every crisp leaf. It’s the kind of simple recipe you’ll turn to again and again on busy weeknights.
Ingredients
Bok choy – 1 lb
Garlic – 3 cloves
Coconut aminos – 2 tbsp
Avocado oil – 1 tbsp
Instructions
1. Wash the bok choy thoroughly under cold running water to remove any dirt from between the leaves.
2. Trim off the very bottom of the bok choy stems and discard.
3. Cut the bok choy into 1-inch pieces, separating the thicker stems from the leafy greens.
4. Mince the garlic cloves finely.
5. Heat a large skillet or wok over medium-high heat for 1 minute.
6. Add the avocado oil to the hot skillet and swirl to coat the surface evenly.
7. Add the minced garlic to the oil and cook for 30 seconds until fragrant but not browned.
8. Add the bok choy stems to the skillet and stir-fry for 2 minutes until they begin to soften.
9. Add the bok choy leaves to the skillet and continue stir-frying for 1 minute until wilted.
10. Pour the coconut aminos over the bok choy and toss to coat everything evenly.
11. Cook for 1 more minute, stirring constantly, until the sauce has reduced slightly and glazes the vegetables.
12. Remove from heat immediately to prevent overcooking.
My favorite thing about this dish is the perfect contrast between the tender-crisp stems and silky leaves, all coated in that umami-rich coconut aminos sauce. Try serving it over steamed rice with a fried egg on top for a complete meal, or pair it with grilled chicken for extra protein. The subtle sweetness from the coconut aminos makes it surprisingly versatile with different cuisines.
Roasted Eggplant with Tahini Dressing

Remember that time you wanted something healthy but actually delicious? Roasted eggplant with tahini dressing is your answer. It’s creamy, savory, and ridiculously easy to make, even on a busy weeknight.
Ingredients
- Eggplant – 1 large
- Olive oil – 2 tbsp
- Salt – ½ tsp
- Tahini – ¼ cup
- Lemon juice – 2 tbsp
- Water – 3 tbsp
- Garlic – 1 clove, minced
Instructions
- Preheat your oven to 400°F.
- Cut the eggplant into 1-inch cubes.
- Toss the eggplant cubes with olive oil and salt in a large bowl.
- Spread the eggplant in a single layer on a baking sheet. Tip: Don’t crowd the pan, or it will steam instead of roast.
- Roast for 25 minutes, or until the edges are golden brown and the centers are tender.
- While the eggplant roasts, make the tahini dressing by whisking together tahini, lemon juice, water, and minced garlic in a small bowl. Tip: If the dressing is too thick, add another tablespoon of water until it’s pourable.
- Remove the roasted eggplant from the oven and let it cool for 5 minutes. Tip: Letting it cool slightly helps the eggplant absorb the dressing better.
- Drizzle the tahini dressing over the roasted eggplant.
- Gently toss to coat everything evenly.
Here’s why you’ll love it: the eggplant turns meltingly soft with crispy edges, while the tahini dressing adds a nutty, garlicky punch. Try serving it over quinoa or scooping it up with warm pita for a complete meal.
Spinach and Mushroom Omelet with Coconut Oil

Kicking off your morning with something both nourishing and delicious doesn’t have to be a chore. This spinach and mushroom omelet comes together in minutes and uses coconut oil for a subtly sweet, rich flavor that makes it feel like a special treat. You’re going to love how simple it is to whip up.
Ingredients
Eggs – 3 large
Fresh spinach – 1 cup, packed
Mushrooms – ½ cup, sliced
Coconut oil – 1 tbsp
Salt – ¼ tsp
Black pepper – ⅛ tsp
Instructions
1. Crack 3 large eggs into a medium bowl.
2. Whisk the eggs vigorously with a fork for 30 seconds until they are fully combined and slightly frothy.
3. Heat a non-stick skillet over medium heat for 1 minute.
4. Add 1 tablespoon of coconut oil to the hot skillet.
5. Swirl the skillet to coat the bottom evenly with the melted oil.
6. Add ½ cup of sliced mushrooms to the skillet in a single layer.
7. Sauté the mushrooms for 3-4 minutes, stirring occasionally, until they are golden brown and have released their moisture.
8. Add 1 cup of packed fresh spinach to the skillet with the mushrooms.
9. Cook the spinach for 1-2 minutes, stirring constantly, until it is completely wilted.
10. Tip: Use a spatula to spread the mushroom and spinach mixture evenly across the bottom of the skillet.
11. Pour the whisked eggs evenly over the vegetables in the skillet.
12. Let the eggs cook undisturbed for 1 minute until the edges begin to set.
13. Gently lift the edges of the omelet with your spatula and tilt the skillet to allow uncooked egg to run underneath.
14. Tip: For a fluffier omelet, avoid over-stirring once the eggs are in the pan.
15. Season the top of the cooking eggs evenly with ¼ teaspoon of salt and ⅛ teaspoon of black pepper.
16. Cook for another 2-3 minutes until the top surface is mostly set but still slightly wet.
17. Carefully fold one half of the omelet over the other with your spatula.
18. Tip: Let the omelet cook for 1 final minute on the folded side to ensure it holds its shape when plated.
19. Slide the finished omelet onto a plate.
Just look at that beautiful golden color from the coconut oil. The inside stays wonderfully soft and creamy, while the mushrooms add a savory, earthy depth. It’s fantastic served with a dash of hot sauce or alongside some sliced avocado for a truly satisfying breakfast.
Lentil Soup with Turmeric and Cumin

Mmm, nothing beats a warm bowl of lentil soup on a chilly day. You’ll love how the turmeric and cumin fill your kitchen with the coziest aroma while making this super simple recipe.
Ingredients
- Olive oil – 2 tbsp
- Yellow onion – 1 medium, diced
- Garlic – 3 cloves, minced
- Ground cumin – 1 tsp
- Ground turmeric – 1 tsp
- Brown lentils – 1 cup
- Vegetable broth – 4 cups
- Salt – 1 tsp
- Black pepper – ½ tsp
- Lemon juice – 2 tbsp
Instructions
- Heat olive oil in a large pot over medium heat for 1 minute.
- Add diced onion and cook for 5 minutes, stirring occasionally, until translucent.
- Add minced garlic and cook for 1 minute until fragrant.
- Sprinkle in cumin and turmeric, stirring constantly for 30 seconds to toast the spices. Tip: Toasting spices releases their full flavor!
- Add brown lentils and stir to coat with the spice mixture.
- Pour in vegetable broth and bring to a boil.
- Reduce heat to low, cover the pot, and simmer for 30 minutes. Tip: Don’t peek too often—keeping the lid on helps the lentils cook evenly.
- Remove the lid and stir in salt and black pepper.
- Continue simmering uncovered for 10 minutes until the soup thickens slightly.
- Turn off the heat and stir in lemon juice. Tip: Adding lemon juice at the end brightens all the flavors beautifully.
Finally, you’ll notice the soup has a wonderfully creamy texture from the softened lentils. The earthy turmeric and warm cumin create such a comforting flavor that just hugs you from the inside. For a fun twist, try topping it with a dollop of Greek yogurt or serving it with crusty bread for dipping.
Almond Flour Crackers with Flaxseeds

Looking for a crunchy snack that won’t derail your healthy eating goals? These almond flour crackers with flaxseeds come together in minutes and deliver that satisfying crisp you crave. You’ll love how simple they are to make with just a handful of ingredients.
Ingredients
- Almond flour – 1 cup
- Flaxseeds – 2 tbsp
- Salt – ½ tsp
- Water – 3 tbsp
- Olive oil – 1 tbsp
Instructions
- Preheat your oven to 350°F and line a baking sheet with parchment paper.
- Combine 1 cup almond flour, 2 tbsp flaxseeds, and ½ tsp salt in a medium bowl.
- Add 1 tbsp olive oil and 3 tbsp water to the dry ingredients.
- Mix with a fork until a dough forms, then use your hands to knead it briefly into a ball. Tip: If the dough feels too dry, add another teaspoon of water until it holds together.
- Place the dough between two sheets of parchment paper and roll it out to ⅛-inch thickness.
- Remove the top parchment and use a pizza cutter or knife to score the dough into 1-inch squares.
- Transfer the parchment with the scored dough directly onto your prepared baking sheet.
- Bake for 12-15 minutes until the edges are golden brown. Tip: Rotate the baking sheet halfway through for even browning.
- Remove from oven and let cool completely on the baking sheet – they’ll crisp up as they cool. Tip: Don’t skip the cooling step, as this is when they achieve their perfect snap.
- Break along the scored lines once completely cooled.
These crackers have a wonderfully nutty flavor and satisfying crunch that pairs perfectly with cheese or dips. Try crumbling them over soups for added texture, or enjoy them plain when you need a quick, wholesome snack.
Herbal Tea Infusion with Ginger and Cinnamon
You know those days when you just need something warm and comforting? Your herbal tea infusion with ginger and cinnamon is perfect for cozy afternoons or chilly evenings. It’s simple to make and fills your kitchen with the most inviting aroma.
Ingredients
Water – 4 cups
Fresh ginger – 1 (2-inch) piece
Cinnamon stick – 1
Honey – 2 tbsp
Instructions
1. Pour 4 cups of water into a medium saucepan.
2. Peel the 2-inch piece of fresh ginger using a spoon to easily scrape off the skin.
3. Thinly slice the peeled ginger into rounds to maximize flavor release.
4. Add the ginger slices and 1 cinnamon stick to the water in the saucepan.
5. Bring the mixture to a boil over high heat.
6. Once boiling, reduce the heat to low and simmer for 15 minutes to allow the flavors to fully infuse.
7. Remove the saucepan from heat after 15 minutes of simmering.
8. Stir in 2 tablespoons of honey until completely dissolved.
9. Strain the tea through a fine-mesh sieve into mugs, discarding the ginger and cinnamon.
Steeped to perfection, this tea delivers a spicy warmth from the ginger with sweet cinnamon undertones. The honey adds just enough sweetness to balance the bold flavors. Try serving it over ice for a refreshing cold version, or add a splash of lemon for a citrusy twist.
Summary
Cooking your way to better gut health has never been more delicious! These 18 candida-friendly recipes prove that healthy eating can be both satisfying and flavorful. We hope you find some new favorites to add to your rotation. Don’t forget to share which recipes you loved most in the comments below and pin this article to your Pinterest boards for easy reference!