Picture this: you’re craving something sweet and satisfying, but fresh fruit is out of season or just not in the pantry. That’s where canned fruit comes to the rescue! In this roundup, we’ve gathered 18 incredibly easy and delicious recipes that transform simple canned fruits into mouthwatering desserts, quick snacks, and even savory dishes. Get ready to be inspired—your next favorite treat is just a can away!
Peach Cobbler with Canned Peaches
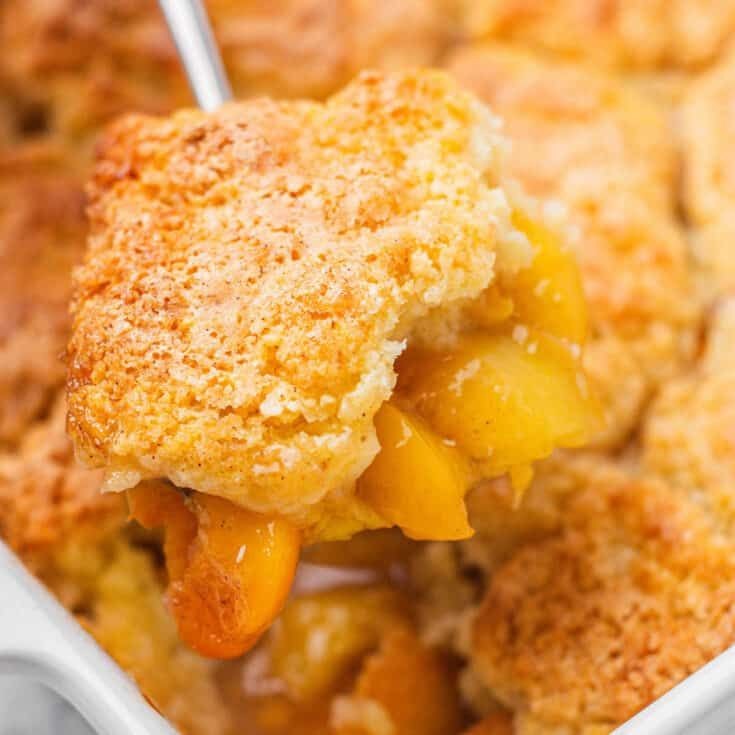
Picture this: it’s a lazy Sunday afternoon, and I’m craving something sweet but don’t want to spend hours in the kitchen. That’s when I turn to my trusty peach cobbler recipe using canned peaches—the ultimate shortcut to comfort food heaven without sacrificing that homemade taste we all love.
Ingredients
- 2 (15 oz) cans sliced peaches in syrup (don’t drain—the syrup adds natural sweetness)
- 1 cup all-purpose flour (spoon and level for accuracy)
- 1 cup granulated sugar (you can reduce to 3/4 cup if you prefer less sweet)
- 1 cup whole milk (2% works fine too)
- 1/2 cup unsalted butter (melted, or use salted butter and omit the salt)
- 1 tbsp baking powder
- 1/2 tsp ground cinnamon (add more for extra warmth)
- 1/4 tsp salt (omit if using salted butter)
- Vanilla ice cream for serving (highly recommended!)
Instructions
- Preheat your oven to 375°F and place the butter in a 9×13 inch baking dish.
- Put the baking dish with butter in the preheating oven for 3-4 minutes until melted, then remove carefully.
- In a medium bowl, whisk together the flour, sugar, baking powder, cinnamon, and salt until well combined.
- Pour the milk into the dry ingredients and stir until just combined—a few lumps are fine, don’t overmix.
- Pour the batter evenly over the melted butter in the baking dish—do not stir.
- Open both cans of peaches and pour them evenly over the batter, syrup and all.
- Bake at 375°F for 45-50 minutes until the top is golden brown and the edges are bubbling.
- Let the cobbler cool for 15-20 minutes before serving—it will thicken as it sits.
Dig into this warm cobbler and you’ll find the magic: the batter rises through the peaches creating a cake-like top with juicy fruit underneath. I love how the cinnamon-spiced crust contrasts with the tender peaches, especially when served à la mode with vanilla ice cream melting into all the nooks and crannies.
Pineapple Upside-Down Cake
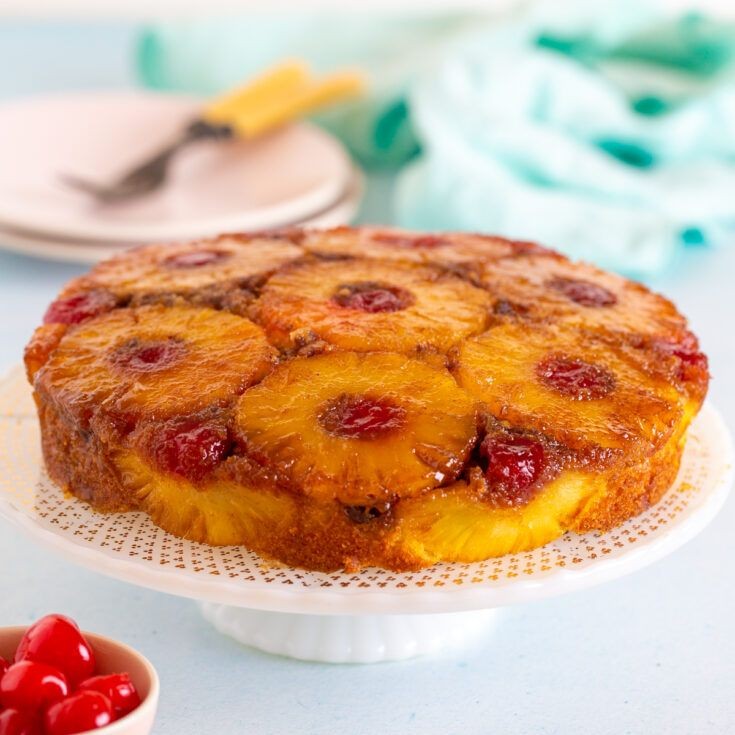
There’s something magical about flipping a cake and revealing that golden, caramelized pineapple top—it’s like a sweet surprise every single time. I first fell in love with pineapple upside-down cake at a summer potluck years ago, and now I make it whenever I need a cozy, nostalgic treat that never fails to impress. Trust me, the aroma alone will have your kitchen smelling like a tropical bakery in no time!
Ingredients
– 1/2 cup unsalted butter, divided (use half for the topping and half for the batter, or substitute with margarine for a dairy-free option)
– 3/4 cup light brown sugar, packed (adjust to taste if you prefer it less sweet)
– 1 can (20 oz) pineapple slices in juice, drained but reserve 1/4 cup juice for the batter
– 6-8 maraschino cherries, patted dry (or use fresh pitted cherries if available)
– 1 1/2 cups all-purpose flour, spooned and leveled (or use gluten-free flour blend for dietary needs)
– 1 cup granulated sugar
– 2 large eggs, at room temperature for better mixing
– 1/2 cup whole milk (or any milk alternative like almond milk)
– 2 tsp baking powder
– 1 tsp vanilla extract
– 1/4 tsp salt
Instructions
1. Preheat your oven to 350°F (175°C) and place a 9-inch round cake pan on a baking sheet to catch any drips.
2. Melt 1/4 cup of butter in the microwave or a small saucepan, then pour it evenly into the bottom of the cake pan.
3. Sprinkle the brown sugar over the melted butter, spreading it into a uniform layer with a spatula.
4. Arrange the pineapple slices in a single layer over the sugar mixture, placing one cherry in the center of each slice.
5. In a medium bowl, whisk together the flour, baking powder, and salt until no lumps remain.
6. In a separate large bowl, beat the remaining 1/4 cup of softened butter and granulated sugar with an electric mixer on medium speed for 2-3 minutes, until light and fluffy.
7. Add the eggs one at a time, beating for 30 seconds after each addition until fully incorporated.
8. Mix in the vanilla extract and reserved 1/4 cup pineapple juice until the batter is smooth.
9. Gradually add the flour mixture to the wet ingredients, alternating with the milk, and mix on low speed just until combined—do not overmix to avoid a tough cake.
10. Pour the batter over the pineapple layer in the pan, spreading it evenly with a spatula.
11. Bake for 40-45 minutes, or until a toothpick inserted into the center comes out clean and the top is golden brown.
12. Let the cake cool in the pan on a wire rack for 10 minutes only—this allows the topping to set without sticking.
13. Run a knife around the edges of the pan to loosen the cake, then place a serving plate upside down over the pan and carefully flip it over in one quick motion.
14. Gently lift the pan to reveal the caramelized pineapple topping.
Enjoy every bite of this warm, buttery cake with its sticky-sweet pineapple jewels and tender crumb. For a fun twist, serve it à la mode with a scoop of vanilla ice cream or alongside a cup of strong coffee to balance the richness.
Cherry Pie Filling Bars
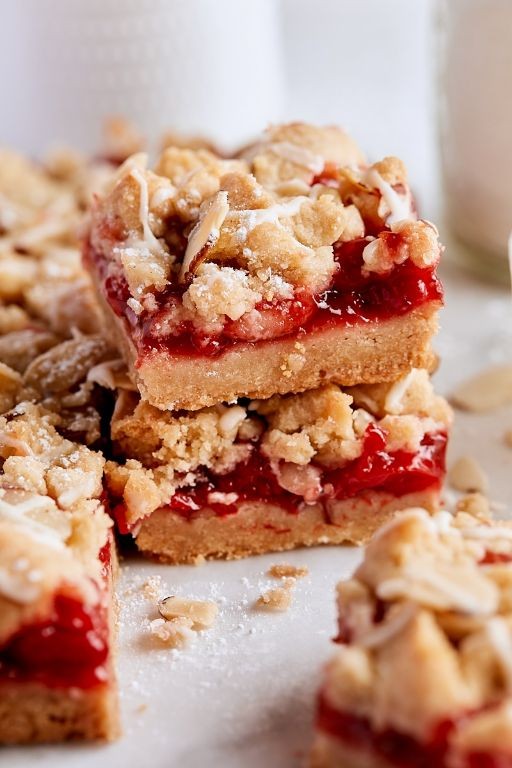
Remember that time I had a can of cherry pie filling sitting in my pantry for months? I finally decided to transform it into these incredible bars that have become my go-to potluck dessert. There’s something magical about how the buttery crust cradles that sweet-tart cherry filling.
Ingredients
- 2 cups all-purpose flour (spoon and level for accuracy)
- 1 cup unsalted butter, cold and cubed (keeps the crust flaky)
- 1/2 cup granulated sugar
- 1 large egg, lightly beaten (for binding)
- 21 oz can cherry pie filling (or homemade if you’re ambitious)
- 1/2 cup old-fashioned oats (adds nice texture)
- 1/4 cup brown sugar, packed
- 1 tsp vanilla extract (pure tastes best)
- 1/4 tsp salt (balances the sweetness)
Instructions
- Preheat your oven to 350°F and line an 8×8 inch baking pan with parchment paper, leaving overhang on two sides for easy removal.
- Combine flour, granulated sugar, and salt in a large bowl using a whisk to ensure even distribution.
- Cut in the cold butter cubes with a pastry cutter until the mixture resembles coarse crumbs with some pea-sized pieces remaining.
- Mix in the beaten egg and vanilla extract just until the dough comes together when pressed between your fingers.
- Reserve 3/4 cup of the dough mixture for the topping and set it aside in the refrigerator.
- Press the remaining dough firmly into the bottom of your prepared pan using the bottom of a measuring cup to create an even layer.
- Spread the cherry pie filling evenly over the crust layer, going all the way to the edges.
- Combine the reserved dough with oats and brown sugar, mixing with your fingers to create a crumbly topping.
- Sprinkle the oat mixture evenly over the cherry filling, covering most of the surface.
- Bake for 35-40 minutes until the topping is golden brown and the edges are bubbling slightly.
- Cool completely in the pan on a wire rack for at least 2 hours before cutting into bars.
Unbelievably satisfying, these bars strike the perfect balance between the crisp oat topping and that juicy cherry center. I love serving them slightly warm with a scoop of vanilla bean ice cream, watching the cold cream melt into the warm cherries. They keep beautifully in an airtight container for days—if they last that long!
Fruit Salad with Canned Mandarin Oranges
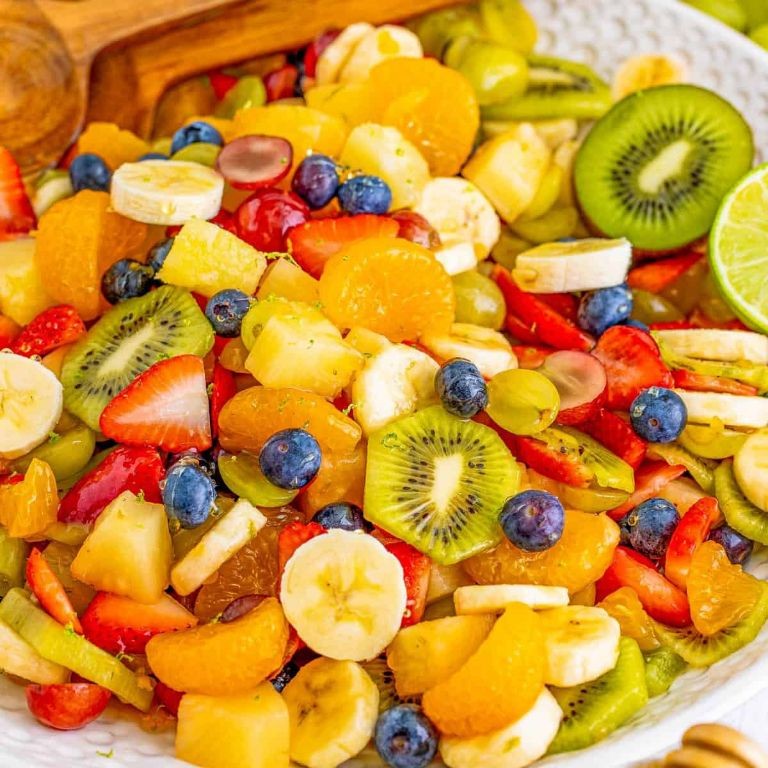
Busy weeknights call for simple, refreshing solutions, and this fruit salad has become my go-to lifesaver. I first started making this version when my neighbor brought over extra canned mandarin oranges—now it’s a staple in my summer rotation that takes just minutes to throw together.
Ingredients
– 2 (15 oz) cans mandarin oranges in light syrup, drained (reserve 2 tablespoons syrup for dressing)
– 1 cup fresh strawberries, hulled and quartered (look for bright red berries)
– 1 cup fresh blueberries (frozen works if thawed and patted dry)
– 1 medium banana, sliced ¼-inch thick (add right before serving to prevent browning)
– ½ cup plain Greek yogurt (vanilla yogurt adds nice sweetness)
– 1 tablespoon honey (adjust for preferred sweetness)
– 1 teaspoon fresh lime juice (bottled works in a pinch)
Instructions
1. Drain both cans of mandarin oranges in a colander over a bowl, catching 2 tablespoons of the light syrup in a small measuring cup.
2. Combine drained mandarin oranges, strawberries, and blueberries in a large mixing bowl.
3. Whisk together the reserved mandarin syrup, Greek yogurt, honey, and lime juice in a separate small bowl until smooth. Tip: If dressing seems too thick, add another teaspoon of mandarin syrup.
4. Pour dressing over the fruit mixture and gently fold with a spatula until evenly coated.
5. Cover the bowl with plastic wrap and refrigerate for at least 20 minutes to allow flavors to meld. Tip: Don’t refrigerate longer than 2 hours or berries may become too soft.
6. Slice banana into ¼-inch rounds just before serving.
7. Add banana slices to the chilled fruit salad and fold gently to combine. Tip: Adding bananas last keeps them from turning mushy.
8. Serve immediately in individual bowls or a large serving dish. Great over vanilla ice cream for a dessert twist or alongside grilled chicken for a light meal—the creamy dressing clings perfectly to each fruit piece while the mandarin oranges provide little bursts of citrus sweetness.
Apple Cinnamon Oatmeal with Canned Apples
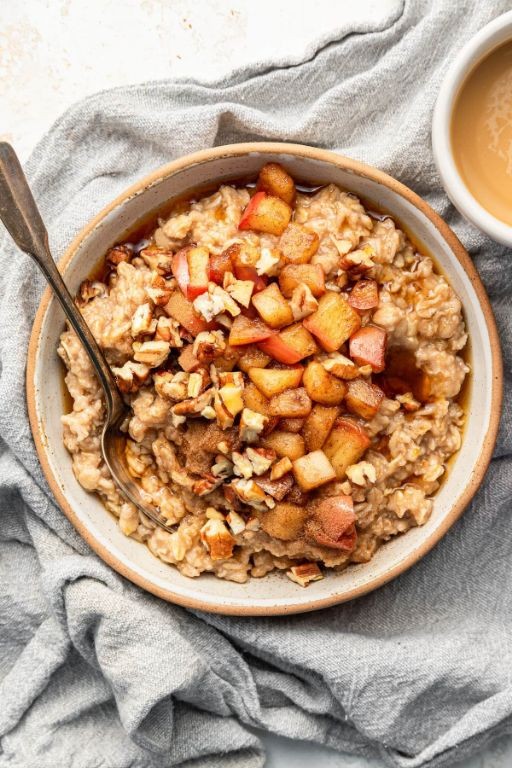
A cozy bowl of apple cinnamon oatmeal has been my go-to breakfast ever since I discovered how canned apples can transform ordinary oats into something special—it’s the kind of warm, spiced comfort that makes chilly mornings feel like a hug from the inside out, and today I’m sharing my foolproof version that’s ready in minutes.
Ingredients
– 1 cup old-fashioned rolled oats (not instant, for better texture)
– 1 can (15 oz) sliced apples in light syrup, drained (reserve 2 tbsp syrup for sweetness)
– 1 ½ cups water (or milk for creaminess)
– 1 tsp ground cinnamon (add more if you love spice)
– ¼ tsp salt (enhances flavor)
– 2 tbsp brown sugar (adjust to taste)
– ½ tsp vanilla extract (optional, for depth)
Instructions
1. Combine 1 cup old-fashioned rolled oats, 1 ½ cups water, 1 tsp ground cinnamon, and ¼ tsp salt in a medium saucepan.
2. Stir in the drained canned apples and 2 tbsp of the reserved apple syrup from the can.
3. Heat the mixture over medium-high heat until it begins to bubble gently, about 3–4 minutes.
4. Reduce the heat to low and simmer for 5 minutes, stirring occasionally to prevent sticking.
5. Add 2 tbsp brown sugar and ½ tsp vanilla extract, stirring until fully incorporated.
6. Continue cooking for another 2–3 minutes until the oats are tender and have absorbed most of the liquid.
7. Remove the saucepan from the heat and let it sit uncovered for 1 minute to thicken slightly.
Tip: For creamier oatmeal, stir in a splash of milk right before serving. Tip: If the oats thicken too much, add a tablespoon of water or milk to loosen. Tip: Toast the oats in a dry pan for 2 minutes before cooking to enhance their nutty flavor.
This oatmeal turns out wonderfully creamy with soft, sweet apple pieces that melt into every spoonful. The cinnamon adds a warm spice that pairs perfectly with the subtle vanilla, and I love topping it with a drizzle of maple syrup or a sprinkle of chopped walnuts for extra crunch.
Apricot Glazed Chicken

Just last week, I found myself staring at a bag of apricots that were perfectly ripe and needed using—and that’s how this sweet and savory apricot glazed chicken came to be. It’s become my go-to for busy weeknights when I want something impressive without a lot of fuss.
Ingredients
– 4 boneless, skinless chicken breasts (about 1.5 lbs total, or thighs if you prefer dark meat)
– 1 cup apricot preserves (look for ones with real fruit for the best flavor)
– 2 tbsp soy sauce (or tamari for gluten-free)
– 1 tbsp olive oil (or any neutral oil like avocado)
– 2 cloves garlic, minced (fresh is best, but 1 tsp jarred works in a pinch)
– 1 tsp grated fresh ginger (or ½ tsp ground ginger)
– ½ tsp black pepper (freshly cracked adds nice heat)
– ¼ tsp salt (adjust if your soy sauce is very salty)
Instructions
1. Preheat your oven to 375°F (190°C) and lightly grease a 9×13-inch baking dish with olive oil or non-stick spray.
2. Pat the chicken breasts completely dry with paper towels—this helps the glaze stick better and promotes browning.
3. In a small bowl, whisk together the apricot preserves, soy sauce, minced garlic, grated ginger, black pepper, and salt until smooth.
4. Brush both sides of each chicken breast generously with the apricot glaze, reserving about ¼ cup for later.
5. Arrange the chicken in a single layer in the prepared baking dish, making sure pieces don’t touch for even cooking.
6. Bake for 20 minutes, then carefully remove the dish from the oven—the glaze will be bubbly and the chicken partially cooked.
7. Brush the reserved glaze over the chicken, making sure to coat the tops evenly.
8. Return the dish to the oven and bake for another 10–15 minutes, or until the internal temperature of the chicken reaches 165°F (74°C) on an instant-read thermometer.
9. Let the chicken rest in the baking dish for 5 minutes before serving—this allows the juices to redistribute so it stays moist.
Unbelievably tender and glossy, this chicken has a sticky-sweet exterior that caramelizes beautifully in the oven. I love serving it over fluffy jasmine rice to soak up the extra glaze, or slicing it thin for next-day salads—the flavors only get better as they mingle.
Mixed Fruit Smoothie
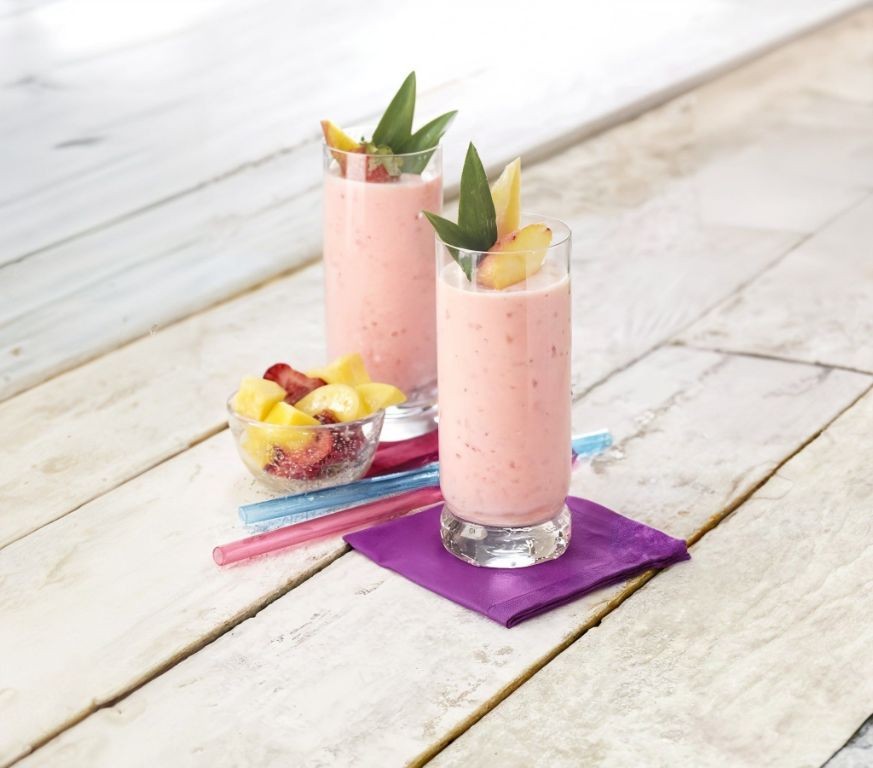
Finally, after years of experimenting with breakfast options that my kids will actually eat, I’ve perfected this mixed fruit smoothie that even my pickiest eater requests every morning. It all started when my daughter declared she was “over” oatmeal, and I needed something quick, nutritious, and delicious to get us out the door on busy school days.
Ingredients
– 1 cup frozen mixed berries (strawberries, blueberries, raspberries – no need to thaw)
– 1 ripe banana, peeled and broken into chunks (the spottier, the sweeter!)
– 1 cup plain Greek yogurt (I prefer full-fat for creaminess, but any works)
– 1/2 cup orange juice (fresh squeezed adds brightness, but bottled is fine)
– 1 tablespoon honey (adjust based on fruit sweetness)
– 1/2 cup ice cubes (omit if using more frozen fruit)
Instructions
1. Add the frozen mixed berries to your blender first – this helps break them down more evenly.
2. Place the banana chunks on top of the berries to create a natural cushion for blending.
3. Spoon the Greek yogurt directly over the banana pieces.
4. Pour the orange juice around the edges of the blender to help liquid reach the bottom immediately.
5. Drizzle honey over the mixture, aiming for the center where it will distribute best.
6. Add ice cubes last so they don’t block the blades at startup.
7. Secure the blender lid tightly and begin blending on low speed for 15 seconds to break up larger pieces.
8. Increase to high speed and blend for 45-60 seconds until completely smooth and no ice chunks remain.
9. Stop blending and check consistency by tilting the blender – the mixture should pour easily without separation.
10. Pour immediately into glasses and serve right away for best texture. During those frantic weekday mornings, this vibrant pink smoothie becomes our edible sunshine in a glass. I love how the creamy yogurt base lets the tart berries shine through while the banana adds natural sweetness that makes everyone happy.
Peach and Yogurt Parfait
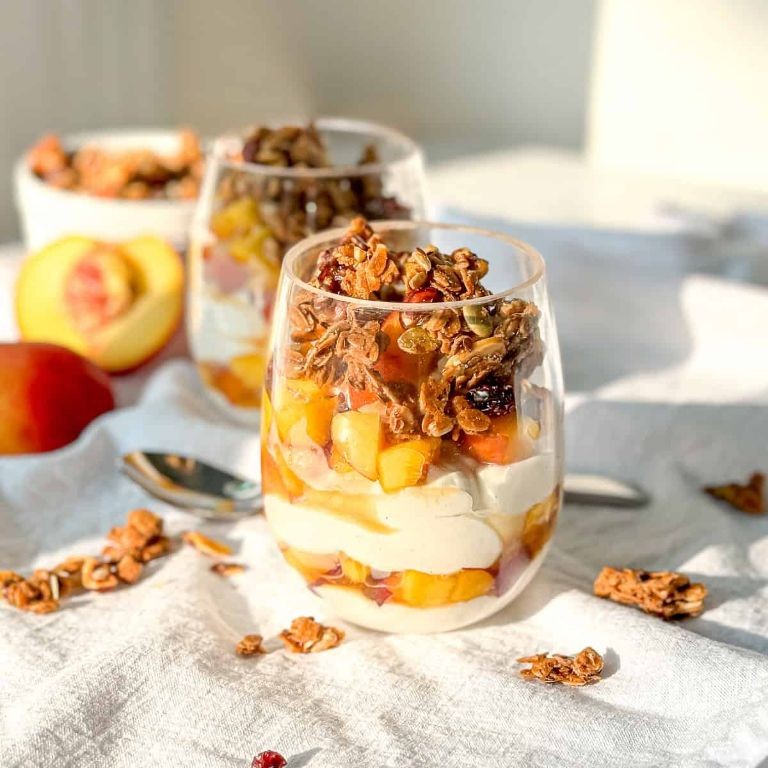
Perfect for those busy mornings when you need something quick yet satisfying, this peach and yogurt parfait has become my go-to breakfast. I first started making these during peach season last summer when my neighbor brought over a huge basket of fresh peaches from her tree, and now it’s a year-round staple in my kitchen. There’s something so comforting about the creamy yogurt layered with sweet, juicy peaches that just makes the day feel brighter.
Ingredients
– 2 cups plain Greek yogurt (full-fat for extra creaminess, but any works)
– 2 medium ripe peaches, peeled and diced (about 1.5 cups)
– 1/4 cup honey (adjust sweetness to your preference)
– 1/2 cup granola (use your favorite brand or homemade)
– 1 tsp vanilla extract (pure vanilla for best flavor)
– Pinch of cinnamon (optional, but adds warmth)
Instructions
1. Wash and dry two medium peaches thoroughly.
2. Use a sharp paring knife to score an “X” on the bottom of each peach.
3. Bring a medium pot of water to a rolling boil over high heat.
4. Carefully lower the peaches into the boiling water using a slotted spoon.
5. Blanch the peaches for exactly 45 seconds to loosen the skins.
6. Immediately transfer the peaches to a bowl of ice water using the slotted spoon.
7. Let the peaches sit in the ice bath for 2 minutes to stop the cooking process.
8. Peel the skins starting from the “X” marks – they should slip off easily.
9. Cut each peach in half and remove the pit.
10. Dice the peeled peaches into 1/2-inch cubes.
11. In a medium bowl, combine 2 cups Greek yogurt with 1 teaspoon vanilla extract.
12. Drizzle 2 tablespoons of honey into the yogurt mixture.
13. Whisk the yogurt mixture vigorously for 30 seconds until smooth and well-combined.
14. Spoon 1/4 cup of the yogurt mixture into the bottom of each serving glass.
15. Add a layer of 1/4 cup diced peaches over the yogurt.
16. Sprinkle 2 tablespoons of granola evenly over the peach layer.
17. Repeat the layers once more, ending with a final sprinkle of granola on top.
18. Drizzle the remaining 2 tablespoons of honey over the finished parfaits.
19. Dust each parfait with a pinch of cinnamon if desired.
20. Serve immediately or refrigerate for up to 2 hours before serving.
The creamy tang of the Greek yogurt creates a beautiful contrast with the sweet, juicy peaches, while the granola adds that satisfying crunch that makes every bite interesting. I love serving these in clear glasses to show off the beautiful layers, and sometimes I’ll add a sprig of fresh mint for an extra pop of color and freshness.
Pineapple Teriyaki Meatballs

Haven’t we all had those nights where takeout sounds tempting, but homemade feels more satisfying? I found myself in that exact spot last week, craving something sweet, savory, and easy to eat while binge-watching my favorite show. That’s how these pineapple teriyaki meatballs were born—they’re my new go-to for a cozy, flavorful meal that comes together with minimal fuss.
Ingredients
– 1 lb ground beef (or ground turkey for a lighter option)
– 1/2 cup panko breadcrumbs (helps keep meatballs tender)
– 1 large egg, beaten (acts as a binder)
– 2 tbsp soy sauce (use low-sodium if preferred)
– 1 tbsp grated fresh ginger (or 1 tsp ground ginger)
– 2 cloves garlic, minced (adjust to your garlic love level)
– 1/4 cup teriyaki sauce (plus extra for glazing)
– 1 cup pineapple chunks, drained (fresh or canned both work)
– 1 tbsp vegetable oil (or any neutral oil for frying)
Instructions
1. Preheat your oven to 375°F and line a baking sheet with parchment paper.
2. In a large bowl, combine the ground beef, panko breadcrumbs, beaten egg, soy sauce, grated ginger, and minced garlic.
3. Mix the ingredients gently with your hands until just combined; overmixing can make the meatballs tough.
4. Roll the mixture into 1-inch meatballs, placing them on the prepared baking sheet as you go.
5. Heat the vegetable oil in a large skillet over medium-high heat until it shimmers.
6. Add the meatballs in a single layer, working in batches if needed to avoid crowding the pan.
7. Sear the meatballs for 2-3 minutes per side, or until they develop a golden-brown crust.
8. Transfer the seared meatballs back to the baking sheet and bake for 12-15 minutes, or until cooked through.
9. While the meatballs bake, pour the teriyaki sauce and pineapple chunks into the same skillet used for searing.
10. Simmer the sauce and pineapple over medium heat for 5-7 minutes, stirring occasionally, until the sauce thickens slightly.
11. Remove the meatballs from the oven and toss them gently in the skillet with the teriyaki-pineapple mixture.
12. Serve the meatballs hot, drizzled with any extra sauce from the pan.
Finally, these meatballs boast a juicy interior with a sticky-sweet glaze that clings to every bite. I love serving them over steamed rice with a sprinkle of green onions, but they’re just as delicious skewered as appetizers for game day.
Fruit-Stuffed French Toast

Every Sunday morning, I find myself craving something special for breakfast, and this fruit-stuffed French toast has become our family’s favorite weekend treat. There’s something magical about pulling apart that golden-brown bread to reveal the warm, jammy fruit filling inside—it always feels like opening a delicious present.
Ingredients
- 8 slices thick-cut brioche bread (about 1 inch thick, or challah works great too)
- 1 cup mixed berries (fresh or frozen, no need to thaw if frozen)
- 4 oz cream cheese, softened (makes spreading easier)
- 3 large eggs
- 1/2 cup whole milk (2% works in a pinch)
- 1 tsp vanilla extract
- 1/2 tsp ground cinnamon
- 2 tbsp unsalted butter (for cooking)
- Maple syrup for serving (warm it up for best results)
- Powdered sugar for dusting (optional but pretty)
Instructions
- Spread 2 tablespoons of softened cream cheese evenly on one side of 4 bread slices.
- Sprinkle 1/4 cup of mixed berries over the cream cheese on each prepared slice.
- Top each with remaining bread slices to create 4 sandwiches, pressing gently to seal.
- In a shallow bowl, whisk together 3 large eggs, 1/2 cup whole milk, 1 teaspoon vanilla extract, and 1/2 teaspoon ground cinnamon until completely combined.
- Dip each sandwich into the egg mixture, letting it soak for 30 seconds per side until the bread absorbs most of the liquid.
- Melt 1 tablespoon of butter in a large non-stick skillet over medium heat until it sizzles but doesn’t brown.
- Cook 2 sandwiches at a time for 4-5 minutes per side until golden brown and crisp.
- Flip carefully using a spatula and cook the second side for another 4-5 minutes until equally golden.
- Transfer cooked French toast to a wire rack instead of a plate to keep the bottom crisp.
- Repeat with remaining 1 tablespoon of butter and 2 sandwiches.
- Slice each stuffed French toast diagonally to show off the colorful fruit filling.
- Drizzle with warm maple syrup and dust with powdered sugar if desired.
Keeping this French toast on a wire rack while cooking the remaining batches prevents the bottom from getting soggy, which I learned the hard way after many mushy breakfasts. The contrast between the crisp exterior and the warm, creamy fruit center makes every bite feel indulgent, and I love serving these with extra berries on the side for a fresh counterpoint to the rich toast.
Canned Fruit Salsa with Cinnamon Chips
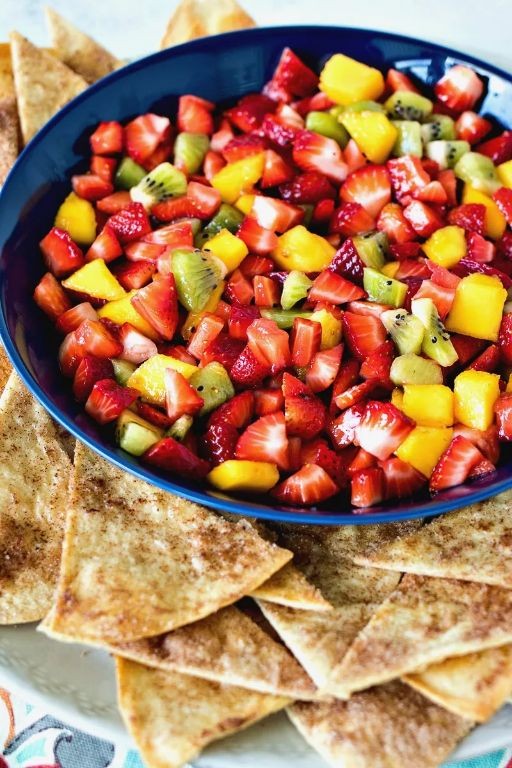
Keeping canned goods in my pantry has saved dinner more times than I can count, but my favorite discovery has been turning them into this vibrant fruit salsa. Just last week, I whipped this up when friends dropped by unexpectedly, and it disappeared in minutes. It’s become my go-to for quick entertaining or when I need a sweet treat without the fuss.
Ingredients
- 1 (15 oz) can diced peaches in light syrup, drained (or use fruit cocktail for variety)
- 1 (8 oz) can crushed pineapple, undrained (the juice adds natural sweetness)
- 1/4 cup finely chopped red onion (soak in cold water for 5 minutes to mellow the bite)
- 2 tbsp fresh lime juice (about 1 lime, bottled works in a pinch)
- 1 tbsp chopped fresh cilantro (omit if you’re not a fan)
- 4 (8-inch) flour tortillas
- 2 tbsp melted butter (or coconut oil for dairy-free)
- 2 tbsp granulated sugar
- 1 tsp ground cinnamon
Instructions
- Preheat your oven to 375°F and line a baking sheet with parchment paper.
- Combine the drained diced peaches, undrained crushed pineapple, finely chopped red onion, fresh lime juice, and chopped cilantro in a medium bowl. Tip: For best flavor, let the salsa sit for 15 minutes so the juices meld.
- Brush both sides of each flour tortilla evenly with the melted butter using a pastry brush.
- Mix the granulated sugar and ground cinnamon in a small bowl, then sprinkle this mixture generously over both sides of each buttered tortilla. Tip: Press lightly to help the cinnamon-sugar adhere.
- Stack the tortillas and cut them into 8 wedges each using a pizza cutter or sharp knife.
- Arrange the tortilla wedges in a single layer on the prepared baking sheet, ensuring they don’t overlap.
- Bake for 8–10 minutes until the edges curl slightly and the chips turn light golden brown. Tip: Watch closely after 7 minutes—they burn quickly!
- Remove the cinnamon chips from the oven and let them cool completely on the baking sheet, about 5 minutes, to crisp up.
Brimming with juicy sweetness from the peaches and pineapple, this salsa has a bright kick from the lime that balances everything beautifully. I love serving it in a hollowed-out pineapple half for summer parties, or just scooping it up with those warm, cinnamony chips while they’re still slightly warm.
Peach BBQ Pulled Pork
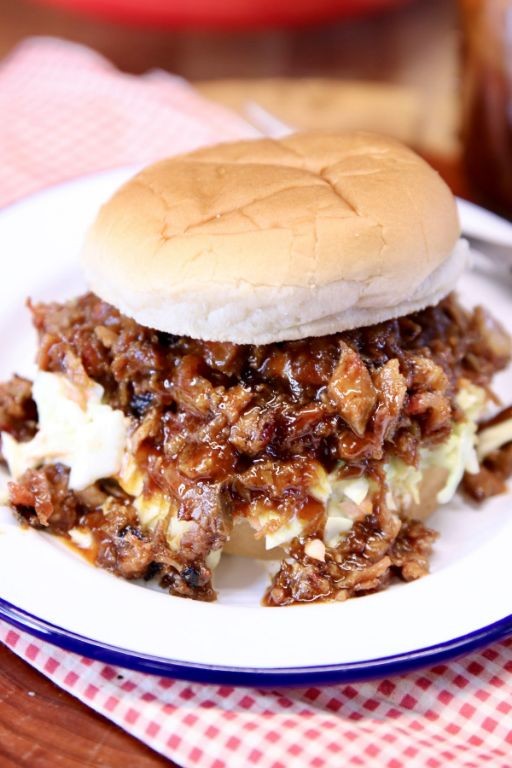
Warm weather always gets me craving something sweet and smoky, and this peach BBQ pulled pork has become my go-to summer comfort food. I first made it for a backyard potluck last July, and now my friends request it every time we grill—it’s that good!
Ingredients
– 3 lbs pork shoulder, trimmed of excess fat (or use pork butt for extra richness)
– 1 tbsp olive oil (or any neutral oil)
– 1 large yellow onion, thinly sliced
– 3 cloves garlic, minced (fresh is best, but jarred works too)
– 1 cup peach preserves (look for ones with real fruit chunks)
– 1/2 cup ketchup
– 1/4 cup apple cider vinegar
– 2 tbsp Worcestershire sauce
– 1 tbsp smoked paprika
– 1 tsp chili powder (adjust to your preferred heat level)
– 1/2 tsp black pepper, freshly ground
– 1 tsp salt (I prefer coarse kosher salt)
Instructions
1. Pat the pork shoulder completely dry with paper towels to ensure a good sear.
2. Heat olive oil in a large Dutch oven over medium-high heat until it shimmers, about 2 minutes.
3. Sear the pork shoulder on all sides until deeply browned, approximately 4-5 minutes per side.
4. Remove the pork from the pot and set it aside on a plate.
5. Add the sliced onion to the same pot and cook until softened and translucent, about 5 minutes.
6. Stir in the minced garlic and cook for 1 minute until fragrant but not browned.
7. Combine peach preserves, ketchup, apple cider vinegar, Worcestershire sauce, smoked paprika, chili powder, black pepper, and salt in a medium bowl.
8. Return the seared pork shoulder to the Dutch oven.
9. Pour the peach BBQ sauce mixture over the pork, making sure it’s well-coated.
10. Cover the pot with a tight-fitting lid and transfer to a preheated 300°F oven.
11. Bake for 4 hours until the pork shreds easily with two forks.
12. Remove the pot from the oven and let the pork rest in the sauce for 15 minutes.
13. Transfer the pork to a cutting board and use two forks to shred all the meat.
14. Skim any excess fat from the surface of the sauce in the pot.
15. Return the shredded pork to the pot and stir to combine with the sauce.
Hearty and perfectly balanced, this pulled pork melts in your mouth with sweet peach notes cutting through the smoky richness. I love serving it piled high on toasted brioche buns with a crisp coleslaw, or even over creamy polenta for a cozy dinner that always satisfies.
Pineapple Coconut Rice Pudding
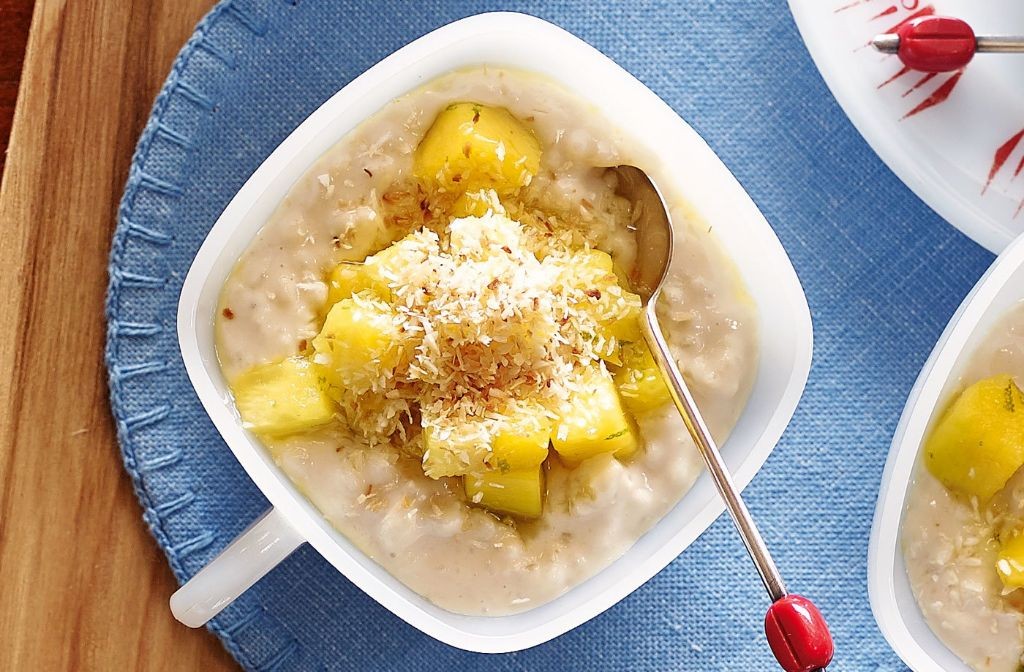
Kind of like a tropical vacation in a bowl, this pineapple coconut rice pudding has become my go-to comfort dessert ever since I first experimented with leftover rice from last week’s takeout. There’s something magical about how the sweet pineapple and creamy coconut transform simple rice into something truly special.
Ingredients
– 1 cup cooked white rice (day-old works best for texture)
– 1 cup coconut milk (full-fat for maximum creaminess)
– 1/2 cup crushed pineapple, drained (reserve 2 tbsp juice)
– 1/4 cup granulated sugar (adjust for sweetness preference)
– 1/4 tsp vanilla extract (pure vanilla recommended)
– Pinch of salt (enhances all the flavors)
– 2 tbsp toasted coconut flakes (for garnish, optional but recommended)
Instructions
1. Combine 1 cup cooked white rice, 1 cup coconut milk, 1/2 cup crushed pineapple, 2 tablespoons reserved pineapple juice, 1/4 cup granulated sugar, and a pinch of salt in a medium saucepan.
2. Cook over medium heat, stirring constantly with a wooden spoon, until the mixture reaches a gentle simmer.
3. Reduce heat to low and continue cooking for 15-18 minutes, stirring every 2-3 minutes to prevent sticking.
4. Check the pudding’s thickness by dragging your spoon across the bottom – it should leave a clear path that fills in slowly.
5. Remove from heat and stir in 1/4 teaspoon vanilla extract until fully incorporated.
6. Transfer the pudding to serving bowls and let cool for 5 minutes at room temperature.
7. Sprinkle 2 tablespoons toasted coconut flakes over the top before serving warm.
Especially wonderful when served warm, this pudding develops a delightful creamy texture that’s neither too thick nor too runny. The tropical pineapple flavor really shines through the rich coconut base, making it perfect for serving in small mason jars for a portable treat or topped with fresh mango slices for an extra fruity twist.
Apple and Cinnamon Pancakes
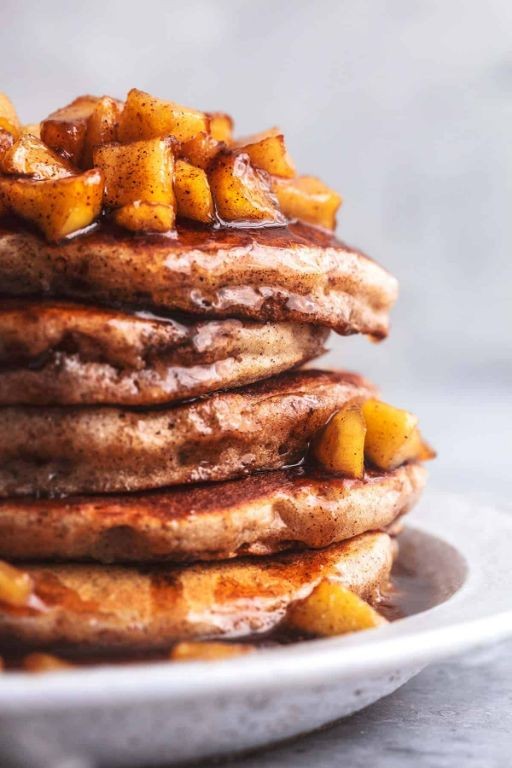
Gosh, there’s something magical about the smell of apples and cinnamon wafting through the kitchen on a crisp fall morning. I first started making these pancakes when my neighbor brought over a bushel of fresh-picked apples, and now they’ve become our family’s favorite weekend treat. There’s just no better way to welcome autumn than with these warm, spiced pancakes that fill the whole house with the coziest aroma.
Ingredients
– 1 cup all-purpose flour (I sometimes use half whole wheat for extra fiber)
– 2 tablespoons granulated sugar (you can reduce this if your apples are very sweet)
– 1 teaspoon baking powder
– 1/2 teaspoon baking soda
– 1 teaspoon ground cinnamon (plus extra for dusting)
– 1/4 teaspoon salt
– 1 cup buttermilk (regular milk works too, but buttermilk makes them extra fluffy)
– 1 large egg
– 2 tablespoons melted butter (cooled slightly)
– 1 medium apple, peeled and finely chopped (about 1 cup)
– Butter or oil for cooking
– Maple syrup for serving
Instructions
1. In a large bowl, whisk together 1 cup flour, 2 tablespoons sugar, 1 teaspoon baking powder, 1/2 teaspoon baking soda, 1 teaspoon cinnamon, and 1/4 teaspoon salt until well combined.
2. In a separate medium bowl, whisk 1 cup buttermilk, 1 large egg, and 2 tablespoons melted butter until smooth.
3. Pour the wet ingredients into the dry ingredients and stir gently until just combined – the batter will be lumpy, and that’s perfect for fluffy pancakes.
4. Gently fold in 1 cup of finely chopped apple until evenly distributed throughout the batter.
5. Heat a non-stick skillet or griddle over medium heat (350°F if using an electric griddle) and lightly grease with butter or oil.
6. Drop 1/4 cup portions of batter onto the hot surface, leaving space between each pancake.
7. Cook for 2-3 minutes until bubbles form on the surface and the edges look set.
8. Flip the pancakes carefully and cook for another 1-2 minutes until golden brown on both sides.
9. Keep cooked pancakes warm in a 200°F oven while you finish the remaining batter.
My favorite thing about these pancakes is how the apples become tender and sweet while the cinnamon infuses every bite with warmth. They’re wonderful served with a drizzle of maple syrup and an extra sprinkle of cinnamon, or try them with a dollop of Greek yogurt for a tangy contrast to the sweet apples.
Pear and Gingerbread Trifle

Keeping warm during these chilly November days calls for something special, and this pear and gingerbread trifle has become my go-to comfort dessert. I first made it for a Friendsgiving potluck last year when I needed to use up leftover gingerbread, and now it’s become a seasonal tradition in our household that always disappears faster than I can make it.
Ingredients
– 1 box gingerbread mix (plus required eggs and oil)
– 3 ripe pears, peeled and diced (Bartlett or Anjou work well)
– 2 tablespoons unsalted butter
– 1/4 cup brown sugar
– 1 teaspoon ground cinnamon
– 2 cups heavy whipping cream
– 1/4 cup granulated sugar
– 1 teaspoon vanilla extract
– 1/2 cup toasted pecans, chopped (walnuts make a good substitute)
Instructions
1. Preheat your oven to 350°F and grease an 8×8 inch baking pan.
2. Prepare the gingerbread mix according to package directions, adding the required eggs and oil.
3. Pour the gingerbread batter into the prepared pan and bake for 25-30 minutes until a toothpick inserted in the center comes out clean.
4. Cool the gingerbread completely on a wire rack, then cut into 1-inch cubes.
5. Melt the butter in a large skillet over medium heat.
6. Add the diced pears, brown sugar, and cinnamon to the skillet.
7. Cook the pear mixture for 8-10 minutes, stirring occasionally, until the pears are tender but still hold their shape.
8. Remove the pear mixture from heat and let it cool to room temperature.
9. Chill a large mixing bowl and beaters in the freezer for 15 minutes before whipping the cream.
10. Pour the heavy cream, granulated sugar, and vanilla extract into the chilled bowl.
11. Whip the cream mixture on high speed for 2-3 minutes until stiff peaks form.
12. Begin assembling the trifle by placing one-third of the gingerbread cubes in the bottom of a trifle dish or large glass bowl.
13. Spoon half of the cooled pear mixture over the gingerbread layer.
14. Spread one-third of the whipped cream over the pears.
15. Repeat the layers with another third of gingerbread, the remaining pears, and another third of whipped cream.
16. Top with the final layer of gingerbread cubes and remaining whipped cream.
17. Sprinkle the toasted pecans evenly over the top layer.
18. Cover the trifle with plastic wrap and refrigerate for at least 4 hours, or overnight for best flavor development.
Perfectly layered and wonderfully aromatic, this trifle develops incredible depth as the gingerbread softens and the pear juices meld with the cream. The contrast between the spicy gingerbread, sweet pears, and cool whipped cream makes each spoonful a textural delight. I love serving it in individual mason jars for holiday parties, and it’s even better the next day when the flavors have fully married together.
Apricot and Almond Energy Bites

Craving something sweet but healthy has become my afternoon ritual, especially since I started working from home last year. These apricot and almond energy bites are my go-to solution when that 3 PM slump hits – they’re like little bursts of sunshine that keep me going until dinner.
Ingredients
– 1 cup dried apricots (chopped into small pieces for easier blending)
– 1 cup raw almonds (toasting them first adds amazing flavor)
– 1/4 cup shredded coconut (unsweetened works best here)
– 2 tablespoons honey (maple syrup works for vegan version)
– 1 tablespoon coconut oil (melted but not hot)
– 1/2 teaspoon vanilla extract (pure vanilla makes a difference)
– Pinch of sea salt (balances the sweetness perfectly)
Instructions
1. Preheat your oven to 350°F and spread the raw almonds in a single layer on a baking sheet.
2. Toast the almonds for 8-10 minutes until fragrant and lightly golden, checking at the 8-minute mark to prevent burning.
3. Let the toasted almonds cool completely for about 15 minutes – this prevents them from steaming in the food processor.
4. Combine the cooled almonds and chopped dried apricots in a food processor fitted with the blade attachment.
5. Pulse the mixture 10-12 times in 2-second bursts until it forms coarse crumbs, scraping down the sides with a spatula between pulses.
6. Add the shredded coconut, honey, melted coconut oil, vanilla extract, and sea salt to the food processor.
7. Process the mixture continuously for 45-60 seconds until it comes together into a sticky dough that holds its shape when pressed.
8. Scoop tablespoon-sized portions of the mixture and roll them into 1-inch balls between your palms.
9. Place the formed balls on a parchment-lined baking sheet and refrigerate for at least 30 minutes to firm up.
10. Transfer the chilled energy bites to an airtight container, separating layers with parchment paper if stacking.
Zesty with bright apricot flavor and satisfying crunch from the almonds, these bites have that perfect chewy texture that makes you forget they’re actually good for you. I love rolling some in extra coconut for a pretty presentation, or packing them in my kid’s lunchbox for a treat that doesn’t cause a sugar crash.
Summary
Zesty, convenient, and budget-friendly—these canned fruit recipes prove that delicious desserts and snacks are just a pantry away! We hope this roundup inspires you to get creative in the kitchen. Try a recipe, leave a comment with your favorite, and don’t forget to share this article on Pinterest for more sweet ideas!