You’re in for a treat this Hanukkah season! As the menorah glows and families gather, there’s nothing quite like sharing delicious traditional foods that fill your home with warmth and joy. From crispy latkes to sweet sufganiyot, we’ve gathered 20 mouthwatering recipes that will make your celebration extra special. Get ready to impress your guests and create lasting memories with these festive favorites!
Classic Potato Latkes with Applesauce
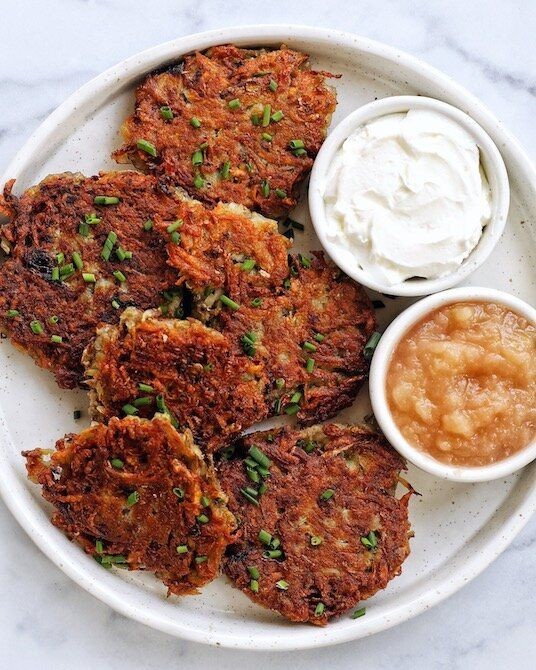
Venerated for generations, these golden potato latkes represent the perfect balance of crispy exterior and tender interior, a timeless Hanukkah tradition that deserves a place at any winter table. With their delicate crunch giving way to fluffy potato centers, they create the ideal canvas for sweet, homemade applesauce. This classic pairing elevates humble ingredients into something truly extraordinary.
Ingredients
– A couple of large russet potatoes (about 2 pounds)
– 1 medium yellow onion
– 2 large eggs
– A quarter cup of all-purpose flour
– A teaspoon of kosher salt
– A half teaspoon of freshly ground black pepper
– A generous splash of vegetable oil for frying (about 1 cup)
– For the applesauce: 4 medium apples, peeled and chopped, a quarter cup of water, a tablespoon of granulated sugar, and a pinch of cinnamon
Instructions
1. Peel the russet potatoes and grate them using the large holes of a box grater.
2. Place the grated potatoes in a clean kitchen towel and squeeze firmly over the sink to remove excess moisture.
3. Grate the yellow onion using the same grater and combine with the potatoes in a large bowl.
4. Crack the 2 eggs into the potato mixture and stir until well combined.
5. Sprinkle the quarter cup of flour, teaspoon of salt, and half teaspoon of pepper over the mixture, then mix gently until just incorporated.
6. Heat a quarter cup of vegetable oil in a large skillet over medium-high heat until it shimmers (about 375°F).
7. Drop heaping tablespoons of the potato mixture into the hot oil, pressing gently with the back of the spoon to form 3-inch rounds.
8. Fry the latkes for 3-4 minutes until the edges are golden brown and crispy.
9. Carefully flip each latke using a spatula and cook for another 3-4 minutes until both sides are deeply golden.
10. Transfer the cooked latkes to a paper towel-lined plate to drain excess oil.
11. While the latkes fry, combine the chopped apples, quarter cup of water, tablespoon of sugar, and pinch of cinnamon in a saucepan.
12. Cook the apple mixture over medium heat for 15 minutes, stirring occasionally, until the apples break down into a chunky sauce.
13. Mash the apples lightly with a fork for your preferred consistency.
Serve these latkes immediately while they’re still warm and crispy. The contrast between the savory, crunchy potato pancakes and the sweet, spiced applesauce creates a perfect harmony of textures and flavors. For an elegant twist, top them with a dollop of crème fraîche and a sprinkle of fresh chives before adding the applesauce.
Crispy Cheese-Filled Sufganiyot

Tender, golden orbs of pillowy dough give way to a molten core of savory cheese in these sophisticated sufganiyot. Traditionally enjoyed during Hanukkah, this elevated version transforms the classic jelly-filled doughnut into a savory-sweet masterpiece that delights the palate with every bite. The contrast between the crisp exterior and the oozing, rich cheese filling creates an unforgettable culinary experience that bridges tradition and innovation.
Ingredients
– 2 cups of all-purpose flour
– 1 packet of active dry yeast
– ¼ cup of granulated sugar
– ¾ cup of warm whole milk (around 110°F)
– 2 large eggs
– 4 tablespoons of unsalted butter, softened
– A good pinch of salt
– 8 ounces of cream cheese, chilled
– ½ cup of shredded sharp cheddar
– Vegetable oil for frying (about 4 cups)
– A dusting of powdered sugar for serving
Instructions
1. Combine the warm milk, sugar, and yeast in a large bowl and let it sit for 5 minutes until frothy.
2. Whisk in the eggs and softened butter until fully incorporated.
3. Gradually mix in the flour and salt until a sticky dough forms.
4. Knead the dough on a floured surface for 8 minutes until smooth and elastic.
5. Place the dough in a greased bowl, cover with a damp cloth, and let rise in a warm spot for 1 hour until doubled in size.
6. While the dough rises, mix the cream cheese and shredded cheddar in a bowl until well combined.
7. Roll the risen dough to ½-inch thickness on a floured surface.
8. Use a 2½-inch round cutter to cut out dough circles.
9. Place 1 teaspoon of the cheese mixture in the center of half the circles.
10. Brush the edges of the filled circles with water and top with the remaining circles, pressing the edges firmly to seal.
11. Heat the vegetable oil in a deep pot to 350°F, using a thermometer to maintain the temperature.
12. Fry the sufganiyot in batches for 2-3 minutes per side until golden brown and puffed.
13. Drain them on a wire rack set over a baking sheet to keep them crisp.
14. Dust the warm sufganiyot generously with powdered sugar before serving.
Heavenly when served warm, these sufganiyot offer a satisfying crackle with each bite before revealing their creamy, tangy center. The subtle saltiness of the cheese filling beautifully balances the sweet dough and powdered sugar coating. For an extra indulgent touch, serve them alongside a dollop of fruit compote or drizzle with honey for contrasting flavors that elevate this Hanukkah treat to new heights.
Homemade Hanukkah Jelly Doughnuts

Oozing with tradition and festive cheer, these homemade Hanukkah jelly doughnuts capture the essence of the holiday in every golden, sugar-dusted bite. Our elevated version balances pillowy softness with jewel-like fruit fillings that burst with vibrant flavor. Perfect for sharing with loved ones, they transform any kitchen into a celebration of light and sweetness.
Ingredients
– 3 ½ cups of all-purpose flour
– 1 packet of active dry yeast
– A generous ½ cup of warm whole milk
– ¼ cup of granulated sugar, plus extra for coating
– 3 large eggs at room temperature
– A good pinch of salt
– 6 tablespoons of unsalted butter, softened
– Your favorite fruit jelly or preserves
– A couple of quarts of vegetable oil for frying
Instructions
1. Combine the warm milk, yeast, and 1 tablespoon of the sugar in a large bowl and let it sit for 5–7 minutes until foamy.
2. Whisk in the eggs, remaining sugar, and salt until fully incorporated.
3. Gradually mix in the flour on low speed until a shaggy dough forms.
4. Add the softened butter in three additions, mixing for 5–7 minutes until the dough is smooth and elastic.
5. Tip: Scrape the bowl occasionally to ensure even mixing and a uniform texture.
6. Place the dough in a lightly oiled bowl, cover with a damp cloth, and let it rise in a warm spot for 1–1.5 hours until doubled in size.
7. Punch down the dough and roll it out on a floured surface to ½-inch thickness.
8. Use a 2 ½-inch round cutter to cut out dough circles, re-rolling scraps once.
9. Place the circles on a parchment-lined baking sheet, cover, and let them rise for another 45 minutes until puffy.
10. Heat the vegetable oil in a deep pot to 350°F, using a thermometer for accuracy.
11. Tip: Maintain the oil temperature carefully to avoid greasy or burnt doughnuts.
12. Fry 2–3 doughnuts at a time for 1–2 minutes per side until golden brown, flipping once.
13. Remove with a slotted spoon and drain on a wire rack set over a baking sheet.
14. Let the doughnuts cool slightly, then fill a piping bag fitted with a narrow tip with jelly.
15. Poke a small hole in the side of each doughnut and pipe in about 1 teaspoon of jelly.
16. Tip: Wipe the tip clean between fillings to prevent clogging and ensure neat presentation.
17. Roll the filled doughnuts in granulated sugar while still warm for even coating.
Remarkably light and airy, these doughnuts offer a delicate crunch from their sugar shell that gives way to a tender, yeasty crumb. The surprise pocket of fruity jelly adds a bright, tangy contrast that elevates each bite. For a festive twist, serve them arranged on a platter drizzled with honey and sprinkled with orange zest to complement the jelly’s sweetness.
Golden Fried Potato Kugel
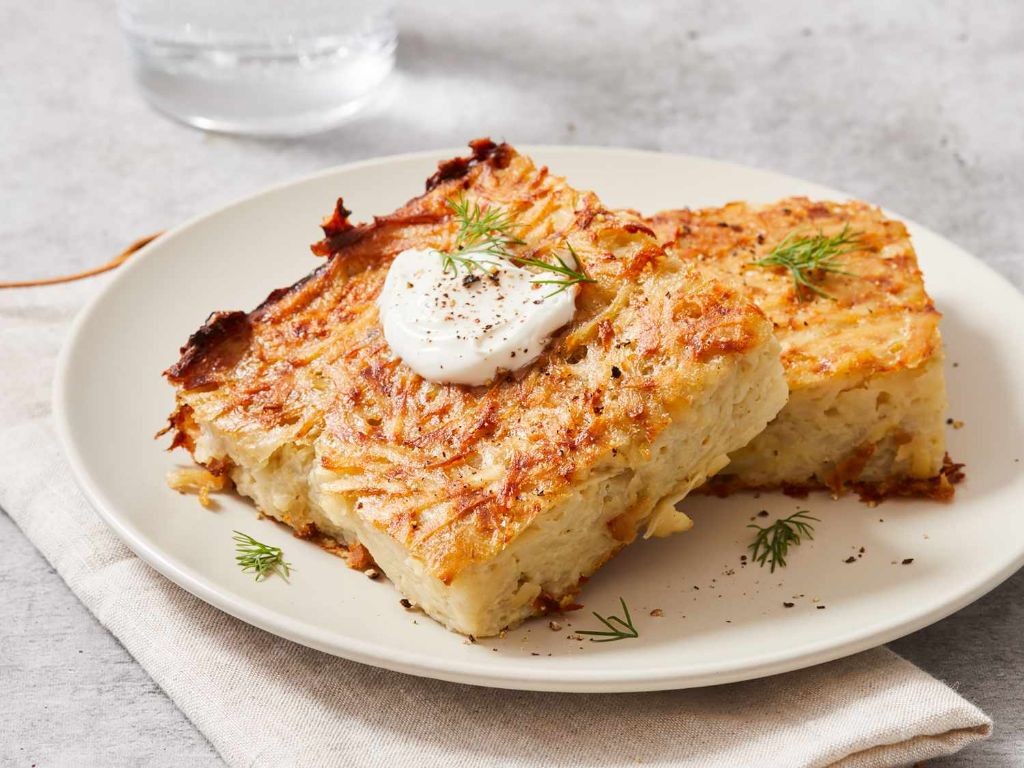
Beneath its golden, crackling exterior lies the soul-warming comfort of traditional Jewish cuisine, reimagined with a contemporary crispness that transforms humble potatoes into an extraordinary side dish. This golden fried potato kugel delivers both nostalgic familiarity and delightful texture in every bite, perfect for holiday tables or cozy weeknight dinners.
Ingredients
– 4 large russet potatoes, peeled
– 1 medium yellow onion
– 2 large eggs
– 1/4 cup all-purpose flour
– 1 teaspoon baking powder
– 1 1/2 teaspoons kosher salt
– A good pinch of black pepper
– A generous 1/2 cup vegetable oil for frying
Instructions
1. Grate the peeled potatoes and onion using the large holes of a box grater into a large bowl.
2. Immediately transfer the grated mixture to a clean kitchen towel and squeeze firmly over the sink to remove all excess moisture, continuing until no more liquid releases.
3. Return the dry potato-onion mixture to the bowl and add the eggs, flour, baking powder, salt, and pepper.
4. Mix everything together with your hands until fully combined and the mixture holds together when pressed.
5. Heat 1/2 cup vegetable oil in a 10-inch cast iron skillet over medium-high heat until it reaches 350°F on a deep-fry thermometer.
6. Carefully drop heaping tablespoonfuls of the potato mixture into the hot oil, leaving about 1 inch between each for even cooking.
7. Fry for 3-4 minutes until the bottoms turn deep golden brown and crispy around the edges.
8. Flip each kugel using a slotted spatula and cook for another 3-4 minutes until both sides achieve an even, crisp golden-brown color.
9. Transfer the finished kugels to a wire rack set over a baking sheet to drain excess oil while maintaining their crisp texture.
10. Repeat the frying process with the remaining potato mixture, adding more oil if needed to maintain 1/4 inch depth in the skillet.
Velvety soft within their shatteringly crisp shells, these golden morsels offer the perfect textural contrast between creamy potato interior and fried exterior. Their savory depth makes them equally splendid alongside roasted chicken or crowned with a dollop of cool sour cream and fresh chives for an elegant appetizer presentation that belies their simple origins.
Sweet and Savory Brisket with Honey Glaze
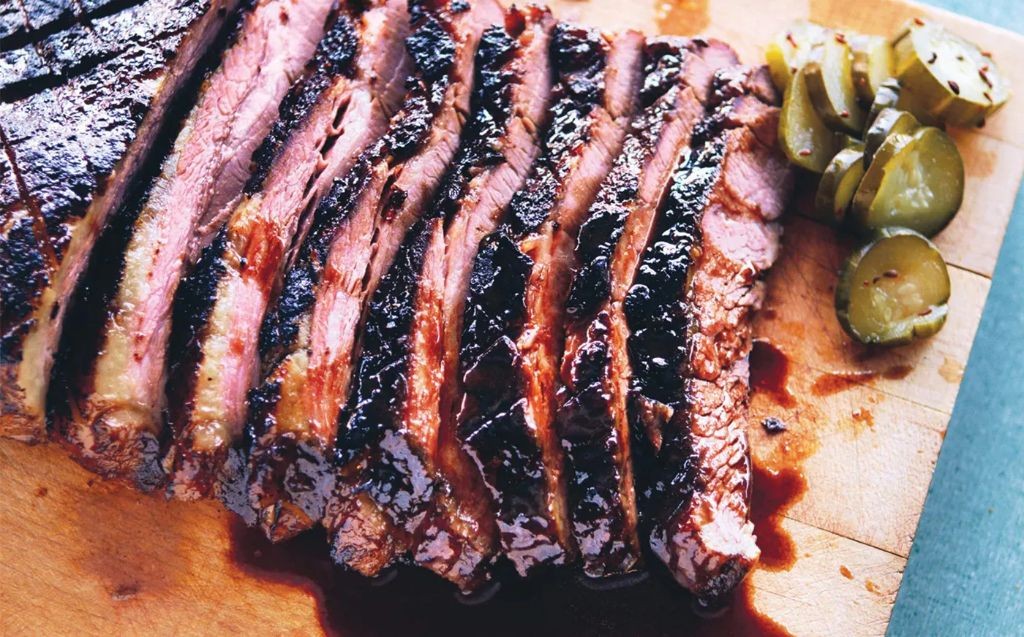
Nothing elevates a cozy dinner quite like the rich, complex harmony of sweet and savory notes dancing across tender, slow-cooked brisket. Nestled beneath a glossy honey glaze, this dish transforms humble ingredients into a show-stopping centerpiece that promises to gather loved ones around the table with its irresistible aroma and deep, caramelized flavor. Perfect for Sunday suppers or festive gatherings, it’s a recipe that feels both timeless and wonderfully comforting.
Ingredients
– a 4-pound beef brisket
– a couple of tablespoons of olive oil
– 1 large yellow onion, thinly sliced
– 3 cloves of garlic, minced
– a generous ½ cup of honey
– ¼ cup of soy sauce
– 2 tablespoons of apple cider vinegar
– 1 teaspoon of smoked paprika
– a pinch of salt and black pepper
– 1 cup of beef broth
Instructions
1. Preheat your oven to 325°F.
2. Pat the brisket dry with paper towels and season both sides evenly with salt, black pepper, and smoked paprika.
3. Heat olive oil in a large, oven-safe Dutch oven over medium-high heat until it shimmers.
4. Sear the brisket for 4–5 minutes per side until a deep brown crust forms.
5. Remove the brisket and set it aside on a plate.
6. Add the sliced onion to the pot and sauté for 5 minutes until softened and lightly golden.
7. Stir in the minced garlic and cook for 1 minute until fragrant.
8. Pour in the beef broth, scraping the bottom of the pot to lift any browned bits.
9. Whisk together the honey, soy sauce, and apple cider vinegar in a small bowl.
10. Return the brisket to the pot and pour the honey mixture over the top.
11. Cover the pot tightly with a lid and transfer it to the preheated oven.
12. Braise for 3 hours, basting the brisket with the pan juices every 45 minutes.
13. Remove the lid and continue cooking for another 30 minutes to allow the glaze to thicken and caramelize.
14. Let the brisket rest for 15 minutes before slicing against the grain into ¼-inch thick pieces.
15. Serve the sliced brisket drizzled with the reduced pan sauce.
Yielded with a melt-in-your-mouth tenderness, the brisket’s fibers practically dissolve under the sticky-sweet glaze, while the subtle smokiness from the paprika lingers on the palate. Consider pairing it with creamy mashed potatoes or a crisp apple slaw to balance the richness, or shred the leftovers into tacos for a delightful next-day twist.
Traditional Hanukkah Challah Bread
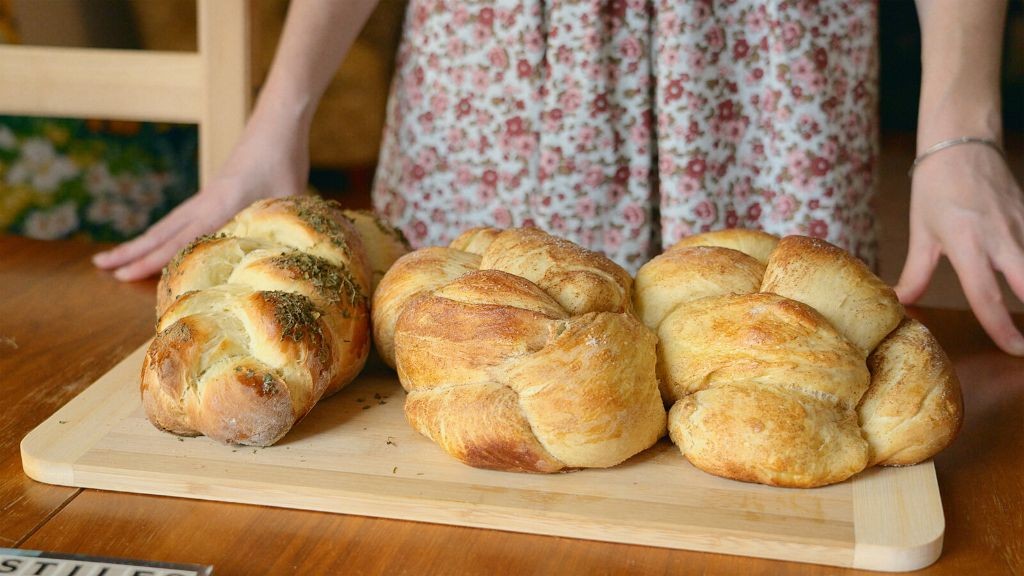
Fragrant and golden, this Traditional Hanukkah Challah Bread weaves together centuries of Jewish culinary heritage with the warmth of holiday tradition. Each braided loaf emerges from the oven with a burnished crust and tender, pillowy interior that speaks to careful craftsmanship and celebratory abundance. During the Festival of Lights, this enriched bread becomes the centerpiece of festive tables, its symbolic braids representing love, truth, and peace.
Ingredients
– A generous cup of warm water (around 110°F)
– A couple of tablespoons of honey
– Two packets of active dry yeast
– Four large eggs (save one for that beautiful egg wash)
– A half cup of neutral oil
– About four and a half cups of all-purpose flour
– A good pinch of salt
– A splash of vanilla extract for warmth
Instructions
1. Combine the warm water, honey, and yeast in a large bowl and let it sit for 5-7 minutes until foamy.
2. Whisk in three eggs, oil, and vanilla until fully incorporated.
3. Gradually mix in the flour and salt until a shaggy dough forms.
4. Knead the dough on a floured surface for 8-10 minutes until smooth and elastic. Tip: The dough is ready when it springs back slowly when poked.
5. Place the dough in a lightly oiled bowl, cover with a damp towel, and let rise in a warm spot for 1.5-2 hours until doubled in size.
6. Punch down the dough and divide into three equal portions.
7. Roll each portion into an 18-inch rope of even thickness.
8. Braid the three ropes tightly, pinching the ends to seal. Tip: For a professional look, tuck both ends under the loaf before baking.
9. Transfer the braid to a parchment-lined baking sheet, cover, and let rise for another 45-60 minutes until puffy.
10. Preheat your oven to 375°F during the final 15 minutes of rising.
11. Beat the remaining egg and brush it generously over the entire surface of the loaf.
12. Bake for 25-30 minutes until deeply golden brown and the loaf sounds hollow when tapped. Tip: Rotate the baking sheet halfway through for even browning.
13. Transfer to a wire rack to cool completely before slicing.
Ultimately, this challah achieves a perfect balance of slightly crisp exterior and cloud-soft crumb that practically melts in your mouth. The subtle sweetness from honey and vanilla makes it equally wonderful for French toast the next morning or simply torn into chunks and dipped in rich olive oil. Consider serving slices alongside a cheese board or using thick cuts for exceptional holiday sandwiches that honor both tradition and innovation.
Crunchy Onion and Zucchini Fritters

Wondrously crisp and golden, these fritters transform humble zucchini and sweet onion into elegant, savory cakes that delight with every bite. Perfect for brunch or a light supper, they offer a satisfying crunch that gives way to a tender, flavorful interior. Their delicate texture and aromatic profile make them an irresistible addition to any seasonal table.
Ingredients
– 2 medium zucchinis, grated
– 1 large sweet onion, thinly sliced
– 1 cup all-purpose flour
– 2 large eggs, lightly beaten
– 1/4 cup grated Parmesan cheese
– A couple of tablespoons of chopped fresh dill
– A splash of olive oil for frying
– 1 teaspoon baking powder
– 1/2 teaspoon salt
– 1/4 teaspoon black pepper
Instructions
1. Place the grated zucchini in a clean kitchen towel and squeeze firmly to remove excess moisture.
2. Combine the squeezed zucchini, sliced onion, flour, eggs, Parmesan, dill, baking powder, salt, and pepper in a large bowl.
3. Mix gently until just combined, being careful not to overwork the batter.
4. Heat 2 tablespoons of olive oil in a large skillet over medium heat until shimmering (about 350°F).
5. Drop 1/4-cup portions of the batter into the hot oil, flattening slightly with the back of a spoon.
6. Cook for 3-4 minutes until the edges appear golden brown and crisp.
7. Flip each fritter carefully using a thin spatula.
8. Cook for another 3-4 minutes until deeply golden and cooked through.
9. Transfer the cooked fritters to a wire rack set over a baking sheet to maintain crispness.
10. Repeat with remaining batter, adding more oil as needed between batches.
Just out of the skillet, these fritters offer a symphony of textures—shatteringly crisp exteriors giving way to moist, vegetable-filled centers. The sweet onion caramelizes beautifully against the fresh zucchini, while Parmesan adds a salty depth that needs no additional garnish. For an elegant presentation, serve them stacked with a dollop of lemon-thyme crème fraîche and microgreens.
Decadent Chocolate Rugelach Pastries

Rich, buttery pastry spirals embracing pools of melted chocolate create these irresistible rugelach, a sophisticated treat that elevates any afternoon tea or holiday gathering. Rolled with care and baked to golden perfection, each crescent-shaped delight offers a delicate crunch yielding to a fudgy, decadent center. These elegant pastries transform simple ingredients into an unforgettable indulgence that feels both nostalgic and refined.
Ingredients
– 2 cups of all-purpose flour
– 1 cup of cold unsalted butter, cut into small cubes
– 8 ounces of cold cream cheese
– A quarter cup of granulated sugar
– A pinch of fine salt
– 1 cup of semi-sweet chocolate chips
– A couple of tablespoons of heavy cream for brushing
– A generous sprinkle of coarse sugar for topping
Instructions
1. Combine 2 cups of all-purpose flour, 1 cup of cold cubed butter, 8 ounces of cold cream cheese, a quarter cup of granulated sugar, and a pinch of salt in a food processor.
2. Pulse the mixture for about 30 seconds until it forms coarse crumbs that just hold together when pressed.
3. Tip: Keep all ingredients cold to ensure a flaky pastry—warm dough will become greasy.
4. Divide the dough into 4 equal portions, shape each into a disk, wrap tightly in plastic wrap, and refrigerate for at least 2 hours until firm.
5. Roll one chilled disk on a lightly floured surface into a 9-inch circle about ⅛-inch thick.
6. Sprinkle a quarter cup of semi-sweet chocolate chips evenly over the dough circle, leaving a ½-inch border around the edge.
7. Cut the circle into 8 equal wedges using a sharp knife or pizza cutter.
8. Starting from the wide end, tightly roll each wedge toward the point to form a crescent shape.
9. Tip: Roll firmly but gently to avoid squeezing out the chocolate filling.
10. Place the shaped rugelach on a parchment-lined baking sheet, curving them slightly into crescent shapes.
11. Repeat steps 5–10 with the remaining dough disks and chocolate chips.
12. Chill the shaped rugelach on the baking sheet for 20 minutes to prevent spreading during baking.
13. Preheat your oven to 350°F while the rugelach chill.
14. Brush the chilled rugelach lightly with heavy cream and sprinkle with coarse sugar.
15. Bake for 20–25 minutes until golden brown and flaky, rotating the pan halfway through.
16. Tip: Watch for even browning—the bottoms should be lightly golden, not dark.
17. Transfer the baked rugelach to a wire rack to cool completely, about 1 hour.
Nothing compares to the delicate shatter of the flaky layers giving way to the molten chocolate core. Serve these warm with a dusting of powdered sugar for an elegant dessert, or pair with strong coffee to balance the richness. Their intricate swirls make them as beautiful to display as they are delightful to eat.
Fluffy Matzo Ball Soup
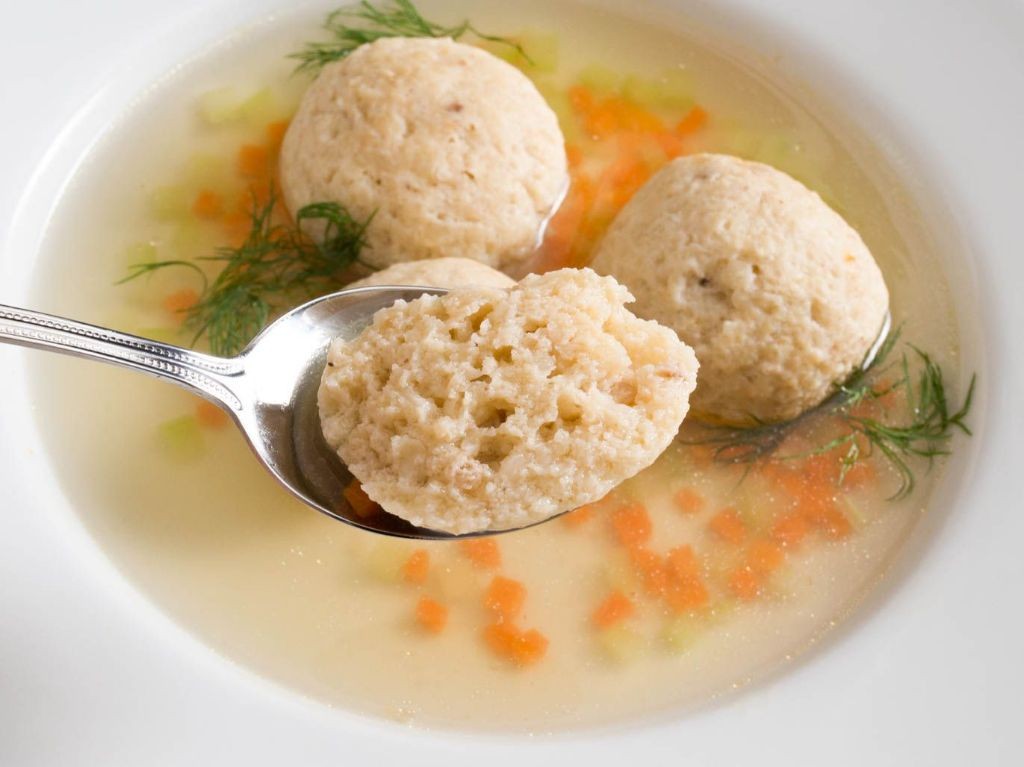
Elegant yet deeply comforting, this matzo ball soup transforms humble ingredients into a soul-warming masterpiece, where feather-light dumplings float in golden broth like culinary clouds. Each spoonful delivers the perfect balance of delicate texture and rich, savory depth that makes this dish a timeless treasure.
Ingredients
– 4 large eggs
– A generous 1/2 cup of matzo meal
– A good 1/4 cup of schmaltz or vegetable oil
– About 1/4 cup of seltzer water
– A couple of teaspoons of kosher salt
– A pinch of freshly ground black pepper
– 8 cups of rich chicken broth
– 2 medium carrots, sliced into thin coins
– 2 celery stalks, chopped
– 1 small yellow onion, diced
– A small handful of fresh dill, chopped
Instructions
1. In a medium bowl, whisk 4 large eggs until completely smooth and pale yellow.
2. Gradually stir in 1/2 cup of matzo meal until no dry spots remain.
3. Mix in 1/4 cup of schmaltz until fully incorporated into the batter.
4. Gently fold in 1/4 cup of seltzer water to create airy bubbles in the mixture.
5. Season the batter with 2 teaspoons of kosher salt and a pinch of black pepper.
6. Cover the bowl with plastic wrap and refrigerate for exactly 45 minutes to allow the matzo meal to hydrate properly.
7. While the batter chills, combine 8 cups of chicken broth, 2 sliced carrots, 2 chopped celery stalks, and 1 diced onion in a large pot.
8. Bring the broth mixture to a gentle simmer over medium heat, then reduce to maintain a steady bubble.
9. Remove the chilled matzo ball batter from the refrigerator—it should be firm enough to handle but still moist.
10. Wet your hands with cold water to prevent sticking, then roll tablespoon-sized portions of batter into smooth, compact balls.
11. Carefully drop the matzo balls into the simmering broth, spacing them evenly without crowding.
12. Cover the pot tightly and simmer for exactly 25 minutes—do not lift the lid during this time to ensure proper steaming.
13. After 25 minutes, test one matzo ball by cutting it in half; it should be cooked through with no raw center.
14. Stir in a handful of chopped fresh dill during the final 2 minutes of cooking to preserve its bright flavor.
15. Ladle the hot soup into bowls, ensuring each serving gets both broth and matzo balls.
Zestful and satisfying, these matzo balls achieve an almost ethereal fluffiness that melts on the tongue, while the broth carries the sweet earthiness of carrots and celery. For an elegant twist, garnish with extra dill sprigs and serve with crusty bread for dipping into the golden liquid.
Herbed Roasted Chicken with Schmaltz

Warm, golden, and fragrant with garden herbs, this roasted chicken transforms humble ingredients into a celebratory centerpiece, while the rendered schmaltz creates culinary gold for future cooking adventures.
Ingredients
- One 4-pound whole chicken
- A generous ¼ cup of extra virgin olive oil
- A couple of tablespoons of fresh lemon juice
- Four minced garlic cloves
- A handful of fresh rosemary sprigs
- A handful of fresh thyme sprigs
- A good sprinkle of kosher salt
- A few cracks of freshly ground black pepper
- One roughly chopped yellow onion
- Two chopped carrots
- Two chopped celery stalks
Instructions
- Preheat your oven to 425°F and position a rack in the middle.
- Pat the entire chicken completely dry inside and out with paper towels—this is crucial for crispy skin.
- Rub the chicken all over with the olive oil, then season generously inside and out with the salt and pepper.
- Gently loosen the skin over the breast and thighs with your fingers, then stuff the minced garlic and a few sprigs each of the rosemary and thyme underneath the skin.
- Place the chopped onion, carrots, and celery in the bottom of a roasting pan to create a flavorful vegetable trivet.
- Set the chicken, breast-side up, on top of the vegetables in the pan.
- Tuck the wingtips behind the chicken’s back and tie the legs together with kitchen twine for even cooking.
- Roast the chicken for 20 minutes at 425°F to kickstart browning.
- Reduce the oven temperature to 375°F and continue roasting for about 60-70 more minutes, until a meat thermometer inserted into the thickest part of the thigh reads 165°F.
- Drizzle the lemon juice over the chicken during the last 10 minutes of cooking for a bright finish.
- Transfer the chicken to a cutting board and let it rest for 15 minutes—don’t skip this, as it allows the juices to redistribute.
- While the chicken rests, strain the pan drippings and vegetables through a fine-mesh sieve into a jar, pressing on the solids; this liquid gold is your schmaltz.
- Carve the chicken and serve immediately.
Exquisitely crisp skin gives way to incredibly moist, herb-infused meat, while the rendered schmaltz holds the deep, savory essence of garlic and roasted vegetables. Consider shredding any leftovers into a hearty grain salad or using the schmaltz to fry potatoes for an unforgettably rich side dish.
Caramelized Apple and Cinnamon Noodle Kugel
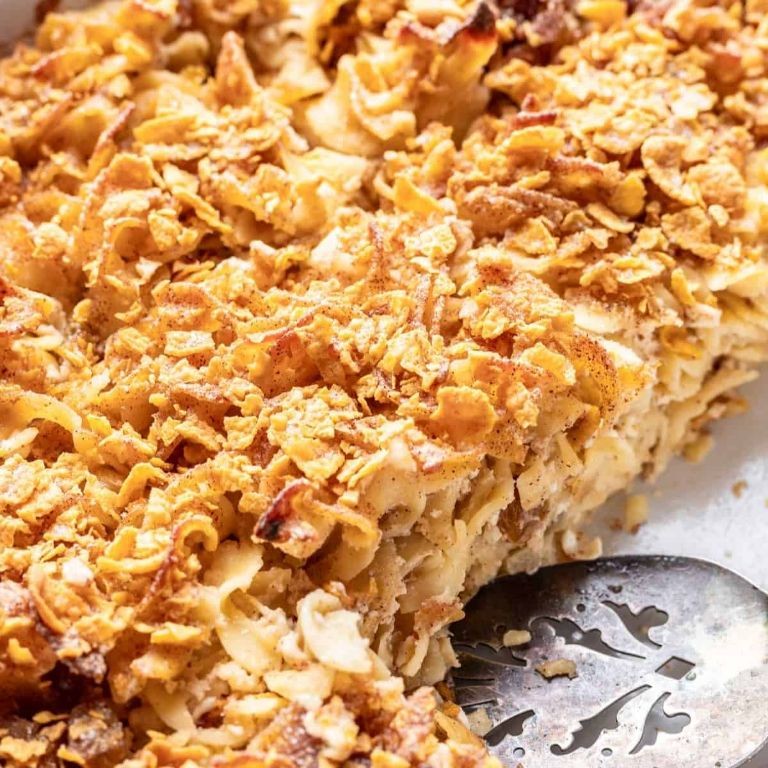
Golden autumn afternoons call for dishes that wrap you in warmth and nostalgia, and this caramelized apple and cinnamon noodle kugel delivers exactly that—a comforting Jewish-American classic reimagined with seasonal sophistication. Glistening with buttery caramelized apples and perfumed with warm cinnamon, this baked pasta pudding transforms humble ingredients into an elegant centerpiece worthy of any holiday table or cozy family gathering. Each slice reveals layers of tender egg noodles embracing sweet-tart fruit in a custardy embrace that feels simultaneously celebratory and deeply familiar.
Ingredients
– 8 ounces of wide egg noodles
– 3 large Granny Smith apples, peeled and sliced
– ½ cup of granulated sugar
– ¼ cup of packed brown sugar
– 4 tablespoons of unsalted butter
– 3 large eggs
– 1 cup of whole milk
– 1 cup of sour cream
– 2 teaspoons of ground cinnamon
– ½ teaspoon of vanilla extract
– A pinch of salt
– A splash of lemon juice
Instructions
1. Preheat your oven to 350°F and generously butter a 9×13-inch baking dish.
2. Cook the egg noodles in boiling salted water for 6 minutes until al dente, then drain thoroughly—they’ll continue cooking in the oven.
3. Melt 2 tablespoons of butter in a large skillet over medium heat until foamy.
4. Add the apple slices and sprinkle with lemon juice to prevent browning, cooking for 8 minutes until slightly softened.
5. Sprinkle ¼ cup of granulated sugar over the apples and cook for 5 more minutes until caramelized and golden brown.
6. In a large bowl, whisk the eggs until pale and frothy, about 2 minutes of vigorous whisking.
7. Add the milk, sour cream, remaining ¼ cup granulated sugar, brown sugar, cinnamon, vanilla, and salt, whisking until completely smooth.
8. Fold the drained noodles into the egg mixture until every strand is coated.
9. Spread half the noodle mixture in the prepared baking dish.
10. Arrange all the caramelized apples evenly over the first noodle layer.
11. Top with the remaining noodle mixture, spreading gently to cover the apples completely.
12. Dot the surface with remaining 2 tablespoons of butter cut into small pieces.
13. Bake for 45 minutes until the top is golden brown and the center springs back when lightly pressed.
14. Let rest for 15 minutes before serving to allow the custard to set properly. The texture emerges as a beautiful contrast between the crisp, sugar-kissed top crust and the soft, custard-soaked noodles beneath. Warm cinnamon perfumes each forkful while the caramelized apples provide pockets of sweet-tart complexity that cut through the richness. Try serving squares slightly warm with a dollop of crème fraîche or cold for breakfast the next day—this kugel gracefully transitions from holiday centerpiece to coveted leftover.
Spiced Hanukkah Honey Cake
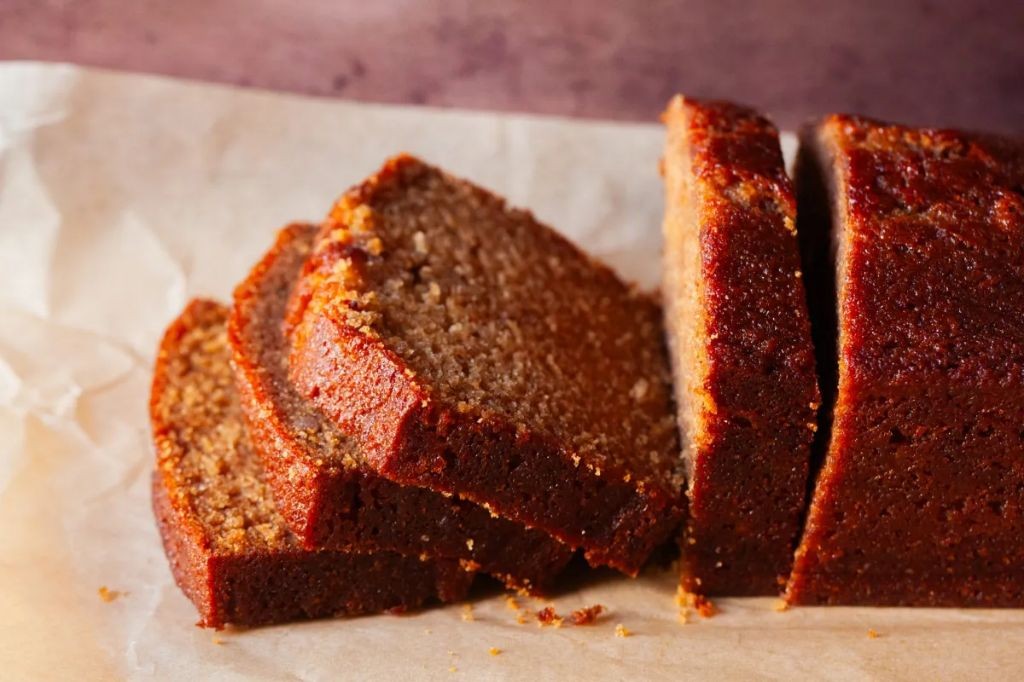
Zestful and aromatic, this Spiced Hanukkah Honey Cake captures the warmth of the season with its rich blend of spices and golden honey. Perfect for holiday gatherings, it fills the kitchen with an inviting fragrance that promises both tradition and comfort. Each slice offers a tender crumb and deep, spiced sweetness that feels both celebratory and cozy.
Ingredients
– 2 cups of all-purpose flour
– 1 cup of honey
– 3 large eggs
– 1/2 cup of vegetable oil
– 1/2 cup of strong brewed coffee, cooled
– 1 teaspoon of baking powder
– 1/2 teaspoon of baking soda
– A generous pinch of salt
– 2 teaspoons of ground cinnamon
– 1/2 teaspoon of ground ginger
– 1/4 teaspoon of ground cloves
– A splash of vanilla extract
Instructions
1. Preheat your oven to 350°F and generously grease a 9-inch loaf pan, then line it with parchment paper for easy removal.
2. In a large bowl, whisk together the flour, baking powder, baking soda, salt, cinnamon, ginger, and cloves until well combined.
3. In a separate bowl, beat the eggs with a hand mixer on medium speed for about 2 minutes until they are pale and frothy.
4. Gradually pour in the honey while continuing to mix, followed by the vegetable oil, cooled coffee, and vanilla extract, blending until the mixture is smooth.
5. Tip: Use room-temperature eggs to help the ingredients emulsify better, preventing a greasy texture.
6. Slowly add the dry ingredients to the wet mixture, folding gently with a spatula until just combined; avoid overmixing to keep the cake tender.
7. Pour the batter into the prepared pan and tap it lightly on the counter to release any air bubbles.
8. Bake in the preheated oven for 45–50 minutes, or until a toothpick inserted into the center comes out clean with no wet batter.
9. Tip: Rotate the pan halfway through baking for even browning, and check for doneness a few minutes early to prevent over-baking.
10. Remove the cake from the oven and let it cool in the pan on a wire rack for 15 minutes before transferring it out to cool completely.
11. Tip: For enhanced flavor, wrap the cooled cake in plastic wrap and let it rest overnight; the spices will meld beautifully.
This cake boasts a moist, dense crumb that melts in your mouth, with the honey lending a subtle floral note balanced by warm spices. Try serving it thinly sliced with a dollop of whipped cream or alongside a cup of spiced tea for a cozy treat.
Savory Cheese and Spinach Bourekas
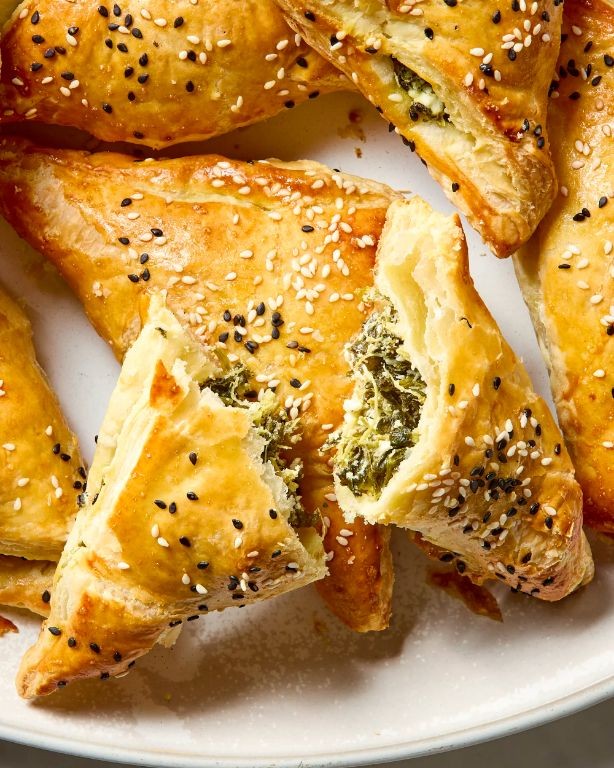
Nothing captures the essence of Mediterranean comfort quite like these golden, flaky parcels of delight. Nestled within crisp phyllo layers lies a vibrant filling of creamy cheeses and tender spinach, creating a perfect balance of textures and flavors that elevate any gathering from ordinary to extraordinary.
Ingredients
– A package of frozen phyllo dough, thawed
– A couple of cups of fresh spinach, roughly chopped
– A generous cup of feta cheese, crumbled
– A good half-cup of ricotta cheese
– One large egg, lightly beaten
– A splash of olive oil
– A pinch of freshly grated nutmeg
– A tablespoon of melted butter for brushing
Instructions
1. Preheat your oven to 375°F and line a baking sheet with parchment paper.
2. Heat a splash of olive oil in a skillet over medium heat until shimmering.
3. Add the chopped spinach and cook for exactly 3 minutes, until wilted and bright green.
4. Transfer the spinach to a colander and press out all excess liquid using the back of a spoon.
5. In a medium bowl, combine the drained spinach, crumbled feta, ricotta, beaten egg, and nutmeg until fully incorporated.
6. Unroll the phyllo dough and cover it with a damp kitchen towel to prevent drying.
7. Place one phyllo sheet on your work surface and brush it lightly with melted butter.
8. Layer another phyllo sheet on top and brush again with butter.
9. Cut the layered phyllo lengthwise into 4 equal strips using a sharp knife.
10. Place one tablespoon of the spinach-cheese mixture at the bottom end of each strip.
11. Fold the bottom corner over the filling to form a triangle, then continue folding in a triangular pattern until the entire strip is used.
12. Repeat steps 7-11 with the remaining phyllo and filling.
13. Arrange the bourekas on the prepared baking sheet and brush the tops with remaining melted butter.
14. Bake for 20-25 minutes until golden brown and crisp.
15. Remove from oven and let cool on the baking sheet for 5 minutes before serving.
Accompanied by a simple yogurt dip or fresh tomato salad, these bourekas reveal a satisfying contrast between the shatteringly crisp exterior and the creamy, savory interior. The subtle tang of feta perfectly complements the earthy spinach, while the delicate phyllo layers provide an elegant vehicle for this Mediterranean-inspired filling that’s equally impressive at brunch or as an appetizer.
Fried Artichoke Hearts with Lemon Aioli
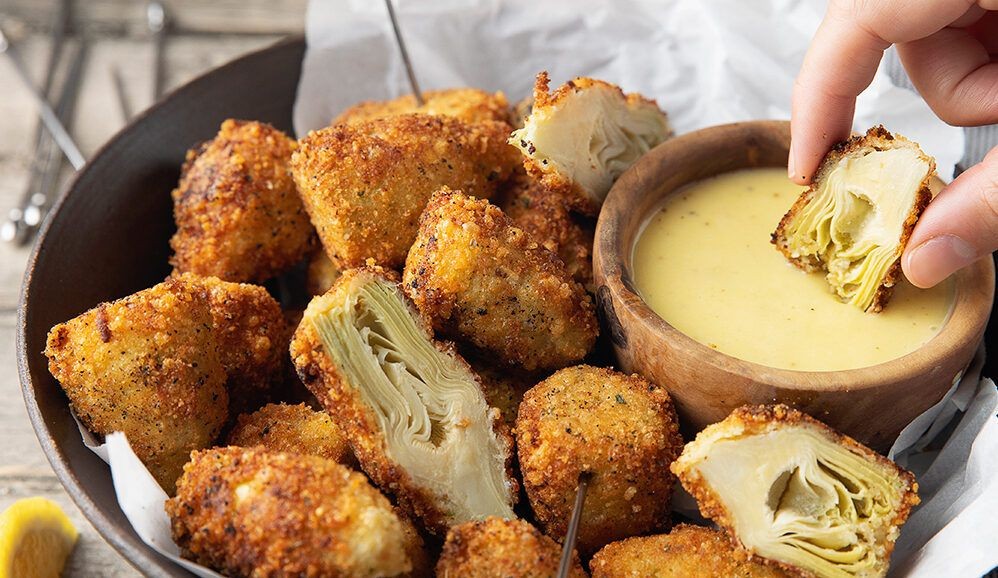
Vibrant and sophisticated, these golden-fried artichoke hearts offer a delightful contrast of crispy exteriors and tender, savory centers. Paired with a bright lemon aioli, they transform simple ingredients into an elegant appetizer perfect for entertaining or elevating weeknight dinners. The combination of textures and zesty flavors makes this dish both approachable and impressively refined.
Ingredients
– A 14-ounce can of artichoke hearts, drained and patted dry
– About 1 cup of all-purpose flour
– A couple of large eggs, lightly beaten
– Roughly 1 cup of panko breadcrumbs
– A generous pinch of salt and black pepper
– Enough vegetable oil to fill your skillet about 1/2 inch deep
– 1/2 cup of mayonnaise
– 1 clove of garlic, minced
– The zest and juice from half a lemon
– A splash of olive oil
Instructions
1. Preheat your oven to 200°F and place a wire rack over a baking sheet to keep the fried artichokes warm and crispy.
2. Set up three shallow bowls: fill the first with flour, the second with beaten eggs, and the third with panko breadcrumbs mixed with salt and pepper.
3. Dredge each artichoke heart in the flour, shaking off any excess to ensure a thin, even coating.
4. Dip the floured artichoke into the beaten eggs, allowing any excess to drip off for a cleaner breading process.
5. Press the artichoke firmly into the panko mixture, coating it thoroughly on all sides for maximum crunch.
6. Heat vegetable oil in a large skillet over medium-high heat until it reaches 350°F, using a thermometer for accuracy.
7. Carefully place breaded artichokes in the hot oil in a single layer, frying in batches to avoid overcrowding.
8. Fry for 2–3 minutes per side until golden brown and crispy, flipping once with tongs for even cooking.
9. Transfer the fried artichokes to the prepared wire rack and keep them warm in the oven while you finish frying the remaining batches.
10. In a small bowl, whisk together mayonnaise, minced garlic, lemon zest, lemon juice, and a splash of olive oil until smooth and well combined.
11. Serve the hot fried artichoke hearts immediately with the lemon aioli for dipping.
Melt-in-your-mouth tender beneath their shatteringly crisp coating, these artichoke hearts offer a satisfying contrast that’s perfectly balanced by the aioli’s creamy, citrusy sharpness. For a stunning presentation, arrange them on a platter with lemon wedges and fresh parsley, or tuck them into lettuce cups for a playful, handheld bite that’s as visually appealing as it is delicious.
Sweet Potato and Carrot Tzimmes
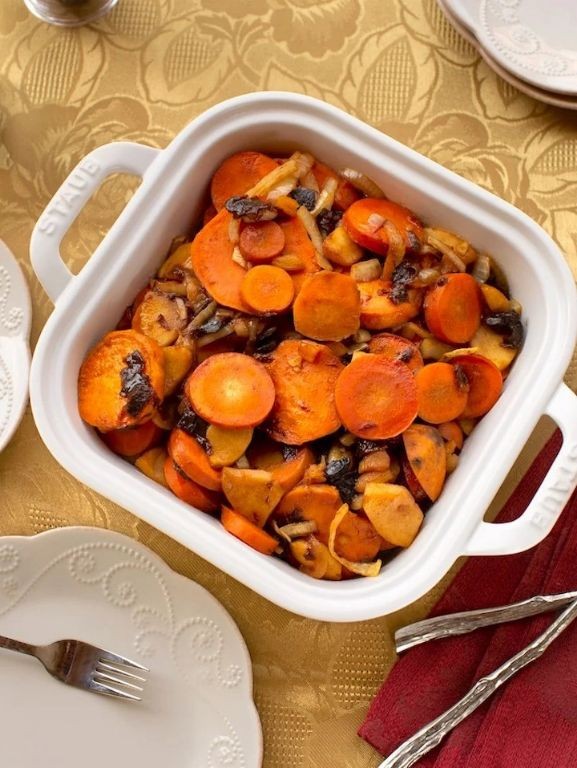
Yielding to autumn’s golden embrace, this sweet potato and carrot tzimmes transforms humble root vegetables into a glazed, jewel-toned centerpiece. The slow-roasted medley develops caramelized edges while maintaining a tender interior, with honey and orange juice creating a glossy, aromatic syrup that perfumes the entire kitchen. This traditional Jewish dish offers both comfort and elegance in every forkful.
Ingredients
– 2 large sweet potatoes, peeled and chopped into 1-inch cubes
– 4 medium carrots, sliced into 1/2-inch coins
– 1/3 cup honey
– 1/4 cup fresh orange juice
– A couple of tablespoons of olive oil
– A generous pinch of cinnamon
– A small handful of pitted prunes
– A splash of water
Instructions
1. Preheat your oven to 375°F and lightly grease a 9×13-inch baking dish with olive oil.
2. Combine the sweet potato cubes and carrot coins in the prepared baking dish, arranging them in a single layer.
3. Drizzle the honey and orange juice evenly over the vegetables, then toss gently to coat everything thoroughly.
4. Sprinkle the cinnamon over the mixture and scatter the pitted prunes throughout the dish.
5. Add a splash of water to the bottom of the dish to prevent sticking and create steam.
6. Cover the baking dish tightly with aluminum foil and place it in the preheated oven.
7. Roast for 45 minutes until the vegetables are fork-tender when pierced with a sharp knife.
8. Remove the foil carefully to avoid steam burns and return the dish to the oven uncovered.
9. Continue roasting for another 20-25 minutes until the edges of the vegetables develop deep caramelization and the liquid reduces to a thick syrup.
10. Let the tzimmes rest for 10 minutes before serving to allow the flavors to meld and the syrup to thicken further.
Delightfully balanced between earthy sweetness and bright citrus notes, this tzimmes achieves a perfect textural contrast with silky soft interiors and sticky caramelized exteriors. The prunes plump into juicy gems that burst with concentrated flavor, while the cinnamon provides just enough warmth to complement without overwhelming. Serve it alongside roasted chicken for a traditional pairing or spoon it over creamy polenta for an unexpected vegetarian main course that celebrates autumn’s bounty.
Homemade Hanukkah Gelt Chocolate Coins
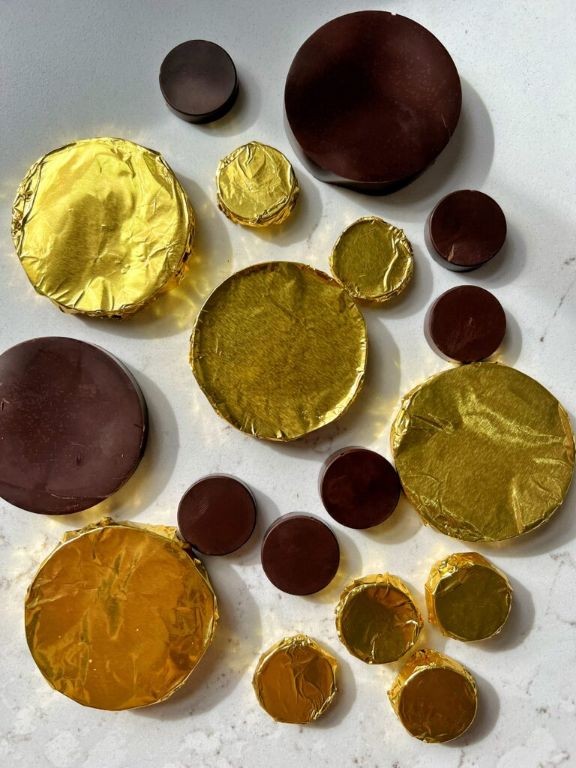
Meticulously crafted chocolate coins bring a touch of golden elegance to Hanukkah celebrations, transforming simple ingredients into edible treasures that shimmer with festive spirit. These homemade gelt pieces offer superior flavor and texture compared to their store-bought counterparts, with a velvety smoothness that melts luxuriously on the tongue. Each coin carries the warmth of tradition and the joy of handmade craftsmanship, making them perfect for both gifting and holiday tables.
Ingredients
– About 8 ounces of high-quality dark chocolate chips
– A tablespoon of refined coconut oil
– A generous pinch of flaky sea salt
– A couple of gold foil wrappers for that authentic gelt look
Instructions
1. Line a baking sheet with parchment paper and set it aside.
2. Combine the dark chocolate chips and refined coconut oil in a microwave-safe bowl.
3. Microwave the chocolate mixture on high power for 30 seconds, then stir thoroughly with a spatula.
4. Continue microwaving in 15-second intervals, stirring after each interval, until the chocolate is completely melted and smooth—this gradual approach prevents scorching.
5. Let the melted chocolate sit for 2 minutes to cool slightly, which helps create thicker coins that hold their shape better.
6. Drop tablespoon-sized portions of the chocolate mixture onto the prepared baking sheet, spacing them about 1 inch apart.
7. Gently tap the baking sheet on the counter 3-4 times to help the chocolate spread into even circles and release any air bubbles.
8. Sprinkle a tiny pinch of flaky sea salt over each chocolate circle before they set.
9. Transfer the baking sheet to the refrigerator and chill for exactly 45 minutes, or until the coins are firm to the touch.
10. Carefully peel the chilled chocolate coins from the parchment paper.
11. Wrap each coin individually in gold foil, twisting the ends to secure—this not only preserves freshness but enhances the traditional presentation.
Unwrapping these homemade gelt coins reveals a satisfying snap and glossy surface that gives way to rich, complex chocolate notes balanced by subtle saltiness. The coconut oil creates an exceptionally smooth mouthfeel that lingers pleasantly, while the gold foil adds ceremonial elegance to your Hanukkah display. Consider arranging them in a decorative bowl as a centerpiece or tucking them into dreidel game prizes for an extra special celebration touch.
Garlicky Roasted Brussels Sprouts with Pomegranate
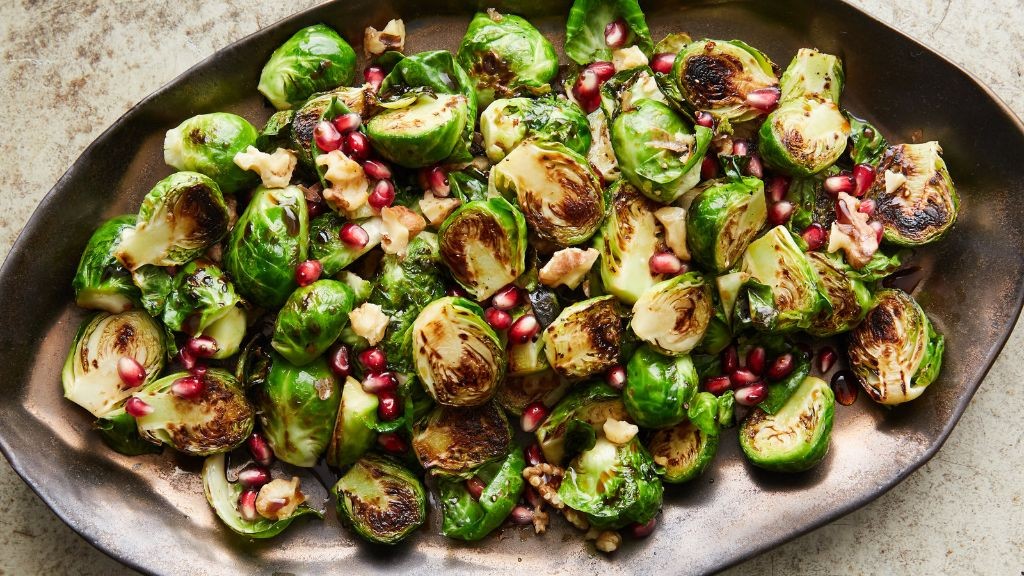
These glistening sprouts transform humble brassicas into a festive masterpiece, their caramelized edges and jewel-like pomegranate arils creating a dish that’s as visually stunning as it is delicious. The combination of roasted garlic’s mellow sweetness and pomegranate’s bright acidity elevates this seasonal favorite to centerpiece status.
Ingredients
– About 1½ pounds of fresh Brussels sprouts, trimmed and halved
– A good glug of olive oil (around 3 tablespoons)
– 4-5 fat garlic cloves, thinly sliced
– A generous pinch of kosher salt
– A couple cracks of fresh black pepper
– The seeds from one pomegranate (about ¾ cup)
– A squeeze of fresh lemon juice (about 1 tablespoon)
Instructions
1. Preheat your oven to 400°F and line a large baking sheet with parchment paper.
2. Toss the halved Brussels sprouts with olive oil, garlic slices, salt, and pepper in a large bowl until evenly coated.
3. Spread the sprouts in a single layer on the prepared baking sheet, cut-side down for maximum caramelization.
4. Roast for 20-25 minutes until the edges are deeply browned and crispy, and the centers are tender when pierced with a fork.
5. Transfer the roasted sprouts to a serving bowl and immediately toss with pomegranate seeds and fresh lemon juice.
6. Let the dish rest for 2-3 minutes to allow the pomegranate juices to slightly warm and meld with the other flavors.
When served warm, the contrast between the crispy, caramelized sprouts and the juicy burst of pomegranate creates an unforgettable texture experience. The garlic becomes nutty and sweet during roasting, providing a perfect foundation for the tart-sweet pomegranate and bright lemon finish. Consider serving this alongside roasted meats or as part of a holiday spread where its vibrant colors and sophisticated flavors truly shine.
Warm Hanukkah Spiced Wine
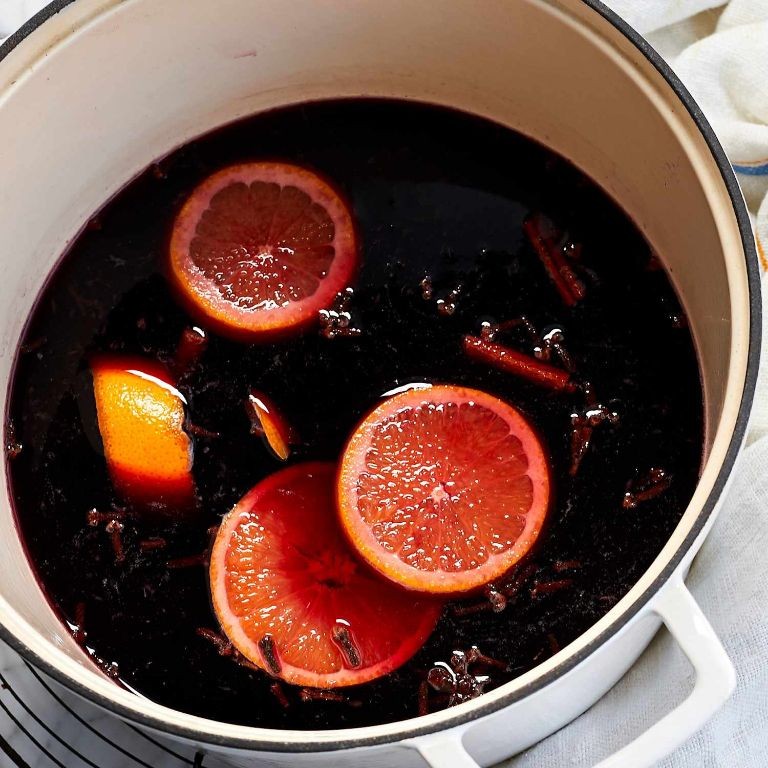
On crisp winter evenings, nothing comforts the soul quite like a steaming mug of Warm Hanukkah Spiced Wine. Offering a fragrant blend of citrus and warm spices, this traditional beverage transforms your kitchen into a haven of holiday cheer. Its deep ruby hue and aromatic steam promise both warmth and celebration in every sip.
Ingredients
– A bottle of dry red wine
– A couple of cinnamon sticks
– A few whole cloves
– A splash of brandy
– Half a cup of honey
– One orange, sliced into rounds
– A pinch of freshly grated nutmeg
Instructions
1. Pour the entire bottle of dry red wine into a medium saucepan.
2. Add the cinnamon sticks, whole cloves, and orange slices to the wine.
3. Stir in the half cup of honey until it completely dissolves into the mixture.
4. Heat the saucepan over medium-low heat until the wine reaches 160°F, which should take about 8-10 minutes—never let it boil to preserve the alcohol and flavors.
5. Reduce the heat to low and let the wine simmer gently for 15 minutes to allow the spices to infuse fully.
6. Stir in the splash of brandy and the pinch of freshly grated nutmeg, then simmer for another 2 minutes.
7. Remove the saucepan from the heat and strain the wine through a fine-mesh sieve into a heatproof pitcher to remove the solids.
8. Ladle the spiced wine into mugs immediately for serving. Keep leftover wine covered in the refrigerator for up to 3 days, and gently reheat it on the stove when ready to enjoy again.
Kindly aromatic and velvety on the palate, this wine boasts a harmonious balance of sweet honey and zesty citrus, with the cloves and cinnamon lending a subtle warmth. For a festive twist, garnish each mug with a fresh orange slice or a cinnamon stick stirrer, making it as visually appealing as it is delicious.
Creamy Dairy-Free Sufganiyot

Elegant yet approachable, these dairy-free sufganiyot offer a sophisticated twist on the traditional Hanukkah treat, featuring a cloud-like texture and rich flavor profile that will delight both vegan and traditional dessert lovers alike. Their golden exterior gives way to a surprisingly creamy filling that proves plant-based alternatives can rival their dairy counterparts in both taste and texture. Perfect for holiday gatherings or elegant dessert presentations, these pillowy doughnuts elevate the classic sufganiyah to new culinary heights.
Ingredients
– 2 cups of all-purpose flour
– 1/4 cup of granulated sugar
– 1 packet (about 2 1/4 teaspoons) of active dry yeast
– 3/4 cup of warm almond milk (around 110°F)
– 1/4 cup of coconut oil, melted
– A good pinch of salt
– 1 large egg replacement (like a flax egg)
– A splash of vanilla extract
– About 4 cups of vegetable oil for frying
– 1/2 cup of dairy-free pastry cream for filling
– A light dusting of powdered sugar for finishing
Instructions
1. Combine the warm almond milk, sugar, and yeast in a large bowl and let it sit for 5 minutes until foamy.
2. Whisk in the melted coconut oil, vanilla extract, and egg replacement until fully incorporated.
3. Gradually mix in the flour and salt until a soft dough forms. Tip: The dough should be slightly sticky but manageable—if it’s too wet, add another tablespoon of flour.
4. Knead the dough on a floured surface for 5-7 minutes until smooth and elastic.
5. Place the dough in a greased bowl, cover with a damp cloth, and let rise in a warm place for 1 hour until doubled in size.
6. Punch down the dough and roll it out to 1/2-inch thickness on a floured surface.
7. Use a 2 1/2-inch round cutter to cut out dough circles, re-rolling scraps as needed.
8. Place the circles on a parchment-lined baking sheet, cover, and let rise for 30 minutes until puffy.
9. Heat vegetable oil in a deep pot to 350°F, using a thermometer to maintain consistent temperature. Tip: Test with a small piece of dough—it should sizzle and rise immediately when the oil is ready.
10. Carefully fry 3-4 doughnuts at a time for 1 1/2 to 2 minutes per side until golden brown.
11. Remove with a slotted spoon and drain on a wire rack set over paper towels. Tip: Let them cool completely before filling to prevent the cream from melting.
12. Use a piping bag with a small tip to fill each sufganiyah with dairy-free pastry cream through a small slit in the side.
13. Dust generously with powdered sugar just before serving.
Creating the perfect texture requires patience—these sufganiyot should be light and airy with a delicate crunch giving way to the luxurious cream filling. Consider serving them alongside spiced hot chocolate or as part of a dessert platter with fresh berries for contrasting flavors and colors that highlight their elegant simplicity.
Golden Fried Cheese Curds with Marinara
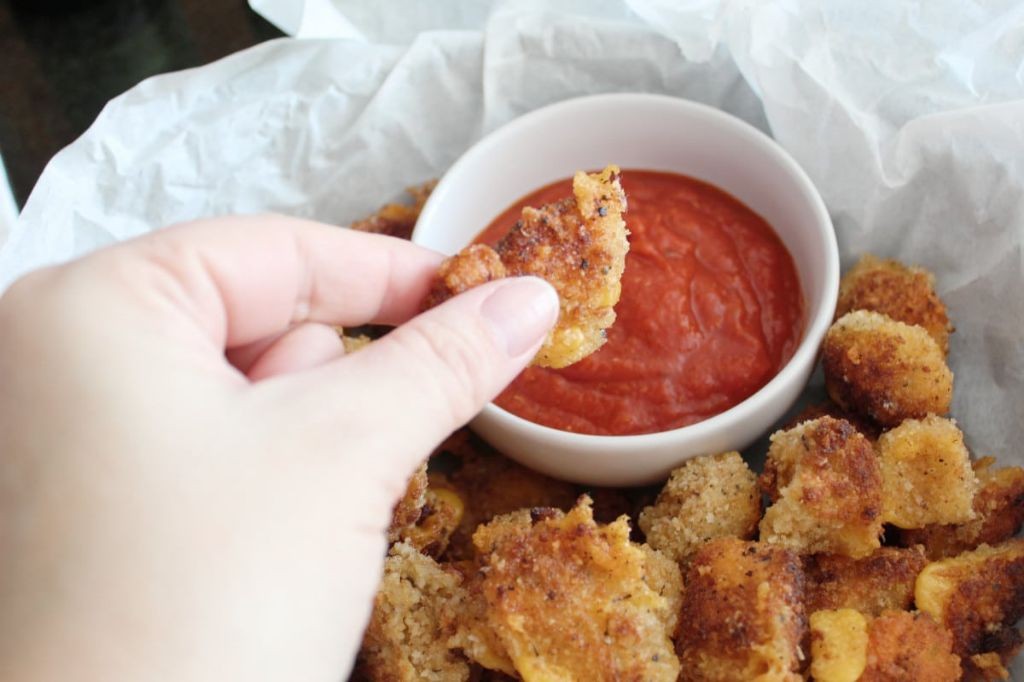
A quintessential comfort food elevated to gourmet status, these golden fried cheese curds offer a satisfying crunch that gives way to molten, stretchy perfection. An irresistible appetizer that transforms simple ingredients into something truly spectacular, they pair beautifully with the bright acidity of homemade marinara for a harmonious balance of flavors.
Ingredients
– A couple of cups of fresh cheese curds
– About a cup of all-purpose flour
– A couple of eggs, beaten
– A generous cup of panko breadcrumbs
– A good pinch of salt and black pepper
– A splash of buttermilk
– A can of crushed tomatoes (28 ounces)
– A couple of cloves of garlic, minced
– A tablespoon of olive oil
– A teaspoon of dried oregano
– A pinch of sugar
– Enough vegetable oil for deep frying (about 4 cups)
Instructions
1. Heat vegetable oil in a heavy-bottomed pot to 375°F, using a deep-fry thermometer to ensure accuracy.
2. While oil heats, prepare the marinara sauce by heating olive oil in a saucepan over medium heat.
3. Add minced garlic and cook for exactly 1 minute until fragrant but not browned.
4. Pour in the crushed tomatoes, then stir in dried oregano, salt, pepper, and a pinch of sugar.
5. Simmer the sauce uncovered for 15 minutes, stirring occasionally, until slightly thickened.
6. Set up your breading station with three shallow bowls: flour in the first, beaten eggs mixed with buttermilk in the second, and panko breadcrumbs seasoned with salt and pepper in the third.
7. Working in small batches, coat cheese curds first in flour, shaking off excess.
8. Dip floured curds into the egg mixture, allowing excess to drip off.
9. Roll the curds in panko breadcrumbs, pressing gently to ensure even coating.
10. Carefully lower breaded curds into the hot oil using a slotted spoon, frying in batches to avoid overcrowding.
11. Fry for 2-3 minutes until golden brown, turning once halfway through for even coloring.
12. Remove fried curds with a slotted spoon and drain on a wire rack set over a baking sheet.
13. Serve immediately with the warm marinara sauce for dipping.
Crispy perfection awaits with each bite revealing the delightful contrast between the shatteringly crisp exterior and the wonderfully stretchy, melted interior. The warm marinara sauce provides a bright, herbaceous counterpoint that cuts through the richness, making these golden morsels ideal for sharing at gatherings or enjoying as an indulgent treat.
Summary
Savor these 20 delicious Hanukkah recipes that bring warmth and tradition to your festive table. From crispy latkes to sweet sufganiyot, there’s something for everyone to enjoy. We hope you try these dishes and share your family favorites in the comments below! Don’t forget to pin this article on Pinterest to save these recipes for future celebrations. Happy Hanukkah!