Welcome to the most delicious part of holiday prep! If you’re dreaming of creating a stunning Christmas charcuterie board that wows your guests, you’ve come to the right place. We’ve gathered 20 festive recipes that blend seasonal flavors with creative presentation—perfect for making your holiday gatherings truly special. Get ready to be inspired and find your new favorite show-stopping appetizer!
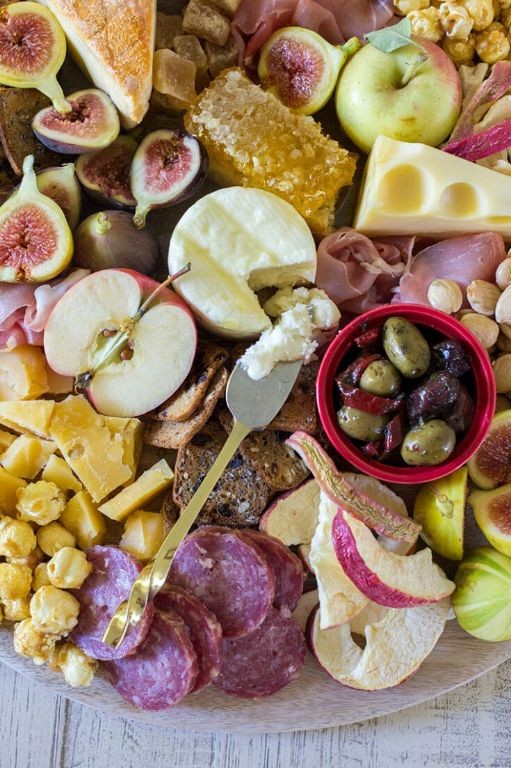
Classic Christmas Charcuterie Board with Cranberry Mustard
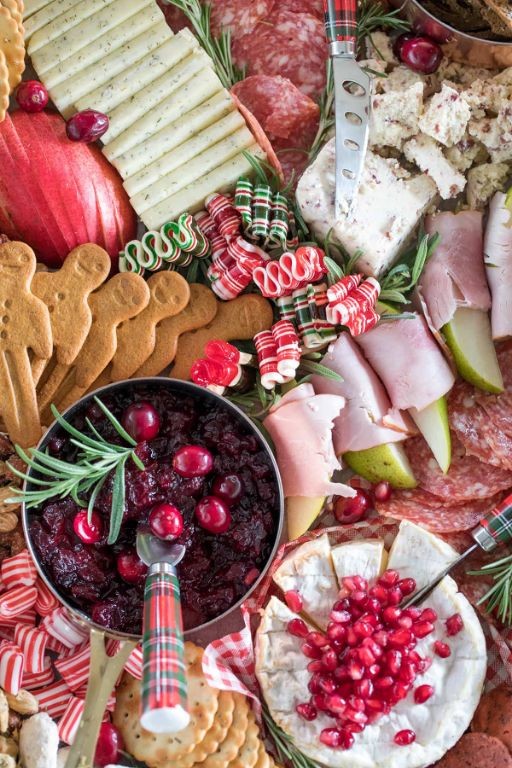
Now, as the first snowflakes begin to dust the windowpane, I find myself drawn to the kitchen, to the quiet ritual of preparing this board—a mosaic of flavors that feels like coming home, like wrapping warmth around those we cherish most during the holidays.
Ingredients
– 1 cup whole cranberries, fresh or frozen (thaw if frozen)
– 1/2 cup Dijon mustard (or stone-ground for more texture)
– 1/4 cup honey (adjust for sweetness preference)
– 1 tbsp apple cider vinegar (brightens the flavor)
– 8 oz assorted cured meats like salami and prosciutto (slice thinly for easy serving)
– 6 oz sharp cheddar cheese, cubed (or Gruyère for a nuttier note)
– 4 oz creamy Brie cheese, room temperature (spreads easily when soft)
– 1/2 cup toasted walnuts (toast for deeper aroma)
– 1 baguette, sliced 1/4-inch thick (stale bread works for crisping)
– 2 tbsp olive oil (for brushing bread)
Instructions
1. Preheat your oven to 375°F to prepare for toasting the baguette slices.
2. Combine 1 cup cranberries, 1/2 cup Dijon mustard, 1/4 cup honey, and 1 tbsp apple cider vinegar in a small saucepan over medium heat.
3. Stir the mixture constantly with a wooden spoon for 8–10 minutes, until the cranberries burst and the sauce thickens slightly.
4. Remove the cranberry mustard from heat and let it cool completely to room temperature, which allows the flavors to meld.
5. Brush the baguette slices lightly with 2 tbsp olive oil on both sides using a pastry brush.
6. Arrange the bread slices in a single layer on a baking sheet and bake at 375°F for 6–8 minutes, until golden and crisp at the edges.
7. Toast 1/2 cup walnuts in a dry skillet over medium heat for 3–4 minutes, shaking the pan often, until fragrant and lightly browned.
8. Slice 8 oz assorted cured meats thinly if not pre-sliced, and cube 6 oz sharp cheddar cheese into bite-sized pieces.
9. Arrange the cured meats, cubed cheddar, 4 oz Brie cheese, toasted walnuts, and toasted baguette slices artfully on a large wooden board or platter.
10. Spoon the cooled cranberry mustard into a small bowl and place it centrally on the board for dipping.
Let the board rest for a few minutes before serving, allowing the Brie to soften further and the cranberry mustard’s tangy-sweet notes to mingle with the salty meats and creamy cheeses. For a festive touch, scatter fresh rosemary sprigs among the components, inviting guests to tear off a piece of bread, layer it with prosciutto and a dollop of that vibrant mustard, and savor the crunch of walnuts against the smooth, rich Brie.
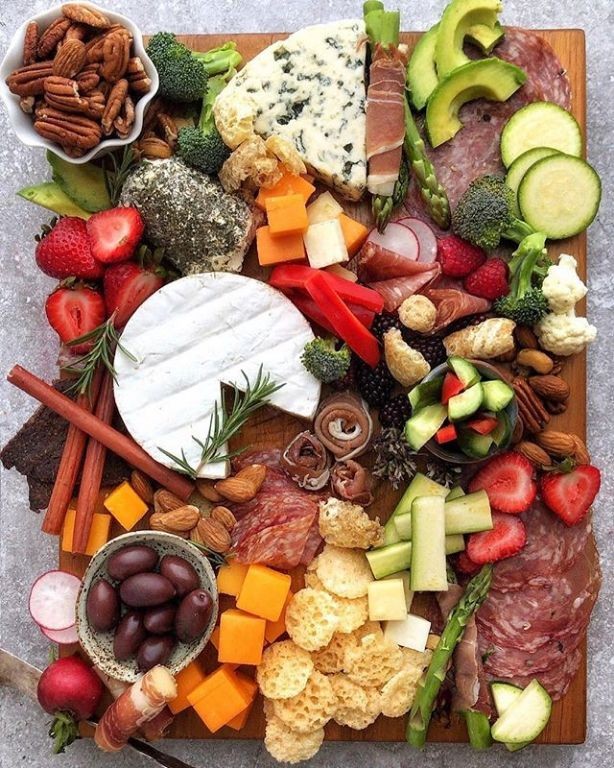
Winter Wonderland Cheese and Meat Platter

Perhaps there’s something quietly magical about gathering simple ingredients during these short, cold days, arranging them not with perfection in mind, but with the gentle intention of creating a centerpiece for slow, shared moments.
Ingredients
- 1 (8 oz) wheel of brie cheese, at room temperature (for easier spreading)
- 4 oz thinly sliced prosciutto
- 1/2 cup whole pecans
- 2 tbsp honey
- 1 baguette, sliced into 1/2-inch thick pieces
- 1/4 cup fig jam (or any fruit preserve you prefer)
- 1 bunch fresh rosemary
- 1/2 tsp flaky sea salt
Instructions
- Preheat your oven to 350°F (175°C).
- Arrange the baguette slices in a single layer on a large baking sheet.
- Toast the baguette slices in the preheated oven for 8-10 minutes, until the edges turn light golden brown and the surfaces feel crisp to the touch.
- Remove the baking sheet from the oven and let the toasts cool completely on the sheet, which helps them stay crisp. (Tip: Letting toasts cool on the baking sheet prevents steam from making them soggy.)
- Place the whole pecans on a separate small baking sheet.
- Toast the pecans in the 350°F (175°C) oven for 5-7 minutes, until they become fragrant and slightly darkened.
- Remove the pecans from the oven and immediately drizzle them with the 2 tablespoons of honey, tossing gently to coat.
- Sprinkle the honey-coated pecans with the 1/2 teaspoon of flaky sea salt and set them aside to cool and harden.
- Arrange the room-temperature brie wheel on a large wooden board or platter.
- Drape the 4 ounces of thinly sliced prosciutto in loose folds around the brie.
- Scatter the cooled honey-glazed pecans around the board, filling empty spaces.
- Place small bowls of the 1/4 cup fig jam among the cheese and meats.
- Tuck several sprigs of fresh rosemary around the arrangement for fragrance and visual warmth. (Tip: Gently rubbing the rosemary sprigs between your hands before placing them releases more aroma.)
- Arrange the cooled baguette toasts in stacks or scattered around the board for serving. (Tip: Grouping items in odd numbers—like threes or fives—creates a more natural, appealing arrangement.)
Each component finds its purpose here—the creamy brie melts smoothly against crisp toast, the salty prosciutto contrasts with sweet, sticky pecans, and the rosemary lends its pine-like fragrance to every bite. Enjoy this platter fireside with sparkling cider, letting the flavors unfold slowly as conversation does.
Peppermint Chocolate Dessert Charcuterie Board
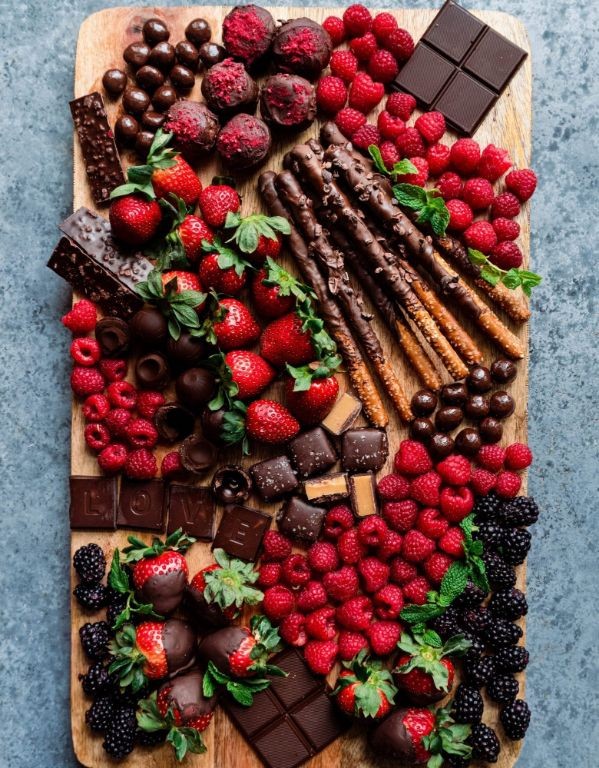
Before the holiday rush begins, I find myself drawn to quiet moments in the kitchen, creating something that feels both festive and deeply personal. This peppermint chocolate dessert board is my way of slowing down, of arranging sweetness with intention rather than haste. It’s a gentle invitation to savor the season, one delicate bite at a time.
Ingredients
– 8 ounces semi-sweet chocolate chips (or chopped baking chocolate)
– 1/2 cup heavy cream, warmed slightly
– 1/4 teaspoon peppermint extract (adjust to preference)
– 1/4 cup crushed candy canes, divided
– 1 cup fresh raspberries
– 4 ounces soft cream cheese, at room temperature
– 1/4 cup powdered sugar, sifted
– 1 prepared chocolate brownie, cut into 1-inch squares
– 6 large marshmallows
– Assorted cookies (like shortbread or biscotti)
Instructions
1. Place semi-sweet chocolate chips in a heatproof bowl.
2. Warm heavy cream in a small saucepan over medium heat until it begins to steam lightly, about 2–3 minutes; do not boil.
3. Pour warm cream over chocolate chips and let sit undisturbed for 1 minute to melt.
4. Stir chocolate and cream mixture gently with a spatula until completely smooth and glossy.
5. Mix in peppermint extract and half of the crushed candy canes until evenly distributed.
6. Allow chocolate ganache to cool at room temperature for 15 minutes, stirring occasionally to prevent a skin from forming.
7. In a separate bowl, beat room-temperature cream cheese with powdered sugar using a hand mixer on low speed until just combined.
8. Spread cream cheese mixture onto chocolate brownie squares in a thin, even layer.
9. Arrange brownie squares, fresh raspberries, marshmallows, and assorted cookies on a large wooden board or platter.
10. Drizzle cooled peppermint chocolate ganache over the arranged components in a zigzag pattern.
11. Sprinkle remaining crushed candy canes over the ganache-drizzled items for a festive crunch.
12. Toast marshmallows lightly with a kitchen torch until golden brown, about 10–15 seconds each, rotating constantly for even coloring.
Looking at the finished board, I love how the cool peppermint contrasts with the rich, velvety chocolate, while the toasted marshmallows add a whisper of warmth. The crushed candy canes provide little bursts of crunch that make each bite uniquely satisfying. For a cozy gathering, place it near a fireplace where guests can dip cookies straight into the ganache, letting the flavors melt together slowly.
Rustic Holiday Charcuterie with Spiced Nuts
Evenings like these, when the chill settles deep and the world grows quiet, my hands naturally reach for the simple, grounding work of preparing food meant for sharing. This board, with its warm spices and rustic charm, feels like gathering autumn’s last whispers before the true winter silence descends, a quiet celebration of texture and flavor.
Ingredients
- 1 cup raw mixed nuts (almonds, pecans, walnuts)
- 1 tbsp pure maple syrup
- 1 tsp olive oil (or any neutral oil)
- 1/2 tsp ground cinnamon
- 1/4 tsp ground nutmeg
- 1/4 tsp sea salt, plus more for finishing
- 1/8 tsp cayenne pepper (optional, for a subtle heat)
- 4 oz sharp cheddar cheese, cut into 1/2-inch cubes
- 2 oz dried apricots
- 3 oz thinly sliced prosciutto
- 1 small baguette, sliced into 1/2-inch thick rounds
Instructions
- Preheat your oven to 325°F and line a small baking sheet with parchment paper.
- Combine the raw mixed nuts, maple syrup, olive oil, cinnamon, nutmeg, 1/4 tsp sea salt, and cayenne pepper (if using) in a medium bowl.
- Toss the nut mixture until every piece is evenly coated with the spiced syrup. Tip: A silicone spatula works best to scrape every bit of syrup from the bowl.
- Spread the coated nuts in a single layer on the prepared baking sheet.
- Roast the nuts in the preheated oven for 12-15 minutes, stirring halfway through, until they are fragrant and the syrup has caramelized. Tip: Watch closely in the final minutes, as the high sugar content can cause them to burn quickly.
- Remove the baking sheet from the oven and immediately transfer the hot spiced nuts to a cool plate to stop the cooking process.
- Let the nuts cool completely for about 20 minutes; they will become crisp as they cool.
- Arrange the sliced baguette rounds on a large wooden board or platter.
- Scatter the cubed sharp cheddar cheese and dried apricots among the bread slices.
- Artfully drape the thinly sliced prosciutto in loose folds around the board.
- Finally, pile the completely cooled spiced nuts in an empty space on the board. Tip: For visual appeal, leave a small bowl of extra nuts nearby for guests to add as they like.
- Finish the entire board with a light sprinkle of flaky sea salt over the cheese and bread.
You’ll find the nuts provide a satisfying crunch against the creamy cheese and chewy apricots, their warmth a lovely contrast to the salty, delicate prosciutto. Yearning for a cozier presentation, I sometimes tuck a few sprigs of fresh rosemary between the elements, its scent mingling with the cinnamon as friends gather close.
Cranberry Brie Christmas Charcuterie Wreath
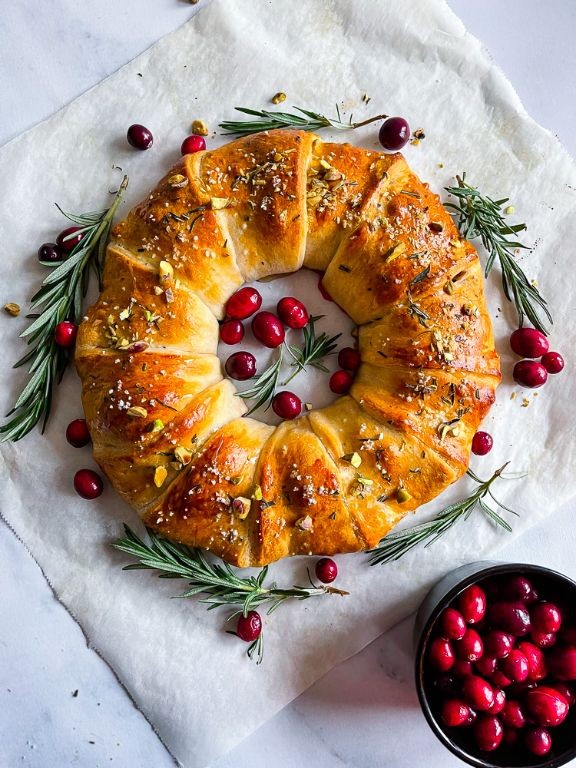
Evenings like this, with the chill settling in and twinkle lights beginning to glow in neighborhood windows, call for something that feels both festive and deeply comforting. This wreath, with its vibrant reds and creamy whites, is more than just a centerpiece—it’s an invitation to gather, to linger, to savor the quiet magic of the season. It comes together with a gentle, almost meditative rhythm, each step a small ritual in itself.
Ingredients
– 1 sheet frozen puff pastry, thawed (keep cold until ready to use for best results)
– 1/2 cup whole-berry cranberry sauce (homemade or high-quality canned)
– 1 (8 oz) wheel of Brie cheese, rind left on (the rind softens beautifully when baked)
– 1 large egg, lightly beaten (for a golden, glossy finish)
– 2 tbsp coarse sugar, for sprinkling (like turbinado, for subtle crunch)
– Fresh rosemary sprigs, for garnish (optional, but adds fragrance)
Instructions
1. Preheat your oven to 400°F and line a baking sheet with parchment paper.
2. Unfold the thawed puff pastry sheet onto the prepared baking sheet, smoothing any creases gently with your fingertips.
3. Spoon the cranberry sauce evenly over the center of the pastry, leaving a 2-inch border clear around all edges.
4. Place the whole Brie wheel directly on top of the cranberry sauce.
5. Fold the pastry edges up and over the Brie, pleating and pressing gently to encase it fully, leaving the top center exposed.
6. Brush the pastry thoroughly with the beaten egg, ensuring even coverage for a uniform golden brown color.
7. Sprinkle the coarse sugar generously over the egg-washed pastry.
8. Tuck small rosemary sprigs between pastry folds for aroma and visual appeal, if using.
9. Bake for 20–25 minutes, or until the pastry is puffed and deep golden brown, and the Brie is soft to the touch.
10. Remove from the oven and let rest for 5–10 minutes before slicing to allow the cheese to set slightly.
Decadently gooey and richly aromatic, this wreath offers a beautiful contrast of flaky, buttery pastry against the tangy-sweet burst of cranberry and molten Brie. Serve it warm with crisp apple slices or toasted baguette rounds for dipping, and watch as it becomes the heart of your holiday table—a edible centerpiece that invites everyone to tear off a piece and share in the warmth.
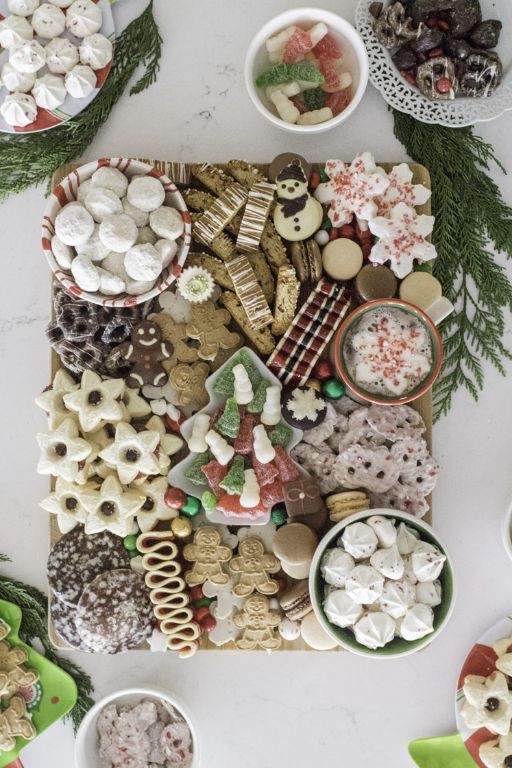
Gingerbread Cookie and Candy Charcuterie Spread

Often, the most comforting holiday traditions are the ones we create ourselves, like this gingerbread cookie and candy charcuterie spread that transforms simple baking into a shared experience. On quiet afternoons when the light slants golden through the kitchen window, I find myself drawn to this ritual of shaping, baking, and arranging. There’s something deeply soothing about filling the house with the warm scent of molasses and spice, then watching friends gather around this edible centerpiece.
Ingredients
– 2 cups all-purpose flour (spooned and leveled for accuracy)
– 1 teaspoon baking soda
– 1 ½ teaspoons ground ginger
– 1 teaspoon ground cinnamon
– ½ teaspoon ground cloves
– ¼ teaspoon salt
– ¾ cup unsalted butter, softened (at room temperature for 60 minutes)
– ¾ cup packed dark brown sugar
– ½ cup molasses
– 1 large egg
– 1 teaspoon pure vanilla extract
– 8 ounces white candy melts
– ½ cup crushed peppermint candies
– ¼ cup holiday sprinkles
Instructions
1. Preheat your oven to 350°F and line two baking sheets with parchment paper.
2. Whisk together flour, baking soda, ginger, cinnamon, cloves, and salt in a medium bowl until fully combined.
3. Beat softened butter and brown sugar in a separate bowl with an electric mixer on medium speed for 2 minutes until light and fluffy.
4. Add molasses to the butter mixture and beat for 30 seconds until incorporated.
5. Crack the egg into the mixture and beat for another 30 seconds.
6. Mix in vanilla extract until just combined.
7. Gradually add the flour mixture to the wet ingredients, mixing on low speed until a soft dough forms.
8. Divide the dough in half, wrap each portion in plastic wrap, and refrigerate for 1 hour until firm.
9. Roll out one portion of chilled dough on a floured surface to ¼-inch thickness.
10. Cut dough into gingerbread shapes using cookie cutters and transfer to prepared baking sheets, spacing them 2 inches apart.
11. Bake cookies for 8-10 minutes until edges are lightly browned and centers appear set.
12. Cool cookies on baking sheets for 5 minutes before transferring to wire racks to cool completely.
13. Melt white candy melts in a microwave-safe bowl in 30-second intervals, stirring between each, until smooth.
14. Dip cooled cookies halfway into melted candy coating, letting excess drip back into the bowl.
15. Immediately sprinkle dipped edges with crushed peppermint candies and holiday sprinkles before coating sets.
16. Arrange decorated cookies on a large wooden board or platter, creating visual interest through varying heights and groupings.
17. Fill remaining space with additional candies, creating clusters that complement the cookie colors and textures.
Here, the crisp gingerbread cookies provide a spicy contrast to the sweet candy coating, while the crushed peppermint adds refreshing bursts of flavor. How lovely it looks when arranged with intentional gaps and clusters, inviting guests to break off pieces and create their own flavor combinations as they gather and talk.
Festive Prosciutto-Wrapped Asparagus Board
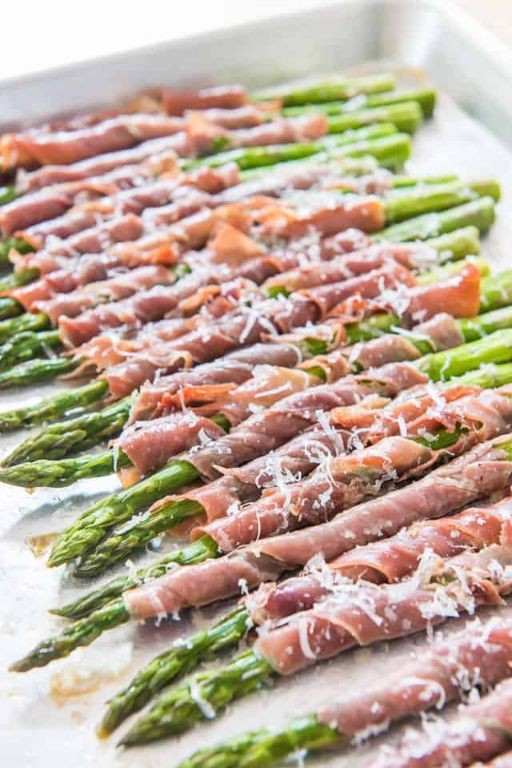
Sometimes, the simplest gatherings call for food that feels both elegant and effortless, like these prosciutto-wrapped asparagus spears arranged thoughtfully on a wooden board. Slowly roasting them brings out their natural sweetness while the prosciutto crisps into a salty embrace. It’s a dish that asks for little but gives so much—quietly celebratory, perfect for sharing with those you hold dear.
Ingredients
– 1 lb fresh asparagus, trimmed (look for firm, bright green spears)
– 4 oz thinly sliced prosciutto (about 12 slices)
– 2 tbsp olive oil (or avocado oil)
– 1 tbsp honey
– 1 tsp black pepper, freshly ground
– 1/2 tsp flaky sea salt (such as Maldon)
– 1 lemon, cut into wedges (for serving)
Instructions
1. Preheat your oven to 400°F and line a baking sheet with parchment paper.
2. Hold one asparagus spear at each end and gently bend until it snaps naturally at the woody point; discard the tough ends and repeat with remaining spears.
3. Drizzle the asparagus with olive oil, using your hands to coat each spear evenly.
4. Wrap one slice of prosciutto around each asparagus spear, starting just below the tip and spiraling down to the base.
5. Arrange the wrapped spears in a single layer on the prepared baking sheet, ensuring they don’t touch.
6. Brush the prosciutto-wrapped asparagus lightly with honey, which will help it caramelize and crisp in the oven.
7. Sprinkle evenly with black pepper and flaky sea salt.
8. Roast for 12–15 minutes, or until the prosciutto is golden and slightly crisp at the edges and the asparagus is tender when pierced with a fork.
9. Transfer the asparagus to a serving board and let rest for 2–3 minutes to allow the flavors to settle.
10. Squeeze fresh lemon juice over the top just before serving to brighten the dish. Unwrap the quiet magic of this combination—the asparagus tender yet crisp, the prosciutto salty and rich, with a hint of honeyed sweetness. Serve it warm alongside a soft cheese or scattered over a grain salad, letting each bite unfold like a gentle conversation.
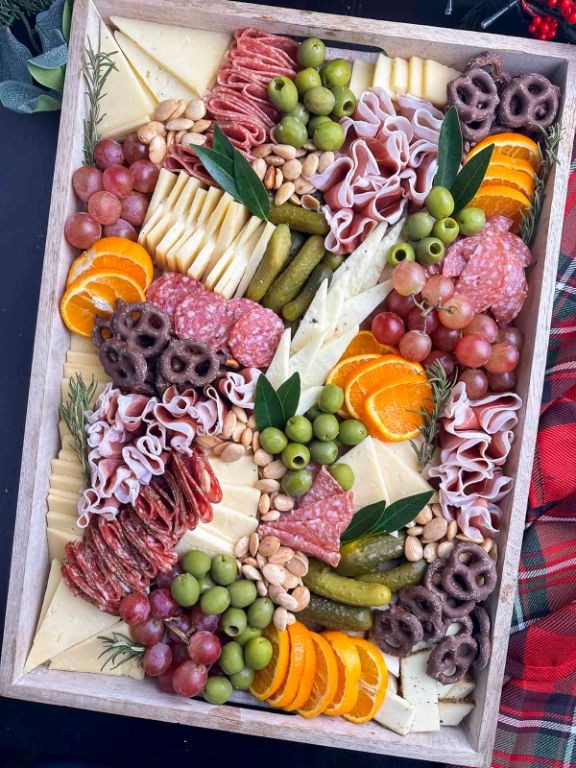
Christmas Tree-Shaped Charcuterie Display
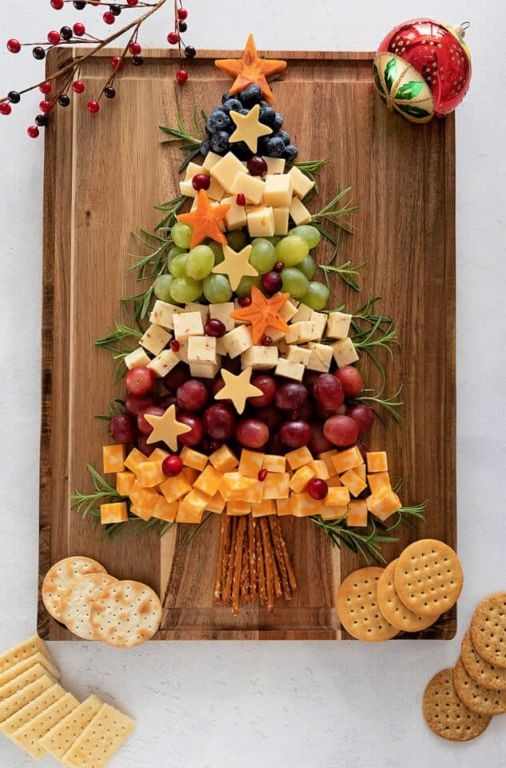
Gently arranging savory morsels on a wooden board feels like creating an edible forest, each piece finding its place in this temporary beauty meant to be shared and savored during quiet holiday moments. The Christmas tree shape emerges slowly beneath your hands, a familiar form built from unfamiliar components that will soon disappear into laughter and conversation. This charcuterie display holds both artistry and impermanence, much like the season itself.
Ingredients
– 1 large wooden cutting board or serving platter (at least 18 inches long for proper tree shape)
– 8 ounces hard salami slices, thinly sliced (Genoa or soppressata work beautifully)
– 6 ounces prosciutto, thinly sliced (tear into rustic pieces for texture)
– 1 cup cherry tomatoes (multicolored varieties add visual interest)
– 1 cup green olives with pits (castelvetrano olives provide nice color contrast)
– 8 ounces sharp cheddar cheese, cut into ½-inch cubes (aged white cheddar holds shape well)
– 8 ounces pepper jack cheese, cut into ½-inch cubes (for those who enjoy subtle heat)
– ½ cup roasted unsalted almonds (marcona almonds offer buttery texture)
– ¼ cup fresh rosemary sprigs (for garnish between layers)
– 2-3 fresh basil leaves, torn (scatter for final touches)
Instructions
1. Place your wooden cutting board horizontally on a clean, flat surface where you have ample working space.
2. Arrange a single row of hard salami slices along the bottom center of the board to form the tree’s base, slightly overlapping each slice.
3. Create the second layer above the base using prosciutto pieces, building upward in a triangular shape that narrows as you go higher.
4. Alternate between salami and prosciutto layers, maintaining the triangular form and ensuring each layer is slightly shorter than the previous one.
5. Insert cherry tomatoes between the meat layers at irregular intervals to create “ornament” accents throughout the tree.
6. Tuck green olives into open spaces between meat slices, positioning them to resemble additional decorative elements.
7. Strategically place cheddar cheese cubes throughout the tree structure, concentrating them in clusters that mimic Christmas lights.
8. Distribute pepper jack cheese cubes in remaining gaps, creating color variation against the cheddar.
9. Scatter roasted almonds in small groupings to fill any sparse areas and add textural contrast.
10. Gently press fresh rosemary sprigs between layers where meats meet, allowing the fragrant herbs to peek through.
11. Finish by tearing fresh basil leaves and scattering them across the top portion of the tree as final greenery.
12. Step back and assess the overall shape, making minor adjustments to maintain a clean triangular silhouette.
Kindly remember that the beauty of this display lies in its rustic imperfections—the slightly uneven cheese distribution and casually placed herbs create authentic charm. The combination of salty meats against sharp cheeses delivers satisfying depth, while occasional briny olives cut through the richness. Consider serving with crusty bread slices arranged around the board’s edges, or place small bowls of honey and grainy mustard nearby for dipping adventures that extend the tasting experience beyond the tree itself.
Hot Cocoa and Marshmallow Dessert Board

Just now, as the afternoon light fades outside my window, I find myself craving something deeply comforting—a dessert that feels like wrapping your hands around a warm mug on a chilly day. This hot cocoa and marshmallow dessert board brings that cozy feeling to life, transforming a beloved drink into a shareable, interactive treat perfect for quiet moments or gentle gatherings.
Ingredients
– 1 cup heavy cream (for a richer texture, or substitute with half-and-half)
– 1/4 cup unsweetened cocoa powder (sifted to avoid lumps)
– 1/3 cup granulated sugar (adjust for sweetness preference)
– 1/4 tsp salt (to balance the sweetness)
– 2 cups whole milk (for creaminess, or use any milk alternative)
– 1 tsp vanilla extract (adds warmth, or use almond extract for variation)
– 2 cups mini marshmallows (for easy melting and topping)
– 1/2 cup semi-sweet chocolate chips (for drizzling, or use dark chocolate)
– Assorted dippers: 8 oz strawberries, 4 oz pretzel rods, 2 sliced bananas (choose your favorites)
Instructions
1. Pour 1 cup heavy cream into a medium saucepan and place it over medium-low heat.
2. Whisk in 1/4 cup unsweetened cocoa powder until no dry patches remain, about 1 minute.
3. Add 1/3 cup granulated sugar and 1/4 tsp salt, stirring continuously until the sugar dissolves fully, about 2–3 minutes.
4. Gradually pour in 2 cups whole milk while whisking to prevent scalding, and heat until steam rises but the mixture does not boil, approximately 4–5 minutes.
5. Remove the saucepan from the heat and stir in 1 tsp vanilla extract until incorporated.
6. Pour the hot cocoa into a shallow serving bowl or directly onto a large wooden board.
7. Scatter 2 cups mini marshmallows evenly over the surface of the hot cocoa.
8. Microwave 1/2 cup semi-sweet chocolate chips in a heatproof bowl for 30 seconds, stir, and repeat in 15-second intervals until fully melted.
9. Drizzle the melted chocolate in zigzag patterns over the marshmallows and board.
10. Arrange 8 oz strawberries, 4 oz pretzel rods, and 2 sliced bananas around the board for dipping.
Each dip into the warm, velvety cocoa reveals layers of creamy sweetness, while the marshmallows soften into pillowy clouds. Try serving it with a sprinkle of cinnamon or crushed peppermint for a festive twist, letting the rich chocolate meld with the crisp fruit and salty pretzels in every bite.
Pomegranate and Goat Cheese Holiday Platter
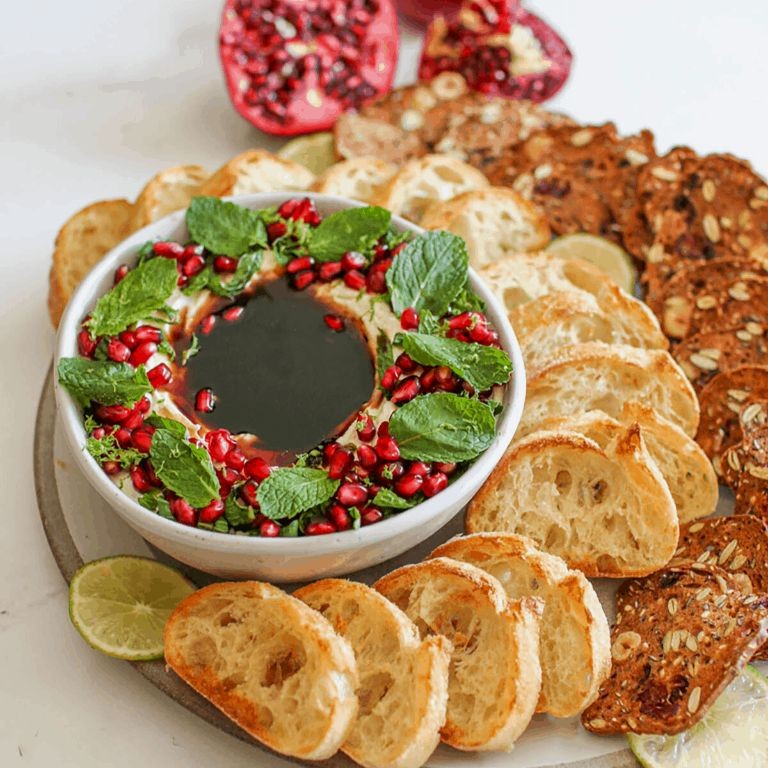
Beneath the soft glow of holiday lights, I find myself drawn to the quiet simplicity of arranging colors and textures, creating something beautiful that requires no oven, no timer, just presence and care. This pomegranate and goat cheese platter feels like a gentle pause in the festive rush, a moment to savor both making and sharing. It’s a canvas of sweet, tart, and creamy, meant to be built with your hands and enjoyed with those you love.
Ingredients
– 8 oz log of creamy goat cheese, chilled (for easier slicing)
– 1 large pomegranate, seeds removed (about 1 cup)
– 1/4 cup honey, warmed slightly (for easier drizzling)
– 1/2 cup toasted walnuts, roughly chopped (or pecans for variation)
– 1 tbsp fresh thyme leaves, stripped from stems (plus extra for garnish)
– 1 baguette, sliced 1/4-inch thick (about 20 slices)
– 2 tbsp extra virgin olive oil (for brushing)
Instructions
1. Preheat your oven to 375°F and line a baking sheet with parchment paper.
2. Arrange the baguette slices in a single layer on the prepared baking sheet.
3. Lightly brush each slice with olive oil using a pastry brush for even coverage.
4. Bake the slices for 8–10 minutes, until the edges are golden and crisp.
5. Remove the toasted baguette slices from the oven and let them cool completely on a wire rack.
6. Unwrap the chilled goat cheese log and place it in the center of a large wooden board or platter.
7. Use a sharp knife to slice the goat cheese log into 1/2-inch thick rounds, wiping the knife between cuts for clean edges.
8. Arrange the goat cheese rounds slightly overlapping in a crescent shape on the platter.
9. Sprinkle the pomegranate seeds evenly over and around the goat cheese.
10. Scatter the toasted walnuts across the platter, focusing on empty spaces.
11. Warm the honey in a microwave-safe bowl for 15 seconds until fluid but not hot.
12. Drizzle the warmed honey in zigzag patterns over the cheese and pomegranate seeds.
13. Garnish the entire platter with fresh thyme leaves, reserving a pinch for final touch.
14. Arrange the cooled baguette toasts around the edge of the platter.
15. Let the platter stand at room temperature for 10 minutes before serving to soften the cheese.
A final dusting of thyme brings an earthy fragrance that mingles with the honey’s sweetness. The creamy goat cheese melts slightly against the crisp toasts, while the pomegranate seeds burst with juicy tartness in each bite. For a winter gathering, cluster tea lights around the platter’s edge—their flicker highlights the ruby seeds and golden honey, turning snack into ceremony.
Smoked Salmon and Cream Cheese Christmas Board
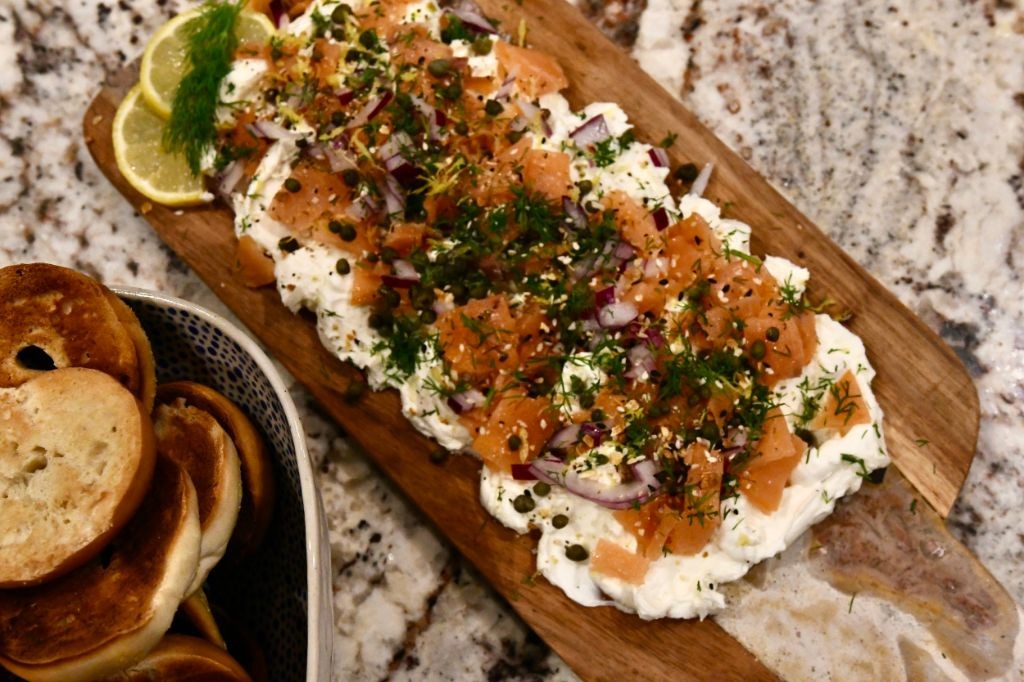
As the winter light filters through my kitchen window, I find myself drawn to creating something that feels both celebratory and comforting, a centerpiece that invites lingering conversation and shared moments around the table. This smoked salmon and cream cheese board is my answer to festive, fuss-free entertaining, where the beauty lies in the assembly rather than complex cooking. It’s a canvas of textures and flavors that welcomes everyone to gather, build, and savor.
Ingredients
– 8 oz cold-smoked salmon, thinly sliced (wild-caught for richer flavor, or substitute with hot-smoked for a firmer texture)
– 8 oz cream cheese, softened to room temperature (full-fat for creaminess, or use whipped for easier spreading)
– 1/4 cup capers, drained (rinsed if you prefer a milder saltiness)
– 1/2 small red onion, very thinly sliced (soak in ice water for 10 minutes to mellow the sharpness)
– 1 tbsp fresh dill, finely chopped (plus extra sprigs for garnish)
– 1 tsp lemon zest (from about 1/2 lemon, avoiding the bitter white pith)
– 1 baguette, sliced into 1/2-inch thick rounds (or use seeded crackers for a gluten-free option)
– 2 tbsp extra virgin olive oil (for brushing, or use melted butter for richer flavor)
– 1/4 tsp flaky sea salt (such as Maldon, for finishing)
– 1/4 tsp freshly cracked black pepper (adjust to preference)
Instructions
1. Preheat your oven to 375°F and line a baking sheet with parchment paper.
2. Arrange the baguette slices in a single layer on the prepared baking sheet.
3. Lightly brush the top of each baguette slice with olive oil using a pastry brush.
4. Bake the baguette slices for 8–10 minutes, or until the edges turn golden brown and the centers are crisp.
5. Remove the toasted baguette from the oven and let them cool completely on a wire rack, about 15 minutes.
6. While the baguette cools, place the softened cream cheese in a small serving bowl and stir in the lemon zest and chopped dill until fully combined.
7. Arrange the smoked salmon slices loosely on a large wooden board or platter, allowing them to drape slightly for visual appeal.
8. Place the cream cheese mixture, capers, and red onion slices in small separate bowls or pile them directly onto the board near the salmon.
9. Scatter the toasted baguette slices around the board, leaving space for guests to easily access all components.
10. Garnish the board with extra dill sprigs and sprinkle the flaky sea salt and black pepper evenly over the salmon and cream cheese. Crisp baguette rounds give way to the silky, cool salmon, while the briny capers and sharp onion cut through the rich cream cheese. Consider serving it with chilled sparkling cider or a dry rosé to highlight the delicate smokiness, and let guests build their own perfect bites as conversation flows into the evening.
Candy Cane-Inspired Sweet and Savory Spread

Under the soft glow of kitchen lights, I find myself drawn to creating something that captures both the nostalgic sweetness and subtle complexity of the season—a spread that whispers of candy canes yet feels entirely new, meant for quiet mornings or shared gatherings where food becomes memory.
Ingredients
– 1 cup cream cheese, softened (full-fat for richness, or reduced-fat for lightness)
– 1/4 cup crushed candy canes (about 4 standard canes, or use pre-crushed for ease)
– 2 tbsp honey (local if available, or maple syrup for depth)
– 1 tsp fresh lemon juice (brightens the flavor, bottled works in a pinch)
– 1/4 tsp fine sea salt (balances sweetness, adjust slightly if using table salt)
– 1/8 tsp ground black pepper (adds a gentle warmth, fresh-cracked preferred)
Instructions
1. Place the softened cream cheese in a medium mixing bowl, ensuring it’s at room temperature to avoid lumps when blending.
2. Add the honey, fresh lemon juice, fine sea salt, and ground black pepper directly to the cream cheese.
3. Use a rubber spatula to fold the ingredients together for about 1 minute, scraping the bowl’s sides until the mixture is smooth and uniformly pale.
4. Gently stir in the crushed candy canes, folding for 30–45 seconds to distribute them evenly without overmixing, which could cause the spread to become too loose.
5. Transfer the spread to an airtight container, pressing it down with the spatula to remove air pockets that might affect texture.
6. Cover the container and refrigerate for at least 2 hours, or until the spread firms up slightly and the flavors meld together. Let’s linger on how this spread transforms in the chill—the candy cane pieces soften into ruby-red flecks, lending a subtle crunch against the creamy base, while the pepper’s warmth emerges slowly, making it perfect for slathering on toasted bagels or pairing with sharp cheddar for a savory twist.
Spiced Apple and Cheddar Charcuterie Arrangement
Drifting through the crisp November air, I find myself drawn to the kitchen, where the earthy scent of apples and sharp tang of cheddar promise a moment of quiet comfort. This arrangement feels like gathering autumn itself onto a board, each element whispering stories of harvest and home. It’s a simple yet thoughtful way to celebrate the season’s bounty, inviting you to slow down and savor every bite.
Ingredients
– 2 medium Honeycrisp apples, thinly sliced (toss with lemon juice to prevent browning)
– 8 oz sharp white cheddar cheese, cut into 1/2-inch cubes (or substitute with aged Gouda for a milder flavor)
– 1/4 cup honey, for drizzling (warm slightly if too thick)
– 1 tsp ground cinnamon, for sprinkling
– 1/2 tsp freshly grated nutmeg, for a warm, aromatic note
– 1 tbsp lemon juice, to coat apple slices
– 1/4 cup toasted pecans, roughly chopped (or walnuts for a earthier crunch)
– Fresh thyme sprigs, for garnish (optional, but adds a herbal freshness)
Instructions
1. Preheat your oven to 350°F and line a small baking sheet with parchment paper.
2. Arrange the pecan pieces in a single layer on the baking sheet and toast for 5–7 minutes, until fragrant and lightly golden, watching closely to avoid burning.
3. While pecans toast, slice the apples into 1/4-inch thick wedges and immediately toss them in a bowl with the lemon juice to prevent browning.
4. Cut the cheddar cheese into uniform 1/2-inch cubes, ensuring they’re easy to pick up and pair with other ingredients.
5. On a large wooden board or platter, scatter the toasted pecans evenly across one section to create a base layer for texture.
6. Artfully arrange the apple slices in a fan or overlapping pattern next to the pecans, leaving space for the cheese.
7. Place the cheddar cubes in small clusters around the apples, balancing colors and shapes for visual appeal.
8. Drizzle honey lightly over the apples and cheese, using a spoon to control the flow and avoid pooling.
9. Sprinkle cinnamon and nutmeg evenly across the arrangement, focusing on the apples and pecans for a warm spice accent.
10. Garnish with fresh thyme sprigs tucked between ingredients, adding a pop of green and herbal aroma.
Offering a delightful contrast of crisp apples, creamy cheddar, and crunchy pecans, this arrangement melts into a harmonious blend of sweet, savory, and spiced notes. Serve it as a centerpiece for cozy gatherings, pairing with crusty bread or a bold red wine to elevate the autumnal experience.
Eggnog and Gingerbread Dessert Charcuterie
Wandering through holiday memories, I find myself drawn to the quiet comfort of seasonal flavors, where eggnog’s creamy nostalgia meets gingerbread’s warm spice in this dessert charcuterie. It’s a gentle invitation to slow down and savor, arranging these familiar tastes into something new yet deeply comforting. Each element tells a story of winter evenings and shared moments, waiting to be rediscovered.
Ingredients
– 1 cup eggnog (full-fat for richest flavor, or dairy-free alternative)
– 2 cups gingerbread cookie dough (store-bought or homemade, chilled)
– 1/2 cup white chocolate chips (high-quality for smoother melting)
– 1/4 tsp ground nutmeg (freshly grated if possible)
– 1/8 tsp ground cinnamon (adjust to preference)
– 1 tbsp powdered sugar (for dusting, optional)
– 8 oz cream cheese (softened to room temperature)
– 1/4 cup heavy cream (cold)
Instructions
1. Preheat your oven to 350°F and line a baking sheet with parchment paper.
2. Roll chilled gingerbread dough to 1/4-inch thickness on a lightly floured surface.
3. Use cookie cutters to cut dough into 2-inch shapes, placing them 1 inch apart on the baking sheet.
4. Bake for 8-10 minutes until edges are firm and centers spring back lightly when touched.
5. Transfer cookies to a wire rack to cool completely, about 20 minutes.
6. Combine softened cream cheese and eggnog in a medium bowl, whisking until smooth and lump-free.
7. In a separate bowl, whip cold heavy cream to stiff peaks, about 2-3 minutes with an electric mixer.
8. Gently fold whipped cream into the eggnog mixture until no white streaks remain.
9. Melt white chocolate chips in a double boiler over simmering water, stirring constantly until smooth.
10. Drizzle melted chocolate over cooled cookies in zigzag patterns using a spoon.
11. Sprinkle nutmeg and cinnamon evenly over the eggnog cream mixture.
12. Arrange cookies on a serving board with small bowls of the spiced cream.
13. Dust assembled charcuterie with powdered sugar just before serving.
Delicate gingerbread cookies provide a crisp contrast to the velvety eggnog cream, while white chocolate drizzle adds subtle sweetness that balances the warm spices. The beauty lies in customizing each bite—layer cream on cookies, dip edges directly, or enjoy elements separately for varying textures. Serve with hot cocoa or coffee to extend the cozy experience, letting guests build their perfect holiday moment.
Festive Antipasto Skewers Charcuterie Board
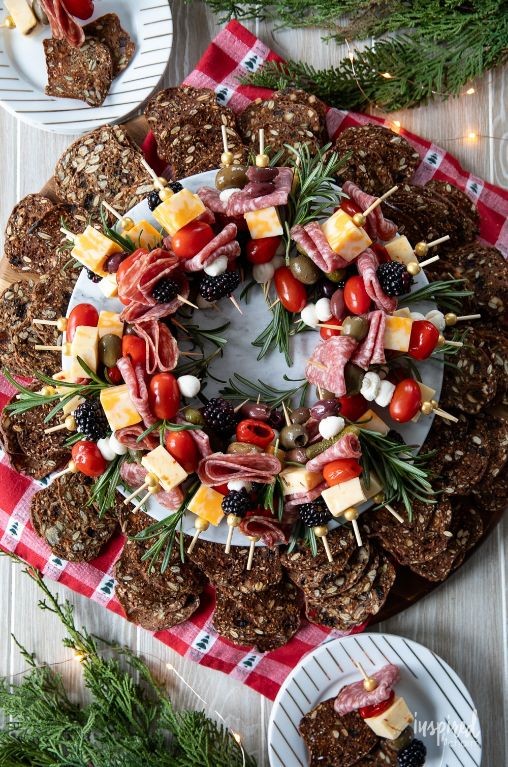
Drifting through the quiet kitchen this afternoon, I find myself drawn to the simple pleasure of assembling these festive antipasto skewers, each one a miniature journey of textures and flavors waiting to be discovered.
Ingredients
– 1 cup cherry tomatoes, halved (choose firm ones for easier skewering)
– 8 ounces mozzarella pearls, drained (or small cubes of fresh mozzarella)
– 4 ounces sliced salami, folded into quarters (Genoa or soppressata work beautifully)
– 1/2 cup pitted Kalamata olives (castelvetrano olives for a milder option)
– 1/4 cup fresh basil leaves (torn if large)
– 2 tablespoons extra virgin olive oil (a fruity variety enhances the flavors)
– 1 tablespoon balsamic glaze (for drizzling at the end)
– 8-10 wooden skewers, 6-inch length (soak in water for 30 minutes to prevent burning)
Instructions
1. Soak 8-10 wooden skewers in cool water for exactly 30 minutes to prevent them from charring when served.
2. Pat dry 1 cup cherry tomatoes and 8 ounces mozzarella pearls with paper towels to ensure ingredients stay securely on skewers.
3. Fold 4 ounces sliced salami into quarter-sized bundles that will fit neatly between other ingredients.
4. Thread one folded salami bundle onto the soaked skewer, pushing it down to the base.
5. Slide one halved cherry tomato onto the skewer immediately after the salami.
6. Add one mozzarella pearl next, ensuring it sits snugly against the tomato.
7. Place one fresh basil leaf against the mozzarella, then thread one pitted Kalamata olive through the skewer.
8. Repeat the threading pattern—salami, tomato, mozzarella, basil, olive—until the skewer is full but has 1 inch remaining at the top for handling.
9. Arrange all completed skewers on a serving platter in a sunburst pattern.
10. Drizzle 2 tablespoons extra virgin olive oil evenly over the arranged skewers.
11. Finish by zigzagging 1 tablespoon balsamic glaze across the skewers for both flavor and visual appeal.
The tomatoes burst with juicy sweetness against the creamy mozzarella, while the salami adds a savory depth that lingers pleasantly. Try serving these skewers nestled among artisanal crackers and marinated vegetables for a complete charcuterie experience that invites guests to create their own perfect bite.
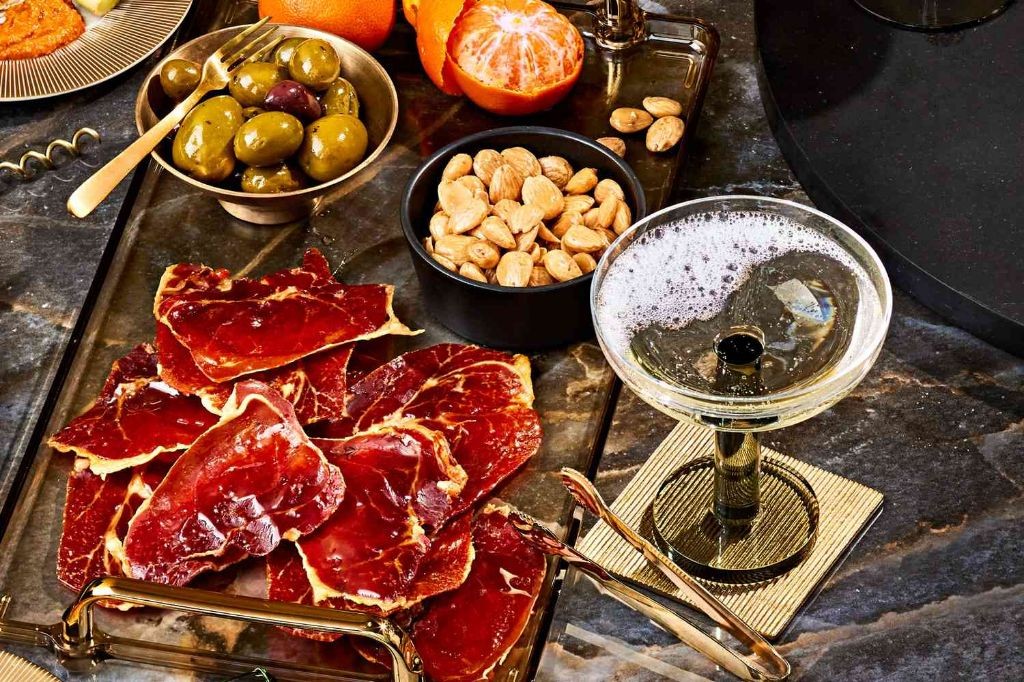
Peppered Beef and Blue Cheese Holiday Platter
Falling into the rhythm of holiday preparation, I find myself drawn to dishes that feel both celebratory and deeply comforting. This peppered beef and blue cheese platter has become my quiet kitchen companion during these shorter days, offering rich flavors that seem to slow time itself. There’s something about the marriage of spicy crust and creamy cheese that makes the season feel complete.
Ingredients
– 1.5 lbs beef tenderloin (at room temperature for even cooking)
– 2 tbsp whole peppercorns (freshly cracked for maximum aroma)
– 1 tbsp olive oil (or any high-heat oil)
– 4 oz blue cheese crumbles (quality matters here)
– 1/4 cup heavy cream (for proper emulsification)
– 1 tbsp fresh thyme leaves (stripped from stems)
– 1/2 tsp kosher salt (adjust based on cheese saltiness)
– Assorted crackers and sliced baguette (for serving)
Instructions
1. Pat the beef tenderloin completely dry with paper towels to ensure proper searing.
2. Crack the peppercorns using a spice grinder or mortar and pestle until coarsely ground.
3. Press the cracked peppercorns and kosher salt evenly onto all surfaces of the beef tenderloin.
4. Heat olive oil in an oven-safe skillet over medium-high heat until shimmering, about 2 minutes.
5. Sear the beef for 3 minutes per side until a dark brown crust forms on all surfaces.
6. Transfer the skillet to a preheated 400°F oven and roast for 18-20 minutes until the internal temperature reaches 130°F for medium-rare.
7. Remove the beef from the oven and let it rest on a cutting board for exactly 10 minutes to redistribute juices.
8. While the beef rests, combine blue cheese crumbles and heavy cream in a small saucepan over low heat.
9. Stir constantly for 3-4 minutes until the cheese melts into a smooth, pourable sauce.
10. Stir in fresh thyme leaves just before removing the sauce from heat.
11. Slice the rested beef against the grain into 1/4-inch thick pieces.
12. Arrange the sliced beef on a serving platter and drizzle with the warm blue cheese sauce.
Resting the beef properly creates the most tender slices that practically melt alongside the sharp blue cheese sauce. The contrast between the spicy pepper crust and creamy sauce makes each bite dynamic, especially when paired with crisp crackers that catch every drop. Consider serving this platter with roasted grapes or honey-drizzled figs to play with sweet and savory notes throughout your holiday gathering.
White Chocolate and Cranberry Dessert Board
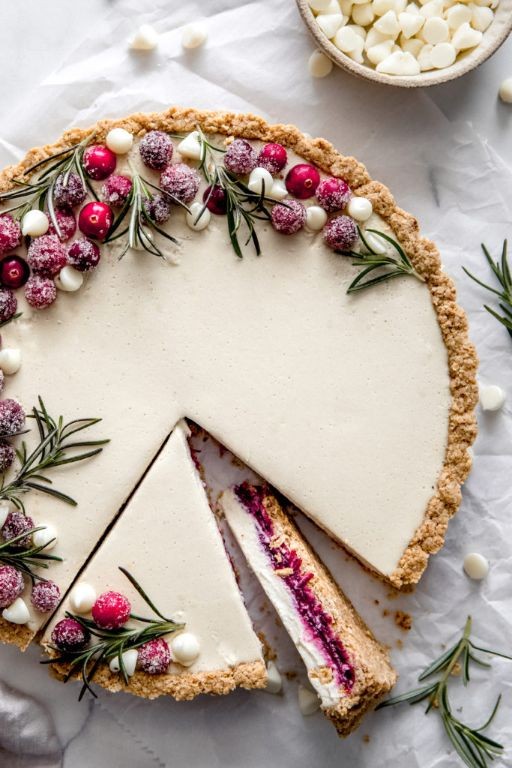
Lately, I’ve found myself craving the quiet comfort of assembling something beautiful with my hands, letting the sweet and tart dance of white chocolate and cranberries fill my kitchen with a gentle, nostalgic warmth. It’s a simple joy, this dessert board, perfect for a slow afternoon or a cozy gathering where the focus is on connection and shared sweetness.
Ingredients
- 8 oz high-quality white chocolate, chopped (for smoother melting)
- 1 cup dried cranberries (unsweetened preferred for balance)
- 1/2 cup roasted unsalted almonds (or pecans for variation)
- 4 oz cream cheese, softened to room temperature (for easy spreading)
- 1/4 cup heavy cream (warmed slightly to prevent seizing)
- 1 tsp vanilla extract (pure for best flavor)
- 1/4 tsp fine sea salt (to enhance sweetness)
- Assorted crackers and sliced apples (for serving, as many as needed)
Instructions
- Place the chopped white chocolate in a heatproof bowl set over a saucepan of gently simmering water, ensuring the bottom of the bowl does not touch the water.
- Stir the chocolate continuously with a spatula until it is completely melted and smooth, about 4–5 minutes, then immediately remove the bowl from the heat. Tip: Avoid getting any steam or water in the chocolate to prevent it from seizing.
- In a separate medium bowl, combine the softened cream cheese, heavy cream, vanilla extract, and sea salt, then whisk vigorously by hand until the mixture is fully blended and creamy, about 1–2 minutes.
- Pour the melted white chocolate into the cream cheese mixture and whisk until fully incorporated and no streaks remain, scraping down the sides of the bowl as needed.
- Spread the white chocolate mixture evenly onto a serving board or large platter using an offset spatula, creating a rustic, swirled texture.
- Sprinkle the dried cranberries and roasted almonds evenly over the white chocolate layer, gently pressing them in so they adhere. Tip: For easier slicing, leave a 1-inch border around the edges free of toppings.
- Arrange the assorted crackers and sliced apples around the edges of the board for dipping and scooping. Tip: To prevent browning, toss the apple slices in a little lemon juice before arranging.
- Chill the assembled dessert board in the refrigerator for at least 30 minutes, or until the white chocolate layer is firm to the touch but still sliceable.
Decadently creamy and studded with chewy cranberries and crunchy almonds, this board offers a delightful play of textures that melts on the tongue. Serve it with crisp apples for a refreshing contrast, or let guests gather around to break off pieces with crackers, making each bite a shared moment of sweetness.
Mini Caprese Christmas Wreath Charcuterie

Musing quietly in my kitchen this morning, I found myself drawn to the simple elegance of seasonal gatherings, where small, thoughtful touches transform ordinary moments into cherished memories. This mini wreath arrangement feels like whispering holiday magic through food, a gentle nod to tradition with a playful twist that invites connection rather than performance.
Ingredients
– 1 package (8 oz) fresh mozzarella ciliegine, patted dry with paper towels for easier handling
– 1 pint cherry tomatoes, stems removed and rinsed
– 1/4 cup fresh basil leaves, plus extra for garnish if desired
– 2 tbsp extra virgin olive oil, or a lightly flavored oil for milder taste
– 1 tbsp balsamic glaze, adjust amount for sweetness preference
– 1/4 tsp flaky sea salt, such as Maldon, for finishing
– 1/4 tsp freshly ground black pepper, freshly cracked for best flavor
Instructions
1. Arrange mozzarella balls and cherry tomatoes alternately in a circle on a large serving platter, leaving a 3-inch empty center to form the wreath shape.
2. Tuck fresh basil leaves evenly between the mozzarella and tomatoes, placing them with the vibrant green side facing upward for visual appeal.
3. Drizzle olive oil slowly over the entire wreath in a circular motion, ensuring each piece receives a light coating to enhance richness.
4. Repeat the drizzling technique with balsamic glaze, focusing on creating thin, decorative lines across the ingredients for balanced sweetness.
5. Sprinkle flaky sea salt evenly over the assembled wreath, holding your hand 6 inches above the platter to distribute it uniformly.
6. Finish by grinding black pepper generously across the surface, using a pepper mill set to a medium-coarse grind for optimal aroma.
7. Let the wreath rest at room temperature for 10 minutes before serving to allow the flavors to meld together gently.
Heirloom tomatoes would add beautiful color variation, while marinated mozzarella could introduce herbal notes if you prefer deeper flavor. The finished wreath offers a delightful contrast between juicy tomato bursts and creamy mozzarella, with basil providing fresh aromatic highlights. Serve it as a centerpiece with crusty bread for scooping, or place small bowls of olive oil for dipping alongside to extend the communal experience.
Rosemary and Honey Glazed Charcuterie Spread
Just now, as autumn light filters through my kitchen window, I find myself drawn to the quiet ritual of preparing this rosemary and honey glazed charcuterie spread—a humble gathering of flavors that feels like wrapping yourself in a warm blanket on a crisp November afternoon.
Ingredients
– 1/4 cup honey (preferably raw, for deeper flavor)
– 2 tbsp fresh rosemary leaves, finely chopped (or 1 tbsp dried if fresh isn’t available)
– 1/2 tsp coarse sea salt (adjust based on saltiness of your charcuterie)
– 1/4 tsp black pepper, freshly ground
– 1 tbsp olive oil (extra virgin works well here)
– 8 oz assorted cured meats (such as prosciutto, salami, and soppressata)
– 4 oz hard cheese (like aged cheddar or manchego), cut into 1/2-inch cubes
– 1/2 cup whole roasted almonds (unsalted, to control seasoning)
– 1 baguette, sliced into 1/2-inch thick pieces
Instructions
1. Preheat your oven to 350°F and line a baking sheet with parchment paper.
2. In a small bowl, combine 1/4 cup honey, 2 tbsp chopped rosemary, 1/2 tsp sea salt, 1/4 tsp black pepper, and 1 tbsp olive oil, whisking until fully incorporated.
3. Arrange 8 oz assorted cured meats, 4 oz cheese cubes, and 1/2 cup almonds in a single layer on the prepared baking sheet.
4. Drizzle the honey-rosemary mixture evenly over the meats, cheese, and almonds, using a spoon to coat everything lightly.
5. Bake at 350°F for 8–10 minutes, until the cheese edges are golden and the almonds are fragrant.
6. While baking, toast the baguette slices in a toaster or under a broiler for 2–3 minutes until crisp and lightly browned.
7. Remove the baking sheet from the oven and let the glazed components cool for 5 minutes to allow the honey to set slightly.
8. Arrange the toasted baguette slices on a serving platter and top with the warm glazed meats, cheese, and almonds.
Yet the true magic unfolds as you bite into the warm, sticky-sweet almonds against the salty crispness of prosciutto, the rosemary lingering like a soft whisper. Serve it with a drizzle of extra honey for those who crave more sweetness, or pair it with a crisp white wine to cut through the richness—each combination feels like discovering a new story in every bite.
Snowman-Themed Cheese and Crackers Board
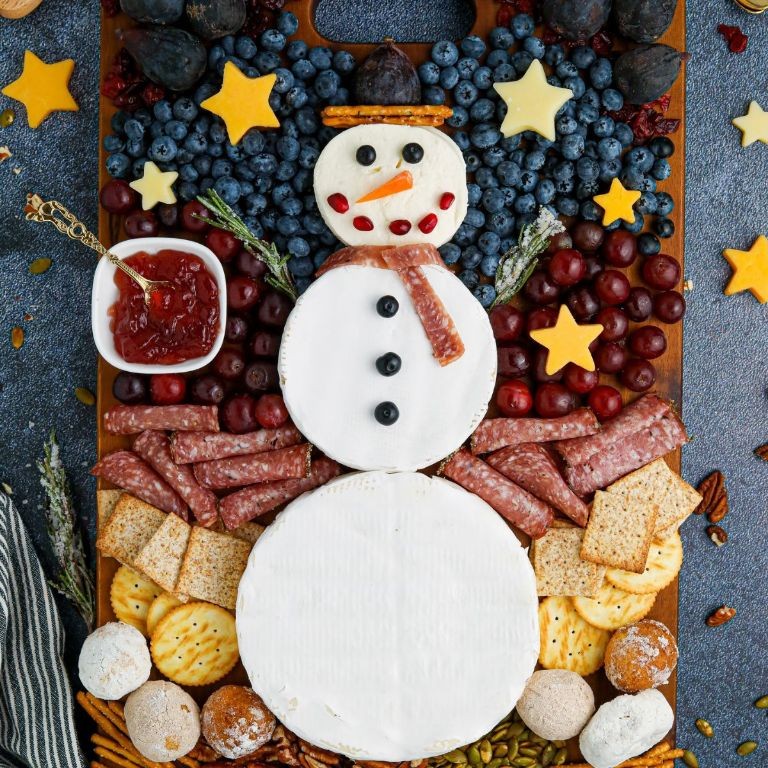
Holding this little snowman cheese board in my hands today feels like catching the first soft flakes of winter—simple, playful, and quietly joyful. It’s a no-bake arrangement that comes together with gentle hands and a sprinkle of whimsy, perfect for slow afternoons when you want to create something sweet without any fuss. Let’s gather our ingredients and begin.
Ingredients
– 8 ounces cream cheese, softened to room temperature for easy shaping
– 1/4 cup shredded white cheddar cheese, packed lightly
– 1 tablespoon mayonnaise, to add creaminess and help bind
– 1/4 teaspoon garlic powder, for a subtle savory note
– 1/8 teaspoon black pepper, freshly ground if possible
– 24 round buttery crackers, about 2 inches in diameter each
– 1 small carrot, peeled and cut into 24 tiny triangles for noses
– 48 whole black peppercorns, for the eyes and buttons
– 2 sprigs fresh rosemary, stripped into small pieces for scarf accents
Instructions
1. Place the softened cream cheese, shredded white cheddar, mayonnaise, garlic powder, and black pepper in a medium mixing bowl.
2. Use a rubber spatula to fold and mix the ingredients until fully combined and smooth, about 1–2 minutes. Tip: If the mixture feels too stiff, let it sit at room temperature for 5 more minutes to soften further.
3. Scoop 1 slightly rounded teaspoon of the cheese mixture and roll it between your palms to form a small, firm ball about 1 inch in diameter.
4. Repeat step 3 until you have 24 cheese balls total, placing them on a parchment-lined tray as you go.
5. Gently press one cheese ball onto the center of each round cracker, flattening it slightly to adhere.
6. Press 2 black peppercorns into the top third of each cheese ball to create the eyes, spacing them about 1/4 inch apart.
7. Insert one tiny carrot triangle just below the eyes to form the nose, pushing it in about 1/8 inch deep.
8. Arrange 3 black peppercorns vertically down the center of each cheese ball to make the buttons, spacing them evenly. Tip: Use tweezers for precise placement if the peppercorns are tricky to handle.
9. Tuck a few tiny rosemary pieces near the top of each snowman, resembling a scarf or hat decoration. Tip: For extra fragrance, lightly crush the rosemary between your fingers before adding.
10. Chill the assembled snowmen on the tray in the refrigerator for at least 15 minutes to firm up before serving. Now the snowmen are ready to share. Notice how the creamy, tangy cheese melts gently against the crisp cracker, while the peppercorns add little bursts of warmth and the carrot a fresh, sweet crunch. Nestle them on a platter dusted with powdered sugar “snow,” or line them up beside a cup of tomato soup for dipping—each bite feels like a cozy, edible hug.
Summary
With these 20 festive charcuterie board ideas, you’re ready to create stunning holiday spreads that will wow your guests! We hope these recipes inspire your Christmas celebrations. Try your favorites, leave a comment below telling us which boards you loved most, and don’t forget to share this article on Pinterest to spread the holiday cheer. Happy entertaining!