
Weeknights can be hectic, but that doesn’t mean dinner has to be boring or time-consuming. We’ve gathered 20 delicious recipes perfect for those busy evenings when you need something quick, satisfying, and full of flavor. From one-pan wonders to 30-minute meals, these dishes will make weeknight cooking a joy. Get ready to transform your evening routine—let’s dive into these tasty solutions!
Creamy Garlic Parmesan Pasta
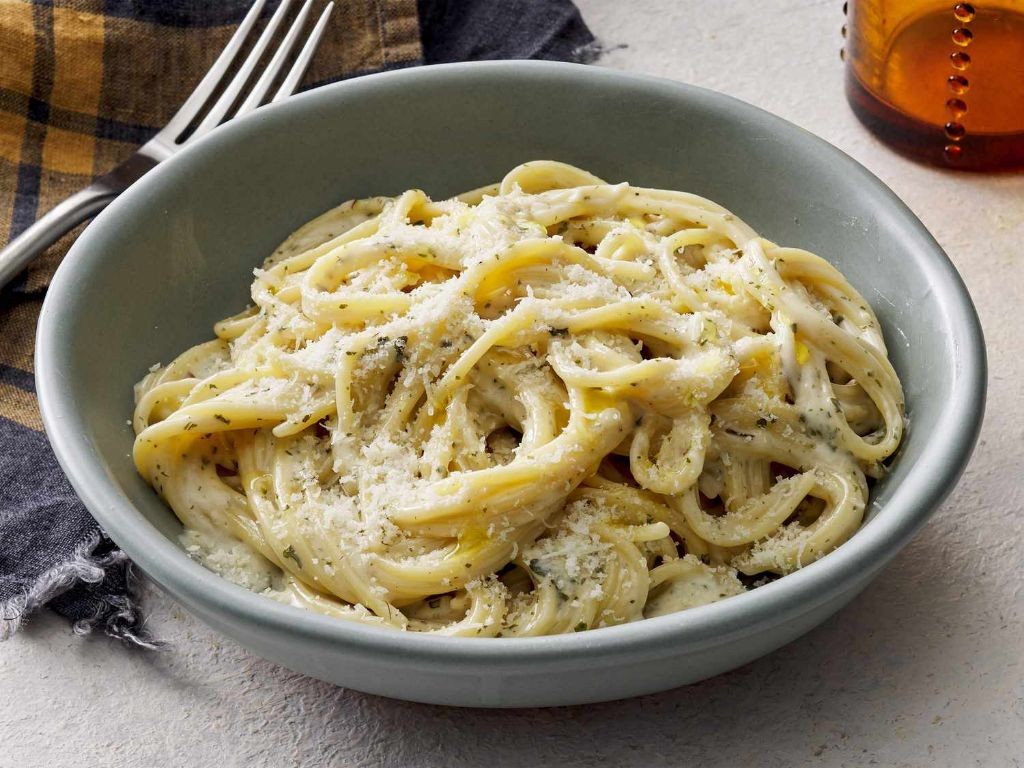
Y’all know that feeling when you’re staring into your pantry, hoping for culinary inspiration to strike? Well, prepare to have your taste buds do a happy dance because this creamy garlic parmesan pasta is about to become your new weeknight hero—it’s so indulgent, it might just make your nonna blush.
Ingredients
- 8 ounces of dried fettuccine pasta
- 3 tablespoons of rich extra virgin olive oil
- 4 cloves of freshly minced garlic
- 1 cup of heavy cream
- 1 cup of freshly grated parmesan cheese
- 2 tablespoons of unsalted butter
- 1 teaspoon of finely ground black pepper
- 1/4 teaspoon of flaky sea salt
- 2 tablespoons of freshly chopped parsley
Instructions
- Bring a large pot of salted water to a rolling boil over high heat.
- Add 8 ounces of dried fettuccine pasta to the boiling water and cook for 10–12 minutes, stirring occasionally, until al dente (tip: taste a strand at 10 minutes to avoid mushy pasta).
- Drain the pasta in a colander, reserving 1/2 cup of starchy pasta water.
- Heat 3 tablespoons of rich extra virgin olive oil in a large skillet over medium heat until shimmering.
- Add 4 cloves of freshly minced garlic and sauté for 1–2 minutes, until fragrant but not browned (tip: watch closely—burnt garlic turns bitter faster than a canceled Netflix show).
- Pour in 1 cup of heavy cream and bring to a gentle simmer, stirring constantly with a wooden spoon.
- Reduce heat to low and whisk in 1 cup of freshly grated parmesan cheese until melted and smooth.
- Stir in 2 tablespoons of unsalted butter until the sauce is glossy and emulsified.
- Add the drained pasta to the skillet, tossing to coat evenly in the sauce.
- If the sauce is too thick, gradually add reserved pasta water, 1 tablespoon at a time, until desired consistency is reached (tip: the starch helps the sauce cling to every noodle).
- Season with 1 teaspoon of finely ground black pepper and 1/4 teaspoon of flaky sea salt, tossing to combine.
- Garnish with 2 tablespoons of freshly chopped parsley before serving.
Seriously, this pasta is the cozy hug your soul deserves—creamy without being heavy, with a garlicky punch that’ll have you swooning. Try serving it alongside a crisp arugula salad for contrast, or go full comfort mode and eat it straight from the skillet while binge-watching your favorite show.
One-Pan Lemon Garlic Butter Chicken

Sick of scrubbing every pot and pan in your kitchen after dinner? This one-pan wonder is about to become your new weeknight hero, delivering restaurant-quality flavor with cleanup so easy you’ll have time to actually watch that Netflix show you’ve been “saving for later.”
Ingredients
– 1.5 lbs boneless, skinless chicken thighs
– 3 tbsp rich extra virgin olive oil
– 4 cloves aromatic garlic, minced
– 1 juicy lemon, thinly sliced
– 1/2 cup dry white wine
– 1/2 cup rich chicken broth
– 3 tbsp cold unsalted butter, cubed
– 1 tbsp freshly chopped parsley
– 1 tsp coarse kosher salt
– 1/2 tsp freshly cracked black pepper
Instructions
1. Pat 1.5 lbs boneless, skinless chicken thighs completely dry with paper towels and season both sides with 1 tsp coarse kosher salt and 1/2 tsp freshly cracked black pepper.
2. Heat 3 tbsp rich extra virgin olive oil in a large oven-safe skillet over medium-high heat for 2 minutes until shimmering.
3. Carefully place chicken thighs in the hot oil and sear for 5-6 minutes per side until golden brown and crisp-edged.
4. Transfer chicken to a clean plate, leaving any rendered fat and browned bits in the skillet.
5. Reduce heat to medium and add 4 cloves minced aromatic garlic, sautéing for 60 seconds until fragrant but not browned.
6. Pour in 1/2 cup dry white wine, scraping up all the flavorful browned bits from the pan bottom with a wooden spoon.
7. Simmer the wine for 2-3 minutes until reduced by half, then stir in 1/2 cup rich chicken broth.
8. Arrange 1 thinly sliced juicy lemon in the sauce and return chicken thighs to the skillet, nestling them among the lemon slices.
9. Transfer the skillet to a preheated 375°F oven and bake for 18-20 minutes until chicken reaches 165°F internally.
10. Remove skillet from oven and place chicken on a serving platter, leaving sauce in the pan.
11. Whisk 3 tbsp cold cubed unsalted butter into the hot sauce off the heat until melted and slightly thickened.
12. Stir in 1 tbsp freshly chopped parsley, then pour the lemon garlic butter sauce over the chicken. Let’s be real—the crispy-edged chicken swimming in that tangy, buttery sauce is basically a hug for your taste buds. Serve it over fluffy mashed potatoes to soak up every last drop, or go low-carb with zucchini noodles that’ll make you feel virtuous enough to have extra sauce.
Spicy Honey Glazed Salmon
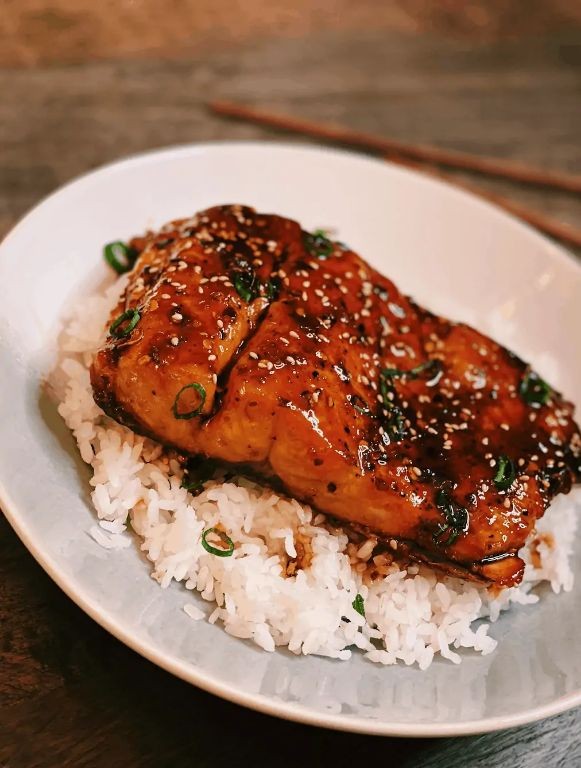
Spicy Honey Glazed Salmon
Salmon just got a major glow-up, folks—this isn’t your average Tuesday night fish. Seriously, if your taste buds had a dating profile, this spicy honey-glazed masterpiece would be their perfect match.
Ingredients
– 4 (6-ounce) skin-on salmon fillets
– 1/4 cup raw, wildflower honey
– 2 tablespoons sriracha sauce
– 1 tablespoon fresh-squeezed lime juice
– 1 teaspoon finely grated ginger
– 1/2 teaspoon smoked paprika
– 1/4 teaspoon coarse sea salt
– 2 tablespoons rich extra virgin olive oil
– 2 tablespoons thinly sliced scallions
– 1 tablespoon toasted sesame seeds
Instructions
1. Preheat your oven to 400°F and line a baking sheet with parchment paper.
2. Pat the salmon fillets completely dry with paper towels to ensure a crisp skin.
3. In a small bowl, whisk together the raw wildflower honey, sriracha sauce, fresh-squeezed lime juice, finely grated ginger, smoked paprika, and coarse sea salt until smooth.
4. Brush both sides of each salmon fillet generously with the spicy honey glaze, reserving about 2 tablespoons for later.
5. Heat the rich extra virgin olive oil in a large oven-safe skillet over medium-high heat until shimmering.
6. Place the salmon fillets skin-side down in the hot skillet and sear for 3 minutes without moving them to develop a golden crust.
7. Transfer the skillet to the preheated oven and bake for 8–10 minutes, until the salmon flakes easily with a fork but remains moist in the center.
8. Remove the skillet from the oven and brush the reserved glaze over the top of each fillet for an extra glossy finish.
9. Sprinkle the thinly sliced scallions and toasted sesame seeds evenly over the salmon.
10. Let the salmon rest for 2 minutes before serving to allow the juices to redistribute.
Caramelized edges give way to tender, flaky flesh that practically melts on your tongue. Consider serving it over a bed of coconut rice to tame the heat, or chop it into tacos for a next-level twist—this dish is as versatile as it is addictive.
Vegetable Stir-Fry with Tofu

Veggie lovers, rejoice! This isn’t your average, sad desk-lunch stir-fry—this is a vibrant fiesta in a pan where crispy tofu and a rainbow of vegetables get tossed in a sauce so good, you’ll want to drink it. Get ready to wok and roll!
Ingredients
- 1 block (14 oz) extra-firm tofu, pressed and cubed
- 2 tablespoons toasted sesame oil
- 3 tablespoons low-sodium soy sauce
- 1 tablespoon rich maple syrup
- 2 cloves garlic, finely minced
- 1 tablespoon freshly grated ginger
- 1 red bell pepper, thinly sliced into vibrant strips
- 1 cup crisp broccoli florets
- 1 large carrot, cut into matchsticks
- 1/2 cup crunchy snow peas
- 2 green onions, thinly sliced
- 1 teaspoon toasted sesame seeds
Instructions
- Press the block of extra-firm tofu for 15 minutes using a tofu press or by wrapping it in paper towels and placing a heavy pan on top to remove excess water.
- Cut the pressed tofu into 1-inch cubes.
- Heat 1 tablespoon of toasted sesame oil in a large wok or skillet over medium-high heat until it shimmers, about 1 minute.
- Add the tofu cubes to the hot oil in a single layer and cook for 4-5 minutes per side until golden brown and crispy on all edges.
- Transfer the crispy tofu to a clean plate.
- Add the remaining 1 tablespoon of toasted sesame oil to the same wok.
- Add the finely minced garlic and freshly grated ginger to the oil and stir constantly for 30 seconds until fragrant but not browned.
- Add the thinly sliced red bell pepper, crisp broccoli florets, and carrot matchsticks to the wok and stir-fry for 3 minutes until the vegetables are bright in color and slightly tender.
- Add the crunchy snow peas and continue stir-frying for 2 more minutes.
- Return the crispy tofu to the wok with the vegetables.
- Pour the low-sodium soy sauce and rich maple syrup over the tofu and vegetables.
- Toss everything together vigorously for 1 minute until the sauce evenly coats all ingredients and glazes nicely.
- Remove the wok from the heat and stir in the thinly sliced green onions and toasted sesame seeds.
Dig into a bowl where the crispy tofu gives way to a soft interior, while the vegetables retain a satisfying crunch. The savory-sweet sauce clings to every bite, making this stir-fry dangerously addictive—serve it over fluffy rice or pile it into lettuce cups for a low-carb crunch fest!
Beef and Broccoli in Oyster Sauce
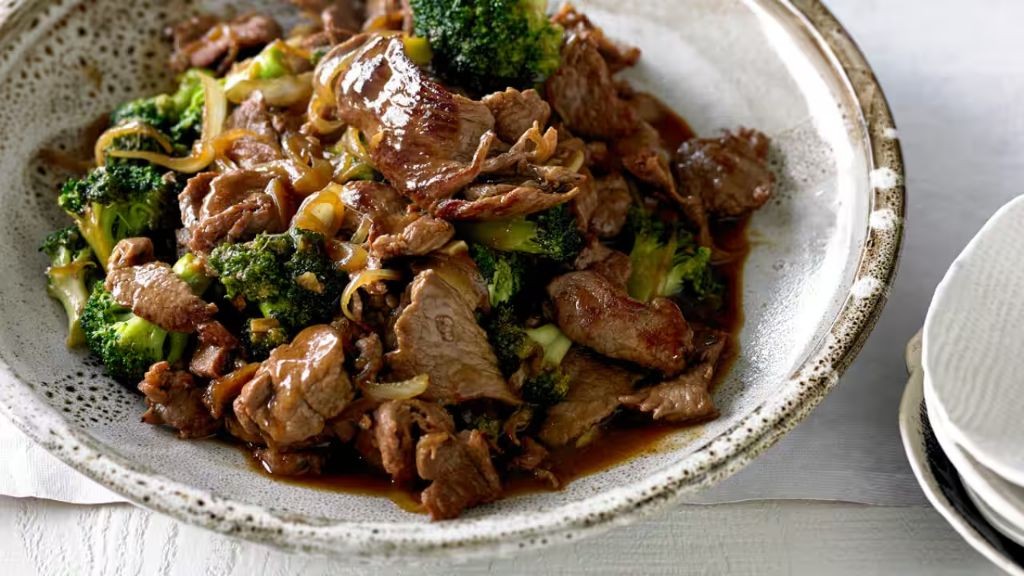
Kick that takeout menu to the curb, friends, because we’re about to whip up a Beef and Broccoli situation so good, it’ll make your favorite restaurant jealous. This saucy, savory stir-fry is your new weeknight hero, ready in less time than it takes to decide what to watch on TV.
Ingredients
– 1 lb thinly sliced flank steak
– 4 cups fresh broccoli florets
– 3 cloves garlic, minced
– 1 tablespoon freshly grated ginger
– 1/4 cup soy sauce
– 3 tablespoons oyster sauce
– 1 tablespoon cornstarch
– 2 tablespoons vegetable oil
– 1/2 cup beef broth
– 1 teaspoon toasted sesame oil
Instructions
1. In a medium bowl, whisk together 1/4 cup soy sauce, 3 tablespoons oyster sauce, 1 tablespoon cornstarch, and 1/2 cup beef broth until the cornstarch is completely dissolved.
2. Heat 1 tablespoon vegetable oil in a large skillet or wok over high heat until it shimmers, about 1 minute.
3. Add 1 lb thinly sliced flank steak in a single layer and cook undisturbed for 90 seconds to develop a golden-brown sear.
4. Flip the steak slices and cook for another 60 seconds until no pink remains, then transfer to a clean plate.
5. Reduce heat to medium-high and add remaining 1 tablespoon vegetable oil to the same skillet.
6. Add 4 cups fresh broccoli florets and stir-fry for 3 minutes until bright green but still crisp.
7. Push broccoli to the sides of the skillet and add 3 cloves minced garlic and 1 tablespoon freshly grated ginger to the center.
8. Cook the garlic and ginger for 30 seconds until fragrant, being careful not to burn them.
9. Return the cooked steak to the skillet and pour the prepared sauce over everything.
10. Bring the mixture to a vigorous boil, then reduce heat to medium and simmer for 2 minutes until the sauce thickens and coats the ingredients.
11. Remove from heat and drizzle with 1 teaspoon toasted sesame oil, tossing to combine.
12. Serve immediately over steamed rice.
Dive into that glossy, saucy goodness where tender beef meets crisp-tender broccoli in perfect harmony. The rich oyster sauce creates a savory-sweet glaze that clings to every bite, while the toasted sesame oil adds that final aromatic punch that’ll have everyone asking for seconds before they’ve finished firsts.
Cheesy Baked Ziti with Italian Sausage

Kick off your comfort food cravings with this glorious baked ziti that’s basically a warm hug from your Italian grandma—if she had a secret weapon called melty, gooey cheese and savory sausage. This dish is so ridiculously satisfying, it might just become your new Sunday night tradition (and yes, it’s totally acceptable to eat straight from the baking dish).
Ingredients
- 1 pound sweet Italian sausage, casings removed
- 1 tablespoon rich extra virgin olive oil
- 1 medium yellow onion, finely diced
- 3 cloves garlic, minced until fragrant
- 24 ounces robust marinara sauce
- 1 pound ziti pasta
- 15 ounces creamy ricotta cheese
- 1 large farm-fresh egg, lightly beaten
- 2 cups shredded mozzarella cheese, divided
- ½ cup freshly grated Parmesan cheese
- ¼ cup fresh basil leaves, chopped
- 1 teaspoon dried oregano
- ½ teaspoon crushed red pepper flakes
- ½ teaspoon freshly ground black pepper
- ½ teaspoon kosher salt
Instructions
- Preheat your oven to 375°F and lightly grease a 9×13-inch baking dish with olive oil.
- Bring a large pot of salted water to a rolling boil for the pasta.
- Heat 1 tablespoon of rich extra virgin olive oil in a large skillet over medium-high heat.
- Add 1 pound of sweet Italian sausage, breaking it into small crumbles with a wooden spoon, and cook for 6-8 minutes until browned and no longer pink.
- Add 1 finely diced yellow onion and cook for 4-5 minutes until softened and translucent.
- Stir in 3 cloves of minced garlic and cook for 1 minute until fragrant.
- Pour in 24 ounces of robust marinara sauce, 1 teaspoon dried oregano, ½ teaspoon crushed red pepper flakes, ½ teaspoon freshly ground black pepper, and ½ teaspoon kosher salt, then simmer for 10 minutes to let flavors meld.
- Cook 1 pound of ziti pasta in the boiling water for 2 minutes less than package directions for al dente texture.
- Drain the pasta thoroughly and return it to the pot.
- In a medium bowl, combine 15 ounces of creamy ricotta cheese, 1 lightly beaten large farm-fresh egg, 1 cup of shredded mozzarella cheese, ½ cup freshly grated Parmesan cheese, and ¼ cup chopped fresh basil leaves.
- Tip: Letting the ricotta mixture sit for 5 minutes helps it incorporate more smoothly with the pasta.
- Add the ricotta mixture and sausage sauce to the pot with the drained ziti, tossing gently until everything is evenly coated.
- Transfer the ziti mixture to the prepared baking dish and spread it into an even layer.
- Sprinkle the remaining 1 cup of shredded mozzarella cheese evenly over the top.
- Tip: For extra crispy edges, lightly spray the cheese topping with cooking spray before baking.
- Bake uncovered at 375°F for 25-30 minutes until the cheese is golden brown and bubbly.
- Tip: Let the baked ziti rest for 10 minutes before serving to allow the layers to set for cleaner slices.
Let this masterpiece cool just enough so you don’t burn your tongue diving into those glorious layers. The ziti emerges with a perfect al dente bite, swimming in a tangy, sausage-studded sauce and cradled by clouds of ricotta and molten mozzarella. Serve it alongside a crisp green salad for contrast, or go full comfort mode and scoop it over garlic bread—because some days call for carb-on-carb action.
Homestyle Meatloaf with Mashed Potatoes
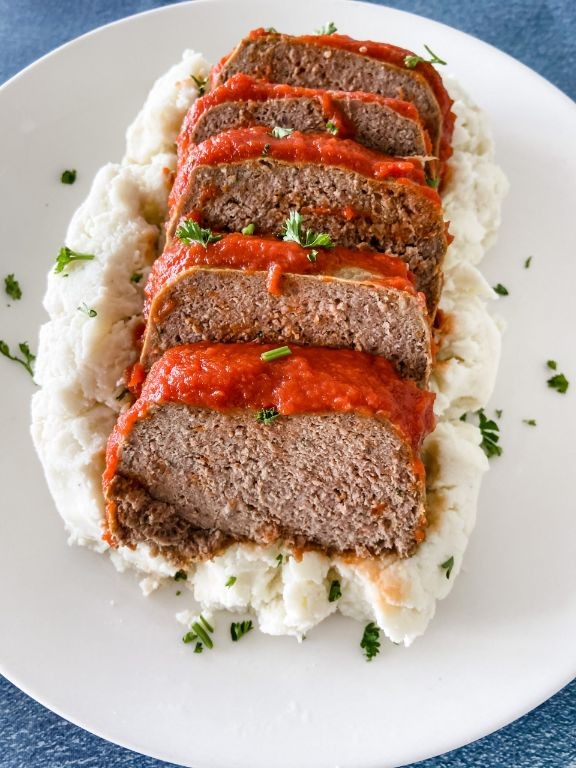
Venture into the glorious world of comfort food that hugs your soul tighter than your favorite sweater! This homestyle meatloaf with mashed potatoes combo is the culinary equivalent of a warm blanket on a chilly day—utterly irresistible and guaranteed to make your taste buds do a happy dance.
Ingredients
– 1 ½ pounds of premium ground beef blend
– 1 cup of finely diced sweet yellow onion
– 2 farm-fresh large eggs
– ¾ cup of crispy panko breadcrumbs
– ½ cup of rich ketchup
– 2 tablespoons of Worcestershire sauce
– 1 tablespoon of Dijon mustard
– 2 pounds of fluffy russet potatoes
– ½ cup of creamy whole milk
– 4 tablespoons of luxurious unsalted butter
– 2 teaspoons of coarse kosher salt
– 1 teaspoon of freshly ground black pepper
Instructions
1. Preheat your oven to 375°F and lightly grease a standard loaf pan.
2. Peel and quarter 2 pounds of russet potatoes, then place them in a large pot of cold salted water.
3. Bring the potatoes to a rolling boil over high heat and cook for 15-20 minutes until fork-tender.
4. While potatoes boil, combine 1 ½ pounds ground beef, 1 cup diced onion, 2 eggs, ¾ cup panko, ½ cup ketchup, 2 tablespoons Worcestershire, 1 tablespoon Dijon, 1 teaspoon salt, and ½ teaspoon pepper in a large bowl.
5. Mix gently with your hands until just combined—overmixing makes tough meatloaf!
6. Press the meat mixture evenly into the prepared loaf pan.
7. Bake at 375°F for 45-55 minutes until the internal temperature reaches 160°F and the top is caramelized.
8. Drain the cooked potatoes thoroughly and return them to the hot pot for 1 minute to evaporate excess moisture.
9. Mash the potatoes with 4 tablespoons butter, ½ cup warm milk, 1 teaspoon salt, and ½ teaspoon pepper until smooth and creamy.
10. Let the meatloaf rest for 10 minutes before slicing to allow juices to redistribute.
Buttery mashed potatoes cradle each savory slice of meatloaf like a cloud embracing sunshine. The crispy-edged meatloaf delivers a satisfying contrast to the velvety potatoes, while the sweet-tangy glaze adds bursts of flavor that’ll have everyone begging for seconds. Try serving open-faced on toasted bread for the ultimate comfort food sandwich experience!
Caprese Stuffed Chicken Breast
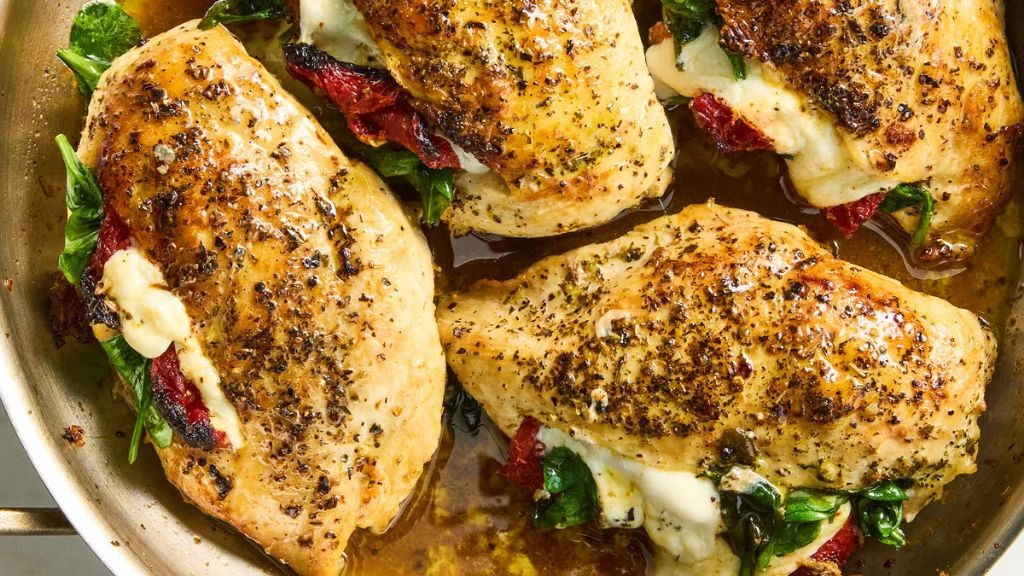
Miraculously, we’ve found a way to stuff sunshine and Italian vacation vibes into a chicken breast—because let’s be real, we all need a little escape from the daily grind. This Caprese Stuffed Chicken Breast is your ticket to a flavor fiesta, where juicy tomatoes, fresh mozzarella, and fragrant basil throw a party inside every bite. Consider it a culinary hug that’s as satisfying to make as it is to devour.
Ingredients
– 2 large boneless, skinless chicken breasts
– 1 cup fresh mozzarella pearls, drained
– 1 cup ripe cherry tomatoes, halved
– 1/4 cup fresh basil leaves, roughly chopped
– 2 tbsp rich extra virgin olive oil
– 1 tsp coarse sea salt
– 1/2 tsp finely ground black pepper
– 1 tsp aromatic dried oregano
– 1/2 cup sharp grated Parmesan cheese
Instructions
1. Preheat your oven to 375°F and lightly grease a baking dish with a drizzle of olive oil.
2. Place one chicken breast on a cutting board and use a sharp knife to slice a deep pocket horizontally through the side, being careful not to cut all the way through.
3. Repeat with the second chicken breast to create two pockets ready for stuffing.
4. In a medium bowl, combine the fresh mozzarella pearls, halved cherry tomatoes, and roughly chopped basil leaves.
5. Gently spoon the mozzarella, tomato, and basil mixture evenly into each chicken breast pocket.
6. Use toothpicks to securely seal the openings of each stuffed chicken breast to prevent filling from leaking during cooking.
7. Brush the outside of each chicken breast generously with the rich extra virgin olive oil.
8. In a small bowl, mix the coarse sea salt, finely ground black pepper, aromatic dried oregano, and sharp grated Parmesan cheese.
9. Sprinkle the seasoning mixture evenly over both chicken breasts, pressing gently to help it adhere.
10. Place the stuffed chicken breasts in the prepared baking dish and bake at 375°F for 25-30 minutes, or until the internal temperature reaches 165°F and the cheese is bubbly.
11. Remove from oven and let rest for 5 minutes before carefully removing toothpicks and slicing.
Seriously, that first slice reveals a glorious cheesy-tomato eruption that’ll make you feel like a kitchen rockstar. The chicken stays incredibly moist while the melted mozzarella creates gooey pockets of joy against the bright basil notes. Serve it over a bed of zesty arugula or alongside garlicky roasted potatoes for a meal that’s basically a standing ovation on a plate.
Thai Red Curry with Coconut Milk

Brace yourselves, spice lovers—we’re diving fork-first into a bowl of pure comfort that’ll make your taste buds do a happy dance. This Thai red curry is the culinary equivalent of a warm hug, with coconut milk smoothing out the fiery kick like a delicious peace treaty in your mouth. Get ready to transform your kitchen into a Southeast Asian street food stall in about 30 minutes flat.
Ingredients
– 2 tablespoons fragrant coconut oil
– 1 large yellow onion, thinly sliced into half-moons
– 3 cloves garlic, finely minced
– 1 tablespoon freshly grated ginger
– 3 tablespoons vibrant red curry paste
– 1 (13.5 oz) can rich, creamy coconut milk
– 1 pound plump chicken thighs, cut into 1-inch cubes
– 1 red bell pepper, sliced into thin strips
– 1 tablespoon sweet palm sugar
– 2 tablespoons tangy fish sauce
– 1 cup fresh Thai basil leaves
– 1 juicy lime, cut into wedges
Instructions
1. Heat 2 tablespoons of fragrant coconut oil in a large skillet over medium-high heat until it shimmers.
2. Add 1 large thinly sliced yellow onion and cook for 4-5 minutes, stirring frequently, until the edges turn golden brown.
3. Stir in 3 cloves of finely minced garlic and 1 tablespoon of freshly grated ginger, cooking for exactly 1 minute until fragrant but not burned.
4. Add 3 tablespoons of vibrant red curry paste and cook for 2 minutes, stirring constantly to toast the spices and deepen the flavor.
5. Pour in 1 can of rich, creamy coconut milk, scraping the bottom of the pan to incorporate all the flavorful bits.
6. Add 1 pound of cubed chicken thighs and simmer for 8-10 minutes until the chicken is fully cooked through and opaque.
7. Stir in 1 sliced red bell pepper and cook for 3-4 minutes until slightly softened but still crisp.
8. Dissolve 1 tablespoon of sweet palm sugar and 2 tablespoons of tangy fish sauce into the curry, stirring until fully incorporated.
9. Remove from heat and fold in 1 cup of fresh Thai basil leaves until just wilted.
10. Squeeze the juice from 2 lime wedges directly into the curry before serving.
Keep those leftovers fabulous—the flavors actually improve overnight as the spices continue to mingle. This curry boasts a luxurious creamy texture that coats every ingredient, with the coconut milk creating a velvety backdrop for the spicy, sweet, and savory notes to play together. Try serving it over jasmine rice for the classic experience, or get wild by stuffing it into warm tortillas for a Thai-Mex fusion taco night that’ll have everyone asking for your secret.
Classic Beef Tacos with Fresh Salsa

Mmm, is there anything more universally beloved than taco night? These classic beef tacos are here to rescue your Tuesday from total boredom, packing a punch of flavor that’ll make you forget all about that sad desk lunch. With a zesty fresh salsa that’s basically summer in a bowl, you’re just minutes away from pure, unapologetic joy.
Ingredients
- 1 lb juicy ground beef (80/20 blend for maximum flavor)
- 8 crispy corn taco shells
- 1 cup finely shredded sharp cheddar cheese
- 2 cups crisp shredded iceberg lettuce
- 1 large ripe tomato, diced into tiny confetti
- 1/4 cup finely chopped fresh cilantro
- 1/4 cup diced sweet white onion
- 1 jalapeño, seeds removed and finely minced
- 2 tbsp freshly squeezed lime juice
- 1 tbsp rich extra virgin olive oil
- 2 tsp aromatic chili powder
- 1 tsp smoky cumin
- 1/2 tsp fragrant garlic powder
- 1/2 tsp coarse kosher salt
Instructions
- Heat a large skillet over medium-high heat until a drop of water sizzles immediately.
- Add the ground beef to the hot skillet, breaking it apart with a wooden spoon into small crumbles.
- Cook the beef for 6-8 minutes, stirring occasionally, until no pink remains and it develops a golden-brown crust.
- Sprinkle the chili powder, cumin, garlic powder, and salt evenly over the cooked beef.
- Stir the spices into the beef and cook for 1 more minute until fragrant.
- Transfer the seasoned beef to a bowl and cover to keep warm.
- In a medium bowl, combine the diced tomato, cilantro, onion, and jalapeño.
- Drizzle the olive oil and lime juice over the vegetable mixture.
- Gently toss the salsa ingredients until everything is lightly coated and well combined.
- Preheat your oven to 325°F and arrange the taco shells on a baking sheet.
- Warm the taco shells in the oven for 5-7 minutes until crisp and lightly golden.
- Remove the warm taco shells from the oven and place them on serving plates.
- Fill each taco shell with a generous portion of the seasoned beef.
- Top the beef with a handful of crisp shredded lettuce.
- Sprinkle the sharp cheddar cheese evenly over the lettuce.
- Finish each taco with a spoonful of the fresh salsa.
Behold your masterpiece! The crunch of those warm shells gives way to savory, spiced beef, while the cool lettuce and creamy cheese create the perfect temperature contrast. That bright, zesty salsa cuts through the richness like a flavor superhero—try stacking them high for maximum structural integrity or serve with an ice-cold Mexican beer for the ultimate Tuesday upgrade.
Spinach and Feta Stuffed Portobello Mushrooms
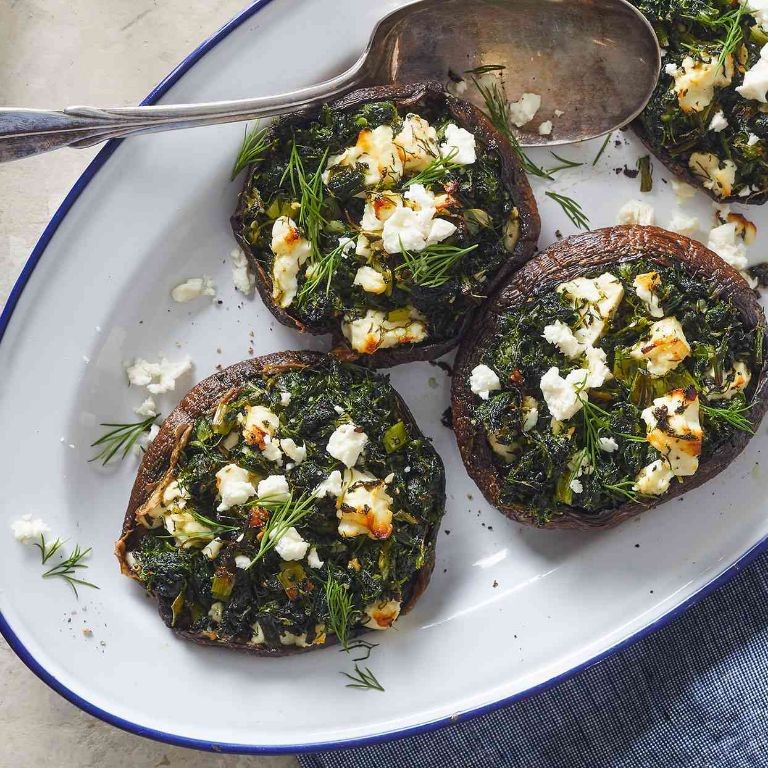
Mushrooms, assemble! We’re about to transform those humble portobello caps into flavor-packed vessels of spinach and feta glory that’ll make you forget all other appetizers. Seriously, these are so good they might just start charging rent in your oven.
Ingredients
– 4 large portobello mushroom caps, wiped clean with a damp paper towel
– 2 tablespoons rich extra virgin olive oil
– 1/2 teaspoon coarse kosher salt
– 1/4 teaspoon freshly cracked black pepper
– 1 (10-ounce) package frozen chopped spinach, thawed and thoroughly squeezed dry
– 4 ounces crumbled creamy feta cheese
– 1/4 cup finely grated Parmesan cheese
– 1 large egg, lightly beaten
– 2 cloves garlic, minced to fragrant perfection
– 1 teaspoon dried oregano, crushed between your fingers to release its oils
Instructions
1. Preheat your oven to 400°F and line a baking sheet with parchment paper.
2. Carefully remove the stems from the portobello mushrooms and use a spoon to gently scrape out the dark gills—this prevents the filling from turning an unappetizing gray color.
3. Brush both sides of the mushroom caps with the extra virgin olive oil, then season the inside cavity with the coarse kosher salt and freshly cracked black pepper.
4. Place the mushrooms cavity-side up on the prepared baking sheet and roast for 10 minutes—they should release some liquid and begin to soften.
5. While the mushrooms roast, combine the thoroughly squeezed dry spinach, crumbled creamy feta cheese, finely grated Parmesan cheese, lightly beaten egg, minced garlic, and crushed dried oregano in a medium bowl.
6. Mix the filling ingredients until well combined—the egg acts as your binding agent to keep everything beautifully intact during baking.
7. Remove the partially roasted mushrooms from the oven and carefully drain any accumulated liquid from the caps.
8. Divide the spinach and feta mixture evenly among the four mushroom caps, pressing gently to form a slight mound.
9. Return the stuffed mushrooms to the oven and bake for 18-20 minutes, until the filling is set and golden brown on top.
10. Let the mushrooms rest for 3-4 minutes before serving—this allows the filling to firm up slightly for cleaner slicing. For a gorgeous presentation, serve these warm atop a bed of peppery arugula with a drizzle of balsamic glaze. The meaty mushroom texture contrasts wonderfully with the creamy, tangy filling that practically sings with garlic and herb notes.
Slow Cooker Pulled Pork Sandwiches

Hallelujah! We’ve found the holy grail of hands-off cooking—the kind of meal that makes you look like a culinary genius while secretly napping on the couch. This slow cooker pulled pork is so tender it practically shreds itself with a stern look, and when piled high on buns, it becomes the sandwich of your saucy dreams.
Ingredients
- 4 pounds boneless pork shoulder roast, well-marbled and generously sized
- 1 cup bold ketchup
- ½ cup packed dark brown sugar, with deep molasses notes
- ¼ cup apple cider vinegar, tangy and unfiltered
- 2 tablespoons Worcestershire sauce, savory and complex
- 1 tablespoon smoked paprika, richly aromatic
- 2 teaspoons garlic powder, finely ground
- 1 teaspoon onion powder, sweet and pungent
- 1 teaspoon coarse kosher salt
- ½ teaspoon freshly cracked black pepper
- 6 soft brioche buns, lightly toasted
Instructions
- Pat the 4-pound pork shoulder completely dry with paper towels to ensure a good sear.
- Season all sides of the pork shoulder evenly with 1 teaspoon coarse kosher salt and ½ teaspoon freshly cracked black pepper.
- Heat a large skillet over medium-high heat until a drop of water sizzles immediately upon contact.
- Sear the pork shoulder for 4-5 minutes per side until a deep golden-brown crust forms, turning with tongs.
- Transfer the seared pork shoulder to the insert of a 6-quart slow cooker.
- In a medium bowl, whisk together 1 cup bold ketchup, ½ cup packed dark brown sugar, ¼ cup apple cider vinegar, 2 tablespoons Worcestershire sauce, 1 tablespoon smoked paprika, 2 teaspoons garlic powder, and 1 teaspoon onion powder until fully combined.
- Pour the sauce mixture evenly over the pork shoulder in the slow cooker, coating all sides.
- Cover the slow cooker and cook on LOW heat for 8 hours until the pork shreds easily with two forks.
- Carefully remove the pork shoulder from the slow cooker using tongs and place it on a large cutting board.
- Using two forks, shred the entire pork shoulder by pulling the meat in opposite directions until no large chunks remain.
- Return all the shredded pork to the slow cooker and stir to coat thoroughly with the remaining sauce.
- Let the pork sit in the warm sauce for 15 minutes to absorb maximum flavor.
- Lightly toast 6 soft brioche buns in a toaster or oven until golden around the edges.
- Pile approximately ¾ cup of pulled pork onto the bottom half of each toasted bun.
Let’s be real—this pork emerges from its slow-cooked slumber with an almost unfair level of juiciness, each strand glistening with that sweet-smoky sauce that clings like your favorite sweatpants. The texture walks that perfect line between melt-in-your-mouth tender and satisfyingly substantial, while the flavor profile hits all the right notes: sweet, tangy, smoky, and unapologetically addictive. Consider serving these beauties with a crunchy vinegar-based slaw right on the sandwich for textural contrast, or go full comfort-mode with a side of crispy potato wedges for the ultimate weeknight victory lap.
Garlic Butter Steak Bites with Roasted Potatoes

Mouthwatering doesn’t even begin to cover these garlic butter steak bites with roasted potatoes—they’re the kind of dish that’ll make you forget all about that fancy steakhouse reservation and have your taste buds doing a happy dance right in your own kitchen. Seriously, if buttery, garlicky perfection had a love child with crispy-on-the-outside, fluffy-on-the-inside potatoes, this would be it. Get ready to become everyone’s favorite home chef with this ridiculously delicious one-pan wonder.
Ingredients
– 1.5 lbs sirloin steak, cut into 1-inch cubes
– 1.5 lbs baby potatoes, halved
– 3 tbsp rich extra virgin olive oil
– 4 tbsp unsalted butter
– 6 cloves fresh garlic, minced
– 2 tsp freshly chopped rosemary
– 1 tsp kosher salt
– 1/2 tsp freshly cracked black pepper
– 1/4 cup chopped fresh parsley
Instructions
1. Preheat your oven to 425°F and position one rack in the center.
2. Toss halved baby potatoes with 2 tablespoons of rich extra virgin olive oil, 1/2 teaspoon kosher salt, and 1/4 teaspoon freshly cracked black pepper in a large bowl until evenly coated.
3. Spread potatoes in a single layer on a baking sheet, cut-side down for maximum crispiness.
4. Roast potatoes at 425°F for 25 minutes until golden brown and easily pierced with a fork.
5. Pat 1.5 lbs of sirloin steak cubes completely dry with paper towels while potatoes roast—this ensures a beautiful sear.
6. Season steak cubes evenly with remaining 1/2 teaspoon kosher salt and 1/4 teaspoon freshly cracked black pepper.
7. Heat remaining 1 tablespoon of rich extra virgin olive oil in a large skillet over medium-high heat until shimmering.
8. Add steak cubes in a single layer, working in batches if needed to avoid overcrowding.
9. Sear steak for 2-3 minutes per side until deeply browned and reaching 130°F internal temperature for medium-rare.
10. Reduce heat to low and push steak to one side of the skillet.
11. Melt 4 tablespoons of unsalted butter in the empty side of the skillet.
12. Add 6 cloves of minced fresh garlic and 2 teaspoons of freshly chopped rosemary to the melted butter.
13. Cook garlic and rosemary in butter for 1 minute until fragrant but not browned.
14. Toss seared steak bites in the garlic butter sauce until thoroughly coated.
15. Remove skillet from heat and stir in 1/4 cup of chopped fresh parsley.
16. Combine garlic butter steak bites with roasted potatoes on a serving platter.
Perfectly seared steak bites swimming in that glorious garlic butter sauce alongside crispy roasted potatoes create a texture symphony you’ll want to experience repeatedly. The contrast between the juicy, tender steak and those crunchy potato edges is nothing short of magical—serve this beauty straight from the skillet with crusty bread to soak up every last drop of that irresistible sauce, or pile it high over a bed of greens for the ultimate steak salad situation.
Lemon Herb Grilled Shrimp Skewers

Brace yourselves, seafood lovers—these lemon herb grilled shrimp skewers are about to become your new warm-weather obsession, delivering such zesty, garlicky perfection that your grill might just demand a promotion. Seriously, these juicy morsels transform from simple shrimp to flavor fireworks in minutes, making them the ultimate crowd-pleaser for any backyard bash or “I deserve something fabulous” weeknight dinner. Let’s turn up the heat and get skewering!
Ingredients
- 1 pound large raw shrimp, peeled and deveined (look for plump, pinkish-gray ones)
- 3 tablespoons rich extra virgin olive oil
- 2 tablespoons freshly squeezed lemon juice (from about 1 juicy lemon)
- 3 cloves garlic, finely minced (for that punchy, aromatic kick)
- 1 teaspoon dried oregano, crumbled between your fingers
- 1/2 teaspoon smoked paprika (for a whisper of smoky depth)
- 1/4 teaspoon crushed red pepper flakes (optional, for a gentle heat)
- 1/2 teaspoon coarse kosher salt
- 1/4 teaspoon freshly cracked black pepper
- 1 tablespoon chopped fresh parsley, for garnish
- Metal or soaked wooden skewers
Instructions
- If using wooden skewers, submerge them in water for at least 30 minutes to prevent burning on the grill.
- Pat the shrimp completely dry with paper towels to ensure a good sear.
- In a medium bowl, whisk together the olive oil, lemon juice, minced garlic, oregano, smoked paprika, red pepper flakes, salt, and black pepper.
- Add the shrimp to the marinade and toss gently to coat every piece evenly.
- Let the shrimp marinate at room temperature for 15 minutes—no longer, or the lemon juice will start to “cook” the shrimp.
- While the shrimp marinates, preheat your grill to medium-high heat (about 400°F).
- Thread the marinated shrimp onto the skewers, piercing each one through the head and tail for stability.
- Place the skewers on the hot grill and cook for 2 minutes, until the bottoms turn pink and opaque.
- Flip the skewers and grill for another 1–2 minutes, just until the shrimp are firm and fully pink with slight grill marks.
- Remove the skewers from the grill immediately to avoid overcooking.
- Sprinkle the grilled shrimp with chopped fresh parsley for a pop of color and freshness.
A buttery-tender bite gives way to a bright lemon zing and herby garlic warmth, making these skewers irresistible straight off the grill. Serve them piled high over fluffy couscous, tucked into warm tortillas with avocado slices, or as the star of a summery salad—just try not to eat them all before they hit the plate!
Vegetable Lasagna with Béchamel Sauce
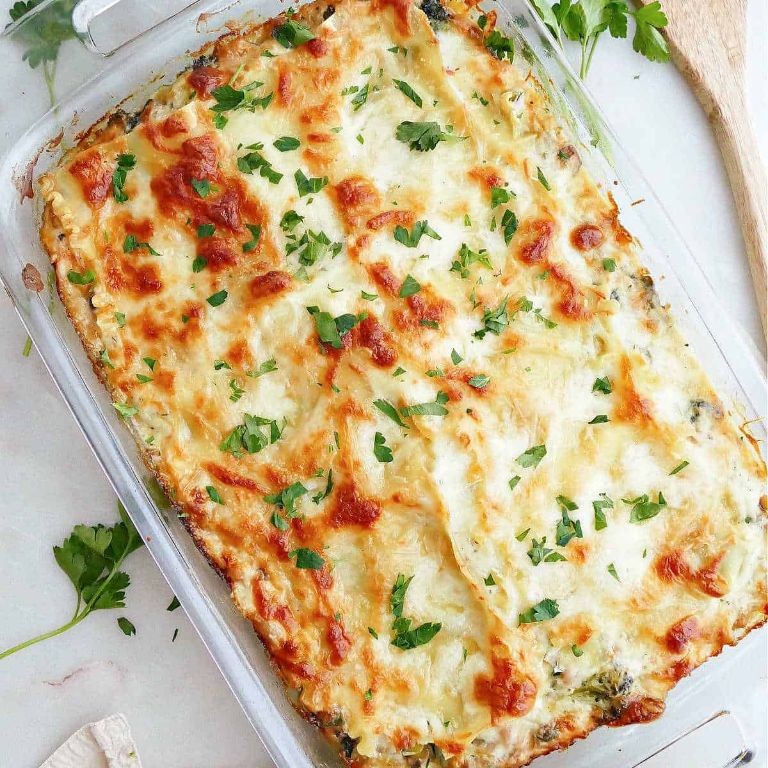
Veggie lovers, rejoice! This isn’t your average layered pasta situation—we’re talking about a vegetable lasagna with béchamel sauce that’ll make even the most devoted carnivores question their life choices. Get ready for creamy, dreamy layers that prove plants can absolutely party.
Ingredients
- 9 no-boil lasagna noodles
- 2 cups whole milk ricotta cheese
- 1 large egg, lightly beaten
- 4 cups shredded mozzarella cheese
- 1 cup grated Parmesan cheese
- 3 tablespoons unsalted butter
- 3 tablespoons all-purpose flour
- 2 cups whole milk
- 1/4 teaspoon freshly grated nutmeg
- 2 tablespoons extra virgin olive oil
- 1 large yellow onion, finely diced
- 3 cloves garlic, minced
- 1 medium zucchini, thinly sliced
- 1 medium yellow squash, thinly sliced
- 8 ounces cremini mushrooms, sliced
- 5 ounces fresh spinach
- 1 (24-ounce) jar marinara sauce
- 1 teaspoon kosher salt
- 1/2 teaspoon freshly ground black pepper
Instructions
- Preheat your oven to 375°F and lightly grease a 9×13-inch baking dish with butter or cooking spray.
- Heat 2 tablespoons of extra virgin olive oil in a large skillet over medium-high heat until shimmering.
- Add the finely diced yellow onion and cook for 5-7 minutes until translucent and fragrant.
- Stir in the minced garlic and cook for 1 minute until golden and aromatic.
- Add the sliced cremini mushrooms and cook for 6-8 minutes until they release their liquid and turn golden brown.
- Mix in the thinly sliced zucchini and yellow squash, cooking for 4-5 minutes until slightly softened.
- Wilt the fresh spinach by stirring it into the vegetable mixture until it reduces in volume, about 2 minutes.
- Season the vegetable mixture with 1 teaspoon kosher salt and 1/2 teaspoon freshly ground black pepper, then remove from heat.
- In a medium saucepan, melt 3 tablespoons unsalted butter over medium heat until bubbling.
- Whisk in 3 tablespoons all-purpose flour and cook for 2 minutes until the mixture turns light golden brown.
- Gradually pour in 2 cups whole milk while whisking constantly to prevent lumps from forming.
- Bring the béchamel sauce to a gentle simmer and cook for 3-4 minutes until thickened enough to coat the back of a spoon.
- Stir in 1/4 teaspoon freshly grated nutmeg and remove the béchamel sauce from the heat.
- In a separate bowl, combine 2 cups whole milk ricotta cheese with 1 lightly beaten large egg until smooth.
- Spread 1/2 cup marinara sauce evenly across the bottom of the prepared baking dish.
- Arrange 3 no-boil lasagna noodles in a single layer over the sauce.
- Spread half of the ricotta mixture over the noodles using a spatula.
- Spoon half of the vegetable mixture evenly over the ricotta layer.
- Drizzle 1/3 of the béchamel sauce over the vegetables.
- Sprinkle 1 cup shredded mozzarella cheese and 1/4 cup grated Parmesan cheese over the béchamel.
- Repeat the layering process with sauce, noodles, remaining ricotta, remaining vegetables, another 1/3 béchamel, and another 1 cup mozzarella with 1/4 cup Parmesan.
- Top with the final 3 no-boil lasagna noodles.
- Spread the remaining marinara sauce over the top noodle layer.
- Pour the remaining béchamel sauce over the marinara and spread evenly.
- Sprinkle the remaining 2 cups mozzarella cheese and 1/2 cup Parmesan cheese over the top.
- Cover the baking dish tightly with aluminum foil and bake at 375°F for 30 minutes.
- Remove the foil and continue baking for 15-20 minutes until the cheese is bubbly and golden brown.
- Let the lasagna rest for 15 minutes before slicing to allow the layers to set properly.
Look at that golden, bubbly masterpiece! The creamy béchamel melds beautifully with the tender vegetables, while the crispy cheese top gives way to perfectly al dente noodles. Serve generous squares with a crisp green salad for the ultimate comfort food experience that somehow feels both indulgent and virtuous.
Teriyaki Chicken Rice Bowl

Zesty, zingy, and downright addictive—this teriyaki chicken rice bowl is the weeknight hero your taste buds have been dreaming of, delivering saucy satisfaction in under 30 minutes without a single boring bite. It’s the kind of meal that makes you feel like a kitchen rockstar, even if your culinary skills usually peak at microwaving leftovers. Get ready to ditch takeout menus forever, because this bowl is about to become your new edible BFF.
Ingredients
– 1 cup fluffy jasmine rice
– 1 lb plump boneless, skinless chicken thighs
– ¼ cup rich soy sauce
– 2 tbsp sweet mirin
– 1 tbsp fragrant toasted sesame oil
– 2 tsp freshly grated ginger
– 2 cloves aromatic garlic, minced
– 1 tbsp glossy cornstarch
– 2 tbsp cool water
– 2 tbsp vibrant sliced green onions
– 1 tsp nutty toasted sesame seeds
Instructions
1. Rinse 1 cup fluffy jasmine rice under cold water until the water runs clear to remove excess starch.
2. Cook the rice according to package directions in a medium saucepan with 2 cups water for 18–20 minutes until tender and fluffy.
3. While rice cooks, pat 1 lb plump boneless, skinless chicken thighs completely dry with paper towels to ensure a golden sear.
4. Heat a large skillet over medium-high heat for 2 minutes until a drop of water sizzles immediately.
5. Add 1 tbsp fragrant toasted sesame oil to the hot skillet and swirl to coat the bottom evenly.
6. Place chicken thighs in the skillet skin-side down and cook undisturbed for 5–6 minutes until deeply golden brown.
7. Flip chicken thighs using tongs and cook for another 4–5 minutes until internal temperature reaches 165°F on an instant-read thermometer.
8. Transfer cooked chicken to a clean cutting board and let rest for 3 minutes to redistribute juices.
9. While chicken rests, whisk together ¼ cup rich soy sauce, 2 tbsp sweet mirin, 2 tsp freshly grated ginger, and 2 cloves minced aromatic garlic in a small bowl.
10. In a separate small bowl, create a slurry by whisking 1 tbsp glossy cornstarch with 2 tbsp cool water until completely smooth.
11. Pour the soy sauce mixture into the same skillet used for chicken and bring to a simmer over medium heat.
12. Whisk in the cornstarch slurry and cook for 1–2 minutes until the sauce thickens to a glossy, coat-the-back-of-a-spoon consistency.
13. Slice the rested chicken into ½-inch thick strips against the grain for maximum tenderness.
14. Return sliced chicken to the skillet and toss gently to coat every piece in the glossy teriyaki sauce.
15. Fluff the cooked jasmine rice with a fork to separate the grains.
16. Divide the fluffy rice between two bowls and top with the saucy teriyaki chicken.
17. Garnish generously with 2 tbsp vibrant sliced green onions and 1 tsp nutty toasted sesame seeds.
Buttery rice soaks up that sticky-sweet teriyaki glaze while the chicken stays miraculously juicy beneath its glossy coat. Try stacking extra green onions and a sprinkle of red pepper flakes for a color-pop that’ll make your Instagram followers swoon—this bowl eats as good as it looks!
Mediterranean Stuffed Bell Peppers
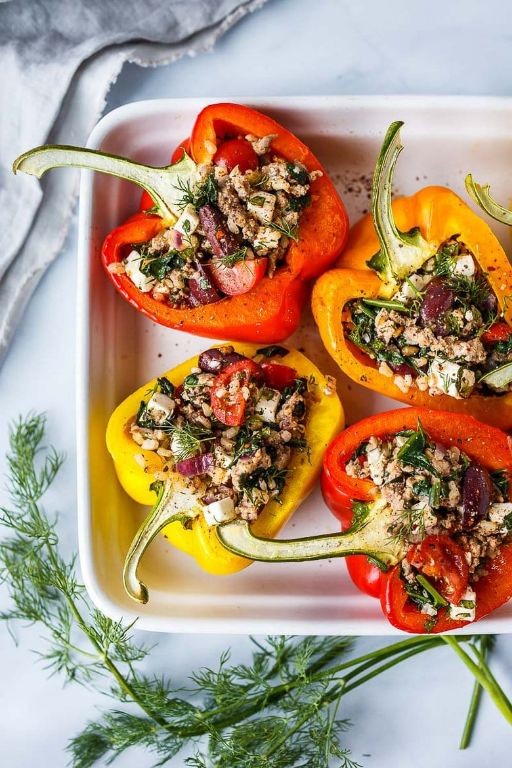
Aren’t you tired of the same old dinner routine? Let’s shake things up with these Mediterranean stuffed bell peppers that are basically a vacation for your taste buds—no passport required! These vibrant flavor parcels will make your Tuesday night feel like a seaside taverna in Greece, minus the questionable sunburn.
Ingredients
– 4 large, colorful bell peppers (red, yellow, or orange)
– 1 pound lean ground lamb
– 1 cup fluffy cooked quinoa
– 1/2 cup crumbled feta cheese
– 1/4 cup rich extra virgin olive oil
– 1 medium yellow onion, finely diced
– 3 garlic cloves, minced
– 1 teaspoon dried oregano
– 1/2 teaspoon smoked paprika
– 1/4 cup chopped fresh parsley
– 1/4 cup toasted pine nuts
– 1 cup robust tomato sauce
– 1/2 teaspoon coarse sea salt
Instructions
1. Preheat your oven to 375°F and line a baking dish with parchment paper.
2. Carefully slice the tops off the bell peppers and remove all seeds and membranes.
3. Heat 2 tablespoons of rich extra virgin olive oil in a large skillet over medium-high heat until shimmering.
4. Add the finely diced yellow onion and cook for 5-7 minutes until translucent and fragrant.
5. Stir in the minced garlic cloves and cook for 1 minute until golden and aromatic.
6. Add the lean ground lamb, breaking it up with a wooden spoon, and cook for 8-10 minutes until browned.
7. Mix in the dried oregano, smoked paprika, and coarse sea salt until evenly distributed.
8. Remove the skillet from heat and stir in the fluffy cooked quinoa, crumbled feta cheese, chopped fresh parsley, and toasted pine nuts.
9. Generously stuff each bell pepper with the lamb mixture, packing it down lightly.
10. Pour the robust tomato sauce over the stuffed peppers, making sure each gets coated.
11. Bake at 375°F for 35-40 minutes until the peppers are tender and slightly charred at the edges.
12. Let the peppers rest for 5 minutes before serving to allow the flavors to meld.
Expert tip: For extra crispy edges, broil for the final 2 minutes! Every bite delivers a satisfying crunch from the pine nuts, creamy tang from the feta, and savory warmth from the seasoned lamb. Serve these beauties with a simple Greek salad or over a bed of lemon-herb couscous for a complete Mediterranean feast that’ll have everyone asking for seconds.
Crispy Baked Parmesan Chicken Tenders

Brace yourselves, crispy chicken connoisseurs, because we’re about to transform your basic baked tenders into golden, Parmesan-crusted perfection that’ll make your taste buds do a happy dance. Forget the greasy drive-thru version—this homemade marvel delivers all the crunch without the guilt, proving that sometimes the best things in life are indeed baked.
Ingredients
– 1.5 pounds of plump, juicy chicken tenders
– 1 cup of finely grated, nutty Parmesan cheese
– 1 cup of golden, crispy panko breadcrumbs
– 2 large, farm-fresh eggs
– 1/2 cup of rich, tangy mayonnaise
– 2 tablespoons of zesty Dijon mustard
– 1 teaspoon of aromatic garlic powder
– 1 teaspoon of smoky paprika
– 1/2 teaspoon of finely ground black pepper
– 1/2 teaspoon of flaky sea salt
– Cooking spray for effortless release
Instructions
1. Preheat your oven to 400°F and line a baking sheet with parchment paper.
2. Pat the plump, juicy chicken tenders completely dry with paper towels to ensure maximum crispiness.
3. In a shallow bowl, whisk together the farm-fresh eggs, rich, tangy mayonnaise, and zesty Dijon mustard until perfectly smooth.
4. In a separate shallow bowl, combine the golden, crispy panko breadcrumbs, finely grated, nutty Parmesan cheese, aromatic garlic powder, smoky paprika, finely ground black pepper, and flaky sea salt.
5. Dip each dried chicken tender into the egg mixture, coating it thoroughly on all sides.
6. Immediately transfer the coated tender to the panko-Parmesan mixture, pressing firmly to adhere a generous, even crust.
7. Place the breaded tenders in a single layer on the prepared baking sheet, ensuring they don’t touch for optimal air circulation.
8. Lightly spritz the tops of the tenders with cooking spray to encourage golden browning.
9. Bake at 400°F for 18–22 minutes, flipping halfway through, until the coating is deeply golden and the internal temperature reaches 165°F.
10. Let the tenders rest on the baking sheet for 3–5 minutes to allow the crust to set and the juices to redistribute.
That first bite delivers an audible crunch giving way to tender, juicy chicken, with the nutty Parmesan and smoky paprika singing in harmony. Serve these beauties stacked high with creamy ranch for dipping, or chop them over a crisp Caesar salad for a next-level lunch upgrade.
Summary
Zesty, quick, and delicious—these 20 recipes are your ticket to stress-free weeknight dinners. We hope you find new favorites that make your evenings easier and tastier. Don’t forget to leave a comment sharing which dish you loved most, and pin this article on Pinterest to save for your next busy night!