
Our grandmothers knew a thing or two about making delicious, satisfying meals with simple ingredients during challenging times. These 18 hearty Depression Era recipes are packed with comfort, flavor, and resourcefulness—perfect for today’s budget-conscious home cook. From savory stews to humble desserts, each dish tells a story of resilience. Ready to cook through history? Let’s dive into these timeless classics that nourish both body and soul.
Depression-era peanut butter bread
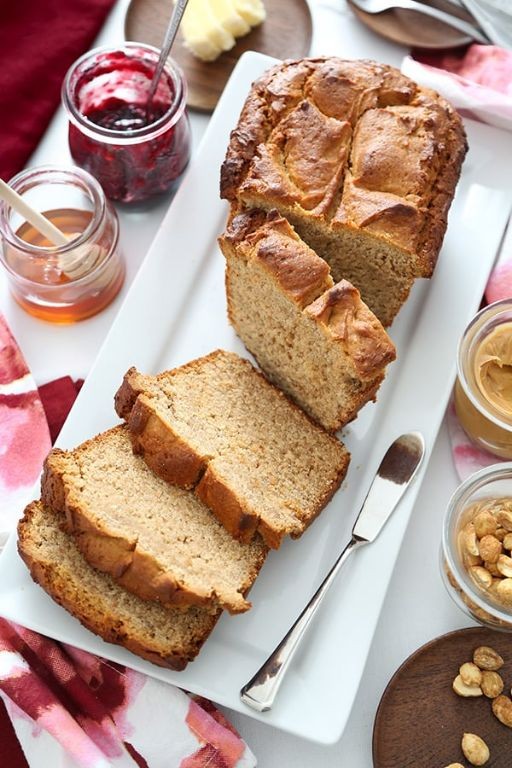
Harkening back to simpler times when resourcefulness reigned supreme, this Depression-era peanut butter bread offers both nostalgic charm and surprising sophistication. Its humble ingredients transform into a subtly sweet, tender loaf that whispers of kitchen ingenuity during challenging economic periods. This recipe proves that elegance often emerges from the most straightforward preparations.
Ingredients
– 2 cups of all-purpose flour
– ½ cup of granulated sugar
– 4 teaspoons of baking powder
– A generous pinch of salt
– 1 cup of creamy peanut butter
– 1 ¼ cups of whole milk
– A splash of vanilla extract
Instructions
1. Preheat your oven to 350°F and generously grease a 9×5-inch loaf pan with butter or cooking spray.
2. Whisk together 2 cups of all-purpose flour, ½ cup of granulated sugar, 4 teaspoons of baking powder, and a generous pinch of salt in a large mixing bowl until thoroughly combined.
3. Add 1 cup of creamy peanut butter to the dry ingredients and use a pastry cutter or two forks to cut it in until the mixture resembles coarse crumbs with peanut butter distributed throughout.
4. Pour in 1 ¼ cups of whole milk and a splash of vanilla extract, then stir gently with a wooden spoon just until the dry ingredients are moistened—be careful not to overmix, as this keeps the bread tender.
5. Transfer the batter to your prepared loaf pan and use a spatula to spread it evenly into all corners, smoothing the top surface.
6. Bake at 350°F for 50-60 minutes, or until a toothpick inserted into the center comes out completely clean with no wet batter clinging to it.
7. Remove the pan from the oven and let the bread cool in the pan for exactly 15 minutes before transferring it to a wire rack to cool completely—this prevents crumbling during slicing.
8. Use a serrated knife to slice the cooled bread into ½-inch thick slices for serving.
Surprisingly moist with a delicate crumb, this bread carries the comforting warmth of peanut butter in every bite. The subtle sweetness makes it perfect for afternoon tea or toasted with a pat of butter melting into its nooks and crannies. Consider serving thin slices alongside fruit preserves or drizzled with honey for an elegant twist on this historical treasure.
Hoover stew with hot dogs and pasta

Elevating humble ingredients to comforting heights, this Hoover stew transforms simple pantry staples into a soul-warming meal that speaks to both resourcefulness and flavor. Every spoonful tells a story of making the most of what’s available, creating something greater than the sum of its parts through slow, thoughtful cooking. The melding of smoky hot dogs with tender pasta in a rich, tomato-based broth yields a dish that feels both nostalgic and perfectly satisfying.
Ingredients
– 1 package of hot dogs (about 8), sliced into coins
– 2 cups of elbow macaroni
– 1 large onion, chopped
– 2 cloves of garlic, minced
– 1 can (28 ounces) of crushed tomatoes
– 4 cups of chicken broth
– A couple of tablespoons of olive oil
– A generous pinch of dried oregano
– A splash of Worcestershire sauce
– A handful of chopped fresh parsley
Instructions
1. Heat 2 tablespoons of olive oil in a large Dutch oven or heavy-bottomed pot over medium heat until shimmering.
2. Add the chopped onion and cook for 5-7 minutes, stirring occasionally, until translucent and fragrant.
3. Stir in the minced garlic and cook for 1 minute until aromatic but not browned.
4. Add the sliced hot dogs and cook for 3-4 minutes, turning occasionally, until lightly browned around the edges.
5. Pour in the crushed tomatoes and 4 cups of chicken broth, scraping the bottom of the pot to incorporate any browned bits.
6. Add the dried oregano and a splash of Worcestershire sauce, then bring the mixture to a gentle boil.
7. Reduce heat to low, cover the pot, and simmer for 15 minutes to allow flavors to meld.
8. Stir in 2 cups of elbow macaroni, ensuring all pasta is submerged in the liquid.
9. Cover and simmer for 12-14 minutes, stirring halfway through, until pasta is al dente.
10. Remove from heat and stir in the chopped fresh parsley.
Buttery-soft pasta mingles with the smoky richness of hot dogs in a tomato broth that’s both bright and deeply savory. Serve this stew in shallow bowls with crusty bread for dipping, or top with a sprinkle of sharp cheddar for extra indulgence—either way, it’s comfort in a bowl that improves with each passing hour.
Wacky cake with no eggs or milk

Often overlooked in today’s complex baking landscape, this Depression-era wacky cake proves that simplicity can yield extraordinary results—a moist, deeply chocolate confection that miraculously requires neither eggs nor dairy. Originally born from wartime rationing, this clever one-bowl wonder has stood the test of time, delivering rich flavor and tender crumb through ingenious chemical reactions. Perfect for last-minute gatherings or spontaneous sweet cravings, this recipe transforms pantry staples into something truly magical.
Ingredients
– A cup and a half of all-purpose flour
– A full cup of granulated sugar
– A third cup of unsweetened cocoa powder
– A teaspoon of baking soda
– Half a teaspoon of fine salt
– A tablespoon of white vinegar
– A third cup of vegetable oil
– A cup of cold water
– A splash of vanilla extract
Instructions
1. Preheat your oven to 350°F and grab an 8×8 inch baking pan—no need to grease it.
2. Whisk together the flour, sugar, cocoa powder, baking soda, and salt directly in the ungreased pan until thoroughly combined.
3. Make three distinct wells in the dry mixture: one large, one medium, and one small.
4. Pour the vegetable oil into the largest well, the vinegar into the medium well, and the vanilla extract into the smallest well.
5. Carefully pour the cold water over everything in the pan.
6. Mix vigorously with a fork or small whisk for about 2 minutes until the batter becomes smooth and no dry patches remain—this thorough mixing activates the baking soda and vinegar reaction.
7. Immediately transfer the pan to the preheated oven and bake for 30-35 minutes.
8. Check for doneness by inserting a toothpick into the center—it should come out clean with just a few moist crumbs attached.
9. Let the cake cool completely in the pan on a wire rack for at least 1 hour before slicing.
Moist and fudgy with an intense chocolate flavor that belies its simple ingredients, this cake develops an even richer texture when allowed to rest overnight. The tender crumb practically melts on the tongue, making it perfect for casual afternoon tea or dressed up with a dusting of powdered sugar and fresh berries. For an elegant presentation, cut into small squares and serve alongside strong coffee or a glass of chilled almond milk.
Poor man’s meal with potatoes and hot dogs

Unassuming yet profoundly satisfying, this humble combination transforms simple pantry staples into a comforting meal that speaks to both budget-conscious cooks and those seeking nostalgic flavors. Utilizing potatoes and hot dogs in perfect harmony, this dish demonstrates how minimal ingredients can create maximum satisfaction when prepared with care. Each component contributes its unique character while melding together in a symphony of textures and tastes.
Ingredients
– 4 medium russet potatoes, peeled and chopped into 1-inch cubes
– 1 package of beef hot dogs (about 8 links), sliced into ½-inch rounds
– 1 large yellow onion, thinly sliced
– 2 tablespoons of vegetable oil
– A generous splash of Worcestershire sauce
– A couple of tablespoons of ketchup
– A pinch of salt and a few cracks of black pepper
Instructions
1. Preheat your oven to 400°F and line a baking sheet with parchment paper.
2. Toss the potato cubes with 1 tablespoon of vegetable oil until evenly coated.
3. Spread the potatoes in a single layer on the prepared baking sheet and roast for 25 minutes until edges begin to crisp.
4. Meanwhile, heat the remaining tablespoon of oil in a large skillet over medium-high heat until shimmering.
5. Add the sliced onions and cook for 6-8 minutes, stirring occasionally, until they become translucent and develop golden edges.
6. Push the onions to one side of the skillet and add the hot dog slices in a single layer.
7. Cook the hot dogs for 3-4 minutes without moving them to achieve a nice sear on one side, then flip and cook for another 2 minutes.
8. Combine the onions and hot dogs, then stir in the Worcestershire sauce and ketchup until everything is well coated.
9. Add the roasted potatoes to the skillet and gently fold everything together, being careful not to break the potato cubes.
10. Season with salt and pepper, then cook for another 2 minutes to allow the flavors to meld. The crispy potato exteriors provide delightful contrast to the tender interiors, while the savory hot dogs and sweet caramelized onions create layers of flavor that comfort and satisfy. Try serving this dish topped with a fried egg for extra richness, or alongside a simple green salad to balance the heartiness.
Depression-era vinegar pie

Unfolding from the pages of American culinary history, Depression-era vinegar pie emerges as a testament to resourcefulness, transforming humble pantry staples into a surprisingly sophisticated dessert with its bright, citrus-like tang and delicate custard texture. This clever creation from lean times demonstrates how scarcity can birth remarkable flavor, offering a slice of nostalgia that feels both authentic and unexpectedly elegant.
Ingredients
– 1 ½ cups of granulated sugar
– ¼ cup of all-purpose flour
– A pinch of salt
– 3 large eggs
– 1 ½ cups of water
– ½ cup of apple cider vinegar
– 2 tablespoons of unsalted butter
– 1 teaspoon of vanilla extract
– 1 pre-made 9-inch pie crust
Instructions
1. Preheat your oven to 350°F and place the empty pie crust in a 9-inch pie plate.
2. In a medium saucepan, whisk together 1 ½ cups of granulated sugar, ¼ cup of all-purpose flour, and a pinch of salt until thoroughly combined.
3. Crack 3 large eggs into the dry mixture and whisk vigorously for about 2 minutes until the mixture becomes pale yellow and smooth.
4. Gradually pour in 1 ½ cups of water while continuously whisking to prevent lumps from forming.
5. Add ½ cup of apple cider vinegar and place the saucepan over medium heat.
6. Cook the filling while stirring constantly with a wooden spoon for 8-10 minutes until it thickens enough to coat the back of the spoon. (Tip: Don’t rush this step—proper thickening ensures the perfect sliceable texture.)
7. Remove the saucepan from heat and stir in 2 tablespoons of unsalted butter until completely melted and incorporated.
8. Mix in 1 teaspoon of vanilla extract until evenly distributed throughout the filling.
9. Carefully pour the warm filling into the prepared pie crust, using a spatula to scrape the saucepan clean.
10. Bake the pie in the preheated oven for 30-35 minutes until the filling is set with a slight jiggle in the center and the crust is golden brown. (Tip: The filling will continue to set as it cools, so don’t overbake.)
11. Transfer the pie to a wire rack and let it cool completely for at least 2 hours before slicing. (Tip: For clean slices, chill the pie in the refrigerator for an additional hour after cooling.)
The resulting pie boasts a silky, firm-yet-tender texture that slices beautifully, while the vinegar provides a sophisticated tang reminiscent of lemon curd but with deeper, more complex notes. Serve it slightly chilled with a dollop of freshly whipped cream to complement the bright acidity, or enjoy it plain to fully appreciate its historical authenticity and surprisingly refined flavor profile.
Cornmeal mush with molasses
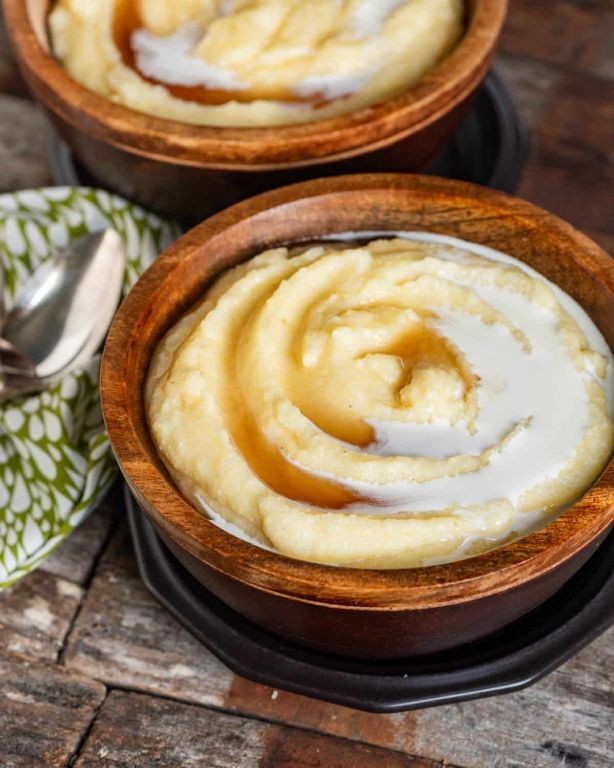
Just when you think comfort food can’t get more nostalgic, cornmeal mush with molasses arrives to warm both kitchen and soul. This humble yet sophisticated dish transforms simple pantry staples into a creamy, golden porridge that whispers of heritage kitchens and cold morning comforts. The deep, caramel notes of molasses create a beautiful counterpoint to the earthy cornmeal, making each spoonful a study in balanced simplicity.
Ingredients
– 1 cup of stone-ground yellow cornmeal
– 4 cups of cold water
– A good pinch of fine sea salt
– A generous ¼ cup of dark molasses
– A couple tablespoons of unsalted butter
– A splash of heavy cream for serving
Instructions
1. Whisk together 1 cup cornmeal and 1 cup cold water in a medium bowl until completely smooth with no lumps.
2. Bring the remaining 3 cups of water to a rolling boil in a heavy-bottomed saucepan over medium-high heat.
3. Slowly stream the cornmeal mixture into the boiling water while whisking constantly to prevent clumping.
4. Reduce heat to low and switch to a wooden spoon, stirring continuously for 15 minutes until the mixture thickens noticeably.
5. Stir in the pinch of salt and continue cooking for another 10 minutes, until the mush pulls away from the sides of the pan.
6. Remove from heat and vigorously stir in the molasses until fully incorporated and the color turns rich mahogany.
7. Fold in the butter until it melts completely and creates a glossy sheen across the surface.
8. Divide into warm bowls and drizzle each serving with that splash of heavy cream. The finished texture should be velvety smooth with just enough body to hold its shape in the bowl. That final drizzle of cream creates beautiful marbling patterns while adding luxurious richness to each earthy-sweet bite. Serve immediately while warm, perhaps with toasted nuts for crunch or fresh berries for brightness.
Boiled cabbage and potatoes
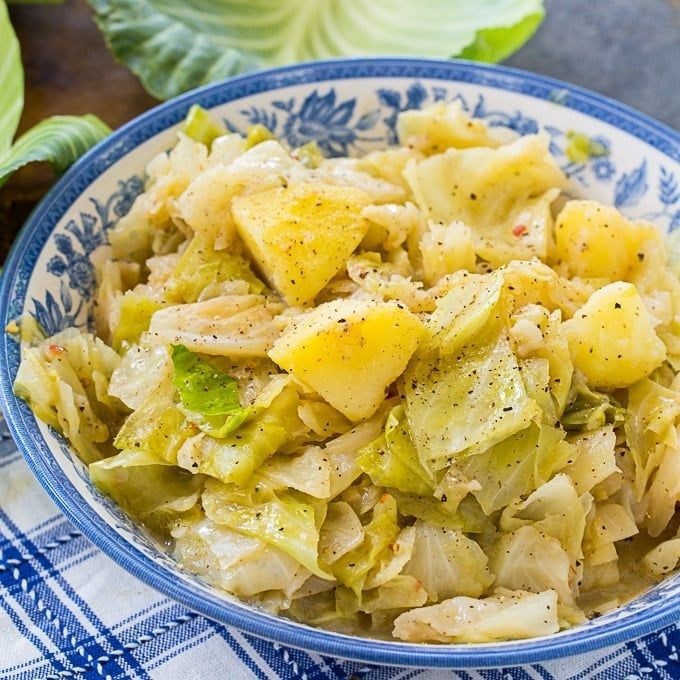
Frequently overlooked in its humble simplicity, boiled cabbage and potatoes reveal an extraordinary elegance when prepared with intention—this rustic pairing transforms into a dish of remarkable comfort and subtle sweetness that speaks to the soul of American home cooking. With just a few quality ingredients and careful attention, these earthy staples become a harmonious, nourishing meal that feels both timeless and utterly satisfying.
Ingredients
– A couple of medium Yukon Gold potatoes
– Half of a small green cabbage
– A generous splash of extra-virgin olive oil
– A big pinch of kosher salt
– A couple of cups of water
Instructions
1. Rinse 2 medium Yukon Gold potatoes under cool running water, scrubbing gently to remove any dirt.
2. Cut each potato into 1-inch cubes, keeping the pieces uniform for even cooking.
3. Remove the outer leaves from half of a small green cabbage and discard them.
4. Cut the cabbage half into 1-inch thick wedges, keeping the core intact to hold the layers together.
5. Place the potato cubes and cabbage wedges in a medium saucepan.
6. Add enough water to the saucepan to cover the vegetables by about 1 inch—approximately 2 cups.
7. Stir in 1 teaspoon of kosher salt until dissolved.
8. Bring the water to a rolling boil over high heat, which should take about 5-7 minutes.
9. Once boiling, reduce the heat to maintain a gentle simmer.
10. Cover the saucepan with a lid, leaving it slightly ajar to allow steam to escape.
11. Simmer for 15 minutes until the potatoes are fork-tender but not falling apart.
12. Test the potatoes by inserting a fork into a cube—it should slide in easily with little resistance.
13. Drain the vegetables thoroughly in a colander, shaking gently to remove excess water.
14. Transfer the drained potatoes and cabbage to a serving bowl.
15. Drizzle 2 tablespoons of extra-virgin olive oil over the warm vegetables.
16. Gently toss to coat everything evenly, being careful not to break up the potatoes.
Unbelievably tender yet maintaining their structural integrity, the potatoes offer a creamy contrast to the cabbage’s delicate, slightly sweet layers. The extra-virgin olive oil adds a fruity richness that elevates the simple vegetables into something truly special. For a delightful twist, serve this alongside grilled sausages or top with crispy breadcrumbs and lemon zest for added texture and brightness.
Mock apple pie made with crackers
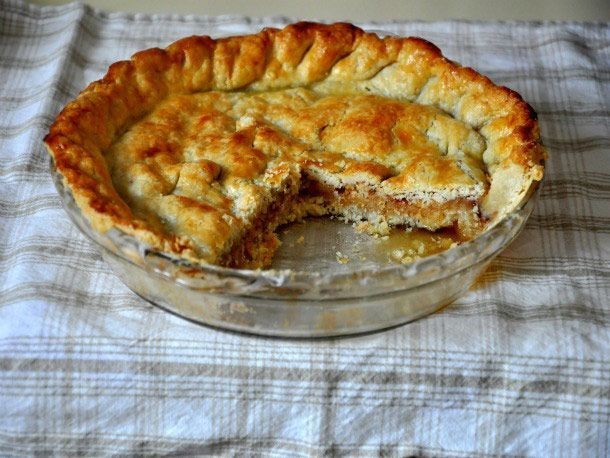
Kindling nostalgia with every slice, this clever mock apple pie transforms humble crackers into a surprisingly elegant dessert that will captivate your guests. Known historically as ‘Depression-era pie,’ this ingenious creation mimics the texture and sweet-tart complexity of traditional apple filling through a masterful blend of spices and simple pantry staples. Prepare to be astonished by how these basic ingredients coalesce into a dessert that feels both comforting and sophisticated.
Ingredients
– A sleeve of buttery round crackers (about 2 cups when crushed)
– A couple of cups of water
– Two cups of granulated sugar
– Two teaspoons of cream of tartar
– A generous squeeze of fresh lemon juice (about 2 tablespoons)
– A good pat of butter (about 2 tablespoons)
– A couple of teaspoons of ground cinnamon
– A pinch of ground nutmeg
– Your favorite 9-inch pie crust (both bottom and top)
Instructions
1. Preheat your oven to 425°F and place a baking sheet on the middle rack to preheat—this will help crisp the bottom crust.
2. Gently crush the crackers into rough, uneven pieces about the size of sliced apples, being careful not to pulverize them completely.
3. Combine water, sugar, and cream of tartar in a medium saucepan over medium-high heat, stirring constantly until the sugar fully dissolves.
4. Bring the syrup to a rolling boil and cook for exactly 2 minutes without stirring to ensure proper crystallization.
5. Remove the saucepan from heat and immediately stir in lemon juice, butter, cinnamon, and nutmeg until the butter melts completely and the spices are evenly distributed.
6. Tip: Work quickly while the syrup is hot to prevent premature thickening.
7. Fold the crushed crackers into the warm syrup mixture until every piece is thoroughly coated and glossy.
8. Spoon the cracker mixture into your unbaked 9-inch pie crust, spreading it evenly across the bottom.
9. Arrange the top crust over the filling, crimping the edges decoratively and cutting several steam vents in the center.
10. Tip: Brush the top crust with a light egg wash for a beautifully golden finish.
11. Place the pie on the preheated baking sheet and bake at 425°F for 15 minutes to set the crust.
12. Reduce the oven temperature to 350°F and continue baking for 25-30 minutes until the crust is deep golden brown and the filling bubbles visibly through the steam vents.
13. Tip: Let the pie cool completely on a wire rack—at least 4 hours—to allow the filling to set properly before slicing.
Heavenly in its deception, the finished pie offers a tender, slightly chewy filling that remarkably echoes the texture of slow-cooked apples. The cinnamon-spiced syrup creates a glossy, translucent filling that shimmers between flaky pastry layers. Consider serving warm slices with a dollop of bourbon-spiked whipped cream or alongside sharp cheddar cheese for a delightful contrast that highlights this dessert’s unique charm.
Water-based tomato soup

Fragrant and surprisingly sophisticated, this water-based tomato soup transforms humble ingredients into an elegant first course. By relying on the natural sweetness of ripe tomatoes rather than cream or stock, it achieves a remarkably clean, bright flavor profile that sings of summer even in the cooler months. The method is straightforward, yet yields results worthy of any dinner party table.
Ingredients
- 2 pounds of ripe Roma tomatoes, halved
- 1 large yellow onion, roughly chopped
- 4 cloves of garlic, smashed
- A generous glug of extra virgin olive oil
- A couple of fresh basil sprigs
- A pinch of sugar
- A splash of balsamic vinegar
- Kosher salt and freshly cracked black pepper to your liking
Instructions
- Preheat your oven to 400°F.
- Arrange the halved Roma tomatoes, chopped yellow onion, and smashed garlic cloves in a single layer on a large, rimmed baking sheet.
- Drizzle everything with that generous glug of extra virgin olive oil, ensuring all pieces are lightly coated.
- Season evenly with kosher salt, freshly cracked black pepper, and that pinch of sugar to help balance the tomatoes’ acidity.
- Roast for 35-40 minutes, until the tomatoes have collapsed and the onion pieces are tender and lightly caramelized at the edges.
- Tip: The caramelization is key for depth of flavor, so don’t be afraid of a little color on those veggies.
- Carefully transfer the entire contents of the baking sheet, including any juices, into a blender.
- Add the fresh basil sprigs and a splash of balsamic vinegar to the blender.
- Blend on high speed for a full 2-3 minutes until the mixture is completely smooth and velvety.
- Tip: For an ultra-silky texture, pass the blended soup through a fine-mesh sieve, pressing on the solids with the back of a spoon.
- Pour the sieved soup into a medium saucepan and warm it gently over low heat for 5-7 minutes, just until steaming.
- Tip: Avoid boiling the soup after blending to preserve its fresh, vibrant flavor.
- Taste and adjust the seasoning with more salt or pepper if needed.
Kissed by the oven’s heat, the final soup boasts a silky, almost velvety texture that feels luxurious on the palate. Its flavor is a beautiful balance of sweet, roasted tomato and the subtle sharpness of balsamic, making it far more complex than its simple ingredients suggest. For a stunning presentation, serve it chilled as a refreshing gazpacho-style starter, or drizzle each warm bowl with a thread of basil oil and a grind of black pepper.
Baked bean sandwiches

Humble yet sophisticated, the baked bean sandwich transforms pantry staples into a comforting masterpiece. Here, sweet-savory beans mingle with tangy cheese and crisp bread for a lunch that feels both nostalgic and distinctly elevated. This recipe celebrates how simple ingredients can create extraordinary satisfaction when prepared with care.
Ingredients
– A couple of thick slices of sourdough bread
– A generous cup of your favorite canned baked beans
– A handful of sharp cheddar cheese, shredded
– A tablespoon of unsalted butter, softened
– A splash of Worcestershire sauce
– A pinch of smoked paprika
Instructions
1. Preheat your oven to 375°F and line a small baking sheet with parchment paper.
2. Drain the baked beans in a colander for 2 minutes to remove excess liquid, which prevents a soggy sandwich.
3. Spread the softened butter evenly on one side of each sourdough slice.
4. Place both bread slices buttered-side down on the prepared baking sheet.
5. Stir the Worcestershire sauce and smoked paprika into the drained beans until fully incorporated.
6. Spoon the bean mixture onto one bread slice, spreading it evenly to cover the surface.
7. Sprinkle the shredded cheddar cheese over the beans on the same slice.
8. Carefully place the second bread slice on top, buttered-side up, pressing down gently.
9. Bake for 12–15 minutes, until the bread is golden brown and the cheese is fully melted and bubbly.
10. Remove from the oven and let the sandwich rest for 3 minutes before slicing—this allows the filling to set for cleaner cuts.
11. Slice the sandwich diagonally with a serrated knife to maintain the structure.
A buttery, crisp exterior gives way to a warm, velvety bean filling punctuated by the sharpness of cheddar. For a creative twist, serve it open-faced with a fried egg on top, where the runny yolk mingles beautifully with the savory beans.
Potato soup with minimal ingredients

Comforting in its simplicity yet sophisticated in flavor, this minimalist potato soup transforms humble ingredients into an elegant bowl of warmth. Creamy russet potatoes form the foundation, while a few carefully chosen additions create a velvety texture and rich depth that belies the short ingredient list. Perfect for chilly evenings when you crave something nourishing yet effortless.
Ingredients
– 4 large russet potatoes, peeled and chopped
– 1 medium yellow onion, diced
– 4 cups of chicken broth
– A generous splash of heavy cream
– A couple of tablespoons of butter
– A pinch of salt and freshly ground black pepper
Instructions
1. Melt 2 tablespoons of butter in a large pot over medium heat until it stops foaming.
2. Add 1 diced yellow onion and cook for 5-7 minutes, stirring occasionally, until the onion turns translucent and fragrant.
3. Add 4 peeled and chopped russet potatoes to the pot, stirring to coat them with the butter and onion mixture.
4. Pour in 4 cups of chicken broth, ensuring the potatoes are fully submerged.
5. Bring the mixture to a boil over high heat, then immediately reduce to a gentle simmer.
6. Cover the pot and simmer for 20-25 minutes, until the potatoes are fork-tender and easily mash against the side of the pot.
7. Remove the pot from heat and use an immersion blender to puree the soup until completely smooth, working in slow circles to incorporate air for extra creaminess.
8. Stir in a generous splash of heavy cream until fully incorporated and the soup turns pale ivory.
9. Season with a pinch of salt and several grinds of black pepper, tasting and adjusting until the flavors balance perfectly.
10. Ladle the hot soup into bowls and serve immediately.
Silky and luxurious, this soup achieves remarkable creaminess without overwhelming richness. The earthy potato flavor shines through, complemented by subtle onion sweetness and a peppery finish. For an elegant presentation, garnish with chive blossoms or serve alongside crusty artisan bread for dipping into the velvety texture.
Depression-era milkless cornbread

Harkening back to a time when resourcefulness reigned supreme in American kitchens, this Depression-era cornbread recipe proves that culinary magic can emerge from the humblest of ingredients. With its dairy-free simplicity and rustic charm, this golden quick bread captures the essence of making do without sacrificing flavor or satisfaction. The result is a beautifully textured, slightly crumbly cornbread that stands as a testament to both historical ingenuity and timeless comfort.
Ingredients
– 1 cup of fine yellow cornmeal
– 1 cup of all-purpose flour
– ¼ cup of granulated sugar
– 1 tablespoon of baking powder
– A good pinch of salt
– 1 large egg
– 1 cup of water
– ¼ cup of vegetable oil
– A splash of apple cider vinegar
Instructions
1. Preheat your oven to 400°F and generously grease an 8-inch square baking pan with vegetable oil.
2. In a large mixing bowl, whisk together 1 cup of fine yellow cornmeal, 1 cup of all-purpose flour, ¼ cup of granulated sugar, 1 tablespoon of baking powder, and a good pinch of salt until thoroughly combined.
3. In a separate medium bowl, beat 1 large egg until pale and frothy, about 1 minute of vigorous whisking.
4. Pour 1 cup of water, ¼ cup of vegetable oil, and a splash of apple cider vinegar into the beaten egg, whisking continuously until the liquid mixture is completely emulsified.
5. Tip: The vinegar reacts with the baking powder to create extra lift, so work quickly once the wet and dry ingredients meet.
6. Pour the wet ingredients into the dry ingredients and stir with a wooden spoon just until no dry spots remain—do not overmix.
7. Tip: A few small lumps are perfectly fine; overmixing develops gluten and makes the cornbread tough.
8. Immediately transfer the batter to your prepared pan, spreading it evenly into all corners.
9. Bake at 400°F for 20-25 minutes, until the top is golden brown and a toothpick inserted in the center comes out completely clean.
10. Tip: For an extra-crispy crust, place the pan on the middle oven rack rather than the bottom.
11. Let the cornbread cool in the pan for 10 minutes before slicing into squares.
Fragrant and golden with a delightfully crisp exterior, this cornbread boasts a tender, slightly crumbly crumb that pairs beautifully with hearty bean soups or chili. Its subtle sweetness makes it equally wonderful drizzled with honey for breakfast or crumbled over a fresh garden salad. For a creative twist, try cutting it into cubes and toasting them for rustic croutons that add wonderful texture to your favorite dishes.
Fried dough with sugar or syrup

Golden, pillowy clouds of fried dough have been comforting souls across cultures for centuries, transforming simple pantry staples into ethereal treats that melt on the tongue. Generously dusted with sparkling sugar or drizzled with amber syrup, these humble morsels deliver pure nostalgia in every bite, bridging generations with their irresistible warmth and simplicity.
Ingredients
– 2 cups of all-purpose flour
– A couple tablespoons of granulated sugar
– A good pinch of salt
– 1 packet of active dry yeast
– About ¾ cup of warm milk (around 110°F)
– A splash of vanilla extract
– Enough vegetable oil for frying (about 4 cups)
– Extra sugar for dusting or maple syrup for drizzling
Instructions
1. Combine the flour, sugar, salt, and yeast in a large bowl, whisking until evenly distributed.
2. Pour in the warm milk and vanilla extract, stirring with a wooden spoon until a shaggy dough forms.
3. Knead the dough on a floured surface for 8 minutes until smooth and elastic, adding a sprinkle more flour if it feels sticky.
4. Place the dough in a lightly oiled bowl, cover with a damp kitchen towel, and let rise in a warm spot for 1 hour until doubled in size.
5. Punch down the risen dough to release air bubbles, then roll it out to ½-inch thickness on a floured surface.
6. Use a pizza cutter to slice the dough into 2-inch squares or use a round cutter for traditional shapes.
7. Heat vegetable oil in a heavy-bottomed pot to 350°F, using a candy thermometer to maintain consistent temperature.
8. Carefully lower 3-4 dough pieces into the hot oil using a slotted spoon, frying for 2-3 minutes until golden brown on both sides.
9. Remove the fried dough with a spider strainer and drain on a wire rack set over a baking sheet—this keeps them crisp.
10. While still warm, generously dust with granulated sugar or drizzle with maple syrup for maximum adhesion.
Buttery and airy with a delicate crunch, these fried dough puffs yield to a tender interior that practically dissolves on the tongue. For an elegant twist, serve them stacked with fresh berries and a dollop of whipped cream, or simply enjoy their warm simplicity straight from the cooling rack.
Eggless mayonnaise cake

Venturing beyond traditional baking constraints reveals delightful surprises, and this eggless mayonnaise cake stands as a testament to that culinary truth. With its remarkably moist crumb and subtle tang, this dessert transforms simple pantry staples into an elegant treat that belies its unconventional star ingredient. Perfect for those with dietary restrictions or spontaneous baking urges, it delivers sophistication without complexity.
Ingredients
– 2 cups of all-purpose flour
– 1½ cups of granulated sugar
– 1 cup of mayonnaise (the real star here!)
– 1 cup of water
– 1/3 cup of unsweetened cocoa powder
– 2 teaspoons of baking soda
– 1 teaspoon of vanilla extract
– A good pinch of salt
– A splash of vegetable oil for greasing
Instructions
1. Preheat your oven to 350°F and generously grease a 9-inch round cake pan with vegetable oil, making sure to coat the sides evenly.
2. In a large mixing bowl, whisk together the flour, sugar, cocoa powder, baking soda, and salt until no streaks remain—this ensures even leavening.
3. Create a well in the center of your dry ingredients and add the mayonnaise, water, and vanilla extract all at once.
4. Use an electric mixer on medium speed to blend the batter for exactly 2 minutes, scraping down the bowl halfway through to incorporate everything uniformly.
5. Pour the smooth batter into your prepared pan and gently tap it on the counter to release any large air bubbles.
6. Bake for 30-35 minutes, or until a toothpick inserted into the center comes out clean with just a few moist crumbs attached.
7. Let the cake cool in the pan for 10 minutes before transferring it to a wire rack to cool completely—this prevents steaming and sogginess.
8. For best results, wrap the cooled cake in plastic and let it rest overnight; this allows the flavors to meld and the texture to become supremely tender. What emerges is a cake with a velvety, dense crumb that melts on the tongue, carrying deep chocolate notes balanced by a whisper of tang from the mayonnaise. Serve it dusted with powdered sugar for understated elegance, or slice and layer with fresh berries and whipped cream for a stunning dessert presentation.
Onion and bread soup

Zesty yet comforting, this onion and bread soup transforms humble ingredients into an elegant bowl of warmth. Slowly caramelized onions create a deep, sweet foundation that melds beautifully with crusty bread and rich broth. Perfect for chilly evenings, this rustic dish delivers sophistication through simple technique.
Ingredients
– 4 large yellow onions, thinly sliced
– 3 tablespoons of olive oil
– 2 tablespoons of butter
– 4 thick slices of day-old crusty bread
– 4 cups of chicken or vegetable broth
– 1/2 cup of dry white wine
– a couple of fresh thyme sprigs
– a generous sprinkle of grated Parmesan cheese
– a splash of heavy cream
Instructions
1. Heat olive oil and butter in a large Dutch oven over medium-low heat until the butter melts completely.
2. Add all sliced onions and cook for 40-45 minutes, stirring every 8-10 minutes, until they turn deep golden brown and become jammy in texture.
3. Pour in white wine and scrape any browned bits from the bottom of the pot, cooking for 3-4 minutes until the wine reduces by half.
4. Add broth and thyme sprigs, then bring to a gentle simmer over medium heat.
5. Reduce heat to low and simmer uncovered for 20 minutes to allow flavors to meld.
6. While soup simmers, toast bread slices at 375°F for 8-10 minutes until golden and crisp around the edges.
7. Remove thyme sprigs from the soup and stir in heavy cream until fully incorporated.
8. Place one toasted bread slice in the bottom of each serving bowl.
9. Ladle hot soup directly over the bread in each bowl.
10. Top generously with grated Parmesan cheese just before serving.
Unbelievably silky with sweet onion depth, this soup features bread that softens into pillowy clouds while maintaining subtle texture. The Parmesan creates a savory crust that contrasts beautifully with the creamy broth beneath. For an elegant presentation, serve in shallow bowls with an extra thyme sprig garnish and crusty bread for dipping.
Depression-era creamed chipped beef on toast

Beyond the pages of history lies a humble comfort dish that sustained generations through lean times, its creamy simplicity belying a depth of flavor that continues to comfort modern palates. This Depression-era staple transforms basic pantry ingredients into something remarkably satisfying, where the salty richness of dried beef melds beautifully with a velvety white sauce over crisp toast. Originally known as “SOS” among military families, this dish carries both nostalgia and practicality in every bite.
Ingredients
– 4 ounces of dried chipped beef
– 3 tablespoons of butter
– 3 tablespoons of all-purpose flour
– 2 cups of whole milk
– A good pinch of black pepper
– 4 thick slices of your favorite bread
– A splash of Worcestershire sauce
Instructions
1. Tear the dried chipped beef into small pieces and place them in a medium bowl.
2. Cover the beef pieces with warm water and let them soak for exactly 5 minutes to reduce saltiness, then drain thoroughly and pat dry with paper towels.
3. Toast your bread slices in a toaster until golden brown and crisp, then transfer them to serving plates.
4. Melt the 3 tablespoons of butter in a medium saucepan over medium heat until it bubbles gently.
5. Whisk in the 3 tablespoons of flour and cook for exactly 2 minutes until the mixture turns light golden brown, creating a smooth roux.
6. Gradually pour in the 2 cups of milk while whisking constantly to prevent lumps from forming.
7. Continue cooking and whisking until the sauce thickens noticeably and coats the back of a spoon, about 5-7 minutes.
8. Stir in the drained beef pieces, a good pinch of black pepper, and a splash of Worcestershire sauce.
9. Cook for another 2 minutes until the beef is heated through and the flavors have melded together.
10. Spoon the creamy beef mixture generously over the waiting toast slices, ensuring each piece gets plenty of sauce.
Unbelievably creamy yet satisfyingly substantial, this dish offers a delightful contrast between the velvety sauce and the crisp toast beneath. The Worcestershire sauce adds a subtle umami depth that complements the salty beef beautifully, while the pepper provides just enough warmth to balance the richness. For a contemporary twist, try serving it over roasted potatoes or alongside a simple green salad to cut through the creaminess.
Rice pudding with leftover rice

Tender grains of yesterday’s rice transform into a luxurious dessert that marries humble beginnings with sophisticated comfort. This creamy rice pudding elevates leftover rice into an elegant treat that feels both nostalgic and refined. With just a few pantry staples, you can create a dessert that whispers of grandmother’s kitchen while maintaining contemporary polish.
Ingredients
– About 2 cups of leftover cooked rice
– 2 cups of whole milk
– A generous 1/3 cup of granulated sugar
– A splash of pure vanilla extract (about 1 teaspoon)
– A couple of pinches of ground cinnamon
– A small pat of unsalted butter (about 1 tablespoon)
– A handful of raisins (about 1/4 cup)
Instructions
1. Combine the leftover rice, whole milk, and granulated sugar in a medium saucepan over medium heat.
2. Bring the mixture to a gentle simmer, stirring occasionally with a wooden spoon to prevent sticking.
3. Reduce the heat to low and cook for 20-25 minutes, stirring every 3-4 minutes, until the milk has thickened noticeably and coats the back of your spoon.
4. Stir in the vanilla extract, ground cinnamon, and unsalted butter until the butter melts completely into the pudding.
5. Add the raisins and continue cooking for another 5-7 minutes until they plump up and the pudding reaches your desired consistency.
6. Remove the saucepan from the heat and let the pudding rest for 10 minutes to allow the flavors to meld and the texture to set.
7. Transfer the rice pudding to serving bowls while still warm, or cover and refrigerate for a chilled version.
Luxuriously creamy with just the right amount of toothsome resistance from the rice grains, this pudding offers comforting warmth in every spoonful. The vanilla and cinnamon create a delicate aromatic backdrop that makes this simple dessert feel special enough for company. For an elegant presentation, top with a drizzle of caramel sauce and toasted almond slices, or serve alongside fresh berries for a bright contrast to the rich, creamy base.
Summary
Valuable recipes from tough times still nourish us today. These Depression-era dishes prove delicious meals don’t need fancy ingredients. We hope you’ll try a few, share which ones become your favorites in the comments below, and pin this article to your Pinterest boards to help others discover these timeless treasures. Happy cooking!