Mealtime should be comforting and worry-free, especially when dealing with swallowing difficulties. That’s why we’ve gathered 20 simple, delicious dysphagia recipes that prioritize safety without sacrificing flavor. From creamy soups to soft entrees, these dishes make eating enjoyable again. Let’s explore these nourishing options that bring peace of mind back to your table!
Silky Butternut Squash Soup

Crisp autumn days practically demand a bowl of something cozy, and this butternut squash soup is here to answer the call with the smooth charm of a jazz saxophonist. It’s the culinary equivalent of your favorite soft sweater—warm, comforting, and surprisingly stylish. Let’s turn that gourd into gold, shall we?
Ingredients
For the roasted squash:
– 1 large butternut squash (about 3 lbs), peeled, seeded, and cubed into 1-inch pieces
– 2 tbsp olive oil
– 1 tsp kosher salt
For the soup base:
– 1 tbsp unsalted butter
– 1 medium yellow onion, diced
– 2 cloves garlic, minced
– 4 cups vegetable broth
– 1/2 cup heavy cream
– 1/4 tsp ground nutmeg
– 1/2 tsp black pepper
Instructions
1. Preheat your oven to 400°F.
2. Toss the cubed butternut squash with 2 tbsp olive oil and 1 tsp kosher salt on a rimmed baking sheet.
3. Roast the squash for 30 minutes, or until the edges are caramelized and a fork pierces the cubes easily.
4. Heat 1 tbsp unsalted butter in a large pot over medium heat until it foams.
5. Add the diced onion and cook for 5 minutes, stirring occasionally, until translucent.
6. Stir in the minced garlic and cook for 1 minute, until fragrant.
7. Tip: Don’t let the garlic brown, or it’ll turn bitter—keep the heat medium.
8. Pour in 4 cups vegetable broth and add the roasted squash.
9. Bring the mixture to a boil, then reduce the heat to low and simmer for 10 minutes.
10. Carefully transfer the soup in batches to a blender, filling it only halfway to avoid spills.
11. Tip: Hold the blender lid down with a towel when blending hot liquids to prevent steam explosions.
12. Blend each batch on high for 45 seconds, until completely smooth.
13. Return the blended soup to the pot and stir in 1/2 cup heavy cream, 1/4 tsp ground nutmeg, and 1/2 tsp black pepper.
14. Warm the soup over low heat for 3 minutes, stirring constantly, until heated through.
15. Tip: For extra silkiness, strain the soup through a fine-mesh sieve after blending to catch any fibrous bits.
Silky doesn’t even begin to describe this soup—it’s like liquid velvet with a sweet, nutty depth that whispers of fall. Serve it in hollowed-out mini pumpkins for a festive twist, or top with crispy sage leaves fried in butter for a savory crunch that’ll make you swoon.
Creamy Mashed Potatoes with Gravy
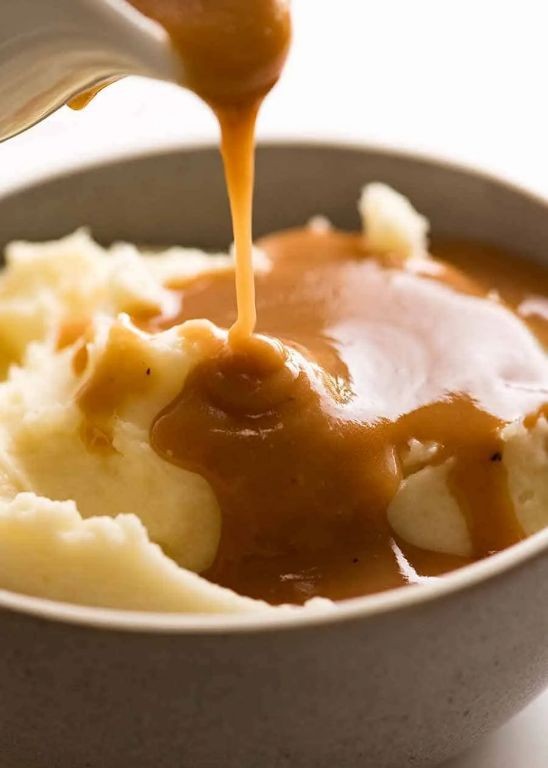
Picture this: you’re about to dive into a cloud-like mountain of mashed potatoes that could make a grown adult weep with joy, all smothered in a gravy so rich it should probably file its own taxes. This isn’t just side dish territory—this is the main event wearing a clever disguise.
Ingredients
For the Mashed Potatoes:
– 3 lbs Yukon Gold potatoes, peeled and quartered
– 1 cup heavy cream
– 1/2 cup unsalted butter
– 1 1/2 tsp salt
– 1/4 tsp black pepper
For the Gravy:
– 1/4 cup unsalted butter
– 1/4 cup all-purpose flour
– 2 cups beef broth
– 1/4 tsp black pepper
Instructions
1. Place the peeled and quartered Yukon Gold potatoes in a large pot and cover with cold water by 1 inch.
2. Bring the pot to a rolling boil over high heat, then reduce heat to maintain a gentle boil.
3. Cook potatoes for 15-20 minutes until they’re fork-tender (a fork should slide through easily without resistance).
4. Drain potatoes completely in a colander, then return them to the warm pot for 30 seconds to evaporate excess moisture.
5. Heat heavy cream and 1/2 cup butter in a small saucepan over medium heat until butter melts and mixture is warm (about 160°F).
6. Mash potatoes with a potato ricer or masher until no large lumps remain.
7. Gradually pour warm cream mixture into potatoes while mashing, creating a smooth consistency.
8. Stir in 1 1/2 teaspoons salt and 1/4 teaspoon black pepper until fully incorporated.
9. Melt 1/4 cup butter in a saucepan over medium heat for the gravy.
10. Whisk in 1/4 cup all-purpose flour and cook for 2 minutes until golden brown, stirring constantly.
11. Slowly pour in 2 cups beef broth while whisking continuously to prevent lumps.
12. Bring gravy to a simmer and cook for 3-5 minutes until thickened enough to coat the back of a spoon.
13. Stir in 1/4 teaspoon black pepper and remove from heat.
14. Serve mashed potatoes immediately topped with warm gravy.
Heavenly doesn’t begin to describe the velvety texture that practically melts on your tongue, while the savory gravy adds a depth that makes every bite feel like a warm hug. Try serving these alongside roasted chicken or use them as a luxurious base for shepherd’s pie—either way, you’ll be fighting over the last spoonful.
Soft Scrambled Eggs with Cheese

Golly, have you ever had scrambled eggs that made you want to write a thank-you note to the chicken? These soft, cheesy clouds of breakfast bliss are about to become your new morning obsession—they’re so dreamy, you might forget to check your phone until the last bite is gone.
Ingredients
- For the egg base:
- 4 large eggs
- 2 tablespoons whole milk
- 1/4 teaspoon kosher salt
- 1/8 teaspoon black pepper
- For cooking and finishing:
- 1 tablespoon unsalted butter
- 1/4 cup shredded sharp cheddar cheese
- 1 tablespoon chopped fresh chives
Instructions
- Crack 4 large eggs into a medium bowl.
- Add 2 tablespoons whole milk, 1/4 teaspoon kosher salt, and 1/8 teaspoon black pepper to the bowl.
- Whisk the mixture vigorously for 45 seconds until fully combined and slightly frothy.
- Place a nonstick skillet over low heat and let it warm for 2 minutes.
- Add 1 tablespoon unsalted butter to the skillet and swirl until melted and coating the bottom.
- Pour the egg mixture into the skillet.
- Let the eggs sit undisturbed for 30 seconds until the edges just begin to set.
- Gently push the eggs from the edges toward the center with a spatula every 20 seconds, creating soft curds.
- Continue this low-and-slow process for 4–5 minutes until the eggs are mostly set but still slightly wet.
- Sprinkle 1/4 cup shredded sharp cheddar cheese evenly over the eggs.
- Fold the cheese into the eggs gently until just incorporated and melted, about 30 seconds.
- Remove the skillet from the heat immediately.
- Garnish with 1 tablespoon chopped fresh chives.
Just look at that velvety texture—each bite melts like a cheesy hug for your taste buds. Serve these eggs piled on toasted sourdough or tucked into a warm tortilla for a breakfast taco that’ll make your mornings feel like a weekend, even on a Tuesday.
Pureed Chicken and Rice Casserole

Venture into the world of comfort food that’s so smooth, it’ll make your blender jealous! This pureed chicken and rice casserole is the ultimate cozy hug in a dish, perfect for when you want something deliciously simple without the chewing commitment. Let’s get blending!
Ingredients
For the Chicken and Rice Base:
– 1 cup long-grain white rice
– 2 cups low-sodium chicken broth
– 1 lb boneless, skinless chicken breasts, cut into 1-inch cubes
– 1/2 cup finely chopped yellow onion
– 2 cloves garlic, minced
– 1 tbsp olive oil
For the Creamy Puree:
– 1 cup whole milk
– 1/2 cup grated Parmesan cheese
– 1/4 cup unsalted butter, melted
– 1 tsp salt
– 1/2 tsp black pepper
For Topping:
– 1/2 cup panko breadcrumbs
– 2 tbsp melted butter
Instructions
1. Preheat your oven to 375°F and lightly grease a 9×13-inch baking dish with non-stick spray.
2. Heat 1 tbsp olive oil in a large skillet over medium heat until shimmering, about 1 minute.
3. Add 1/2 cup chopped onion and sauté for 3-4 minutes until translucent and fragrant.
4. Stir in 2 minced garlic cloves and cook for 30 seconds until golden—don’t let it burn!
5. Add 1 lb cubed chicken breasts and cook for 6-7 minutes, turning occasionally, until no longer pink inside.
6. Transfer the chicken mixture to the prepared baking dish and spread it evenly.
7. Sprinkle 1 cup uncooked rice over the chicken in a single layer.
8. Pour 2 cups chicken broth evenly over the rice and chicken.
9. Cover the dish tightly with aluminum foil and bake at 375°F for 25 minutes.
10. Remove from oven and carefully uncover—steam alert!
11. Transfer the baked mixture to a blender or food processor.
12. Add 1 cup whole milk, 1/2 cup Parmesan, 1/4 cup melted butter, 1 tsp salt, and 1/2 tsp pepper.
13. Blend on high speed for 60-90 seconds until completely smooth and creamy.
14. Pour the puree back into the baking dish and spread it evenly with a spatula.
15. In a small bowl, mix 1/2 cup panko breadcrumbs with 2 tbsp melted butter until coated.
16. Sprinkle the buttery panko evenly over the puree.
17. Bake uncovered at 375°F for 15-18 minutes until the topping is golden brown and crispy.
18. Let it cool for 5 minutes before serving—patience, it’s lava-hot!
Fabulously smooth and velvety, this casserole delivers a rich, savory flavor with a satisfying crunch from the golden panko topping. Serve it in colorful ramekins for a fancy individual presentation, or dollop it over roasted vegetables for a textural contrast that’ll make every spoonful a delight.
Blended Banana Oatmeal

Nope, your morning oatmeal doesn’t have to be a sad, lumpy affair that makes you question all your life choices. This blended banana oatmeal is here to rescue your breakfast routine with the creamy texture of a smoothie and the comforting warmth of traditional oats—basically, it’s what would happen if a milkshake and oatmeal had a delicious baby. Get ready to make your taste buds do a happy dance while secretly getting your fiber fix!
Ingredients
For the Blended Base
– 1 cup old-fashioned rolled oats
– 1 very ripe banana (the spottier, the sweeter!)
– 1 ½ cups milk of choice
– 1 tablespoon maple syrup
– ½ teaspoon vanilla extract
– Pinch of salt
For Cooking & Toppings
– ½ cup water
– Optional toppings: fresh berries, chopped nuts, or extra banana slices
Instructions
1. Combine 1 cup old-fashioned rolled oats, 1 very ripe banana, 1 ½ cups milk, 1 tablespoon maple syrup, ½ teaspoon vanilla extract, and a pinch of salt in a blender.
2. Blend on high speed for 45-60 seconds until completely smooth and no oat pieces remain.
3. Pour the blended mixture into a medium saucepan and add ½ cup water.
4. Cook over medium heat, stirring constantly with a whisk or spatula, for 5-7 minutes until the oatmeal thickens noticeably and tiny bubbles form around the edges.
5. Reduce heat to low and continue cooking for 2 more minutes, stirring frequently, until the oatmeal reaches your desired thickness.
6. Remove from heat and let stand for 1 minute to allow the oats to fully absorb the liquid.
7. Serve immediately in bowls and top with fresh berries, chopped nuts, or extra banana slices if desired.
Creamy doesn’t even begin to describe this dreamy breakfast situation—the blended oats create a velvety texture that’s somewhere between pudding and porridge, while the banana provides natural sweetness that makes you forget you’re eating something actually good for you. Try it chilled overnight for a grab-and-go breakfast, or go wild and layer it with granola for an instant parfait that’ll make your coworkers jealous.
Smooth Avocado Yogurt
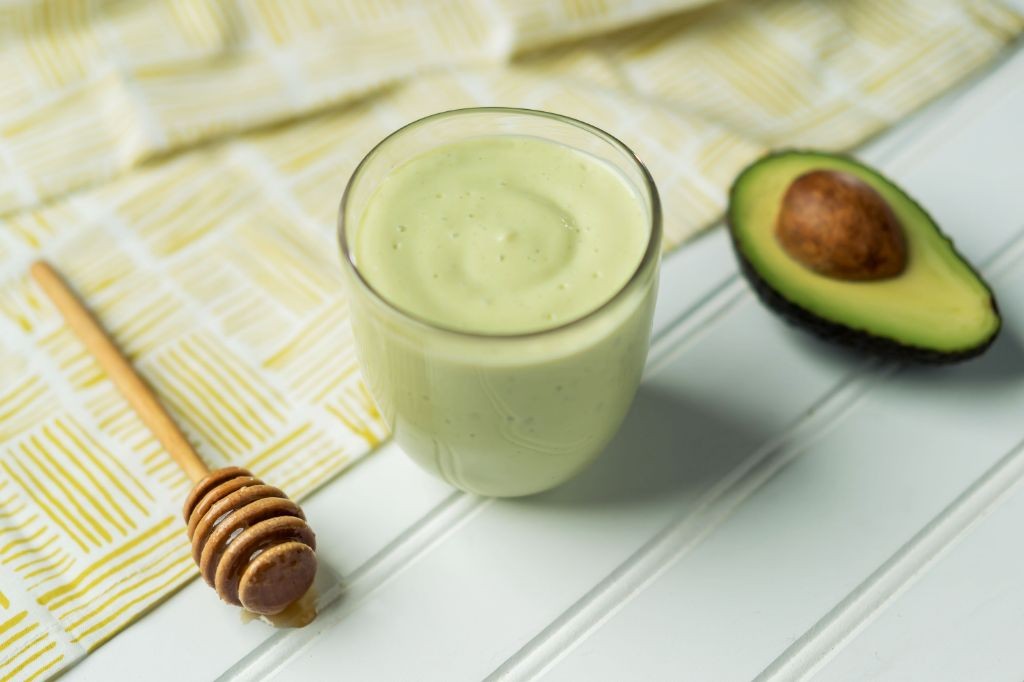
Yikes, your boring breakfast routine called—it wants its lackluster vibes back! Meet your new creamy obsession: this smooth avocado yogurt that’s so dreamy, it’ll make your morning toast weep with joy. Think velvety green goodness that’s part brunch superstar, part snack-time hero, and 100% ridiculously easy to whip up.
Ingredients
For the base blend:
– 1 large ripe avocado, pitted and peeled
– 1 cup plain Greek yogurt
– 2 tbsp fresh lime juice
– 1 tbsp honey
– ¼ tsp salt
For garnish (optional but fabulous):
– 1 tbsp chopped fresh cilantro
– 1 tsp toasted sesame seeds
– A pinch of red pepper flakes
Instructions
1. Scoop the avocado flesh into a medium mixing bowl, discarding the pit and skin.
2. Add the Greek yogurt, lime juice, honey, and salt to the bowl.
3. Use a fork or immersion blender to mash and mix everything until completely smooth and no avocado chunks remain—this should take about 2 minutes of vigorous blending. (Tip: For ultra-creamy results, ensure your avocado is perfectly ripe; it should yield slightly to gentle pressure.)
4. Taste the mixture and adjust salt or honey if desired, but avoid overmixing once blended.
5. Transfer the smooth avocado yogurt to a serving bowl.
6. Sprinkle the chopped cilantro, toasted sesame seeds, and red pepper flakes evenly over the top for a pop of color and crunch. (Tip: Toast sesame seeds in a dry skillet over medium heat for 1–2 minutes until golden and fragrant, shaking the pan frequently to prevent burning.)
7. Serve immediately or cover and refrigerate for up to 1 hour to chill slightly. (Tip: Press plastic wrap directly onto the surface before storing to prevent browning from air exposure.)
Creamy, tangy, and subtly sweet, this avocado yogurt boasts a luxuriously smooth texture that’s spreadable, dippable, or downright spoonable. Slather it on whole-grain toast, dollop it over grilled chicken, or simply devour it straight from the bowl—it’s the versatile green goddess your fridge didn’t know it needed.
Pureed Lentil Stew

Phew, who knew humble lentils could transform into such velvety comfort? This pureed lentil stew is basically a warm hug in a bowl that won’t judge you for wearing sweatpants at 2 PM. Get ready to blend your way to cozy-town with this ridiculously simple yet soul-satisfying creation.
Ingredients
For the Base
- 1 tbsp olive oil
- 1 medium yellow onion, diced
- 2 carrots, peeled and chopped
- 2 celery stalks, chopped
- 3 garlic cloves, minced
For the Stew
- 1 cup brown lentils, rinsed
- 4 cups vegetable broth
- 1 tsp cumin
- 1/2 tsp smoked paprika
- 1/2 cup coconut milk
- 1 tbsp lemon juice
Instructions
- Heat 1 tbsp olive oil in a large pot over medium heat until shimmering.
- Add diced onion, chopped carrots, and chopped celery, sautéing for 8 minutes until vegetables soften.
- Stir in minced garlic and cook for 1 minute until fragrant.
- Add 1 cup rinsed brown lentils to the pot.
- Pour in 4 cups vegetable broth, scraping any browned bits from the bottom.
- Stir in 1 tsp cumin and 1/2 tsp smoked paprika until well combined.
- Bring the stew to a boil, then reduce heat to low and cover with a lid.
- Simmer for 35 minutes until lentils are completely tender.
- Remove the pot from heat and let cool for 5 minutes.
- Carefully transfer the stew to a blender in batches, filling only halfway.
- Blend on high speed for 45 seconds until completely smooth and creamy.
- Return the pureed stew to the pot over low heat.
- Stir in 1/2 cup coconut milk until fully incorporated.
- Add 1 tbsp lemon juice and stir to combine.
- Heat for 3 minutes until warmed through, then serve immediately.
Now, about that silky-smooth texture that practically whispers “spoon me” – it’s the culinary equivalent of your favorite blanket fresh from the dryer. The coconut milk adds just enough richness to make you feel fancy, while the lemon juice cuts through with a welcome zing. Try serving it in hollowed-out bread bowls for maximum cozy-points, or drizzle with chili oil if you’re feeling spicy.
Soft Poached Salmon with Dill Sauce
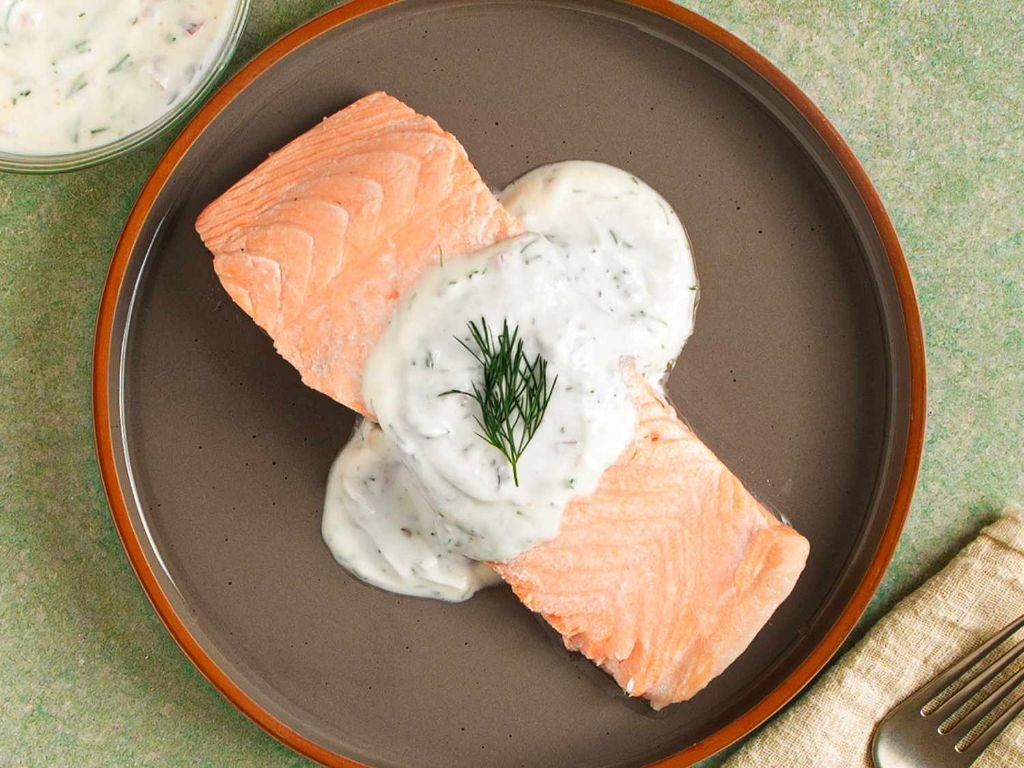
Oh, the drama of perfectly poached salmon—it’s like a spa day for fish, but you get to eat the results. This soft poached salmon with dill sauce is so tender it practically melts on your tongue, and the creamy, herby sauce is the zesty sidekick it deserves. Let’s dive in and make your kitchen smell like a fancy seaside bistro without the pretentious prices.
Ingredients
For the poached salmon:
– 2 salmon fillets (6 oz each), skin-on
– 4 cups water
– 1 lemon, sliced
– 2 sprigs fresh dill
– 1 tsp salt
For the dill sauce:
– 1/2 cup Greek yogurt
– 2 tbsp fresh dill, chopped
– 1 tbsp lemon juice
– 1/4 tsp black pepper
Instructions
1. Combine 4 cups water, 1 tsp salt, lemon slices, and dill sprigs in a large skillet over high heat.
2. Bring the liquid to a gentle simmer (around 180°F), where small bubbles form but it’s not boiling vigorously.
3. Carefully place the salmon fillets skin-side down into the simmering liquid.
4. Poach the salmon for 8–10 minutes, until the flesh turns opaque and flakes easily with a fork.
5. Tip: Keep the heat low to avoid overcooking—the salmon should jiggle slightly when shaken.
6. Remove the salmon from the liquid using a slotted spatula and let it rest on a plate for 2 minutes.
7. In a small bowl, mix 1/2 cup Greek yogurt, 2 tbsp chopped dill, 1 tbsp lemon juice, and 1/4 tsp black pepper until smooth.
8. Tip: Stir the sauce gently to keep it creamy; overmixing can make it runny.
9. Drizzle the dill sauce over the poached salmon just before serving.
10. Tip: For extra flavor, spoon a bit of the warm poaching liquid over the salmon after plating.
Unbelievably silky and subtly briny, this salmon pairs beautifully with crispy roasted potatoes or a simple arugula salad. The dill sauce adds a cool, tangy contrast that makes each bite feel like a mini celebration—try it stuffed into lettuce wraps for a low-carb twist that’s downright addictive.
Blended Pea and Mint Soup
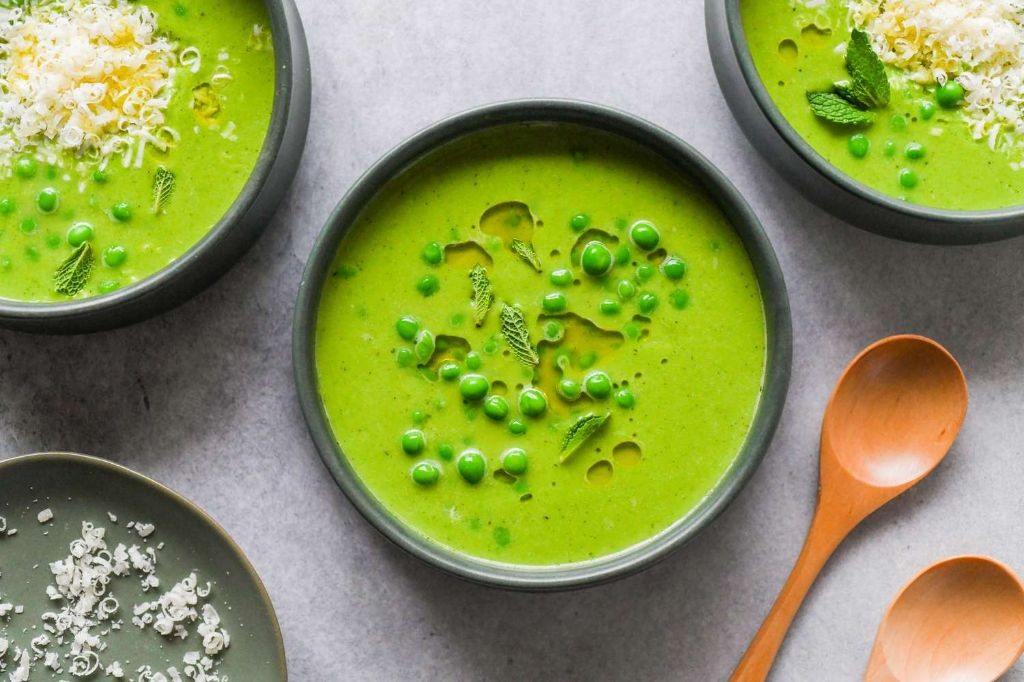
Gosh, who knew those frozen peas lurking in your freezer could transform into something this spectacular? This vibrant green elixir is basically a spa day in a bowl—cool, refreshing, and ridiculously easy to whip up when you’re craving something fancy without the fuss. Consider it your secret weapon for impressing guests (or just treating yourself) with minimal effort and maximum flavor payoff.
Ingredients
– For the soup base: 2 tablespoons olive oil, 1 medium yellow onion (diced), 2 cloves garlic (minced), 4 cups frozen peas, 4 cups vegetable broth
– For blending and finishing: 1/2 cup fresh mint leaves (packed), 1/2 cup heavy cream, 1 tablespoon lemon juice, 1/2 teaspoon salt, 1/4 teaspoon black pepper
Instructions
1. Heat 2 tablespoons olive oil in a large pot over medium heat for 1 minute until shimmering.
2. Add 1 diced yellow onion and cook for 5–7 minutes, stirring occasionally, until translucent and fragrant.
3. Stir in 2 minced garlic cloves and cook for 1 minute until aromatic but not browned.
4. Pour in 4 cups frozen peas and 4 cups vegetable broth, then bring to a boil over high heat.
5. Reduce heat to medium-low, cover the pot, and simmer for 8 minutes until peas are tender but still bright green.
6. Carefully transfer the hot soup mixture to a blender, add 1/2 cup fresh mint leaves, and blend on high for 1–2 minutes until completely smooth.
7. Return the blended soup to the pot and stir in 1/2 cup heavy cream, 1 tablespoon lemon juice, 1/2 teaspoon salt, and 1/4 teaspoon black pepper.
8. Warm the soup over low heat for 3–4 minutes, stirring constantly, until heated through but not boiling.
My, what a velvety smooth texture this soup boasts—it’s like sipping on a cool, creamy garden. The mint adds a refreshing zing that plays perfectly against the sweet peas, making it ideal for serving chilled in fancy glasses or hot with a dollop of yogurt and extra mint sprigs for a restaurant-worthy touch.
Silky Pumpkin Custard

Gather ’round, pumpkin enthusiasts! This silky custard is basically autumn in a ramekin—smooth, sophisticated, and secretly easy enough to make while binge-watching your favorite spooky series. Forget the stress of pie crusts; this dessert is all about that velvety texture and cozy spice hug.
Ingredients
For the custard base:
– 1 (15-ounce) can pure pumpkin puree
– 3/4 cup granulated sugar
– 1 teaspoon ground cinnamon
– 1/2 teaspoon ground ginger
– 1/4 teaspoon ground nutmeg
– 1/4 teaspoon salt
– 4 large eggs
For the creamy mixture:
– 1 cup heavy cream
– 1 cup whole milk
– 1 teaspoon vanilla extract
Instructions
1. Preheat your oven to 325°F and arrange six 6-ounce ramekins in a large baking dish.
2. In a large bowl, whisk together the pumpkin puree, granulated sugar, cinnamon, ginger, nutmeg, and salt until completely smooth.
3. Crack the eggs into the pumpkin mixture and whisk vigorously for 1 full minute until fully incorporated and slightly frothy.
4. Pour in the heavy cream, whole milk, and vanilla extract, then whisk for another 2 minutes until the mixture is uniform and airy.
5. Divide the custard evenly among the ramekins, filling each about 3/4 full.
6. Carefully pour hot water into the baking dish around the ramekins until it reaches halfway up their sides.
7. Bake at 325°F for 45-50 minutes, until the edges are set but the centers still jiggle slightly when shaken.
8. Remove the ramekins from the water bath and cool on a wire rack for 1 hour.
9. Cover with plastic wrap and refrigerate for at least 4 hours, or overnight, until fully chilled and firm.
Zesty with spice yet mellowed by cream, this custard emerges from the fridge with the consistency of satin and the soul of a pumpkin patch. Serve it straight from the ramekin with a dollop of whipped cream, or get fancy with a caramel drizzle and toasted pecans for that extra crunch—either way, it’s the effortless star of any fall table.
Pureed Beef and Vegetable Medley

Hear ye, hear ye, all you busy bees and kitchen-phobes! This Pureed Beef and Vegetable Medley is about to become your new best friend—it’s the cozy, no-fuss hug your blender has been dreaming of, and it’s so forgiving even your cat could probably whip it up (if only they had opposable thumbs).
Ingredients
For the beef base:
– 1 lb ground beef (80/20 blend for maximum flavor)
– 1 tbsp olive oil
– 1 medium yellow onion, diced
– 2 cloves garlic, minced
– 1 tsp salt
– ½ tsp black pepper
For the vegetable blend:
– 2 large carrots, peeled and chopped
– 2 cups chopped butternut squash
– 1 cup frozen peas
– 4 cups low-sodium beef broth
– 1 tsp dried thyme
Instructions
1. Heat 1 tbsp olive oil in a large pot over medium-high heat until it shimmers.
2. Add 1 lb ground beef and cook for 5–7 minutes, breaking it up with a spatula until no pink remains.
3. Stir in the diced onion and minced garlic, cooking for 3–4 minutes until the onion turns translucent and fragrant.
4. Sprinkle in 1 tsp salt and ½ tsp black pepper, stirring to coat the beef mixture evenly.
5. Add the chopped carrots and butternut squash to the pot, stirring to combine with the beef.
6. Pour in 4 cups low-sodium beef broth and 1 tsp dried thyme, bringing the mixture to a boil.
7. Reduce the heat to low, cover the pot, and simmer for 20 minutes until the vegetables are fork-tender.
8. Stir in 1 cup frozen peas and cook for an additional 3 minutes until they’re bright green and heated through.
9. Carefully transfer the entire mixture to a blender, securing the lid tightly.
10. Blend on high speed for 1–2 minutes until completely smooth and creamy, pausing to scrape down the sides if needed.
This velvety puree is like a savory cloud with a subtle sweetness from the carrots and squash, making it perfect for cozy nights or even fancying it up with a drizzle of truffle oil and crusty bread for dipping—because who says purees can’t be posh?
Soft Baked Apples with Cinnamon
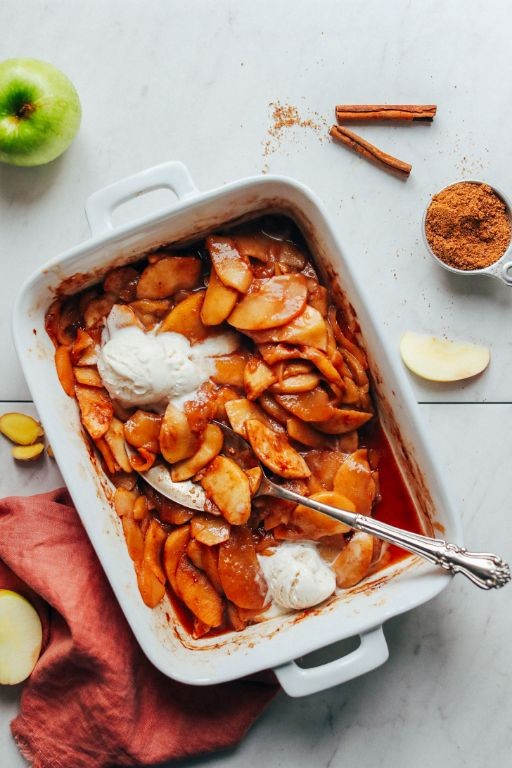
Gosh, is there anything more delightfully autumnal than your kitchen smelling like a cinnamon-scented hug? These soft baked apples are basically fall in dessert form—warm, cozy, and guaranteed to make you forget about that pile of leaves waiting in your yard. They’re so simple, even your oven will feel like it’s showing off.
Ingredients
For the Apple Filling:
- 4 large apples (such as Honeycrisp or Granny Smith)
- 1/4 cup brown sugar
- 1 tsp ground cinnamon
- 2 tbsp unsalted butter, cubed
For the Topping & Baking:
- 1/2 cup water
- 1/4 cup granulated sugar
Instructions
- Preheat your oven to 375°F (190°C) and grab an 8×8-inch baking dish.
- Core all 4 apples completely, leaving the bottoms intact to create little cups. Tip: Use a melon baller for easy coring without breaking the apples.
- In a small bowl, mix together 1/4 cup brown sugar and 1 tsp ground cinnamon until well combined.
- Stuff each cored apple evenly with the brown sugar-cinnamon mixture, packing it down gently.
- Top each stuffed apple with the cubed 2 tbsp unsalted butter, dividing it equally among them.
- Place the filled apples in the baking dish, spacing them apart so they don’t steam each other.
- Pour 1/2 cup water into the bottom of the dish around the apples (not over them).
- Sprinkle 1/4 cup granulated sugar evenly over the apples and into the water in the dish.
- Bake at 375°F for 40–45 minutes, or until the apples are tender when pierced with a fork and the tops are lightly caramelized. Tip: Baste the apples with the pan juices halfway through for extra flavor and gloss.
- Remove from the oven and let cool for 5–10 minutes before serving. Tip: They’ll be molten-lava hot, so patience is a virtue (and a burn-preventer).
The apples turn meltingly soft, almost like a cross between pie filling and apple sauce, with a caramel-kissed top that crackles slightly. Serve them warm with a scoop of vanilla ice cream for a cozy dessert, or spoon the syrupy pan juices over pancakes the next morning—because why should dessert have all the fun?
Creamy Polenta with Parmesan
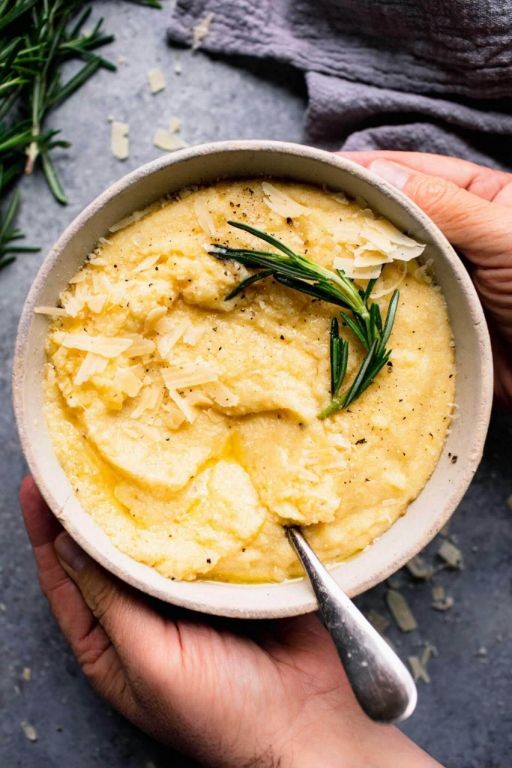
Oh, the humble polenta—often overlooked in favor of its trendier grain cousins, but today we’re giving it the creamy, cheesy glow-up it so rightly deserves. Imagine a bowl of pure comfort that’s smoother than your best excuse for skipping the gym and cheesier than a rom-com marathon. Let’s turn that cornmeal into a velvety dream you’ll want to face-plant into.
Ingredients
– For the polenta base: 1 cup coarse-ground yellow cornmeal, 4 cups water, 1 tsp fine sea salt
– For finishing: 1/2 cup grated Parmesan cheese, 2 tbsp unsalted butter, 1/4 cup heavy cream
Instructions
1. Pour 4 cups of water into a medium saucepan and bring it to a rolling boil over high heat.
2. Whisk in 1 cup of coarse-ground yellow cornmeal in a slow, steady stream to prevent lumps from forming.
3. Reduce the heat to low and simmer the polenta, stirring frequently with a wooden spoon for 25–30 minutes until it thickens and pulls away from the sides of the pan.
4. Stir in 1 tsp of fine sea salt until fully incorporated.
5. Add 2 tbsp of unsalted butter and stir until melted and glossy.
6. Pour in 1/4 cup of heavy cream and mix until the polenta becomes luxuriously smooth.
7. Fold in 1/2 cup of grated Parmesan cheese until evenly distributed and melted.
8. Remove the polenta from the heat and let it rest for 2 minutes to allow the flavors to meld.
Now, that silky, cloud-like texture is your blank canvas—top it with saucy mushrooms for an earthy twist or a runny fried egg for breakfast-for-dinner vibes. Each spoonful delivers a rich, savory punch from the Parmesan, balanced by the cornmeal’s subtle sweetness, making it the ultimate cozy companion for any season.
Pureed Carrot and Ginger Soup

Huddle up, soup lovers! This pureed carrot and ginger concoction is about to become your new favorite cozy companion—it’s basically a warm hug in a bowl that’s bold enough to kick seasonal sniffles to the curb with a zesty grin.
Ingredients
- For the Base:
- 2 tablespoons olive oil
- 1 medium yellow onion, chopped
- 3 cloves garlic, minced
- 1 tablespoon freshly grated ginger
- For the Soup:
- 1 pound carrots, peeled and sliced into 1/2-inch rounds
- 4 cups vegetable broth
- 1/2 cup heavy cream
- 1/2 teaspoon salt
- 1/4 teaspoon black pepper
Instructions
- Heat 2 tablespoons olive oil in a large pot over medium heat until it shimmers.
- Add 1 chopped yellow onion and sauté for 5 minutes, stirring occasionally, until translucent.
- Stir in 3 minced garlic cloves and 1 tablespoon grated ginger; cook for 1 minute until fragrant. Tip: Grate ginger frozen for less mess and easier peeling!
- Add 1 pound sliced carrots and 4 cups vegetable broth to the pot.
- Bring the mixture to a boil, then reduce heat to low, cover, and simmer for 20 minutes until carrots are fork-tender.
- Carefully transfer the soup to a blender and blend on high for 2 minutes until completely smooth. Tip: Leave the blender lid slightly ajar to let steam escape and avoid a hot soup explosion.
- Return the pureed soup to the pot and stir in 1/2 cup heavy cream, 1/2 teaspoon salt, and 1/4 teaspoon black pepper.
- Warm over low heat for 3 minutes, stirring constantly, until heated through. Tip: For a dairy-free twist, swap heavy cream with coconut milk for a tropical vibe.
Get ready to swoon over that velvety-smooth texture and the spicy-sweet dance of ginger and carrot. Dollop with yogurt or crown with crunchy croutons for a bowl that’s as fun to style as it is to slurp!
Blended Tuna Salad
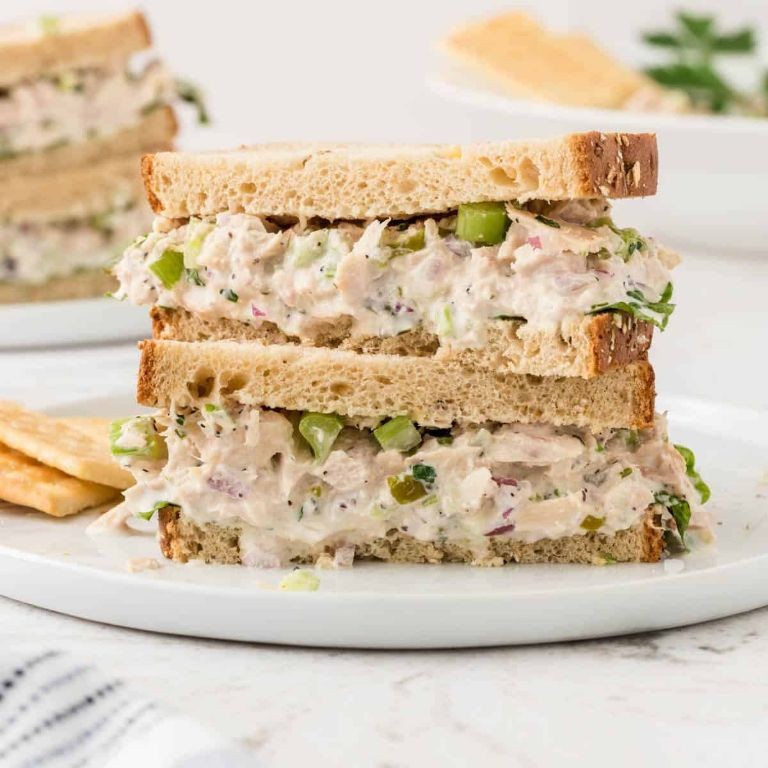
Pondering what to do with that can of tuna staring at you from the pantry? Prepare to be amazed, because we’re about to transform that humble fish into the creamiest, dreamiest blended tuna salad your taste buds have ever encountered—no sad, dry sandwiches allowed!
Ingredients
– For the tuna base: 2 (5-ounce) cans of solid white tuna in water (drained), 1/2 cup mayonnaise, 1/4 cup plain Greek yogurt, 1 tablespoon Dijon mustard, 1 tablespoon lemon juice
– For the mix-ins: 1/4 cup finely diced red onion, 1/4 cup finely chopped celery, 2 tablespoons sweet pickle relish, 1/4 teaspoon garlic powder, 1/4 teaspoon black pepper
Instructions
1. Drain both cans of tuna thoroughly by pressing the lids against the fish to squeeze out excess liquid.
2. Add the drained tuna, mayonnaise, Greek yogurt, Dijon mustard, and lemon juice to a food processor or high-speed blender.
3. Pulse the mixture 5–7 times, just until the tuna breaks down and the ingredients combine into a creamy, spreadable consistency—don’t over-blend into paste! (Tip: For chunkier texture, pulse fewer times.)
4. Transfer the blended tuna mixture to a medium mixing bowl.
5. Add the diced red onion, chopped celery, sweet pickle relish, garlic powder, and black pepper to the bowl.
6. Fold all ingredients together with a spatula until the mix-ins are evenly distributed. (Tip: Let it chill for 30 minutes in the fridge for flavors to meld beautifully.)
7. Taste and adjust seasoning if needed, but remember the relish adds sweetness and the mustard brings tang.
8. Serve immediately or store covered in the refrigerator for up to 3 days. (Tip: Spread it on toasted sourdough with crisp lettuce for ultimate crunch contrast.)
Yum—this blended wonder delivers a luxuriously smooth base with pops of celery crunch and sweet relish tang. Slather it on croissants, stuff it into avocados, or scoop it with ridged potato chips for a texture party that’ll make you forget tuna salad ever had a boring era.
Soft Steamed Fish with Lemon Butter

Ready to transform that boring fish fillet into a cloud of citrusy, buttery perfection that’ll make your taste buds do a happy dance? This soft steamed fish with lemon butter is so tender it practically melts on your tongue, delivering restaurant-quality elegance with minimal effort—because who has time for complicated recipes on a Tuesday?
Ingredients
For the Fish
– 1 lb white fish fillets (like cod or tilapia)
– 1/2 tsp salt
– 1/4 tsp black pepper
For the Lemon Butter Sauce
– 4 tbsp unsalted butter
– 2 tbsp fresh lemon juice
– 1 tsp lemon zest
– 1 tbsp chopped fresh parsley
– 1/4 tsp garlic powder
For Steaming
– 1 cup water
Instructions
1. Pat the 1 lb white fish fillets completely dry with paper towels to ensure even steaming.
2. Season both sides of the fish with 1/2 tsp salt and 1/4 tsp black pepper.
3. Pour 1 cup water into a large skillet and bring to a simmer over medium-high heat.
4. Place the seasoned fish fillets in a single layer in a steamer basket above the simmering water.
5. Cover the skillet tightly with a lid and steam the fish for 8-10 minutes until opaque and flaky.
6. While the fish steams, melt 4 tbsp unsalted butter in a small saucepan over low heat.
7. Whisk 2 tbsp fresh lemon juice and 1 tsp lemon zest into the melted butter until fully combined.
8. Stir in 1 tbsp chopped fresh parsley and 1/4 tsp garlic powder to the butter mixture.
9. Carefully remove the steamed fish from the skillet using a spatula and transfer to serving plates.
10. Drizzle the warm lemon butter sauce generously over the steamed fish fillets.
Creamy, citrus-kissed butter cascades over fish so tender it flakes at the mere suggestion of a fork. The bright lemon zing cuts through the richness beautifully, creating a light yet indulgent experience that pairs magically with crisp roasted asparagus or fluffy jasmine rice. Seriously, this dish brings such elegant comfort to your table, you might just start serving it for fancy Tuesday nights.
Silky Chocolate Pudding
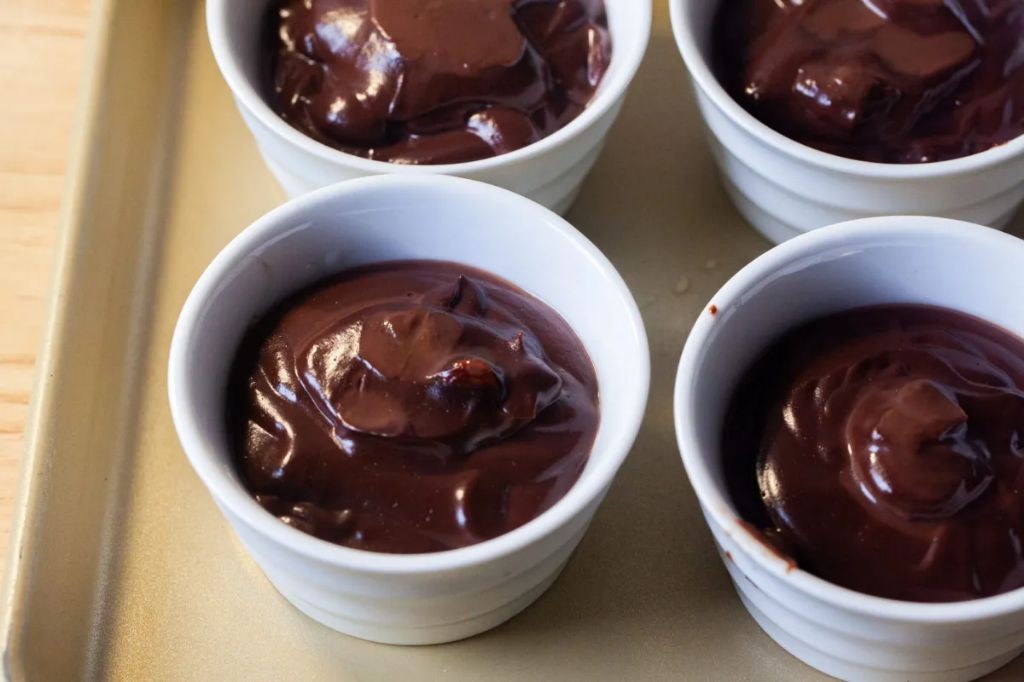
Mmm, let’s be real—this isn’t your grandma’s lumpy, sad pudding. This silky chocolate pudding is the dessert equivalent of slipping into silk pajamas after a long day: luxurious, smooth, and deeply comforting. It’s the kind of treat that makes you want to hide the bowl from your family, and honestly, we support that 100%.
Ingredients
– For the base: 1/2 cup granulated sugar, 1/4 cup unsweetened cocoa powder, 3 tbsp cornstarch, 1/4 tsp salt
– For the dairy mixture: 2 cups whole milk, 1/2 cup heavy cream
– For finishing: 4 oz semi-sweet chocolate (chopped), 2 tbsp unsalted butter, 1 tsp vanilla extract
Instructions
1. In a medium saucepan, whisk together 1/2 cup granulated sugar, 1/4 cup unsweetened cocoa powder, 3 tbsp cornstarch, and 1/4 tsp salt until no lumps remain.
2. Gradually pour in 2 cups whole milk and 1/2 cup heavy cream while whisking constantly to prevent clumps from forming.
3. Place the saucepan over medium heat and cook, stirring continuously with a spatula, until the mixture thickens and begins to bubble gently, about 8–10 minutes.
4. Reduce heat to low and simmer for exactly 1 minute while stirring to cook out the starchy taste from the cornstarch.
5. Remove the saucepan from the heat and immediately stir in 4 oz chopped semi-sweet chocolate until fully melted and smooth.
6. Add 2 tbsp unsalted butter and 1 tsp vanilla extract, stirring until the butter is completely incorporated and the pudding is glossy.
7. Pour the pudding through a fine-mesh sieve into a clean bowl to remove any potential lumps and ensure maximum silkiness.
8. Press plastic wrap directly onto the surface of the pudding to prevent a skin from forming as it cools.
9. Refrigerate the pudding for at least 4 hours, or until completely chilled and set.
Let’s talk texture: this pudding is so velvety it practically glides off the spoon, with a deep chocolate flavor that’s rich but not overly sweet. For a next-level move, layer it in glasses with crushed peppermint cookies or top with a dollop of espresso-spiked whipped cream—because why should your taste buds have a boring day?
Pureed Cauliflower and Cheese

Jazz up your dinner game with this ridiculously creamy pureed cauliflower and cheese that’s basically mashed potatoes’ cooler, low-carb cousin. It’s so velvety and cheesy, you’ll forget there’s a vegetable hiding in there—until your body thanks you later. Trust me, this is the side dish that might just steal the spotlight from the main event.
Ingredients
For the cauliflower base:
– 1 large head cauliflower, cut into florets
– 2 tablespoons unsalted butter
– 1/2 cup heavy cream
– 1/2 teaspoon garlic powder
– 1/4 teaspoon black pepper
For the cheesy finish:
– 1 cup shredded sharp cheddar cheese
– 1/4 cup grated Parmesan cheese
– 1/4 teaspoon salt
Instructions
1. Place the cauliflower florets in a large pot and add enough water to cover them by 1 inch.
2. Bring the water to a boil over high heat, then reduce the heat to medium and simmer for 10 minutes until the cauliflower is fork-tender.
3. Drain the cauliflower thoroughly in a colander, pressing gently with a spoon to remove excess water (this prevents a watery puree).
4. Transfer the drained cauliflower to a food processor or blender.
5. Add the unsalted butter, heavy cream, garlic powder, and black pepper to the food processor.
6. Blend on high speed for 1 minute until the mixture is completely smooth and no lumps remain.
7. Scrape down the sides of the food processor with a spatula to ensure even blending.
8. Transfer the pureed cauliflower to a medium saucepan over low heat.
9. Stir in the shredded sharp cheddar cheese, grated Parmesan cheese, and salt.
10. Cook for 3–4 minutes, stirring constantly, until the cheeses are fully melted and the mixture is heated through.
A silky, cloud-like texture meets a bold cheddar kick in every spoonful—this isn’t your grandma’s cauliflower. Try scooping it into roasted bell peppers or using it as a decadent dip for crispy bacon strips. It’s the cozy comfort food that somehow feels a little fancy, too.
Blended Mango Smoothie

Smoothie season just got a major upgrade, folks! Forget those sad, watery concoctions—this blended mango smoothie is basically sunshine in a glass, ready to rescue your taste buds from bland beverage purgatory in under five minutes flat. It’s the tropical vacation your blender has been dreaming of, no passport required.
Ingredients
- For the smoothie base:
- 2 cups frozen mango chunks
- 1 cup plain Greek yogurt
- 1/2 cup orange juice
- 1 tablespoon honey
- 1/2 teaspoon vanilla extract
- For optional garnish:
- Fresh mint leaves
- Toasted coconut flakes
Instructions
- Add 2 cups frozen mango chunks to your blender pitcher.
- Measure 1 cup plain Greek yogurt and pour it over the mango.
- Pour 1/2 cup orange juice directly into the blender.
- Drizzle 1 tablespoon honey over the other ingredients.
- Add 1/2 teaspoon vanilla extract to the mixture.
- Secure the blender lid tightly until you hear it click into place.
- Blend on high speed for 45 seconds, or until the mixture is completely smooth with no visible chunks.
- Stop the blender and check consistency by tilting the pitcher—if it pours like a thick milkshake, it’s perfect.
- Pour the smoothie immediately into two 16-ounce glasses.
- Garnish with fresh mint leaves and toasted coconut flakes if desired.
You’ll be rewarded with a luxuriously creamy texture that somehow feels both indulgent and refreshing, where the bright mango tang plays perfectly against the subtle honey sweetness. Try serving it with a colorful paper umbrella for maximum tropical vibes, or pour it into popsicle molds for a frosty afternoon treat that’ll make you the hero of snack time.
Soft Cottage Cheese with Honey
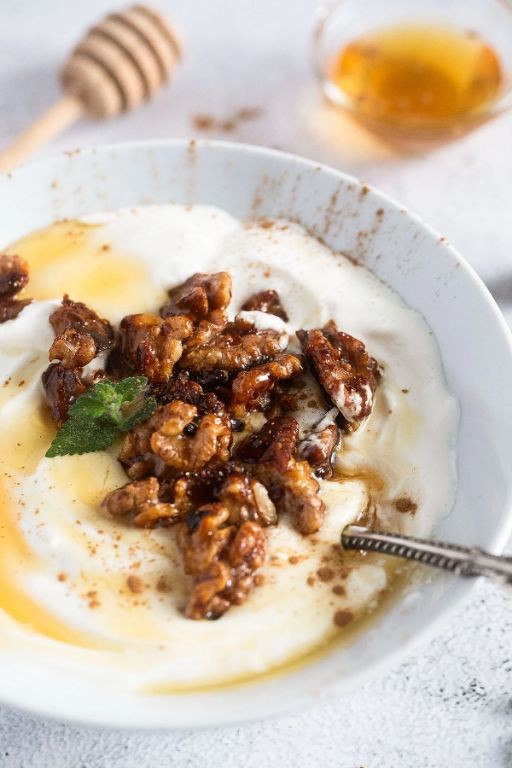
Delightfully simple yet surprisingly sophisticated, this creamy cottage cheese with honey is the snack that thinks it’s dessert—or is it dessert pretending to be a snack? Either way, it’s the culinary equivalent of wearing pajamas to a fancy brunch: comfortable, slightly rebellious, and absolutely delicious.
Ingredients
- For the base: 1 cup full-fat cottage cheese
- For sweetening: 2 tablespoons raw honey
- For garnish: ¼ cup toasted walnuts, ½ teaspoon ground cinnamon
Instructions
- Measure exactly 1 cup of full-fat cottage cheese into a small serving bowl.
- Drizzle 2 tablespoons of raw honey over the cottage cheese in a zigzag pattern.
- Sprinkle ¼ cup of toasted walnuts evenly across the surface.
- Dust ½ teaspoon of ground cinnamon over the entire dish using a fine-mesh sieve for even distribution.
- Let the dish rest at room temperature for 5 minutes to allow the honey to slightly warm and become more fluid.
- Gently fold the ingredients together with a spoon just once or twice—you want distinct swirls rather than complete incorporation.
- Serve immediately while the walnuts retain their crunch against the creamy cottage cheese.
Keep this magical combination in your back pocket for those moments when your sweet tooth stages a coup but your sensible side still wants some protein. The contrasting textures of creamy curds, crunchy walnuts, and silky honey create a symphony in your mouth, while the cinnamon adds just enough warmth to make it feel like a hug from the inside. Try serving it in fancy shot glasses for a playful appetizer or alongside fresh pear slices for an elegant twist that’ll make you feel downright civilized.
Summary
Finally, these 20 easy dysphagia recipes offer delicious, safe options that maintain nutrition and enjoyment at mealtime. We hope this collection brings comfort and convenience to your kitchen. Try a few favorites, leave a comment sharing which ones you loved, and don’t forget to pin this article on Pinterest to help others discover these helpful recipes!