
Bonjour, home cooks! Ever dreamed of creating delicious French dishes but felt intimidated by complex techniques? You’re in luck! We’ve gathered 20 simple, beginner-friendly recipes that bring Parisian flair right to your kitchen. From quick weeknight dinners to impressive comfort foods, these dishes prove French cooking is totally achievable. Let’s dive in and discover how easy it is to cook like a French chef!
Simple Ratatouille
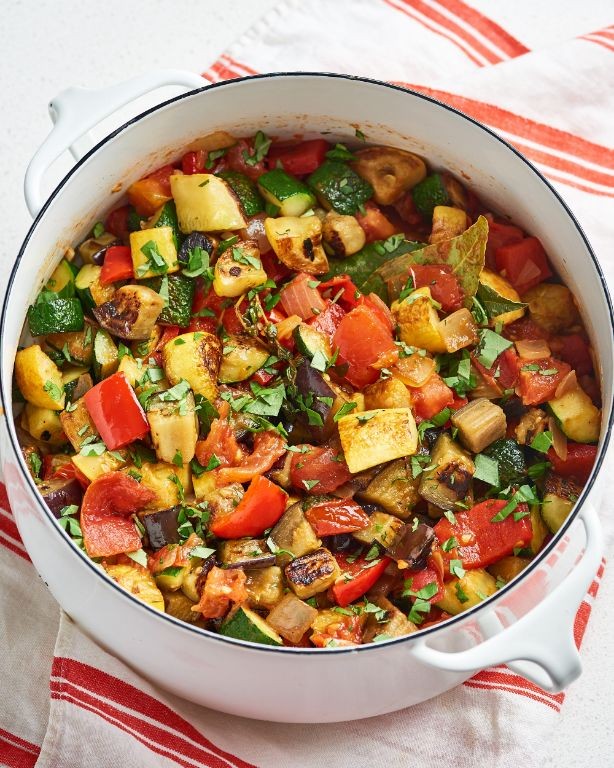
Jumpstart your veggie game with this French classic that’s easier than it looks. Just layer, bake, and watch those humble vegetables transform into something magical. Perfect for meal prep or impressing dinner guests without the stress.
Ingredients
– 2 medium eggplants, sliced into ¼-inch rounds (I always salt them first to remove bitterness)
– 3 medium zucchinis, sliced into ¼-inch rounds (go for firm, vibrant green ones)
– 2 yellow bell peppers, thinly sliced (they add such sunny sweetness)
– 1 large yellow onion, thinly sliced (sweet varieties work best here)
– 4 ripe tomatoes, sliced into ¼-inch rounds (room temp helps them slice cleanly)
– 3 cloves garlic, minced (fresh is non-negotiable for that aromatic punch)
– ¼ cup extra virgin olive oil (my go-to for its fruity notes)
– 1 tsp dried thyme (rub between your palms to wake up the oils)
– ½ tsp black pepper, freshly ground
– 1 tsp kosher salt (it sticks better to vegetables than table salt)
Instructions
1. Preheat your oven to 375°F.
2. Arrange eggplant slices in a single layer on a baking sheet lined with paper towels.
3. Sprinkle ½ teaspoon of kosher salt evenly over the eggplant slices.
4. Let the salted eggplant sit for 20 minutes to draw out excess moisture.
5. Pat the eggplant dry thoroughly with fresh paper towels.
6. Combine sliced zucchini, bell peppers, onion, and tomatoes in a large mixing bowl.
7. Add minced garlic, olive oil, thyme, remaining salt, and black pepper to the bowl.
8. Toss the vegetable mixture until every piece is evenly coated with oil and seasonings.
9. Arrange the vegetables in alternating patterns in a 9×13 inch baking dish.
10. Pour any remaining oil and seasoning mixture from the bowl over the arranged vegetables.
11. Cover the baking dish tightly with aluminum foil.
12. Bake at 375°F for 40 minutes.
13. Remove the foil carefully to avoid steam burns.
14. Continue baking uncovered for another 20 minutes until vegetables are tender and edges are slightly caramelized.
15. Let the ratatouille rest for 10 minutes before serving.
When it comes out of the oven, you’ll find the vegetables have softened into silky tenderness while maintaining their individual character. The garlic and thyme infuse every bite with earthy warmth that makes this dish feel both rustic and elegant. Serve it over creamy polenta, alongside crusty bread to soak up the juices, or even cold the next day when the flavors have deepened beautifully.
Quick Croque Monsieur

Just when you need comfort food FAST. This French classic gets a speedy upgrade that delivers all the cheesy, hammy goodness in minutes. Jump-start your lunch game with this crispy, melty masterpiece.
Ingredients
- 4 slices thick white bread – I prefer brioche for that extra richness
- 8 slices Black Forest ham – the thin-sliced kind works best here
- 1 cup shredded Gruyère cheese – freshly grated melts so much smoother than pre-shredded
- 2 tbsp Dijon mustard – this is my secret flavor booster
- 3 tbsp unsalted butter – room temp spreads evenly without tearing the bread
- 1/4 cup whole milk – cold from the fridge creates the perfect sauce consistency
- 2 tbsp all-purpose flour – I always sift mine to prevent lumps
Instructions
- Preheat your oven to 425°F and line a baking sheet with parchment paper.
- Spread 1 tablespoon of room temperature butter evenly on one side of each bread slice.
- Place all 4 bread slices buttered-side down on your prepared baking sheet.
- Spread ½ tablespoon of Dijon mustard evenly across the unbuttered side of each bread slice.
- Layer 2 slices of Black Forest ham neatly on top of the mustard on each bread slice.
- Sprinkle ¼ cup of shredded Gruyère cheese evenly over the ham on each sandwich half.
- Bake at 425°F for exactly 8 minutes until the cheese is fully melted and bubbling.
- While baking, melt the remaining 1 tablespoon of butter in a small saucepan over medium heat.
- Whisk 2 tablespoons of all-purpose flour into the melted butter and cook for 1 minute until golden.
- Gradually whisk in ¼ cup of cold whole milk until the sauce thickens noticeably, about 2 minutes.
- Remove the saucepan from heat and stir in the remaining ½ cup of shredded Gruyère until completely smooth.
- Take the baked sandwiches out of the oven when the cheese is bubbly and edges are golden brown.
- Immediately spoon the cheese sauce evenly over the top of each hot sandwich.
- Return the sauced sandwiches to the oven and bake for 3 more minutes until the topping is lightly browned.
Absolutely divine when that crispy bread gives way to molten cheese and savory ham. The Dijon cuts through the richness perfectly. Amp up the experience by serving with cornichons and a simple green salad for the ultimate bistro vibe at home.
Effortless Quiche Lorraine

Effortless Quiche Lorraine elevates your brunch game without the fuss. Embrace this flaky, bacon-packed beauty that comes together in minutes. Everyone will think you spent hours in the kitchen.
Ingredients
- 1 store-bought pie crust (I keep mine frozen for last-minute cravings)
- 6 slices thick-cut bacon (go for the good stuff—it makes all the difference)
- 1 cup shredded Gruyère cheese (freshly grated melts so much better)
- 4 large eggs (room temp eggs blend smoother with the cream)
- 1 cup heavy cream (this is non-negotiable for that rich custard)
- 1/2 tsp salt (I use fine sea salt for even distribution)
- 1/4 tsp black pepper (freshly cracked adds a nice kick)
- 1/4 tsp ground nutmeg (just a hint—trust me on this)
Instructions
- Preheat your oven to 375°F.
- Place the frozen pie crust on a baking sheet—this makes handling easier and catches any drips.
- Cook the bacon in a skillet over medium heat for 8-10 minutes until crispy.
- Transfer the bacon to a paper towel-lined plate to drain excess grease.
- Crumble the cooled bacon into small pieces.
- Sprinkle the shredded Gruyère evenly over the bottom of the pie crust.
- Top the cheese with the crumbled bacon.
- In a medium bowl, whisk the eggs until fully combined and slightly frothy.
- Pour in the heavy cream while continuously whisking to create a smooth custard base.
- Add the salt, black pepper, and nutmeg to the egg mixture, whisking for 30 seconds to incorporate fully.
- Carefully pour the custard mixture over the bacon and cheese in the pie crust.
- Bake at 375°F for 35-40 minutes until the center is set and the top is golden brown.
- Let the quiche rest on a wire rack for 15 minutes before slicing—this prevents a soupy center.
The quiche emerges with a buttery, flaky crust and a creamy, savory filling that melts in your mouth. That hint of nutmeg subtly enhances the smoky bacon and rich Gruyère. Try serving warm slices with a simple arugula salad for a perfect brunch balance.
Basic Beef Bourguignon
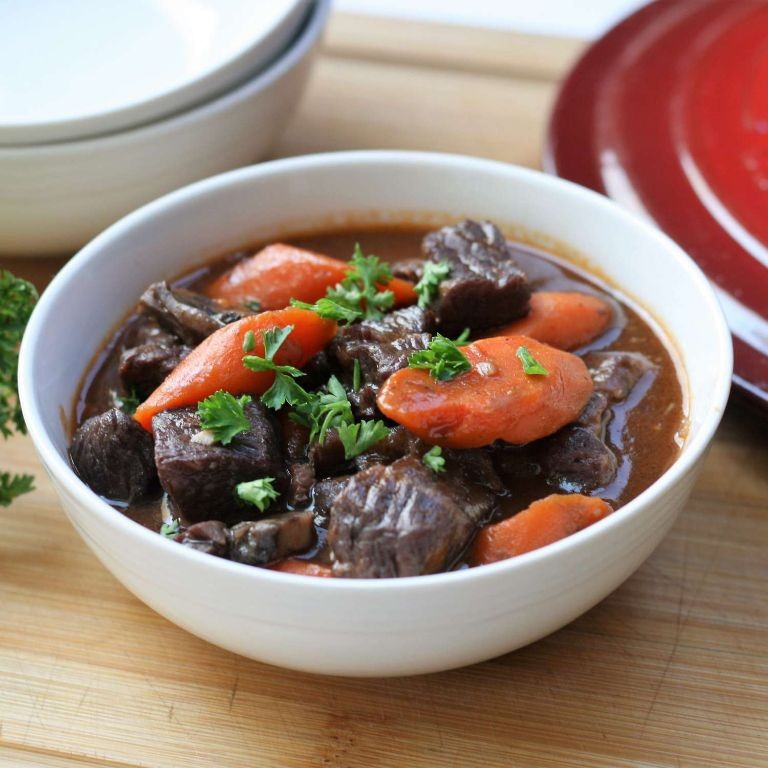
Craving cozy French vibes without the fuss? This beef bourguignon brings all the rich, wine-kissed comfort in half the time. Transform tough chuck into melt-in-your-mouth magic with these pro shortcuts.
Ingredients
– 2 lbs beef chuck, cut into 2-inch cubes (I go for well-marbled—trust me, it makes all the difference)
– 4 slices thick-cut bacon, chopped (the smoky flavor base is non-negotiable)
– 1 large yellow onion, diced (sweet Vidalias are my favorite here)
– 2 carrots, peeled and sliced into 1/2-inch coins
– 8 oz cremini mushrooms, halved (baby bellas add earthy depth)
– 3 cloves garlic, minced (fresh only—no jarred stuff!)
– 2 cups dry red wine, like Pinot Noir (use one you’d actually drink)
– 2 cups beef broth (low-sodium lets you control the salt)
– 2 tbsp tomato paste (the secret umami booster)
– 1 tbsp all-purpose flour (for that glossy sauce)
– 3 sprigs fresh thyme (dried works in a pinch, but fresh is brighter)
– 1 bay leaf (remove it before serving—nobody wants a woody surprise)
– 2 tbsp olive oil (extra virgin for finishing)
– Salt and black pepper (season aggressively at every stage)
Instructions
1. Pat the beef cubes completely dry with paper towels—this ensures a killer sear.
2. Season the beef generously with salt and black pepper on all sides.
3. Heat 1 tablespoon of olive oil in a large Dutch oven over medium-high heat until shimmering.
4. Sear the beef in a single layer, working in batches to avoid crowding, for 3–4 minutes per side until deeply browned.
5. Transfer the seared beef to a plate, leaving any drippings in the pot.
6. Add the chopped bacon to the pot and cook for 5–7 minutes until crispy and the fat renders.
7. Remove the bacon with a slotted spoon and set aside with the beef.
8. Add the diced onion and carrot coins to the bacon fat, sautéing for 5 minutes until softened.
9. Stir in the minced garlic and cook for 1 minute until fragrant—don’t let it burn!
10. Sprinkle the flour over the vegetables and cook, stirring constantly, for 1 minute to form a roux.
11. Add the tomato paste and cook for 1 more minute to deepen its flavor.
12. Pour in the red wine, scraping the bottom of the pot to lift all the browned bits.
13. Simmer the wine for 3–4 minutes until reduced by half, stirring occasionally.
14. Return the beef and bacon to the pot, along with any accumulated juices.
15. Pour in the beef broth until the meat is just submerged.
16. Add the thyme sprigs and bay leaf, then bring everything to a gentle boil.
17. Reduce the heat to low, cover the pot, and simmer for 2 hours until the beef is fork-tender.
18. While the stew simmers, heat the remaining 1 tablespoon of olive oil in a skillet over medium-high heat.
19. Sauté the halved mushrooms for 5–7 minutes until golden brown and any liquid evaporates.
20. Stir the sautéed mushrooms into the stew during the last 10 minutes of cooking.
21. Discard the thyme sprigs and bay leaf before serving.
Fork-tender beef collapses at the slightest nudge, swimming in a glossy, wine-rich gravy that clings to every vegetable. Serve it over buttery mashed potatoes or crusty bread to soak up every last drop—elevate leftovers by topping with a fried egg for next-level brunch vibes.
Speedy Tarte Tatin

A dessert that flips expectations faster than you can say “caramelized apples.” This speedy tarte tatin delivers buttery, caramel-kissed perfection in under an hour. Forget fussy pastry—we’re making magic with store-bought puff and just five ingredients.
Ingredients
– 1 sheet frozen puff pastry, thawed (I keep mine in the fridge overnight for easier handling)
– 4 medium Granny Smith apples, peeled and cored (their tartness balances the sweet caramel beautifully)
– ¾ cup granulated sugar (don’t skimp—this forms our glossy caramel base)
– 6 tbsp unsalted butter, cubed (cold butter creates the perfect caramel texture)
– ½ tsp vanilla extract (my secret for warming up the caramel’s flavor)
Instructions
1. Preheat your oven to 400°F and position a rack in the center.
2. Arrange apple halves cut-side down in a 10-inch oven-safe skillet, packing them tightly in a single layer.
3. Sprinkle sugar evenly over the apples, ensuring no bald spots remain.
4. Dot the surface with cold butter cubes—they’ll melt slowly for ideal caramel consistency.
5. Cook over medium heat for 15 minutes until the sugar dissolves and bubbles into a deep amber syrup.
6. Drizzle vanilla extract around the edge of the skillet, avoiding the center to prevent splattering.
7. Remove from heat and let the bubbling subside completely (about 2 minutes).
8. Lay the puff pastry sheet directly over the apples, tucking the edges inward with a spatula.
9. Cut four 1-inch slits in the pastry center to allow steam to escape during baking.
10. Bake for 20-22 minutes until the pastry puffs and turns golden brown.
11. Cool the skillet on a wire rack for exactly 8 minutes—this lets the caramel set slightly.
12. Place a serving plate over the skillet and carefully flip it upside down in one confident motion. Use oven mitts!
Uncover that golden beauty to reveal glazed apples nestled in flaky pastry. The contrast between crisp crust and tender, cinnamon-less fruit makes this feel elegantly simple. Serve it warm with a scoop of vanilla bean ice cream melting into the caramel pockets, or slice it cold for breakfast with your coffee—no judgment here.
Easy Chocolate Soufflé
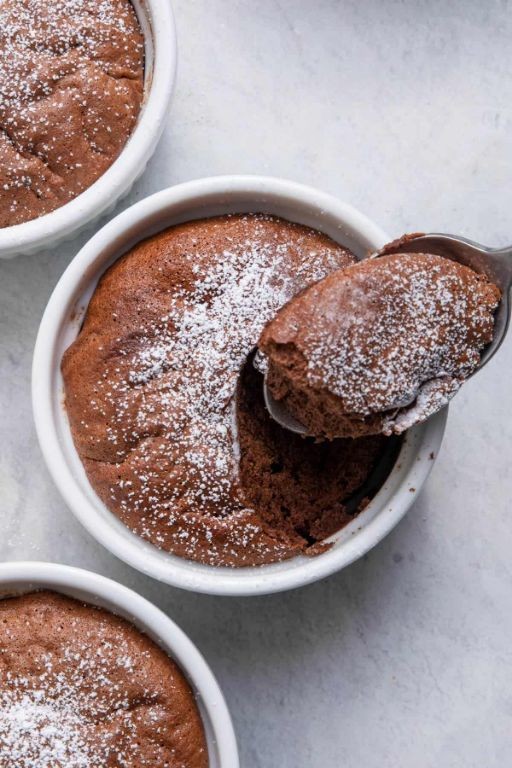
TikTok’s been sleeping on soufflés, but this easy chocolate version will blow up your feed. Forget the fuss—this recipe delivers cloud-like perfection with pantry staples. Get ready for the most impressive 30-minute dessert of your life.
Ingredients
– 4 oz semi-sweet chocolate chips (I always use Ghirardelli for that rich melt)
– 3 large eggs, separated and at room temp—trust me, room temp whites whip up fluffier
– 1/4 cup granulated sugar, plus extra for dusting
– 1 tbsp unsalted butter for greasing
– 1 tsp pure vanilla extract (skip the imitation stuff)
– Pinch of cream of tartar—this little secret stabilizes your peaks
– Powdered sugar for dusting at the end
Instructions
1. Preheat your oven to 375°F and position the rack in the center.
2. Generously grease four 6-oz ramekins with butter using upward strokes—this helps the soufflé climb.
3. Dust the buttered ramekins with granulated sugar, tapping out any excess.
4. Melt chocolate chips in a double boiler over simmering water, stirring until completely smooth.
5. Remove melted chocolate from heat and stir in vanilla extract.
6. Separate egg yolks from whites, placing whites in a perfectly clean, dry bowl.
7. Whisk egg yolks into the warm chocolate mixture until fully combined.
8. Add cream of tartar to the egg whites and beat on medium speed until foamy.
9. Gradually add 1/4 cup sugar while beating until stiff, glossy peaks form.
10. Fold one-third of the egg whites into the chocolate mixture to lighten it.
11. Gently fold in remaining egg whites until no white streaks remain—don’t overmix!
12. Divide batter evenly among prepared ramekins, smoothing the tops.
13. Run your thumb around the inside edge of each ramekin to create a “moat” for even rising.
14. Bake for 12-15 minutes until puffed and set but still slightly jiggly in the center.
15. Dust immediately with powdered sugar and serve within minutes.
Unbelievably light with a molten chocolate core that oozes sophistication. The crackly top gives way to an airy interior that melts on your tongue. Serve it straight from the oven with fresh berries or a dollop of whipped cream for that restaurant-worthy finish.
Simple Salade Niçoise

Packed with Mediterranean vibes, this Simple Salade Niçoise delivers fresh flavors in minutes. Grab your favorite bowl and let’s build this vibrant masterpiece—your taste buds will thank you instantly.
Ingredients
– 4 large eggs (I prefer room temp for even cooking)
– 1 lb baby potatoes (halved—they soak up dressing beautifully)
– 8 oz green beans (trimmed, for that perfect crisp-tender bite)
– 2 (5 oz) cans tuna in olive oil (drained, extra virgin is my go-to for richness)
– 1 pint cherry tomatoes (halved, they burst with sweetness)
– 1/4 cup Kalamata olives (pitted, for a salty punch)
– 3 tbsp red wine vinegar (brightens everything up)
– 1/3 cup extra virgin olive oil (don’t skimp—it makes the dressing silky)
– 1 tsp Dijon mustard (my secret for emulsifying)
– 1/4 red onion (thinly sliced, soak in ice water to mellow the bite)
– 1 head butter lettuce (torn, creates a soft base)
Instructions
1. Place eggs in a saucepan and cover with 1 inch of cold water. Bring to a rolling boil over high heat, then immediately remove from heat, cover, and let sit for 10 minutes. Transfer eggs to an ice bath for 5 minutes to stop cooking—this prevents gray yolks.
2. Add potatoes to a pot of salted boiling water and cook for 12 minutes until fork-tender. Use a slotted spoon to remove potatoes, reserving the boiling water.
3. Blanch green beans in the same boiling water for 3 minutes until bright green and crisp-tender. Immediately plunge into ice water to lock in color and crunch.
4. Whisk together red wine vinegar, Dijon mustard, and a pinch of salt in a small bowl. Slowly drizzle in olive oil while whisking continuously until emulsified.
5. Peel and quarter the hard-boiled eggs. Toss warm potatoes with half of the dressing to absorb flavor while hot.
6. Arrange butter lettuce on a platter. Top with dressed potatoes, green beans, tuna, tomatoes, olives, red onion, and eggs. Drizzle remaining dressing over everything.
Hearty textures shine here—creamy eggs, firm tuna, and crisp-tender beans create a satisfying bite. Serve it family-style straight from the platter, or pack individual portions for a stunning lunch on the go. The tangy dressing ties each element together for a meal that feels both elegant and effortless.
Quick Provençal Chicken

Hate spending hours in the kitchen? This Quick Provençal Chicken transforms basic chicken into a vibrant French masterpiece in under 30 minutes. Seriously, it’s faster than scrolling through your feed.
Ingredients
– 1.5 lbs boneless, skinless chicken thighs (I always go for thighs—they stay so much juicier)
– 2 tbsp extra virgin olive oil (my go-to for that fruity kick)
– 3 garlic cloves, minced (fresh is best, don’t even think about the jarred stuff)
– 1 cup cherry tomatoes (halve them for maximum saucy goodness)
– 1/2 cup pitted Kalamata olives (the salty punch is everything)
– 1 tbsp herbes de Provence (this blend is non-negotiable for that authentic flavor)
– 1/2 cup dry white wine (a crisp Sauvignon Blanc works perfectly here)
– 1/4 cup chopped fresh parsley (for that bright, fresh finish)
Instructions
1. Pat the chicken thighs completely dry with paper towels—this is my secret for getting that perfect sear without steaming.
2. Heat the olive oil in a large skillet over medium-high heat until it shimmers, about 2 minutes.
3. Season chicken generously with salt and place in the hot skillet, cooking for 6 minutes per side until golden brown and internal temperature reaches 165°F.
4. Remove chicken from skillet and set aside on a plate.
5. Add minced garlic to the same skillet and cook for exactly 60 seconds until fragrant but not browned.
6. Toss in halved cherry tomatoes and cook for 3 minutes until they start to blister and release their juices.
7. Stir in herbes de Provence and cook for 30 seconds to bloom the flavors.
8. Pour in white wine, scraping up all those browned bits from the bottom of the pan—that’s where the magic flavor lives.
9. Add Kalamata olives and simmer the sauce for 4 minutes until slightly reduced.
10. Return chicken to the skillet, spooning sauce over the top, and heat through for 2 minutes.
11. Stir in fresh parsley just before serving.
What you get is tender chicken swimming in a briny, herbaceous sauce that’s bursting with Mediterranean vibes. The tomatoes break down into this incredible jammy texture that clings to every bite. Serve it over creamy polenta or crusty bread to soak up every last drop of that incredible sauce.
French Lentil Salad
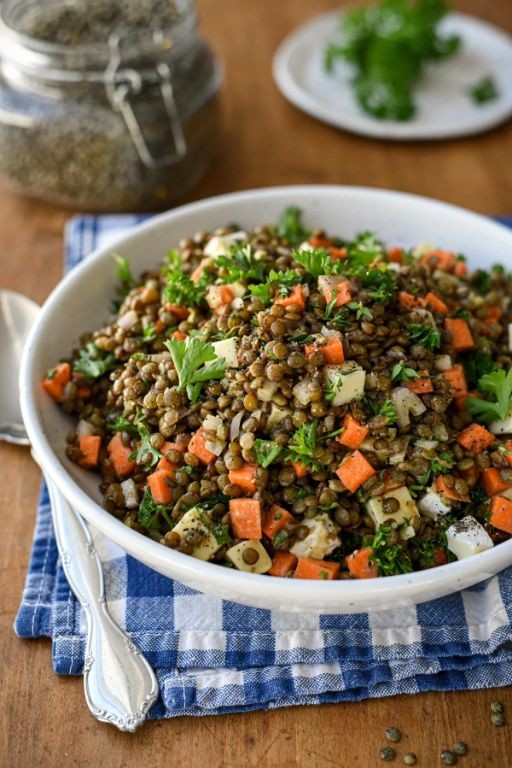
Nailing that perfect lunch prep just got easier. French lentil salad delivers serious flavor with minimal effort—toss it together in minutes, enjoy it all week. Bold herbs and tangy dressing transform humble lentils into your new obsession.
Ingredients
– 1 cup French green lentils (these hold their shape better than brown lentils)
– 3 cups water
– 1 tsp salt (I use fine sea salt for even distribution)
– 1/4 cup extra virgin olive oil (my go-to for dressings)
– 2 tbsp red wine vinegar
– 1 tsp Dijon mustard (the grainy kind adds nice texture)
– 1/2 red onion, finely diced (soak in ice water for 5 minutes to reduce sharpness)
– 1/4 cup chopped fresh parsley (flat-leaf has more flavor than curly)
– 2 oz feta cheese, crumbled (block feta tastes better than pre-crumbled)
Instructions
1. Rinse 1 cup French green lentils under cold running water in a fine-mesh strainer.
2. Combine rinsed lentils, 3 cups water, and 1 tsp salt in a medium saucepan.
3. Bring lentil mixture to a boil over high heat.
4. Reduce heat to maintain a gentle simmer and cook uncovered for 20 minutes.
5. Test lentils for doneness—they should be tender but still hold their shape, not mushy.
6. Drain lentils thoroughly in a colander and spread them on a baking sheet to cool completely.
7. Whisk together 1/4 cup olive oil, 2 tbsp red wine vinegar, and 1 tsp Dijon mustard in a large bowl until emulsified.
8. Add cooled lentils to the dressing and toss to coat evenly.
9. Stir in 1/2 diced red onion and 1/4 cup chopped parsley.
10. Gently fold in 2 oz crumbled feta cheese just before serving. Marvel at how the creamy lentils soak up the tangy dressing while the feta adds salty bursts. Serve it chilled over greens for lunch, or pack it for a picnic—the flavors deepen beautifully overnight.
Easy Crème Brûlée

Tired of thinking crème brûlée is restaurant-only? This version shatters that myth. Grab your torch—we’re making silky custard with that iconic crackable top in your own kitchen.
Ingredients
– 2 cups heavy cream (I always use the good stuff—it makes all the difference)
– 5 large egg yolks (room temp eggs blend smoother, trust me)
– 1/2 cup granulated sugar (split between custard and topping)
– 1 tsp pure vanilla extract (skip the imitation—real vanilla elevates everything)
– Pinch of fine sea salt (just a tiny bit to balance the sweetness)
Instructions
1. Preheat your oven to 325°F and arrange 4 ramekins in a baking dish.
2. Pour 2 cups heavy cream into a saucepan and heat over medium until it just begins to simmer—you’ll see tiny bubbles around the edges.
3. Whisk 5 large egg yolks with 1/4 cup granulated sugar in a separate bowl until pale and slightly thickened.
4. Slowly pour the hot cream into the egg mixture while continuously whisking to prevent curdling.
5. Stir in 1 tsp pure vanilla extract and a pinch of fine sea salt until fully incorporated.
6. Divide the custard mixture evenly among the 4 ramekins using a ladle.
7. Carefully pour hot water into the baking dish until it reaches halfway up the sides of the ramekins—this water bath ensures gentle, even cooking.
8. Bake at 325°F for 35-40 minutes until the edges are set but the centers still jiggle slightly when shaken.
9. Remove ramekins from the water bath and cool completely on a wire rack—chill in the refrigerator for at least 4 hours, preferably overnight for the firmest texture.
10. Sprinkle the remaining 1/4 cup granulated sugar evenly over each chilled custard, tapping gently to create a thin, uniform layer.
11. Use a kitchen torch to caramelize the sugar, moving constantly until you achieve a deep amber color with no white spots remaining.
12. Let the brûléed tops sit for 2 minutes to harden completely before serving.
Moment you crack that glass-like sugar crust reveals the magic—the contrast between warm, brittle caramel and cold, velvet custard is pure theater. Serve immediately while the topping still snaps, or get creative by topping with fresh berries or a drizzle of espresso for an affogato twist. That silken interior practically melts on the tongue, making every spoonful worth the (minimal) effort.
Basic Pain Perdu (French Toast)

Tired of boring breakfasts? Transform that stale bread into golden glory. This French toast hack delivers crispy edges with custardy centers every single time.
Ingredients
– 4 thick slices of day-old bread (stale works better for absorption)
– 2 large eggs (room temp blends smoother with milk)
– 1/2 cup whole milk (richer than skim for creamier soak)
– 1 tbsp granulated sugar (my sweet spot for balanced sweetness)
– 1 tsp vanilla extract (pure vanilla makes all the difference)
– 1/2 tsp ground cinnamon (freshly ground if you have it)
– Pinch of salt (enhances all the flavors)
– 2 tbsp unsalted butter (for that perfect golden crust)
– Maple syrup for serving (the real stuff, never imitation)
Instructions
1. Crack 2 large eggs into a shallow bowl wide enough to fit bread slices.
2. Pour 1/2 cup whole milk into the bowl with the eggs.
3. Add 1 tablespoon granulated sugar, 1 teaspoon vanilla extract, 1/2 teaspoon ground cinnamon, and a pinch of salt to the egg mixture.
4. Whisk everything together vigorously until fully combined and slightly frothy.
5. Place 4 thick slices of day-old bread in the mixture, letting them soak for 30 seconds per side (tip: don’t oversoak or they’ll get mushy).
6. Melt 2 tablespoons unsalted butter in a large skillet over medium heat until bubbling but not browned.
7. Carefully place soaked bread slices into the hot skillet, working in batches if needed.
8. Cook for 3-4 minutes until the bottom develops a deep golden-brown crust (tip: lift a corner to check color).
9. Flip each slice using a spatula and cook another 3-4 minutes until equally golden.
10. Transfer cooked French toast to a wire rack instead of a plate (tip: this keeps bottoms crisp).
11. Repeat with remaining bread slices, adding more butter if needed.
12. Serve immediately with maple syrup drizzled over top.
Ready for that first bite? The exterior shatters while the inside stays impossibly soft. Drizzle generously with maple syrup, or get creative with fresh berries and whipped cream for weekend brunch vibes.
Speedy Duck Confit
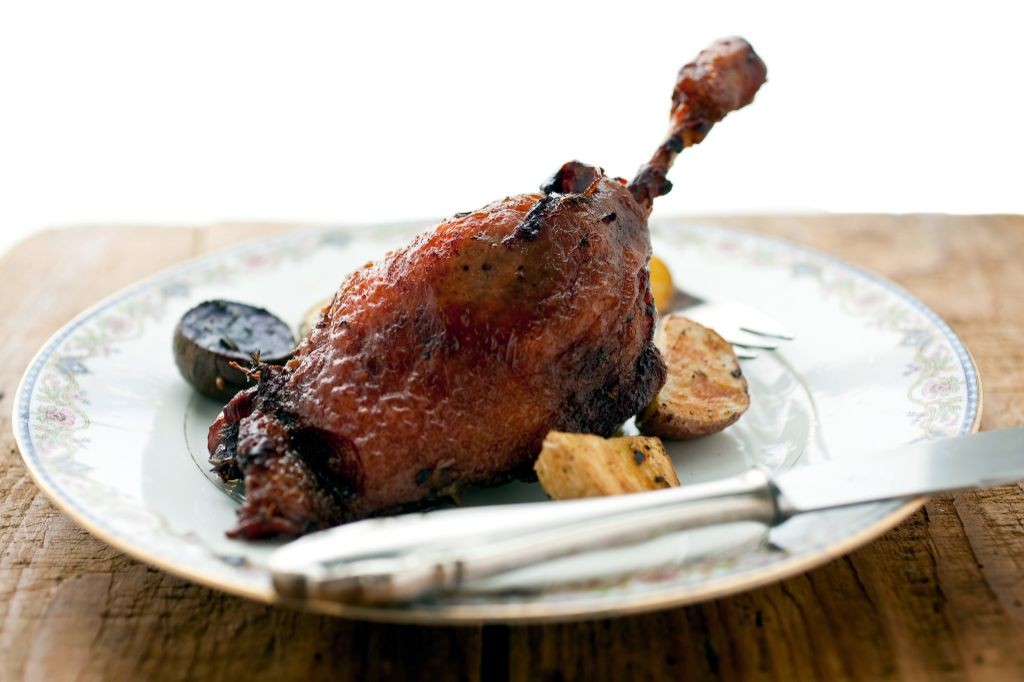
Get ready to make restaurant-quality duck confit in record time. Forget the traditional 36-hour method—this version delivers crispy, tender duck in just hours. Game-changing technique meets French bistro perfection.
Ingredients
– 4 duck legs (I always look for ones with good fat coverage)
– 2 cups duck fat (melt it first—makes measuring easier)
– 4 garlic cloves (smash them with your knife for maximum flavor)
– 2 sprigs fresh thyme (dried works but fresh is worth it)
– 1 tbsp kosher salt (I prefer Diamond Crystal for even seasoning)
– 1 tsp black peppercorns (crack them roughly for better aroma)
Instructions
1. Pat duck legs completely dry with paper towels.
2. Rub kosher salt evenly over all sides of each duck leg.
3. Arrange duck legs in a single layer in a baking dish.
4. Add smashed garlic cloves, thyme sprigs, and cracked peppercorns around the duck.
5. Pour melted duck fat over the legs until completely submerged.
6. Cover the baking dish tightly with aluminum foil.
7. Bake at 300°F for 2.5 hours until the meat pulls easily from the bone.
8. Remove the baking dish from the oven and let cool for 30 minutes.
9. Transfer duck legs to a clean baking sheet, reserving the fat.
10. Increase oven temperature to 425°F.
11. Roast duck legs for 15 minutes until the skin is golden and crispy.
12. Check internal temperature reaches 165°F with an instant-read thermometer.
Let that crispy skin crackle as you pull the tender meat apart. The garlic-infused fat makes incredible roasted potatoes tomorrow. Layer it over creamy polenta or shred into a hearty salad for next-level leftovers.
French Baguette Sandwich

Ditch the boring lunch routine—this French baguette sandwich brings Parisian cafe vibes right to your kitchen. Grab that crusty loaf and let’s build layers of flavor that’ll make your taste buds dance.
Ingredients
- 1 French baguette (I always look for that perfect crackly crust)
- 8 slices prosciutto (the paper-thin kind that melts in your mouth)
- 4 slices Swiss cheese (go for the nutty Gruyère if you’re feeling fancy)
- 2 cups arugula (that peppery kick is everything)
- 2 tbsp Dijon mustard (the grainy kind adds amazing texture)
- 2 tbsp mayonnaise (Duke’s is my secret weapon for creaminess)
- 1 tbsp extra virgin olive oil (a good drizzle makes all the difference)
- 1 tbsp red wine vinegar (just enough to brighten everything up)
Instructions
- Preheat your oven to 350°F to warm the baguette.
- Slice the French baguette lengthwise, keeping one edge intact like a hinge.
- Place the baguette directly on the oven rack and bake for 5 minutes until warm and slightly crisp.
- Whisk together olive oil and red wine vinegar in a small bowl.
- Toss the arugula with the dressing until every leaf is lightly coated.
- Spread mayonnaise evenly on the bottom half of the warm baguette.
- Layer prosciutto slices over the mayonnaise, covering the entire surface.
- Arrange Swiss cheese slices over the prosciutto.
- Spread Dijon mustard on the top half of the baguette.
- Pile the dressed arugula evenly over the cheese layer.
- Press the top half of the baguette down firmly to compress the layers.
- Slice the sandwich into 4 equal portions using a serrated knife for clean cuts.
Here’s why this sandwich slaps: that crisp baguette gives way to creamy, tangy layers with salty prosciutto and peppery arugula creating perfect harmony. Serve it with cornichons for extra crunch or pack it for a picnic—it travels like a dream and tastes even better as the flavors meld.
Easy Gougères (Cheese Puffs)

Brace your taste buds—these French cheese puffs are about to become your new party trick. They’re crispy, cheesy, and shockingly simple to whip up in under 30 minutes. Perfect for impressing guests or treating yourself to something fancy without the fuss.
Ingredients
– 1 cup water (I use filtered for a cleaner flavor)
– 1/2 cup unsalted butter (cubed and cold—it helps with the puff)
– 1 cup all-purpose flour (spoon and level it for accuracy)
– 4 large eggs (I prefer room temp—they incorporate smoother)
– 1 cup grated Gruyère cheese (freshly grated melts better than pre-shredded)
– 1/2 tsp salt (I use fine sea salt for even distribution)
– 1/4 tsp black pepper (freshly cracked adds a nice kick)
– 1/4 tsp nutmeg (just a pinch—it enhances the cheesy flavor)
Instructions
1. Preheat your oven to 425°F and line two baking sheets with parchment paper.
2. Combine the water, butter, and salt in a medium saucepan over medium heat.
3. Bring the mixture to a rolling boil, stirring occasionally until the butter fully melts.
4. Remove the pan from heat and immediately add the flour all at once.
5. Stir vigorously with a wooden spoon until the mixture forms a smooth ball that pulls away from the sides of the pan—this should take about 1-2 minutes.
6. Tip: Let the dough cool for 5 minutes before adding eggs to prevent them from cooking.
7. Add the eggs one at a time, beating well after each addition until fully incorporated and the dough is glossy.
8. Stir in the Gruyère, black pepper, and nutmeg until evenly distributed.
9. Drop tablespoon-sized mounds of dough onto the prepared baking sheets, spacing them 2 inches apart.
10. Tip: Use a small cookie scoop for uniform puffs that bake evenly.
11. Bake for 15 minutes at 425°F, then reduce the oven temperature to 375°F without opening the door.
12. Continue baking for another 10-12 minutes until the gougères are deeply golden and sound hollow when tapped.
13. Tip: Rotate the pans halfway through baking for even browning.
14. Transfer the gougères to a wire rack and let them cool for 5 minutes before serving.
Zesty and airy, these gougères boast a crisp shell with a tender, cheesy interior that melts in your mouth. Serve them warm alongside a glass of chilled white wine or split and fill with herbed cream cheese for an elegant appetizer twist.
Simple Potato Dauphinoise
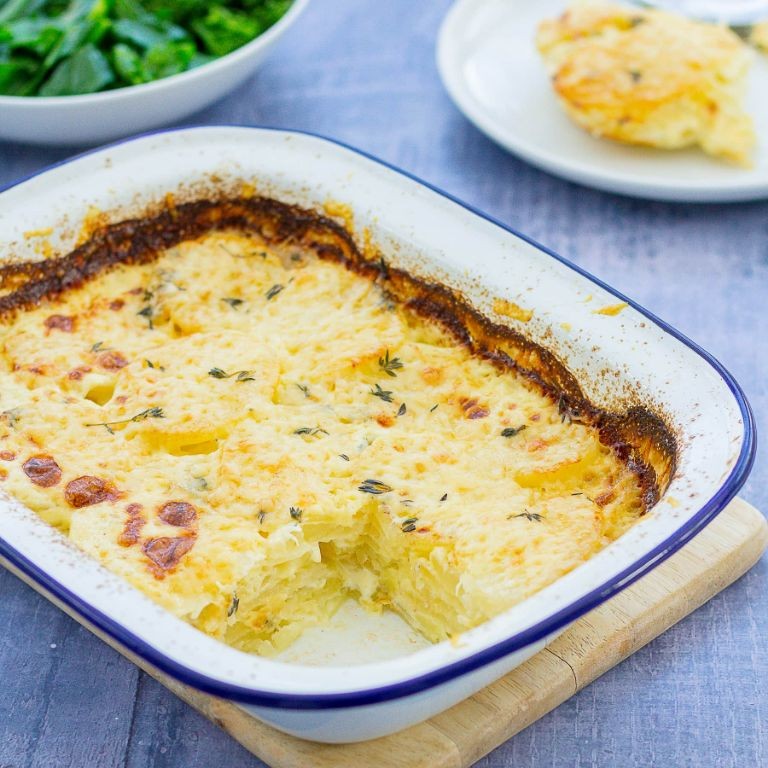
Just when you thought potatoes couldn’t get more luxurious. This creamy, layered masterpiece transforms humble spuds into pure comfort food magic. Seriously, it’s easier than it looks—and totally worth the hype.
Ingredients
– 2 lbs Yukon Gold potatoes (their buttery texture is perfect here)
– 1 ½ cups heavy cream (go for the good stuff—it makes all the difference)
– 1 cup whole milk (I always use whole for maximum richness)
– 3 garlic cloves, minced (fresh is best, don’t skimp!)
– 1 tsp kosher salt (I prefer Diamond Crystal for even distribution)
– ½ tsp black pepper, freshly ground
– ½ tsp freshly grated nutmeg (trust me, this secret weapon adds warmth)
– 1 cup shredded Gruyère cheese (the nutty flavor is essential)
– 2 tbsp unsalted butter, softened (for greasing the dish)
Instructions
1. Preheat your oven to 350°F (175°C).
2. Generously grease a 9×13-inch baking dish with all 2 tablespoons of softened butter, making sure to coat the bottom and sides thoroughly.
3. Peel all 2 lbs of Yukon Gold potatoes and slice them uniformly into ⅛-inch thick rounds using a mandoline for even cooking.
4. In a medium saucepan, combine 1 ½ cups heavy cream, 1 cup whole milk, 3 minced garlic cloves, 1 tsp kosher salt, ½ tsp black pepper, and ½ tsp freshly grated nutmeg.
5. Heat the cream mixture over medium heat until it just begins to simmer—you’ll see small bubbles forming around the edges—then immediately remove from heat.
6. Arrange one-third of the potato slices in a single, slightly overlapping layer across the bottom of the prepared baking dish.
7. Pour one-third of the warm cream mixture evenly over the first potato layer.
8. Repeat steps 6 and 7 twice more, creating three complete layers and using all potatoes and cream mixture.
9. Cover the baking dish tightly with aluminum foil and bake at 350°F for 45 minutes.
10. Remove the foil and evenly sprinkle 1 cup shredded Gruyère cheese over the top layer.
11. Return the uncovered dish to the oven and bake for another 25-30 minutes, until the top is golden brown and bubbly.
12. Let the dish rest at room temperature for 15 minutes before serving—this allows the creamy layers to set properly.
Velvety layers melt into each other with every forkful, the nutmeg adding subtle warmth against the sharp Gruyère crust. Serve it alongside roast chicken for a cozy Sunday dinner, or make it the star of your next holiday table—either way, expect empty plates and requests for seconds.
Quick Cassoulet

Rethink everything you know about French classics. This quick cassoulet delivers that rich, soul-warming flavor in under an hour—no all-day simmering required. Grab your Dutch oven and let’s transform humble ingredients into something extraordinary.
Ingredients
– 1 lb chicken thighs (bone-in for maximum flavor, trust me)
– 4 pork sausages (I use spicy Italian for that kick)
– 1 large onion, diced (yellow onions are my go-to for sweetness)
– 3 garlic cloves, minced (fresh only—no jarred stuff)
– 2 carrots, chopped (peeled for smoother texture)
– 2 (15 oz) cans cannellini beans, drained (don’t rinse—that starchy liquid helps thicken)
– 1 (14.5 oz) can diced tomatoes (fire-roasted add amazing depth)
– 4 cups chicken broth (homemade if you have it, but boxed works)
– 2 tbsp olive oil (extra virgin is my kitchen staple)
– 1 tsp smoked paprika (this is the secret weapon)
– 1 bay leaf (remove it before serving—nobody wants to chew on that)
– Fresh parsley for garnish (flat-leaf has better flavor)
Instructions
1. Preheat your oven to 375°F.
2. Pat chicken thighs completely dry with paper towels—this ensures crispy skin.
3. Heat olive oil in a large Dutch oven over medium-high heat until shimmering.
4. Place chicken thighs skin-side down and cook for 6 minutes until golden brown.
5. Flip chicken and cook for 4 more minutes, then transfer to a plate.
6. Add sausages to the same pot and brown on all sides for 5 minutes total.
7. Remove sausages and slice into 1-inch pieces.
8. Add diced onion to the pot and cook for 3 minutes until translucent.
9. Stir in minced garlic and cook for 1 minute until fragrant—don’t let it burn.
10. Add chopped carrots and cook for 2 minutes to soften slightly.
11. Sprinkle smoked paprika over vegetables and stir for 30 seconds to toast the spices.
12. Pour in diced tomatoes with their juices and scrape any browned bits from the bottom.
13. Add drained cannellini beans, chicken broth, and bay leaf.
14. Return chicken and sliced sausages to the pot, nestling them into the liquid.
15. Bring to a simmer, then cover and transfer to the preheated oven.
16. Bake for 30 minutes until chicken is cooked through and tender.
17. Remove bay leaf and discard.
18. Let rest for 5 minutes before serving—this allows flavors to meld.
19. Garnish with fresh parsley.
Final thoughts: That creamy bean texture against the crispy-skinned chicken is pure comfort. The smoked paprika gives it that slow-cooked depth without the wait. Serve it with crusty bread for dipping—you’ll want to soak up every last bit of that rich broth.
French Strawberry Tart

Fancy a dessert that looks straight from a Parisian patisserie but comes together in your kitchen? French strawberry tart brings buttery crust, silky pastry cream, and glossy berries into one stunning showstopper. Forget complicated techniques—this version keeps it simple but seriously impressive.
Ingredients
– 1 ½ cups all-purpose flour (I always spoon and level for accuracy)
– ½ cup cold unsalted butter, cubed (keep it icy cold for the flakiest crust)
– ¼ cup granulated sugar
– 1 large egg yolk (room temp helps it incorporate smoothly)
– 2 tbsp ice water
– 2 cups whole milk (the higher fat, the creamier your pastry cream)
– ½ cup granulated sugar
– 3 large egg yolks
– ¼ cup cornstarch
– 1 tsp pure vanilla extract (skip imitation—it makes all the difference)
– 1 lb fresh strawberries, hulled (look for bright red, fragrant ones)
– ¼ cup apricot jam (for that professional glossy finish)
Instructions
1. Combine 1 ½ cups flour, ½ cup cold cubed butter, and ¼ cup sugar in a food processor.
2. Pulse until the mixture resembles coarse crumbs, about 10 pulses.
3. Add 1 egg yolk and 2 tbsp ice water, then pulse just until the dough comes together.
4. Tip: Don’t overmix—visible butter bits create flakiness.
5. Shape the dough into a disk, wrap in plastic, and chill for 30 minutes.
6. Roll the dough to a 12-inch circle on a floured surface.
7. Transfer to a 9-inch tart pan, press into edges, and trim excess.
8. Prick the bottom all over with a fork, then freeze for 15 minutes.
9. Preheat oven to 375°F.
10. Line the crust with parchment and fill with pie weights or dried beans.
11. Bake for 15 minutes, then remove weights and parchment.
12. Bake for another 10 minutes until golden; cool completely.
13. Heat 2 cups milk in a saucepan until steaming but not boiling.
14. Whisk ½ cup sugar, 3 egg yolks, and ¼ cup cornstarch in a bowl until pale.
15. Tip: Temper the eggs by slowly pouring half the hot milk into the yolk mixture while whisking constantly.
16. Pour the tempered mixture back into the saucepan and cook over medium heat.
17. Whisk continuously until thick and bubbling, about 3-4 minutes.
18. Remove from heat and stir in 1 tsp vanilla extract.
19. Press plastic wrap directly on the surface and chill for 1 hour.
20. Spread the chilled pastry cream evenly into the cooled crust.
21. Arrange 1 lb hulled strawberries in concentric circles over the cream.
22. Heat ¼ cup apricot jam with 1 tbsp water until melted and smooth.
23. Tip: Brush the warm glaze over the strawberries for a shiny, professional look.
24. Chill the tart for 30 minutes before serving. Expect a crisp, buttery crust that shatters with each bite, contrasting the velvety vanilla cream and juicy strawberries. Serve it slightly chilled with a dollop of whipped cream or alongside afternoon coffee for that café-at-home vibe.
Summary
Mastering French cooking is easier than you think with these 20 beginner-friendly recipes! We hope this collection inspires you to bring a taste of France into your kitchen. Try a recipe this week and let us know which one becomes your favorite in the comments below. Don’t forget to share this article on Pinterest so other home cooks can discover these delicious dishes too. Bon appétit!