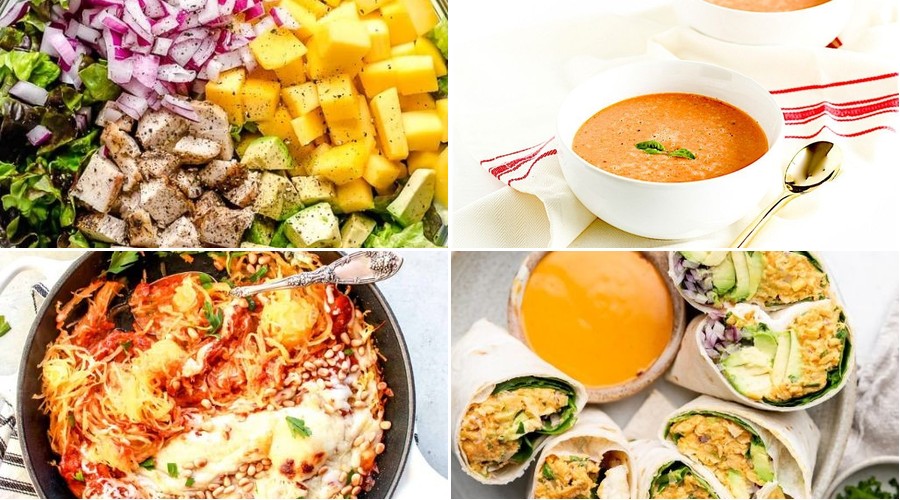
Welcome to a collection of heart-healthy recipes that prove low sodium doesn’t mean low flavor! Whether you’re looking for quick weeknight dinners, comforting classics, or fresh seasonal favorites, these 18 delicious dishes make eating well easy and enjoyable. Keep reading to discover simple, satisfying meals that will nourish your body and delight your taste buds.
Baked Salmon with Dill and Asparagus
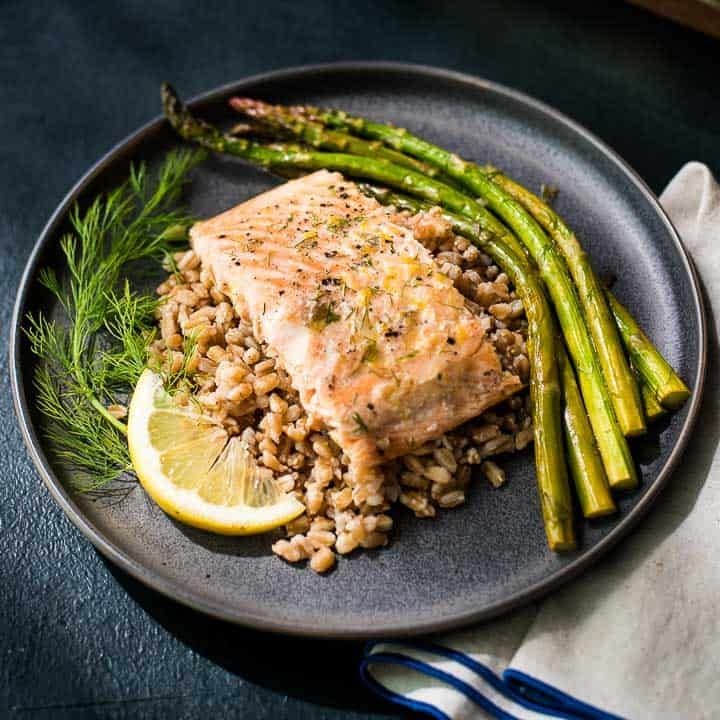
Zestfully simple yet sophisticated, this baked salmon with dill and asparagus transforms humble ingredients into an elegant weeknight masterpiece. Perfectly flaky fish meets tender-crisp spears in a harmonious union that celebrates freshness and flavor.
Ingredients
- 1 ½ pounds fresh wild-caught salmon fillet
- 1 pound vibrant green asparagus spears
- 3 tablespoons rich extra virgin olive oil
- 2 tablespoons freshly chopped dill fronds
- 2 cloves aromatic garlic, minced
- 1 lemon, thinly sliced into rounds
- 1 teaspoon coarse sea salt
- ½ teaspoon freshly cracked black pepper
Instructions
- Preheat your oven to 400°F and position the rack in the center for even heating.
- Pat the salmon fillet completely dry with paper towels to ensure crisp skin.
- Trim the tough woody ends from the asparagus spears by snapping them where they naturally break.
- Arrange the asparagus in a single layer on a parchment-lined baking sheet.
- Drizzle 2 tablespoons of olive oil over the asparagus, coating each spear thoroughly.
- Season the asparagus with ½ teaspoon of sea salt and ¼ teaspoon of black pepper.
- Place the salmon skin-side down directly atop the asparagus bed.
- Rub the remaining tablespoon of olive oil over the salmon’s surface.
- Sprinkle the minced garlic evenly across the salmon flesh.
- Cover the salmon with the fresh dill, pressing gently to adhere.
- Arrange the lemon slices in an overlapping pattern over the salmon.
- Season with the remaining salt and pepper, ensuring even distribution.
- Bake for 12-15 minutes until the salmon flakes easily with a fork and reaches 145°F internally.
- Remove from oven when the asparagus is tender-crisp and bright green.
- Let rest for 3 minutes before serving to allow juices to redistribute.
Perfectly flaky salmon melts against the crisp-tender asparagus, while the bright dill and lemon cut through the richness. Present this golden-hued dish family-style for dramatic effect, or plate individually over creamy polenta for an elevated dinner party presentation.
Herbed Brown Rice Pilaf with Mushrooms
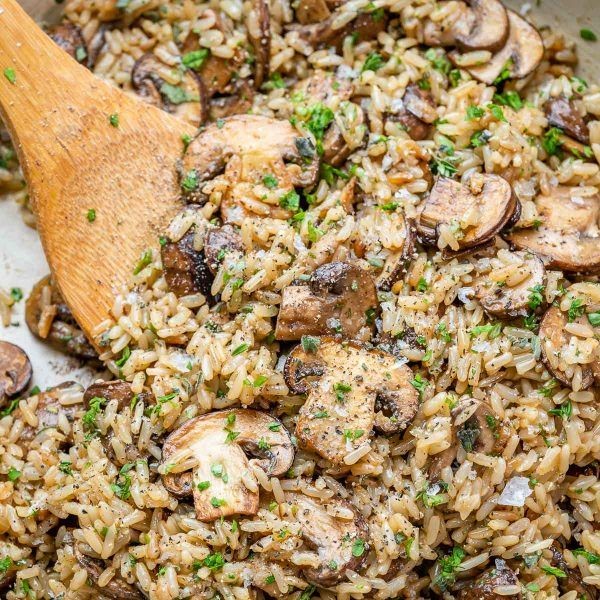
Zestfully aromatic and deeply satisfying, this herbed brown rice pilaf with mushrooms transforms humble ingredients into an elegant side dish worthy of any occasion. Earthy mushrooms and fragrant herbs mingle with nutty brown rice, creating layers of flavor that develop beautifully with each gentle simmer. This versatile pilaf offers both nutritional richness and sophisticated appeal, making it equally suitable for weeknight dinners or celebratory gatherings.
Ingredients
– 1 cup long-grain brown rice
– 8 ounces cremini mushrooms, sliced
– 1 medium yellow onion, finely diced
– 2 cloves garlic, minced
– 2 tablespoons rich extra virgin olive oil
– 2 cups rich vegetable broth
– 2 tablespoons fresh thyme leaves
– 1 tablespoon fresh rosemary, finely chopped
– ½ teaspoon fine sea salt
– ¼ teaspoon freshly ground black pepper
– 2 tablespoons fresh parsley, chopped
Instructions
1. Heat 2 tablespoons of rich extra virgin olive oil in a large skillet over medium heat until shimmering.
2. Add 1 medium finely diced yellow onion and cook for 4-5 minutes until translucent and fragrant.
3. Stir in 8 ounces of sliced cremini mushrooms and cook for 6-7 minutes until golden brown and their liquid has evaporated.
4. Add 2 cloves of minced garlic and cook for 1 minute until fragrant but not browned.
5. Pour in 1 cup of long-grain brown rice and toast for 2 minutes, stirring constantly until lightly fragrant.
6. Add 2 cups of rich vegetable broth, 2 tablespoons of fresh thyme leaves, 1 tablespoon of finely chopped fresh rosemary, ½ teaspoon of fine sea salt, and ¼ teaspoon of freshly ground black pepper.
7. Bring the mixture to a boil, then immediately reduce heat to low and cover tightly.
8. Simmer for 40-45 minutes until the liquid is fully absorbed and the rice is tender.
9. Remove from heat and let stand covered for 10 minutes to allow the grains to firm up.
10. Fluff the pilaf with a fork and stir in 2 tablespoons of chopped fresh parsley.
Wonderfully textured with distinct grains and tender mushrooms, this pilaf offers a satisfying chew and earthy depth. The aromatic herbs provide bright counterpoints to the rich umami notes, creating a balanced harmony in every forkful. Consider serving it alongside roasted chicken or as a bed for grilled vegetables to showcase its versatile elegance.
Grilled Lemon Pepper Tilapia with Steamed Broccoli
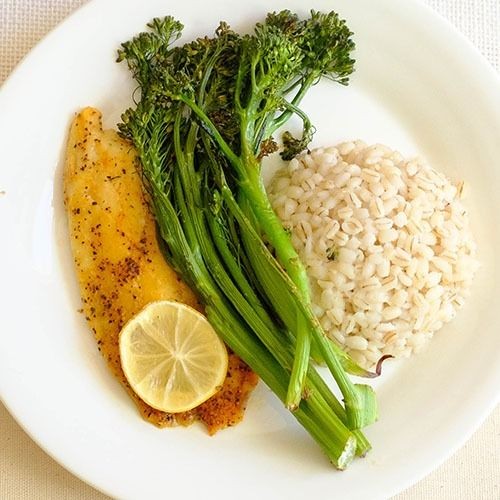
Luminous and light, this grilled lemon pepper tilapia with steamed broccoli offers a sophisticated yet approachable weeknight dinner that transforms simple ingredients into an elegant plate. The bright citrus notes dance with the subtle heat of freshly cracked pepper against the delicate white fish, while the emerald broccoli provides a crisp, verdant counterpoint. This dish proves that culinary excellence need not be complicated, delivering restaurant-quality flavors from your own kitchen with minimal effort.
Ingredients
– 4 fresh tilapia fillets (6 ounces each)
– 2 tablespoons rich extra virgin olive oil
– 2 tablespoons freshly squeezed lemon juice
– 1 teaspoon finely grated lemon zest
– 1 tablespoon coarsely ground black pepper
– 1 teaspoon kosher salt
– 1 pound vibrant broccoli florets
– 1 tablespoon unsalted butter
– 1/4 teaspoon flaky sea salt
Instructions
1. Preheat your grill to medium-high heat (400°F) and lightly oil the grates to prevent sticking.
2. Pat the fresh tilapia fillets completely dry with paper towels to ensure proper searing.
3. Whisk together the rich extra virgin olive oil, freshly squeezed lemon juice, and finely grated lemon zest in a small bowl.
4. Brush both sides of each tilapia fillet generously with the lemon-olive oil mixture.
5. Season both sides of the fillets evenly with coarsely ground black pepper and kosher salt.
6. Place the seasoned tilapia fillets on the preheated grill and cook for 3-4 minutes until grill marks appear and the edges turn opaque.
7. Carefully flip each fillet using a thin spatula and grill for another 3-4 minutes until the fish flakes easily with a fork.
8. While the fish grills, place the vibrant broccoli florets in a steamer basket over boiling water.
9. Cover and steam the broccoli for 5-6 minutes until bright green and tender-crisp when pierced with a knife.
10. Transfer the steamed broccoli to a serving bowl and toss with unsalted butter until evenly coated.
11. Sprinkle the buttered broccoli with flaky sea salt for enhanced flavor and texture.
12. Remove the grilled tilapia from the heat and serve immediately alongside the steamed broccoli. Velvety in texture with a satisfying crisp exterior, the tilapia yields delicate flakes that absorb the bright lemon and peppery notes beautifully. For an elegant presentation, arrange the emerald broccoli around the golden fish and garnish with additional lemon wedges, creating a visually stunning plate that delights both the palate and the eye.
Vegetable Stir-Fry with Tofu and Low-Sodium Soy Sauce

A vibrant symphony of colors and textures awaits in this elegant vegetable stir-fry, where crisp seasonal vegetables dance with delicate tofu cubes in a light, savory embrace. This wholesome creation transforms simple ingredients into a sophisticated weeknight masterpiece that nourishes both body and soul while celebrating the natural beauty of plant-based cooking.
Ingredients
– 1 block firm organic tofu, pressed and cubed
– 2 tablespoons toasted sesame oil
– 3 cloves fresh garlic, minced
– 1 tablespoon freshly grated ginger
– 1 large red bell pepper, thinly sliced
– 1 cup crisp sugar snap peas, trimmed
– 2 medium carrots, julienned
– 4 green onions, sliced diagonally
– 3 tablespoons low-sodium soy sauce
– 1 tablespoon rice vinegar
– 1 teaspoon pure maple syrup
– 1 tablespoon cornstarch
– 2 tablespoons cold filtered water
– 1 tablespoon toasted sesame seeds
Instructions
1. Press the firm organic tofu between paper towels with a heavy pan for 15 minutes to remove excess moisture, then cut into 1-inch cubes.
2. Heat 1 tablespoon toasted sesame oil in a large wok or skillet over medium-high heat until shimmering.
3. Add tofu cubes in a single layer and cook for 4-5 minutes per side until golden brown and crispy.
4. Transfer tofu to a plate and set aside, keeping the wok over heat.
5. Add remaining tablespoon of toasted sesame oil to the hot wok.
6. Sauté minced garlic and freshly grated ginger for 30 seconds until fragrant but not browned.
7. Add thinly sliced red bell pepper and cook for 2 minutes until slightly softened.
8. Incorporate crisp sugar snap peas and julienned carrots, stir-frying for 3 minutes until vegetables are bright and tender-crisp.
9. Whisk together low-sodium soy sauce, rice vinegar, and pure maple syrup in a small bowl.
10. Create a slurry by mixing cornstarch with cold filtered water until completely smooth.
11. Return tofu to the wok and pour the soy sauce mixture over the vegetables and tofu.
12. Add the cornstarch slurry and stir continuously for 1-2 minutes until the sauce thickens and coats everything evenly.
13. Remove from heat and fold in sliced green onions and toasted sesame seeds.
14. Serve immediately while hot. Beyond the initial visual appeal, this stir-fry delivers contrasting textures from the crispy tofu to the snap of fresh peas, while the subtle sweetness of maple syrup balances the umami-rich sauce. Consider serving over jasmine rice or alongside soba noodles for a complete meal that celebrates clean, vibrant flavors.
Homemade Low-Sodium Tomato Basil Soup

Zestfully capturing the essence of garden-fresh simplicity, this homemade low-sodium tomato basil soup transforms humble ingredients into an elegant bowl of comfort. With vibrant Roma tomatoes and aromatic basil taking center stage, this recipe celebrates pure, unadulterated flavors while thoughtfully reducing sodium content. Each spoonful promises a harmonious balance of sweet acidity and herbal freshness that will become your new cold-weather staple.
Ingredients
– 2 pounds ripe Roma tomatoes, halved lengthwise
– 3 tablespoons rich extra-virgin olive oil, divided
– 1 large yellow onion, thinly sliced
– 3 cloves fresh garlic, minced
– 1/4 cup fresh basil leaves, tightly packed
– 1/2 cup heavy cream
– 1 teaspoon raw honey
– 1/4 teaspoon freshly cracked black pepper
Instructions
1. Preheat your oven to 400°F and line a baking sheet with parchment paper.
2. Arrange the halved Roma tomatoes cut-side up on the prepared baking sheet.
3. Drizzle 2 tablespoons of extra-virgin olive oil evenly over the tomatoes.
4. Roast the tomatoes for 35-40 minutes until the skins are blistered and the edges are lightly caramelized.
5. While tomatoes roast, heat the remaining 1 tablespoon of olive oil in a large Dutch oven over medium heat.
6. Add the thinly sliced yellow onion and cook for 8-10 minutes, stirring occasionally, until translucent and fragrant.
7. Stir in the minced garlic and cook for 1 minute until aromatic but not browned.
8. Transfer the roasted tomatoes and any accumulated juices to the Dutch oven.
9. Add the fresh basil leaves and bring the mixture to a gentle simmer.
10. Carefully transfer the soup to a blender and puree until completely smooth, working in batches if necessary.
11. Return the pureed soup to the Dutch oven over low heat.
12. Stir in the heavy cream, raw honey, and freshly cracked black pepper.
13. Heat the soup for 3-4 minutes until warmed through, but do not allow it to boil.
For a velvety texture that coats the spoon beautifully, this soup achieves remarkable depth through slow-roasted tomatoes and the gentle sweetness of honey. Finish with a swirl of cream and fresh basil chiffonade for an elegant presentation that highlights the soup’s vibrant color and aromatic qualities.
Grilled Chicken and Mango Salad
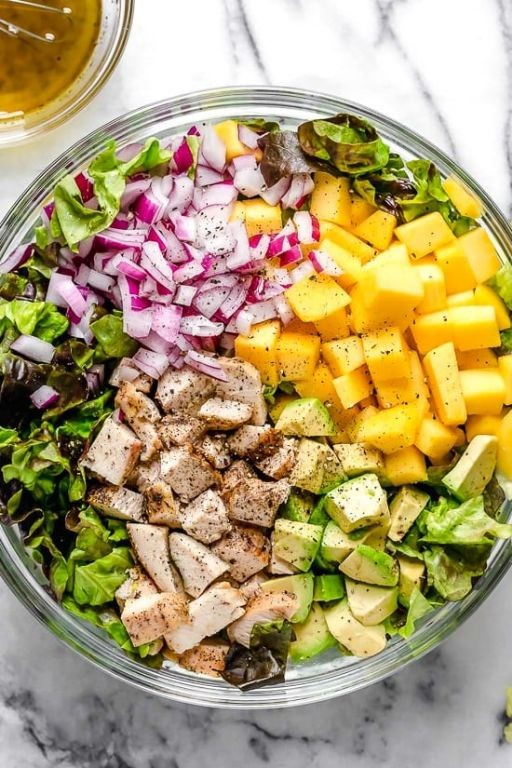
A vibrant symphony of sweet and savory, this grilled chicken and mango salad brings tropical sunshine to your table with its sophisticated balance of charred protein and juicy fruit. An elegant composition that transforms simple ingredients into a memorable culinary experience, perfect for al fresco dining or a refreshing lunch that feels both indulgent and nourishing.
Ingredients
- 2 boneless, skinless chicken breasts (about 1 pound total)
- 2 tablespoons extra virgin olive oil, rich and golden
- 1 teaspoon kosher salt, finely textured
- 1/2 teaspoon freshly cracked black pepper, aromatic
- 1 large ripe mango, sweet and fragrant
- 6 cups mixed baby greens, tender and vibrant
- 1/4 cup thinly sliced red onion, crisp and mildly pungent
- 1/4 cup fresh cilantro leaves, bright and citrusy
- 1/4 cup toasted sliced almonds, nutty and crisp
- 3 tablespoons fresh lime juice, zesty and tangy
Instructions
- Preheat your grill to medium-high heat, approximately 400°F, ensuring the grates are clean and lightly oiled to prevent sticking.
- Pat the chicken breasts completely dry with paper towels, then brush both sides evenly with the extra virgin olive oil.
- Sprinkle the kosher salt and freshly cracked black pepper evenly over both sides of the chicken breasts.
- Place the chicken on the preheated grill and cook for 6-7 minutes, until grill marks appear and the bottom releases easily.
- Flip the chicken using tongs and grill for another 6-7 minutes, until the internal temperature reaches 165°F when measured with an instant-read thermometer.
- Transfer the grilled chicken to a cutting board and let it rest for 5 minutes to allow juices to redistribute.
- While the chicken rests, peel the mango and slice the flesh away from the pit in 1/2-inch thick slices.
- Arrange the mixed baby greens as a base in a large serving bowl.
- Thinly slice the rested chicken crosswise into 1/4-inch strips and arrange over the greens.
- Scatter the mango slices, thinly sliced red onion, fresh cilantro leaves, and toasted sliced almonds over the chicken and greens.
- Drizzle the fresh lime juice evenly over the entire salad, tossing gently just before serving to maintain crisp textures.
Now the salad presents a delightful contrast between the warm, smoky chicken and cool, crisp greens, while the mango’s sweetness beautifully counters the lime’s acidity. For an elegant presentation, layer the components separately on individual plates rather than tossing, allowing each ingredient to shine. Nutty toasted almonds add the perfect crunch to this refreshing, restaurant-worthy dish that’s as beautiful as it is delicious.
Roasted Vegetable and Hummus Wrap

Vibrant roasted vegetables nestled in creamy hummus create a portable masterpiece that transforms simple ingredients into an extraordinary lunch experience. This wrap combines the earthy sweetness of caramelized vegetables with the luxurious texture of homemade hummus, all wrapped in a soft flour tortilla for effortless elegance. Each bite delivers a symphony of flavors and textures that will elevate your midday meal to restaurant-quality heights.
Ingredients
– 2 cups colorful bell peppers, sliced into ½-inch strips
– 1 medium zucchini, cut into ½-inch half-moons
– 1 small red onion, thinly sliced
– 3 tablespoons rich extra-virgin olive oil
– 1 teaspoon coarse sea salt
– ½ teaspoon freshly cracked black pepper
– 1 cup creamy homemade hummus
– 4 large whole wheat flour tortillas
– 2 cups fresh baby spinach leaves
– ¼ cup crumbled feta cheese
Instructions
1. Preheat your oven to 425°F and line a large baking sheet with parchment paper.
2. In a large mixing bowl, combine the bell pepper strips, zucchini half-moons, and sliced red onion with the extra-virgin olive oil, ensuring all vegetables are evenly coated.
3. Sprinkle the sea salt and cracked black pepper over the vegetables, then toss gently to distribute the seasonings evenly.
4. Spread the seasoned vegetables in a single layer on the prepared baking sheet, being careful not to overcrowd the pan for optimal roasting.
5. Roast the vegetables for 20-25 minutes until they develop golden-brown edges and become tender when pierced with a fork.
6. Remove the baking sheet from the oven and let the vegetables cool for 5 minutes to prevent the tortillas from becoming soggy.
7. Warm the whole wheat tortillas in a dry skillet over medium heat for 30 seconds per side until pliable and slightly toasted.
8. Spread ¼ cup of creamy hummus evenly across the center of each warmed tortilla, leaving a 2-inch border around the edges.
9. Arrange ½ cup of fresh baby spinach leaves over the hummus layer, creating a green foundation for the roasted vegetables.
10. Divide the roasted vegetable mixture evenly among the four tortillas, placing them in a neat horizontal line down the center.
11. Sprinkle 1 tablespoon of crumbled feta cheese over the vegetables on each wrap for a tangy contrast.
12. Fold the bottom edge of the tortilla up over the filling, then fold in the sides and roll tightly away from you to create a secure wrap.
13. Cut each wrap in half diagonally to reveal the beautiful layers of colorful vegetables and creamy hummus.
Soothingly creamy hummus provides the perfect counterpoint to the caramelized sweetness of roasted vegetables, while the crisp spinach adds refreshing texture. The slight tang of feta cheese cuts through the richness, creating a balanced flavor profile that delights with every bite. For an elegant presentation, serve these wraps on a wooden board with extra hummus for dipping and a sprinkle of fresh herbs.
Herb-Roasted Turkey Tenderloin with Mashed Cauliflower
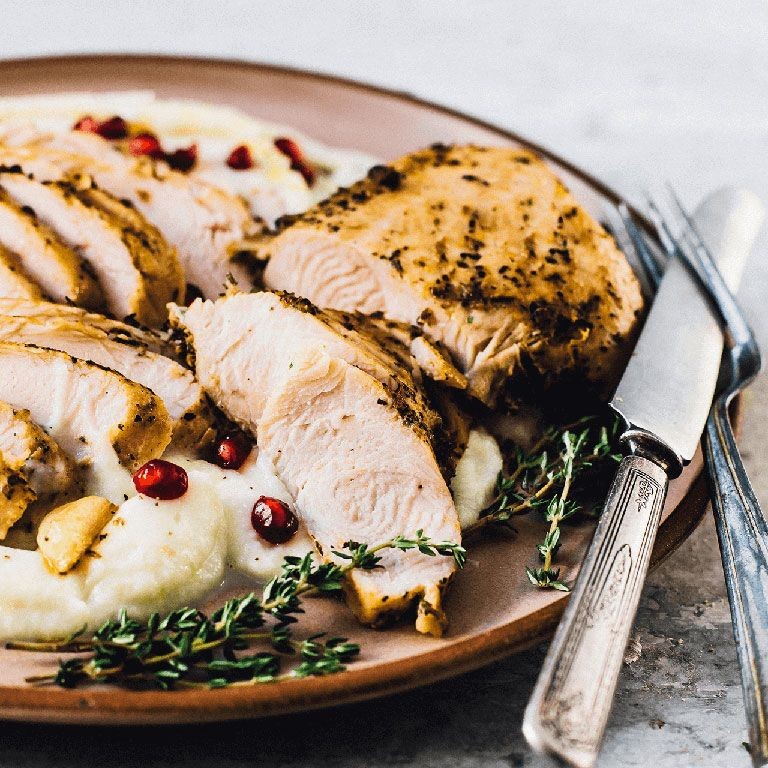
Unveiling a sophisticated yet approachable centerpiece for intimate gatherings, this herb-roasted turkey tenderloin rests atop creamy mashed cauliflower, creating a harmonious balance of elegant flavors and comforting textures that transforms weeknight dining into a memorable culinary experience.
Ingredients
– 1.5 lbs fresh turkey tenderloins
– 2 tbsp rich extra virgin olive oil
– 3 cloves aromatic garlic, minced
– 1 tbsp fresh rosemary leaves, finely chopped
– 1 tbsp fresh thyme leaves
– 1 tsp coarse kosher salt
– ½ tsp freshly cracked black pepper
– 1 large head fresh cauliflower, cut into florets
– ¼ cup heavy cream, warmed
– 2 tbsp unsalted European-style butter
– ¼ tsp freshly grated nutmeg
Instructions
1. Preheat your oven to 400°F and position the rack in the center for even heating.
2. Pat the turkey tenderloins completely dry with paper towels to ensure proper browning.
3. In a small bowl, combine the olive oil, minced garlic, rosemary, thyme, salt, and pepper to create an aromatic herb paste.
4. Rub the herb mixture evenly over all surfaces of the turkey tenderloins, coating thoroughly.
5. Place the seasoned tenderloins on a rimmed baking sheet lined with parchment paper.
6. Roast for 25-30 minutes until the internal temperature reaches 165°F and the exterior develops a golden-brown crust.
7. While the turkey roasts, steam the cauliflower florets over boiling water for 12-15 minutes until fork-tender.
8. Drain the cauliflower thoroughly in a colander to remove excess moisture for creamier results.
9. Transfer the hot cauliflower to a food processor and pulse until smooth.
10. Add the warmed heavy cream, butter, and nutmeg, then process for 30 seconds until silky and well-combined.
11. Remove the turkey from the oven and let rest for 5 minutes to allow juices to redistribute.
12. Slice the turkey against the grain into ½-inch thick medallions.
A symphony of textures awaits—the turkey’s juicy interior and crisp herb crust contrast beautifully with the velvety cauliflower puree. For an elegant presentation, fan the sliced medallions over the mashed cauliflower and garnish with fresh herb sprigs, creating a restaurant-worthy plate that celebrates both sophistication and comfort in every bite.
Fresh Berry and Yogurt Parfait

Crafted with precision and grace, this Fresh Berry and Yogurt Parfait offers a symphony of textures and flavors that dance elegantly on the palate. Layering creamy Greek yogurt with jewel-toned berries and crunchy granola creates a dessert that feels both indulgent and refreshingly light. It’s the perfect balance of sophistication and simplicity, ideal for brunch gatherings or a wholesome afternoon treat.
Ingredients
– 2 cups thick Greek yogurt
– 1 cup mixed fresh berries (such as raspberries, blueberries, and sliced strawberries)
– ½ cup honey
– 1 cup crunchy granola clusters
– 1 teaspoon pure vanilla extract
– Fresh mint leaves for garnish
Instructions
1. Place 2 cups of thick Greek yogurt in a medium mixing bowl.
2. Drizzle 1 teaspoon of pure vanilla extract into the yogurt and stir gently until fully incorporated.
3. Warm ½ cup of honey in a microwave-safe bowl for 15 seconds to thin it slightly for easier drizzling.
4. Rinse 1 cup of mixed fresh berries under cool water and pat them dry with a paper towel to prevent sogginess.
5. Select four clear parfait glasses to showcase the beautiful layers.
6. Spoon 2 tablespoons of the vanilla-infused yogurt into the bottom of each glass, spreading it evenly.
7. Sprinkle 2 tablespoons of crunchy granola clusters over the yogurt layer in each glass.
8. Arrange a generous layer of mixed fresh berries over the granola, dividing them evenly among the glasses.
9. Repeat the layering process with another 2 tablespoons of yogurt, followed by granola and berries.
10. Drizzle 1 tablespoon of warmed honey over the top layer of each parfait.
11. Garnish each parfait with fresh mint leaves for a pop of color and aromatic freshness.
12. Chill the assembled parfaits in the refrigerator for at least 20 minutes to allow the flavors to meld.
Sublime in its simplicity, this parfait delights with contrasting textures—the creaminess of yogurt, the crispness of granola, and the burst of juicy berries. For an elegant twist, serve it in champagne flutes or accompany with a drizzle of dark chocolate sauce to elevate its dessert appeal.
Summary
Zesty, heart-healthy eating has never been easier! These 18 low-sodium recipes prove that delicious food and good health go hand in hand. We’d love to hear which recipes become your new favorites—drop us a comment below and share this roundup with friends on Pinterest to spread the love for flavorful, heart-smart cooking!