Zesty, wholesome dinners that won’t derail your wellness goals? You’ve come to the right place! We’ve gathered 20 delicious, easy Weight Watchers dinners perfect for busy weeknights. From cozy comfort foods to fresh, vibrant bowls, these recipes are designed to keep you satisfied and on track. Ready to make dinner both healthy and exciting? Dive in and discover your new favorites!
Slow Cooker Chicken Tacos

Perfect for busy weeknights, these slow cooker chicken tacos practically make themselves. Pile your favorite toppings on warm tortillas for a fuss-free feast that feeds a crowd.
Ingredients
- 2 lbs boneless, skinless chicken breasts
- 1 packet (1 oz) taco seasoning
- 1 cup chicken broth
- 1/2 cup salsa
- 1 tbsp lime juice
- 1 tsp cumin
- 1/2 tsp chili powder
- 8 corn tortillas
- 1 cup shredded lettuce
- 1/2 cup diced tomatoes
- 1/2 cup shredded cheddar cheese
- 1/4 cup sour cream
Instructions
- Place 2 lbs boneless, skinless chicken breasts in a 6-quart slow cooker.
- Sprinkle 1 packet taco seasoning evenly over the chicken.
- Pour 1 cup chicken broth and 1/2 cup salsa around the chicken.
- Add 1 tbsp lime juice, 1 tsp cumin, and 1/2 tsp chili powder to the slow cooker.
- Cover and cook on LOW for 6 hours or HIGH for 3 hours until chicken reaches 165°F internally.
- Remove chicken from slow cooker and shred using two forks. Tip: For extra flavor, mix shredded chicken with 1/4 cup of the cooking liquid.
- Warm 8 corn tortillas in a dry skillet over medium heat for 30 seconds per side until pliable. Tip: Keep tortillas warm by wrapping them in a clean kitchen towel.
- Divide shredded chicken evenly among warmed tortillas.
- Top each taco with 1 cup shredded lettuce, 1/2 cup diced tomatoes, 1/2 cup shredded cheddar cheese, and 1/4 cup sour cream. Tip: For crispier tacos, briefly pan-fry filled tortillas in 1 tbsp oil until golden.
Hearty shredded chicken stays incredibly moist while absorbing all the zesty taco seasoning. The tender filling contrasts beautifully with crisp lettuce and cool sour cream—try serving them taco bar-style with extra lime wedges and hot sauce for customizable fun.
Zucchini Noodles with Turkey Meatballs
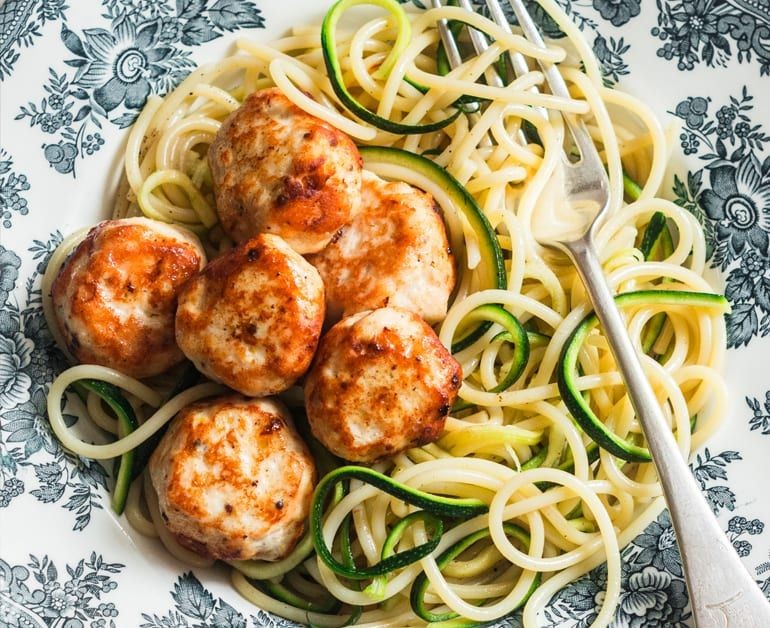
Ready to transform your spiralizer into a weeknight hero? Rethink pasta night with this protein-packed powerhouse that swaps heavy carbs for fresh veggie ribbons. Get ready to twirl your fork into something seriously satisfying.
Ingredients
– 1 lb ground turkey
– 1/2 cup breadcrumbs
– 1/4 cup grated Parmesan cheese
– 1 egg
– 2 cloves garlic, minced
– 1 tsp dried oregano
– 1/2 tsp salt
– 1/4 tsp black pepper
– 2 tbsp olive oil
– 4 medium zucchini
– 2 cups marinara sauce
– Fresh basil leaves for garnish
Instructions
1. Preheat your oven to 400°F and line a baking sheet with parchment paper.
2. Combine ground turkey, breadcrumbs, Parmesan, egg, minced garlic, oregano, salt, and pepper in a large bowl.
3. Mix the ingredients thoroughly with your hands until just combined—don’t overwork the meat.
4. Roll the mixture into 1-inch meatballs and place them 1 inch apart on the prepared baking sheet.
5. Bake the meatballs for 18-20 minutes until they reach 165°F internally and have golden-brown exteriors.
6. While meatballs bake, spiralize all zucchini into noodles using the medium blade.
7. Heat olive oil in a large skillet over medium-high heat until shimmering.
8. Sauté zucchini noodles for 2-3 minutes, tossing constantly until just tender but still al dente.
9. Warm marinara sauce in a separate saucepan over medium heat until bubbling gently.
10. Combine the baked meatballs with the warmed marinara sauce, stirring to coat evenly.
11. Divide zucchini noodles among four plates and top with saucy meatballs.
12. Garnish with fresh basil leaves before serving immediately.
Nothing beats the fresh crunch of zucchini noodles against those juicy turkey meatballs. Nestle this bowl up and watch the vibrant colors and aromas make everyone gather around—perfect for doubling up and enjoying cold for lunch tomorrow.
One-Pot Turkey Chili
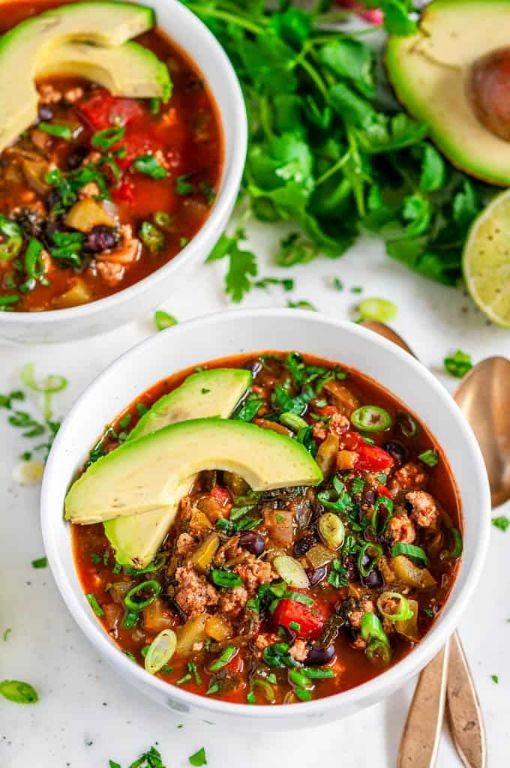
Packed with protein and ready in under an hour, this one-pot turkey chili delivers maximum flavor with minimal cleanup. Brown your ground turkey, simmer with bold spices, and let the ingredients meld into a hearty, satisfying meal that’s perfect for busy weeknights.
Ingredients
– 1 tbsp olive oil
– 1 lb ground turkey
– 1 medium yellow onion, diced
– 3 cloves garlic, minced
– 1 tbsp chili powder
– 1 tsp ground cumin
– 1/2 tsp smoked paprika
– 1 (15 oz) can kidney beans, drained and rinsed
– 1 (15 oz) can diced tomatoes
– 2 cups chicken broth
– 1/2 tsp salt
– 1/4 tsp black pepper
Instructions
1. Heat 1 tbsp olive oil in a large pot over medium-high heat until shimmering.
2. Add 1 lb ground turkey and cook for 5-7 minutes, breaking it apart with a spoon until no pink remains.
3. Stir in diced onion and minced garlic, cooking for 3 minutes until fragrant and softened.
4. Sprinkle in 1 tbsp chili powder, 1 tsp cumin, and 1/2 tsp smoked paprika, toasting for 1 minute to deepen flavors.
5. Pour in diced tomatoes with their juices, stirring to scrape up any browned bits from the pot bottom.
6. Add drained kidney beans, 2 cups chicken broth, 1/2 tsp salt, and 1/4 tsp black pepper.
7. Bring the chili to a boil, then reduce heat to low and simmer uncovered for 25 minutes, stirring occasionally.
8. Check consistency after 20 minutes—if too thick, add 1/4 cup more broth; if too thin, simmer 5 minutes longer.
9. Remove from heat and let stand for 5 minutes before serving to allow flavors to meld.
Hearty and slightly smoky, this chili boasts tender turkey and beans in a rich, tomato-based broth. Top with avocado slices or a dollop of Greek yogurt for extra creaminess, or serve over baked potatoes for a comforting twist.
Baked Lemon Garlic Salmon
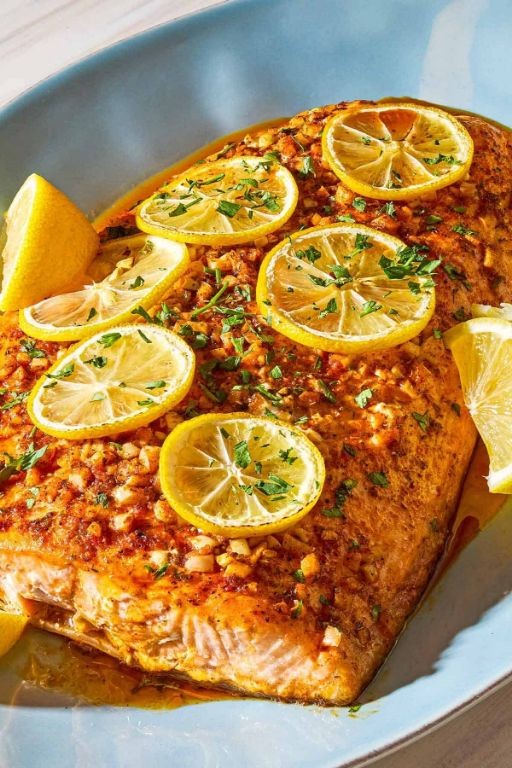
Ready to transform your weeknight dinner game? This baked lemon garlic salmon delivers restaurant-quality flavor with minimal effort. Roast it to perfection in just 15 minutes.
Ingredients
- 4 salmon fillets (6 oz each)
- 2 tbsp olive oil
- 3 cloves garlic, minced
- 1 lemon, sliced
- 1 tsp dried oregano
- 1/2 tsp salt
- 1/4 tsp black pepper
- 2 tbsp fresh parsley, chopped
Instructions
- Preheat your oven to 400°F and line a baking sheet with parchment paper.
- Pat salmon fillets completely dry with paper towels to ensure crispy skin.
- Brush both sides of each fillet with olive oil using a pastry brush.
- Rub minced garlic evenly over the top surface of each salmon fillet.
- Sprinkle salt, black pepper, and dried oregano evenly across all fillets.
- Arrange lemon slices in a single layer on the prepared baking sheet.
- Place salmon fillets skin-side down directly on top of the lemon slices.
- Bake at 400°F for 12-15 minutes until the internal temperature reaches 145°F.
- Check for doneness by observing opaque flesh that flakes easily with a fork.
- Remove from oven and let rest for 2 minutes to redistribute juices.
- Sprinkle with fresh parsley before serving immediately.
Expect flaky, moist salmon with crispy edges and bright citrus notes. The garlic infuses every bite without overpowering the delicate fish. Serve over quinoa with roasted asparagus for a complete meal that impresses guests.
Skinny Beef and Broccoli Stir-Fry
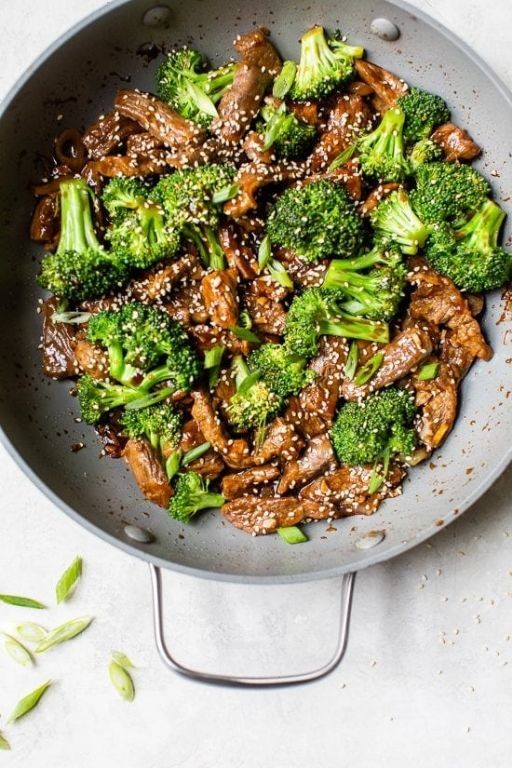
Let’s transform your weeknight dinner game with this lightning-fast stir-fry that delivers restaurant-quality flavors without the guilt. Load up on lean protein and crisp broccoli in a savory sauce that comes together faster than your takeout order. Skip the greasy containers and master this healthy hack that’ll become your new go-to.
Ingredients
– 1 lb flank steak, thinly sliced against the grain
– 4 cups broccoli florets
– 2 tbsp olive oil
– 3 cloves garlic, minced
– 1 tbsp fresh ginger, grated
– 1/4 cup low-sodium soy sauce
– 2 tbsp honey
– 1 tbsp rice vinegar
– 1 tsp sesame oil
– 1 tbsp cornstarch
– 1/4 cup water
– 1/2 tsp red pepper flakes
– Cooked brown rice for serving
Instructions
1. Whisk together 1/4 cup low-sodium soy sauce, 2 tbsp honey, 1 tbsp rice vinegar, 1 tsp sesame oil, and 1/2 tsp red pepper flakes in a small bowl.
2. Combine 1 tbsp cornstarch with 1/4 cup water in a separate bowl, stirring until completely smooth to prevent lumps in your sauce.
3. Heat 1 tbsp olive oil in a large skillet or wok over high heat until shimmering, about 1 minute.
4. Add 1 lb thinly sliced flank steak in a single layer, searing for 90 seconds per side until browned but not cooked through.
5. Transfer steak to a clean plate, reserving any juices in the skillet.
6. Add remaining 1 tbsp olive oil to the same skillet over medium-high heat.
7. Sauté 3 cloves minced garlic and 1 tbsp grated ginger for 30 seconds until fragrant but not browned.
8. Add 4 cups broccoli florets and stir-fry for 3 minutes until bright green and slightly tender.
9. Pour the prepared sauce mixture over the broccoli, bringing it to a rapid boil.
10. Stir the cornstarch slurry once more before adding it to the skillet, cooking for 1 minute until sauce thickens and coats the broccoli.
11. Return the seared steak and any accumulated juices to the skillet, tossing everything together for 1 minute until heated through.
12. Remove from heat immediately to prevent overcooking the steak.
What makes this dish truly special is the perfect contrast between tender beef and crisp-tender broccoli, all glazed in that addictive sweet-savory sauce. Serve it over steaming brown rice for maximum sauce absorption, or get creative by stuffing the stir-fry into lettuce wraps for a low-carb twist that still delivers big flavor.
Black Bean and Corn Stuffed Peppers
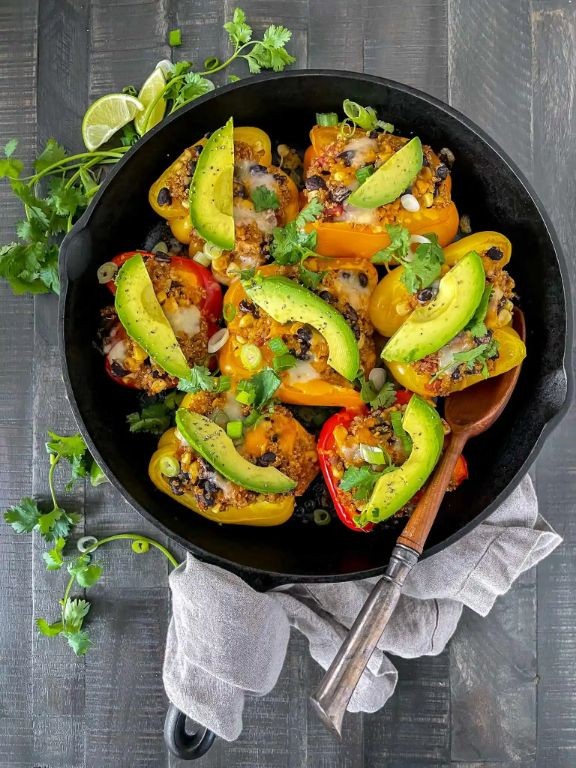
Just when you thought stuffed peppers couldn’t get more crave-worthy—these black bean and corn versions will blow your mind. Jam-packed with protein and bursting with Southwest flavors, they’re the ultimate weeknight win that’ll have everyone begging for seconds.
Ingredients
– 4 large bell peppers
– 1 tablespoon olive oil
– 1 cup cooked rice
– 15 ounces canned black beans
– 1 cup frozen corn
– 1 cup shredded Monterey Jack cheese
– 1 teaspoon chili powder
– 1/2 teaspoon cumin
– 1/2 teaspoon garlic powder
– 1/4 teaspoon salt
– 1/4 cup chopped cilantro
Instructions
1. Preheat your oven to 375°F.
2. Slice bell peppers in half lengthwise and remove all seeds and membranes.
3. Brush pepper halves with olive oil inside and out.
4. Place peppers cut-side up on a baking sheet and bake for 15 minutes.
5. While peppers bake, rinse and drain black beans thoroughly.
6. In a large bowl, combine cooked rice, black beans, frozen corn, 3/4 cup cheese, chili powder, cumin, garlic powder, and salt.
7. Remove peppers from oven—they should be slightly softened but still hold their shape.
8. Evenly divide filling mixture among pepper halves, packing it down gently.
9. Sprinkle remaining 1/4 cup cheese over stuffed peppers.
10. Return to oven and bake for 20 minutes until cheese is golden and peppers are tender.
11. Switch oven to broil and cook for 2-3 minutes until cheese is bubbly and lightly browned.
12. Remove from oven and let rest for 5 minutes before serving.
13. Garnish with chopped cilantro.
These peppers deliver a satisfying contrast between the tender-crisp shells and the hearty, slightly spicy filling. Top with avocado slices or a dollop of Greek yogurt for extra creaminess that balances the Southwest kick perfectly.
Grilled Shrimp Skewers with Pineapple
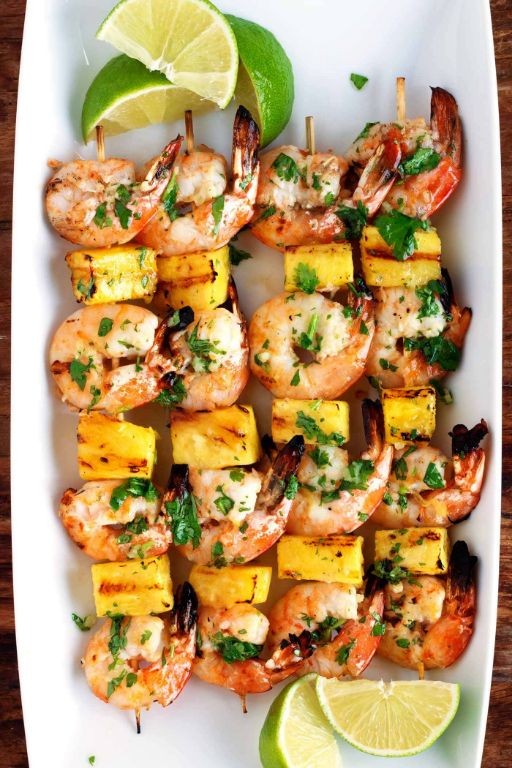
Hear me out—these grilled shrimp skewers with pineapple will become your summer obsession. Fire up the grill for juicy shrimp and caramelized pineapple that delivers sweet, smoky perfection in every bite. Seriously, this is the ultimate crowd-pleaser that looks fancy but takes minutes to throw together.
Ingredients
– 1 lb large raw shrimp, peeled and deveined
– 2 cups fresh pineapple chunks
– 3 tbsp olive oil
– 2 tbsp lime juice
– 2 cloves garlic, minced
– 1 tsp smoked paprika
– 1/2 tsp salt
– 1/4 tsp black pepper
– 8 wooden skewers
Instructions
1. Soak 8 wooden skewers in water for 30 minutes to prevent burning.
2. Preheat your grill to medium-high heat (400°F).
3. Pat 1 lb shrimp completely dry with paper towels for better searing.
4. In a medium bowl, whisk together 3 tbsp olive oil, 2 tbsp lime juice, 2 minced garlic cloves, 1 tsp smoked paprika, 1/2 tsp salt, and 1/4 tsp black pepper.
5. Add shrimp to the marinade and toss to coat evenly.
6. Thread marinated shrimp and 2 cups pineapple chunks alternately onto soaked skewers.
7. Place skewers on preheated grill and cook for 2 minutes.
8. Flip skewers and cook for another 2-3 minutes until shrimp turn pink and opaque.
9. Check for doneness by ensuring shrimp are firm with lightly charred edges.
10. Remove skewers from grill and let rest for 2 minutes before serving.
Zesty grilled shrimp pairs beautifully with the caramelized pineapple’s natural sweetness, creating a tropical flavor explosion. The shrimp stay tender while the pineapple gets juicy and slightly charred—perfect served over cilantro lime rice or alongside a crisp salad. These skewers also make fantastic tacos when slid off into warm tortillas with avocado crema.
Lemon Herb Baked Cod
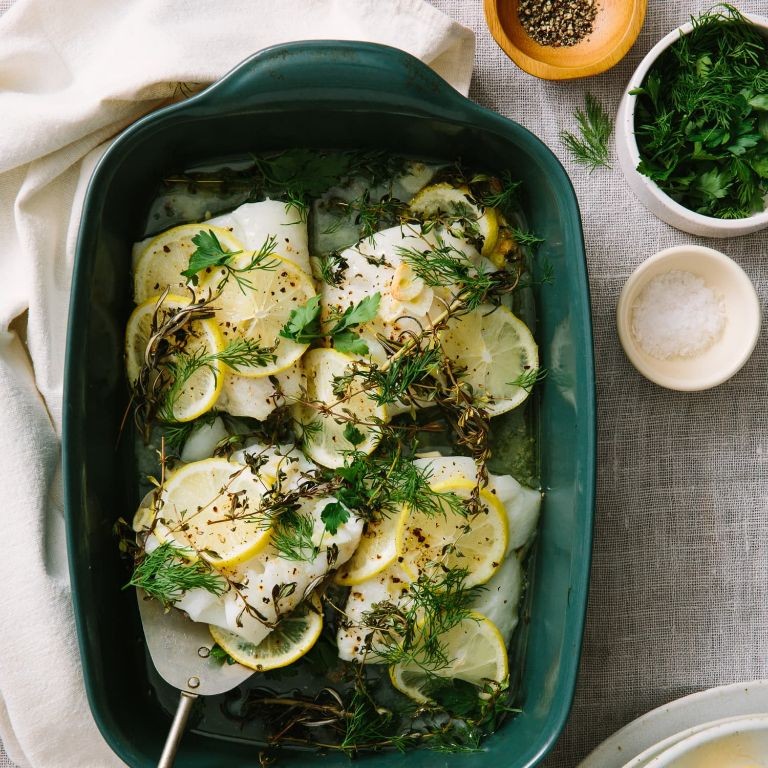
Tired of boring fish dinners? This lemon herb baked cod transforms flaky white fish into a vibrant masterpiece. Get ready for restaurant-quality results with minimal effort.
Ingredients
– 4 (6 oz) cod fillets
– 2 tbsp olive oil
– 1 lemon
– 2 tbsp fresh parsley
– 1 tbsp fresh dill
– 2 cloves garlic
– 1/2 tsp salt
– 1/4 tsp black pepper
– 1/4 tsp paprika
Instructions
1. Preheat your oven to 400°F.
2. Pat cod fillets completely dry with paper towels.
3. Arrange fillets in a single layer in a baking dish.
4. Drizzle olive oil evenly over all fillets.
5. Zest the entire lemon directly over the fish.
6. Cut the zested lemon in half and squeeze juice over fillets.
7. Mince garlic cloves finely and sprinkle over fish.
8. Chop fresh parsley and dill, then distribute evenly.
9. Season with salt, black pepper, and paprika.
10. Bake at 400°F for 12-15 minutes until fish flakes easily with a fork.
11. Check internal temperature reaches 145°F with an instant-read thermometer.
12. Remove from oven when edges appear slightly golden.
13. Let rest for 3 minutes before serving.
The flaky cod practically melts while the lemon-herb crust provides bright, zesty crunch. Serve over creamy polenta or alongside roasted asparagus for a complete meal that feels fancy but comes together effortlessly.
Skinny Chicken Fajitas
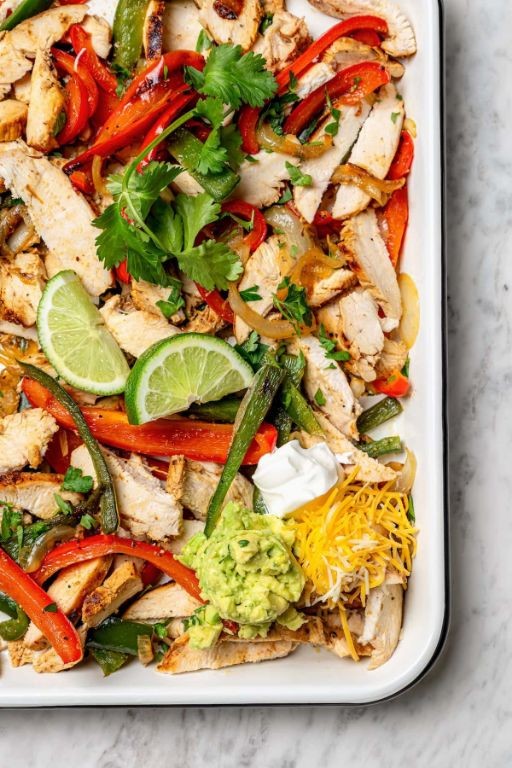
Make your weeknight dinner sizzle with these guilt-free chicken fajitas. Master the art of lean, flavor-packed cooking that comes together in under 30 minutes.
Ingredients
- 1.5 lbs chicken breast
- 2 tbsp olive oil
- 2 tbsp fajita seasoning
- 1 large red bell pepper
- 1 large green bell pepper
- 1 large yellow onion
- 8 small flour tortillas
- 1 lime
- 1/4 cup fresh cilantro
- 1/2 cup plain Greek yogurt
Instructions
- Slice chicken breast into 1/2-inch thick strips against the grain.
- Toss chicken strips with 1 tablespoon olive oil and fajita seasoning in a medium bowl.
- Cut bell peppers and onion into uniform 1/4-inch strips.
- Heat remaining 1 tablespoon olive oil in a large cast-iron skillet over medium-high heat until shimmering.
- Add chicken to the hot skillet in a single layer, cooking for 4-5 minutes without moving.
- Flip chicken and cook for another 3-4 minutes until internal temperature reaches 165°F.
- Transfer cooked chicken to a clean plate, leaving drippings in the skillet.
- Add sliced peppers and onions to the same skillet, spreading them evenly.
- Cook vegetables for 6-8 minutes, stirring only once halfway through to develop char.
- Return chicken to the skillet with vegetables, tossing to combine and heat through for 1 minute.
- Warm tortillas in a dry skillet for 30 seconds per side or until pliable.
- Chop fresh cilantro and cut lime into wedges.
- Assemble fajitas by dividing chicken and vegetable mixture among warmed tortillas.
- Top each fajita with a dollop of Greek yogurt, fresh cilantro, and a squeeze of lime juice.
Zesty lime cuts through the smoky char while creamy Greek yogurt balances the spice. These fajitas deliver restaurant-quality crisp-tender vegetables and juicy chicken without the heavy calories. Serve them family-style with extra lime wedges for squeezing over the sizzling skillet right at the table.
Turkey and Spinach Stuffed Portobello Mushrooms

Haven’t found a low-carb dinner that actually satisfies? These Turkey and Spinach Stuffed Portobello Mushrooms deliver serious flavor without the guilt. Whip them up in under 30 minutes for a protein-packed meal that feels indulgent.
Ingredients
- 4 large portobello mushroom caps
- 1 tbsp olive oil
- 1 lb ground turkey
- 1/2 cup diced yellow onion
- 2 cloves garlic, minced
- 4 cups fresh spinach
- 1/2 cup grated Parmesan cheese
- 1/4 cup breadcrumbs
- 1/4 cup heavy cream
- 1 tsp dried oregano
- 1/2 tsp salt
- 1/4 tsp black pepper
Instructions
- Preheat your oven to 400°F.
- Remove stems from portobello mushrooms and scrape out gills using a spoon.
- Brush mushroom caps with olive oil and place them gill-side up on a baking sheet.
- Bake mushrooms for 8 minutes to release excess moisture.
- While mushrooms bake, heat a large skillet over medium-high heat.
- Add ground turkey and cook for 5 minutes, breaking it up with a spatula.
- Add diced onion and cook for 3 minutes until translucent.
- Stir in minced garlic and cook for 1 minute until fragrant.
- Add fresh spinach and cook for 2 minutes until wilted.
- Remove skillet from heat and drain any excess liquid.
- Mix in Parmesan cheese, breadcrumbs, heavy cream, oregano, salt, and pepper.
- Pat mushroom caps dry with paper towels to ensure crispy edges.
- Divide turkey mixture evenly among the mushroom caps.
- Bake stuffed mushrooms for 15 minutes at 400°F until golden brown.
- Let rest for 3 minutes before serving to allow flavors to meld.
Mouthwatering results await with juicy turkey filling contrasting the meaty mushroom base. The Parmesan creates a savory crust while the spinach adds fresh brightness. Serve over cauliflower rice for a complete meal or slice into quarters for impressive appetizers.
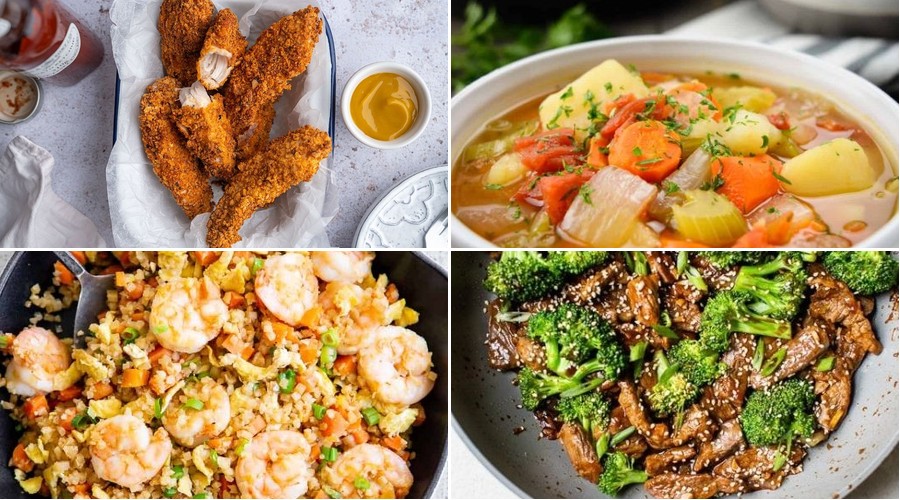
Air Fryer Crispy Chicken Tenders

Just when you thought chicken tenders couldn’t get better—enter the air fryer. Jumpstart your weeknight dinner game with these impossibly crispy, perfectly seasoned tenders that cook in minutes. Forget soggy oven-baked versions—this method delivers restaurant-quality crunch without the oil bath.
Ingredients
– 1.5 lbs chicken tenders
– 1 cup all-purpose flour
– 2 large eggs
– 1.5 cups panko breadcrumbs
– 1 tsp garlic powder
– 1 tsp paprika
– 1/2 tsp black pepper
– 1 tsp salt
– Cooking spray
Instructions
1. Preheat your air fryer to 400°F for 3 minutes.
2. Pat chicken tenders completely dry with paper towels.
3. Combine flour, garlic powder, paprika, black pepper, and salt in a shallow bowl.
4. Whisk eggs in a separate shallow bowl until fully blended.
5. Place panko breadcrumbs in a third shallow bowl.
6. Dredge each chicken tender in the flour mixture, shaking off excess.
7. Dip the floured tender into the egg mixture, coating completely.
8. Press the tender into panko breadcrumbs, ensuring full coverage on all sides.
9. Arrange coated tenders in a single layer in the air fryer basket, leaving space between each piece.
10. Lightly spray all tenders with cooking spray.
11. Air fry at 400°F for 8 minutes.
12. Flip each tender using tongs.
13. Spray the flipped side with cooking spray.
14. Air fry for another 6-8 minutes until golden brown and internal temperature reaches 165°F.
15. Remove tenders and let rest for 2 minutes before serving.
Unbelievably crunchy outside gives way to juicy, tender chicken inside—these rival any fried version. Use them for next-level wraps, chop over salads, or dunk in your favorite sauces for the ultimate snack.
Summary
A fantastic collection of healthy, satisfying dinners that make sticking to your Weight Watchers plan deliciously simple. I hope these recipes bring joy to your kitchen! Try them out and let me know which ones become your new favorites in the comments below. Don’t forget to share this roundup on Pinterest to help other home cooks discover these easy, flavorful meals.