Vibrant, wholesome meals don’t have to be complicated or time-consuming! We’ve gathered 20 delicious, nutritious recipes perfect for busy home cooks looking to eat healthier today. From quick dinners to satisfying comfort foods, these dishes prove that healthy eating can be both easy and incredibly tasty. Get ready to find your new go-to favorites—let’s dive in!
Quinoa and Avocado Salad with Lemon Dressing
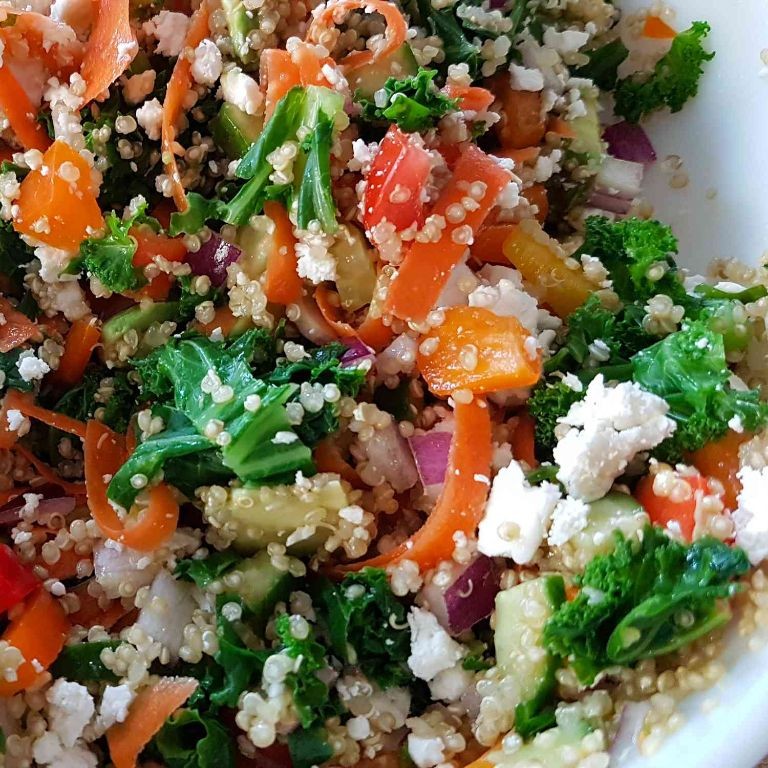
Often I find myself craving something that feels both nourishing and gentle, a meal that doesn’t demand much but gives back in quiet, satisfying ways. On days like this, when the light slants just so through the kitchen window, I return to this simple combination, letting each ingredient speak for itself without any fuss.
Ingredients
Quinoa – 1 cup
Water – 2 cups
Avocado – 1 large
Lemon juice – 3 tbsp
Olive oil – 2 tbsp
Salt – ½ tsp
Black pepper – ¼ tsp
Instructions
1. Rinse 1 cup of quinoa thoroughly in a fine-mesh strainer under cold running water for 1 full minute to remove its natural bitter coating.
2. Combine the rinsed quinoa and 2 cups of water in a medium saucepan over high heat.
3. Bring the mixture to a rolling boil, then immediately reduce the heat to the lowest setting and cover the saucepan tightly with a lid.
4. Simmer the quinoa for exactly 15 minutes—resist lifting the lid during this time to prevent steam from escaping.
5. After 15 minutes, remove the saucepan from the heat and let the quinoa rest, still covered, for 5 more minutes to absorb any remaining moisture.
6. Fluff the cooked quinoa gently with a fork, then spread it in a thin layer on a baking sheet to cool completely to room temperature, which typically takes about 20 minutes.
7. While the quinoa cools, whisk together 3 tablespoons of fresh lemon juice, 2 tablespoons of olive oil, ½ teaspoon of salt, and ¼ teaspoon of black pepper in a small bowl until fully emulsified.
8. Peel and pit 1 large avocado, then dice it into ½-inch cubes directly into the cooled quinoa to prevent browning.
9. Pour the lemon dressing over the quinoa and avocado mixture, then fold everything together gently with a spatula to avoid mashing the avocado.
10. Serve immediately or refrigerate for up to 2 hours to allow the flavors to meld.
You’ll notice how the creamy avocado softens against the slight chew of quinoa, while the bright lemon dressing cuts through with just enough sharpness to wake up the senses. I sometimes serve it nestled in butter lettuce cups for a handheld lunch, or topped with a sprinkle of toasted sunflower seeds for extra crunch on quieter evenings.
Grilled Chicken with Steamed Broccoli and Brown Rice
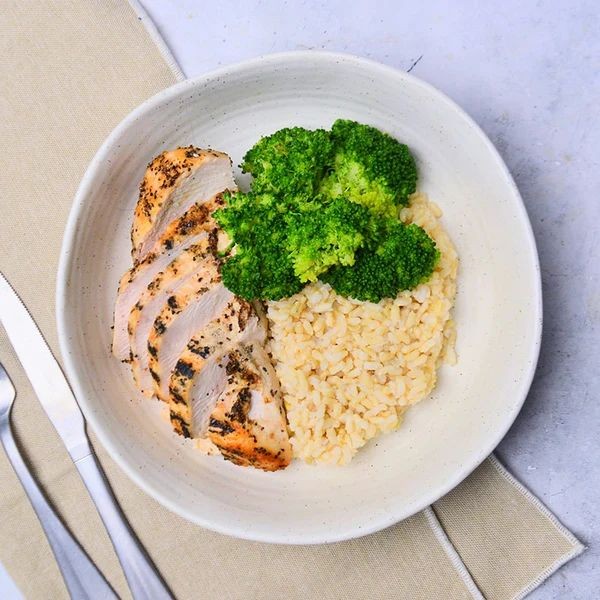
Remembering how simple meals often bring the most comfort, I find myself returning to this balanced plate time and again. There’s something quietly satisfying about the way these basic elements come together to create something truly nourishing for both body and spirit.
Ingredients
– Chicken breasts – 2
– Broccoli – 1 head
– Brown rice – 1 cup
– Olive oil – 2 tbsp
– Salt – 1 tsp
– Black pepper – ½ tsp
– Garlic powder – 1 tsp
– Lemon – 1
Instructions
1. Rinse 1 cup of brown rice under cold water until the water runs clear.
2. Combine the rinsed rice with 2 cups of water in a medium saucepan.
3. Bring the rice to a boil over high heat, then reduce heat to low and cover with a tight-fitting lid.
4. Simmer the rice for 45 minutes without removing the lid.
5. Remove the rice from heat and let it steam, covered, for 10 additional minutes.
6. While rice cooks, pat 2 chicken breasts completely dry with paper towels.
7. Rub 1 tbsp olive oil evenly over both sides of the chicken breasts.
8. Season both sides of the chicken with ½ tsp salt, ½ tsp black pepper, and 1 tsp garlic powder.
9. Preheat your grill to medium-high heat (400°F).
10. Place the seasoned chicken breasts on the hot grill and cook for 6 minutes.
11. Flip the chicken and cook for another 6 minutes, or until internal temperature reaches 165°F.
12. Remove chicken from grill and let it rest for 5 minutes before slicing.
13. While chicken rests, cut 1 head of broccoli into florets.
14. Steam the broccoli florets over boiling water for 4-5 minutes until bright green and tender-crisp.
15. Toss the steamed broccoli with 1 tbsp olive oil and remaining ½ tsp salt.
16. Squeeze the juice from 1 lemon over the finished broccoli.
The tender, juicy chicken contrasts beautifully with the bright, crisp broccoli and fluffy rice, creating a symphony of textures that feels both comforting and revitalizing. I love serving this with an extra lemon wedge for squeezing at the table, letting each person customize the brightness to their preference.
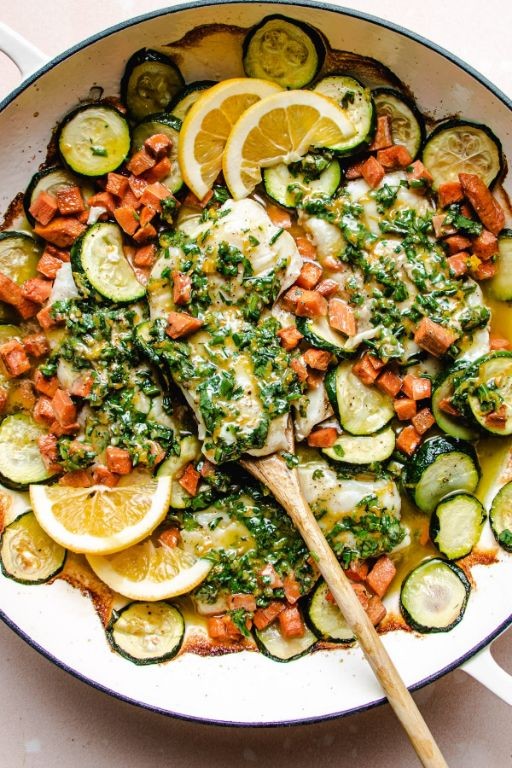
Baked Salmon with Asparagus and Sweet Potatoes

Years have a way of softening the edges of memory, yet certain meals remain vivid in their simplicity—like this quiet evening’s preparation, where the oven’s warmth fills the kitchen and the promise of something nourishing settles in the air. It’s a gentle ritual, this baking of salmon alongside asparagus and sweet potatoes, each element finding its place without hurry or fuss. You gather what’s needed, letting the ingredients speak for themselves, and begin.
Ingredients
Salmon fillets – 2 (6 oz each)
Sweet potatoes – 2 medium
Asparagus – 1 bunch
Olive oil – 2 tbsp
Salt – 1 tsp
Black pepper – ½ tsp
Garlic powder – ½ tsp
Instructions
1. Preheat the oven to 400°F and line a baking sheet with parchment paper.
2. Peel the sweet potatoes and slice them into ½-inch thick rounds.
3. Toss the sweet potato rounds with 1 tablespoon of olive oil, ½ teaspoon of salt, ¼ teaspoon of black pepper, and ¼ teaspoon of garlic powder until evenly coated.
4. Arrange the sweet potatoes in a single layer on one half of the baking sheet and roast for 15 minutes.
5. While the sweet potatoes roast, trim the tough ends from the asparagus spears.
6. Pat the salmon fillets dry with a paper towel to ensure crisp skin.
7. Toss the asparagus with the remaining 1 tablespoon of olive oil, ¼ teaspoon of salt, ¼ teaspoon of black pepper, and ¼ teaspoon of garlic powder.
8. After 15 minutes, remove the baking sheet and add the asparagus to the other half, then place the salmon fillets skin-side down in the center.
9. Season the salmon with the remaining ¼ teaspoon of salt and ¼ teaspoon of garlic powder.
10. Return the baking sheet to the oven and bake for 12–15 minutes, until the salmon flakes easily with a fork and the asparagus is tender-crisp.
Just as the salmon yields to gentle pressure, the sweet potatoes caramelize at their edges, offering a subtle sweetness against the asparagus’s earthy bite. Serve it straight from the pan, perhaps with a squeeze of lemon or over a bed of quinoa, letting the tender flakes mingle with the roasted vegetables for a meal that feels both grounding and complete.
Spinach and Kale Smoothie with Almond Milk
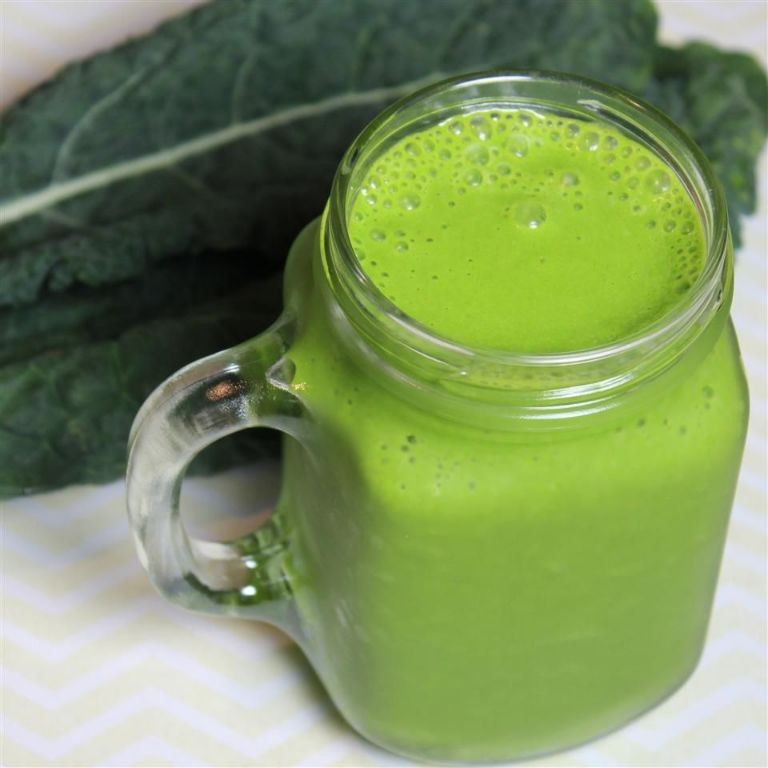
Lately, I’ve been finding myself reaching for this smoothie in the quiet of the morning, when the kitchen is still and the only sound is the gentle hum of the blender. It feels less like a chore and more like a small, nourishing ritual that sets the tone for the day ahead, a simple way to gather a little quiet strength from the earth’s own greens.
Ingredients
- Fresh Spinach – 2 cups
- Fresh Kale – 1 cup
- Unsweetened Almond Milk – 1 ½ cups
- Banana – 1, peeled
- Honey – 1 tbsp
Instructions
- Place 2 cups of fresh spinach and 1 cup of fresh kale into the base of a high-speed blender.
- Pour 1 ½ cups of unsweetened almond milk over the greens. (Tip: Adding the liquid first helps the blades move more freely and blend the greens more thoroughly, preventing leafy chunks.)
- Add 1 peeled banana and 1 tablespoon of honey to the blender.
- Secure the blender lid tightly.
- Begin blending on a low speed for 15 seconds to initially break down the ingredients.
- Increase the blender speed to high and blend for 45-60 seconds, or until the mixture is completely smooth with no visible pieces of leaf or fruit. (Tip: If the mixture seems too thick and isn’t blending properly, pause the blender, add another 2 tablespoons of almond milk, and continue blending.)
- Stop the blender and check the consistency by tilting the pitcher; the smoothie should pour easily without separation.
- Pour the finished smoothie immediately into a glass. (Tip: For the best texture and to prevent the smoothie from becoming watery, serve it right after blending.)
The resulting texture is silkily smooth, with the almond milk lending a subtle nuttiness that softens the earthy tones of the greens. The honey and banana weave through it all with a gentle, floral sweetness, making it feel like a quiet indulgence. Pouring it over ice or adding a sprinkle of cinnamon can transform this simple ritual into a slightly different experience each time.
Lentil and Vegetable Stir-Fry with Turmeric
Today, as the afternoon light slants across my kitchen counter, I find myself reaching for the humble lentil, that quiet comfort food that asks for so little yet gives so much. There’s something deeply satisfying about watching turmeric’s golden warmth bloom in the pan, transforming simple vegetables into something that feels like nourishment for both body and soul.
Ingredients
– Olive oil – 2 tbsp
– Yellow onion – 1 medium, chopped
– Garlic – 3 cloves, minced
– Carrots – 2 medium, sliced
– Red bell pepper – 1 large, sliced
– Brown lentils – 1 cup, rinsed
– Ground turmeric – 1 tsp
– Vegetable broth – 2 cups
– Soy sauce – 1 tbsp
– Fresh parsley – ¼ cup, chopped
Instructions
1. Heat olive oil in a large skillet over medium heat until it shimmers when you tilt the pan.
2. Add chopped onion and cook for 4-5 minutes until translucent, stirring occasionally with a wooden spoon.
3. Stir in minced garlic and cook for exactly 1 minute until fragrant but not browned.
4. Add sliced carrots and bell pepper, cooking for 3 minutes until they begin to soften at the edges.
5. Sprinkle ground turmeric over the vegetables and stir continuously for 30 seconds to toast the spices—this deepens their flavor beautifully.
6. Add rinsed brown lentils and pour in vegetable broth, scraping any browned bits from the bottom of the pan.
7. Bring the mixture to a gentle boil, then reduce heat to low and cover with a tight-fitting lid.
8. Simmer for 25 minutes until lentils are tender but still hold their shape—check at 20 minutes to prevent overcooking.
9. Remove the lid and stir in soy sauce, letting the liquid reduce for 2-3 minutes until the stir-fry thickens slightly.
10. Turn off the heat and fold in fresh parsley just before serving to preserve its bright color and fresh flavor.
During those quiet moments of stirring, the lentils become tender without turning mushy, each bite offering earthy depth from the turmeric and subtle sweetness from the vegetables. I love serving this over quinoa for extra protein, or sometimes wrapping it in warm tortillas with a dollop of yogurt for a completely different experience.
Black Bean and Sweet Potato Tacos with Avocado
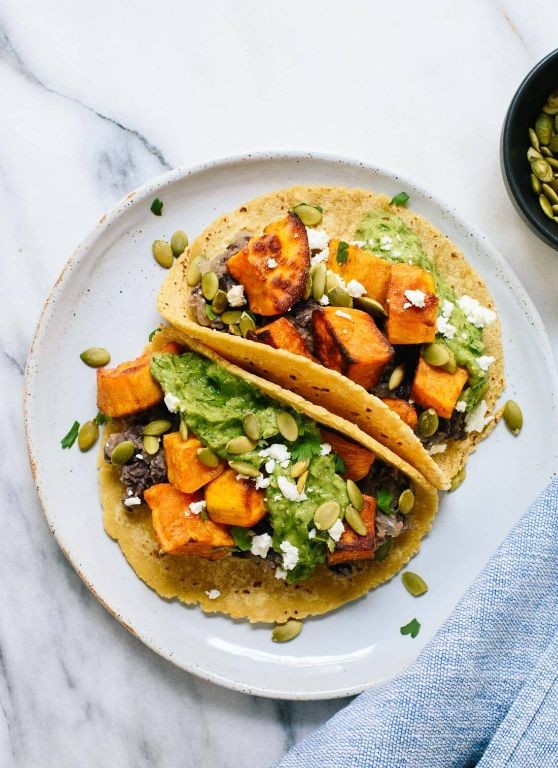
Remembering how the autumn light slants through my kitchen window this time of year, I find myself reaching for these familiar ingredients—the humble sweet potato, the sturdy black bean—knowing they’ll quietly transform into something warm and nourishing, something that feels like a gentle exhale at the end of a long day.
Ingredients
– Sweet potatoes – 2 medium
– Olive oil – 2 tbsp
– Black beans – 1 can (15 oz), rinsed
– Cumin – 1 tsp
– Chili powder – ½ tsp
– Corn tortillas – 8
– Avocado – 1, sliced
– Lime – 1, cut into wedges
– Salt – ½ tsp
Instructions
1. Preheat your oven to 400°F.
2. Peel the sweet potatoes and cut them into ½-inch cubes.
3. Toss the sweet potato cubes with 1 tablespoon of olive oil and ½ teaspoon of salt on a baking sheet.
4. Roast the sweet potatoes for 20–25 minutes, until they are tender and lightly browned at the edges.
5. Tip: Spread the sweet potatoes in a single layer to ensure even roasting and crispiness.
6. Heat the remaining 1 tablespoon of olive oil in a skillet over medium heat.
7. Add the rinsed black beans, cumin, and chili powder to the skillet.
8. Cook the bean mixture for 5–7 minutes, stirring occasionally, until the beans are warmed through and fragrant.
9. Tip: Gently mash a few beans with the back of your spoon to help thicken the mixture naturally.
10. Warm the corn tortillas one at a time in a dry skillet over medium heat for 30 seconds per side, until pliable.
11. Tip: Keep the warmed tortillas wrapped in a clean kitchen towel to stay soft and warm until serving.
12. Assemble each taco by placing a spoonful of roasted sweet potatoes and seasoned black beans onto a warm tortilla.
13. Top each taco with avocado slices and a squeeze of fresh lime juice.
The soft, creamy avocado melts into the spiced beans, while the roasted sweet potatoes offer little caramelized bites that contrast beautifully with the slight chew of warm corn tortillas. Try serving these open-faced on a platter scattered with extra lime wedges for a family-style meal that invites everyone to build their own perfect bite.
Oven-Roasted Brussels Sprouts with Balsamic Glaze
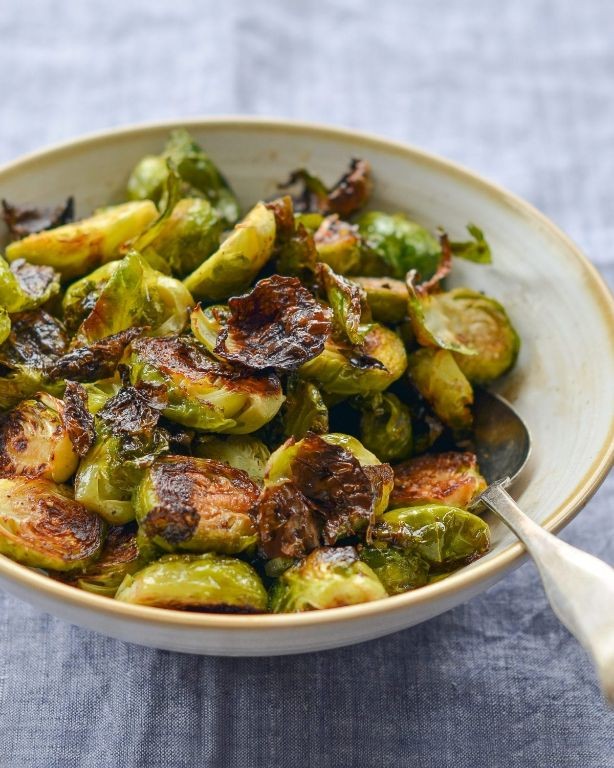
Under the soft glow of the kitchen light, I find myself returning to this simple ritual, the quiet transformation of humble sprouts into something tender and caramelized, a small comfort on a cool evening.
Ingredients
- Brussels sprouts – 1 lb
- Olive oil – 2 tbsp
- Salt – ½ tsp
- Black pepper – ¼ tsp
- Balsamic vinegar – 2 tbsp
- Honey – 1 tbsp
Instructions
- Preheat your oven to 400°F.
- Trim the stem ends from 1 lb of Brussels sprouts and remove any yellowed outer leaves.
- Cut each Brussels sprout in half lengthwise.
- Place the halved Brussels sprouts in a large bowl.
- Drizzle 2 tbsp of olive oil over the Brussels sprouts.
- Sprinkle ½ tsp of salt and ¼ tsp of black pepper over the Brussels sprouts.
- Toss the Brussels sprouts until evenly coated with oil and seasonings.
- Arrange the Brussels sprouts in a single layer on a baking sheet, cut sides down.
- Roast the Brussels sprouts at 400°F for 20 minutes.
- Flip the Brussels sprouts with a spatula after 20 minutes.
- Continue roasting for another 10-15 minutes until the edges are deeply browned and crispy.
- While the Brussels sprouts roast, combine 2 tbsp of balsamic vinegar and 1 tbsp of honey in a small saucepan.
- Simmer the balsamic mixture over medium heat for 3-4 minutes until it thickens slightly.
- Drizzle the warm balsamic glaze over the roasted Brussels sprouts immediately after removing them from the oven.
- Toss gently to coat the Brussels sprouts with the glaze.
But the true magic happens in that final drizzle—the glossy balsamic glaze clinging to each crispy edge, creating a beautiful contrast between the sweet, tangy coating and the savory, nutty sprouts beneath. I love serving them scattered over creamy polenta or alongside roasted chicken, where their deep, caramelized notes can truly shine.
Grilled Shrimp and Quinoa Stuffed Bell Peppers
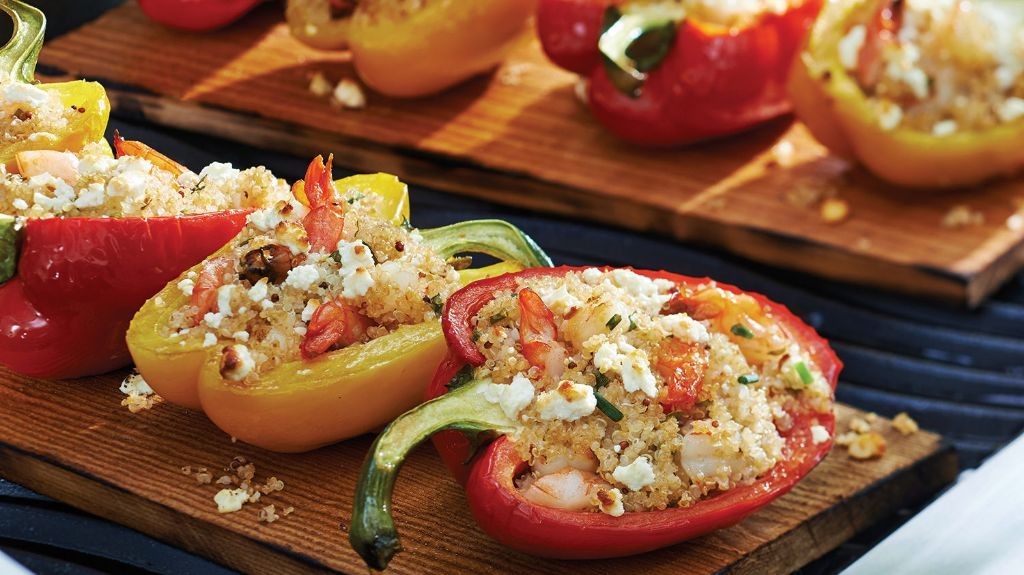
Beneath the quiet hum of the afternoon, there’s something deeply comforting about preparing food that feels both nourishing and intentional, like these peppers waiting to be filled. It’s a gentle process, one that invites you to slow down and savor each step, from the sizzle of shrimp to the fluff of quinoa.
Ingredients
Bell peppers – 4 large
Olive oil – 2 tbsp
Shrimp – 1 lb, peeled and deveined
Quinoa – 1 cup, rinsed
Water – 2 cups
Salt – 1 tsp
Black pepper – ½ tsp
Instructions
1. Preheat your oven to 375°F.
2. Slice the tops off the bell peppers and remove all seeds and membranes.
3. Brush the outside of each pepper with 1 tablespoon of olive oil.
4. Place the peppers cut-side up in a baking dish.
5. Roast the peppers for 15 minutes until slightly softened.
6. While the peppers roast, heat the remaining 1 tablespoon of olive oil in a skillet over medium-high heat.
7. Pat the shrimp dry with a paper towel to ensure a good sear.
8. Cook the shrimp for 2 minutes per side until pink and opaque, then transfer to a plate.
9. In the same skillet, add the rinsed quinoa and toast for 1 minute, stirring constantly.
10. Pour in 2 cups of water and add 1 teaspoon of salt and ½ teaspoon of black pepper.
11. Bring to a boil, then reduce heat to low, cover, and simmer for 15 minutes until the quinoa absorbs all the water.
12. Fluff the quinoa with a fork to separate the grains.
13. Chop the cooked shrimp into bite-sized pieces.
14. Gently fold the chopped shrimp into the cooked quinoa.
15. Remove the peppers from the oven and carefully fill each one with the shrimp and quinoa mixture, packing it lightly.
16. Return the stuffed peppers to the oven and bake for another 20 minutes until the peppers are tender and the filling is heated through.
When you pull them from the oven, the peppers will be tender with a slight char, giving way to a filling that’s fluffy and savory, each bite layered with the delicate sweetness of shrimp. Serve them warm, perhaps with a drizzle of lemon juice or alongside a simple green salad for a complete, comforting meal.
Cauliflower Rice with Stir-Fried Vegetables
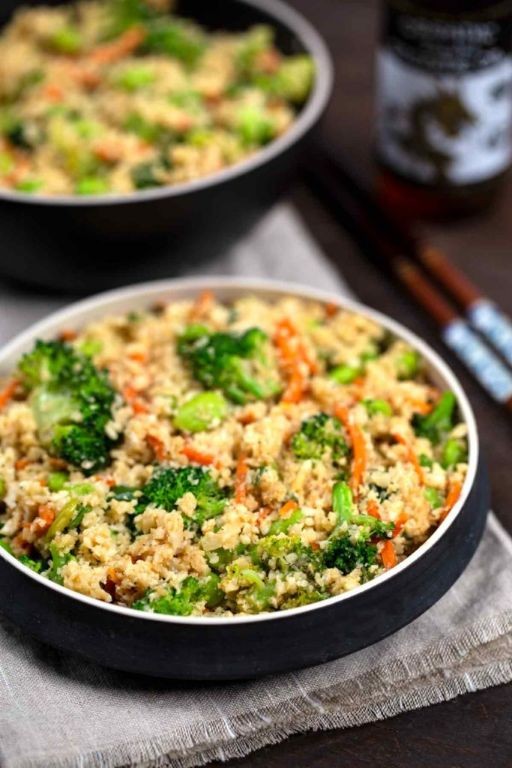
A quiet afternoon like this makes me reach for simple comforts, the kind that fill the kitchen with gentle sizzles and steam, transforming humble vegetables into something warm and complete. It’s a peaceful process, this making of cauliflower rice with stir-fried vegetables, where each chop and stir feels like a small, mindful ritual.
Ingredients
Cauliflower – 1 head
Vegetable oil – 2 tbsp
Garlic – 2 cloves, minced
Carrot – 1 medium, diced
Bell pepper – 1, diced
Frozen peas – ½ cup
Soy sauce – 2 tbsp
Instructions
1. Remove the leaves and core from the cauliflower head.
2. Chop the cauliflower florets into small, rice-sized pieces using a knife, or pulse in a food processor until the texture resembles grains of rice.
3. Heat 1 tablespoon of vegetable oil in a large skillet or wok over medium-high heat until the oil shimmers.
4. Add the minced garlic to the hot oil and stir for 30 seconds until fragrant.
5. Add the diced carrot and bell pepper to the skillet.
6. Stir-fry the vegetables for 5–7 minutes until the carrots are tender-crisp and the peppers are slightly softened.
7. Push the cooked vegetables to one side of the skillet.
8. Add the remaining 1 tablespoon of vegetable oil to the empty side of the skillet.
9. Add the cauliflower rice to the oil and spread it evenly in the skillet.
10. Cook the cauliflower rice without stirring for 2 minutes to allow it to lightly brown on the bottom.
11. Stir the cauliflower rice and continue cooking for another 3–4 minutes until it is tender but not mushy.
12. Add the frozen peas to the skillet and stir to combine with the cauliflower rice and vegetables.
13. Pour the soy sauce evenly over the mixture in the skillet.
14. Stir everything together for 1–2 minutes until the peas are heated through and the soy sauce is well distributed.
15. Remove the skillet from the heat.
Gently spoon the finished dish into bowls, noticing how the cauliflower stays light and separate while the vegetables add soft, sweet bursts. The soy sauce ties it all together with a quiet umami warmth, perfect just as it is or topped with a soft-fried egg for a simple, comforting meal.
Homemade Hummus with Carrot and Cucumber Sticks
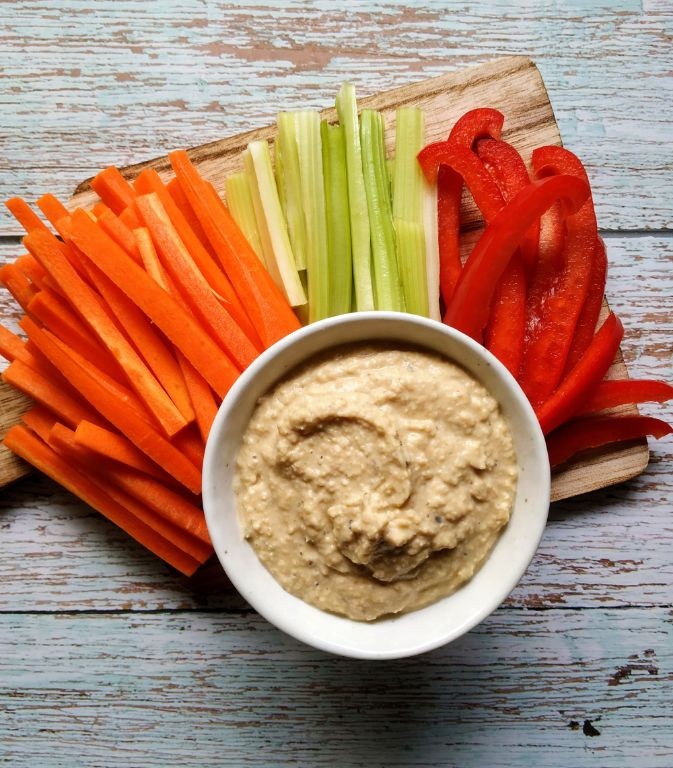
Perhaps there’s something quietly comforting about transforming simple pantry staples into a creamy, dreamy dip, especially on a slow afternoon when the kitchen feels like a sanctuary. Pulling out a few carrots and cucumbers feels almost meditative, a small ritual of slicing and dipping that grounds me in the present moment.
Ingredients
– Chickpeas – 1 (15 oz) can
– Tahini – ¼ cup
– Lemon juice – 2 tbsp
– Garlic – 1 clove
– Olive oil – 2 tbsp
– Salt – ½ tsp
– Carrots – 2 medium
– Cucumber – 1 medium
Instructions
1. Drain and rinse the chickpeas thoroughly under cold running water for 1 minute to remove excess sodium.
2. Peel the garlic clove and roughly chop it into small pieces to ensure even blending.
3. Combine the chickpeas, tahini, lemon juice, garlic, olive oil, and salt in a food processor.
4. Process the mixture on high speed for 2 minutes, scraping down the sides with a spatula halfway through to incorporate everything evenly.
5. Check the hummus consistency; if it’s too thick, add 1 tablespoon of cold water and process for another 30 seconds until smooth and creamy.
6. Wash the carrots and cucumber under cool water, then pat them dry with a clean kitchen towel.
7. Trim the ends off the carrots and peel them completely to remove the outer skin.
8. Slice the carrots lengthwise into sticks that are ¼-inch thick and 3–4 inches long.
9. Cut the cucumber in half crosswise, then slice each half into ¼-inch thick sticks, similar to the carrot sticks.
10. Arrange the carrot and cucumber sticks on a small plate alongside a bowl of the prepared hummus.
Zesty and velvety, this hummus clings gently to each crisp vegetable stick, offering a subtle garlicky tang that mellows into the nutty tahini. I love scooping up generous dips, watching the pale orange and green sticks disappear into the creamy depths, or spreading it thickly on toast for a lazy lunch.
Baked Cod with Lemon and Herbs over Wild Rice
Wandering through the kitchen this quiet afternoon, I found myself craving something simple yet deeply comforting, the kind of meal that fills the room with gentle aromas and warms you from the inside out. It’s a baked cod with lemon and herbs over wild rice, a dish that feels like a soft exhale at the end of a long day, where each bite brings a little peace and brightness.
Ingredients
Cod fillets – 1 lb
Wild rice – 1 cup
Lemon – 1
Fresh parsley – 2 tbsp
Fresh dill – 1 tbsp
Olive oil – 2 tbsp
Salt – 1 tsp
Black pepper – ½ tsp
Garlic – 2 cloves
Instructions
1. Preheat your oven to 400°F.
2. Rinse 1 cup of wild rice under cold water until the water runs clear.
3. Combine the rinsed wild rice with 2 cups of water in a medium saucepan.
4. Bring the rice and water to a boil over high heat.
5. Reduce the heat to low, cover the saucepan, and simmer the rice for 45 minutes.
6. Pat 1 lb of cod fillets dry with paper towels to ensure a crispier bake.
7. Place the cod fillets in a single layer on a baking sheet lined with parchment paper.
8. Drizzle 2 tbsp of olive oil evenly over the cod fillets.
9. Squeeze the juice of 1 lemon over the cod fillets.
10. Mince 2 cloves of garlic and sprinkle them over the cod.
11. Chop 2 tbsp of fresh parsley and 1 tbsp of fresh dill, then sprinkle the herbs over the cod.
12. Season the cod with 1 tsp of salt and ½ tsp of black pepper.
13. Bake the cod in the preheated oven for 12–15 minutes, until the flesh flakes easily with a fork.
14. Fluff the cooked wild rice with a fork to separate the grains for a lighter texture.
15. Serve the baked cod over the wild rice.
The cod emerges tender and flaky, with the lemon and herbs lending a bright, aromatic note that cuts through the earthy wild rice. For a cozy twist, try topping it with a sprinkle of extra fresh herbs or a drizzle of olive oil just before serving, letting the flavors meld together like a quiet conversation.
Egg White Omelette with Spinach, Tomatoes, and Feta

Just now, as the morning light filters through my kitchen window, I find myself reaching for the same simple ingredients that have become my quiet ritual. There’s something deeply comforting about the gentle sizzle of egg whites meeting a warm pan, the vibrant red of tomatoes, and the earthy green of spinach coming together in this humble omelette.
Ingredients
Egg whites – ¾ cup
Spinach – 1 cup
Cherry tomatoes – ½ cup
Feta cheese – ¼ cup
Olive oil – 1 tbsp
Salt – ¼ tsp
Black pepper – ⅛ tsp
Instructions
1. Heat 1 tablespoon olive oil in a non-stick skillet over medium heat for 2 minutes until shimmering.
2. Add ½ cup cherry tomatoes and cook for 3 minutes until skins begin to wrinkle and release juices.
3. Place 1 cup spinach in the skillet and cook for 1 minute until just wilted, stirring constantly.
4. Pour ¾ cup egg whites evenly over the vegetables in the skillet.
5. Sprinkle ¼ teaspoon salt and ⅛ teaspoon black pepper evenly over the egg whites.
6. Cook undisturbed for 2 minutes until edges appear set and bottom is lightly golden.
7. Gently lift one edge with a spatula to check for golden-brown coloring before flipping.
8. Carefully flip the entire omelette using a wide spatula.
9. Immediately sprinkle ¼ cup feta cheese over one half of the omelette.
10. Cook for 1 minute more until cheese begins to soften and melt slightly.
11. Fold the empty half over the cheese-filled side using your spatula.
12. Slide the completed omelette onto a plate and let rest for 1 minute before serving.
Carefully sliced, the omelette reveals delicate layers—creamy feta melting into tender egg whites, bright tomatoes bursting with acidity against earthy spinach. I sometimes serve it alongside toasted whole-grain bread for contrasting textures, or fold it into a warm tortilla for a quick breakfast wrap when mornings feel particularly rushed.
Roasted Beet and Goat Cheese Salad with Walnuts
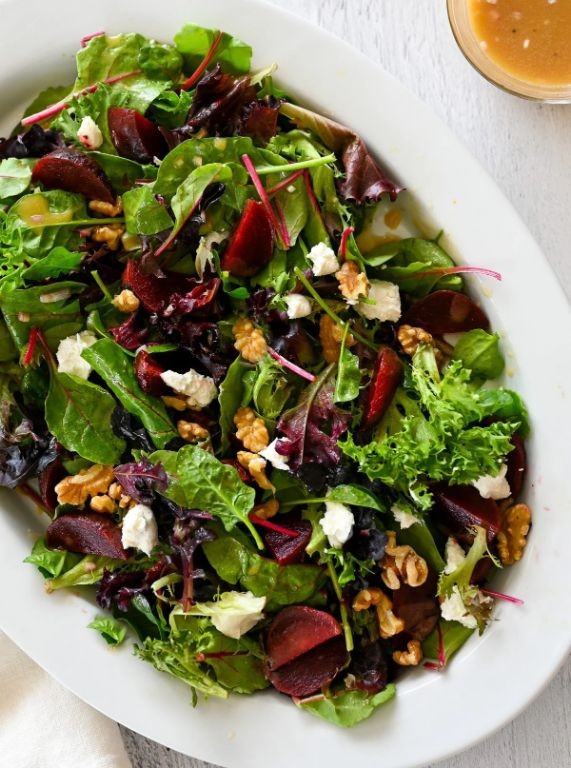
Years have a way of softening the edges of memory, yet some flavors remain crisp and vivid in the mind. This roasted beet and goat cheese salad is one of those quiet comforts that returns to me each autumn, a gentle reminder of how simple ingredients can hold such depth. There’s something almost meditative in the process of roasting beets, their earthy sweetness filling the kitchen as walnuts toast nearby.
Ingredients
– Beets – 4 medium
– Olive oil – 2 tbsp
– Salt – ½ tsp
– Goat cheese – 4 oz
– Walnuts – ½ cup
Instructions
1. Preheat your oven to 400°F.
2. Scrub the beets thoroughly under cool running water to remove any dirt.
3. Pat the beets completely dry with paper towels.
4. Place the beets on a large sheet of aluminum foil.
5. Drizzle 1 tablespoon of olive oil evenly over the beets.
6. Sprinkle ¼ teaspoon of salt over the beets.
7. Wrap the beets tightly in the foil to create a sealed packet.
8. Roast the beets in the preheated oven for 60 minutes.
9. Test the beets by inserting a fork—it should slide in easily with no resistance.
10. Remove the beets from the oven and let them cool for 15 minutes until safe to handle.
11. While the beets cool, spread the walnuts in a single layer on a baking sheet.
12. Toast the walnuts in the 400°F oven for 5-7 minutes until fragrant and lightly golden.
13. Use the edge of a spoon to gently rub the skin off the cooled beets—it should slip away easily.
14. Cut the peeled beets into ½-inch cubes.
15. Arrange the beet cubes on a serving platter.
16. Crumble the goat cheese evenly over the beets.
17. Sprinkle the toasted walnuts over the salad.
18. Drizzle the remaining 1 tablespoon of olive oil over everything.
19. Finish with the remaining ¼ teaspoon of salt.
When you take that first bite, the tender sweetness of the beets gives way to the creamy tang of goat cheese, while the walnuts provide a satisfying crunch that ties everything together. I love serving this salad slightly warm, perhaps with a slice of crusty bread to soak up the vibrant pink juices that collect at the bottom of the bowl.
Almond Butter and Banana Smoothie with Flaxseeds
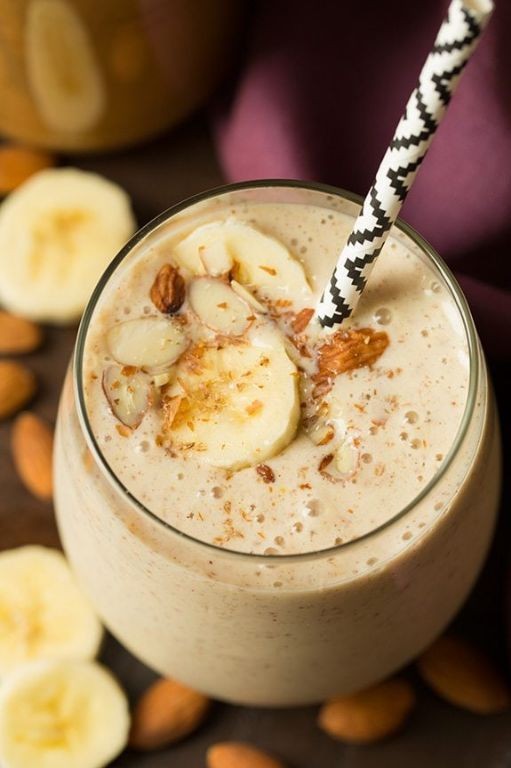
This quiet morning finds me reaching for the simplest comforts, the kind that settle gently in both hands and heart. There’s something deeply soothing about the humble almond butter and banana smoothie, a soft blend that feels like a warm whisper on a slow day.
Ingredients
– Frozen banana – 1 large
– Almond butter – 2 tbsp
– Ground flaxseeds – 1 tbsp
– Milk – 1 cup
– Honey – 1 tbsp
Instructions
1. Peel one large frozen banana and break it into three chunks.
2. Add the banana chunks to a high-speed blender.
3. Measure 2 tablespoons of almond butter and add it to the blender.
4. Spoon 1 tablespoon of ground flaxseeds into the blender.
5. Pour 1 cup of milk over the ingredients.
6. Drizzle 1 tablespoon of honey into the mixture.
7. Secure the blender lid tightly.
8. Blend on high speed for 45 seconds until completely smooth and creamy.
9. Stop the blender and check consistency by tilting the pitcher; if any chunks remain, blend for another 15 seconds.
10. Pour the smoothie immediately into a tall glass.
Only the creamy texture and subtle nuttiness remain, with the flaxseeds adding a gentle earthiness that lingers. I sometimes pour it over oatmeal or enjoy it with a sprinkle of cinnamon for a different kind of morning.
Grilled Veggie Wrap with Hummus and Whole Wheat Tortilla

Mornings like this, when the light filters through the kitchen window just so, I find myself craving something simple yet deeply satisfying, something that feels like a quiet conversation between fresh ingredients and gentle preparation. This grilled veggie wrap is exactly that—a humble assembly of warmth and texture, perfect for a slow lunch or a light dinner when you need a moment of calm. It’s the kind of meal that doesn’t rush you, inviting you to savor each step as much as the first bite.
Ingredients
Whole wheat tortilla – 1 large
Zucchini – 1 medium, sliced into ¼-inch strips
Red bell pepper – 1, sliced into ¼-inch strips
Yellow onion – ½, sliced into ¼-inch rings
Olive oil – 1 tbsp
Salt – ½ tsp
Black pepper – ¼ tsp
Hummus – ⅓ cup
Instructions
1. Preheat a grill or grill pan to medium-high heat (400°F).
2. Brush the zucchini, red bell pepper, and yellow onion slices evenly with 1 tbsp of olive oil.
3. Sprinkle ½ tsp of salt and ¼ tsp of black pepper over the oiled vegetables.
4. Place the vegetables on the preheated grill in a single layer, avoiding overcrowding to ensure even charring.
5. Grill the vegetables for 4–5 minutes per side, until they develop visible grill marks and soften slightly.
6. Remove the grilled vegetables from the heat and let them rest for 2 minutes to allow flavors to meld.
7. Warm the whole wheat tortilla on the grill for 20–30 seconds per side, just until pliable.
8. Spread ⅓ cup of hummus evenly over the center of the warmed tortilla, leaving a 1-inch border around the edges.
9. Arrange the grilled zucchini, red bell pepper, and yellow onion slices in a horizontal line over the hummus.
10. Fold the bottom edge of the tortilla up over the vegetables, then fold in the sides and roll tightly away from you to form a secure wrap.
When you take that first bite, the soft give of the tortilla gives way to the smoky sweetness of the peppers and the tender bite of zucchini, all smoothed by the creamy hummus. Try serving it sliced diagonally with a side of crisp apple slices for a contrast in texture, or wrap it in parchment for a picnic where the flavors seem to deepen with each unwrapping.
Summary
You now have 20 fantastic recipes that make healthy eating delicious and achievable! Whether you’re meal prepping for the week or cooking a special dinner, these dishes prove nutritious food can be incredibly tasty. We’d love to hear which recipes become your favorites—leave a comment below and don’t forget to share this roundup on Pinterest to inspire fellow home cooks!