
Planning your next meal just got easier! Whether you’re whipping up a quick weeknight dinner, hosting a weekend gathering, or craving some cozy comfort food, we’ve gathered 20 mouthwatering recipes that are sure to delight. From seasonal favorites to timeless classics, there’s something here for every occasion and every palate. Let’s dive in and discover your next go-to dish!
Chocolate Chip Cookie Dough Dip
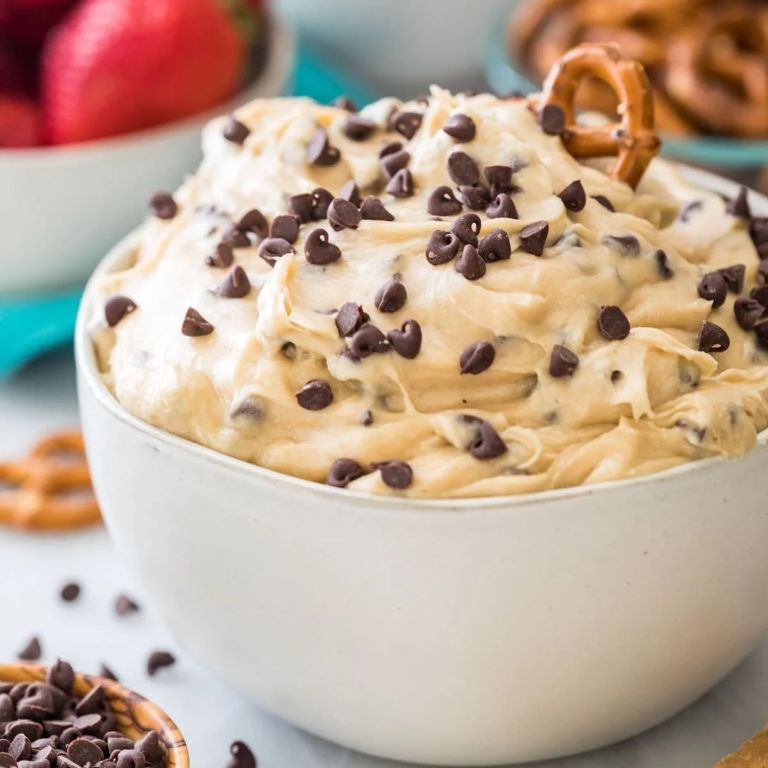
Elevating the nostalgic charm of unbaked cookie dough into a sophisticated dip, this creamy confection transforms simple ingredients into an irresistible treat that balances rich sweetness with subtle texture. Every spoonful delivers the familiar comfort of chocolate chip cookies in an elegant, spreadable form perfect for gatherings or indulgent moments.
Ingredients
- Cream cheese – 8 oz
- Butter – ½ cup
- Brown sugar – ¾ cup
- Vanilla extract – 1 tsp
- Flour – 1 cup
- Milk – 2 tbsp
- Mini chocolate chips – ¾ cup
Instructions
- Place the flour in a microwave-safe bowl and heat on high for 1 minute, stirring halfway through, to kill any potential bacteria.
- Beat the softened cream cheese and butter together in a large mixing bowl using an electric mixer on medium speed for 2 minutes until completely smooth and lump-free.
- Add the brown sugar and vanilla extract to the cream cheese mixture, then beat on medium speed for another 2 minutes until the sugar dissolves and the mixture lightens in color.
- Gradually sprinkle the heat-treated flour into the bowl while mixing on low speed to prevent a dusty cloud from forming.
- Pour in the milk and continue mixing on low speed for 1 minute until the dip achieves a uniform, spreadable consistency.
- Gently fold in the mini chocolate chips with a spatula using broad, sweeping motions to distribute them evenly without overmixing.
- Transfer the dip to a serving bowl, cover with plastic wrap, and refrigerate for at least 1 hour to allow the flavors to meld and the texture to firm slightly.
Miraculously creamy with a velvety texture that melts on the tongue, this dip delivers deep caramel notes from the brown sugar punctuated by bursts of rich chocolate. Serve it alongside crisp apple slices for a refreshing contrast, or spread it between graham crackers for an instant cookie sandwich experience that celebrates both elegance and nostalgia.
Homemade Gummy Bears

Elegant yet delightfully nostalgic, homemade gummy bears transform simple pantry ingredients into jewel-toned treats that far surpass their store-bought counterparts. With just a few quality components and precise technique, you can craft these chewy confections with customized flavors and the perfect tender bite. This refined approach elevates childhood nostalgia into sophisticated edible artistry.
Ingredients
Unflavored gelatin – 4 packets (28g total)
Fruit juice – ¾ cup
Honey – ¼ cup
Citric acid – ½ tsp
Instructions
1. Pour ¾ cup fruit juice into a small saucepan and sprinkle 4 packets unflavored gelatin evenly over the surface.
2. Let the gelatin bloom undisturbed for 5 minutes until the powder absorbs liquid and appears wrinkled.
3. Place the saucepan over low heat and whisk constantly until the gelatin completely dissolves and the mixture becomes smooth, about 3-4 minutes.
4. Add ¼ cup honey and ½ tsp citric acid to the saucepan, continuing to whisk until fully incorporated and the mixture reaches 160°F on a candy thermometer.
5. Carefully pour the warm liquid into a glass measuring cup with a spout for easier handling.
6. Fill gummy bear molds by slowly pouring the mixture into each cavity, taking care not to overfill.
7. Transfer the filled molds to the refrigerator and chill for exactly 2 hours until firm to the touch.
8. Gently pop the gummy bears out of the molds by pressing from the bottom of each cavity.
9. Arrange the gummy bears in a single layer on a parchment-lined baking sheet and let them air-dry at room temperature for 12 hours to develop their signature chew.
Delightfully tender with a satisfying resistance, these homemade gummy bears offer a sophisticated balance of sweet honey and bright fruit notes. Their translucent jewel-like appearance makes them stunning displayed in glass apothecary jars or scattered across dessert plates as edible garnishes. The subtle tang from citric acid creates a complex flavor profile that evolves with each chew, making these far more intriguing than commercial versions.
Fruit and Yogurt Parfait
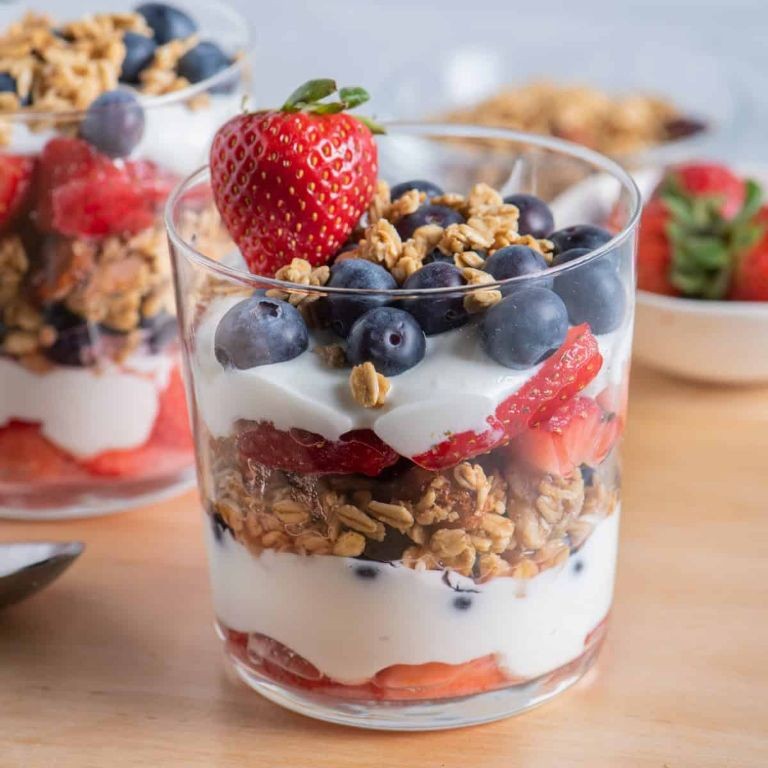
Whether you’re seeking a light breakfast or an elegant dessert, this fruit and yogurt parfait offers layers of creamy texture and vibrant flavor that delight both the palate and the eye. With just a few simple ingredients, it transforms into a sophisticated treat perfect for any occasion, balancing sweetness and tang in every spoonful.
Ingredients
Plain Greek yogurt – 2 cups
Honey – ¼ cup
Granola – 1 cup
Fresh mixed berries – 2 cups
Instructions
1. Place 2 cups of plain Greek yogurt in a medium mixing bowl.
2. Pour ¼ cup of honey into the yogurt.
3. Whisk the yogurt and honey together until fully combined and smooth.
4. Rinse 2 cups of fresh mixed berries under cold running water in a colander.
5. Pat the berries dry gently with a paper towel to remove excess moisture.
6. Slice any larger berries, such as strawberries, into uniform ¼-inch pieces.
7. Spoon 2 tablespoons of the yogurt mixture into the bottom of a serving glass.
8. Add 2 tablespoons of granola evenly over the yogurt layer.
9. Top the granola with 2 tablespoons of the prepared mixed berries.
10. Repeat the layering process with yogurt, granola, and berries until the glass is filled.
11. Finish the parfait with a final layer of yogurt on top.
12. Garnish the top with a few whole berries for visual appeal.
13. Chill the assembled parfait in the refrigerator for 15 minutes before serving.
For the ultimate experience, the parfait presents a delightful contrast between the cool, creamy yogurt and the crunchy granola, while the berries burst with juicy sweetness. Feel free to experiment with seasonal fruits like peaches or pomegranate seeds to create your own signature variation.
Edible Cookie Dough
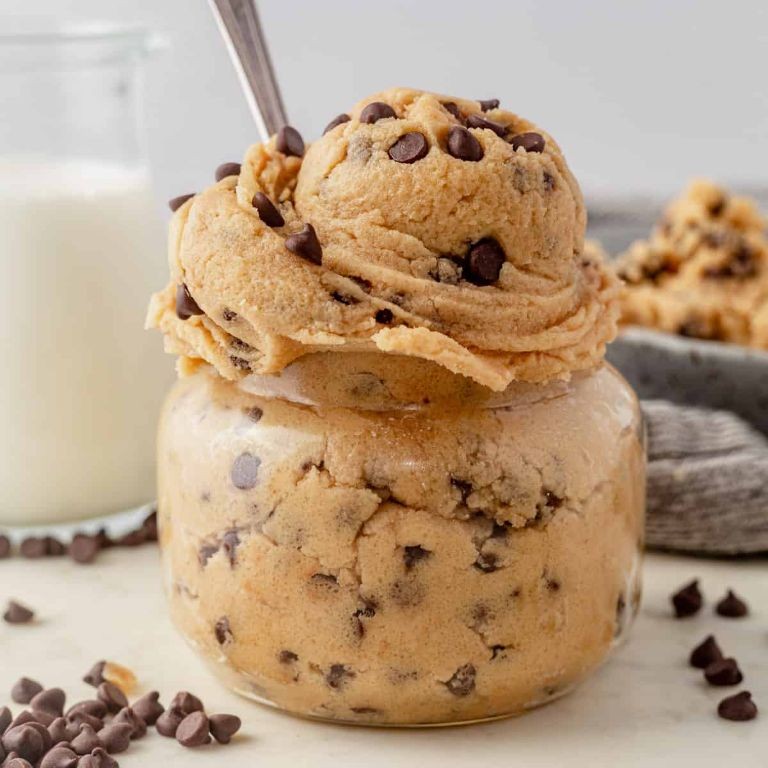
Yes, there exists that rare culinary delight that bridges childhood nostalgia with sophisticated indulgence—edible cookie dough, a treat that requires no baking yet delivers all the comforting richness of its oven-baked counterpart. Crafted with careful attention to safety and texture, this version transforms simple pantry staples into a velvety, spoonable confection. It’s the perfect answer for those moments when a sweet craving strikes without the patience for preheating or cooling.
Ingredients
Flour – 1 cup
Unsalted butter – ½ cup
Brown sugar – ½ cup
Granulated sugar – ¼ cup
Milk – 2 tbsp
Vanilla extract – 1 tsp
Salt – ¼ tsp
Instructions
1. Spread the flour evenly on a baking sheet and bake at 350°F for 10 minutes to eliminate any potential bacteria, then let it cool completely.
2. Tip: Toasting the flour enhances its nutty flavor and ensures food safety without altering the dough’s texture.
3. In a medium bowl, beat the softened unsalted butter with an electric mixer on medium speed for 2 minutes until pale and creamy.
4. Add the brown sugar and granulated sugar, then beat for another 3 minutes until the mixture is fluffy and no graininess remains.
5. Pour in the milk and vanilla extract, mixing on low speed just until incorporated to avoid overworking the fats.
6. Tip: For a smoother consistency, use room-temperature ingredients—this prevents the dough from seizing or becoming gritty.
7. Gradually fold in the cooled flour and salt with a spatula, stirring until no dry streaks are visible and the dough comes together.
8. Tip: If the dough feels too stiff, add an extra teaspoon of milk one at a time until it reaches a soft, scoopable texture.
9. Chill the dough in the refrigerator for 30 minutes to firm it up slightly, making it easier to handle and enhancing the flavors.
Glistening with a buttery sheen and speckled with caramel notes from the brown sugar, this edible cookie dough boasts a luxuriously smooth, almost fudgy texture that melts on the tongue. Serve it scooped into mini mason jars for a charming dessert, or roll it into truffle-sized balls and dip them in dark chocolate for an elegant twist. Its richness pairs wonderfully with a drizzle of salted caramel or a sprinkle of flaky sea salt to balance the sweetness.
Rainbow Fruit Skewers
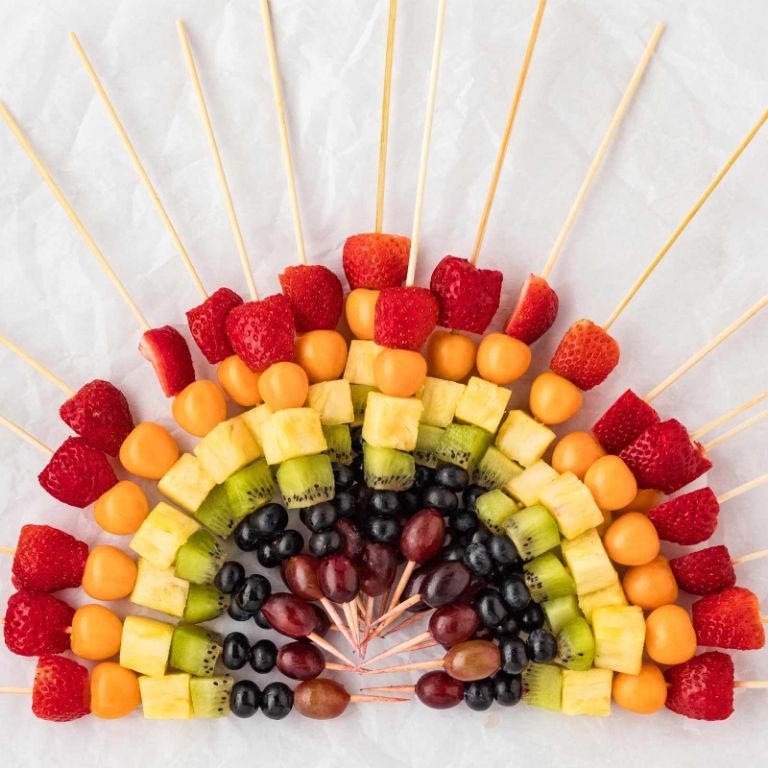
Nowhere does summer’s vibrant spirit shine more brilliantly than in these artful Rainbow Fruit Skewers, where jewel-toned fruits are threaded onto slender bamboo skewers to create edible rainbows that delight both the eye and palate. Each skewer offers a symphony of sweet, tart, and juicy flavors, transforming simple fresh fruits into an elegant presentation perfect for warm-weather gatherings. This effortless yet stunning dish celebrates nature’s candy at its peak seasonal perfection.
Ingredients
Strawberries – 1 cup
Pineapple chunks – 1 cup
Mango chunks – 1 cup
Kiwi slices – 1 cup
Blueberries – 1 cup
Bamboo skewers – 8
Instructions
1. Soak 8 bamboo skewers in cold water for 30 minutes to prevent burning during assembly.
2. Wash and pat dry 1 cup of strawberries, removing the green stems and cutting any large berries in half.
3. Cut 1 cup of fresh pineapple into 1-inch chunks, ensuring uniform size for even presentation.
4. Peel and slice 1 mango into 1-inch cubes, carefully avoiding the flat pit in the center.
5. Peel 2-3 kiwis and slice them into ½-inch thick rounds that will stack neatly on the skewers.
6. Rinse 1 cup of blueberries and set them aside with your other prepared fruits.
7. Begin threading fruits onto soaked skewers in rainbow order: strawberry, pineapple chunk, mango chunk, kiwi slice, and 3-4 blueberries.
8. Leave 2 inches empty at the bottom of each skewer for easy handling and serving.
9. Arrange completed skewers on a serving platter, covering them with plastic wrap.
10. Refrigerate the skewers for at least 1 hour before serving to allow flavors to meld and chill thoroughly.
With their jewel-like appearance and refreshing crispness, these skewers offer a delightful textural journey from the firm pineapple to the bursting blueberries. The natural sweetness of ripe mango balances perfectly with the subtle tartness of kiwi, creating a harmonious flavor profile that needs no additional enhancement. For an elegant presentation, arrange the skewers in a sunburst pattern on a large platter and drizzle with a light honey-lime glaze just before serving.
Banana Oatmeal Breakfast Cookies
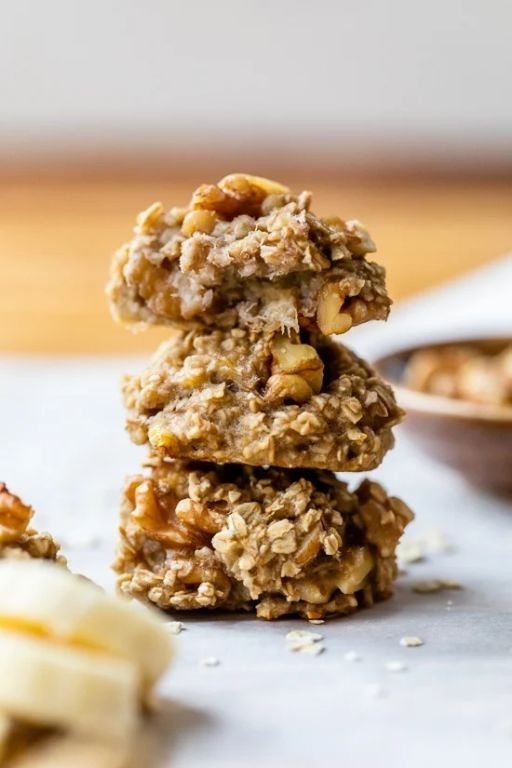
Mornings transformed with these wholesome Banana Oatmeal Breakfast Cookies, offering a portable, nutritious start to your day that feels both indulgent and virtuous. Imagine soft, chewy cookies filled with natural sweetness and hearty texture, perfect for busy mornings when sitting down for breakfast feels impossible. These elegant treats bridge the gap between convenience and homemade goodness, delivering satisfaction in every bite.
Ingredients
– Rolled oats – 2 cups
– Ripe bananas – 3 medium
– Almond butter – ½ cup
– Maple syrup – 2 tbsp
– Cinnamon – 1 tsp
– Baking soda – ½ tsp
Instructions
1. Preheat your oven to 350°F and line a baking sheet with parchment paper.
2. Mash the ripe bananas thoroughly in a large bowl until no large chunks remain.
3. Add the almond butter and maple syrup to the mashed bananas, then stir until fully combined.
4. Mix in the rolled oats, cinnamon, and baking soda, stirring until all ingredients are evenly incorporated and a thick dough forms.
5. Scoop 2-tablespoon portions of dough onto the prepared baking sheet, spacing them 2 inches apart.
6. Gently flatten each portion with the back of a spoon to create uniform cookie shapes about ½-inch thick.
7. Bake for 15–18 minutes at 350°F until the edges are lightly golden and the centers appear set.
8. Remove the baking sheet from the oven and let the cookies cool completely on the sheet for 20 minutes to firm up.
9. Transfer the cooled cookies to an airtight container for storage. Beyond their delightful chewiness and warm cinnamon notes, these cookies reveal subtle banana sweetness that pairs beautifully with a drizzle of honey or a smear of cream cheese. For an elegant twist, crumble one over Greek yogurt or enjoy alongside a spiced latte for a cozy morning ritual.
Vegan Chocolate Avocado Pudding
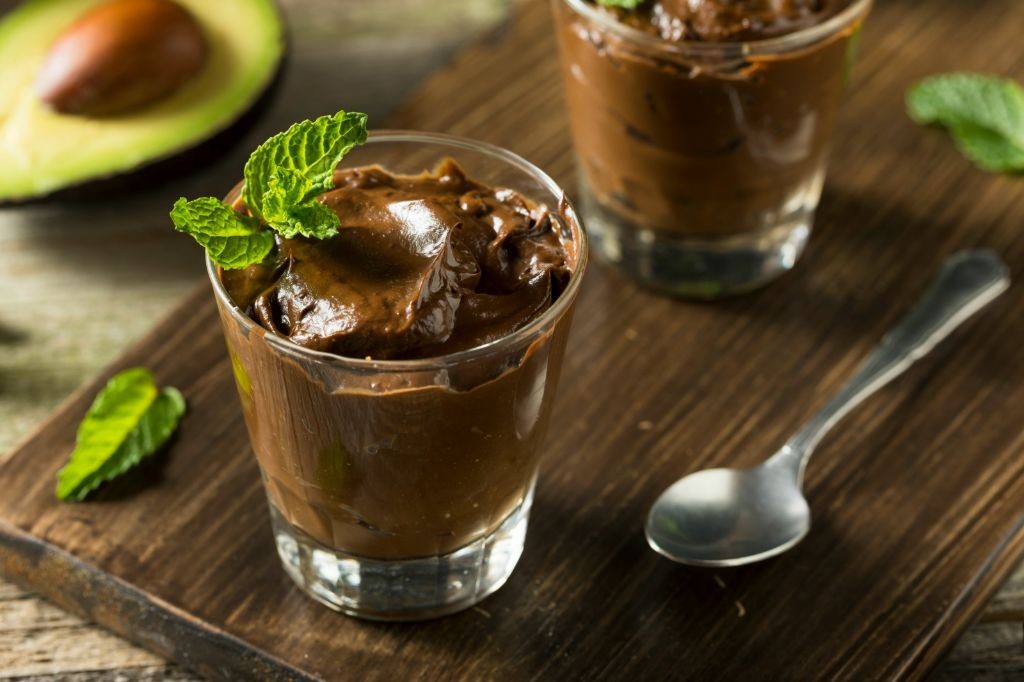
A velvety indulgence awaits with this sophisticated vegan chocolate pudding, where ripe avocado creates an impossibly smooth texture while offering a nutrient-rich foundation for deep cocoa flavor. This elegant dessert transforms simple pantry staples into a luxurious treat that belies its healthful ingredients, perfect for impressing guests or enjoying a moment of personal decadence.
Ingredients
– Ripe avocados – 2 large
– Cocoa powder – ½ cup
– Maple syrup – ¼ cup
– Vanilla extract – 1 tsp
– Salt – ¼ tsp
– Almond milk – 2 tbsp
Instructions
1. Cut the avocados in half lengthwise and remove the pits using a spoon. 2. Scoop the avocado flesh into a food processor or high-speed blender. 3. Add the cocoa powder, maple syrup, vanilla extract, and salt to the avocado. 4. Pour in the almond milk to help with blending consistency. 5. Process the mixture on high speed for 2 minutes, scraping down the sides with a spatula halfway through to ensure even incorporation. 6. Continue blending for another minute until the pudding becomes completely smooth and no green avocado specks remain. 7. Taste the pudding and adjust sweetness by adding more maple syrup if desired, blending for 30 seconds to incorporate. 8. Transfer the pudding to serving bowls or glasses using a spatula. 9. Cover the bowls tightly with plastic wrap, pressing it directly against the pudding surface to prevent oxidation. 10. Refrigerate the pudding for at least 2 hours until thoroughly chilled and set. What emerges is a remarkably silken chocolate creation with the rich depth of premium cocoa balanced by subtle sweetness. The avocado contributes an almost mousse-like quality that melts luxuriously on the tongue, while the chilling process allows the flavors to harmonize beautifully. Consider garnishing with fresh raspberries and toasted coconut flakes for contrasting textures, or layer it with crushed vegan cookies for an elegant parfait presentation.
Stuffed Dates with Almond Butter
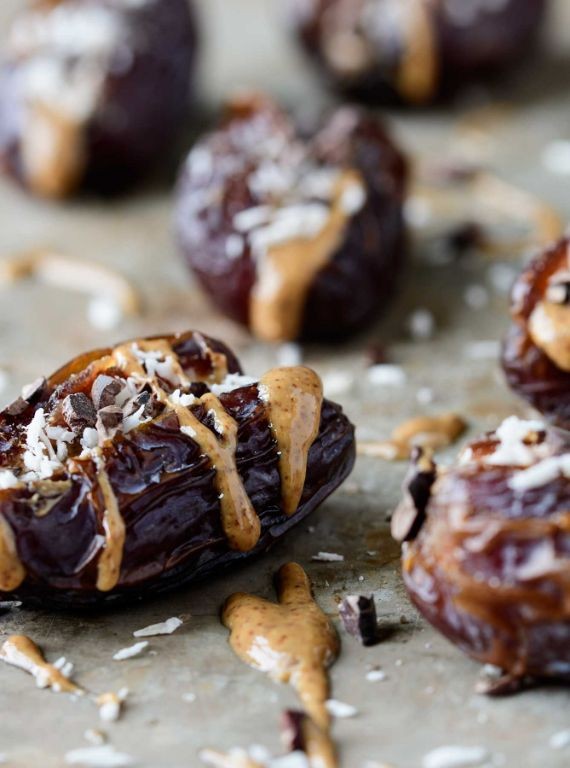
Fusing the ancient sweetness of dates with modern nutritional sensibilities, these elegant stuffed morsels offer a sophisticated balance of creamy and chewy textures. Perfect for holiday entertaining or an elevated afternoon treat, this simple preparation yields impressive results that belie the minimal effort required. Each bite delivers a harmonious blend of caramel-like fruit and rich nut butter that feels both indulgent and wholesome.
Ingredients
Medjool dates – 12
Almond butter – ¼ cup
Flaky sea salt – ½ tsp
Instructions
1. Preheat your oven to 350°F and line a baking sheet with parchment paper.
2. Using a sharp paring knife, make a lengthwise slit along each date, being careful not to cut completely through to the other side.
3. Gently pry open each date and remove the pit with your fingers, preserving the fruit’s structural integrity.
4. Spoon approximately 1 teaspoon of almond butter into the cavity of each date, using the back of the spoon to press it firmly into place.
5. Arrange the stuffed dates in a single layer on the prepared baking sheet, ensuring they don’t touch to promote even heating.
6. Bake for 8-10 minutes until the almond butter becomes fragrant and the dates appear slightly plumped.
7. Remove the baking sheet from the oven and immediately sprinkle each date with a pinch of flaky sea salt.
8. Transfer the dates to a wire rack and allow them to cool for 15 minutes until firm enough to handle but still warm.
Now these warm, sophisticated treats reveal their full complexity – the dates become wonderfully soft and caramelized while the almond butter develops a deeper, toasted flavor. The subtle crunch of flaky salt provides the perfect counterpoint to the natural sweetness, making these equally stunning served on a cheese board or as an elegant dessert alongside dark coffee.
Homemade Granola Bars
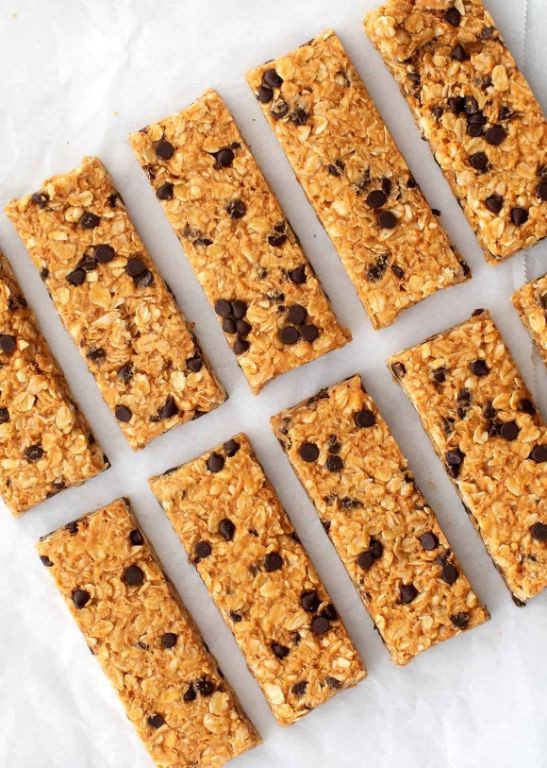
Heralding the perfect balance of wholesome nutrition and irresistible flavor, these homemade granola bars elevate the humble snack into something truly special. Crafted with thoughtful precision, they deliver satisfying crunch and natural sweetness in every bite. Whether enjoyed as a quick breakfast or afternoon pick-me-up, they offer both convenience and culinary delight.
Ingredients
– Rolled oats – 2 cups
– Honey – ½ cup
– Almond butter – ⅓ cup
– Chopped almonds – ½ cup
– Dried cranberries – ⅓ cup
– Vanilla extract – 1 tsp
– Salt – ¼ tsp
Instructions
1. Preheat your oven to 325°F and line an 8×8-inch baking pan with parchment paper, leaving overhang on two sides for easy removal.
2. Spread the rolled oats evenly on a baking sheet and toast in the preheated oven for 10 minutes until fragrant and lightly golden.
3. Combine the honey and almond butter in a medium saucepan over medium heat, stirring constantly until the mixture becomes smooth and pourable.
4. Remove the honey mixture from heat and stir in vanilla extract and salt until fully incorporated.
5. Transfer the toasted oats to a large mixing bowl and add chopped almonds and dried cranberries.
6. Pour the warm honey mixture over the dry ingredients and mix thoroughly until every component is coated.
7. Tip: For perfectly even distribution, use a rubber spatula to fold from the bottom upward.
8. Press the mixture firmly into the prepared baking pan using the bottom of a measuring cup.
9. Tip: Apply even pressure across the entire surface to prevent crumbly bars later.
10. Bake at 325°F for 20-22 minutes until the edges turn deep golden brown.
11. Cool completely in the pan on a wire rack for at least 2 hours before slicing.
12. Tip: For clean cuts, use a sharp knife and wipe it clean between slices.
13. Cut into 10 even bars and store in an airtight container at room temperature. The resulting bars offer a delightful contrast between the crisp oat clusters and chewy dried fruit, with the almond butter providing rich depth against the honey’s floral sweetness. Consider drizzling with melted dark chocolate for an elegant dessert variation, or crumble over Greek yogurt for a sophisticated breakfast parfait.
Chia Seed Pudding
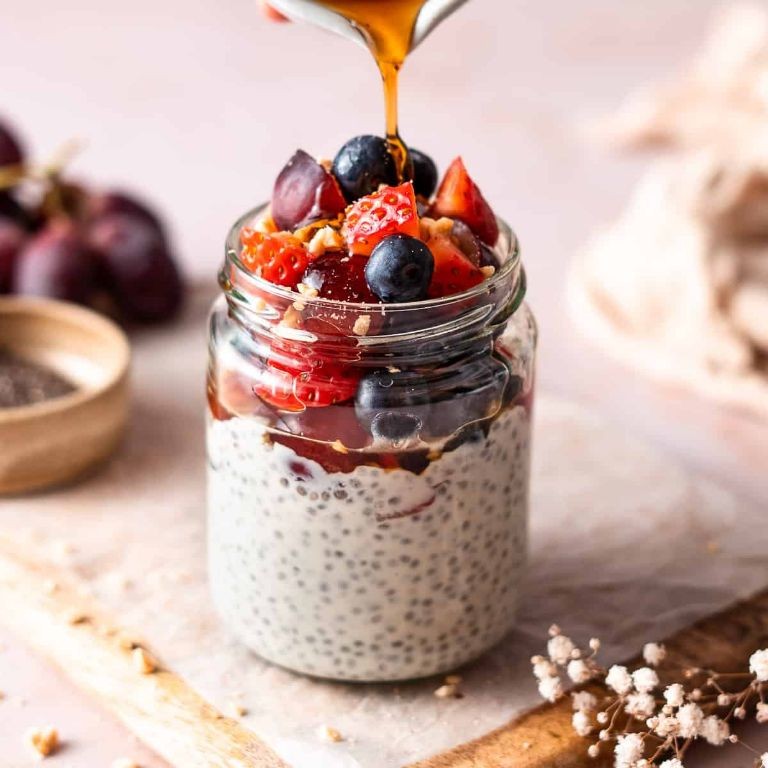
Delightfully simple yet sophisticated, chia seed pudding offers a canvas of creamy texture and subtle nutty flavor that transforms overnight. This elegant breakfast or dessert requires minimal effort but delivers maximum satisfaction with its velvety consistency. Discover how these tiny seeds blossom into a luxurious treat that feels both nourishing and indulgent.
Ingredients
Chia seeds – ¼ cup
Milk – 1 cup
Maple syrup – 1 tbsp
Vanilla extract – ½ tsp
Instructions
1. Combine ¼ cup chia seeds and 1 cup milk in a medium bowl.
2. Add 1 tablespoon maple syrup and ½ teaspoon vanilla extract to the mixture.
3. Whisk vigorously for 30 seconds to prevent clumping and ensure even distribution.
4. Let the mixture rest for 5 minutes, then whisk again to break up any seed clusters that formed.
5. Cover the bowl tightly with plastic wrap, pressing it directly against the pudding surface to prevent skin formation.
6. Refrigerate the pudding for at least 4 hours or overnight until thickened to a spoonable consistency.
7. Check the pudding’s texture after 4 hours by dipping a spoon into the center—it should hold its shape without being watery.
8. Stir the pudding thoroughly before serving to redistribute any settled seeds and create uniform creaminess.
9. Divide the pudding evenly between two serving bowls using a measuring cup for perfect portions.
Beyond its initial preparation, this pudding develops deeper flavor complexity when allowed to rest overnight. The finished texture should be luxuriously thick yet spoonable, with chia seeds providing gentle resistance against the creamy base. For an elegant presentation, layer it with fresh berries and toasted coconut, or drizzle with honey just before serving to highlight its delicate sweetness.
Apple Cinnamon Energy Bites

Heralding the crisp essence of autumn, these Apple Cinnamon Energy Bites capture the cozy warmth of the season in perfectly portioned morsels. Combining tender apple pieces with aromatic spices, they offer a sophisticated yet effortless treat that nourishes both body and spirit with every bite.
Ingredients
Rolled Oats – 1 cup
Almond Butter – ½ cup
Maple Syrup – 3 tbsp
Finely Diced Apple – ⅓ cup
Ground Cinnamon – 1 tsp
Instructions
- Combine 1 cup rolled oats, ½ cup almond butter, 3 tbsp maple syrup, ⅓ cup finely diced apple, and 1 tsp ground cinnamon in a medium mixing bowl.
- Stir the mixture vigorously for 2-3 minutes until all ingredients are fully incorporated and the texture becomes thick and cohesive.
- Refrigerate the mixture for 30 minutes to firm up, which makes rolling easier and prevents sticking to your hands.
- Scoop 1 tablespoon of the chilled mixture and roll between your palms to form 1-inch balls, repeating until all mixture is used.
- Arrange the balls in a single layer on a parchment-lined baking sheet, spacing them 1 inch apart to prevent sticking.
- Chill the energy bites for 1 hour in the refrigerator to fully set and develop their flavors.
You’ll find these bites offer a delightful contrast between the chewy oats and the soft apple pieces, with the cinnamon providing a warm, aromatic finish. For an elegant presentation, serve them alongside spiced chai tea or crumble over morning yogurt for added texture.
Pumpkin Spice Protein Balls
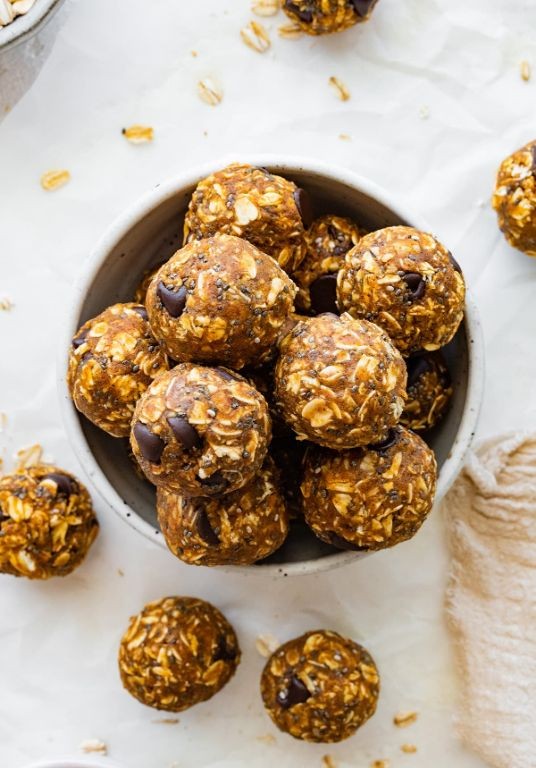
Glistening with autumnal charm, these pumpkin spice protein balls offer a sophisticated twist on seasonal snacking, blending warm spices with nourishing ingredients in perfectly portioned bites that satisfy both cravings and nutritional needs. Their elegant appearance belies the simple preparation, making them ideal for impromptu entertaining or thoughtful gifting during the fall months. Each sphere delivers a harmonious balance of earthy pumpkin, aromatic spices, and subtle sweetness that elevates the humble snack into something truly special.
Ingredients
Rolled oats – 1 cup
Pumpkin puree – ½ cup
Vanilla protein powder – ¼ cup
Maple syrup – 2 tbsp
Pumpkin pie spice – 1 tsp
Salt – ¼ tsp
Instructions
1. Combine 1 cup rolled oats, ½ cup pumpkin puree, ¼ cup vanilla protein powder, 2 tbsp maple syrup, 1 tsp pumpkin pie spice, and ¼ tsp salt in a medium mixing bowl.
2. Mix thoroughly with a spatula until all ingredients are fully incorporated and a cohesive dough forms, about 2 minutes of continuous stirring.
3. Chill the mixture in the refrigerator for 30 minutes to firm the dough for easier handling.
4. Scoop 1 tablespoon of chilled dough and roll between your palms to form smooth, round balls about 1 inch in diameter.
5. Arrange the formed balls in a single layer on a parchment-lined baking sheet.
6. Refrigerate the protein balls for at least 1 hour until firm to the touch before serving.
7. Store the chilled protein balls in an airtight container in the refrigerator for up to 1 week.
Buttery in texture yet surprisingly light, these protein balls deliver a sophisticated flavor profile where the earthy pumpkin notes dance elegantly with warm spices. Consider serving them alongside espresso for an afternoon pick-me-up or arranged on a wooden board with dried fruits and nuts for an autumnal charcuterie presentation. Their velvety interior and subtle sweetness make them equally suitable for elegant dessert platters or as a refined addition to lunchboxes.
Roasted Chickpeas with Sea Salt
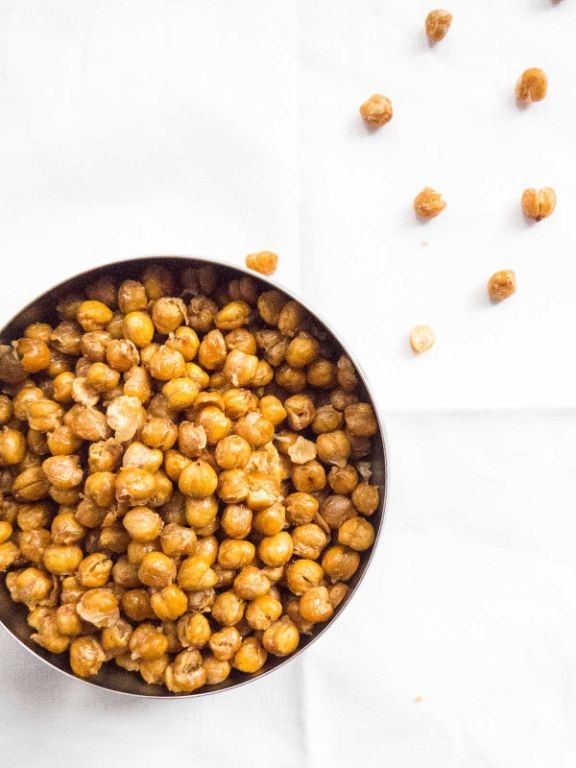
Nothing elevates humble legumes quite like the transformative power of heat, and these roasted chickpeas with sea salt emerge from the oven as crisp, golden nuggets of pure satisfaction. Perfectly seasoned and delightfully crunchy, they offer a sophisticated alternative to everyday snacks that feels both elegant and effortlessly simple to prepare.
Ingredients
- Canned chickpeas – 2 (15 oz) cans
- Olive oil – 2 tbsp
- Sea salt – 1 tsp
Instructions
- Preheat your oven to 400°F and line a large baking sheet with parchment paper.
- Drain both cans of chickpeas in a colander and rinse thoroughly under cold running water.
- Pat the chickpeas completely dry using a clean kitchen towel, rolling them gently to remove any loose skins for maximum crispiness.
- Transfer the dried chickpeas to a medium bowl and drizzle with 2 tablespoons of olive oil.
- Toss the chickpeas until they are evenly coated with the oil.
- Spread the chickpeas in a single layer on your prepared baking sheet, ensuring they don’t overlap.
- Roast in the preheated oven for 30 minutes, then shake the pan to rotate the chickpeas for even browning.
- Continue roasting for another 15-20 minutes until the chickpeas are deep golden brown and crisp when tapped.
- Immediately transfer the hot chickpeas to a clean bowl and sprinkle evenly with 1 teaspoon of sea salt while still warm.
- Toss gently to distribute the salt evenly throughout the chickpeas.
Out of the oven, these chickpeas achieve a satisfying crunch that gives way to a tender interior, with the flaky sea salt creating bright bursts of flavor against the nutty, toasted notes. Consider serving them warm over a bed of greens with shaved Parmesan for a sophisticated salad topping, or simply enjoy their addictive texture straight from the bowl as an elegant cocktail accompaniment.
Healthy No-Bake Brownies

Brimming with rich chocolate flavor and requiring no oven time, these sophisticated no-bake brownies deliver indulgence without compromise. Their fudgy texture develops through a simple process of melting, mixing, and setting that transforms wholesome ingredients into elegant squares. Perfect for impromptu gatherings or satisfying sudden cravings, this recipe proves that decadent desserts need not be complicated.
Ingredients
Medjool dates – 1 ½ cups
Raw walnuts – 1 cup
Cocoa powder – ½ cup
Maple syrup – ¼ cup
Vanilla extract – 1 tsp
Sea salt – ¼ tsp
Instructions
1. Place pitted Medjool dates in a medium heatproof bowl and cover with boiling water, allowing them to soak for exactly 10 minutes to soften.
2. Drain the dates thoroughly and pat them dry with paper towels to remove excess moisture, which ensures proper binding.
3. Combine the softened dates, raw walnuts, cocoa powder, maple syrup, vanilla extract, and sea salt in a food processor fitted with the S-blade.
4. Process the mixture on high speed for 90 seconds until it forms a sticky, uniform dough that pulls away from the sides of the bowl.
5. Line a 6×6-inch square baking pan with parchment paper, allowing 2 inches of overhang on two opposite sides for easy removal.
6. Transfer the brownie mixture into the prepared pan and use damp hands to press it firmly into an even layer, reaching all corners.
7. Refrigerate the pan for at least 3 hours, or until the brownies are firm enough to slice cleanly without crumbling.
8. Using the parchment paper handles, lift the set brownie slab from the pan and place it on a cutting board.
9. Cut the slab into 9 equal squares with a sharp knife wiped clean between cuts for neat edges.
Heavenly in their dense, fudgy texture, these brownies offer deep cocoa notes balanced by the caramel sweetness of dates. The walnuts provide satisfying crunch while the sea salt heightens the chocolate intensity. For an elegant presentation, dust with extra cocoa powder or serve alongside fresh raspberries whose tartness complements the richness beautifully.
Frozen Yogurt Bark
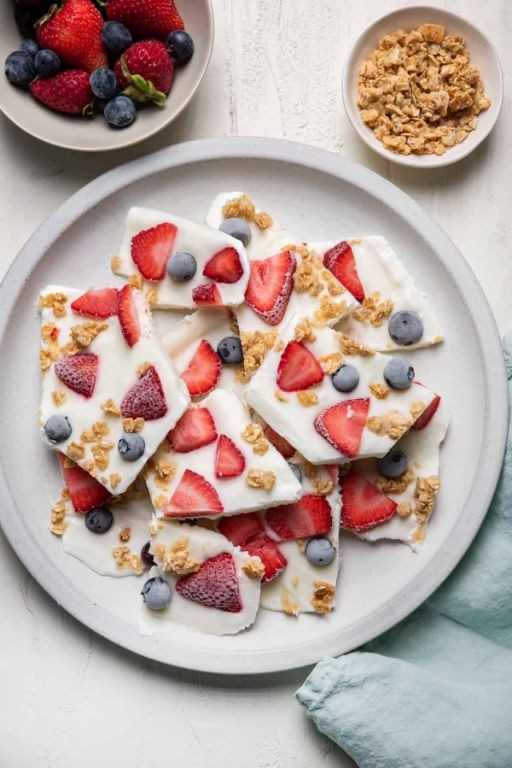
Kindly consider this elegant frozen confection that transforms humble ingredients into a sophisticated treat worthy of any gathering. Frozen yogurt bark delivers a delightful balance of creamy tang and sweet crunch, offering a refreshing alternative to traditional desserts that can be prepared with minimal effort yet yields impressive results. Its versatility allows for endless customization while maintaining a polished presentation that belies its simplicity.
Ingredients
Plain Greek yogurt – 2 cups
Honey – ¼ cup
Vanilla extract – 1 tsp
Mixed berries – 1 cup
Dark chocolate chips – ½ cup
Instructions
1. Line a standard baking sheet (approximately 9×13 inches) with parchment paper, ensuring the paper extends slightly beyond the edges for easy removal.
2. In a medium mixing bowl, combine 2 cups of plain Greek yogurt, ¼ cup of honey, and 1 teaspoon of vanilla extract using a whisk until the mixture becomes completely smooth and uniform in texture.
3. Spread the yogurt mixture evenly across the prepared baking sheet using an offset spatula, creating a consistent ¼-inch thick layer that reaches all corners of the pan.
4. Evenly distribute 1 cup of mixed berries and ½ cup of dark chocolate chips across the entire surface of the yogurt layer, gently pressing them slightly into the mixture to ensure they adhere properly during freezing.
5. Place the baking sheet in the freezer and freeze for exactly 4 hours at 0°F until the bark becomes completely firm and can be cleanly broken into pieces.
6. Remove the frozen bark from the freezer and carefully lift the parchment paper to transfer the entire sheet to a clean cutting board.
7. Break the frozen yogurt bark into irregular, rustic pieces approximately 2-3 inches in size by pressing firmly with your hands or using the tip of a sharp knife.
Vibrantly studded with jewel-toned berries and rich chocolate, this frozen yogurt bark offers a satisfying contrast between the creamy, tangy base and the crisp, frozen texture. The elegant shards make for a stunning presentation when arranged on a chilled platter, perhaps accompanied by sparkling prosecco for an sophisticated dessert experience that delights both the palate and the eye.
Summary
Outstanding recipes await in this collection perfect for any gathering! Whether you’re hosting a party or cooking a family dinner, these 20 delicious dishes will impress. We’d love to hear which recipes become your favorites—leave a comment below and share your culinary creations on Pinterest so others can discover these tasty ideas too!