Many of us are looking for natural ways to support our immune systems, and elderberries have emerged as a powerful ally. These tiny, dark purple berries are packed with antioxidants and vitamins that can help keep you feeling your best. In this roundup, we’ve gathered 20 delicious elderberry recipes—from soothing syrups to tasty treats—that make it easy to incorporate this superfood into your daily routine. Let’s dive in!
Elderberry Syrup for Cold Relief
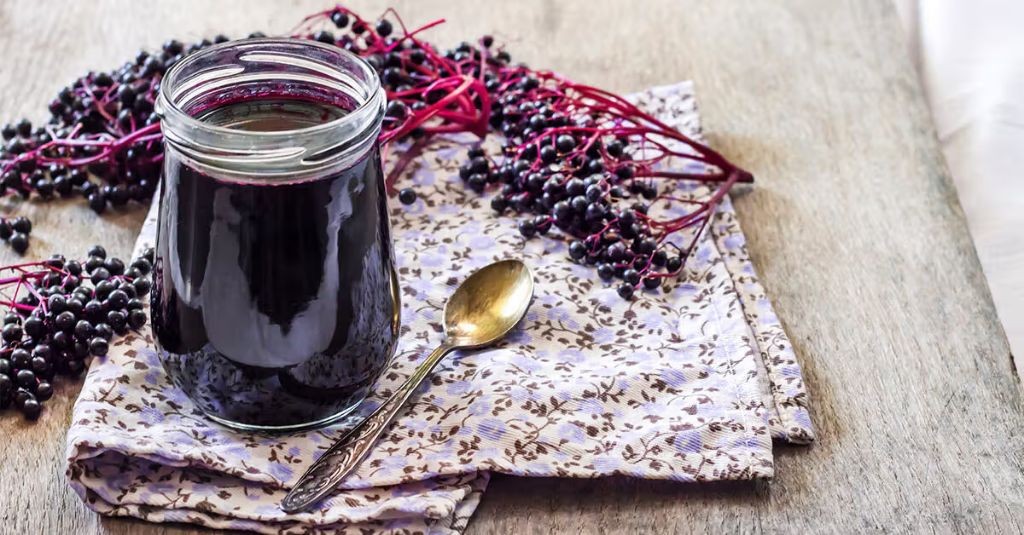
Keeping my family healthy during cold season has become my mission, and this elderberry syrup recipe is my secret weapon—I make a big batch every November when the sniffles start making their rounds. There’s something comforting about watching those dark berries bubble away on the stove, knowing I’m creating natural relief that actually works.
Ingredients
Elderberries – 1 cup
Water – 3 cups
Honey – 1 cup
Fresh ginger – 2-inch piece
Instructions
1. Combine 1 cup of elderberries and 3 cups of water in a medium saucepan.
2. Peel the 2-inch piece of fresh ginger using a spoon to easily scrape off the skin.
3. Thinly slice the peeled ginger and add it to the saucepan with the elderberries.
4. Bring the mixture to a boil over high heat, then immediately reduce to a simmer.
5. Simmer uncovered for 45 minutes, stirring occasionally with a wooden spoon—the liquid should reduce by about half.
6. Strain the mixture through a fine-mesh sieve into a clean bowl, pressing gently on the berries to extract all the liquid.
7. Let the strained liquid cool to room temperature, about 30 minutes—this prevents the honey from losing its beneficial properties when added to hot liquid.
8. Stir in 1 cup of honey until fully dissolved.
9. Pour the finished syrup into a sterilized glass jar with a tight-fitting lid.
10. Store the syrup in the refrigerator where it will keep for up to 3 months.
This syrup turns out thick and deeply purple with a sweet-tart flavor that even kids don’t mind taking. The ginger adds a lovely warmth that makes it perfect stirred into hot tea or drizzled over pancakes for a medicinal breakfast treat.
Homemade Elderberry Jam
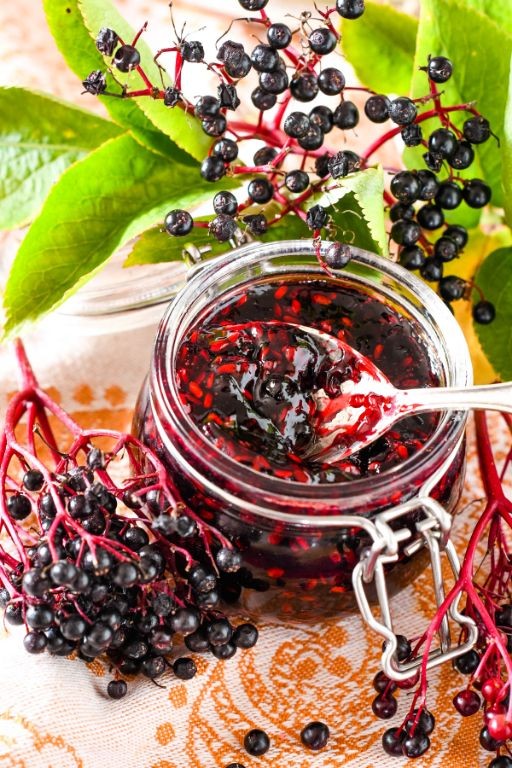
Years ago, I stumbled upon a wild elderberry bush during an autumn hike, and ever since, making this jam has become my annual ritual that fills my kitchen with the most incredible floral aroma. There’s something magical about transforming these tiny dark berries into jewel-toned preserves that capture the essence of fall in every spoonful.
Ingredients
Elderberries – 4 cups
Granulated sugar – 3 cups
Lemon juice – 2 tbsp
Pectin – 1 packet
Instructions
1. Rinse 4 cups of fresh elderberries under cool running water to remove any debris.
2. Use a fork to gently strip the berries from their stems into a large bowl.
3. Transfer the cleaned berries to a heavy-bottomed pot and crush them with a potato masher until juices release.
4. Cook the berries over medium heat for 15 minutes, stirring occasionally with a wooden spoon.
5. Strain the berry mixture through a fine-mesh sieve into a clean pot, pressing with the back of a spoon to extract all pulp.
6. Add 3 cups of granulated sugar and 2 tbsp of lemon juice to the strained berry juice.
7. Bring the mixture to a rolling boil at 220°F, stirring constantly to prevent scorching.
8. Stir in 1 packet of pectin and maintain the boil for exactly 1 minute while continuing to stir.
9. Remove the pot from heat and skim off any foam from the surface with a spoon.
10. Ladle the hot jam into sterilized jars, leaving ¼ inch of headspace at the top.
11. Process the filled jars in a boiling water bath for 10 minutes to seal properly.
12. Remove the jars from the water bath and let them cool completely on a towel-lined counter.
The finished jam sets up with a beautiful spreadable consistency and deep purple color that looks stunning swirled into yogurt or spread over warm biscuits. This elderberry jam has a uniquely complex flavor—tart yet sweet with subtle earthy notes that make it perfect for pairing with sharp cheeses or even as a glaze for roasted meats.
Elderberry and Honey Tea
Huddled under a blanket with the first chill of autumn settling in, I found myself craving something that would warm me from the inside out. This elderberry and honey tea has become my go-to remedy, a ritual I started after a particularly stubborn cold last year. There’s something almost magical about how these two simple ingredients come together to create such comfort.
Ingredients
- Dried elderberries – ½ cup
- Water – 4 cups
- Honey – 2 tbsp
Instructions
- Measure ½ cup of dried elderberries into a medium saucepan.
- Pour 4 cups of cold water over the elderberries in the saucepan.
- Place the saucepan on the stove over medium-high heat and bring the mixture to a boil.
- Once boiling, reduce the heat to low and simmer for 20 minutes. (Tip: Don’t boil vigorously after reducing heat – gentle simmering extracts the most flavor without making the tea bitter.)
- After 20 minutes, remove the saucepan from heat and let it sit for 5 minutes to cool slightly.
- Place a fine-mesh strainer over a heatproof bowl or large measuring cup.
- Carefully pour the tea through the strainer to remove all the elderberry solids.
- Press gently on the berries in the strainer with the back of a spoon to extract all the liquid.
- Discard the strained elderberries and return the liquid to the cleaned saucepan.
- Stir in 2 tablespoons of honey until fully dissolved. (Tip: Add honey after straining and while the tea is still warm – this preserves honey’s beneficial properties that can be damaged by high heat.)
- Pour the finished tea into your favorite mug and serve immediately. (Tip: For an extra cozy touch, warm your mug with hot water before pouring in the tea – it keeps your drink hotter longer.)
Creating this deep burgundy elixir feels like bottling autumn itself. The tea has a rich, jammy berry flavor that’s perfectly balanced by the floral sweetness of honey, with a texture that’s both soothing and substantial. I love serving it in my grandmother’s ceramic mugs, sometimes with a cinnamon stick stirrer for an extra aromatic touch on particularly crisp evenings.
Elderberry Smoothie Bowl
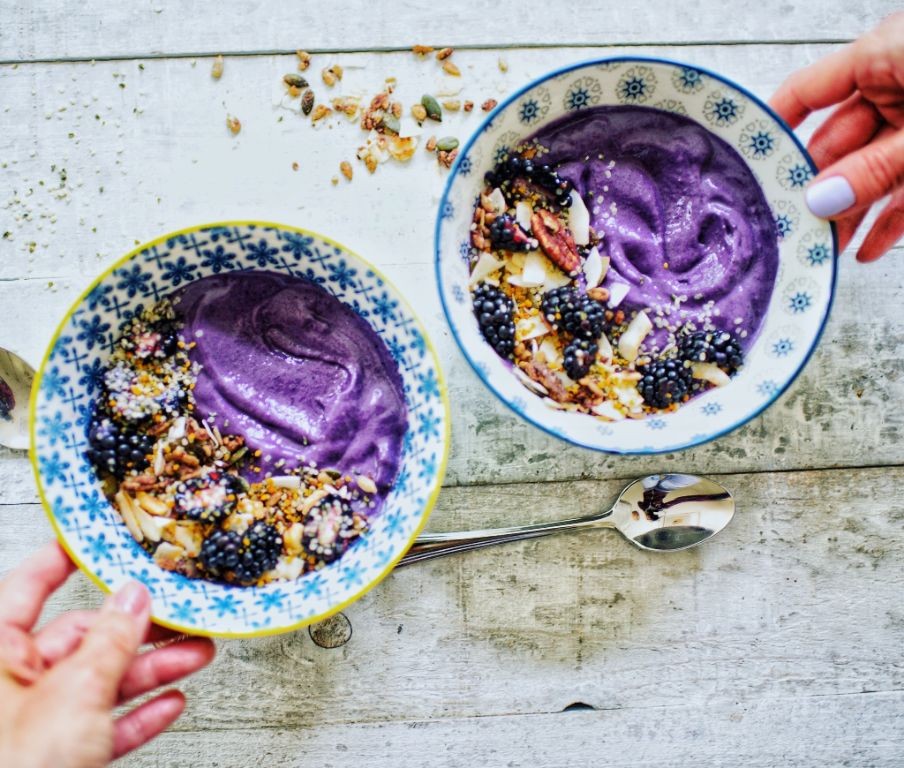
A few weeks ago, I discovered the magic of elderberries when my neighbor gifted me a jar from her backyard harvest—now I’m obsessed with incorporating them into my morning routine. This vibrant smoothie bowl has become my go-to breakfast that keeps me energized through my busy blogging days while satisfying my sweet tooth naturally.
Ingredients
– Frozen elderberries – ½ cup
– Frozen banana – 1 medium
– Plain Greek yogurt – ½ cup
– Almond milk – ¼ cup
– Honey – 1 tbsp
– Chia seeds – 1 tsp
Instructions
1. Combine ½ cup frozen elderberries, 1 medium frozen banana, ½ cup plain Greek yogurt, ¼ cup almond milk, and 1 tbsp honey in a high-speed blender.
2. Blend on high speed for 45-60 seconds until completely smooth and creamy, scraping down the sides once with a spatula if needed.
3. Pour the smoothie mixture into a wide, shallow bowl using a rubber spatula to get every last drop.
4. Sprinkle 1 tsp chia seeds evenly over the surface of the smoothie bowl.
5. Let the bowl sit for 2-3 minutes to allow the chia seeds to slightly soften and adhere to the surface.
Just spoon through that gorgeous purple hue and you’ll discover the most velvety texture that holds its shape beautifully. The tart elderberries play wonderfully against the natural sweetness of banana and honey, making this bowl feel like dessert for breakfast—I love serving it with extra berries arranged in a sunburst pattern for Instagram-worthy mornings.
Elderberry Chia Pudding
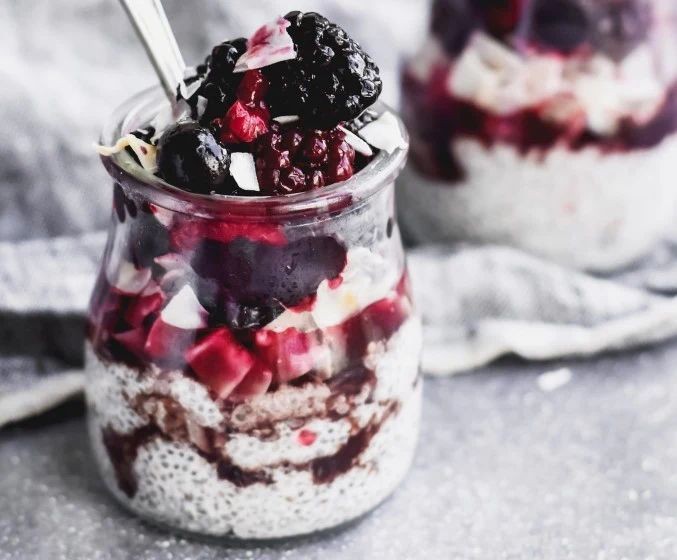
A few weeks ago, I discovered the magic of elderberry syrup during cold season, and now I’m obsessed with incorporating it into everything—including this dreamy chia pudding that’s become my go-to breakfast. As someone who’s perpetually running late in the mornings, I love that I can prep this the night before and grab it on my way out the door.
Ingredients
Elderberry syrup – ¼ cup
Chia seeds – ¼ cup
Milk – 1 cup
Instructions
1. Combine ¼ cup chia seeds and 1 cup milk in a mason jar or bowl. 2. Whisk vigorously for 30 seconds to prevent clumping—this is crucial for smooth pudding texture. 3. Stir in ¼ cup elderberry syrup until fully incorporated. 4. Let the mixture sit undisturbed for 5 minutes. 5. Whisk again thoroughly to break up any seed clusters that formed. 6. Cover the container tightly with a lid or plastic wrap. 7. Refrigerate for at least 4 hours or overnight—the longer it sits, the thicker it gets. 8. Check consistency after refrigeration; if too thick, stir in 1 tablespoon additional milk. Creamy and jewel-toned, this pudding has a delightful jam-like texture with subtle tartness from the elderberries. I love layering it with Greek yogurt and granola for parfaits, or spreading it on toast for a quick, nutrient-packed snack that feels indulgent.
Elderberry Pancakes with Maple Syrup
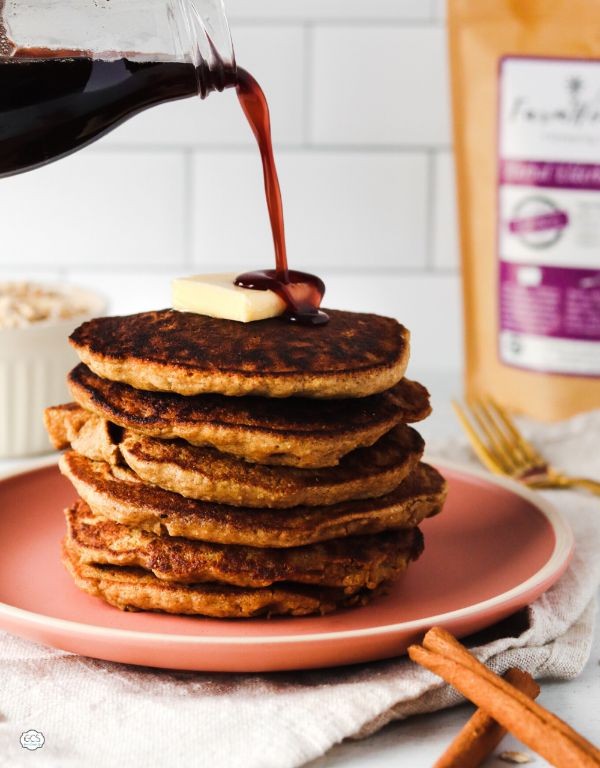
Every fall, when the elderberries ripen along our country lane, I get this overwhelming craving for fluffy pancakes that capture their deep, earthy sweetness. There’s something magical about transforming those tiny purple gems into a breakfast that feels both rustic and indulgent. My grandmother taught me this recipe decades ago, and I still make it exactly her way—though I’ve learned to keep a closer eye on the heat than she ever did!
Ingredients
– Flour – 1 cup
– Baking powder – 2 tsp
– Salt – ½ tsp
– Milk – ¾ cup
– Egg – 1
– Elderberries – ½ cup
– Butter – 2 tbsp
– Maple syrup – ¼ cup
Instructions
1. Whisk together 1 cup flour, 2 tsp baking powder, and ½ tsp salt in a large bowl until fully combined.
2. Pour ¾ cup milk into the dry ingredients and crack in 1 egg.
3. Stir the batter gently until just mixed—lumps are fine and prevent overmixing, which makes pancakes tough.
4. Fold ½ cup elderberries into the batter until evenly distributed.
5. Melt 1 tbsp butter on a griddle over medium heat (350°F).
6. Drop ¼ cup batter onto the hot griddle for each pancake.
7. Cook pancakes for 2-3 minutes until bubbles form on the surface and edges look set.
8. Flip pancakes carefully with a spatula when the bottoms are golden brown.
9. Cook for another 2 minutes until the second side is golden and centers spring back when pressed.
10. Transfer cooked pancakes to a plate and repeat with remaining batter, adding more butter as needed.
11. Warm ¼ cup maple syrup in a small saucepan over low heat for 1 minute.
12. Drizzle warm syrup over stacked pancakes before serving.
Buttery, berry-studded perfection emerges from this simple process—the elderberries burst with tartness against the sweet maple syrup in every bite. I love serving these with crispy bacon for salty contrast, or sometimes I’ll sprinkle powdered sugar over the top for special occasions. They’re equally wonderful cold the next day, straight from the fridge when that berry craving strikes again.
Elderberry Infused Vodka
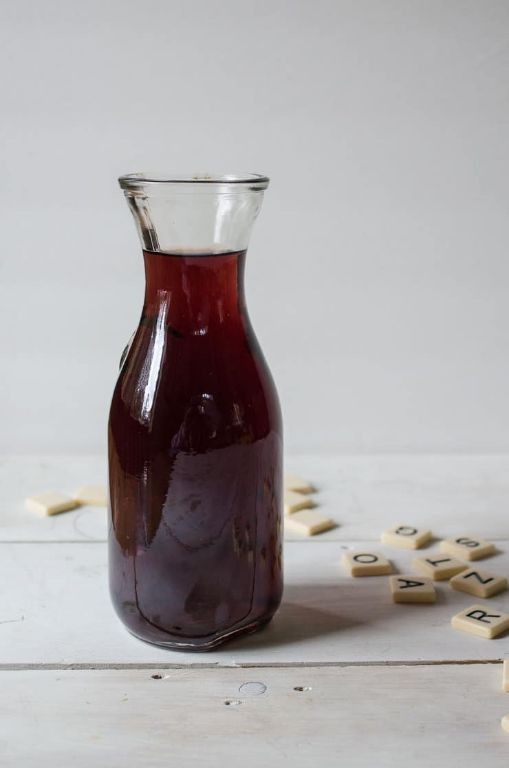
Venturing into homemade infused spirits has become my latest kitchen obsession, especially after discovering how simple yet rewarding elderberry vodka can be. I first tried this at a friend’s fall gathering last year and was instantly hooked by its deep flavor—now I make batches throughout the season to share with neighbors. Honestly, there’s something special about creating your own signature drink that store-bought versions just can’t match.
Ingredients
Vodka – 2 cups
Dried elderberries – ½ cup
Granulated sugar – ¼ cup
Instructions
1. Pour 2 cups of vodka into a clean 1-quart glass jar with a tight-fitting lid.2. Add ½ cup of dried elderberries to the vodka in the jar.3. Secure the lid tightly and shake the jar vigorously for 30 seconds to combine.4. Store the jar in a cool, dark place like a pantry for 4 weeks, shaking it every 3 days to help infusion.5. Place a fine-mesh strainer over a medium bowl after the 4-week infusion period.6. Pour the vodka mixture through the strainer to separate the liquid from the elderberries.7. Press the elderberries gently with the back of a spoon to extract any remaining liquid, then discard the solids.8. Add ¼ cup of granulated sugar to the strained vodka in the bowl.9. Whisk the mixture continuously for 2 minutes until the sugar is fully dissolved.10. Transfer the finished elderberry vodka to a clean glass bottle using a funnel.11. Seal the bottle and store it in the refrigerator for up to 6 months.Zesty and richly flavored, this vodka boasts a velvety texture with deep berry notes that mellow beautifully over time. I love serving it chilled in small glasses as a digestif or mixing it into seasonal cocktails—try it with ginger beer and a lime wedge for a festive twist. It’s the kind of homemade touch that makes holiday gatherings feel extra special.
Elderberry and Apple Crumble
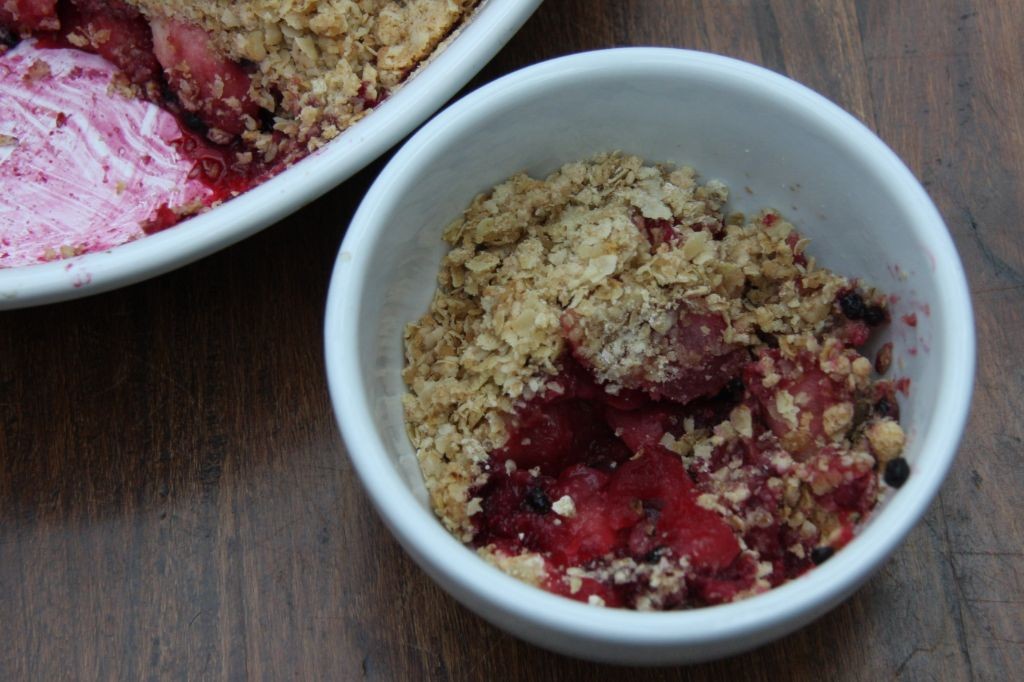
Perfectly tart elderberries and sweet apples come together in this cozy crumble that reminds me of my grandmother’s kitchen every fall. I love making this when the weather turns crisp and I need something warm and comforting to share with friends over coffee.
Ingredients
- Elderberries – 2 cups
- Apples – 3 medium
- Sugar – ¾ cup
- Flour – 1 cup
- Butter – ½ cup
- Oats – ½ cup
- Cinnamon – 1 tsp
- Salt – ¼ tsp
Instructions
- Preheat your oven to 375°F.
- Wash 2 cups of elderberries thoroughly and pat them dry with paper towels.
- Peel 3 medium apples, then core and slice them into ¼-inch thick pieces.
- Combine the elderberries and apple slices in a large mixing bowl.
- Sprinkle ½ cup of sugar and 1 teaspoon of cinnamon over the fruit mixture.
- Toss the fruit with the sugar and cinnamon until evenly coated.
- Transfer the fruit mixture to a 9-inch baking dish, spreading it in an even layer.
- In a separate bowl, combine 1 cup of flour, ½ cup of oats, remaining ¼ cup of sugar, and ¼ teaspoon of salt.
- Cut ½ cup of cold butter into small cubes and add it to the flour mixture.
- Use your fingers to work the butter into the dry ingredients until the mixture resembles coarse crumbs with some pea-sized butter pieces remaining.
- Sprinkle the crumble topping evenly over the fruit in the baking dish.
- Place the baking dish in the preheated oven and bake for 35-40 minutes.
- Check the crumble at 35 minutes – the topping should be golden brown and the fruit should be bubbling around the edges.
- Remove the crumble from the oven when the topping is crisp and golden.
- Let the crumble rest on a wire rack for 15 minutes before serving to allow the fruit filling to set.
My favorite thing about this crumble is how the tart elderberries play against the sweet apples beneath that buttery, crunchy topping. It’s wonderful served warm with a scoop of vanilla ice cream that melts into all the nooks and crannies, or try it for breakfast the next day with a dollop of Greek yogurt.
Elderberry Lemonade
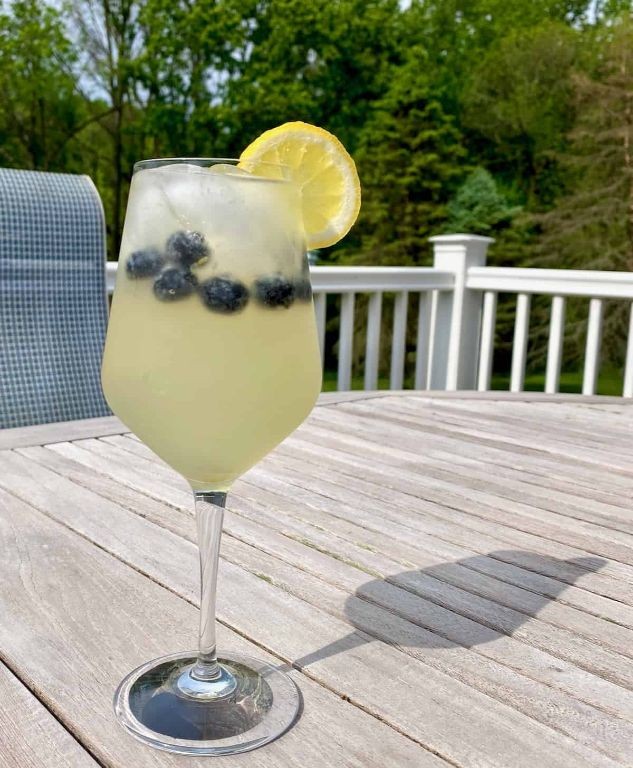
Finally, after discovering a massive elderberry bush in my backyard last fall, I’ve been experimenting with ways to use these tart little berries beyond just syrups. This elderberry lemonade has become my go-to summer thirst-quencher—it’s the perfect balance of sweet, tart, and refreshing that makes even the hottest afternoons bearable.
Ingredients
Elderberries – 1 cup
Water – 4 cups
Granulated sugar – ¾ cup
Fresh lemon juice – ½ cup
Ice cubes – 2 cups
Instructions
1. Combine 1 cup elderberries and 4 cups water in a medium saucepan.
2. Bring the mixture to a boil over high heat, which should take about 8-10 minutes.
3. Reduce heat to medium-low and simmer for 25 minutes until the berries have burst and released their deep purple color.
4. Strain the mixture through a fine-mesh sieve into a large pitcher, pressing gently on the berries to extract all the juice.
5. Stir in ¾ cup granulated sugar while the liquid is still warm to help it dissolve completely.
6. Add ½ cup fresh lemon juice and stir until fully incorporated.
7. Refrigerate the lemonade for at least 2 hours until thoroughly chilled.
8. Fill glasses with 2 cups ice cubes and pour the chilled elderberry lemonade over the ice.
Just poured over ice, this lemonade delivers a beautiful deep magenta color with a perfect sweet-tart balance that makes your taste buds dance. The elderberries add a subtle earthy complexity that pairs wonderfully with the bright lemon, creating a sophisticated twist on classic lemonade. I love serving it in mason jars with a sprig of fresh mint and thin lemon slices for an extra special touch.
Elderberry BBQ Sauce

You know that moment when you’re rummaging through your pantry and stumble upon that forgotten jar of elderberry jam from last fall? That’s exactly how this unique BBQ sauce was born—a happy accident that turned into my new favorite grilling companion.
Ingredients
Elderberry jam – 1 cup
Ketchup – ½ cup
Apple cider vinegar – ¼ cup
Brown sugar – 2 tbsp
Worcestershire sauce – 1 tbsp
Garlic powder – 1 tsp
Smoked paprika – 1 tsp
Black pepper – ½ tsp
Instructions
1. Combine elderberry jam, ketchup, apple cider vinegar, brown sugar, and Worcestershire sauce in a medium saucepan.
2. Whisk the mixture over medium heat until the brown sugar completely dissolves, which should take about 2-3 minutes.
3. Stir in garlic powder, smoked paprika, and black pepper until fully incorporated.
4. Reduce heat to low and simmer the sauce uncovered for 15 minutes, stirring occasionally to prevent sticking.
5. Remove the saucepan from heat and let the sauce cool to room temperature, about 20-25 minutes.
6. Transfer the cooled sauce to an airtight container and refrigerate for at least 2 hours before using.
This sauce develops this incredible glossy sheen that clings perfectly to ribs without dripping off. The elderberry gives it this subtle fruity sweetness that balances beautifully with the smoky paprika, making it fantastic not just for grilling but also as a dipping sauce for sweet potato fries or stirred into baked beans for an unexpected twist.
Elderberry Dark Chocolate Bark
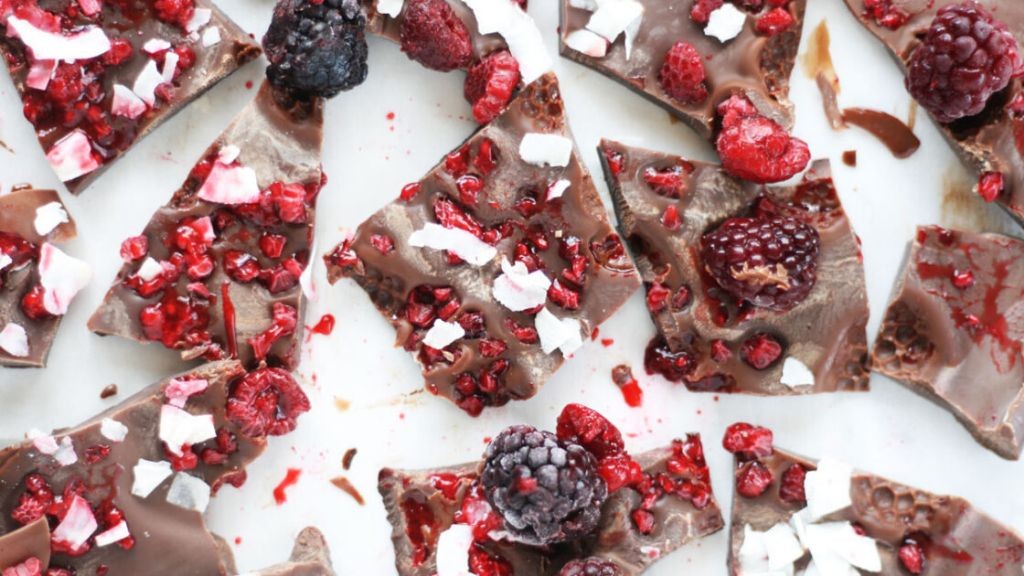
Dazzling my kitchen with this elderberry dark chocolate bark has become my favorite autumn ritual—there’s something magical about watching glossy chocolate transform into a beautiful, crackly treat that never fails to impress guests. During last week’s chilly evening, I found myself craving something both sophisticated and easy, leading me to create this recipe that perfectly balances rich chocolate with tart elderberries. Honestly, it’s become my go-to dessert for book club nights because it looks fancy but requires minimal effort—my kind of cooking!
Ingredients
Dark chocolate chips – 2 cups
Dried elderberries – ½ cup
Flaky sea salt – 1 tsp
Instructions
1. Line a standard baking sheet with parchment paper.
2. Pour 2 cups of dark chocolate chips into a microwave-safe bowl.
3. Microwave the chocolate chips on high power for 1 minute.
4. Stir the chocolate chips thoroughly with a spatula.
5. Microwave the chocolate chips for another 30 seconds.
6. Stir the chocolate until completely smooth and glossy. (Tip: If any unmelted chips remain, microwave in 15-second intervals, stirring after each, to avoid scorching.)
7. Pour the melted chocolate onto the prepared baking sheet.
8. Use an offset spatula to spread the chocolate into an even layer about ¼-inch thick.
9. Sprinkle ½ cup of dried elderberries evenly over the chocolate surface.
10. Sprinkle 1 tsp of flaky sea salt evenly over the elderberries. (Tip: Crush the salt between your fingers as you sprinkle for better distribution.)
11. Gently press the toppings into the chocolate with clean hands.
12. Transfer the baking sheet to the refrigerator.
13. Chill the bark for exactly 45 minutes until completely firm. (Tip: Don’t rush this step—proper chilling prevents the bark from cracking unevenly when broken.)
14. Remove the chilled bark from the refrigerator.
15. Break the bark into irregular pieces with your hands.
Really, the contrast between the crisp chocolate snap and the chewy elderberries makes each bite exciting, while the salt enhances the dark chocolate’s complexity. I love serving this bark alongside strong coffee for dessert or crumbling it over vanilla ice cream for an instant upgrade—it stores beautifully in an airtight container, though mine never lasts long enough to test that theory!
Elderberry Oatmeal Cookies

Just when I thought my morning oatmeal routine couldn’t get any cozier, I discovered the magic of baking it into cookies—and not just any cookies, but these elderberry-packed delights that have become my go-to for chilly November mornings. There’s something about folding those deep purple berries into the dough that feels like bottling up autumn itself, and the way my kitchen smells while they bake is pure comfort.
Ingredients
- Rolled oats – 2 cups
- Flour – 1 cup
- Butter – ½ cup
- Brown sugar – ¾ cup
- Egg – 1
- Dried elderberries – ½ cup
- Baking soda – 1 tsp
- Salt – ¼ tsp
Instructions
- Preheat your oven to 350°F and line a baking sheet with parchment paper.
- Beat the butter and brown sugar together in a large bowl for exactly 2 minutes until light and fluffy—this creaming step is crucial for that perfect cookie texture.
- Add the egg and mix until fully incorporated, scraping down the sides of the bowl to ensure even mixing.
- In a separate bowl, whisk together the flour, rolled oats, baking soda, and salt.
- Gradually add the dry ingredients to the wet mixture, mixing just until combined to avoid tough cookies.
- Fold in the dried elderberries gently to prevent them from bleeding too much color into the dough.
- Scoop tablespoon-sized portions of dough onto the prepared baking sheet, spacing them 2 inches apart.
- Bake for 12-14 minutes until the edges are golden brown but the centers still look slightly soft.
- Let the cookies cool on the baking sheet for 5 minutes before transferring to a wire rack—this resting time helps them set properly without becoming too crisp.
Out of the oven, these cookies strike the perfect balance between chewy and crisp, with the elderberries adding little bursts of tartness that cut through the sweetness beautifully. I love serving them slightly warm with a dollop of Greek yogurt for breakfast or crumbling them over vanilla ice cream for an easy dessert that always impresses.
Elderberry Mulled Wine
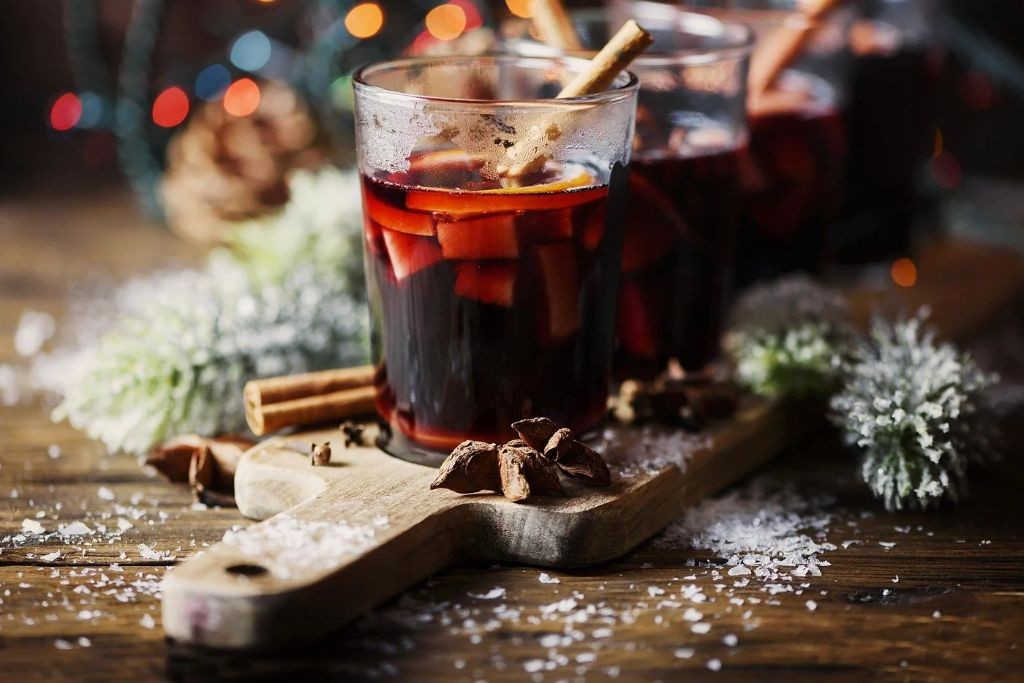
Nothing warms the soul quite like a steaming mug of mulled wine on a crisp autumn evening, and my elderberry version has become a seasonal staple in our household. I first stumbled upon this comforting concoction during a chilly camping trip when I needed to use up some foraged elderberries, and now it’s my go-to for cozy gatherings. There’s something magical about watching the deep purple hue develop as the spices meld together.
Ingredients
- Red wine – 1 bottle
- Elderberry syrup – ½ cup
- Orange – 1
- Cinnamon sticks – 2
- Whole cloves – 1 tsp
- Star anise – 2 pods
Instructions
- Pour the entire bottle of red wine into a large saucepan.
- Add ½ cup of elderberry syrup to the saucepan. Tip: Use a high-quality syrup for the best flavor depth.
- Slice the orange into ¼-inch thick rounds and add them to the saucepan.
- Add 2 cinnamon sticks, 1 teaspoon of whole cloves, and 2 star anise pods to the mixture.
- Heat the mixture over medium-low heat until it reaches 160°F, using a kitchen thermometer to monitor temperature. Tip: Never let it boil to preserve the alcohol content.
- Reduce heat to low and simmer for 25 minutes to allow flavors to fully infuse.
- Remove from heat and let stand for 5 minutes to settle. Tip: For clearer wine, strain through a fine mesh sieve before serving.
- Ladle the mulled wine into heatproof mugs, including one orange slice in each serving.
Keeping this aromatic brew warm in a slow cooker makes for effortless hosting during holiday parties. The final result boasts a velvety texture with deep berry notes that beautifully complement the warm spice undertones. I love garnishing each mug with an extra cinnamon stick for stirring and presentation—it makes everyone feel extra special on chilly evenings.
Elderberry and Ginger Kombucha
Every fall when the elderberries ripen in my backyard, I get that familiar itch to brew something special that captures the season’s transition. Yesterday’s brisk walk inspired this batch of Elderberry and Ginger Kombucha—a fizzy, immune-boosting drink that’s become my go-to for chilly mornings. It’s simpler than you’d think, and the deep purple hue alone is worth the wait.
Ingredients
Elderberries – ½ cup
Fresh ginger – 1 tbsp, grated
Kombucha SCOBY – 1
Granulated sugar – ½ cup
Filtered water – 4 cups
Black tea bags – 2
Instructions
1. Bring 4 cups of filtered water to 212°F in a medium saucepan.
2. Steep 2 black tea bags in the hot water for 7 minutes, then remove and discard them.
3. Stir in ½ cup of granulated sugar until fully dissolved.
4. Let the sweetened tea cool to 75°F, which usually takes about 45 minutes—test with a kitchen thermometer to avoid harming the SCOBY.
5. Pour the cooled tea into a clean ½-gallon glass jar.
6. Add 1 Kombucha SCOBY to the jar.
7. Cover the jar with a coffee filter or breathable cloth secured with a rubber band.
8. Ferment the kombucha at 68–72°F for 7 days, keeping it out of direct sunlight.
9. Strain ½ cup of elderberries and 1 tbsp of grated fresh ginger through a fine-mesh sieve into a separate bowl.
10. Combine the strained elderberry-ginger liquid with the fermented kombucha in swing-top bottles.
11. Seal the bottles and let them sit at room temperature for 3 days to build carbonation—burp the lids daily to prevent over-pressurization.
12. Refrigerate the bottles for at least 4 hours before serving to chill and slow fermentation. You’ll notice the flavor mellows and the fizz tightens up after chilling. Yes, this kombucha pours with a vibrant magenta color and a lively sparkle that tingles on the tongue. The ginger adds a warm kick that balances the tart elderberry, making it perfect poured over ice with a sprig of fresh mint or mixed into a morning smoothie for an extra zing.
Elderberry Popsicles
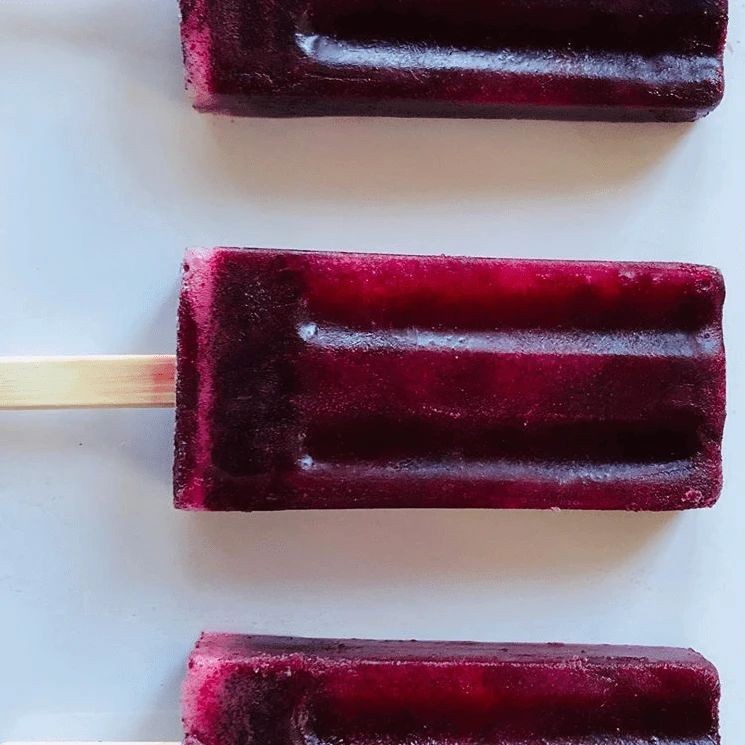
Just when I thought summer was officially over, my neighbor surprised me with a massive bag of fresh elderberries from her backyard—apparently they’re still thriving in this unseasonably warm November! Elderberry popsicles became my delicious solution to using them up before they spoiled.
Ingredients
Elderberries – 2 cups
Water – 1 cup
Honey – ¼ cup
Lemon juice – 2 tbsp
Instructions
1. Rinse 2 cups of elderberries thoroughly under cold running water to remove any debris.
2. Combine the rinsed elderberries and 1 cup of water in a medium saucepan.
3. Bring the mixture to a boil over medium-high heat, then reduce to a simmer.
4. Simmer for 15 minutes, stirring occasionally, until the berries have broken down and released their juices.
5. Strain the mixture through a fine-mesh sieve into a bowl, pressing firmly on the solids with the back of a spoon to extract all the liquid.
6. Discard the leftover pulp and seeds from the sieve.
7. Stir ¼ cup of honey and 2 tablespoons of lemon juice into the warm elderberry liquid until fully dissolved.
8. Let the mixture cool to room temperature for about 30 minutes.
9. Pour the cooled mixture into popsicle molds, leaving ¼ inch of space at the top for expansion.
10. Insert popsicle sticks and freeze for at least 6 hours, or until completely solid.
11. To unmold, run warm water over the outside of the molds for 10-15 seconds, then gently pull out the popsicles.
Extraordinarily vibrant and packed with that distinctive tart-sweet elderberry flavor, these popsicles have a smooth, icy texture that’s incredibly refreshing. I love serving them alongside a warm cup of tea for a delightful temperature contrast, or crushing them over Greek yogurt for a quick breakfast treat that feels surprisingly sophisticated.
Elderberry Glazed Chicken
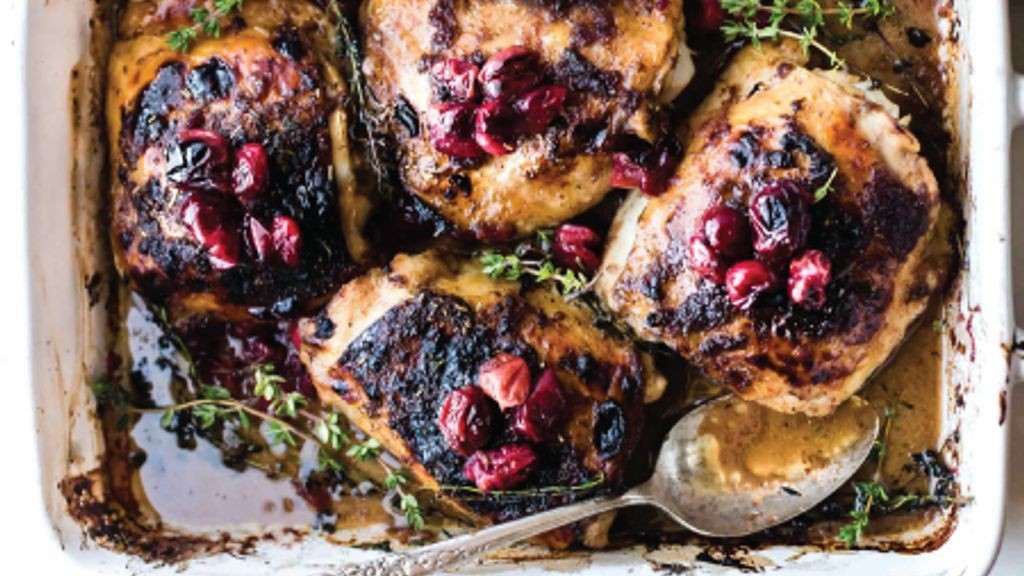
A few weeks ago, I discovered a jar of elderberry syrup in the back of my pantry that my aunt gifted me last holiday season, and I knew I had to create something special with it before it went to waste. After some experimentation, I landed on this sweet and savory elderberry glazed chicken that’s become a weeknight favorite in our house—it’s so simple, yet feels impressively gourmet. Honestly, I love how the glaze caramelizes into a sticky, glossy coating that makes the chicken look like it came straight from a fancy restaurant.
Ingredients
Chicken thighs – 1.5 lbs
Elderberry syrup – ½ cup
Soy sauce – 2 tbsp
Garlic – 2 cloves, minced
Olive oil – 1 tbsp
Salt – ½ tsp
Black pepper – ¼ tsp
Instructions
1. Preheat your oven to 375°F and line a baking sheet with parchment paper.
2. Pat the chicken thighs completely dry with paper towels to ensure crispy skin.
3. Rub the chicken thighs evenly with olive oil, salt, and black pepper on both sides.
4. Arrange the chicken thighs skin-side up on the prepared baking sheet.
5. Bake the chicken for 25 minutes at 375°F until the skin starts to turn golden.
6. While the chicken bakes, whisk together elderberry syrup, soy sauce, and minced garlic in a small bowl.
7. Brush half of the elderberry glaze evenly over the partially cooked chicken thighs.
8. Return the chicken to the oven and bake for another 15 minutes at 375°F.
9. Brush the remaining glaze over the chicken and bake for a final 10 minutes until the internal temperature reaches 165°F.
10. Let the chicken rest for 5 minutes before serving to allow the juices to redistribute.
Heavenly is the word that comes to mind when you bite into this chicken—the skin is crackly and sweet from the glaze, while the meat stays incredibly juicy and tender. I love serving it over a bed of fluffy jasmine rice to soak up every last drop of that deep purple elderberry sauce, and sometimes I’ll even toss in some roasted Brussels sprouts for a colorful, complete meal that always impresses guests.
Elderberry Salad Dressing
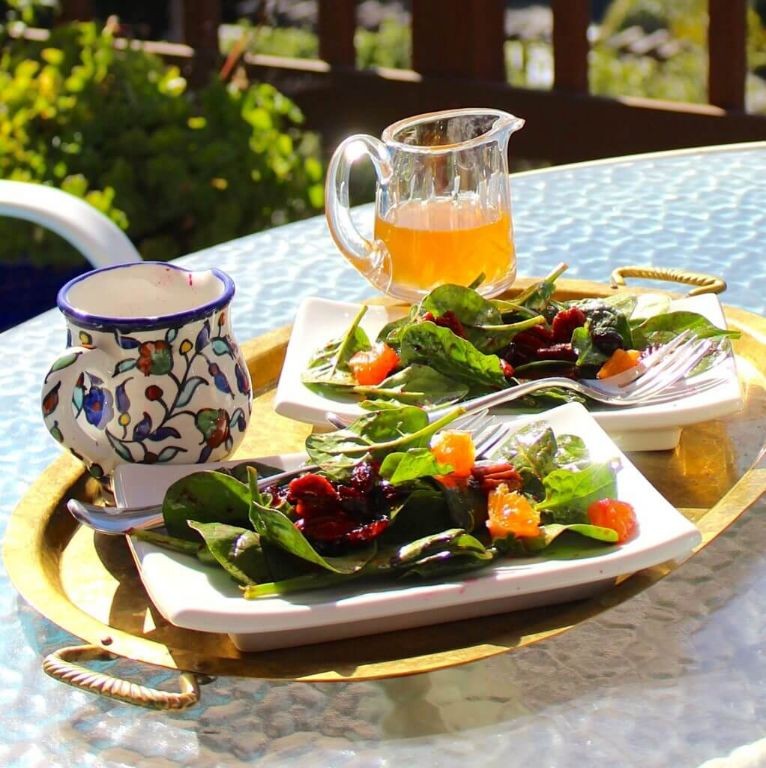
Finally, after experimenting with countless salad dressings, I stumbled upon this elderberry version that’s become my absolute favorite—it all started when I found a forgotten jar of elderberry syrup in my pantry during a frantic pre-dinner search. This sweet-tart dressing has completely transformed my basic greens into something I actually crave, and it’s so simple I can whip it up while chatting with my kids about their school day.
Ingredients
Elderberry syrup – ¼ cup
Extra virgin olive oil – ½ cup
Apple cider vinegar – 2 tbsp
Dijon mustard – 1 tsp
Garlic – 1 clove
Salt – ¼ tsp
Instructions
1. Peel 1 clove of garlic and mince it finely using a sharp knife. 2. Combine ¼ cup elderberry syrup, ½ cup extra virgin olive oil, 2 tbsp apple cider vinegar, 1 tsp Dijon mustard, the minced garlic, and ¼ tsp salt in a medium-sized mixing bowl. 3. Whisk the mixture vigorously for 45-60 seconds until the dressing appears fully emulsified with no visible separation between oil and other ingredients. 4. Taste the dressing and adjust seasoning if needed—I find the elderberry sweetness usually balances perfectly with the vinegar’s acidity. 5. Transfer the dressing to a glass jar or bottle with a tight-fitting lid. 6. Refrigerate the dressing for at least 30 minutes before serving to allow the flavors to meld together properly. The deep purple hue of this dressing makes even the simplest green salads feel elegant, with a flavor that’s both fruity and subtly savory from the garlic. I love drizzling it over spinach with toasted walnuts and goat cheese, or using it as a marinade for grilled chicken—the elderberry notes caramelize beautifully on the grill.
Elderberry and Pear Tart
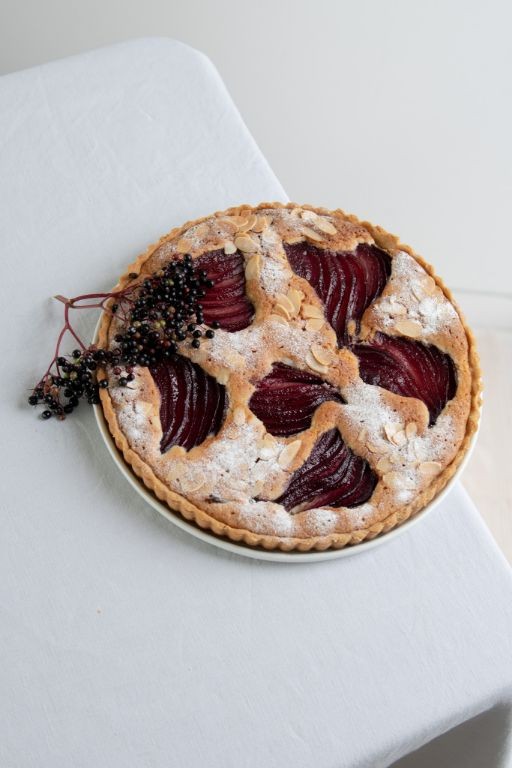
Remember that time I stumbled upon wild elderberries during my autumn hike last year? I’ve been dreaming about incorporating them into a dessert ever since, and this elegant tart with sweet pears is the perfect vehicle to showcase their unique floral-tart flavor that always reminds me of crisp fall afternoons.
Ingredients
Pie crust – 1
Elderberries – 1 cup
Pears – 2 medium
Sugar – ½ cup
Cornstarch – 2 tbsp
Butter – 2 tbsp
Egg – 1
Instructions
1. Preheat your oven to 375°F. 2. Roll out the pie crust and press it into a 9-inch tart pan. 3. Core and thinly slice the pears into ¼-inch thick pieces. 4. Arrange the pear slices in a circular pattern over the crust. 5. Sprinkle the elderberries evenly over the pears. 6. Whisk together the sugar and cornstarch in a small bowl. 7. Sprinkle the sugar-cornstarch mixture over the fruit. 8. Dot the top with small pieces of butter. 9. Beat the egg with 1 tablespoon of water to create an egg wash. 10. Brush the egg wash along the exposed crust edges. 11. Bake at 375°F for 35-40 minutes until the crust is golden brown and the filling is bubbling. 12. Let the tart cool completely on a wire rack for at least 2 hours before slicing. Every time I make this, the contrast between the tender, juicy pears and the pop of tart elderberries creates such a delightful texture experience. Enjoy it slightly warm with a scoop of vanilla ice cream melting into the fruity filling, or serve it at room temperature with your afternoon tea for a truly special treat.
Elderberry Energy Balls
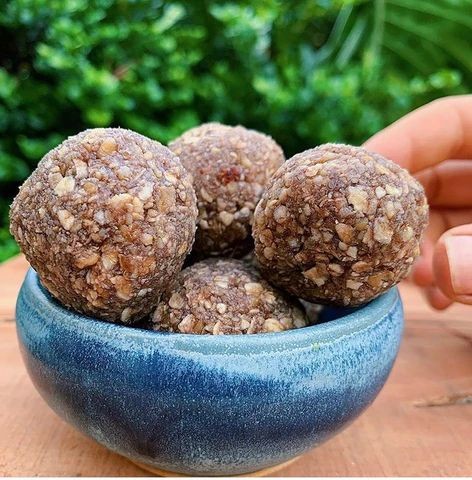
Recently, I found myself staring at the clock at 3 PM, feeling that familiar afternoon slump hit hard. That’s when I remembered the jar of elderberry syrup in my pantry and decided to whip up these energy balls—they’ve become my go-to solution for powering through those long work-from-home days without reaching for another cup of coffee.
Ingredients
– Rolled oats – 1 cup
– Almond butter – ½ cup
– Honey – ¼ cup
– Elderberry syrup – 2 tbsp
– Shredded coconut – ⅓ cup
Instructions
1. Combine 1 cup of rolled oats, ½ cup of almond butter, ¼ cup of honey, 2 tablespoons of elderberry syrup, and ⅓ cup of shredded coconut in a medium mixing bowl.
2. Stir the mixture continuously for 2-3 minutes until all ingredients are fully incorporated and a thick, sticky dough forms. Tip: If the mixture feels too dry, add another tablespoon of honey to help it bind together.
3. Use a 1-tablespoon cookie scoop to portion the dough into uniform balls.
4. Roll each portion between your palms for 15-20 seconds until smooth and round. Tip: Lightly dampen your hands with water to prevent sticking while rolling.
5. Arrange the energy balls in a single layer on a parchment-lined baking sheet.
6. Refrigerate the energy balls for exactly 45 minutes to firm up completely. Tip: Don’t skip the chilling time—this ensures they hold their shape and develop the perfect chewy texture.
7. Transfer the chilled energy balls to an airtight container for storage.
What I love most about these little powerhouses is their perfect chewy texture with just the right amount of sweetness from the honey and that subtle tartness from the elderberry. They’re fantastic straight from the fridge, but I also love crumbling one over my morning yogurt or packing them in my kid’s lunchbox for a healthy treat.
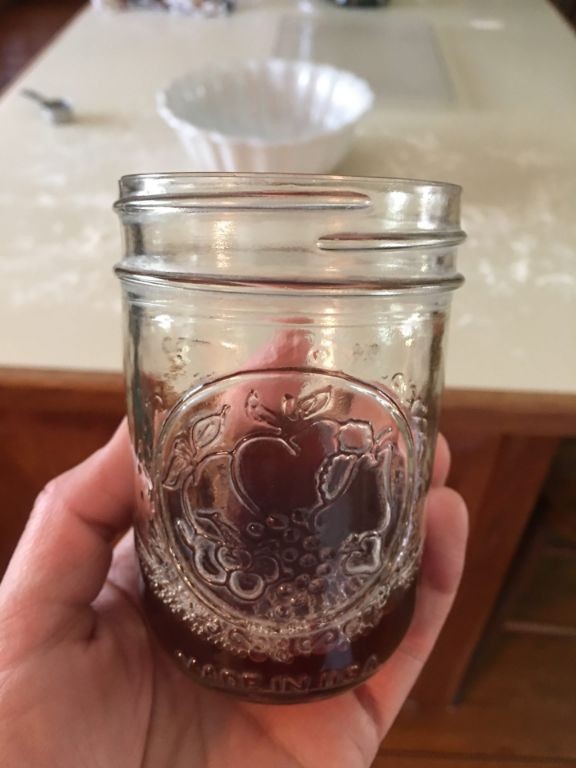
Elderberry Sourdough Bread
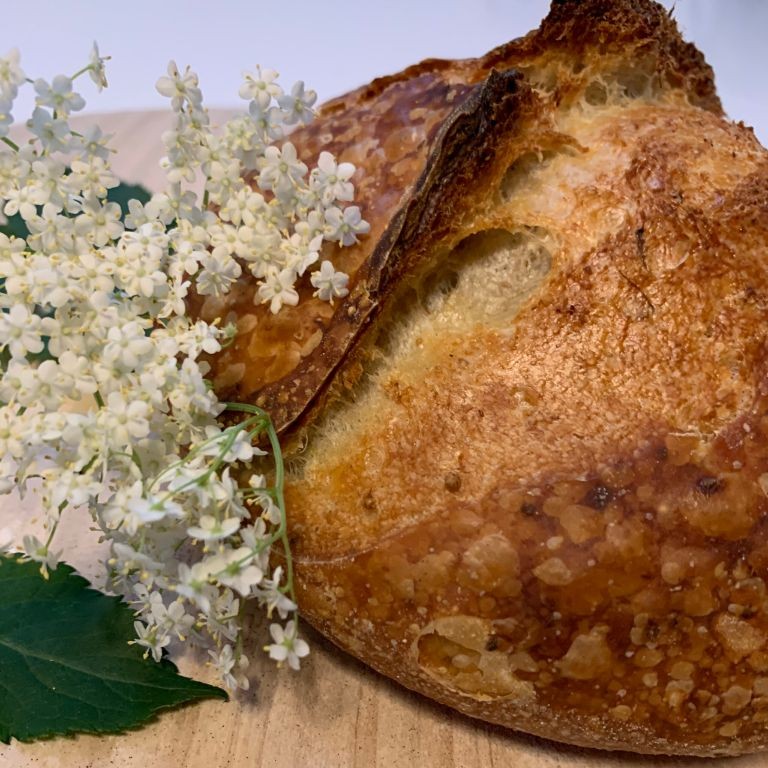
Perfect for those crisp autumn mornings, I first discovered elderberry sourdough when my neighbor gifted me a jar of homemade elderberry syrup last fall. There’s something magical about how the tart berries mellow during baking, creating this beautiful purple swirl throughout the crusty loaf that always makes me feel like I’m baking something truly special.
Ingredients
- Sourdough starter – 1 cup
- Bread flour – 3 cups
- Water – 1¼ cups
- Elderberry syrup – ½ cup
- Salt – 1½ tsp
Instructions
- Combine 1 cup active sourdough starter, 3 cups bread flour, and 1¼ cups warm water (about 85°F) in a large mixing bowl.
- Mix until no dry flour remains, then cover with a damp cloth and let rest for 30 minutes (this autolyse helps develop gluten).
- Add 1½ tsp salt and ½ cup elderberry syrup, then knead for 8-10 minutes until the dough becomes smooth and elastic.
- Place dough in a lightly oiled bowl, cover, and let rise at room temperature (70-75°F) for 4-6 hours until doubled in size.
- Gently deflate the dough and shape into a tight round, being careful not to overwork it and deflate all the bubbles.
- Place shaped dough seam-side up in a floured proofing basket, cover, and refrigerate for 12-16 hours for better flavor development.
- Preheat oven to 475°F with a Dutch oven inside for at least 45 minutes to ensure proper heat retention.
- Score the top of the dough with a sharp razor blade about ¼ inch deep to control expansion during baking.
- Bake covered in the preheated Dutch oven for 25 minutes, then uncover and bake for another 20-25 minutes until deeply golden brown.
- Transfer bread to a wire rack and let cool completely for at least 2 hours before slicing (this prevents a gummy texture).
Amazingly moist with a subtle fruity tang, this bread develops beautiful purple streaks throughout its open crumb. I love toasting thick slices and serving them with creamy goat cheese for breakfast, or using it for French toast where the elderberry flavor really shines through the eggy custard.
Summary
Clearly, elderberries offer incredible immune-boosting benefits in so many delicious forms! We hope this collection inspires you to try these recipes in your own kitchen. Don’t forget to leave a comment sharing your favorite elderberry creation and pin this article to your Pinterest boards to help other home cooks discover these wonderful recipes!