Mmm, can you smell that? There’s nothing quite like gathering around the table with loved ones, sharing hearty, comforting dishes that warm both bellies and hearts. Whether it’s a holiday feast or a simple Sunday supper, these cozy recipes are perfect for creating lasting memories. Ready to find your next family favorite? Let’s dive into these delicious ideas!
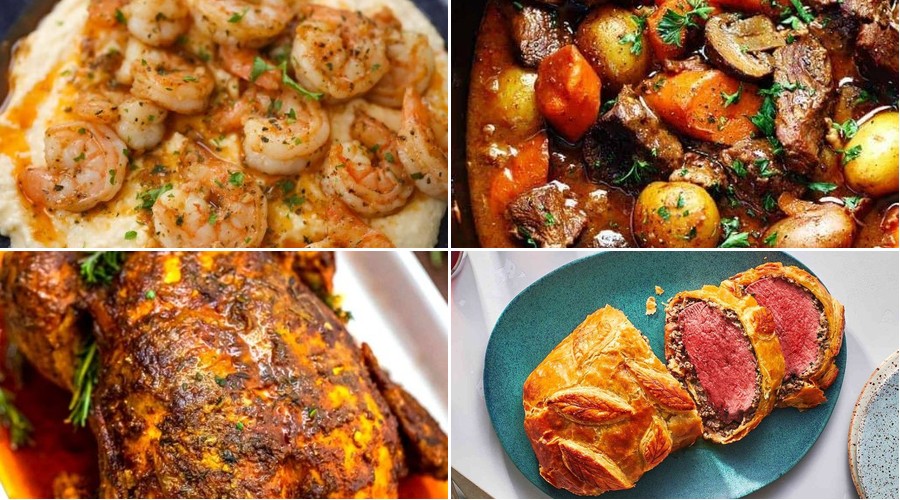
Garlic Butter Herb Roasted Chicken
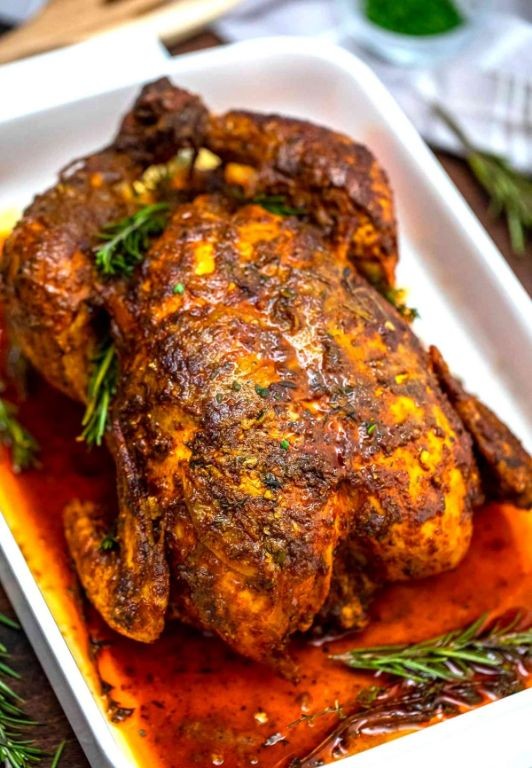
Hallelujah, chicken lovers! We’ve cracked the code on achieving that impossibly juicy, herb-infused, golden-brown bird that’ll have your family doing a happy dance around the dinner table. This Garlic Butter Herb Roasted Chicken is the culinary equivalent of a warm hug—only with more butter and significantly better aromatherapy.
Ingredients
– 1 whole (3.5-4 lb) air-chilled chicken, patted dry
– 4 tbsp European-style unsalted butter, softened
– 6 large garlic cloves, finely minced
– 2 tbsp fresh rosemary leaves, finely chopped
– 2 tbsp fresh thyme leaves, stripped from stems
– 1 lemon, zested and halved
– 1.5 tsp fine sea salt
– 1 tsp freshly cracked black pepper
– 1 tbsp extra-virgin olive oil
Instructions
1. Preheat your oven to 425°F (218°C) and position a rack in the lower third of the oven.
2. In a small bowl, combine the softened European-style unsalted butter, finely minced garlic cloves, finely chopped fresh rosemary, stripped fresh thyme leaves, and lemon zest, mixing until fully incorporated.
3. Carefully loosen the skin over the chicken breast and thighs by gently sliding your fingers between the skin and meat, creating pockets.
4. Spread half of the garlic-herb butter mixture evenly underneath the loosened skin, covering both breast and thigh areas.
5. Rub the remaining garlic-herb butter mixture all over the exterior of the air-chilled chicken.
6. Season the entire surface of the chicken, including the cavity, with fine sea salt and freshly cracked black pepper.
7. Truss the chicken legs together with kitchen twine to promote even cooking.
8. Place the halved lemon inside the chicken cavity.
9. Drizzle the extra-virgin olive oil over a roasting pan, then place the prepared chicken breast-side up in the pan.
10. Roast at 425°F for 15 minutes to initiate browning.
11. Reduce oven temperature to 375°F (190°C) and continue roasting for approximately 60-75 minutes, or until an instant-read thermometer inserted into the thickest part of the thigh registers 165°F (74°C).
12. Transfer the chicken to a cutting board and let rest for 15 minutes before carving to allow juices to redistribute.
Seriously, that first bite reveals crackling golden skin giving way to impossibly moist meat infused with aromatic herbs and pungent garlic. The lemon’s bright acidity cuts through the rich butter beautifully. Serve this showstopper carved over creamy polenta to catch every last drop of those glorious pan juices, or shred the leftovers for next-level chicken salad sandwiches that’ll make your lunchbox the envy of the breakroom.
Slow Cooker Beef Bourguignon
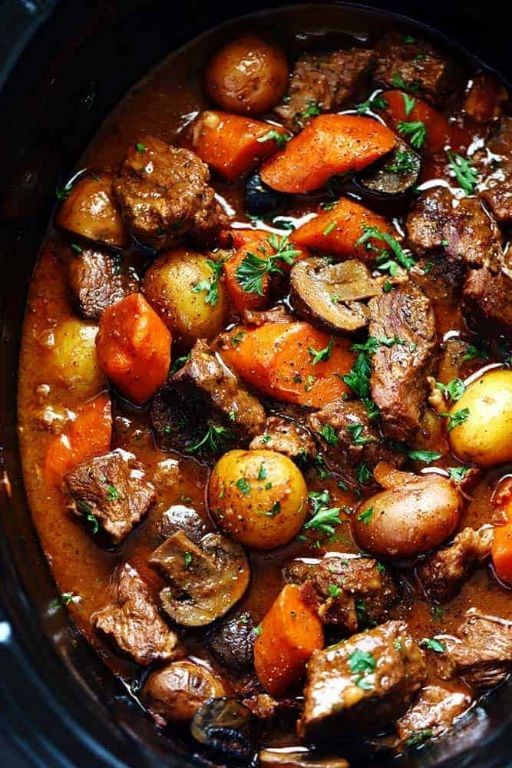
Ladies and gentlemen, prepare to abandon your weekend plans because this slow cooker beef bourguignon is about to become your new culinary obsession—it’s basically a cozy French hug in a bowl, minus the beret. Let’s dive into this effortlessly elegant dish that transforms humble ingredients into a rich, soul-warming masterpiece with minimal effort and maximum flavor payoff.
Ingredients
- 2 lbs beef chuck roast, cut into 2-inch cubes
- 4 slices thick-cut bacon, diced
- 1 large yellow onion, finely diced
- 2 carrots, peeled and sliced into ¼-inch rounds
- 8 oz cremini mushrooms, quartered
- 3 cloves garlic, minced
- 2 cups full-bodied red wine, such as Pinot Noir
- 1 cup beef stock
- 2 tbsp tomato paste
- 1 tbsp all-purpose flour
- 2 tbsp unsalted butter
- 1 bouquet garni (2 sprigs fresh thyme, 1 bay leaf, 4 parsley stems tied with kitchen twine)
- 1 tsp kosher salt
- ½ tsp freshly cracked black pepper
- 2 tbsp chopped fresh parsley, for garnish
Instructions
- Pat the beef chuck roast cubes completely dry with paper towels and season evenly with kosher salt and freshly cracked black pepper.
- Heat a large skillet over medium-high heat and add the diced thick-cut bacon, rendering until crisp and golden, approximately 6–8 minutes.
- Transfer the crisp bacon to the slow cooker using a slotted spoon, reserving the rendered fat in the skillet.
- Sear the seasoned beef cubes in the hot bacon fat in a single layer, working in batches to avoid overcrowding, until deeply browned on all sides, about 3–4 minutes per side.
- Transfer the seared beef to the slow cooker, arranging it over the bacon.
- Add the unsalted butter to the same skillet and sauté the finely diced yellow onion until translucent and lightly caramelized, about 5–7 minutes.
- Stir in the minced garlic and cook for 1 minute until fragrant, being careful not to burn it.
- Sprinkle the all-purpose flour over the onion-garlic mixture and cook, stirring constantly, for 1 minute to form a roux.
- Whisk in the full-bodied red wine, scraping up any browned bits from the skillet, followed by the beef stock and tomato paste, bringing the liquid to a simmer.
- Pour the wine mixture over the beef and bacon in the slow cooker, ensuring all ingredients are submerged.
- Add the peeled, sliced carrots, quartered cremini mushrooms, and the bouquet garni to the slow cooker, gently stirring to combine.
- Cover and cook on low heat for 8 hours, or until the beef is fork-tender and the sauce has thickened.
- Discard the bouquet garni and skim any excess fat from the surface with a spoon.
- Ladle the beef bourguignon into shallow bowls and garnish with the chopped fresh parsley.
Know that each spoonful delivers meltingly tender beef enveloped in a velvety, wine-infused sauce with earthy mushrooms and sweet carrots. The slow-cooked magic creates layers of umami depth that pair beautifully with crusty baguette for soaking up every last drop or spooned over creamy mashed potatoes for ultimate comfort.
Honey Glazed Ham with Pineapple
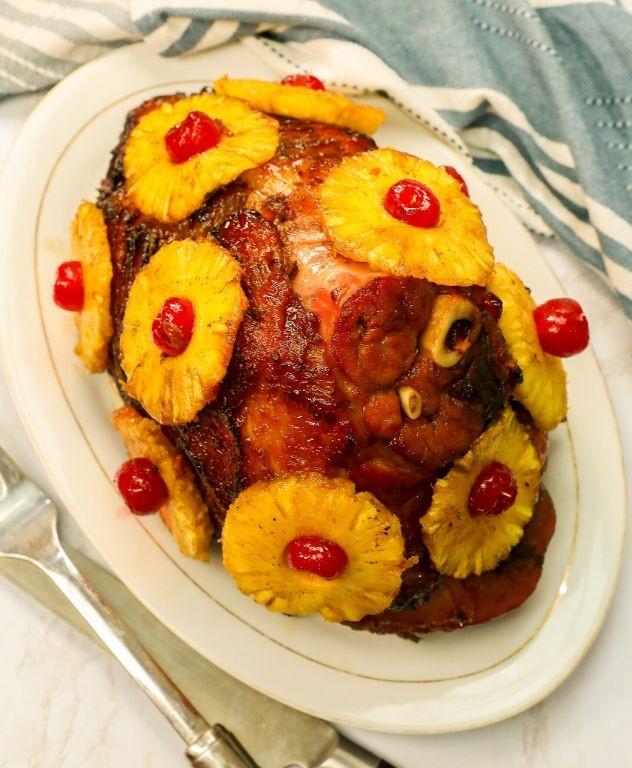
Virtually every holiday table needs that one showstopper centerpiece that makes guests forget they’re wearing elastic-waist pants—and this Honey Glazed Ham with Pineapple is here to deliver. Imagine a succulent, slow-roasted ham lacquered with a sticky-sweet glaze, then crowned with caramelized pineapple rings that practically wink at you from the platter. It’s the kind of dish that turns polite nibblers into unabashed plate-scrapers, and yes, it’s easier to make than resisting a second helping.
Ingredients
- 1 (8-10 lb) fully cooked, bone-in smoked ham
- 1 cup raw wildflower honey
- 1/4 cup Dijon mustard
- 2 tbsp apple cider vinegar
- 1 tsp freshly grated ginger root
- 1/4 tsp freshly grated nutmeg
- 1/4 tsp cayenne pepper
- 1 (20 oz) can pineapple rings in 100% juice, drained (reserve 1/4 cup juice)
- Whole cloves for studding
Instructions
- Preheat your oven to 325°F and position a rack in the lower third of the oven.
- Score the ham fat in a 1-inch diamond pattern, about 1/4-inch deep, using a sharp chef’s knife.
- Stud the center of each diamond with a whole clove, pressing gently to secure.
- Place the ham, cut side down, in a roasting pan fitted with a V-rack.
- Insert an oven-safe probe thermometer into the thickest part of the ham, avoiding the bone.
- Roast the ham, uncovered, for 1 hour and 15 minutes, or until the internal temperature reaches 110°F.
- While the ham roasts, combine the honey, Dijon mustard, apple cider vinegar, grated ginger, nutmeg, cayenne, and reserved pineapple juice in a small saucepan.
- Simmer the glaze over medium heat for 5-7 minutes, stirring constantly, until it thickens slightly and coats the back of a spoon.
- Brush one-third of the warm glaze evenly over the partially roasted ham.
- Arrange the pineapple rings over the ham surface, securing with toothpicks if needed.
- Continue roasting for another 30-40 minutes, brushing with remaining glaze every 10 minutes, until the internal temperature reaches 140°F and the pineapple edges are caramelized.
- Transfer the ham to a carving board and let it rest for 20 minutes before slicing against the grain.
Zesty, sticky, and unapologetically festive, this ham emerges with a crackly-sweet crust giving way to juicy, pink slices beneath. The pineapple rings soften into jammy, caramelized discs that cut the richness with a tropical tang. Serve it warm alongside sharp cheddar-scallion biscuits or chop leftovers for next-day Cubano sandwiches—because glory shouldn’t end with the first meal.
Herb-Crusted Rack of Lamb
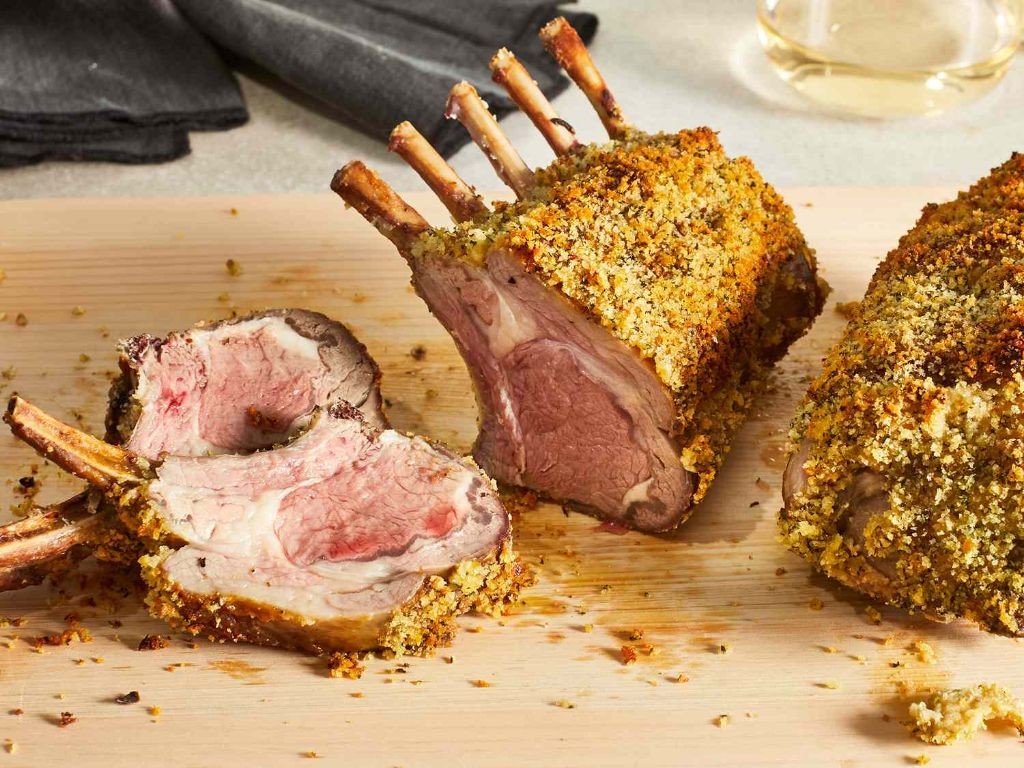
Venture forth, brave home chefs, into the glorious realm of herb-crusted rack of lamb—a dish that turns your Tuesday into a triumph and makes your oven feel like a five-star kitchen. This isn’t just dinner; it’s a flavor-packed event where a humble rack of lamb gets a crunchy, aromatic coat and emerges as the undisputed star of the table.
Ingredients
- 1 (1.5-pound) frenched rack of lamb, trimmed of excess fat
- 2 tablespoons extra-virgin olive oil
- 3 cloves garlic, finely minced
- 1 tablespoon Dijon mustard
- 1/2 cup panko breadcrumbs
- 1/4 cup fresh parsley, finely chopped
- 2 tablespoons fresh rosemary, finely chopped
- 1 tablespoon fresh thyme leaves
- 1/2 teaspoon fine sea salt
- 1/4 teaspoon freshly cracked black pepper
Instructions
- Preheat your oven to 400°F and position a rack in the center.
- Pat the frenched rack of lamb completely dry with paper towels.
- Rub the entire surface of the lamb with extra-virgin olive oil.
- Season the lamb evenly on all sides with fine sea salt and freshly cracked black pepper.
- Heat a large oven-safe skillet over medium-high heat for 2 minutes.
- Sear the lamb, fat-side down, for 3 minutes until a deep golden-brown crust forms.
- Flip the rack and sear the bone side for 2 minutes.
- Transfer the lamb to a plate and reduce the stovetop heat to low.
- Brush the fat-side of the lamb evenly with Dijon mustard.
- Combine panko breadcrumbs, finely minced garlic, finely chopped fresh parsley, finely chopped fresh rosemary, and fresh thyme leaves in a small bowl.
- Press the herb-breadcrumb mixture firmly onto the mustard-coated side of the lamb.
- Return the lamb to the skillet, crust-side up.
- Roast in the preheated 400°F oven for 15 minutes for medium-rare, or until an instant-read thermometer inserted into the thickest part reads 125°F.
- Remove the skillet from the oven and transfer the lamb to a cutting board.
- Let the lamb rest for 10 minutes before slicing between the bones into individual chops.
Nothing beats the contrast of that crisp, garlicky herb crust against the juicy, pink-perfect lamb beneath. The aromatic rosemary and thyme infuse every bite, while the panko adds a delightful crunch that’s downright addictive. Serve these elegant chops over creamy polenta or alongside roasted root vegetables for a meal that’s as impressive as it is irresistibly delicious.
Classic Beef Wellington
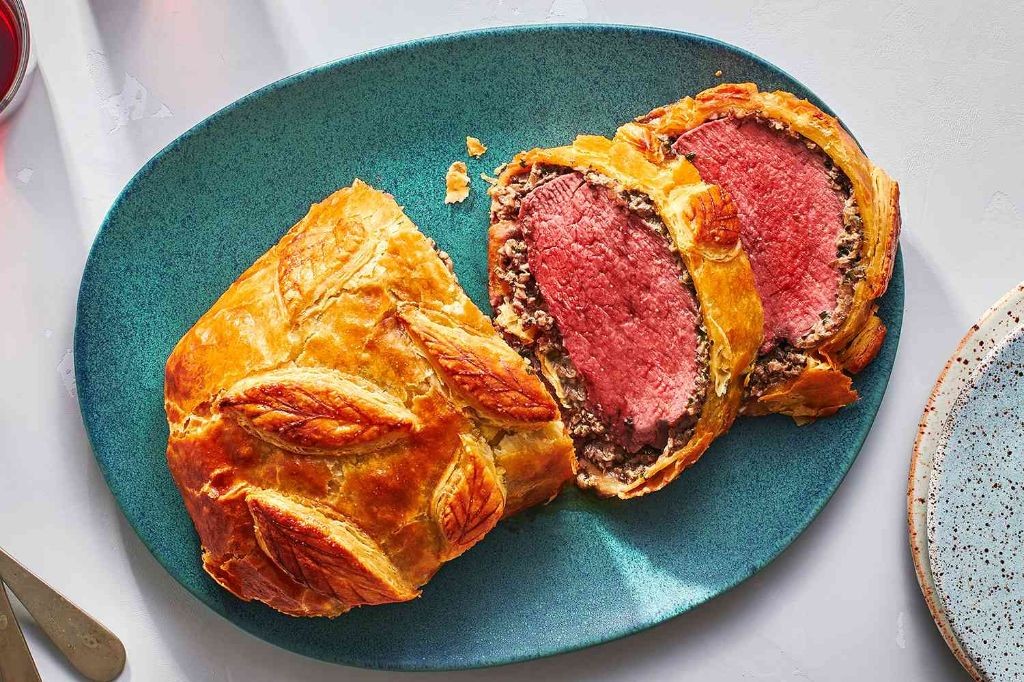
Whew, you’ve decided to tackle the Mount Everest of dinner parties—a dish that separates the casual cooks from the culinary daredevils. This is the legendary, buttery, beefy masterpiece that will have your guests questioning if you secretly trained under Gordon Ramsay.
Ingredients
- 1 (2-pound) center-cut beef tenderloin, trimmed
- 2 tablespoons extra-virgin olive oil
- Kosher salt and freshly cracked black pepper
- 2 tablespoons Dijon mustard
- 10 ounces cremini mushrooms, finely chopped
- 2 tablespoons unsalted butter
- 1 shallot, minced
- 2 tablespoons dry sherry
- 6 slices prosciutto
- 14 ounces puff pastry, thawed
- 1 large pasture-raised egg, lightly beaten
- Flaky sea salt
Instructions
- Pat the beef tenderloin completely dry with paper towels.
- Rub the entire surface of the beef with olive oil.
- Season all sides generously with kosher salt and black pepper.
- Heat a large cast-iron skillet over high heat until smoking hot, about 3 minutes.
- Sear the beef for 2 minutes per side until a deep brown crust forms.
- Transfer the beef to a wire rack and let it cool completely to room temperature, about 30 minutes.
- Brush the cooled beef evenly with Dijon mustard. Tip: Cooling prevents the mustard from cooking off and ensures maximum flavor adhesion.
- Pulse mushrooms in a food processor until they form a fine paste, known as a duxelles.
- Cook the duxelles in butter with minced shallot over medium heat for 10 minutes, stirring frequently, until all moisture evaporates.
- Deglaze the pan with dry sherry and cook for 2 more minutes until the liquid evaporates.
- Spread the mushroom duxelles mixture onto a layer of plastic wrap into a rectangle slightly larger than your beef.
- Arrange the prosciutto slices in a single layer over the duxelles, slightly overlapping.
- Place the mustard-brushed beef in the center of the prosciutto layer.
- Use the plastic wrap to tightly roll the prosciutto and duxelles around the beef, twisting the ends to form a tight cylinder.
- Refrigerate the wrapped beef for 20 minutes to set the shape. Tip: This chilling step is crucial for preventing the pastry from becoming soggy during baking.
- Roll the puff pastry on a floured surface to ¼-inch thickness.
- Unwrap the chilled beef bundle and place it in the center of the pastry.
- Brush the edges of the pastry with the beaten egg.
- Wrap the pastry around the beef, sealing all seams completely.
- Trim any excess pastry and use the scraps to create decorative lattice or leaf patterns if desired.
- Brush the entire pastry surface with the remaining beaten egg.
- Score the top of the pastry with a sharp knife in a diagonal pattern, being careful not to cut through to the filling.
- Sprinkle the top with flaky sea salt.
- Refriger the assembled Wellington for 30 minutes to ensure the pastry bakes up flaky. Tip: This final chill prevents the butter in the pastry from melting too quickly, resulting in superior layers.
- Preheat your oven to 425°F.
- Bake the Wellington on a parchment-lined baking sheet for 35-40 minutes until the pastry is golden brown and puffed.
- Insert an instant-read thermometer into the center of the beef; remove from oven when it registers 125°F for medium-rare.
- Let the Wellington rest on the baking sheet for 15 minutes before slicing.
Key to this dish’s magic is that dramatic contrast between the shatteringly crisp, golden pastry and the succulent, pink-centered beef. Each slice reveals a beautiful spiral of savory mushrooms and salty prosciutto hugging the perfectly cooked tenderloin. Consider serving thick slices atop a pool of red wine reduction with roasted root vegetables for a presentation that’s genuinely restaurant-worthy.
Baked Mac and Cheese with Crispy Topping

Mmm, let’s be real—the only thing standing between you and true happiness is a bubbling dish of mac and cheese crowned with a shatteringly crisp top. This isn’t just comfort food; it’s a crunchy, cheesy hug for your soul, and we’re about to make it ridiculously easy.
Ingredients
- 8 ounces of dried cavatappi pasta
- 4 tablespoons of unsalted European-style butter
- 1/4 cup of all-purpose flour
- 3 cups of whole milk, warmed to 110°F
- 1 teaspoon of Dijon mustard
- 1/4 teaspoon of freshly grated nutmeg
- 8 ounces of sharp white cheddar cheese, freshly grated
- 4 ounces of Gruyère cheese, freshly grated
- 1 cup of panko breadcrumbs
- 2 tablespoons of clarified butter, melted
- 2 tablespoons of freshly chopped chives
Instructions
- Preheat your oven to 375°F and lightly butter a 2-quart baking dish.
- Bring a large pot of heavily salted water to a rolling boil over high heat.
- Add the dried cavatappi pasta to the boiling water and cook for 7 minutes, until just al dente.
- Drain the pasta immediately in a colander, but do not rinse it. (Tip: The starchy surface helps the cheese sauce cling beautifully.)
- Melt the 4 tablespoons of unsalted European-style butter in a heavy-bottomed saucepan over medium heat.
- Whisk in the 1/4 cup of all-purpose flour and cook for exactly 90 seconds, stirring constantly, to form a pale golden roux.
- Gradually pour in the 3 cups of warmed whole milk, whisking continuously to prevent lumps.
- Bring the sauce to a gentle simmer and cook for 4-5 minutes, until it thickens enough to coat the back of a spoon.
- Remove the saucepan from the heat and whisk in the 1 teaspoon of Dijon mustard and 1/4 teaspoon of freshly grated nutmeg.
- Stir in the 8 ounces of grated sharp white cheddar and 4 ounces of grated Gruyère until fully melted and smooth.
- Fold the drained cavatappi pasta into the cheese sauce until evenly coated.
- Transfer the macaroni mixture to the prepared baking dish and spread it into an even layer.
- In a small bowl, combine the 1 cup of panko breadcrumbs, 2 tablespoons of melted clarified butter, and 2 tablespoons of freshly chopped chives. (Tip: Clarified butter prevents sogginess, giving you an ultra-crispy topping.)
- Sprinkle the panko mixture evenly over the macaroni.
- Bake for 25-30 minutes, until the topping is deep golden brown and the edges are bubbly. (Tip: For extra crunch, broil for the final 60-90 seconds, watching closely to avoid burning.)
Velvety, rich cheese sauce clings to every curve of the cavatappi, while that golden panko crust delivers a satisfying crunch with each bite. Serve it straight from the oven alongside a bright, acidic salad to cut through the decadence, or be a hero and top it with crispy bacon bits for a next-level experience.
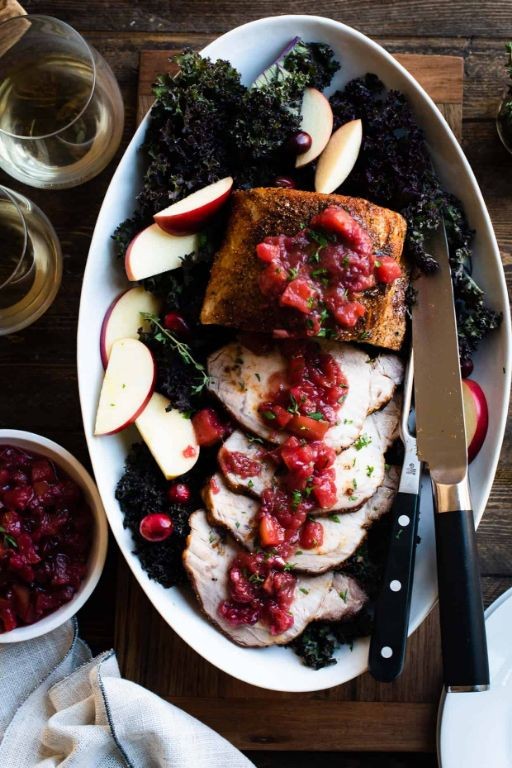
Roasted Turkey with Cranberry Sauce

Darlings, gather ’round because we’re about to transform that intimidating bird into the star of your table with more confidence than a turkey doing the cha-cha on Thanksgiving morning! This roasted beauty with its tangy cranberry sidekick will have your guests plotting leftovers heists before you even carve.
Ingredients
– 1 whole turkey (12-14 lbs), patted dry
– ½ cup clarified butter, melted
– 2 tbsp kosher salt
– 1 tbsp freshly cracked black pepper
– 2 tsp dried thyme
– 1 large yellow onion, roughly chopped
– 3 celery stalks, roughly chopped
– 2 carrots, peeled and roughly chopped
– 4 garlic cloves, smashed
– 2 cups turkey or chicken stock
– 12 oz fresh cranberries
– 1 cup granulated sugar
– ½ cup freshly squeezed orange juice
– 1 tsp orange zest
– ¼ tsp ground cinnamon
Instructions
1. Preheat your oven to 325°F and position the rack in the lower third of the oven.
2. Pat the turkey completely dry inside and out with paper towels—this ensures crispy skin, not steamed sadness.
3. Rub the entire turkey surface with melted clarified butter, making sure to get under the skin where possible.
4. Combine kosher salt, black pepper, and dried thyme in a small bowl, then season the turkey generously inside and out.
5. Stuff the cavity with chopped yellow onion, celery stalks, carrots, and smashed garlic cloves.
6. Truss the turkey legs together with kitchen twine to promote even cooking.
7. Place the turkey breast-side up on a rack in a roasting pan and pour turkey stock into the bottom of the pan.
8. Roast for 3-3½ hours, basting every 45 minutes with pan juices until the internal temperature reaches 165°F in the thickest part of the thigh.
9. While the turkey roasts, combine fresh cranberries, granulated sugar, orange juice, orange zest, and ground cinnamon in a saucepan.
10. Cook the cranberry mixture over medium heat for 12-15 minutes, stirring frequently until berries burst and sauce thickens.
11. Remove the turkey from the oven and let it rest for 30 minutes before carving—this allows juices to redistribute for maximum moisture.
12. Carve the turkey against the grain for tender slices and serve with the cranberry sauce.
Oh, the glorious contrast! The turkey emerges with crackling golden skin giving way to impossibly juicy meat, while the cranberry sauce provides that perfect sweet-tart punch that cuts through the richness. Try serving slices over creamy polenta with extra cranberry sauce drizzled dramatically across the plate—it’s a flavor symphony that’ll have everyone requesting encores.
Braised Short Ribs in Red Wine Sauce
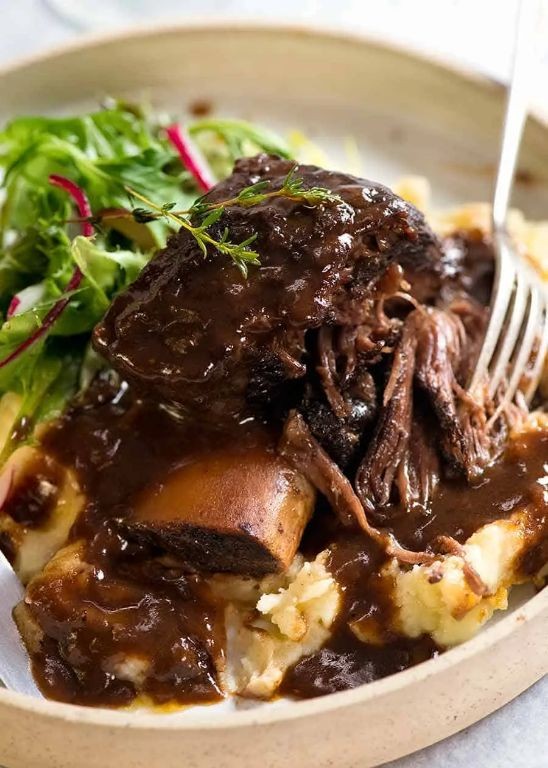
Finally, a dish that makes you look like a Michelin-starred chef while secretly being more forgiving than your last relationship. These braised short ribs will have your guests weeping with joy while you casually pretend it was no big deal—just some magic you whipped up between Netflix episodes.
Ingredients
- 4 pounds bone-in beef short ribs, frenched
- 2 tablespoons extra-virgin olive oil
- 1 large yellow onion, finely diced
- 2 medium carrots, peeled and cut into ½-inch rounds
- 3 celery stalks, cut into ½-inch slices
- 4 garlic cloves, thinly sliced
- 2 tablespoons tomato paste
- 1 bottle dry red wine, such as Cabernet Sauvignon
- 4 cups rich beef stock, preferably homemade
- 4 sprigs fresh thyme
- 2 bay leaves
- Kosher salt and freshly cracked black pepper
Instructions
- Preheat your oven to 325°F and position a rack in the lower third.
- Pat the short ribs completely dry with paper towels and season aggressively on all sides with kosher salt and black pepper.
- Heat the olive oil in a large Dutch oven over medium-high heat until shimmering but not smoking.
- Sear the short ribs in batches, turning with tongs, until deeply browned on all sides—about 4–5 minutes per side.
- Transfer the seared ribs to a plate, leaving the rendered fat in the pot.
- Add the onion, carrots, and celery to the pot and sauté, stirring occasionally, until softened and lightly caramelized—about 8 minutes.
- Stir in the garlic and tomato paste and cook for 1 minute until fragrant and the paste darkens slightly.
- Pour in the red wine, scraping the bottom of the pot with a wooden spoon to release any browned bits.
- Bring the wine to a simmer and reduce by half, about 10–12 minutes.
- Return the short ribs to the pot, along with any accumulated juices.
- Add the beef stock, thyme sprigs, and bay leaves, ensuring the ribs are nearly submerged.
- Bring the liquid to a gentle simmer, then cover the pot tightly and transfer to the preheated oven.
- Braise for 3 hours, or until the meat is fork-tender and easily pulls away from the bone.
- Carefully remove the pot from the oven and transfer the short ribs to a serving platter.
- Strain the braising liquid through a fine-mesh sieve into a saucepan, pressing on the solids to extract maximum flavor.
- Skim off excess fat from the surface using a ladle or fat separator.
- Simmer the sauce over medium heat until reduced by one-third and slightly thickened, about 15–20 minutes.
- Season the sauce with salt and pepper to taste, then pour over the short ribs.
Unbelievably tender, these ribs practically dissolve at the touch of a fork, while the reduced wine sauce delivers a deep, velvety richness with hints of herbaceous thyme and sweet roasted vegetables. Serve them over creamy polenta or buttery mashed potatoes to soak up every last drop of that glorious sauce—because wasting it would be a culinary crime.
Grilled Salmon with Lemon Dill Sauce
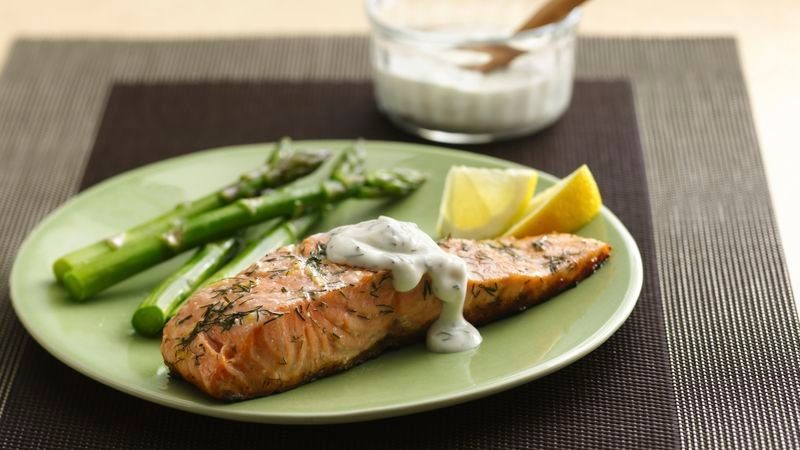
Mmm, let’s talk about that glorious moment when perfectly grilled salmon meets a zesty lemon dill sauce—it’s basically a culinary high-five for your taste buds that’ll make you feel like a seafood superstar without the fancy chef hat drama.
Ingredients
– 4 (6-ounce) skin-on salmon fillets
– 2 tablespoons extra-virgin olive oil
– 1 teaspoon kosher salt
– ½ teaspoon freshly cracked black pepper
– 1 cup crème fraîche
– ¼ cup freshly squeezed lemon juice
– 2 tablespoons finely chopped fresh dill fronds
– 1 teaspoon lemon zest, finely grated
– ¼ teaspoon fine sea salt
Instructions
1. Preheat a gas or charcoal grill to medium-high heat (400°F), ensuring the grates are clean and lightly oiled to prevent sticking.
2. Pat the salmon fillets completely dry with paper towels to ensure a crisp skin.
3. Brush both sides of each fillet evenly with extra-virgin olive oil.
4. Season the flesh side of the salmon with kosher salt and freshly cracked black pepper.
5. Place the salmon skin-side down on the preheated grill and close the lid.
6. Grill for 5–6 minutes until the skin is crispy and releases easily from the grates.
7. Flip the salmon carefully using a thin metal spatula and grill for another 2–3 minutes until the internal temperature reaches 125°F for medium-rare.
8. Transfer the grilled salmon to a clean plate and let it rest for 3 minutes to allow juices to redistribute.
9. While the salmon rests, whisk together crème fraîche, freshly squeezed lemon juice, finely chopped fresh dill fronds, finely grated lemon zest, and fine sea salt in a small bowl until fully combined.
10. Spoon the lemon dill sauce over the rested salmon fillets just before serving.
Lightly charred edges give way to buttery, flaky flesh that practically melts alongside the bright, herbaceous sauce—try draping it over a bed of quinoa with roasted asparagus for a plate that’s as vibrant as your newfound grilling confidence.
Pork Tenderloin with Apple Chutney
Oh, the humble pork tenderloin—often relegated to dry, sad dinner parties—gets a glamorous makeover with this sweet-tart apple chutney that’ll make you forget it’s not bacon. Picture this: juicy, herb-rubbed pork meeting a chunky, spiced apple relish that’s basically autumn in a bowl. It’s the kind of dish that’ll have your guests asking for the recipe while secretly plotting to steal your leftovers.
Ingredients
- 1 (1.5 lb) pork tenderloin, trimmed of silver skin
- 2 tbsp extra-virgin olive oil
- 1 tsp kosher salt
- 1/2 tsp freshly cracked black pepper
- 1 tsp fresh thyme leaves, finely minced
- 1/2 tsp smoked paprika
- 2 large Granny Smith apples, peeled, cored, and diced into 1/2-inch pieces
- 1/2 cup yellow onion, finely diced
- 1/4 cup apple cider vinegar
- 2 tbsp light brown sugar, packed
- 1/4 tsp red pepper flakes
- 1/4 tsp ground cinnamon
- 2 tbsp unsalted butter
Instructions
- Preheat your oven to 400°F and position a rack in the center.
- Pat the pork tenderloin completely dry with paper towels to ensure a crisp sear.
- Rub the tenderloin evenly with olive oil, then season all sides with kosher salt, black pepper, minced thyme, and smoked paprika.
- Heat a large oven-safe skillet over medium-high heat until a drop of water sizzles upon contact.
- Sear the pork for 2–3 minutes per side, until a golden-brown crust forms on all surfaces.
- Transfer the skillet directly to the preheated oven and roast for 15–18 minutes, or until an instant-read thermometer inserted into the thickest part registers 145°F.
- Remove the pork from the skillet, place it on a cutting board, and tent loosely with foil to rest for 10 minutes—this allows juices to redistribute.
- While the pork rests, return the skillet to medium heat and add the diced onion, sautéing for 3–4 minutes until translucent.
- Stir in the diced apples, apple cider vinegar, brown sugar, red pepper flakes, and cinnamon, scraping up any browned bits from the skillet for extra flavor.
- Simmer the mixture for 8–10 minutes, stirring occasionally, until the apples are tender but still hold their shape.
- Remove the skillet from heat and swirl in the unsalted butter until melted and glossy.
- Slice the rested pork into 1/2-inch thick medallions and arrange on a platter.
- Spoon the warm apple chutney generously over the pork slices. Slice into the pork to reveal its blush-pink center, contrasting with the chunky, sweet-spicy chutney that clings to each piece. Serve it alongside creamy polenta or over a bed of wild rice for a cozy, restaurant-worthy weeknight meal that’s anything but basic.
Seafood Paella with Saffron

Fabulous food fanatics, gather ’round! If your taste buds are ready for a Spanish vacation without leaving your kitchen, this seafood paella is about to become your new culinary crush—just don’t tell the other dishes in your recipe rotation, they might get jealous.
Ingredients
– 2 cups Bomba rice
– 4 cups fish stock, heated to 180°F
– 1 lb wild-caught jumbo shrimp, peeled and deveined
– 1 lb fresh mussels, scrubbed and debearded
– 8 oz fresh squid, cleaned and sliced into rings
– 1 large yellow onion, finely diced
– 4 cloves garlic, minced
– 1 red bell pepper, julienned
– 1/2 cup extra-virgin olive oil
– 1/4 tsp Spanish saffron threads, lightly toasted
– 1 tsp smoked paprika
– 1/2 cup dry white wine
– 1 lemon, cut into wedges
– 1/4 cup fresh flat-leaf parsley, chopped
Instructions
1. Heat olive oil in a 15-inch paella pan over medium-high heat until shimmering.
2. Sauté diced onion for 4 minutes until translucent, stirring frequently.
3. Add minced garlic and cook for 1 minute until fragrant but not browned.
4. Stir in julienned red bell pepper and cook for 3 minutes until slightly softened.
5. Add Bomba rice to the pan and toast for 2 minutes, stirring constantly to coat each grain with oil.
6. Sprinkle smoked paprika and toasted saffron threads over the rice, stirring to distribute evenly.
7. Pour in dry white wine and cook for 1 minute until mostly evaporated.
8. Add heated fish stock in a circular motion, distributing it evenly across the pan.
9. Arrange jumbo shrimp, mussels, and squid rings decoratively across the rice surface.
10. Reduce heat to medium-low and simmer uncovered for 18 minutes without stirring.
11. Increase heat to high for the final 2 minutes to create the prized socarrat crust on the bottom.
12. Remove from heat, cover with a clean kitchen towel, and rest for 5 minutes.
13. Garnish with chopped parsley and lemon wedges before serving.
Remarkably, the finished paella achieves that magical textural trifecta: tender rice grains, succulent seafood, and that addictive crispy bottom layer. The saffron lends an earthy elegance that plays beautifully against the briny sweetness of the shellfish. For maximum drama, serve it family-style right in the paella pan with crusty bread for sopping up every last golden-hued drop.
Herb-Roasted Potatoes with Garlic
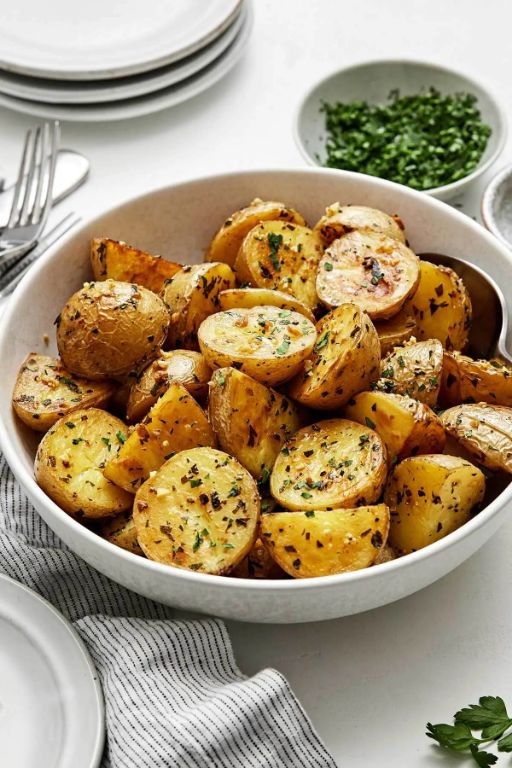
Ridiculously simple yet impossibly addictive, these herb-roasted potatoes will make you question why you ever settled for sad, soggy spuds. With crispy golden edges and fluffy insides, they’re basically potato perfection in under an hour. Consider this your official upgrade from boring side dish to main character energy.
Ingredients
– 2 pounds Yukon Gold potatoes, cut into 1-inch cubes
– 3 tablespoons extra virgin olive oil
– 4 cloves garlic, minced
– 1 tablespoon fresh rosemary, finely chopped
– 1 tablespoon fresh thyme leaves
– 1 teaspoon kosher salt
– ½ teaspoon freshly cracked black pepper
Instructions
1. Preheat your oven to 425°F and position a rack in the center of the oven.
2. Cut 2 pounds of Yukon Gold potatoes into uniform 1-inch cubes to ensure even cooking.
3. In a large mixing bowl, combine 3 tablespoons of extra virgin olive oil, 4 minced garlic cloves, 1 tablespoon of chopped fresh rosemary, 1 tablespoon of fresh thyme leaves, 1 teaspoon of kosher salt, and ½ teaspoon of freshly cracked black pepper.
4. Add the cubed potatoes to the bowl and toss vigorously until every piece is thoroughly coated with the herb mixture.
5. Spread the potatoes in a single layer on a rimmed baking sheet, ensuring they aren’t crowded.
6. Roast for 25 minutes at 425°F until the bottoms develop a golden crust.
7. Remove the baking sheet from the oven and flip each potato piece using tongs to expose uncooked surfaces.
8. Return to the oven and roast for an additional 15-20 minutes until the potatoes are deeply golden brown and crispy on all edges.
9. Test for doneness by piercing a potato cube with a fork—it should slide through the fluffy interior without resistance.
10. Transfer the roasted potatoes to a serving dish immediately to prevent steaming on the hot pan.
Keep these golden beauties front and center—their crackly exterior gives way to cloud-like centers infused with garlic and herbs. Try scattering them over a bed of arugula with shaved Parmesan for a warm potato salad situation, or serve alongside perfectly seared steak where they’ll happily soak up all those meaty juices.
Caramelized Onion and Goat Cheese Tart
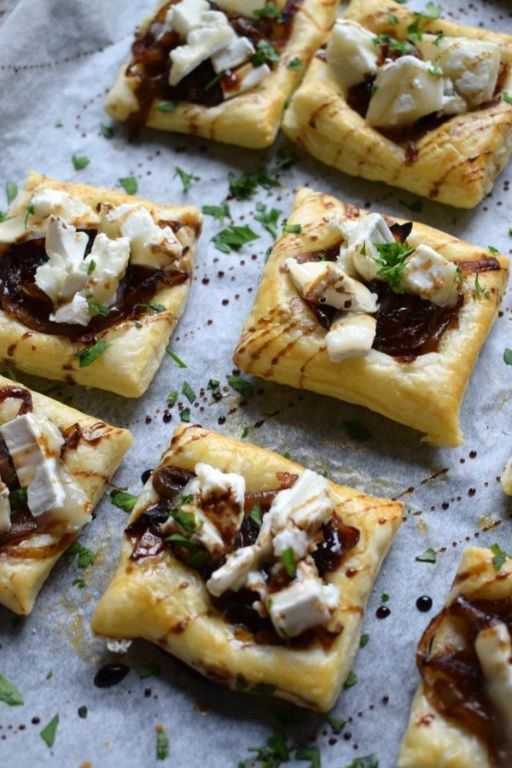
Savor this moment, because we’re about to transform the humble onion into something truly spectacular—a buttery, flaky tart filled with sweet, jammy caramelized onions and tangy, creamy goat cheese that will make you the star of any potluck or picnic. This isn’t just a tart; it’s a flavor journey from savory to sublime, proving that patience (and a whole lot of onions) pays off deliciously. Get ready to impress your taste buds and maybe even your mother-in-law.
Ingredients
- 1 ½ cups all-purpose flour, sifted
- ½ cup unsalted European-style butter, chilled and cubed
- ¼ cup ice-cold water
- 3 large yellow onions, thinly sliced on a mandoline
- 2 tablespoons clarified butter
- 1 teaspoon granulated sugar
- ¼ cup dry white wine, such as Sauvignon Blanc
- 4 ounces fresh chèvre goat cheese, crumbled
- 2 pasture-raised eggs, lightly beaten
- ½ cup heavy cream
- 1 teaspoon fresh thyme leaves, finely chopped
- ¼ teaspoon freshly grated nutmeg
- ½ teaspoon flaky sea salt, such as Maldon
- ¼ teaspoon freshly cracked black pepper
Instructions
- Combine the sifted all-purpose flour and chilled, cubed unsalted European-style butter in a food processor.
- Pulse the mixture until it resembles coarse meal with pea-sized butter pieces, about 10 pulses.
- Drizzle in the ice-cold water while pulsing, just until the dough begins to clump together.
- Turn the dough out onto a lightly floured surface and gather it into a disc.
- Wrap the dough disc tightly in plastic wrap and refrigerate for 30 minutes to relax the gluten.
- Heat the clarified butter in a large skillet over medium-low heat until shimmering.
- Add the thinly sliced yellow onions and granulated sugar to the skillet.
- Cook the onions, stirring occasionally, for 35–40 minutes until deeply golden brown and jammy.
- Deglaze the skillet with the dry white wine, scraping up any browned bits from the bottom.
- Continue cooking until the wine has fully evaporated, about 3 minutes.
- Remove the caramelized onions from the heat and let them cool completely to room temperature.
- Preheat your oven to 375°F and position a rack in the center.
- Roll out the chilled dough on a floured surface to a 12-inch circle, about ⅛-inch thick.
- Carefully transfer the dough to a 9-inch tart pan with a removable bottom.
- Press the dough gently into the edges and trim any excess overhang.
- Prick the bottom of the tart shell all over with a fork to prevent puffing.
- Line the tart shell with parchment paper and fill with pie weights or dried beans.
- Blind bake the tart shell for 15 minutes until the edges are lightly golden.
- Remove the parchment and weights and bake for another 5 minutes until the bottom is set.
- Whisk together the lightly beaten pasture-raised eggs, heavy cream, fresh thyme, and freshly grated nutmeg in a medium bowl.
- Spread the cooled caramelized onions evenly over the pre-baked tart shell.
- Scatter the crumbled fresh chèvre goat cheese over the onion layer.
- Pour the egg and cream mixture evenly over the onions and cheese.
- Sprinkle the flaky sea salt and freshly cracked black pepper over the top.
- Bake the tart at 375°F for 25–30 minutes until the filling is set and the crust is golden brown.
- Let the tart cool in the pan on a wire rack for 15 minutes before slicing.
Let this tart cool just enough so you don’t burn your tongue—because you’ll want to dive right in. The contrast between the crisp, buttery crust and the silky, savory-sweet filling is nothing short of magical. Serve it warm with a simple arugula salad for a light lunch, or slice it into elegant wedges and pair with a crisp rosé for your next fancy-ish dinner party.
Chicken Pot Pie with Flaky Crust
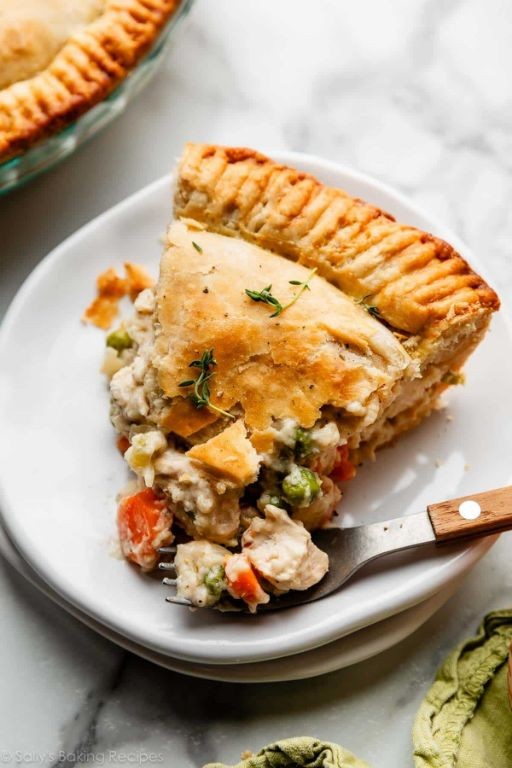
Mmm, is there anything more comforting than breaking through that golden-brown crust to reveal a steaming, savory chicken pot pie? This isn’t just dinner—it’s a warm hug in a baking dish, a culinary masterpiece that turns a Tuesday night into a celebration. Get ready to impress your taste buds and maybe even your mother-in-law with this flaky-crusted wonder.
Ingredients
– 1 ½ cups all-purpose flour
– ½ cup unsalted European-style butter, chilled and cubed
– ¼ cup ice water
– 1 lb boneless, skinless chicken thighs, diced into ½-inch pieces
– 2 tbsp clarified butter
– 1 cup yellow onion, finely diced
– ¾ cup carrots, peeled and diced into ¼-inch pieces
– ¾ cup celery, diced into ¼-inch pieces
– 3 tbsp all-purpose flour
– 1 ½ cups chicken stock, warmed to 120°F
– ½ cup heavy cream
– 1 tsp fresh thyme leaves, finely chopped
– 1 large pasture-raised egg, lightly beaten
– ½ tsp fine sea salt
– ¼ tsp freshly cracked black pepper
Instructions
1. Combine 1 ½ cups all-purpose flour and ½ tsp fine sea salt in a large mixing bowl.
2. Add ½ cup chilled, cubed unsalted European-style butter to the flour mixture.
3. Use a pastry cutter to incorporate the butter until pea-sized crumbs form, about 2 minutes.
4. Drizzle ¼ cup ice water into the mixture while stirring with a fork until a shaggy dough forms.
5. Turn the dough onto a lightly floured surface and gently knead just until it holds together.
6. Shape the dough into a disk, wrap tightly in plastic wrap, and refrigerate for 45 minutes.
7. Heat 2 tbsp clarified butter in a large skillet over medium-high heat until shimmering.
8. Add 1 lb diced chicken thighs and cook for 6-8 minutes until golden brown and internal temperature reaches 165°F.
9. Transfer the cooked chicken to a plate using a slotted spoon, leaving drippings in the skillet.
10. Add 1 cup finely diced yellow onion, ¾ cup diced carrots, and ¾ cup diced celery to the skillet.
11. Sauté the vegetables for 7-9 minutes until softened and onions become translucent.
12. Sprinkle 3 tbsp all-purpose flour over the vegetables and cook for 1 minute while stirring constantly.
13. Gradually pour in 1 ½ cups warmed chicken stock while whisking to prevent lumps.
14. Stir in ½ cup heavy cream and 1 tsp fresh thyme leaves until fully incorporated.
15. Return the cooked chicken to the skillet and add ¼ tsp freshly cracked black pepper.
16. Simmer the filling for 8-10 minutes until thickened to a gravy-like consistency.
17. Preheat your oven to 400°F and position a rack in the center.
18. Roll the chilled dough on a floured surface to a ¼-inch thickness, 1 inch larger than your baking dish.
19. Pour the hot filling into a 9-inch pie dish or cast-iron skillet.
20. Carefully drape the rolled dough over the filling, trimming excess and crimping the edges.
21. Cut 4-5 steam vents in the top crust using a sharp paring knife.
22. Brush the entire crust surface with 1 lightly beaten pasture-raised egg.
23. Bake at 400°F for 30-35 minutes until the crust is deep golden brown and filling is bubbling.
24. Let the pot pie rest for 15 minutes before serving to allow the filling to set.
Finally, that first crack through the flaky, buttery crust releases an aromatic steam cloud of thyme and roasted chicken. The creamy filling clings to each vegetable while maintaining distinct textures—tender carrots, crisp-tender celery, and juicy chicken pieces. Serve it straight from the baking dish with a crisp green salad to cut through the richness, or go full comfort-food mode and pair it with mashed potatoes for the ultimate carb-on-carb experience.
Spicy Shrimp and Grits

Jazz up your dinner routine with this fiery Southern classic that’ll have your taste buds doing the cha-cha. Spicy shrimp and grits is the culinary equivalent of a surprise party in your mouth—unexpected, delightful, and guaranteed to make you the star of your own kitchen show. Just when you thought comfort food couldn’t get any better, this dish saunters in wearing cowboy boots and a wink.
Ingredients
– 1 cup stone-ground grits
– 4 cups filtered water
– 1 cup heavy cream
– 6 ounces sharp white cheddar, finely grated
– 2 tablespoons clarified butter
– 1 pound wild-caught shrimp (16/20 count), peeled and deveined
– 2 teaspoons Cajun seasoning blend
– 1 teaspoon smoked paprika
– 3 garlic cloves, microplaned
– 1 jalapeño pepper, brunoise cut
– ½ cup andouille sausage, small dice
– ¼ cup scallions, bias cut
– 2 tablespoons unsalted butter
– 1 lemon, juiced
Instructions
1. Combine stone-ground grits and filtered water in a heavy-bottomed saucepan over medium-high heat.
2. Whisk continuously for 2 minutes to prevent clumping and activate starch.
3. Reduce heat to low and simmer grits for 25 minutes, stirring every 5 minutes with a wooden spoon.
4. Pour in heavy cream and cook for additional 10 minutes until grits coat the back of a spoon.
5. Fold in finely grated sharp white cheddar until fully incorporated and glossy.
6. Pat wild-caught shrimp completely dry with paper towels—this ensures proper searing.
7. Toss shrimp with Cajun seasoning blend and smoked paprika, ensuring even coating.
8. Heat clarified butter in a cast-iron skillet over medium-high heat until it shimmers.
9. Sear shrimp for 90 seconds per side until they form a golden crust and curl into a C-shape.
10. Transfer shrimp to a clean plate, reserving pink juices in the skillet.
11. Sauté brunoise-cut jalapeño and small-dice andouille sausage in the same skillet for 4 minutes until sausage renders fat.
12. Add microplaned garlic and cook for 45 seconds until fragrant but not browned.
13. Deglaze the skillet with fresh lemon juice, scraping up all browned bits with a spatula.
14. Swirl in unsalted butter off heat to create an emulsified pan sauce.
15. Return shrimp to the skillet and toss with bias-cut scallions for 30 seconds.
Divine doesn’t begin to describe the textural symphony here—creamy, cheesy grits cradling plump shrimp wearing a spicy crust like edible armor. The andouille adds smoky counterpoints while the lemon cuts through the richness with citrusy sass. Serve this beauty in shallow bowls with extra scallions scattered like confetti, because Tuesday dinners deserve celebration too.
Ratatouille with Fresh Herbs
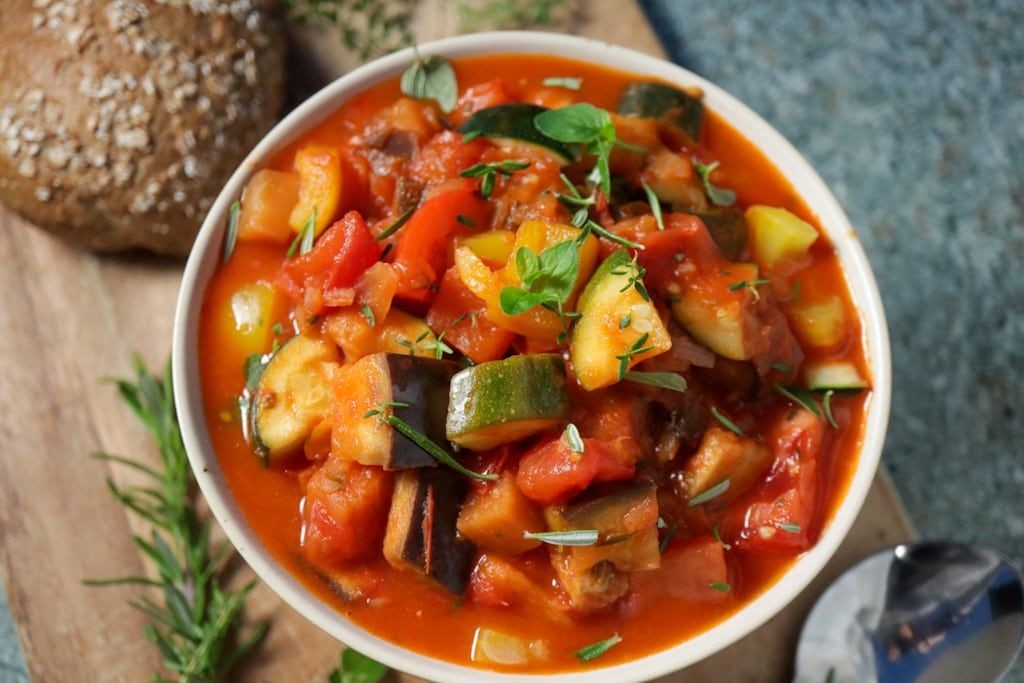
Veggie lovers, rejoice! This isn’t your grandmother’s mushy vegetable stew—this ratatouille is a vibrant, herb-kissed masterpiece that’ll make even the most stubborn carnivore reconsider their life choices. Get ready to transform humble produce into a dish that screams sophistication without the fuss.
Ingredients
- 1 large globe eggplant, cut into ½-inch cubes
- 2 medium zucchini, sliced into ¼-inch rounds
- 1 large yellow bell pepper, julienned
- 1 large red onion, thinly sliced
- 4 ripe heirloom tomatoes, blanched, peeled, and roughly chopped
- 3 cloves garlic, minced
- ¼ cup extra-virgin olive oil
- 2 tbsp fresh thyme leaves
- 2 tbsp fresh basil, chiffonade
- 1 tbsp fresh oregano, finely chopped
- 1 tsp flaky sea salt
- ½ tsp freshly cracked black pepper
Instructions
- Preheat your oven to 375°F and position one rack in the center.
- Place the cubed eggplant in a colander, sprinkle with 1 teaspoon of kosher salt, and let drain for 20 minutes to remove bitterness, then pat completely dry with paper towels.
- Heat 2 tablespoons of olive oil in a large, oven-safe skillet over medium-high heat until shimmering but not smoking.
- Add the eggplant cubes and sauté for 6-8 minutes until golden brown and slightly tender, stirring occasionally to prevent sticking.
- Transfer the eggplant to a bowl, leaving any remaining oil in the skillet.
- Add the remaining 2 tablespoons of olive oil to the skillet and heat for 30 seconds.
- Sauté the sliced red onion for 4-5 minutes until translucent and fragrant.
- Add the minced garlic and cook for 1 minute until aromatic but not browned.
- Incorporate the julienned yellow bell pepper and cook for 3-4 minutes until slightly softened.
- Add the zucchini rounds and cook for 2-3 minutes until bright green and barely tender.
- Stir in the chopped heirloom tomatoes, fresh thyme, and oregano, cooking for 2 minutes until the tomatoes begin to break down.
- Return the sautéed eggplant to the skillet, gently folding to combine all vegetables.
- Sprinkle with flaky sea salt and cracked black pepper, adjusting seasoning as needed.
- Transfer the skillet to the preheated oven and bake uncovered for 25-30 minutes until vegetables are tender but still hold their shape.
- Remove from oven and immediately stir in the chiffonade basil.
Zesty, vibrant, and bursting with garden-fresh flavor, this ratatouille achieves the perfect balance between tender vegetables and structural integrity. The herbaceous notes from the fresh thyme and basil elevate each bite, while the slow roasting intensifies the natural sweetness of the produce. Serve it warm over creamy polenta, alongside crusty artisan bread for dipping, or chilled the next day as a sophisticated salad—it only gets better as the flavors meld.
Tiramisu for Dessert
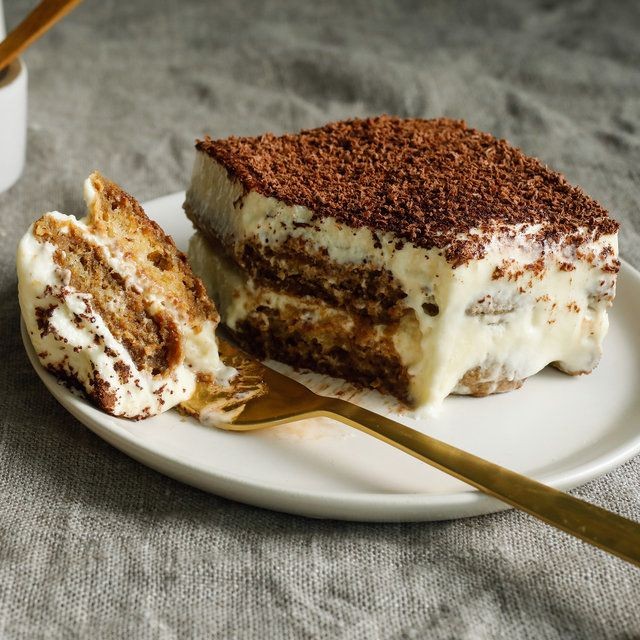
Zesty, dreamy, and dangerously addictive—this isn’t your nonna’s tiramisu, but it just might become your new dessert obsession. We’re talking cloud-like layers of espresso-soaked ladyfingers and mascarpone cream that’ll make you forget you ever liked cake. Get ready to caffeinate your sweet tooth in the most elegant way possible.
Ingredients
– 6 large pasture-raised egg yolks
– ¾ cup granulated sugar
– 1 pound mascarpone cheese, room temperature
– 1½ cups heavy cream
– 2 cups freshly brewed espresso, cooled to 75°F
– ¼ cup coffee liqueur
– 24 crisp ladyfinger cookies (savoiardi)
– 2 tablespoons Dutch-process cocoa powder
– 1 ounce dark chocolate (70% cacao), finely grated
Instructions
1. Combine egg yolks and granulated sugar in a heatproof bowl set over a saucepan of simmering water.
2. Whisk continuously for 8 minutes until pale yellow and thickened to ribbon consistency.
3. Remove bowl from heat and whip yolk mixture with electric mixer on medium-high speed for 4 minutes until cooled.
4. Add room-temperature mascarpone cheese and beat on low speed just until incorporated.
5. In separate chilled bowl, whip heavy cream to stiff peaks using electric mixer on high speed.
6. Gently fold whipped cream into mascarpone mixture using a rubber spatula until no streaks remain.
7. Combine cooled espresso and coffee liqueur in shallow dish.
8. Quickly dip each ladyfinger cookie into espresso mixture for exactly 2 seconds per side.
9. Arrange single layer of soaked ladyfingers in 9×13-inch baking dish.
10. Spread half of mascarpone cream over ladyfingers using offset spatula.
11. Create second layer with remaining soaked ladyfingers.
12. Top with remaining mascarpone cream, smoothing surface with spatula.
13. Sift Dutch-process cocoa powder evenly over entire surface through fine-mesh sieve.
14. Sprinkle finely grated dark chocolate over cocoa layer.
15. Cover tightly with plastic wrap and refrigerate for minimum 8 hours or up to 24 hours.
Glacial patience rewards you with a dessert that’s simultaneously airy and decadent—the espresso-kissed layers meld into a creamy symphony that practically floats off the spoon. Serve chilled in elegant glasses for a dinner party, or eat it straight from the pan at 2 AM (we won’t judge).
Summary
Nothing brings families together like delicious home-cooked meals. These 20 cozy recipes offer the perfect comfort food for your next gathering. We hope you find new favorites to share around your table! Try them out, leave a comment telling us which recipes your family loved most, and don’t forget to pin this article on Pinterest to save these comforting dishes for future feasts.