Oh, the buttery bliss of French pastries! Whether you’re planning a fancy brunch, a cozy afternoon treat, or just craving something spectacular, these 18 decadent recipes bring a touch of Parisian elegance right to your kitchen. From flaky croissants to rich éclairs, there’s a perfect pastry for every moment. Ready to bake your way to heaven? Let’s dive into these irresistible delights!
Classic French Croissants
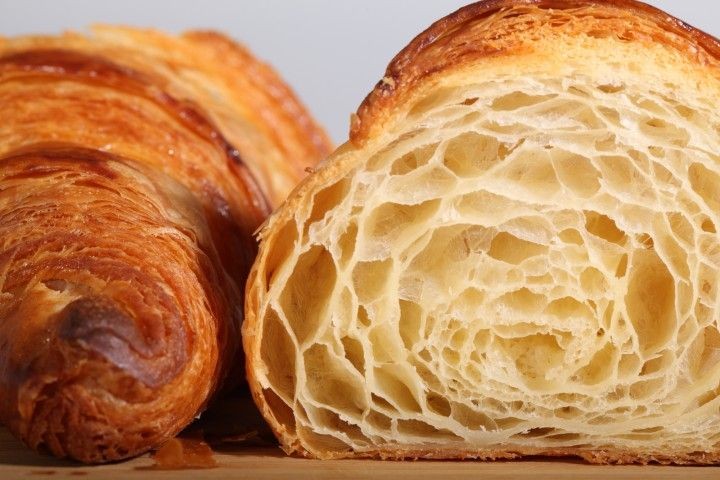
Making classic French croissants requires patience and precision, but the flaky, buttery results are absolutely worth the effort. This methodical approach will guide you through creating authentic laminated dough that bakes into golden, crescent-shaped perfection. Follow each step carefully for bakery-quality croissants right from your own kitchen.
Ingredients
– 4 cups all-purpose flour
– 1/4 cup granulated sugar
– 1 tbsp active dry yeast
– 1 1/4 cups whole milk
– 2 tsp salt
– 1 1/4 cups unsalted butter
– 1 large egg
Instructions
1. Combine 4 cups all-purpose flour, 1/4 cup granulated sugar, 1 tbsp active dry yeast, and 2 tsp salt in a large mixing bowl.
2. Warm 1 1/4 cups whole milk to 110°F using a digital thermometer.
3. Pour the warm milk into the dry ingredients and mix until a shaggy dough forms.
4. Knead the dough on a floured surface for 8 minutes until smooth and elastic.
5. Place the dough in a greased bowl, cover with plastic wrap, and let rise at room temperature for 1 hour until doubled in size.
6. Chill 1 1/4 cups unsalted butter between two sheets of parchment paper and pound with a rolling pin into an 8-inch square.
7. Roll the risen dough into a 10-inch square on a floured surface.
8. Place the chilled butter square diagonally in the center of the dough square.
9. Fold the dough corners over the butter to completely encase it, pinching the seams to seal.
10. Roll the dough-butter package into a 20×8-inch rectangle, maintaining even pressure.
11. Fold the dough into thirds like a business letter, wrap in plastic, and refrigerate for 30 minutes.
12. Repeat the rolling and folding process two more times, chilling for 30 minutes between each turn.
13. After the final fold, refrigerate the dough for at least 4 hours or overnight.
14. Roll the chilled dough into a 20×10-inch rectangle on a lightly floured surface.
15. Cut the rectangle into long triangles measuring 10 inches tall and 5 inches wide at the base.
16. Make a 1-inch slit in the center of each triangle’s wide end.
17. Stretch each triangle slightly and roll tightly from the wide end to the point.
18. Curve the rolled dough into crescent shapes and place on parchment-lined baking sheets.
19. Cover the shaped croissants loosely with plastic wrap and let rise at room temperature for 2 hours until puffy and nearly doubled.
20. Preheat your oven to 400°F and position racks in the upper and lower thirds.
21. Whisk 1 large egg with 1 tablespoon of water to create an egg wash.
22. Brush the risen croissants lightly with the egg wash using a pastry brush.
23. Bake for 18-22 minutes, rotating pans halfway through, until deeply golden brown.
24. Transfer the baked croissants to a wire rack to cool completely.
Golden, flaky layers shatter with each bite, revealing a tender, airy interior with rich butter flavor. These croissants shine when served warm with jam or used for exceptional breakfast sandwiches. For an elegant presentation, dust with powdered sugar just before serving alongside fresh berries and coffee.
Chocolate-filled Pain au Chocolat
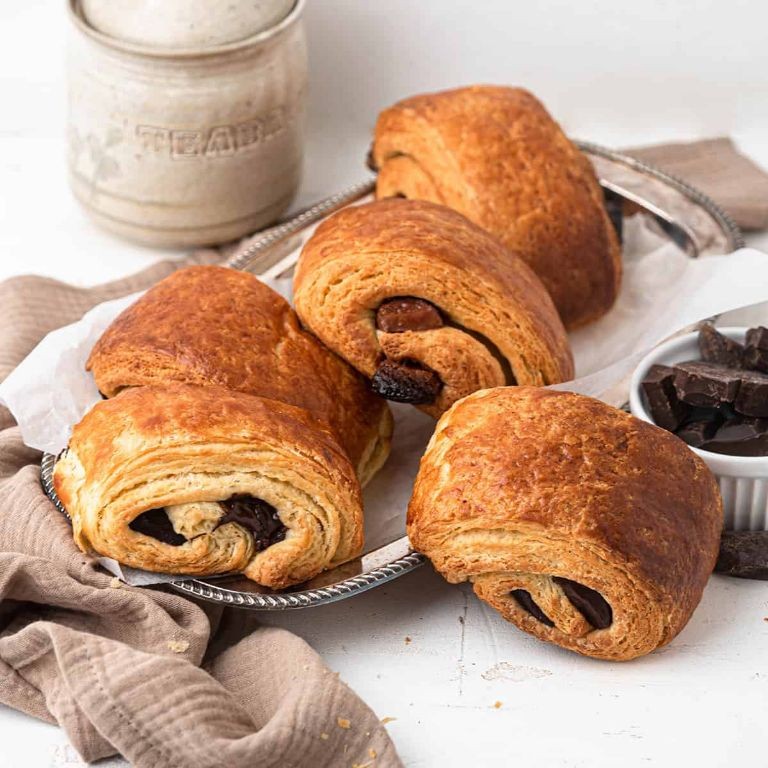
Let’s master the art of creating flaky, chocolate-filled pain au chocolat right in your own kitchen. This methodical approach will guide you through each precise step to achieve bakery-quality results. Learning these techniques will give you the confidence to create this classic French pastry with perfect layers and rich chocolate centers.
Ingredients
– 2 1/4 cups all-purpose flour
– 1/4 cup granulated sugar
– 1 teaspoon active dry yeast
– 1/2 teaspoon salt
– 3/4 cup whole milk
– 1/2 cup unsalted butter
– 4 ounces dark chocolate bars
– 1 large egg
Instructions
1. Combine 2 1/4 cups all-purpose flour, 1/4 cup granulated sugar, 1 teaspoon active dry yeast, and 1/2 teaspoon salt in a large mixing bowl.
2. Heat 3/4 cup whole milk to 110°F in a small saucepan, using a thermometer to ensure proper yeast activation temperature.
3. Pour the warmed milk into the dry ingredients and mix until a shaggy dough forms.
4. Knead the dough on a floured surface for 8 minutes until smooth and elastic.
5. Place the dough in a greased bowl, cover with plastic wrap, and let rise in a warm place for 1 hour until doubled in size.
6. Roll the dough into a 12×8-inch rectangle on a lightly floured surface.
7. Cut 1/2 cup unsalted butter into thin slices and arrange them over two-thirds of the dough rectangle.
8. Fold the unbuttered third over the middle, then fold the remaining buttered third over the top, creating three layers.
9. Roll the folded dough into a 12×8-inch rectangle again, then repeat the folding process.
10. Wrap the dough in plastic and refrigerate for 30 minutes to chill the butter between layers.
11. Repeat the rolling and folding process two more times, chilling for 30 minutes between each turn.
12. Roll the final dough into a 16×12-inch rectangle about 1/4-inch thick.
13. Cut the dough into 8 equal rectangles using a sharp knife or pizza cutter for clean edges.
14. Break 4 ounces dark chocolate bars into sticks and place two chocolate sticks at one short end of each dough rectangle.
15. Roll each rectangle tightly around the chocolate, starting from the chocolate end.
16. Place the rolled pastries seam-side down on a parchment-lined baking sheet, spacing them 2 inches apart.
17. Cover with a clean kitchen towel and let rise in a warm place for 45 minutes until puffy.
18. Preheat your oven to 400°F during the last 15 minutes of rising time.
19. Whisk 1 large egg with 1 tablespoon water to create an egg wash.
20. Brush the egg wash gently over the top of each pastry using a pastry brush.
21. Bake at 400°F for 18-20 minutes until golden brown and puffed.
22. Transfer to a wire rack to cool for 15 minutes before serving.
When you break open these warm pastries, the crisp, buttery layers shatter beautifully against the molten chocolate center. The contrast between the flaky exterior and rich, melted chocolate creates an irresistible texture experience. Warm them slightly before serving and pair with strong coffee for the ultimate breakfast indulgence, or slice them horizontally and fill with vanilla ice cream for an elegant dessert.
Flaky Raspberry Almond Croissants
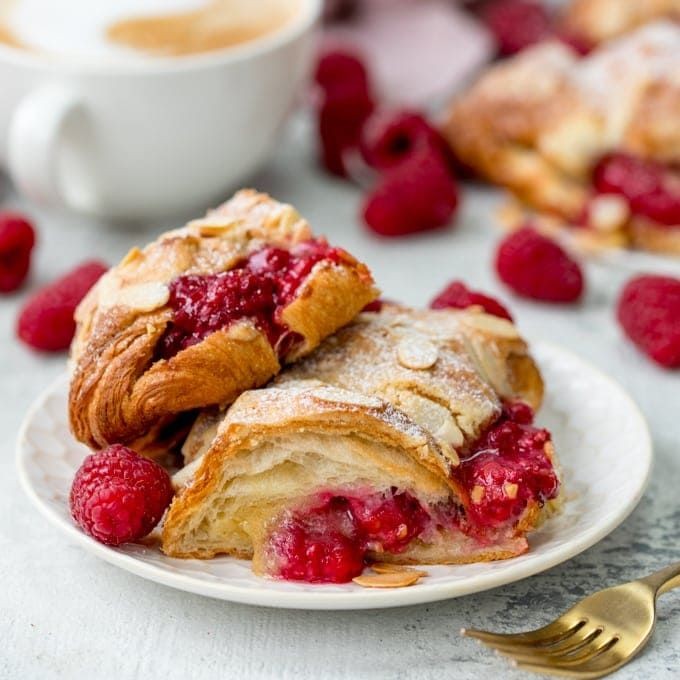
Just imagine biting into a buttery, flaky pastry filled with sweet-tart raspberry jam and nutty almond cream. These raspberry almond croissants transform store-bought puff pastry into an impressive bakery-style treat perfect for weekend brunch or special occasions. Following these methodical steps will ensure perfect results every time.
Ingredients
– 1 package frozen puff pastry
– 1/2 cup raspberry jam
– 1/2 cup almond flour
– 1/4 cup granulated sugar
– 4 tablespoons unsalted butter
– 1 large egg
– 1/4 cup sliced almonds
– 1 tablespoon water
Instructions
1. Thaw the puff pastry according to package directions, about 40 minutes at room temperature.
2. Preheat your oven to 400°F and line a baking sheet with parchment paper.
3. Combine almond flour, sugar, and softened butter in a medium bowl until a smooth paste forms.
4. Roll the thawed puff pastry into a 12×12 inch square on a lightly floured surface.
5. Cut the pastry into 4 equal squares using a sharp knife or pizza cutter.
6. Spread 2 tablespoons of almond cream in the center of each square, leaving a 1-inch border.
7. Top the almond cream with 1 tablespoon of raspberry jam per square.
8. Whisk the egg with 1 tablespoon of water to create an egg wash.
9. Brush the egg wash along the edges of each pastry square.
10. Fold each square diagonally to form triangles, pressing the edges firmly to seal.
11. Use the tip of a sharp knife to score 3 shallow diagonal lines across the top of each croissant.
12. Brush the tops with remaining egg wash, being careful not to let it pool in the scored lines.
13. Sprinkle sliced almonds evenly over the egg-washed surfaces.
14. Bake at 400°F for 18-22 minutes until deeply golden brown and puffed.
15. Transfer the croissants to a wire rack and cool for 15 minutes before serving. Zesty raspberry jam cuts through the rich almond cream, creating a perfect sweet-tart balance within each flaky layer. The sliced almonds add delightful crunch against the tender pastry interior. For an elegant presentation, dust with powdered sugar or serve warm with a dollop of whipped cream.
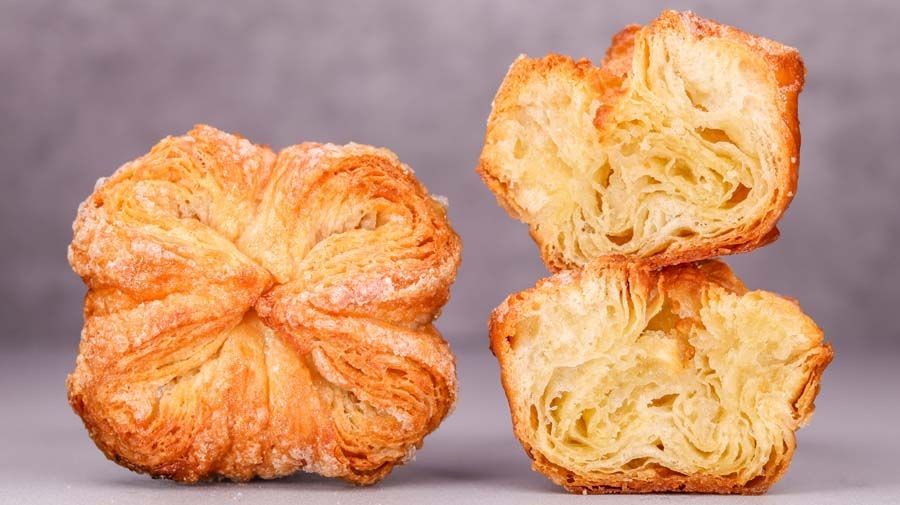
Buttery Kouign-Amann
Finally mastering the art of laminated pastry begins with this buttery kouign-amann recipe. Follow each step precisely to create those signature caramelized, flaky layers that make this French pastry so irresistible. Let’s transform simple ingredients into something truly spectacular through careful technique and patience.
Ingredients
– 4 cups all-purpose flour
– 1 ½ cups warm water (110°F)
– 2 ¼ tsp active dry yeast
– 1 tbsp granulated sugar
– 1 ½ cups unsalted butter, cold
– 1 ½ cups granulated sugar
– 1 tsp fine sea salt
Instructions
1. Combine 4 cups all-purpose flour, 2 ¼ tsp active dry yeast, 1 tbsp granulated sugar, and 1 tsp fine sea salt in a large mixing bowl.
2. Pour 1 ½ cups warm water (110°F) into the dry ingredients and mix until a shaggy dough forms.
3. Knead the dough on a floured surface for 8-10 minutes until smooth and elastic.
4. Place the dough in a lightly oiled bowl, cover with plastic wrap, and let rise in a warm place for 1 hour until doubled in size.
5. Roll 1 ½ cups cold unsalted butter between two sheets of parchment paper into an 8×8 inch square.
6. Roll the risen dough into a 12×12 inch square on a floured surface.
7. Place the butter square diagonally in the center of the dough square and fold the dough corners over the butter to enclose completely.
8. Roll the dough-butter package into a 20×10 inch rectangle, maintaining even pressure.
9. Fold the dough into thirds like a letter, rotate 90 degrees, and repeat the rolling and folding process two more times.
10. Chill the laminated dough in the refrigerator for 30 minutes between folds to keep the butter firm.
11. After the final fold, refrigerate the dough for 1 hour to relax the gluten.
12. Roll the chilled dough into a 16×16 inch square on a surface sprinkled with ½ cup granulated sugar.
13. Sprinkle the remaining 1 cup granulated sugar evenly over the entire surface of the dough.
14. Fold the sugared dough into thirds both horizontally and vertically to create 9 layers.
15. Cut the folded dough into 9 equal squares and place each square into a greased muffin tin.
16. Let the pastries proof at room temperature for 30-45 minutes until slightly puffed.
17. Preheat your oven to 375°F and bake for 25-30 minutes until deeply golden brown.
18. Immediately invert the pastries onto a cooling rack to prevent sticking to the pan.
Look for that perfect combination of crisp, caramelized sugar exterior giving way to tender, buttery layers inside. The contrast between the crunchy top and soft interior makes each bite unforgettable. Serve these warm with coffee for breakfast or as an elegant dessert with vanilla ice cream to complement the rich caramel notes.
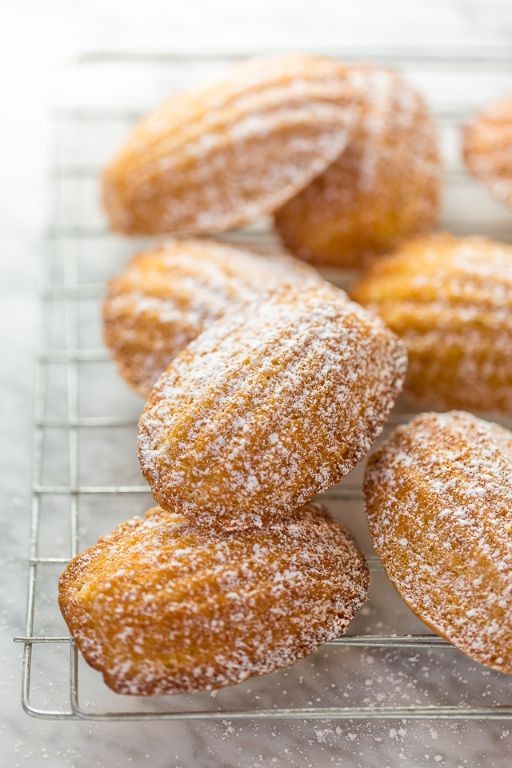
Traditional French Madeleines
Elegant yet surprisingly simple, these traditional French madeleines feature that iconic shell shape and delicate, buttery crumb. Following these methodical steps will guide even beginner bakers toward perfect results every single time. Let’s begin by gathering our ingredients and preparing our equipment.
Ingredients
– 1/2 cup unsalted butter
– 3/4 cup granulated sugar
– 2 large eggs
– 1 cup all-purpose flour
– 1/2 teaspoon baking powder
– 1/4 teaspoon salt
– 1 teaspoon vanilla extract
– 2 tablespoons honey
Instructions
1. Melt 1/2 cup unsalted butter in a small saucepan over medium heat until completely liquid, then set aside to cool slightly.
2. Preheat your oven to 375°F and generously grease a madeleine pan with additional butter, ensuring every shell cavity is thoroughly coated.
3. Whisk 3/4 cup granulated sugar with 2 large eggs in a medium bowl for exactly 3 minutes until pale yellow and slightly thickened.
4. Sift 1 cup all-purpose flour, 1/2 teaspoon baking powder, and 1/4 teaspoon salt directly into the egg mixture to prevent lumps.
5. Gently fold the dry ingredients into the wet ingredients using a spatula, making about 15-20 folds until just combined.
6. Pour the slightly cooled melted butter around the edge of the bowl and add 1 teaspoon vanilla extract and 2 tablespoons honey.
7. Fold the butter mixture into the batter until fully incorporated, being careful not to overmix.
8. Cover the bowl with plastic wrap and refrigerate the batter for 30 minutes to help develop the characteristic hump.
9. Spoon 1 tablespoon of chilled batter into each prepared madeleine cavity, filling them about 3/4 full.
10. Bake at 375°F for 10-12 minutes until the edges are golden brown and the centers spring back when lightly touched.
11. Immediately tap the pan on the counter to release the madeleines, then transfer them to a wire rack using a small offset spatula.
Knowing you’ve achieved perfection when you see that distinctive hump and delicate golden color is incredibly satisfying. These madeleines offer a light, cake-like texture with subtle honey notes that pair wonderfully with afternoon tea or coffee. For an elegant twist, dust them with powdered sugar just before serving or dip the scalloped sides in melted dark chocolate.
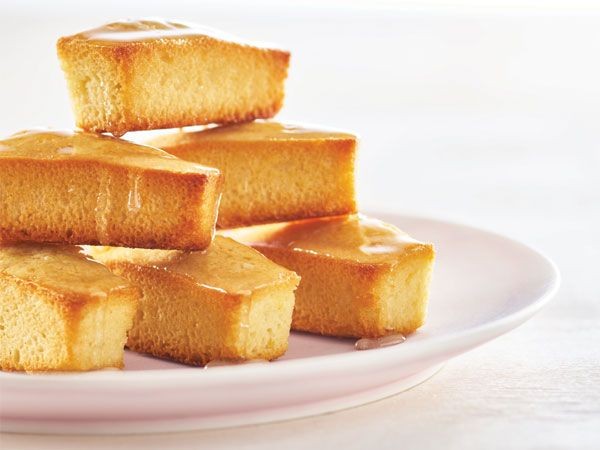
Lemon Glazed Financiers
When you want an elegant French pastry that’s surprisingly simple to make, these lemon glazed financiers deliver buttery almond flavor with a bright citrus finish. We’ll walk through each stage methodically, from preparing the financier batter to creating the perfect glossy lemon glaze. With careful attention to temperature and technique, you’ll achieve professional-looking results right in your home kitchen.
Ingredients
– 1/2 cup unsalted butter
– 1 cup almond flour
– 3/4 cup powdered sugar
– 1/4 cup all-purpose flour
– 4 large egg whites
– 1 tsp vanilla extract
– 1 tbsp lemon zest
– 1 cup powdered sugar
– 2 tbsp lemon juice
– 1/2 tsp lemon zest
Instructions
1. Preheat your oven to 375°F and generously butter a financier mold or mini muffin tin.
2. Melt 1/2 cup unsalted butter in a small saucepan over medium heat until it turns golden brown and develops nutty aromas, about 5-7 minutes.
3. Immediately transfer the browned butter to a heatproof bowl to prevent burning and let it cool to room temperature.
4. Whisk together 1 cup almond flour, 3/4 cup powdered sugar, and 1/4 cup all-purpose flour in a medium bowl until thoroughly combined.
5. Lightly beat 4 large egg whites with a fork just until frothy, being careful not to create stiff peaks.
6. Pour the cooled browned butter, beaten egg whites, 1 teaspoon vanilla extract, and 1 tablespoon lemon zest into the dry ingredients.
7. Gently fold the mixture together using a spatula until just combined, being careful not to overmix the batter.
8. Spoon the batter into the prepared molds, filling each cavity about 3/4 full to allow for rising.
9. Bake at 375°F for 12-15 minutes until the financiers are golden brown and spring back when lightly pressed.
10. Transfer the baked financiers to a wire rack and let them cool completely, about 30 minutes.
11. Whisk together 1 cup powdered sugar, 2 tablespoons lemon juice, and 1/2 teaspoon lemon zest in a small bowl until smooth and glossy.
12. Dip the top of each cooled financier into the lemon glaze, allowing excess to drip back into the bowl.
13. Return the glazed financiers to the wire rack and let the glaze set completely, about 20 minutes.
Glazed financiers offer a delightful contrast between their crisp golden exterior and moist, tender crumb infused with toasted almond flavors. The sharp lemon glaze cuts through the richness beautifully, creating a balanced treat that’s neither too sweet nor too heavy. For an elegant presentation, serve these alongside afternoon tea or as a light dessert with fresh berries.
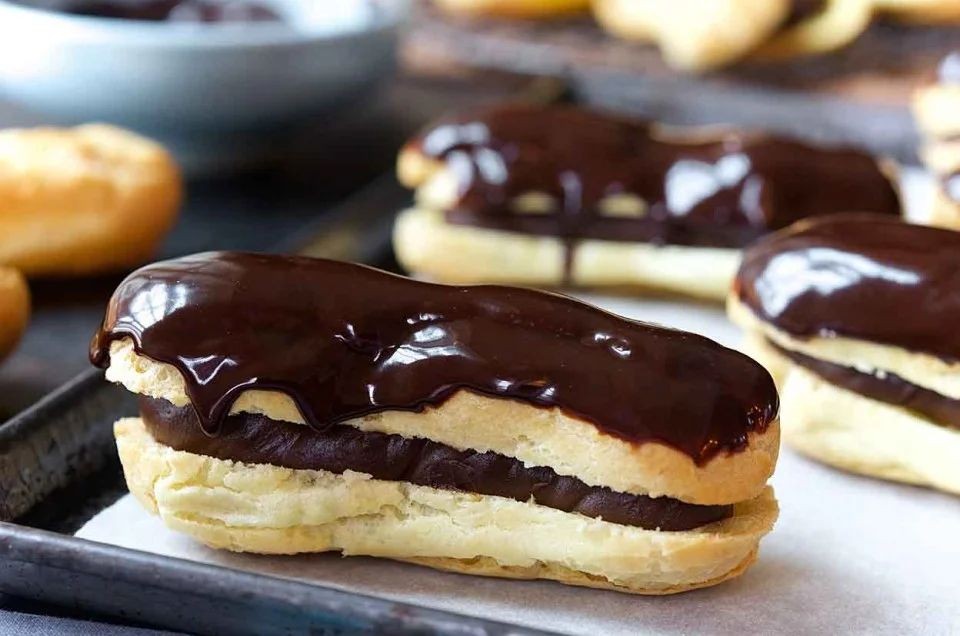
Rich Chocolate Éclairs
Perfecting French pastry doesn’t require professional training—just careful attention to technique. Preparing rich chocolate éclairs involves three distinct components that come together to create an impressive dessert worthy of any special occasion.
Ingredients
- 1 cup water
- 1/2 cup unsalted butter
- 1 cup all-purpose flour
- 4 large eggs
- 2 cups whole milk
- 1/2 cup granulated sugar
- 1/4 cup cornstarch
- 1 teaspoon vanilla extract
- 4 ounces semisweet chocolate
- 1/2 cup heavy cream
Instructions
- Preheat your oven to 400°F and line a baking sheet with parchment paper.
- Combine 1 cup water and 1/2 cup unsalted butter in a medium saucepan over medium heat until the butter melts completely.
- Add 1 cup all-purpose flour all at once and stir vigorously with a wooden spoon until the mixture forms a ball that pulls away from the sides of the pan, about 2 minutes.
- Transfer the dough to a mixing bowl and let it cool for 5 minutes until warm but not hot to the touch.
- Add 4 large eggs one at a time, beating thoroughly after each addition until the dough becomes smooth and glossy. Tip: The dough should fall slowly from the spoon when lifted—if it’s too thick, add an extra tablespoon of water.
- Pipe 4-inch long éclair shapes onto the prepared baking sheet using a pastry bag fitted with a 1/2-inch round tip.
- Bake for 25 minutes at 400°F, then reduce the oven temperature to 350°F and bake for 10 more minutes until golden brown and firm.
- Remove the éclairs from the oven and immediately poke a small hole in each end with a skewer to release steam, then cool completely on a wire rack.
- For the pastry cream, whisk together 1/2 cup granulated sugar and 1/4 cup cornstarch in a saucepan, then gradually whisk in 2 cups whole milk until smooth.
- Cook over medium heat, stirring constantly, until the mixture thickens and bubbles, about 8-10 minutes.
- Remove from heat and stir in 1 teaspoon vanilla extract, then transfer to a bowl and press plastic wrap directly onto the surface to prevent a skin from forming.
- Refrigerate the pastry cream for at least 2 hours until completely chilled. Tip: Chilling the cream thoroughly prevents it from making the éclair shells soggy when filled.
- Fill a pastry bag fitted with a small round tip with the chilled pastry cream and pipe it into the cooled éclair shells through the holes you created earlier.
- For the chocolate glaze, heat 1/2 cup heavy cream in a small saucepan until it just begins to simmer, then pour it over 4 ounces semisweet chocolate in a heatproof bowl.
- Let the mixture sit for 2 minutes, then whisk until smooth and glossy. Tip: If the glaze seems too thick for dipping, add more heavy cream one teaspoon at a time until it reaches the desired consistency.
- Dip the top of each filled éclair into the chocolate glaze, allowing the excess to drip off before placing them on a wire rack to set.
Expect crisp shells that give way to creamy vanilla filling, all enveloped in a rich chocolate coating. These éclairs develop an even more complex flavor when chilled overnight, making them perfect for preparing ahead. For an elegant presentation, dust the finished éclairs with powdered sugar or garnish with chocolate shavings before serving.
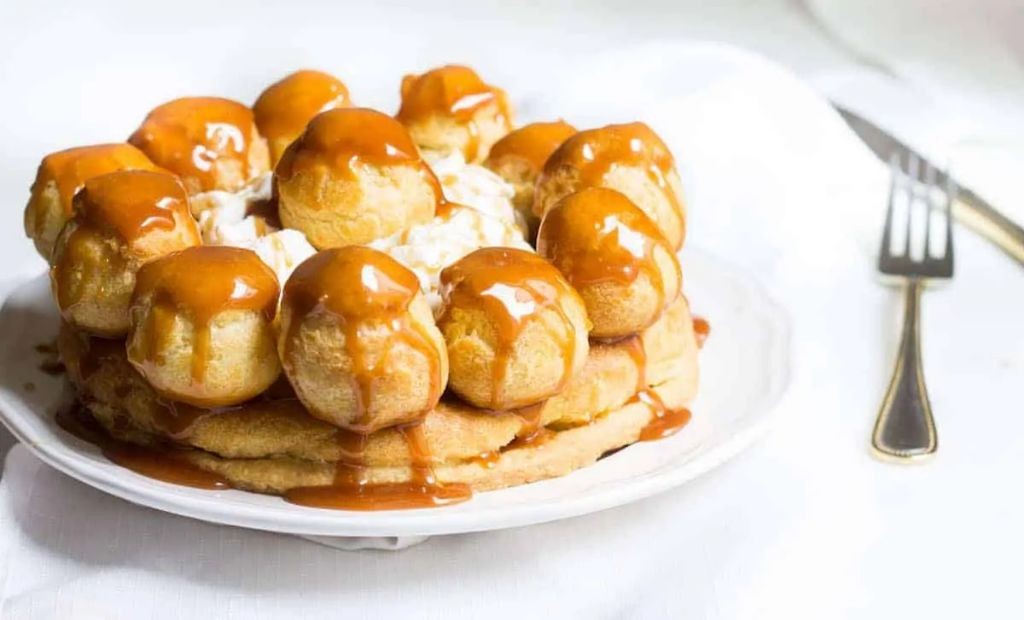
Vanilla Cream Puffs
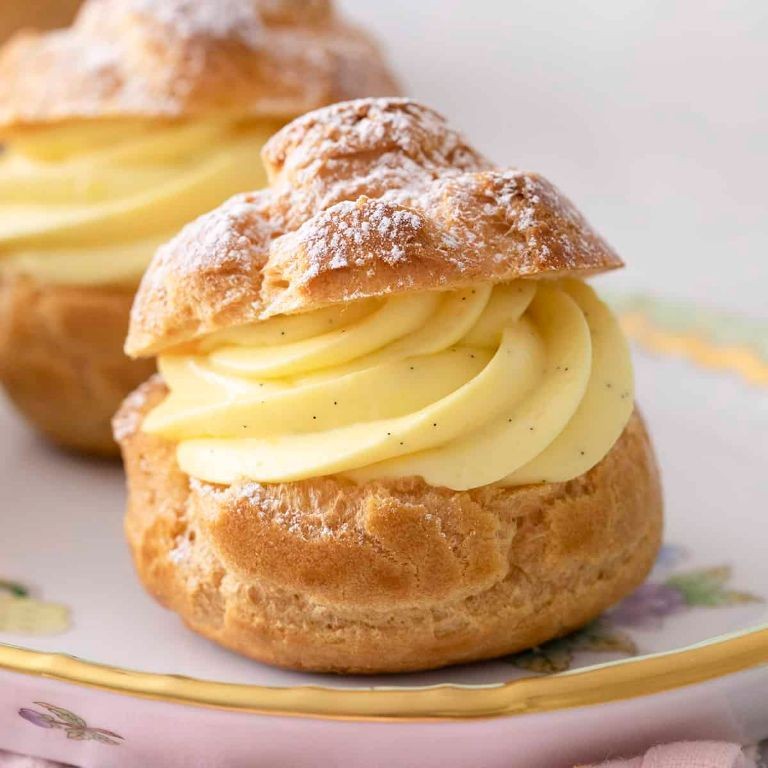
Every baker needs a reliable vanilla cream puff recipe in their arsenal—these delicate pastries with their crisp shells and creamy filling are surprisingly approachable when broken down step by step. Let me guide you through creating these elegant treats from scratch, perfect for impressing guests or enjoying as a special homemade dessert.
Ingredients
– 1 cup water
– 1/2 cup unsalted butter
– 1/4 tsp salt
– 1 cup all-purpose flour
– 4 large eggs
– 2 cups heavy cream
– 1/4 cup granulated sugar
– 1 tsp vanilla extract
Instructions
1. Preheat your oven to 425°F and line two baking sheets with parchment paper.
2. Combine 1 cup water, 1/2 cup unsalted butter, and 1/4 tsp salt in a medium saucepan over medium heat.
3. Bring the mixture to a rolling boil, stirring occasionally until the butter completely melts.
4. Remove the saucepan from heat and immediately add 1 cup all-purpose flour all at once.
5. Stir vigorously with a wooden spoon until the mixture forms a smooth ball that pulls away from the sides of the pan.
6. Transfer the dough to a mixing bowl and let it cool for 5 minutes until warm but not hot to the touch.
7. Add 4 large eggs one at a time, beating thoroughly after each addition until fully incorporated before adding the next egg.
8. Continue beating until the dough becomes smooth, glossy, and holds its shape when scooped.
9. Drop heaping tablespoonfuls of dough onto prepared baking sheets, spacing them 2 inches apart.
10. Bake at 425°F for 15 minutes until puffed and beginning to show some color.
11. Reduce oven temperature to 350°F and continue baking for 25 minutes until golden brown and firm to the touch.
12. Turn off the oven and prop the door open slightly with a wooden spoon, allowing the puffs to cool gradually inside for 30 minutes to prevent collapsing.
13. While puffs cool, whip 2 cups heavy cream, 1/4 cup granulated sugar, and 1 tsp vanilla extract in a chilled bowl until stiff peaks form.
14. Cut cooled puffs horizontally about three-quarters of the way through using a serrated knife.
15. Pipe or spoon the whipped cream filling into each puff until generously filled.
16. Dust filled cream puffs with powdered sugar just before serving.
Outstanding cream puffs feature a delicate, crisp shell that gives way to a cloud-like, vanilla-scented interior. The contrast between the sturdy pastry and airy cream creates an elegant texture experience that feels both light and indulgent. For a creative twist, try drizzling with chocolate ganache or serving alongside fresh berries to complement the simple vanilla flavor.
Crunchy Palmiers
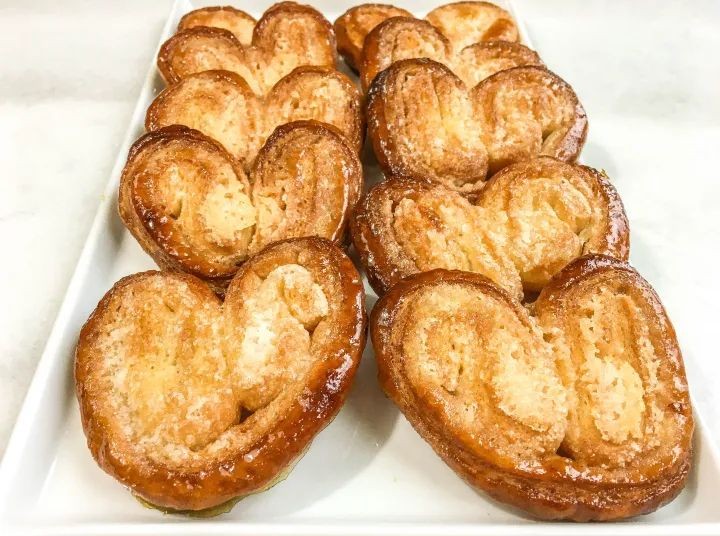
Gently transforming simple pantry staples into elegant, flaky pastries is easier than you might think. These crunchy palmiers require just a few ingredients and some careful folding to create impressive results that will delight any crowd. Let’s walk through the process methodically to ensure your palmiers come out perfectly crisp and golden every time.
Ingredients
- 1 sheet frozen puff pastry
- 1/2 cup granulated sugar
- 1/4 cup unsalted butter
- 1 large egg
- 1 tbsp water
Instructions
- Thaw the frozen puff pastry sheet at room temperature for 40 minutes until pliable but still cool to the touch.
- Preheat your oven to 400°F and line a baking sheet with parchment paper.
- Lightly flour your work surface and unfold the puff pastry sheet, smoothing any creases with a rolling pin.
- Sprinkle 1/4 cup of granulated sugar evenly over the entire surface of the puff pastry.
- Roll the pastry gently with a rolling pin to press the sugar crystals into the dough, creating a slightly textured surface.
- Fold the left side of the pastry toward the center, stopping exactly at the midpoint.
- Fold the right side of the pastry toward the center, meeting the left fold precisely in the middle.
- Fold the two halves together like closing a book, creating four layers of pastry with sugar between each layer.
- Wrap the folded pastry tightly in plastic wrap and refrigerate for 30 minutes to firm up the butter layers, which will create maximum flakiness during baking.
- Remove the pastry from refrigerator and slice into 1/2-inch thick pieces using a sharp knife, wiping the blade clean between cuts for neat slices.
- Place the slices 2 inches apart on the prepared baking sheet, as they will expand significantly during baking.
- Whisk together the egg and 1 tablespoon of water to create an egg wash.
- Brush the egg wash lightly over the top of each palmier to promote even browning and a shiny finish.
- Sprinkle the remaining 1/4 cup of granulated sugar over the egg-washed surfaces.
- Bake at 400°F for 15-18 minutes until the edges are deep golden brown and the sugar has caramelized.
- Flip each palmier carefully with a spatula and bake for another 5-7 minutes until both sides are evenly crisp and golden.
- Transfer the palmiers to a wire rack to cool completely, which allows them to become properly crisp throughout.
Lightly caramelized sugar creates a satisfying crackle with each bite, while the delicate layers shatter into buttery flakes. These elegant treats pair beautifully with afternoon coffee or can be served alongside fruit sorbet for a sophisticated dessert. Their distinctive heart shape makes them particularly charming for special occasions or holiday gatherings.
Delicate Canelés de Bordeaux

You’ve probably admired these elegant French pastries in bakeries, wondering if you could ever create those caramelized shells and custardy centers at home. Yes, you absolutely can master classic canelés with this detailed, beginner-friendly approach that breaks down each technique.
Ingredients
– 2 cups whole milk
– 4 tbsp unsalted butter
– 1 cup granulated sugar
– 1 cup all-purpose flour
– 2 large eggs
– 2 large egg yolks
– 3 tbsp dark rum
– 1 tsp vanilla extract
– 2 tbsp beeswax
Instructions
1. Combine 2 cups whole milk and 4 tbsp unsalted butter in a saucepan over medium heat.
2. Heat the mixture until it reaches 180°F, stirring occasionally with a thermometer.
3. Remove from heat and let cool to 110°F, about 15 minutes.
4. Whisk 1 cup granulated sugar and 1 cup all-purpose flour in a separate bowl.
5. Beat 2 large eggs and 2 large egg yolks in another bowl until pale yellow.
6. Gradually pour the cooled milk mixture into the egg mixture while whisking constantly.
7. Add the flour-sugar mixture to the liquid ingredients and whisk until smooth.
8. Stir in 3 tbsp dark rum and 1 tsp vanilla extract until fully incorporated.
9. Strain the batter through a fine-mesh sieve into a clean container.
10. Cover the container tightly with plastic wrap, pressing it directly onto the batter surface.
11. Refrigerate the batter for exactly 48 hours to develop flavor and texture.
12. Preheat your oven to 450°F and place a baking sheet on the middle rack.
13. Melt 2 tbsp beeswax with 2 tbsp unsalted butter in a small saucepan over low heat.
14. Brush the warm beeswax mixture evenly inside 12 canelé molds using a pastry brush.
15. Fill each prepared mold ¾ full with the chilled batter.
16. Immediately place the filled molds on the preheated baking sheet.
17. Bake at 450°F for 15 minutes until the tops begin bubbling.
18. Reduce oven temperature to 375°F without opening the oven door.
19. Continue baking for 45-50 minutes until the canelés are dark mahogany brown.
20. Remove from oven and immediately unmold onto a wire rack.
21. Let cool completely for 2 hours before serving.
The contrast between the crisp, caramelized exterior and the soft, vanilla-scented interior creates an unforgettable texture experience. Serve them alongside strong coffee for breakfast or with dessert wine for an elegant evening treat—their sophisticated appearance belies how approachable they become once you understand the method.
Apple Tarte Tatin
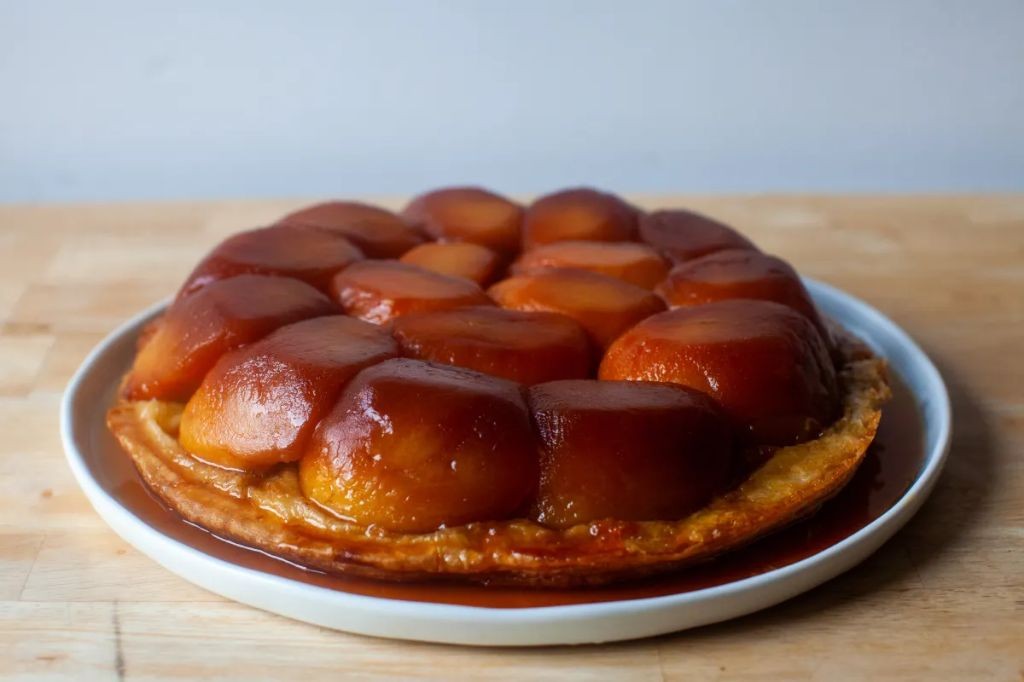
Generating a perfect caramel-coated apple dessert requires patience and precision, but this classic French tarte Tatin delivers stunning results for home bakers willing to follow each step carefully. Let’s walk through the process methodically to ensure your apples caramelize evenly and your crust turns golden brown.
Ingredients
– 6 medium Granny Smith apples
– 1 ½ cups granulated sugar
– ½ cup unsalted butter
– 1 sheet frozen puff pastry
– 1 tsp lemon juice
– ½ tsp ground cinnamon
– ¼ tsp salt
Instructions
1. Preheat your oven to 400°F and position a rack in the center. 2. Peel all 6 Granny Smith apples using a vegetable peeler. 3. Cut each apple in half vertically through the core. 4. Use a melon baller or small spoon to remove the core and seeds from each apple half. 5. Toss the prepared apple halves with 1 teaspoon lemon juice to prevent browning. 6. Sprinkle 1 ½ cups granulated sugar evenly across the bottom of a 10-inch oven-safe skillet. 7. Arrange the ½ cup unsalted butter, cut into tablespoon-sized pieces, evenly over the sugar. 8. Place the skillet over medium heat and cook without stirring for 5-7 minutes until the sugar melts and turns amber-colored. 9. Carefully arrange the apple halves rounded-side down in the caramel, packing them tightly in a single layer. 10. Sprinkle ½ teaspoon ground cinnamon and ¼ teaspoon salt evenly over the apples. 11. Continue cooking the apples over medium heat for 12-15 minutes until they release their juices and the caramel bubbles around them. 12. Remove the skillet from heat and let it cool for 10 minutes until the caramel stops bubbling vigorously. 13. While the apples cool, thaw 1 sheet frozen puff pastry according to package directions. 14. Roll the puff pastry to ⅛-inch thickness on a lightly floured surface. 15. Cut the pastry into a circle slightly larger than your skillet using a knife or bowl as a guide. 16. Drape the pastry circle over the cooled apples, tucking the edges down inside the skillet rim. 17. Cut 4 small slits in the pastry center to allow steam to escape during baking. 18. Bake at 400°F for 25-30 minutes until the pastry is puffed and golden brown. 19. Remove the skillet from the oven using oven mitts and place it on a heat-safe surface. 20. Let the tarte cool in the skillet for exactly 15 minutes to allow the caramel to thicken slightly. 21. Place a large serving plate upside down over the skillet. 22. Using both hands protected by oven mitts, quickly flip the skillet and plate together in one confident motion. 23. Gently lift the skillet away, leaving the inverted tarte on the plate. 24. Scrape any remaining caramel from the skillet over the apples. Using a heavy, oven-safe skillet ensures even heat distribution for perfect caramelization, while the 15-minute cooling period before flipping allows the caramel to set just enough to hold its shape without becoming too hard. Serve your tarte Tatin warm with the caramel sauce pooling around each slice. The apples maintain a slight firmness beneath their glossy coating, creating a satisfying contrast with the flaky, buttery pastry. For an elegant presentation, garnish with vanilla bean ice cream that slowly melts into the warm caramel, or add a sprinkle of flaky sea salt to heighten the sweet-salty balance.
Pear Frangipane Tart
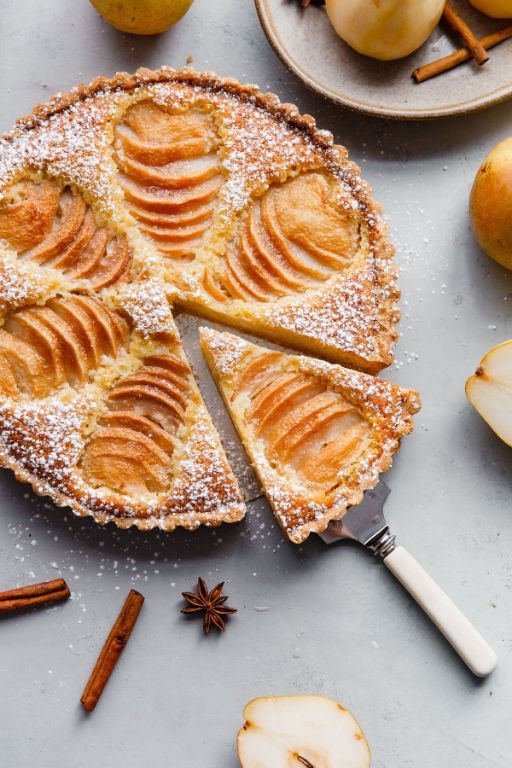
Let’s create a stunning pear frangipane tart that combines buttery crust, nutty almond filling, and tender fruit in perfect harmony. This elegant dessert appears sophisticated but follows straightforward techniques anyone can master. We’ll build this tart methodically from crust to final glaze.
Ingredients
– 1 ¼ cups all-purpose flour
– ½ cup unsalted butter
– ¼ cup granulated sugar
– 1 large egg
– 1 cup almond flour
– ½ cup unsalted butter
– ½ cup granulated sugar
– 2 large eggs
– 1 teaspoon vanilla extract
– 3 ripe pears
– 2 tablespoons apricot jam
Instructions
1. Combine 1 ¼ cups all-purpose flour, ½ cup cold cubed unsalted butter, and ¼ cup granulated sugar in a food processor.
2. Pulse the mixture until it resembles coarse crumbs with butter pieces no larger than peas.
3. Add 1 large egg and pulse just until the dough begins to clump together.
4. Tip: Avoid overmixing the dough to prevent a tough crust.
5. Press the dough evenly into a 9-inch tart pan with removable bottom, covering the bottom and sides completely.
6. Chill the crust in the refrigerator for 30 minutes to prevent shrinkage during baking.
7. Preheat your oven to 375°F while the crust chills.
8. Bake the empty crust for 15 minutes until lightly golden around the edges.
9. Cream together ½ cup softened unsalted butter and ½ cup granulated sugar until light and fluffy.
10. Beat in 2 large eggs one at a time until fully incorporated.
11. Mix in 1 cup almond flour and 1 teaspoon vanilla extract until smooth.
12. Spread the frangipane filling evenly over the partially baked crust.
13. Peel 3 ripe pears, cut them in half, and remove the cores with a melon baller.
14. Slice each pear half crosswise into ¼-inch thick slices, keeping the shape intact.
15. Arrange the pear halves in a circular pattern over the frangipane filling, gently pressing them in.
16. Tip: Fan the pear slices slightly for an attractive presentation while maintaining structure.
17. Bake at 375°F for 35-40 minutes until the frangipane is puffed and golden brown.
18. Heat 2 tablespoons apricot jam with 1 tablespoon water in a small saucepan until melted.
19. Brush the warm jam glaze over the baked tart for a shiny finish.
20. Tip: Let the tart cool completely before slicing to ensure clean cuts through the layers.
21. Cool the tart on a wire rack for at least 2 hours before serving.
Zesty almond frangipane contrasts beautifully with the soft, sweet pears, while the buttery crust provides satisfying crunch. This tart develops richer flavor overnight, making it perfect for preparing ahead. Serve warm slices with vanilla ice cream or enjoy at room temperature with afternoon coffee for maximum enjoyment.
Rustic Cherry Clafoutis
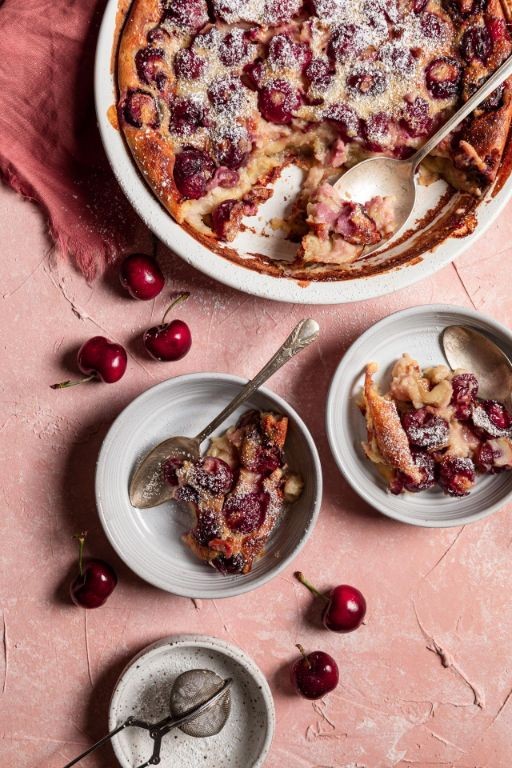
Here’s a simple yet elegant dessert that transforms basic pantry ingredients into something truly special. Rustic cherry clafoutis combines juicy fruit with a custard-like batter that bakes up beautifully golden. Let me walk you through each step to ensure perfect results every time.
Ingredients
– 1 cup whole milk
– 3 large eggs
– 1/2 cup granulated sugar
– 1/2 cup all-purpose flour
– 1/4 teaspoon salt
– 1 teaspoon vanilla extract
– 2 tablespoons unsalted butter
– 2 cups fresh cherries, pitted
– 1 tablespoon powdered sugar
Instructions
1. Preheat your oven to 350°F and position a rack in the center for even heating.
2. Generously grease a 9-inch pie dish with the 2 tablespoons of unsalted butter, making sure to coat the entire surface.
3. Arrange the 2 cups of pitted cherries in a single layer across the bottom of the prepared dish.
4. In a medium mixing bowl, whisk together the 3 large eggs until they become pale yellow and slightly frothy.
5. Gradually add the 1/2 cup granulated sugar while continuing to whisk, creating a smooth, creamy mixture.
6. Pour in the 1 cup of whole milk and 1 teaspoon of vanilla extract, whisking until fully incorporated.
7. Sift the 1/2 cup all-purpose flour and 1/4 teaspoon salt directly into the wet ingredients to prevent lumps.
8. Whisk the batter vigorously for 60 seconds until completely smooth and free of flour streaks.
9. Carefully pour the batter over the cherries in the pie dish, ensuring even distribution.
10. Bake at 350°F for 35-40 minutes until the edges are golden brown and the center springs back when lightly touched.
11. Remove from oven and let cool on a wire rack for 20 minutes to allow the custard to set properly.
12. Dust the top evenly with 1 tablespoon of powdered sugar just before serving.
Out of the oven, this clafoutis offers a delightful contrast between the tender, cake-like custard and burst-in-your-mouth cherries. The texture remains wonderfully moist while developing delicate crispy edges that provide perfect balance. For a creative twist, serve warm slices with a dollop of whipped cream or alongside vanilla ice cream for an extra indulgent treat.
Lavender Honey Macarons

You’ve probably admired those delicate French macarons in bakery cases, but making lavender honey macarons at home is more achievable than you might think. Let’s walk through each stage methodically to create these elegant treats with their floral sweetness and signature crisp shell.
Ingredients
– 1 cup almond flour
– 1 ¾ cups powdered sugar
– 3 large egg whites
– ¼ cup granulated sugar
– ¼ teaspoon cream of tartar
– 2 tablespoons dried culinary lavender
– ½ cup honey
– ½ cup unsalted butter
– 4 ounces cream cheese
Instructions
1. Pulse 1 cup almond flour and 1 ¾ cups powdered sugar in a food processor for 30 seconds until finely combined.
2. Sift the almond flour mixture through a fine-mesh sieve into a large bowl to remove any coarse bits.
3. Place 3 large egg whites in a clean, grease-free stand mixer bowl and whisk on medium speed until foamy.
4. Add ¼ teaspoon cream of tartar to the egg whites and continue whisking until soft peaks form.
5. Gradually add ¼ cup granulated sugar while whisking on high speed until stiff, glossy peaks form.
6. Gently fold the sifted dry ingredients into the meringue in three additions using a spatula.
7. Continue folding until the batter flows off the spatula in a continuous ribbon, about 40-50 strokes.
8. Transfer the batter to a piping bag fitted with a ½-inch round tip.
9. Pipe 1½-inch circles onto parchment-lined baking sheets, spacing them 1 inch apart.
10. Firmly tap the baking sheets on the counter 3-4 times to release air bubbles.
11. Let the piped macarons rest at room temperature for 30 minutes until a skin forms on the surface.
12. Preheat your oven to 300°F with a rack positioned in the center.
13. Bake one sheet at a time for 15 minutes until the macarons lift cleanly from the parchment.
14. Cool completely on the baking sheet for 20 minutes before removing.
15. Grind 2 tablespoons dried culinary lavender in a spice grinder for 15 seconds until finely powdered.
16. Beat ½ cup unsalted butter and 4 ounces cream cheese with a mixer on medium speed for 2 minutes until smooth.
17. Add ½ cup honey and the ground lavender to the butter mixture and beat for 1 minute until fluffy.
18. Transfer the lavender honey filling to a piping bag fitted with a ¼-inch round tip.
19. Pipe a dollop of filling onto the flat side of one macaron shell.
20. Sandwich with another shell and gently press until the filling reaches the edges.
Just baked, these macarons offer a crisp exterior that gives way to a chewy interior, with the lavender’s floral notes balancing the honey’s warmth. For a stunning presentation, arrange them on a tiered stand with fresh lavender sprigs, or package them in clear boxes tied with velvet ribbon for thoughtful gifts.
Pistachio Raspberry Paris-Brest
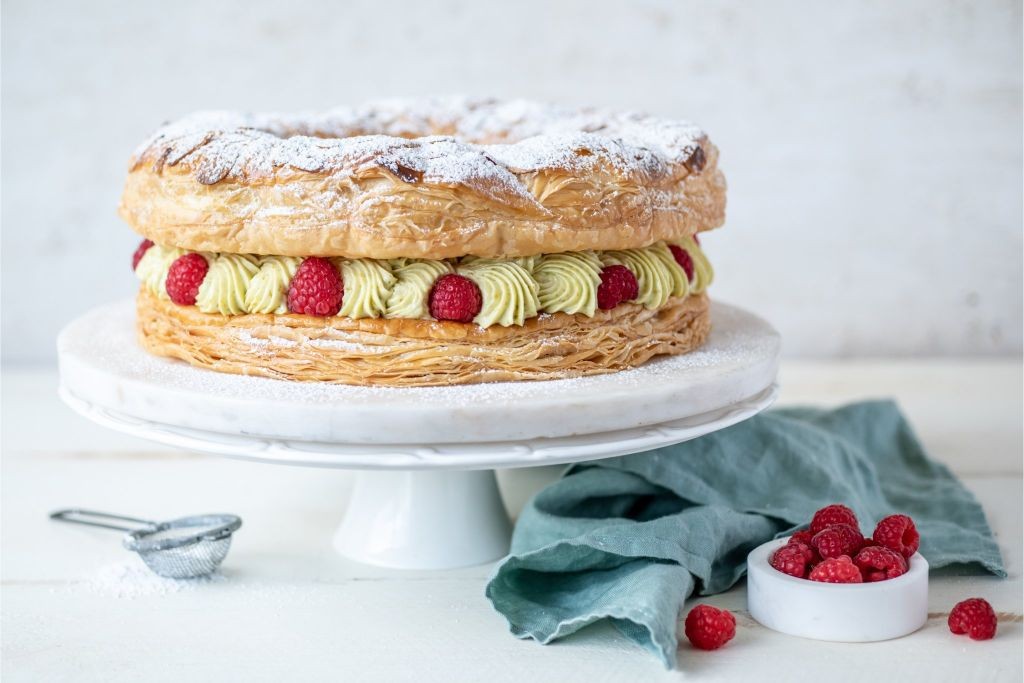
Savor the elegant combination of nutty pistachio and tart raspberry in this classic French pastry reimagined for the American home baker. Starting with a crisp choux ring, we’ll fill it with a luxurious pistachio cream and top it with vibrant raspberry preserves for a dessert that looks as impressive as it tastes. You’ll master the techniques behind this stunning showstopper through clear, methodical steps.
Ingredients
– 1 cup water
– 8 tablespoons unsalted butter
– 1 cup all-purpose flour
– 4 large eggs
– 1/2 cup granulated sugar
– 1/2 cup shelled pistachios
– 2 cups heavy cream
– 1/2 cup raspberry preserves
– 1/4 cup sliced pistachios
Instructions
1. Preheat your oven to 400°F and line a baking sheet with parchment paper.
2. Combine 1 cup water and 8 tablespoons unsalted butter in a medium saucepan over medium heat.
3. Bring the mixture to a rolling boil, then immediately remove from heat.
4. Add 1 cup all-purpose flour all at once and stir vigorously with a wooden spoon until the mixture forms a ball that pulls away from the sides of the pan.
5. Transfer the dough to a mixing bowl and let it cool for 5 minutes until warm but not hot.
6. Add 4 large eggs one at a time, beating thoroughly after each addition until the dough becomes smooth and glossy.
7. Pipe or spoon the choux pastry into a 9-inch ring on the prepared baking sheet.
8. Bake at 400°F for 25 minutes until puffed and golden brown, then reduce oven temperature to 350°F.
9. Continue baking for another 15 minutes until the ring feels light and hollow when tapped.
10. Use a paring knife to immediately slice the ring horizontally in half while still warm, then transfer both halves to a wire rack to cool completely.
11. While the choux ring cools, toast 1/2 cup shelled pistachios in a dry skillet over medium heat for 3-4 minutes until fragrant.
12. Grind the toasted pistachios with 1/2 cup granulated sugar in a food processor until finely ground.
13. Whip 2 cups heavy cream in a chilled bowl until soft peaks form.
14. Fold the pistachio-sugar mixture into the whipped cream until fully incorporated.
15. Spread 1/2 cup raspberry preserves evenly over the bottom half of the cooled choux ring.
16. Pipe or spoon the pistachio cream over the raspberry layer.
17. Place the top half of the choux ring over the filling.
18. Sprinkle 1/4 cup sliced pistachios over the assembled Paris-Brest.
19. Refrigerate for at least 1 hour before serving to allow the flavors to meld.
Your finished Paris-Brest offers a delightful contrast of textures, from the crisp choux pastry to the smooth, nutty cream and bursts of fruity raspberry. You’ll notice how the pistachio flavor deepens as it chills, creating a more complex dessert experience. For an elegant presentation, dust with powdered sugar just before serving or accompany with fresh raspberries on the side.
Crème Brûlée Tartlets
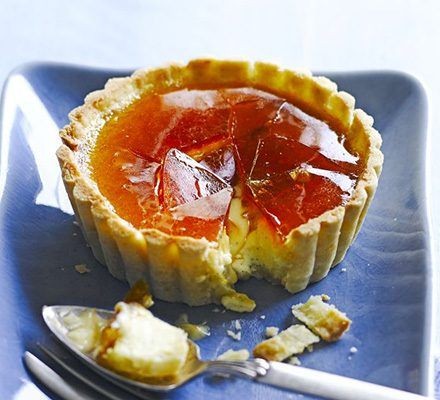
Rarely does a dessert combine elegance with approachability quite like these individual crème brûlée tartlets. Rather than tackling a large, intimidating custard, we’ll create perfectly portioned treats with that signature crackly sugar top and velvety filling, guiding you through each simple step to ensure success. You’ll master the classic technique while working with manageable mini portions that bake evenly and impress guests effortlessly.
Ingredients
– 1 ½ cups all-purpose flour
– ½ cup unsalted butter
– ¼ cup granulated sugar
– 1 large egg yolk
– 2 tablespoons ice water
– 1 ½ cups heavy cream
– ½ cup granulated sugar
– 4 large egg yolks
– 1 teaspoon vanilla extract
Instructions
1. Combine 1 ½ cups all-purpose flour, ½ cup cold unsalted butter cut into small cubes, and ¼ cup granulated sugar in a food processor.
2. Pulse the mixture until it resembles coarse crumbs, about 10 short pulses.
3. Add 1 large egg yolk and 2 tablespoons ice water to the food processor.
4. Pulse just until the dough begins to clump together, being careful not to overmix.
5. Press the dough evenly into 6 individual tartlet pans, ensuring it covers the bottom and sides completely.
6. Chill the tartlet shells in the refrigerator for 30 minutes to prevent shrinkage during baking.
7. Preheat your oven to 350°F while the shells chill.
8. Bake the chilled tartlet shells for 15-18 minutes until lightly golden and set.
9. Heat 1 ½ cups heavy cream in a saucepan over medium heat until it just begins to simmer around the edges.
10. Whisk 4 large egg yolks with ½ cup granulated sugar in a separate bowl until pale and thickened.
11. Slowly pour the hot cream into the egg mixture while whisking constantly to temper the eggs.
12. Stir in 1 teaspoon vanilla extract until fully incorporated.
13. Strain the custard through a fine-mesh sieve to remove any cooked egg bits for the smoothest texture.
14. Divide the strained custard evenly among the baked tartlet shells.
15. Bake at 300°F for 25-30 minutes until the edges are set but the centers still jiggle slightly.
16. Cool the tartlets completely at room temperature, then refrigerate for at least 4 hours until thoroughly chilled.
17. Sprinkle a thin, even layer of granulated sugar over each chilled tartlet just before serving.
18. Caramelize the sugar using a kitchen torch, moving constantly until evenly golden and bubbly.
19. Let the caramelized sugar harden for 1-2 minutes before serving.
Perfectly executed crème brûlée tartlets offer that satisfying crack when you tap the caramelized sugar shield, revealing the silkiest vanilla custard beneath. The contrast between the crisp sugar, creamy filling, and buttery crust creates a textural experience that feels both sophisticated and comforting. For a creative twist, serve them with fresh berries or a drizzle of espresso reduction to complement the rich vanilla notes.
Almond Cream St. Honoré Cake
Keeping classic French patisserie approachable, this Almond Cream St. Honoré Cake combines crisp puff pastry, airy choux puffs, and rich almond cream in an elegant yet achievable dessert.
Ingredients
– 1 sheet frozen puff pastry
– 1 cup water
– 1/2 cup unsalted butter
– 1 cup all-purpose flour
– 4 large eggs
– 1 cup granulated sugar
– 2 cups whole milk
– 1/2 cup cornstarch
– 1 teaspoon almond extract
– 1/4 teaspoon salt
– 1 cup sliced almonds
Instructions
1. Thaw the frozen puff pastry sheet at room temperature for 40 minutes.
2. Preheat your oven to 400°F.
3. Unfold the puff pastry sheet onto a parchment-lined baking sheet.
4. Use a fork to prick the pastry surface evenly, which prevents excessive rising.
5. Bake the pastry for 15 minutes until golden and puffed.
6. Combine 1 cup water and 1/2 cup unsalted butter in a saucepan over medium heat.
7. Bring the mixture to a rolling boil.
8. Immediately remove from heat and stir in 1 cup all-purpose flour until a ball forms.
9. Cool the dough for 5 minutes.
10. Beat in 4 large eggs one at a time until smooth and glossy.
11. Transfer the choux pastry to a piping bag fitted with a round tip.
12. Pipe 1-inch mounds onto the baked puff pastry base, spacing them 1 inch apart.
13. Bake the assembled cake at 375°F for 25 minutes until the choux puffs are golden and hollow-sounding when tapped.
14. Whisk 1 cup granulated sugar, 1/2 cup cornstarch, and 1/4 teaspoon salt in a saucepan.
15. Gradually whisk in 2 cups whole milk until smooth.
16. Cook over medium heat, stirring constantly, until the mixture thickens and bubbles, about 8 minutes.
17. Remove from heat and stir in 1 teaspoon almond extract.
18. Cool the almond cream to room temperature, covering with plastic wrap directly on the surface to prevent a skin from forming.
19. Spread the cooled almond cream over the puff pastry base between the choux puffs.
20. Sprinkle 1 cup sliced almonds evenly over the almond cream.
21. Return the cake to a 350°F oven for 10 minutes to toast the almonds lightly.
22. Cool the cake completely on a wire rack for 2 hours before serving.
Finally, this cake offers a delightful contrast between the flaky pastry base, creamy almond filling, and crisp choux puffs. For a festive presentation, drizzle with caramel sauce just before serving to complement the nutty flavors.
Caramelized Mille-Feuille
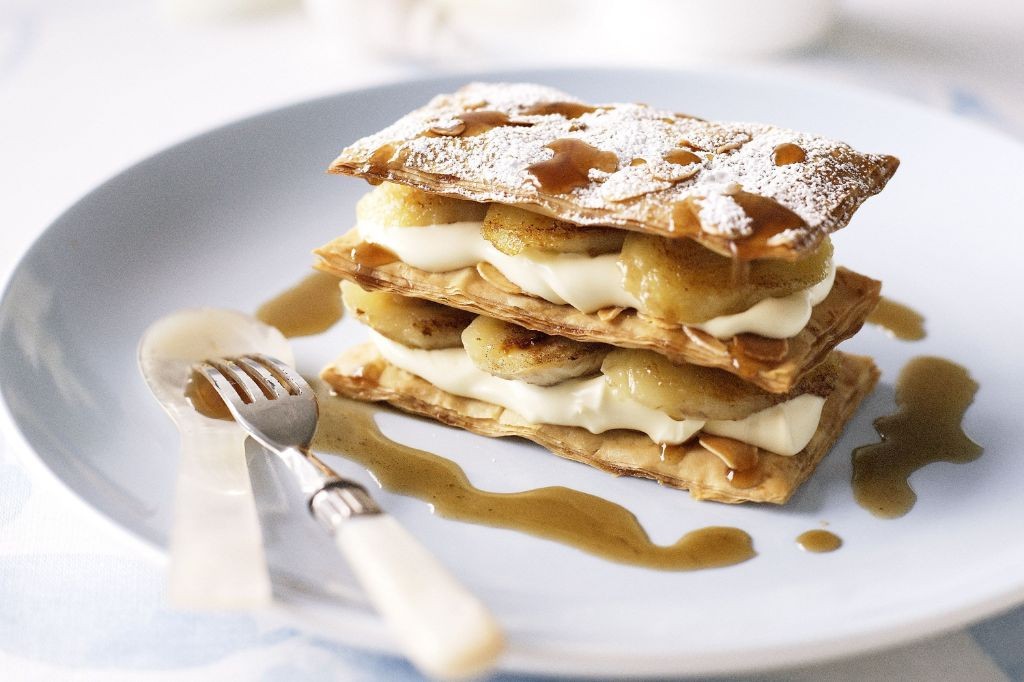
Baking the perfect caramelized mille-feuille requires patience and precision, but the reward is a stunning dessert with crisp, buttery layers and sweet caramel notes. By carefully following each step, you’ll create a professional-looking pastry that’s surprisingly achievable at home. Let’s begin with gathering our ingredients and preparing the components systematically.
Ingredients
– 1 package frozen puff pastry
– 1 cup granulated sugar
– 1/4 cup water
– 2 cups heavy cream
– 1/4 cup powdered sugar
– 1 teaspoon vanilla extract
– 1/4 teaspoon salt
Instructions
1. Thaw one package of frozen puff pastry according to package directions, about 30 minutes at room temperature.
2. Preheat your oven to 400°F and line a baking sheet with parchment paper.
3. Roll the thawed puff pastry into a 12×9-inch rectangle on a lightly floured surface.
4. Cut the pastry into 12 equal rectangles using a sharp knife or pizza cutter.
5. Transfer the pastry rectangles to the prepared baking sheet, spacing them 1 inch apart.
6. Prick each pastry rectangle all over with a fork to prevent excessive puffing.
7. Bake at 400°F for 15-18 minutes until golden brown and fully puffed.
8. Remove the baked pastry layers from the oven and cool completely on a wire rack.
9. Combine 1 cup granulated sugar and 1/4 cup water in a heavy-bottomed saucepan over medium heat.
10. Cook the sugar mixture without stirring until it reaches 350°F on a candy thermometer.
11. Immediately remove the caramel from heat when it reaches a deep amber color.
12. Dip the top of each cooled pastry layer into the hot caramel, then place on a parchment-lined tray.
13. Allow the caramel coating to harden completely, about 10 minutes.
14. Whip 2 cups heavy cream with 1/4 cup powdered sugar, 1 teaspoon vanilla extract, and 1/4 teaspoon salt until stiff peaks form.
15. Spread the whipped cream between three caramel-coated pastry layers to form each stack.
16. Repeat the stacking process to create four complete mille-feuille pastries.
Resulting in an exquisite dessert, the caramelized mille-feuille offers a satisfying crackle when you bite through the glass-like caramel topping. The crisp pastry layers provide textural contrast against the smooth, lightly sweetened cream filling. For an elegant presentation, dust the assembled pastries with additional powdered sugar just before serving.
Summary
Outstanding French pastries await in this collection, perfect for any celebration or cozy baking day. We hope these 18 recipes inspire your next kitchen adventure! Don’t forget to share which pastry became your favorite in the comments below and pin this article on Pinterest to save these decadent treats for later.