Nothing says fun and refreshing like a colorful gelatin creation! Whether you’re planning a summer party, looking for a light dessert, or just craving something sweet and wobbly, these 20 recipes are sure to delight. From fruity classics to creative new twists, get ready to rediscover the joy of gelatin. Let’s dive into these delicious, easy-to-make treats that will bring smiles to every table!
Strawberry Jell-O Salad
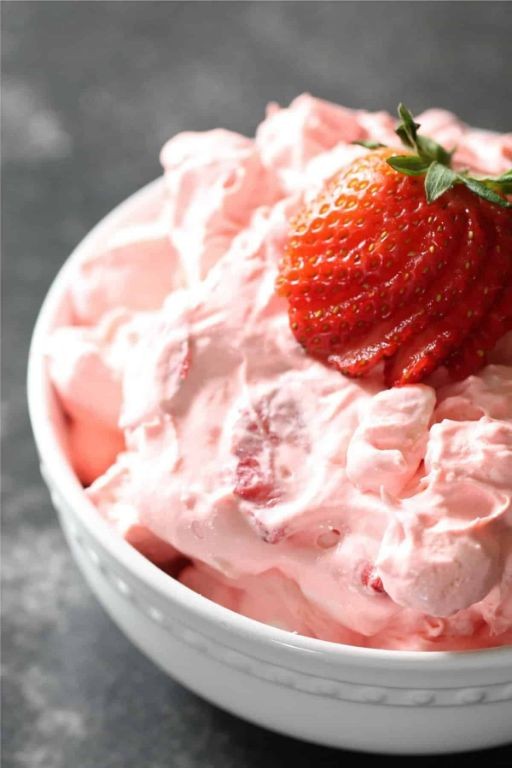
Delightfully bridging the gap between nostalgic comfort and contemporary elegance, this Strawberry Jell-O Salad transforms simple ingredients into a stunning centerpiece. During the warmer months, its refreshing qualities make it an ideal accompaniment to grilled entrees or a light standalone dessert. The vibrant crimson hue and delicate texture never fail to impress guests at potlucks and family gatherings alike.
Ingredients
– 1 (6-ounce) package strawberry Jell-O—I find the name brand yields the most vibrant color
– 2 cups boiling water—using filtered water ensures the purest flavor
– 2 cups cold water—chilled beforehand for quicker setting
– 1 (16-ounce) container frozen sliced strawberries in syrup—thawed, as frozen berries will cloud the gelatin
– 1 (8-ounce) can crushed pineapple in juice—undrained, the juice adds natural sweetness
– 1 cup miniature marshmallows—these create delightful pockets of soft texture
– 1/2 cup chopped pecans—toasted lightly for deeper flavor
– 1 cup sour cream—full-fat provides the creamiest layer
Instructions
1. Pour the strawberry Jell-O powder into a large heatproof bowl.
2. Carefully measure and pour 2 cups of boiling water directly over the Jell-O powder.
3. Whisk continuously for 2 full minutes until the powder is completely dissolved and no granules remain.
4. Add 2 cups of cold water to the dissolved Jell-O mixture and whisk to combine thoroughly.
5. Gently stir in the thawed frozen strawberries with their syrup until evenly distributed.
6. Fold in the undrained crushed pineapple using a spatula to maintain fruit integrity.
7. Sprinkle the miniature marshmallows evenly throughout the mixture.
8. Add the chopped toasted pecans and fold gently to incorporate without overmixing.
9. Pour half of the Jell-O mixture into a 9×13-inch glass baking dish.
10. Refrigerate the first layer for 45 minutes exactly, until set but not firm—it should jiggle slightly when moved.
11. Spread 1 cup of sour cream evenly over the set Jell-O layer using an offset spatula.
12. Carefully pour the remaining Jell-O mixture over the sour cream layer.
13. Return the dish to the refrigerator and chill for at least 4 hours, or until completely firm.
14. Cut into squares using a sharp knife dipped in warm water between cuts for clean edges. Creamy and refreshing, this salad offers a delightful contrast between the firm gelatin and the soft sour cream layer. Consider garnishing with fresh mint sprigs and additional toasted pecans for an elegant presentation that elevates this classic dish beyond its humble origins.
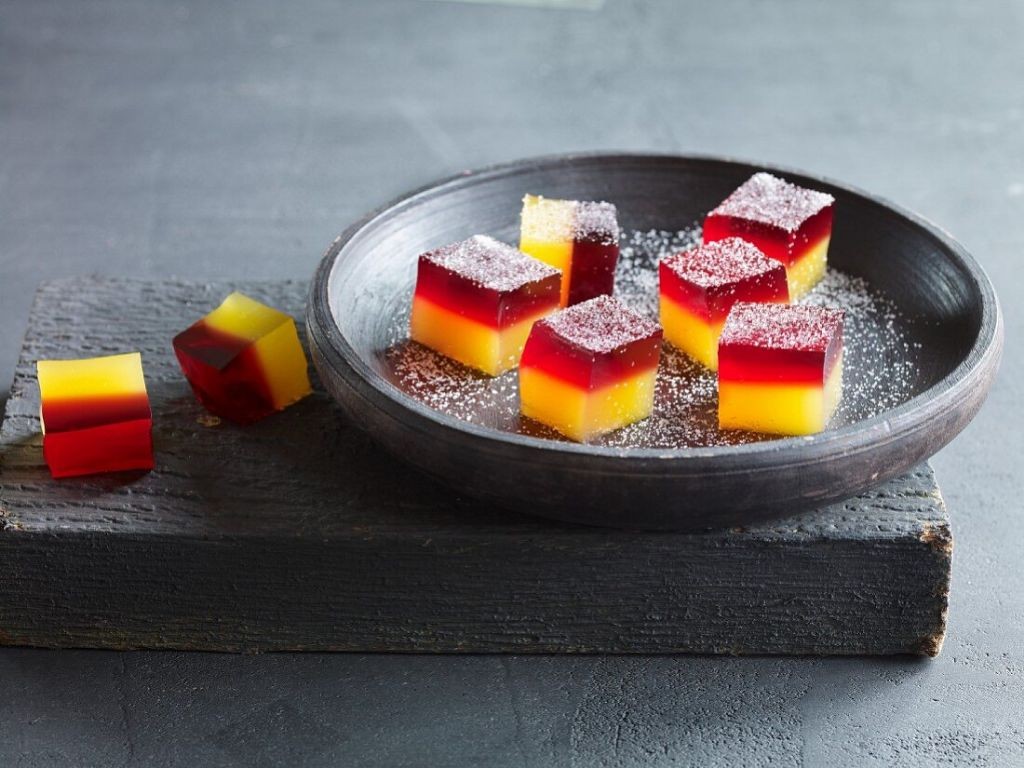
Rainbow Layered Gelatin Dessert
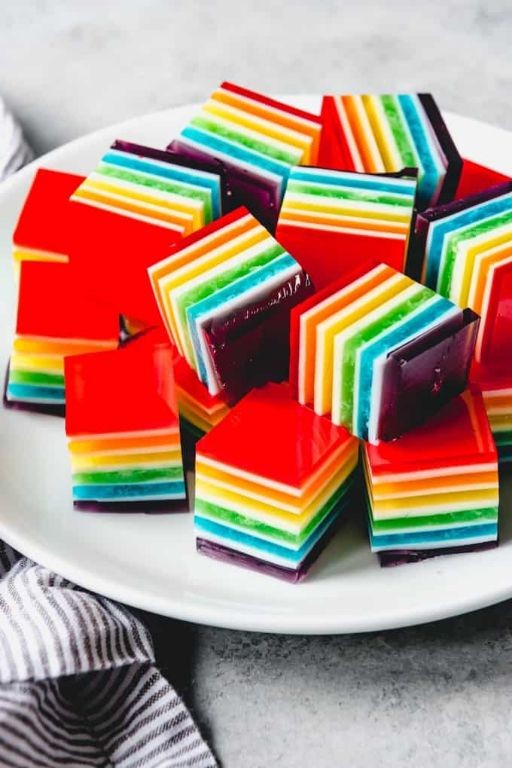
Delightfully vibrant and visually stunning, this rainbow layered gelatin dessert transforms simple ingredients into an edible work of art. Each translucent layer captures the spectrum of colors in a delicate dance of sweet flavors and smooth textures. Perfect for celebrations or simply brightening an ordinary day, this dessert never fails to impress both the eyes and palate.
Ingredients
- 6 boxes (3 oz each) of different flavored gelatin – I love using strawberry, orange, lemon, lime, berry blue, and grape for the full rainbow effect
- 4 envelopes unflavored gelatin powder – this extra gelatin ensures clean, distinct layers that hold their shape beautifully
- 4 cups boiling water – freshly boiled works best for complete dissolution
- 4 cups cold water – I prefer using filtered water for the purest flavor
- 1 can (14 oz) sweetened condensed milk – this creates the creamy white layers that separate the colors
- 2 cups heavy cream – chilled straight from the refrigerator for optimal whipping
Instructions
- Lightly grease a 9×13-inch glass baking dish with cooking spray, ensuring easy removal later.
- Dissolve one flavored gelatin packet in 1 cup of boiling water in a medium bowl, stirring continuously for 2 minutes until completely clear.
- Mix in 1/2 cup of cold water and pour this first colored layer into the prepared dish.
- Refrigerate the dish for exactly 30 minutes until the gelatin sets firmly when touched.
- Meanwhile, dissolve 2 envelopes of unflavored gelatin in 1 cup of boiling water, stirring for 90 seconds.
- Whisk in the sweetened condensed milk and remaining 1 1/2 cups cold water until fully incorporated.
- Gently pour 1 cup of this white mixture over the first colored layer, tilting the dish to distribute evenly.
- Return to refrigerator for another 30 minutes until the white layer feels firm to the touch.
- Repeat steps 2-4 with remaining colored gelatins, alternating with white layers, allowing each to set completely before adding the next.
- After the final layer sets, refrigerate the complete dessert for at least 4 hours or overnight.
- Whip the heavy cream to stiff peaks using an electric mixer on medium-high speed for 3-4 minutes.
- Run a thin knife around the edges of the dish and dip the bottom in warm water for 10 seconds to loosen.
- Invert the dessert onto a serving platter and cut into squares using a sharp knife dipped in hot water between cuts.
- Top each serving with a dollop of whipped cream just before serving.
Perfectly layered and jewel-toned, this dessert offers a delightful contrast between the firm, fruity gelatin and creamy white intervals. The clean slices reveal stunning cross-sections that make each serving feel like a miniature masterpiece. Present it on a clear glass platter to showcase the rainbow effect, or cut into smaller cubes for a colorful addition to dessert buffets.
Orange Creamsicle Jell-O
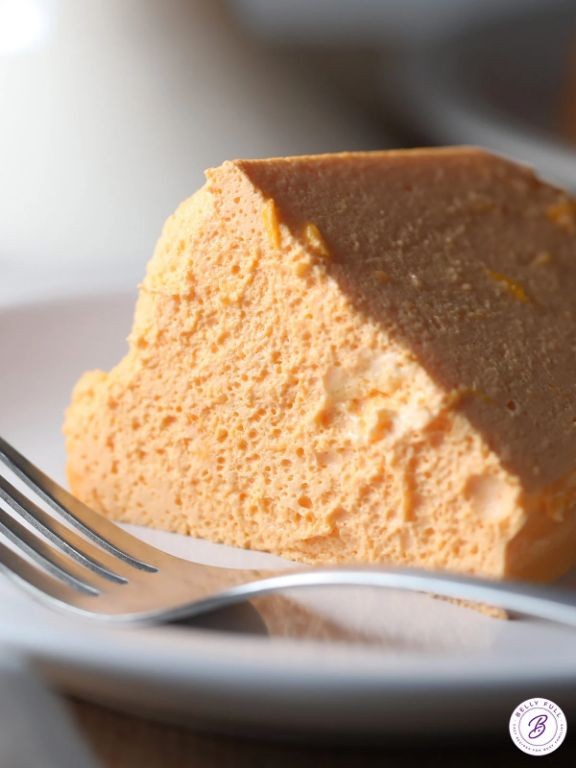
Capturing the nostalgic essence of childhood summers in a sophisticated dessert, this Orange Creamsicle Jell-O transforms simple ingredients into an elegant treat. Combining the bright citrus notes of fresh oranges with the creamy richness of vanilla, this layered creation offers both visual appeal and delightful flavor complexity. Perfect for bridging the gap between casual gatherings and formal occasions, it brings a touch of whimsical refinement to any table.
Ingredients
– 1 package (3 oz) orange-flavored gelatin—I find the name-brand version yields the most vibrant color
– 1 cup boiling water
– 1 cup cold orange juice, preferably freshly squeezed for the brightest flavor
– 1 cup heavy whipping cream, chilled thoroughly for optimal whipping
– 2 tablespoons granulated sugar
– 1 teaspoon pure vanilla extract—this is where splurging on Madagascar vanilla makes a noticeable difference
Instructions
1. Pour the orange-flavored gelatin powder into a medium heatproof bowl.
2. Carefully measure 1 cup of boiling water and pour it directly over the gelatin powder.
3. Whisk continuously for 2 full minutes until the gelatin is completely dissolved and no granules remain.
4. Stir in 1 cup of cold orange juice until fully incorporated.
5. Pour the orange gelatin mixture into an 8×8-inch glass baking dish.
6. Refrigerate the dish for exactly 45 minutes until the gelatin is set around the edges but still slightly jiggly in the center.
7. While the gelatin chills, combine 1 cup chilled heavy whipping cream, 2 tablespoons granulated sugar, and 1 teaspoon vanilla extract in a large mixing bowl.
8. Using an electric mixer on medium-high speed, whip the cream mixture for 3-4 minutes until stiff peaks form that hold their shape when the beaters are lifted.
9. Spread the whipped cream mixture evenly over the partially set orange gelatin layer using an offset spatula.
10. Return the dish to the refrigerator and chill for at least 2 hours until completely firm.
11. Cut into 1-inch squares using a sharp knife dipped in warm water between cuts for clean edges.
Keeping its delicate balance of airy cream and vibrant citrus, this dessert offers a satisfying contrast between the firm gelatin base and cloud-like topping. The vanilla-infused cream layer melts elegantly against the bright orange foundation, creating a sophisticated play on the classic frozen treat. For an extra touch of elegance, serve these jewel-like squares in individual champagne coupes garnished with fresh orange zest.
Lime Gelatin with Pineapple
There’s something wonderfully nostalgic about lime gelatin with pineapple—a dessert that bridges generations with its vibrant hue and refreshing simplicity. This classic combination brings together the zesty brightness of lime with the tropical sweetness of pineapple in a shimmering, jewel-like creation that’s perfect for everything from family gatherings to elegant dinner parties. With just a few quality ingredients and careful technique, you can elevate this retro favorite into something truly special.
Ingredients
– 1 (6-ounce) package lime gelatin (I find the name-brand version sets more reliably)
– 2 cups boiling water
– 1 cup cold water (ice-cold works best for quick cooling)
– 1 (20-ounce) can crushed pineapple in juice, undrained (the natural juice adds wonderful flavor)
– ½ cup heavy cream, chilled (this creates the most luxurious texture)
Instructions
1. Empty the lime gelatin powder into a large heatproof bowl.
2. Pour 2 cups of boiling water directly over the gelatin powder.
3. Whisk continuously for 2 full minutes until the gelatin is completely dissolved and no granules remain visible.
4. Add 1 cup of cold water to the dissolved gelatin mixture and whisk to combine thoroughly.
5. Tip: Place the bowl in an ice water bath for 15-20 minutes, stirring occasionally, until the mixture thickens to the consistency of egg whites—this prevents the pineapple from sinking.
6. Gently fold in the entire can of crushed pineapple with its juice using a rubber spatula.
7. Tip: Fold rather than stir to maintain as much air in the mixture as possible for a lighter texture.
8. In a separate chilled bowl, whip the ½ cup heavy cream until soft peaks form, about 2-3 minutes.
9. Gently fold the whipped cream into the gelatin-pineapple mixture until just combined with no white streaks remaining.
10. Tip: Work quickly once the cream is added to prevent the gelatin from setting prematurely.
11. Pour the mixture into a 9×9-inch glass baking dish or individual serving glasses.
12. Cover the dish tightly with plastic wrap, making sure it touches the surface to prevent a skin from forming.
13. Refrigerate for at least 4 hours, or preferably overnight, until completely set and firm to the touch.
A beautifully set lime gelatin with pineapple offers a delightful contrast between the creamy, cloud-like texture and the bright bursts of tropical fruit. The subtle richness from the whipped cream balances the vibrant citrus notes, creating a dessert that’s both refreshing and satisfying. For an elegant presentation, consider serving it in vintage coupe glasses garnished with fresh mint sprigs and thin lime slices.
Blueberry Gelatin Parfait
Glistening layers of jewel-toned blueberries suspended in delicate gelatin create a dessert that marries sophistication with nostalgic charm. This blueberry gelatin parfait offers a refreshing balance of sweet and tart, with textures that range from silky smooth to gently yielding. It’s the perfect make-ahead treat for elegant dinners or a special afternoon indulgence.
Ingredients
– 2 cups fresh blueberries (I always look for plump, deeply colored berries with that characteristic silvery bloom)
– 1 cup granulated sugar (this creates the perfect sweetness level without overwhelming the fruit)
– 3 packets unflavored gelatin (about 2 1/4 teaspoons total – I prefer the sheet-like consistency this creates)
– 1/2 cup cold water (for blooming the gelatin)
– 1 1/2 cups boiling water (essential for proper gelatin dissolution)
– 1 tablespoon fresh lemon juice (this brightens the blueberry flavor beautifully)
– 1 cup heavy whipping cream (chilled thoroughly for best results)
– 1/4 cup powdered sugar (for stabilizing the whipped cream)
– 1 teaspoon pure vanilla extract (my secret for adding depth to the cream layer)
Instructions
1. Rinse 2 cups of fresh blueberries under cool running water and pat them completely dry with paper towels.
2. Sprinkle 3 packets of unflavored gelatin over 1/2 cup of cold water in a medium bowl and let it bloom for 5 minutes until it resembles applesauce in texture.
3. Pour 1 1/2 cups of boiling water over the bloomed gelatin and whisk continuously for 2 minutes until completely dissolved and the mixture is clear.
4. Stir in 1 cup of granulated sugar until fully incorporated and the liquid becomes slightly syrupy.
5. Add 1 tablespoon of fresh lemon juice and mix thoroughly to combine.
6. Gently fold in the dried blueberries, being careful not to crush them.
7. Divide the blueberry-gelatin mixture evenly among 6 parfait glasses, filling each about two-thirds full.
8. Refrigerate the glasses for 2 hours until the gelatin is set firm to the touch.
9. In a chilled mixing bowl, combine 1 cup of heavy whipping cream, 1/4 cup of powdered sugar, and 1 teaspoon of pure vanilla extract.
10. Whip the cream mixture on medium-high speed for 3-4 minutes until stiff peaks form that hold their shape when the whisk is lifted.
11. Pipe or spoon the whipped cream over the set gelatin layer in each glass.
12. Top each parfait with a few reserved fresh blueberries for garnish.
13. Return the completed parfaits to the refrigerator for at least 30 minutes before serving.
Layers of creamy vanilla-scented whipped cream contrast beautifully with the vibrant blueberry gelatin beneath. The berries maintain their structural integrity while absorbing just enough sweetness to become jewel-like pockets of flavor. Serve these parfaits in clear glasses to showcase their beautiful strata, or accompany with buttery shortbread cookies for added textural contrast.
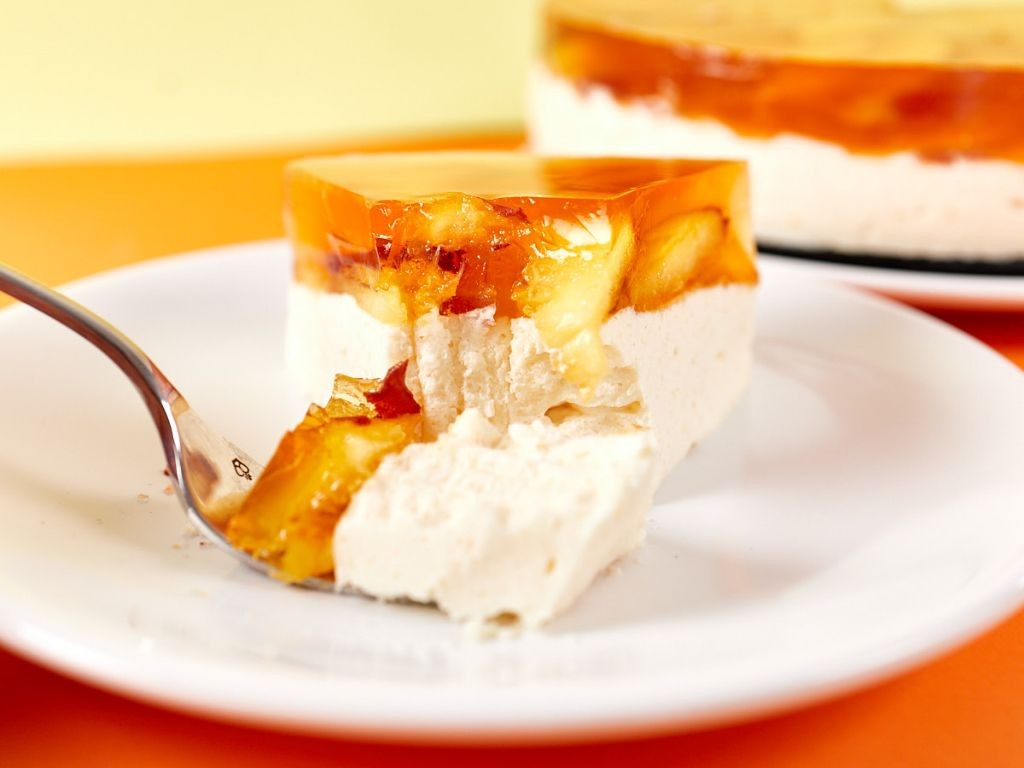
Cherry Gelatin Cheesecake
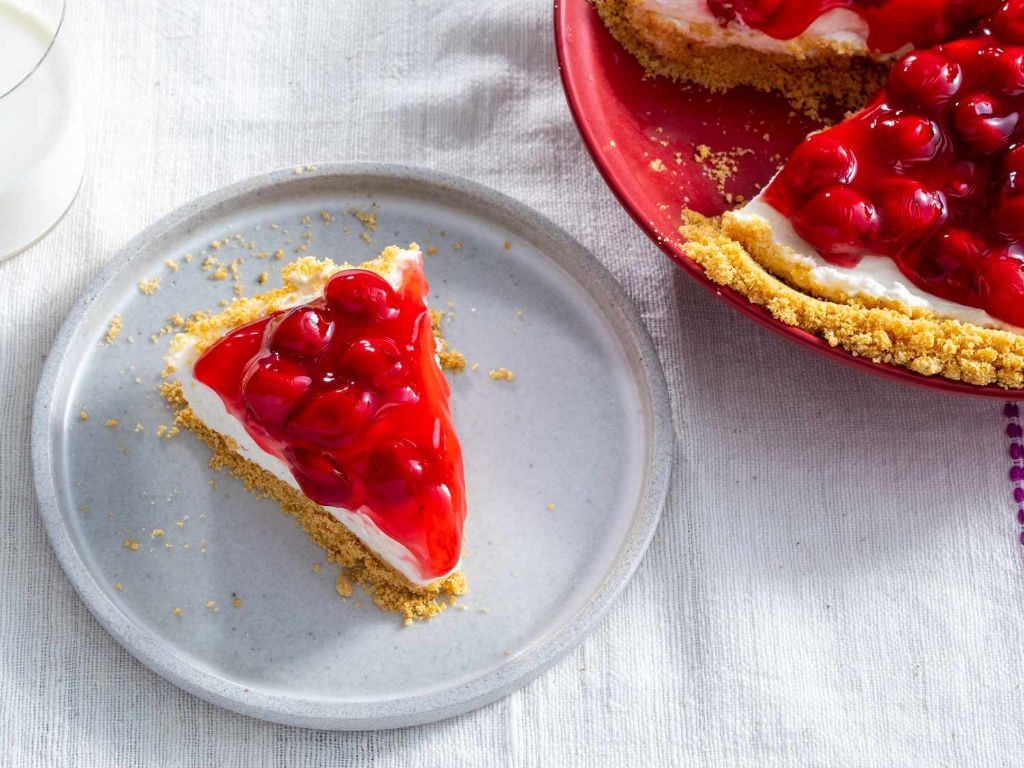
Zesty yet sophisticated, this cherry gelatin cheesecake marries the creamy indulgence of classic cheesecake with the vibrant, jewel-like appeal of cherry gelatin. Imagine a dessert that captures the essence of holiday cheer in every silky, layered bite. It’s the showstopper that effortlessly bridges nostalgia and contemporary elegance.
Ingredients
– 1 ½ cups graham cracker crumbs (I always crush mine fresh for maximum flavor)
– ½ cup unsalted butter, melted (using European-style butter adds a lovely richness)
– 16 oz cream cheese, softened to room temperature (this is crucial for a lump-free filling)
– ½ cup granulated sugar
– 1 tsp pure vanilla extract
– 1 cup heavy whipping cream, chilled
– 1 package (3 oz) cherry gelatin
– 1 cup boiling water
– ½ cup cold water
– 1 can (21 oz) cherry pie filling (I prefer the kind with extra whole cherries for texture)
Instructions
1. Combine the graham cracker crumbs and melted butter in a medium bowl until the mixture resembles wet sand.
2. Press the crumb mixture firmly into the bottom of a 9-inch springform pan using the bottom of a measuring cup to create an even layer.
3. Bake the crust at 350°F for 8 minutes, then cool completely on a wire rack—this prevents sogginess.
4. Beat the room-temperature cream cheese and granulated sugar in a large bowl with an electric mixer on medium speed for 2 minutes until smooth and creamy.
5. Add the vanilla extract and beat for 30 seconds more to incorporate.
6. In a separate chilled bowl, whip the heavy cream on high speed for 3–4 minutes until stiff peaks form.
7. Gently fold the whipped cream into the cream cheese mixture in three additions to maintain airiness.
8. Spread the cream cheese filling evenly over the cooled crust and smooth the top with an offset spatula.
9. Refrigerate the cheesecake base for 1 hour to set slightly while preparing the gelatin layer.
10. Dissolve the cherry gelatin completely in 1 cup of boiling water, stirring for 2 minutes.
11. Stir in ½ cup of cold water until well combined.
12. Let the gelatin mixture cool at room temperature for 15 minutes until slightly thickened but still pourable.
13. Spoon the cherry pie filling evenly over the chilled cheesecake layer.
14. Slowly pour the cooled cherry gelatin over the pie filling, tilting the pan to cover the surface evenly.
15. Refrigerate the assembled cheesecake for at least 4 hours, or preferably overnight, until fully set.
Notably, the final dessert offers a delightful contrast between the velvety cheesecake and the firm, fruity gelatin topping. Each slice reveals ruby-red cherries suspended in glossy gelatin, creating a visually stunning presentation. For a festive twist, garnish with fresh mint leaves and a drizzle of dark chocolate sauce just before serving.
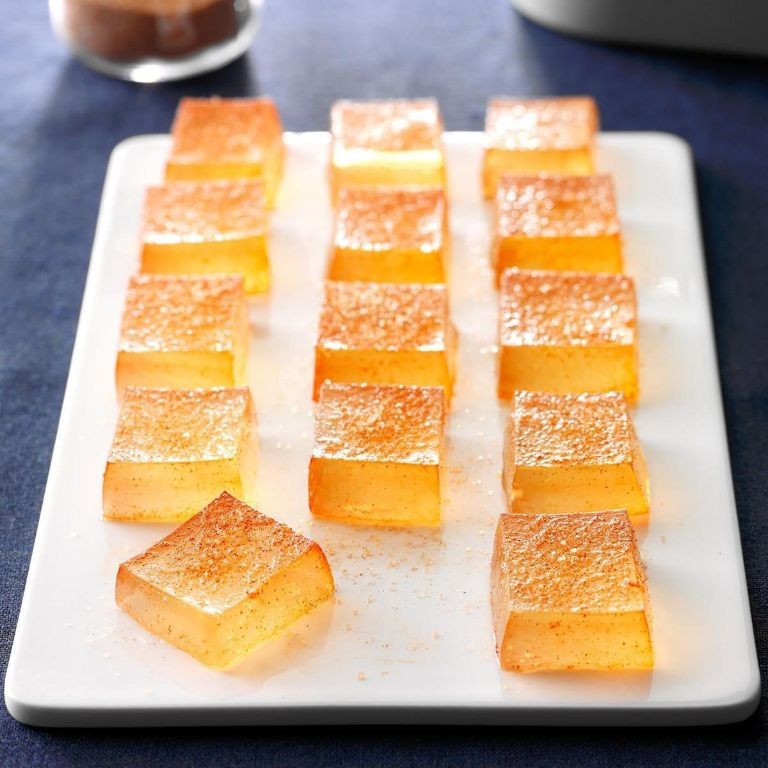
Pomegranate Gelatin Cubes
Glistening like edible rubies, these pomegranate gelatin cubes transform the jewel-toned fruit into elegant, shimmering bites that dance between sophisticated dessert and refreshing palate cleanser. Their vibrant crimson hue and delicate wobble make them as visually stunning as they are delicious, perfect for holiday gatherings or when you want to add a touch of luxury to everyday moments. Each translucent cube captures the perfect balance of sweet and tart, offering a burst of pomegranate flavor that feels both nostalgic and refreshingly modern.
Ingredients
– 4 cups pure pomegranate juice (I always seek out the not-from-concentrate variety for the brightest flavor)
– 1/2 cup granulated sugar (this amount creates the ideal sweetness without overpowering the fruit’s natural tartness)
– 3 packets unflavored gelatin (about 2 1/4 teaspoons total – I find the packet measurement most reliable for consistent results)
– 1 tablespoon fresh lemon juice (a squeeze of citrus really makes the pomegranate flavor pop)
Instructions
1. Pour 1 cup of cold pomegranate juice into a medium saucepan and sprinkle the gelatin packets evenly over the surface, then let it sit undisturbed for 5 minutes to allow the gelatin to bloom properly.
2. Turn the stove burner to medium-low heat and warm the juice-gelatin mixture for 3-4 minutes, stirring constantly with a whisk until the gelatin completely dissolves and the liquid becomes clear.
3. Add the sugar and continue whisking for 2 minutes until all sugar crystals have fully dissolved into the warm liquid.
4. Remove the saucepan from heat and whisk in the remaining 3 cups of pomegranate juice along with the fresh lemon juice until thoroughly combined.
5. Carefully pour the mixture through a fine-mesh strainer into a 9×9 inch baking dish to catch any undissolved gelatin particles.
6. Gently tap the baking dish on the counter 2-3 times to release any air bubbles that might cloud the finished cubes.
7. Cover the dish tightly with plastic wrap, making sure the wrap touches the surface of the liquid to prevent a rubbery skin from forming.
8. Refrigerate the gelatin for at least 6 hours, or preferably overnight, until completely set and firm to the touch.
9. Run a thin knife around the edges of the baking dish to loosen the gelatin sheet.
10. Dip the bottom of the dish in warm water for 10-15 seconds to help release the gelatin, then invert it onto a cutting board.
11. Cut the gelatin into 1-inch cubes using a sharp knife dipped in hot water between cuts for clean edges.
The resulting cubes have a delicate, melt-in-your-mouth texture that releases their bright, fruity essence with each bite. Their jewel-like appearance makes them stunning served in crystal bowls as a light dessert, or try skewering them with fresh mint leaves for an elegant appetizer presentation that delights both the eyes and palate.
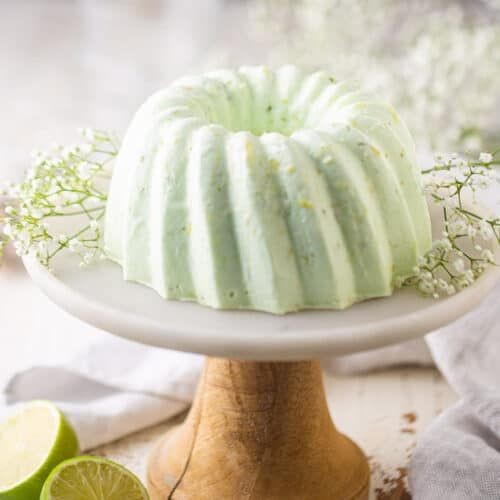
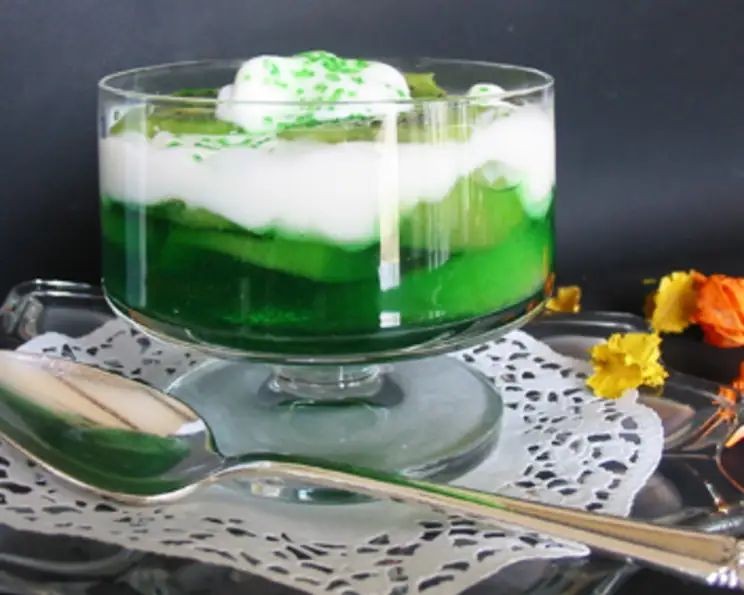
Lemon-Lime Jell-O Mold
Kindly reminiscent of midcentury gatherings, this Lemon-Lime Jell-O Mold brings a refreshingly tart elegance to any table, its jewel-like translucence concealing a delightful burst of citrus beneath a perfectly quivering surface. Crafted with care, this molded dessert transforms simple ingredients into a conversation piece that bridges nostalgia and contemporary sophistication. Each slice offers a clean, vibrant flavor that cleanses the palate and delights the senses.
Ingredients
– 2 (3-ounce) packages lemon Jell-O, for its bright, sunny flavor
– 2 (3-ounce) packages lime Jell-O, which adds a crisp, refreshing edge
– 4 cups boiling water, to dissolve the gelatin completely
– 2 cups cold water, which I prefer chilled for faster setting
– 1 cup heavy cream, chilled thoroughly for optimal whipping
– 1/4 cup granulated sugar, to gently sweeten the cream
– 1 teaspoon pure vanilla extract, my secret for a warm, aromatic note
Instructions
1. Place 2 packages of lemon Jell-O and 2 packages of lime Jell-O into a large heatproof bowl.
2. Pour 4 cups of boiling water over the Jell-O powders, and whisk continuously for 2 minutes until fully dissolved and no granules remain.
3. Stir in 2 cups of cold water until the mixture is smooth and evenly combined.
4. Lightly spray a 6-cup Jell-O mold with nonstick cooking spray, ensuring all crevices are coated to prevent sticking.
5. Pour the Jell-O mixture into the prepared mold, filling it to within 1/4 inch of the rim.
6. Refrigerate the mold uncovered for 4 hours, or until the Jell-O is completely set and firm to the touch.
7. While the Jell-O chills, combine 1 cup of chilled heavy cream, 1/4 cup granulated sugar, and 1 teaspoon pure vanilla extract in a chilled mixing bowl.
8. Whip the cream mixture on medium-high speed for 3–4 minutes until stiff peaks form that hold their shape when the beaters are lifted.
9. Cover the whipped cream and refrigerate it until the Jell-O is fully set.
10. To unmold, dip the mold up to its rim in a bowl of warm water for 10–15 seconds to loosen the edges.
11. Invert a serving plate over the mold, hold both firmly together, and flip them over in one quick motion.
12. Gently lift the mold away; if it resists, re-dip for 5 more seconds and try again.
13. Serve the unmolded Jell-O immediately, topped with dollops of the prepared whipped cream.
A marvel of texture, the Jell-O yields with a delicate quiver, its citrus notes brightened by the cloud-like whipped cream. For a stunning presentation, garnish with thin lemon and lime zest curls or serve alongside buttery shortbread cookies. This dessert shines as a centerpiece for brunches or a light finale to rich meals, its retro charm effortlessly updated for modern tastes.
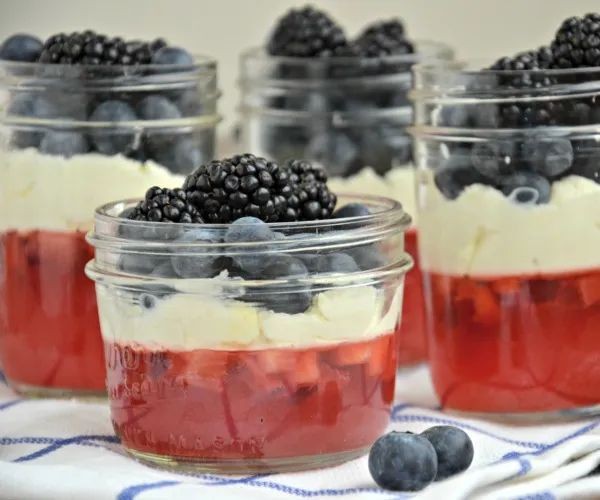
Raspberry Gelatin with Fresh Berries
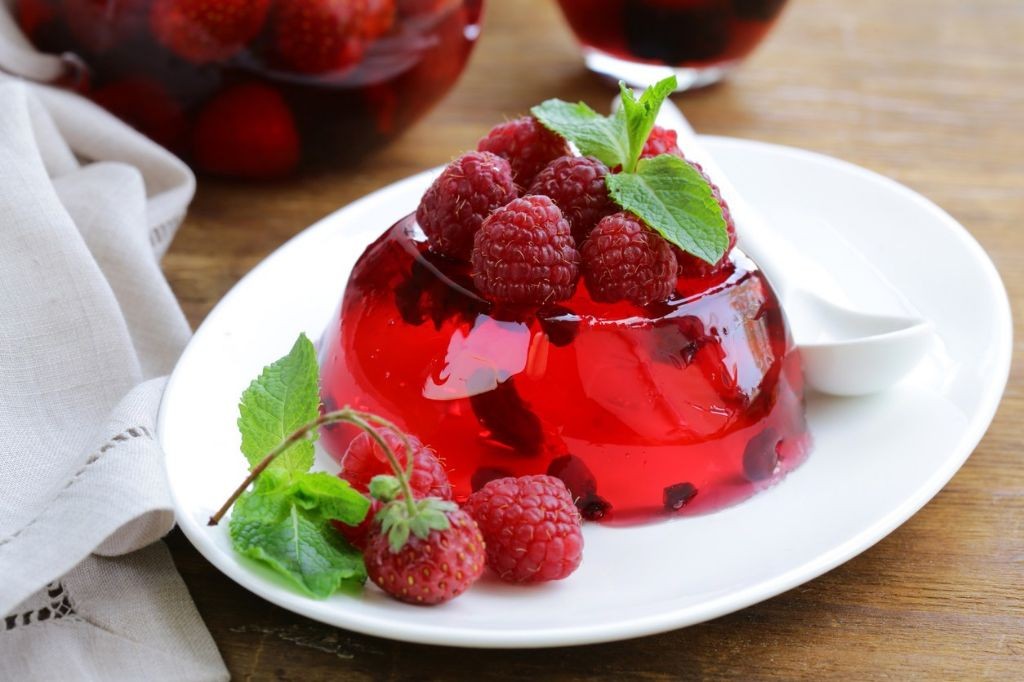
Beautifully translucent and jewel-toned, this raspberry gelatin with fresh berries offers a sophisticated twist on a classic dessert that feels both nostalgic and refreshingly modern. With its vibrant ruby hue and delicate wobble, it transforms simple ingredients into an elegant centerpiece perfect for entertaining or a quiet indulgence.
Ingredients
- 2 cups fresh raspberries (I love using a mix of Driscoll’s for consistent sweetness)
- 1 cup granulated sugar (organic cane sugar adds a lovely caramel note)
- 3 packets unflavored gelatin (Knox brand gives me the perfect firm-yet-tender set every time)
- 2 cups cold water (filtered water ensures the purest raspberry flavor shines)
- 1 cup heavy cream (I prefer using high-fat cream for the silkiest texture)
- 1 teaspoon pure vanilla extract (Madagascar bourbon vanilla is my splurge here)
- 1 pint mixed fresh berries—blueberries, blackberries, sliced strawberries (local farmers’ market berries have the brightest flavor)
- Pinch of fine sea salt (this tiny addition balances the sweetness beautifully)
Instructions
- Place 1 cup of cold water in a medium saucepan and sprinkle 3 packets of unflavored gelatin evenly over the surface; let it bloom for 5 minutes until the granules look spongy and have absorbed the water.
- Heat the gelatin mixture over low heat, stirring constantly with a whisk for 2–3 minutes until the gelatin fully dissolves and the liquid becomes clear—do not let it boil, as high heat can weaken gelatin’s setting power.
- Add 2 cups of fresh raspberries, 1 cup of granulated sugar, and a pinch of fine sea salt to the dissolved gelatin, then increase the heat to medium and simmer for 8 minutes, mashing the berries gently with a wooden spoon to release their juices.
- Strain the raspberry mixture through a fine-mesh sieve into a large bowl, pressing firmly on the solids with the back of a ladle to extract all the liquid—discard the seeds and pulp left in the sieve.
- Stir in the remaining 1 cup of cold water and 1 teaspoon of pure vanilla extract into the strained raspberry liquid until fully combined.
- Lightly grease a 9-inch mold or glass baking dish with neutral oil (a pro tip: use a pastry brush to coat the edges evenly for easy unmolding later).
- Pour the raspberry mixture into the prepared mold and refrigerate uncovered for 1 hour until the surface is slightly tacky but not fully set.
- Arrange 1 pint of mixed fresh berries—blueberries, blackberries, and sliced strawberries—evenly over the partially set gelatin, gently pressing them just below the surface.
- Return the mold to the refrigerator and chill for at least 4 more hours, or ideally overnight, until the gelatin is firm and springs back when touched lightly.
- In a chilled bowl, whip 1 cup of heavy cream with an electric mixer on medium-high speed for 3–4 minutes until soft peaks form—chilling your bowl and beaters beforehand helps the cream whip faster and hold its shape better.
- To serve, dip the mold briefly in warm water for 10 seconds, then run a thin knife around the edges before inverting onto a serving plate.
- Slice the gelatin into wedges or squares and top each portion with a dollop of whipped cream.
The gelatin yields a delicate, quivering texture that melts on the tongue, while the fresh berries provide bursts of juicy contrast. For a stunning presentation, layer individual servings in clear glasses with alternating stripes of crushed vanilla wafer crumbs. Its balanced sweetness and vibrant acidity make it equally fitting for a summer brunch or a holiday finale.
Peach Gelatin with Whipped Cream
Nestled between summer’s bounty and autumn’s crisp arrival, this peach gelatin with whipped cream captures the fleeting sweetness of ripe peaches in a shimmering, elegant dessert. Perfect for bridging seasons, it transforms simple stone fruit into a sophisticated treat that feels both nostalgic and refreshingly modern. The delicate wobble of the gelatin paired with cloud-like cream creates a dessert that’s as beautiful to behold as it is delightful to eat.
Ingredients
– 4 large ripe peaches, peeled and pitted (I find freestone varieties easiest to work with)
– 1 cup granulated sugar (adjust based on your peaches’ natural sweetness)
– 2 packets unflavored gelatin (about 4 1/2 teaspoons total)
– 1/2 cup cold water for blooming gelatin
– 1 cup heavy whipping cream, chilled (the higher fat content creates more stable peaks)
– 2 tablespoons powdered sugar for the whipped cream
– 1 teaspoon pure vanilla extract (I always splurge on the real thing here)
Instructions
1. Place peeled and pitted peaches in a blender and purée until completely smooth, about 1 minute.
2. Pour peach purée through a fine-mesh strainer into a medium saucepan, pressing with a spatula to extract maximum liquid while removing any fibrous bits.
3. Add granulated sugar to the strained peach purée and whisk until fully dissolved.
4. Sprinkle gelatin packets over 1/2 cup cold water in a small bowl and let bloom for 5 minutes until the granules have absorbed the liquid and look spongy.
5. Warm the peach mixture over medium heat until it reaches 160°F on an instant-read thermometer, stirring constantly.
6. Remove peach mixture from heat and immediately whisk in the bloomed gelatin until completely dissolved and no granules remain visible.
7. Pour the gelatin mixture into your preferred serving dishes or a single 8-inch square pan, filling each about 3/4 full.
8. Refrigerate the gelatin for at least 4 hours, or until fully set and firm to gentle touch.
9. Combine chilled heavy cream, powdered sugar, and vanilla extract in a chilled metal bowl.
10. Whip the cream mixture using an electric mixer on medium-high speed until soft peaks form, about 2-3 minutes, being careful not to over-whip.
11. Dollop or pipe the whipped cream over the set peach gelatin just before serving.
The silky texture of the peach gelatin yields beautifully to the spoon, releasing bright, fruity notes that dance with the vanilla-kissed cream. Try serving individual portions in vintage coupe glasses for an extra touch of elegance, or layer the gelatin and cream in parfait glasses for a stunning visual effect that highlights the sunset-hued dessert.
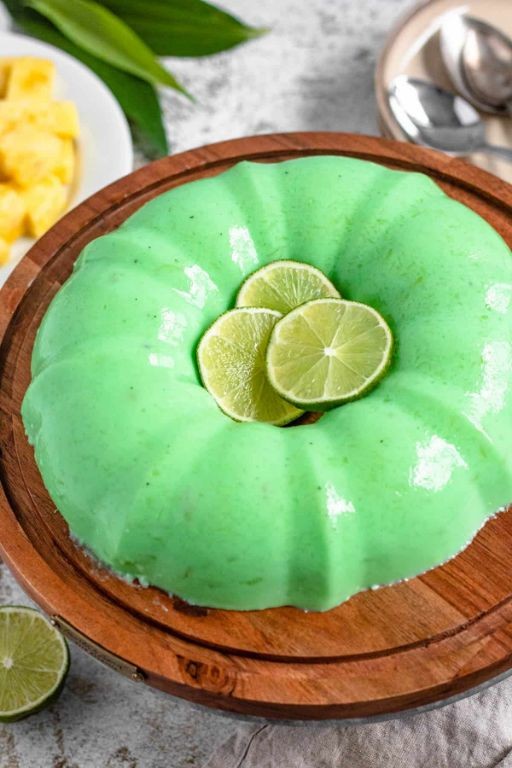
Tropical Mango Gelatin

Heralding the vibrant flavors of sun-drenched tropics, this mango gelatin transforms simple ingredients into an elegant dessert that captures the essence of summer in every shimmering bite. With its brilliant golden hue and refreshing sweetness, it offers a sophisticated yet effortless finale to any meal or a delightful afternoon treat that feels both nostalgic and contemporary. The delicate balance of ripe mango and subtle citrus notes creates a dessert that’s as beautiful to behold as it is satisfying to savor.
Ingredients
– 2 cups fresh mango puree (I find ripe Ataulfo mangoes yield the sweetest, most vibrant color)
– 1/2 cup granulated sugar (adjust slightly depending on your mango’s natural sweetness)
– 1/4 cup freshly squeezed lime juice (about 2-3 limes, I always roll them firmly on the counter first to maximize juice yield)
– 2 1/2 teaspoons unflavored gelatin powder
– 1/4 cup cold water for blooming the gelatin
– 1 cup boiling water
– Pinch of fine sea salt (this tiny addition really makes the mango flavor pop)
Instructions
1. Prepare your mango puree by peeling 3-4 ripe mangoes and blending the flesh in a high-speed blender until completely smooth, scraping down the sides as needed.
2. Sprinkle the gelatin powder evenly over the 1/4 cup cold water in a medium heatproof bowl and let it bloom for 5 minutes until it becomes spongy and opaque.
3. Pour the 1 cup of boiling water directly over the bloomed gelatin and whisk continuously for 2 minutes until the gelatin is completely dissolved and the mixture is clear.
4. Add the 1/2 cup granulated sugar and pinch of salt to the hot gelatin mixture, whisking until the sugar fully dissolves, about 1 minute.
5. Stir in the 2 cups mango puree and 1/4 cup lime juice, whisking gently but thoroughly until the mixture is completely homogeneous.
6. Strain the mixture through a fine-mesh sieve into a pouring vessel to ensure the smoothest possible texture.
7. Lightly grease your preferred mold or individual serving glasses with neutral oil (a pastry brush works perfectly for this).
8. Carefully pour the mango mixture into your prepared mold, filling to about 1/4 inch from the top.
9. Gently tap the mold on the counter 3-4 times to release any air bubbles that might cloud the final appearance.
10. Cover the mold tightly with plastic wrap, making sure the wrap doesn’t touch the surface of the gelatin.
11. Refrigerate for at least 4 hours, or preferably overnight, until the gelatin is completely set and firm to the touch.
Unveiling this shimmering creation reveals a dessert with the perfect wobble—firm enough to hold its shape yet delicate enough to melt on the tongue. The vibrant mango flavor sings with brightness, complemented by the subtle citrus undertone that keeps it from being overly sweet. For an elegant presentation, serve cubed in champagne glasses with fresh mint sprigs, or layer it with coconut cream for a tropical parfait that transports you straight to island paradise.
Blackberry Gelatin Pie

Perfectly balancing tart and sweet, this blackberry gelatin pie transforms summer’s jewel-toned bounty into an elegant dessert that holds its shape beautifully while melting tenderly on the tongue. The vibrant purple filling, suspended in a buttery crust, offers both visual drama and refreshing flavor that transitions effortlessly from warm afternoons to formal dinners.
Ingredients
- 1 9-inch pre-baked pie crust (I always blind-bake mine with pie weights for maximum crispness)
- 4 cups fresh blackberries (frozen work too, but fresh give that lovely pop of texture)
- 1 cup granulated sugar
- 3 tablespoons cornstarch
- 1/4 cup cold water
- 1 tablespoon unflavored gelatin powder
- 1/4 cup fresh lemon juice (bottled lacks that bright zing)
- 1/2 cup heavy cream, chilled (the higher fat content creates better stability)
- Pinch of salt
Instructions
- Place 3 cups of blackberries in a medium saucepan over medium heat.
- Cook berries for 5-7 minutes until they release their juices and become soft.
- Press the cooked berries through a fine-mesh sieve into a clean bowl, discarding seeds and pulp.
- Return the strained blackberry juice to the saucepan.
- Whisk in sugar, cornstarch, and salt until no lumps remain.
- Heat the mixture over medium heat, stirring constantly with a wooden spoon for 4-5 minutes until thickened and glossy.
- Remove from heat and stir in lemon juice.
- Sprinkle gelatin over cold water in a small bowl and let bloom for 5 minutes until absorbed.
- Whisk the bloomed gelatin into the warm blackberry mixture until completely dissolved.
- Transfer the filling to a large bowl and cool to room temperature, about 20 minutes.
- While filling cools, whip chilled heavy cream to soft peaks using a hand mixer.
- Gently fold the whipped cream into the cooled blackberry mixture until no white streaks remain.
- Arrange remaining 1 cup fresh blackberries evenly across the bottom of your pre-baked pie crust.
- Pour the blackberry cream filling over the fresh berries, smoothing the top with an offset spatula.
- Refrigerate the pie for at least 4 hours, or until firmly set when gently jiggled.
Amazingly light yet substantial, this pie delivers a sophisticated contrast between the crisp crust and cloud-like filling that’s punctuated by bursts of fresh berry. The gelatin creates a clean slice while maintaining an almost mousse-like delicacy that pairs wonderfully with vanilla bean ice cream or a drizzle of crème fraîche for added tang.
Coconut Milk Gelatin Squares
Radiating with tropical elegance, these Coconut Milk Gelatin Squares transform simple ingredients into an ethereal dessert that melts delicately on the tongue. Their creamy texture and subtle sweetness make them perfect for warm afternoons or as a light finish to any meal. This recipe balances richness with refreshing clarity, creating a treat that feels both indulgent and wholesome.
Ingredients
– 2 cups full-fat coconut milk (I always shake the can vigorously before opening to emulsify the cream)
– 1/2 cup granulated sugar (organic cane sugar adds a lovely caramel note)
– 2 packets unflavored gelatin (about 4 1/2 teaspoons total)
– 1/4 cup cold water (for blooming the gelatin)
– 1 teaspoon pure vanilla extract (Madagascar bourbon vanilla is my preference for its floral depth)
– Pinch of fine sea salt (to heighten the coconut flavor)
Instructions
1. Pour 1/4 cup cold water into a small bowl and sprinkle both packets of unflavored gelatin evenly over the surface. Let it bloom for 5 minutes until the granules absorb the water and become spongy. Tip: Avoid stirring during blooming to prevent clumping.
2. In a saucepan over medium heat, combine 2 cups coconut milk, 1/2 cup sugar, and a pinch of sea salt. Heat the mixture while stirring constantly until it reaches 120°F on an instant-read thermometer and the sugar fully dissolves. Tip: Do not boil the coconut milk, as high heat can cause separation.
3. Remove the saucepan from heat and whisk in the bloomed gelatin until it completely dissolves and no granules remain visible, about 1 minute of vigorous stirring.
4. Stir in 1 teaspoon vanilla extract until fully incorporated into the warm mixture.
5. Pour the liquid through a fine-mesh sieve into an 8×8-inch baking dish to catch any undissolved gelatin bits. Tip: Straining ensures an exceptionally smooth texture in the final squares.
6. Refrigerate the dish uncovered for at least 4 hours, or until the gelatin is fully set and firm to the touch.
7. Run a thin knife around the edges of the set gelatin to loosen it from the dish.
8. Dip the bottom of the dish in warm water for 10 seconds to help release the gelatin cleanly.
9. Invert the dish onto a cutting board and gently tap to unmold the entire sheet of gelatin.
10. Use a sharp knife dipped in hot water to slice the gelatin into 1-inch squares, wiping the blade clean between cuts for neat edges. What makes these squares truly captivating is their velvety, melt-in-your-mouth consistency that carries the floral aroma of coconut and vanilla. Serve them chilled on a platter garnished with toasted coconut flakes, or layer them with fresh mango cubes for a vibrant parfait. Their delicate jiggle and creamy sweetness offer a sophisticated twist on classic gelatin desserts.
Grape Gelatin with Cream Cheese
Remarkably refreshing and visually stunning, this grape gelatin with cream cheese offers a sophisticated twist on a nostalgic classic. The deep purple hue and creamy layers create an elegant dessert that balances fruity sweetness with rich, tangy complexity. Perfect for entertaining or as a special treat, this recipe transforms simple ingredients into something truly extraordinary.
Ingredients
- 2 cups 100% grape juice, preferably Welch’s for that authentic grape flavor
- 1/4 cup granulated sugar, though you might reduce it slightly if using very sweet juice
- 2 envelopes unflavored gelatin powder, which gives a cleaner taste than pre-flavored mixes
- 8 ounces cream cheese, softened at room temperature for easier blending
- 1/2 cup heavy cream, chilled for optimal whipping
- 1 teaspoon pure vanilla extract, my secret for enhancing both the cream and grape layers
Instructions
- Pour 1/2 cup of grape juice into a small bowl and sprinkle both envelopes of gelatin evenly over the surface, allowing it to bloom for 5 minutes until the granules absorb the liquid.
- Heat the remaining 1 1/2 cups grape juice with sugar in a saucepan over medium heat, stirring constantly until the sugar completely dissolves and the mixture reaches 160°F on a kitchen thermometer.
- Remove the saucepan from heat and whisk in the bloomed gelatin mixture until no granules remain visible and the liquid becomes perfectly clear.
- Pour the grape gelatin through a fine-mesh strainer into a clean bowl to ensure a silky smooth texture without any undissolved particles.
- Divide the strained gelatin mixture evenly between 6 serving glasses, filling each approximately halfway, then refrigerate for 45 minutes until set but still slightly tacky to touch.
- While the first layer chills, beat the softened cream cheese in a mixing bowl with an electric mixer on medium speed for 2 minutes until completely smooth and free of lumps.
- Gradually pour in the heavy cream while continuing to beat, then add vanilla extract and continue whipping for 3-4 minutes until the mixture forms soft peaks that hold their shape.
- Carefully spoon the cream cheese mixture over the set grape gelatin layer in each glass, using the back of a spoon to create an even, level surface.
- Return the assembled desserts to the refrigerator and chill for at least 2 hours, or until the cream cheese layer is firm and the gelatin beneath is completely set.
Velvety smooth cream cheese contrasts beautifully with the firm yet yielding grape gelatin beneath, creating a delightful textural experience. The vibrant purple layer shines through the creamy topping, making each spoonful both visually striking and deliciously balanced between sweet and tangy. For an elegant presentation, garnish with fresh mint leaves and a few whole grapes just before serving to highlight the dessert’s sophisticated simplicity.
Watermelon Gelatin Slices
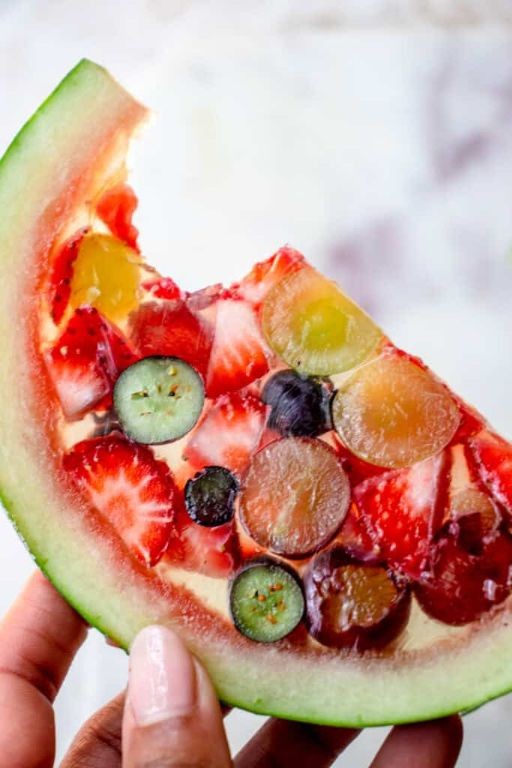
Heralding the arrival of summer’s sweetest treasure, these watermelon gelatin slices capture the essence of sun-ripened fruit in a shimmering, jewel-like presentation. Their translucent ruby flesh, studded with dark chocolate “seeds,” offers a refreshingly cool treat that delights both the eye and palate. This elegant dessert transforms humble ingredients into something truly spectacular for warm-weather gatherings.
Ingredients
– 4 cups fresh watermelon juice, strained through cheesecloth for crystal clarity
– 3 tablespoons unflavored gelatin powder, which creates the perfect delicate set
– 1/2 cup granulated sugar, adjusted to your watermelon’s natural sweetness
– 2 tablespoons freshly squeezed lime juice, my secret for brightening the flavor
– 1/4 cup miniature chocolate chips, standing in for those charming watermelon seeds
– Pinch of fine sea salt, to balance and enhance all the flavors
Instructions
1. Pour 1 cup of watermelon juice into a medium saucepan and sprinkle the gelatin powder evenly over the surface, allowing it to bloom for 5 minutes until the liquid appears slightly thickened.
2. Heat the saucepan over medium-low heat, stirring constantly with a whisk until the gelatin completely dissolves and the mixture becomes perfectly clear, about 3-4 minutes—never let it boil as high heat can compromise the gelatin’s setting power.
3. Whisk in the remaining 3 cups of watermelon juice, sugar, lime juice, and sea salt until the sugar fully dissolves and the mixture feels smooth when you dip a clean spoon into it.
4. Pour the mixture through a fine-mesh strainer into a clean bowl to catch any undissolved gelatin particles, ensuring your final slices will have that flawless, glass-like clarity.
5. Gently stir in the miniature chocolate chips, distributing them evenly throughout the liquid without overmixing, which could cause them to sink prematurely.
6. Carefully pour the mixture into a 9×5-inch loaf pan that you’ve lightly sprayed with cooking spray, then tap the pan firmly on the counter several times to release any air bubbles.
7. Refrigerate the pan for at least 6 hours, or preferably overnight, until the gelatin is completely set and firm to the touch—this extended chilling time guarantees clean, sharp slices when cut.
8. To unmold, dip the bottom of the pan in warm water for 15 seconds, then run a thin knife around the edges before inverting onto a cutting board.
9. Using a sharp knife dipped in hot water between cuts, slice the gelatin block into 1-inch thick wedges that resemble actual watermelon slices.
Luxuriously smooth with a delicate melt-in-your-mouth texture, these slices offer a burst of pure watermelon essence that’s both refreshing and sophisticated. The subtle tang of lime elevates the fruit’s natural sweetness, while the chocolate chips provide delightful textural surprises. For an especially elegant presentation, arrange the slices on a platter with fresh mint sprigs and serve chilled on a warm afternoon.
Kiwi-Lime Gelatin Cups
Kickstarting our seasonal dessert collection, these Kiwi-Lime Gelatin Cups offer a refreshing departure from heavy holiday sweets, with their vibrant green hue and tropical flair that dances elegantly between sweet and tart. Perfectly portioned in individual servings, they bring a touch of sophistication to any gathering while remaining surprisingly simple to prepare. Their translucent beauty reveals jewel-like kiwi slices suspended in a shimmering lime-infused base, promising both visual delight and palate-cleansing freshness.
Ingredients
– 4 ripe kiwis, peeled and sliced (I find slightly firm ones hold their shape better when suspended)
– 1 cup freshly squeezed lime juice (about 8-10 limes—worth the extra effort for that bright, authentic flavor)
– 1 cup granulated sugar (I prefer organic cane sugar for its subtle caramel notes)
– 3 packets unflavored gelatin (2 tablespoons total—this creates the perfect wobbly texture)
– 2 cups cold water, divided
– 6 clear dessert cups (4-ounce capacity—transparent glass showcases the beautiful layers)
Instructions
1. Place 6 clear dessert cups on a stable baking sheet for easy transport to the refrigerator.
2. Sprinkle 3 packets of unflavored gelatin evenly over 1 cup of cold water in a medium saucepan and let it bloom for 5 minutes until the surface appears wrinkled and absorbed.
3. Turn the stove to medium-low heat and whisk the gelatin mixture constantly for 2-3 minutes until completely dissolved and the liquid becomes clear—never let it boil as high heat can break gelatin’s setting power.
4. Add 1 cup granulated sugar and continue whisking for 1 minute until the sugar fully dissolves and the mixture becomes slightly syrupy.
5. Remove the saucepan from heat and stir in 1 cup freshly squeezed lime juice and the remaining 1 cup cold water.
6. Arrange 4-5 kiwi slices in a single layer at the bottom of each dessert cup, placing them flat against the glass for maximum visibility.
7. Carefully pour the lime-gelatin mixture into each cup, filling to within ¼ inch of the rim.
8. Gently tap each cup on the counter 2-3 times to release any air bubbles that might cloud the finished gelatin.
9. Refrigerate the cups uncovered for at least 4 hours, or until firmly set when gently jiggled—overnight chilling yields the clearest, most stable results.
10. Serve chilled directly from the refrigerator.
The texture achieves a delicate quiver that melts instantly on the tongue, while the bright lime perfectly balances the kiwi’s subtle sweetness. Try garnishing with edible flowers for special occasions, or layer with coconut whipped cream for a tropical twist that elevates this simple dessert into something truly memorable.
Vanilla Pudding and Gelatin Trifle

Kaleidoscopic layers of creamy vanilla pudding, delicate gelatin, and tender cake create a dessert that feels both nostalgic and sophisticated. This vanilla pudding and gelatin trifle transforms simple ingredients into an elegant centerpiece perfect for gatherings. Each spoonful offers a delightful textural journey that will impress even the most discerning dessert lovers.
Ingredients
– 2 cups whole milk (I find the richness makes all the difference)
– 3 large egg yolks, room temperature (they incorporate more smoothly when not chilled)
– 1/2 cup granulated sugar
– 1/4 cup cornstarch
– 1 tablespoon pure vanilla extract (always splurge on the good stuff)
– 1 packet unflavored gelatin
– 1/4 cup cold water
– 1/2 cup boiling water
– 1/4 cup additional granulated sugar for gelatin
– 1 prepared pound cake, cut into 1-inch cubes (homemade or high-quality store-bought)
– 1 cup heavy whipping cream
– Fresh berries for garnish (my grandmother always used raspberries)
Instructions
1. Pour 2 cups whole milk into a medium saucepan and heat over medium heat until small bubbles form around the edges, about 180°F.
2. Whisk 3 large egg yolks, 1/2 cup granulated sugar, and 1/4 cup cornstarch in a separate bowl until pale yellow and smooth.
3. Slowly pour half of the hot milk into the egg mixture while continuously whisking to temper the eggs.
4. Pour the tempered egg mixture back into the saucepan with the remaining milk.
5. Cook over medium heat, whisking constantly, until the pudding thickens and large bubbles break the surface, about 3-4 minutes.
6. Remove from heat and stir in 1 tablespoon pure vanilla extract until fully incorporated.
7. Transfer the pudding to a clean bowl and press plastic wrap directly onto the surface to prevent skin formation.
8. Refrigerate the pudding for exactly 2 hours until completely chilled and set.
9. Sprinkle 1 packet unflavored gelatin over 1/4 cup cold water in a small bowl and let bloom for 5 minutes until spongy.
10. Pour 1/2 cup boiling water over the bloomed gelatin and whisk continuously until completely dissolved, about 1 minute.
11. Stir in 1/4 cup additional granulated sugar until fully dissolved into the gelatin mixture.
12. Let the gelatin cool to room temperature, about 15 minutes, while occasionally stirring.
13. Whip 1 cup heavy whipping cream in a chilled bowl until stiff peaks form, about 3-4 minutes.
14. Fold the whipped cream gently into the chilled vanilla pudding until no white streaks remain.
15. Arrange half of the 1-inch pound cake cubes in the bottom of a trifle bowl.
16. Drizzle half of the cooled gelatin mixture evenly over the cake layer.
17. Spread half of the pudding mixture over the gelatin-soaked cake layer.
18. Repeat layers with remaining cake cubes, gelatin, and pudding mixture.
19. Cover the trifle and refrigerate for at least 4 hours, or preferably overnight, to allow flavors to meld.
20. Garnish with fresh berries just before serving. Notably, the finished trifle presents a beautiful mosaic of textures—the silken pudding contrasts wonderfully with the delicate gelatin and soft cake. For an elegant presentation, serve in individual glass bowls to showcase the stunning layers, making each portion feel like a special occasion.
Spiced Apple Cider Gelatin
Vividly capturing the essence of autumn in a shimmering, sophisticated dessert, this spiced apple cider gelatin transforms seasonal flavors into an elegant treat that delights both the palate and the eye. Velvety smooth with warm spice notes and the bright tang of apple, it offers a refreshing departure from traditional fall desserts while celebrating the very best of the harvest season. Perfect for entertaining or as a special family treat, this gelatin brings a touch of culinary artistry to your table.
Ingredients
– 4 cups high-quality apple cider (I always seek out local orchard cider for the freshest flavor)
– 1/2 cup granulated sugar (adjust slightly depending on your cider’s sweetness)
– 3 cinnamon sticks (whole sticks provide more nuanced flavor than ground)
– 5 whole cloves (their floral notes complement the apple beautifully)
– 2 packets unflavored gelatin (about 4 1/2 teaspoons total)
– 1/4 cup cold water (for blooming the gelatin)
– 1 tablespoon fresh lemon juice (a squeeze of brightness that balances the sweetness)
Instructions
1. Pour 4 cups of apple cider into a medium saucepan and add 1/2 cup granulated sugar.
2. Place 3 cinnamon sticks and 5 whole cloves into the saucepan with the cider mixture.
3. Heat the mixture over medium heat, stirring occasionally with a wooden spoon, until the sugar completely dissolves and tiny bubbles form around the edges of the pan (about 5-7 minutes).
4. Remove the saucepan from heat, cover with a lid, and let the spices steep for 15 minutes to develop full flavor.
5. While the cider steeps, sprinkle 2 packets of unflavored gelatin evenly over 1/4 cup cold water in a small bowl.
6. Let the gelatin bloom for 5 minutes until it becomes spongy and absorbs all the water.
7. Strain the steeped cider through a fine-mesh sieve to remove the cinnamon sticks and cloves.
8. Return the strained cider to the saucepan and heat over low heat until it reaches 120°F on an instant-read thermometer.
9. Whisk the bloomed gelatin into the warm cider until completely dissolved and no granules remain visible.
10. Stir in 1 tablespoon of fresh lemon juice until fully incorporated.
11. Carefully pour the mixture into a 9×5-inch loaf pan or individual serving glasses.
12. Refrigerate the gelatin for at least 4 hours, or until completely set and firm to the touch.
Crystalline in its clarity and jewel-like appearance, this gelatin offers a delightful textural experience that’s both firm and meltingly tender on the tongue. The warm spice notes unfold gradually against the bright apple backdrop, creating a sophisticated flavor profile that lingers pleasantly. Consider serving it in elegant coupe glasses with a dollop of whipped cream, or cubed and layered with spiced pear compote for an impressive parfait presentation.
Pina Colada Gelatin Dessert
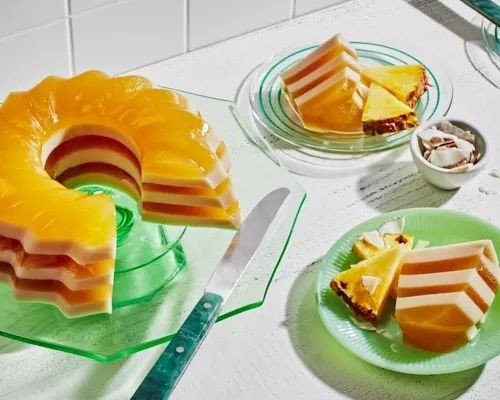
Fusing tropical elegance with nostalgic charm, this Pina Colada Gelatin Dessert transforms classic cocktail flavors into a sophisticated, shimmering treat. Imagine layers of creamy coconut and bright pineapple suspended in a delicate, jewel-toned canvas that captures the essence of a breezy beachside escape. Each spoonful offers a refreshing balance of sweet and tropical notes, perfect for elevating any dinner party or summer gathering.
Ingredients
– 1 cup pineapple juice (I prefer using 100% not-from-concentrate for the brightest flavor)
– 1 cup canned coconut milk (full-fat gives the creamiest texture)
– 1/2 cup granulated sugar
– 2 packets unflavored gelatin (about 14 grams total)
– 1/4 cup cold water
– 1/2 cup crushed pineapple, well-drained (freshly chopped pineapple adds wonderful texture)
– 1/4 cup sweetened shredded coconut (toasted coconut brings out its nutty aroma)
Instructions
1. Pour 1/4 cup cold water into a small bowl and sprinkle 2 packets unflavored gelatin evenly over the surface. Let it bloom for 5 minutes until the granules absorb the water and become spongy.
2. Heat 1 cup pineapple juice and 1/2 cup granulated sugar in a saucepan over medium heat, stirring constantly with a whisk until the sugar completely dissolves and the mixture reaches 160°F on a kitchen thermometer.
3. Remove the saucepan from heat and immediately whisk in the bloomed gelatin until it fully dissolves and no granules remain visible.
4. Stir in 1 cup canned coconut milk until the mixture becomes smooth and uniformly creamy.
5. Divide the gelatin mixture equally between two separate bowls.
6. Fold 1/2 cup well-drained crushed pineapple into one bowl until evenly distributed.
7. Lightly grease a 9×5-inch loaf pan with coconut oil to prevent sticking.
8. Pour the pineapple-gelatin mixture into the prepared pan and refrigerate for 45 minutes until set to a soft, jiggly consistency.
9. Gently pour the plain coconut gelatin layer over the set pineapple layer.
10. Sprinkle 1/4 cup sweetened shredded coconut evenly across the surface.
11. Refrigerate the dessert for at least 4 hours, or preferably overnight, until completely firm and easily removable from the pan.
12. To serve, dip the bottom of the pan in warm water for 15 seconds, then run a thin knife around the edges before inverting onto a serving plate.
Zestfully tropical and visually stunning, this dessert offers a delightful contrast between the creamy coconut layer and the fruity pineapple suspension. The texture remains beautifully firm yet melts delicately on the tongue, releasing waves of coconut and pineapple harmony. For an elegant presentation, slice it thinly and serve alongside grilled pineapple spears or a drizzle of dark rum caramel.
Chocolate Gelatin Mousse
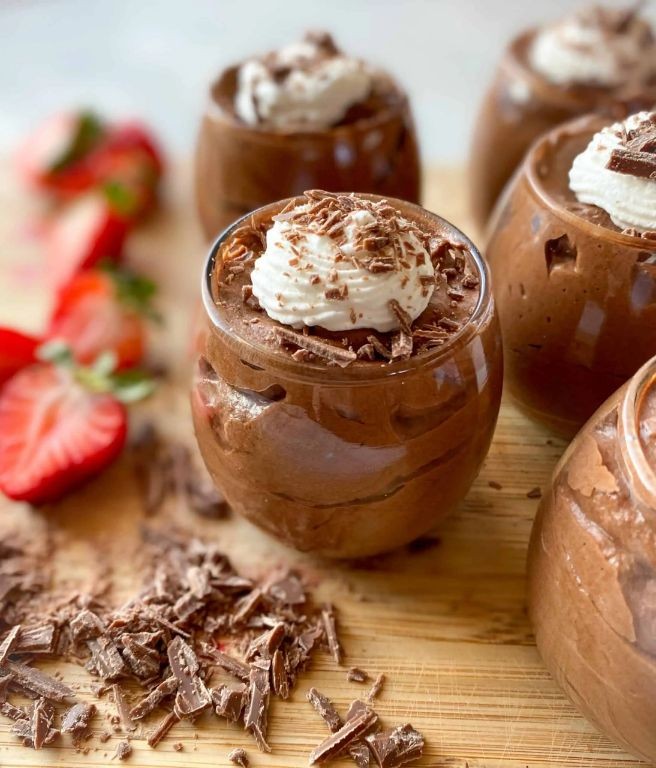
Whisking together childhood nostalgia with sophisticated elegance, this chocolate gelatin mousse transforms simple pantry staples into an ethereal dessert that feels both comforting and luxurious. With its velvety texture and deep cocoa notes, it bridges the gap between classic Jell-O treats and French patisserie, creating something truly special for any occasion.
Ingredients
– 1 packet (0.25 oz) unflavored gelatin – I find the powdered variety dissolves more evenly than sheets
– 1/4 cup cold water – straight from the tap works perfectly
– 1 cup whole milk – the higher fat content creates a richer mouthfeel
– 1/2 cup granulated sugar – I prefer cane sugar for its subtle molasses notes
– 1/4 cup unsweetened cocoa powder – Dutch-processed gives the deepest chocolate flavor
– 1 teaspoon pure vanilla extract – always worth splurging on the real thing
– 1 cup heavy cream – chilled thoroughly for optimal whipping
– Pinch of fine sea salt – just enough to enhance the chocolate without tasting salty
Instructions
1. Sprinkle the unflavored gelatin evenly over the 1/4 cup cold water in a small bowl and let it bloom for 5 minutes until the granules have absorbed the liquid and look spongy.
2. Heat the 1 cup whole milk in a saucepan over medium heat until small bubbles form around the edges, about 3-4 minutes – don’t let it boil.
3. Whisk the bloomed gelatin mixture into the warm milk until completely dissolved, about 1 minute of vigorous stirring.
4. Combine the 1/2 cup granulated sugar, 1/4 cup unsweetened cocoa powder, and pinch of fine sea salt in a medium bowl.
5. Gradually pour the warm milk mixture into the dry ingredients while whisking constantly to prevent lumps from forming.
6. Stir in the 1 teaspoon pure vanilla extract until fully incorporated.
7. Set the chocolate mixture aside to cool to room temperature, about 20-25 minutes – it should feel just warm to the touch.
8. While the chocolate cools, whip the 1 cup chilled heavy cream in a separate bowl using an electric mixer on medium-high speed until soft peaks form, about 2-3 minutes.
9. Gently fold one-third of the whipped cream into the cooled chocolate mixture using a rubber spatula to lighten it.
10. Carefully fold in the remaining whipped cream until no white streaks remain, being careful not to deflate the mixture.
11. Divide the mousse among serving glasses or bowls and refrigerate for at least 4 hours, or until fully set.
Nothing compares to the moment your spoon breaks through the delicate surface into the cloud-like interior, releasing waves of intense chocolate aroma. The mousse maintains an almost magical lightness while delivering profound cocoa depth, making it equally suited for elegant dinner parties or quiet weeknight indulgences. Consider garnishing with chocolate shavings or fresh berries to complement its sophisticated simplicity.
Summary
Deliciously simple and endlessly versatile, these gelatin recipes offer something for every occasion—from family desserts to elegant entertaining. We hope you’ve found a new favorite to try in your own kitchen! Don’t forget to leave a comment sharing which recipe you loved most, and pin this roundup on Pinterest to save for later. Happy cooking!