Ready to indulge without compromise? These 18 decadent gluten-free dessert recipes prove that dietary restrictions don’t mean sacrificing flavor or indulgence. From rich chocolate cakes to creamy cheesecakes and buttery cookies, we’ve gathered the most irresistible treats that will satisfy any sweet tooth. Get ready to discover your new favorite desserts that everyone at your table will love—gluten-free never tasted so good!
Coconut Macaroons
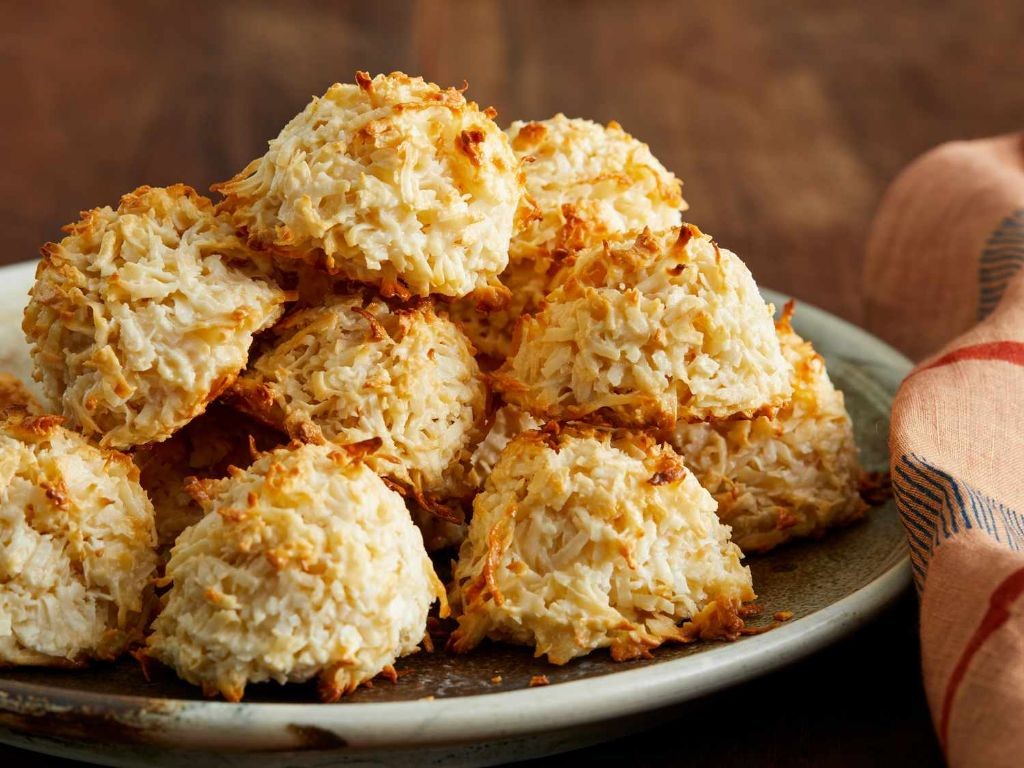
Kind of obsessed with how these coconut macaroons transport me straight to tropical paradise with just one bite. I first made them for a last-minute potluck and now they’re my go-to when I need something impressive but easy. There’s something magical about how simple ingredients transform into these chewy, golden delights.
Ingredients
– 14 ounces sweetened shredded coconut
– 1 cup granulated sugar
– 6 large egg whites
– 1 teaspoon vanilla extract
– 1/4 teaspoon salt
Instructions
1. Preheat your oven to 325°F and line two baking sheets with parchment paper.
2. Combine 14 ounces sweetened shredded coconut, 1 cup granulated sugar, and 1/4 teaspoon salt in a large mixing bowl.
3. In a separate bowl, whisk 6 large egg whites until frothy but not stiff, about 1 minute.
4. Stir 1 teaspoon vanilla extract into the egg whites.
5. Pour the egg white mixture into the coconut mixture and fold together until fully combined.
6. Use a 2-tablespoon cookie scoop to portion the mixture onto prepared baking sheets, spacing them 2 inches apart.
7. Bake for 20-25 minutes until the edges are deep golden brown and the tops are lightly toasted.
8. Transfer the baking sheets to wire racks and let the macaroons cool completely, about 30 minutes.
Every time I bite into these macaroons, I’m amazed by the perfect contrast between the crisp exterior and chewy interior. The vanilla really enhances the tropical coconut flavor, making them taste far more sophisticated than their simple ingredients suggest. Try dipping the bottoms in melted dark chocolate for an elegant twist that always impresses guests.
Chia Seed Pudding with Berries
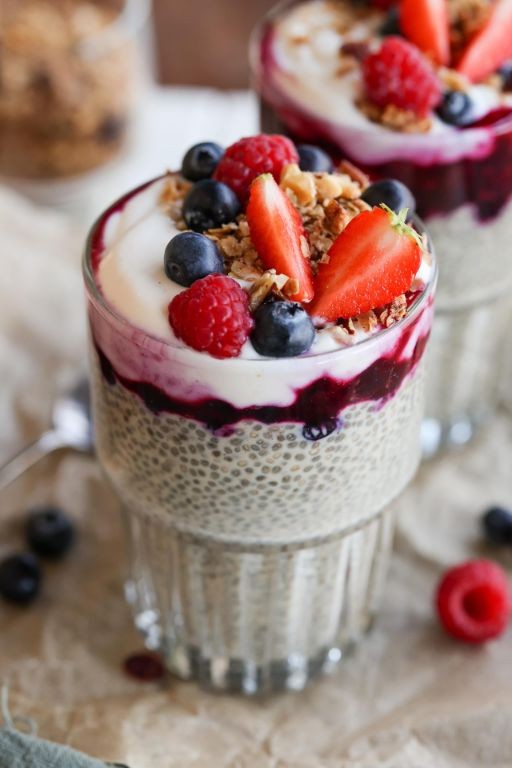
Every morning, I find myself reaching for something quick yet nourishing to start my day, and this chia seed pudding has become my absolute go-to. I first discovered it during a busy work week when I needed breakfasts I could prep ahead, and now it’s a staple in my fridge—perfect for those mornings when I’m rushing out the door but still want something delicious and healthy.
Ingredients
- 1/4 cup chia seeds
- 1 cup unsweetened almond milk
- 1 tbsp maple syrup
- 1/2 tsp vanilla extract
- 1/2 cup mixed fresh berries
Instructions
- Combine 1/4 cup chia seeds and 1 cup unsweetened almond milk in a medium bowl.
- Add 1 tbsp maple syrup and 1/2 tsp vanilla extract to the bowl.
- Whisk the mixture vigorously for 30 seconds to prevent clumping.
- Let the mixture sit undisturbed for 5 minutes.
- Whisk again for 15 seconds to break up any forming clumps.
- Cover the bowl tightly with plastic wrap.
- Refrigerate the pudding for at least 4 hours or overnight until thickened to a gel-like consistency.
- Wash 1/2 cup mixed fresh berries under cold running water.
- Pat the berries dry gently with paper towels.
- Spoon the chilled pudding into serving bowls.
- Top each serving with the fresh berries.
- Serve immediately or refrigerate for up to 3 days.
Chilled and creamy with a subtle sweetness, this pudding has a delightful tapioca-like texture that pairs perfectly with the burst of fresh berries. I love how the vanilla and maple notes shine through, making it feel like a treat rather than just breakfast. For a fun twist, try layering it with granola in a parfait glass or swirling in some mashed raspberries before chilling for a marbled effect.
Avocado Chocolate Mousse
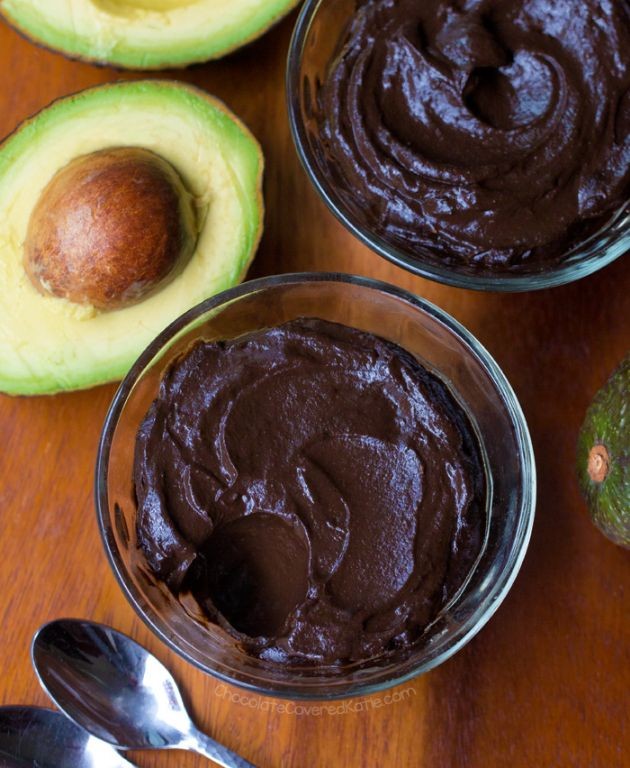
Zesty as it sounds, I first discovered avocado chocolate mousse during a desperate pantry raid when my sweet tooth struck but I was out of cream. This magical combination creates the creamiest, richest dessert that will make you forget there’s even avocado in it! I’ve since perfected this recipe for those nights when you want something decadent but don’t want to feel guilty afterward.
Ingredients
– 2 large ripe avocados
– 1/4 cup cocoa powder
– 1/4 cup maple syrup
– 1/4 cup almond milk
– 1 tsp vanilla extract
– 1/4 tsp salt
– 1/2 cup dark chocolate chips
Instructions
1. Cut 2 large ripe avocados in half, remove the pits, and scoop the flesh into a food processor.
2. Add 1/4 cup cocoa powder, 1/4 cup maple syrup, 1/4 cup almond milk, 1 tsp vanilla extract, and 1/4 tsp salt to the food processor.
3. Process the mixture on high speed for 2 minutes until completely smooth, scraping down the sides halfway through.
4. Melt 1/2 cup dark chocolate chips in a microwave-safe bowl using 30-second intervals, stirring between each interval until fully melted.
5. Add the melted chocolate to the food processor and process for another minute until fully incorporated.
6. Taste the mousse and adjust sweetness if needed by adding more maple syrup 1 tablespoon at a time.
7. Transfer the mousse to serving bowls or glasses using a spatula.
8. Chill the mousse in the refrigerator for at least 2 hours to allow it to set and develop flavor.
9. Serve chilled with optional toppings like fresh berries, chopped nuts, or coconut flakes.
Just out of the fridge, this mousse has an incredibly silky texture that melts on your tongue with deep chocolate flavor. The avocado provides such a luxurious creaminess that you’ll never miss traditional dairy. I love serving it in small mason jars with crushed graham crackers on top for that s’mores vibe!
Pumpkin Spice Donuts
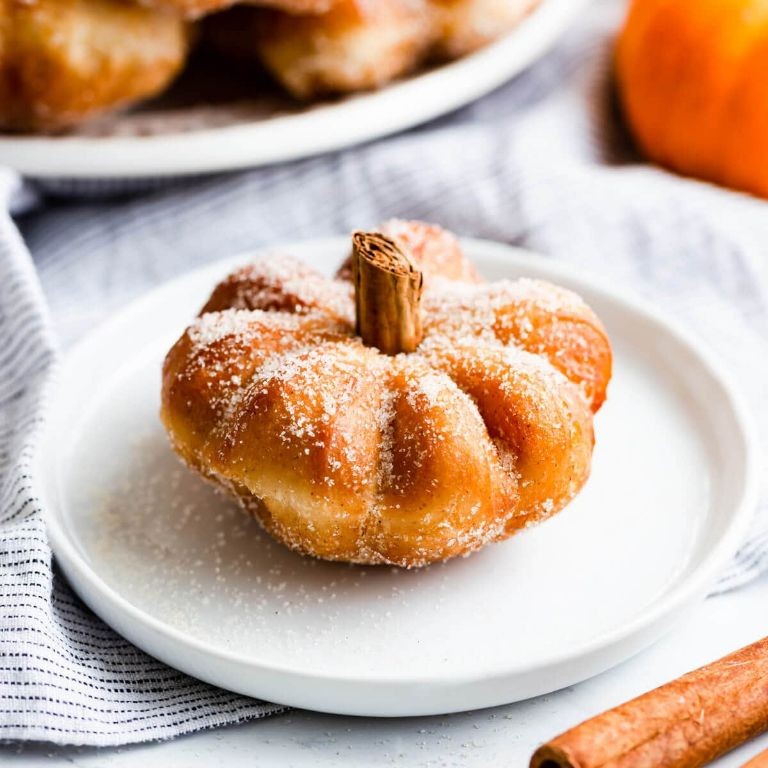
Baking these pumpkin spice donuts has become my favorite fall ritual—there’s something magical about filling the kitchen with that warm cinnamon aroma while the leaves change outside. I actually started making these when my neighbor brought over an extra can of pumpkin puree, and now they’re a seasonal staple that disappears within minutes. Nothing beats enjoying one fresh from the oven with a cup of coffee on a crisp autumn morning.
Ingredients
– 1 ½ cups all-purpose flour
– 1 ½ tsp baking powder
– ½ tsp salt
– 1 tsp ground cinnamon
– ½ tsp ground nutmeg
– ¼ tsp ground cloves
– ¼ tsp ground ginger
– ½ cup granulated sugar
– ½ cup brown sugar
– 1 cup pumpkin puree
– 2 large eggs
– ¼ cup vegetable oil
– ½ cup milk
– 1 tsp vanilla extract
– 6 tbsp unsalted butter, melted
– ½ cup granulated sugar (for coating)
Instructions
1. Preheat your oven to 350°F and grease a standard donut pan thoroughly with non-stick spray.
2. Whisk together 1 ½ cups all-purpose flour, 1 ½ tsp baking powder, ½ tsp salt, 1 tsp ground cinnamon, ½ tsp ground nutmeg, ¼ tsp ground cloves, and ¼ tsp ground ginger in a medium bowl until fully combined.
3. In a separate large bowl, beat ½ cup granulated sugar, ½ cup brown sugar, 1 cup pumpkin puree, 2 large eggs, ¼ cup vegetable oil, ½ cup milk, and 1 tsp vanilla extract with an electric mixer on medium speed for exactly 2 minutes until smooth and creamy.
4. Gradually add the dry ingredients to the wet ingredients, mixing on low speed just until no flour streaks remain—be careful not to overmix.
5. Spoon the batter into a large piping bag or zip-top bag with one corner snipped off for easier filling.
6. Pipe the batter into the prepared donut pan cavities, filling each about ¾ full to allow for rising.
7. Bake for 12-14 minutes until the donuts spring back when lightly pressed and a toothpick inserted comes out clean.
8. Let the donuts cool in the pan for 5 minutes before transferring to a wire rack.
9. Brush each warm donut with 6 tbsp melted unsalted butter using a pastry brush for even coverage.
10. Dip each buttered donut into ½ cup granulated sugar, coating both sides completely.
Heavenly warm and cake-like with that signature spiced pumpkin flavor, these donuts have the perfect tender crumb that just melts in your mouth. I love serving them stacked high on a wooden board for gatherings, or sometimes I’ll drizzle them with a simple maple glaze for extra indulgence—they’re absolutely irresistible when the sugar coating creates that slight crackle with each bite.
Lemon Raspberry Tart
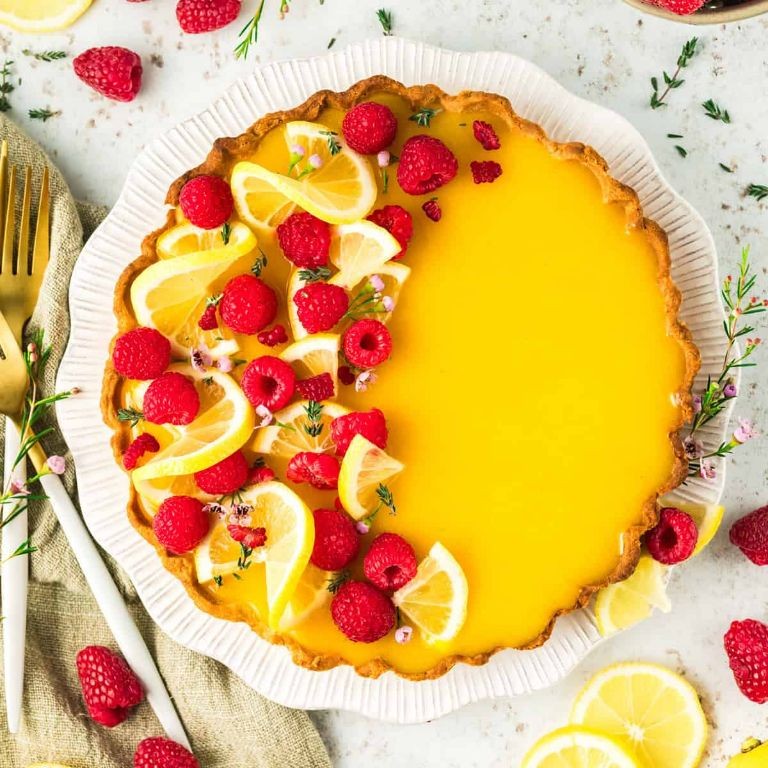
Finally, after testing countless lemon desserts, I’ve perfected this lemon raspberry tart that always disappears at family gatherings. My secret is using both lemon zest and juice for that bright, sunny flavor that pairs perfectly with sweet raspberries. I actually developed this recipe after my neighbor’s lemon tree produced a bumper crop last summer.
Ingredients
– 1 ½ cups all-purpose flour
– ½ cup unsalted butter
– ¼ cup granulated sugar
– 1 large egg yolk
– 2 tablespoons ice water
– ¾ cup granulated sugar
– 3 large eggs
– ½ cup fresh lemon juice
– 1 tablespoon lemon zest
– 6 tablespoons unsalted butter
– 1 cup fresh raspberries
– 2 tablespoons powdered sugar
Instructions
1. Preheat your oven to 350°F.
2. Combine 1 ½ cups all-purpose flour, ½ cup unsalted butter, and ¼ cup granulated sugar in a food processor.
3. Pulse the mixture until it resembles coarse crumbs.
4. Add 1 large egg yolk and 2 tablespoons ice water to the food processor.
5. Pulse until the dough just comes together.
6. Press the dough evenly into a 9-inch tart pan with removable bottom.
7. Chill the crust in the refrigerator for 30 minutes to prevent shrinking.
8. Bake the crust at 350°F for 15 minutes until lightly golden.
9. Whisk together ¾ cup granulated sugar and 3 large eggs in a medium bowl.
10. Add ½ cup fresh lemon juice and 1 tablespoon lemon zest to the egg mixture.
11. Cook the lemon mixture in a double boiler over simmering water for 8 minutes, stirring constantly.
12. Remove the lemon curd from heat when it thickens enough to coat the back of a spoon.
13. Stir 6 tablespoons unsalted butter into the warm lemon curd until fully incorporated.
14. Pour the lemon curd into the baked tart shell.
15. Arrange 1 cup fresh raspberries evenly over the lemon curd.
16. Refrigerate the tart for at least 4 hours until completely set.
17. Dust the chilled tart with 2 tablespoons powdered sugar before serving.
The creamy lemon curd provides the perfect tangy contrast to the sweet raspberries, while the buttery crust adds a satisfying crunch. I love serving this chilled with a dollop of whipped cream for extra indulgence, or you could garnish with fresh mint leaves for a beautiful presentation.
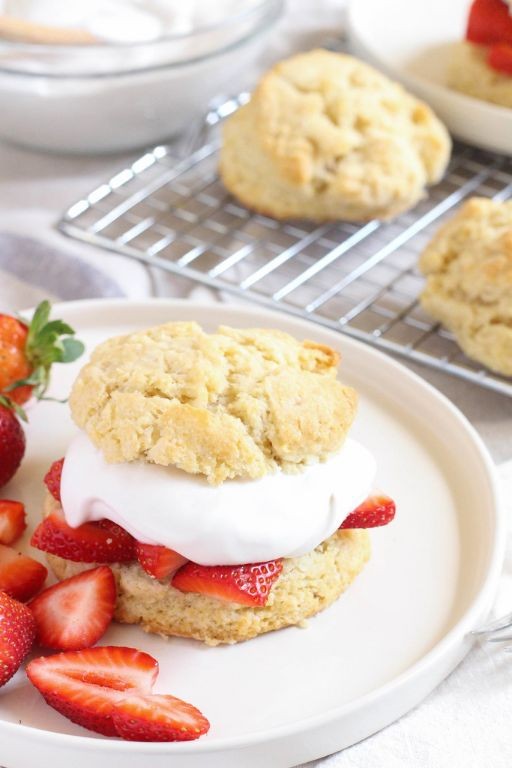
Strawberry Shortcake with Coconut Whipped Cream
T
There’s something magical about strawberry shortcake that takes me right back to childhood summers. I still remember my grandmother teaching me how to make the perfect biscuit base—her secret was always using cold butter and not overmixing the dough. This version with coconut whipped cream has become my go-to for summer gatherings because it feels both nostalgic and refreshingly modern.
Ingredients
– 2 cups all-purpose flour
– 1/4 cup granulated sugar
– 1 tbsp baking powder
– 1/2 tsp salt
– 1/2 cup unsalted butter
– 2/3 cup whole milk
– 1 lb fresh strawberries
– 1/4 cup granulated sugar
– 1 can full-fat coconut milk
– 1 tsp vanilla extract
– 2 tbsp powdered sugar
Instructions
1. Refrigerate the can of coconut milk for at least 12 hours to separate the cream from the liquid.
2. Preheat your oven to 425°F and line a baking sheet with parchment paper.
3. Whisk together 2 cups all-purpose flour, 1/4 cup granulated sugar, 1 tablespoon baking powder, and 1/2 teaspoon salt in a large bowl.
4. Cut 1/2 cup cold unsalted butter into small cubes and add to the dry ingredients.
5. Use a pastry cutter or your fingers to work the butter into the flour mixture until it resembles coarse crumbs with pea-sized butter pieces.
6. Pour in 2/3 cup whole milk and stir just until the dough comes together—be careful not to overmix.
7. Turn the dough onto a floured surface and gently pat it into a 1-inch thick circle.
8. Use a 3-inch round cutter to cut out 6 biscuits, gathering and re-rolling the scraps once.
9. Place the biscuits on the prepared baking sheet, spacing them 2 inches apart.
10. Bake for 12-15 minutes until golden brown and cooked through.
11. While biscuits bake, hull and slice 1 pound of fresh strawberries.
12. Toss the sliced strawberries with 1/4 cup granulated sugar and let macerate for 15 minutes.
13. Open the chilled coconut milk and scoop the solid cream into a chilled mixing bowl, discarding the liquid.
14. Add 1 teaspoon vanilla extract and 2 tablespoons powdered sugar to the coconut cream.
15. Whip the mixture on high speed for 2-3 minutes until soft peaks form.
16. Let the baked biscuits cool completely on a wire rack before assembling.
17. Split each biscuit in half horizontally using a serrated knife.
18. Place the bottom half of each biscuit on individual plates.
19. Spoon macerated strawberries and their juices over the biscuit bottoms.
20. Top with a generous dollop of coconut whipped cream.
21. Place the biscuit tops over the whipped cream at a slight angle.
Creating this dessert feels like capturing summer in a bowl—the tender biscuits soak up the strawberry juices beautifully while the coconut cream adds a tropical lightness that balances the sweetness. Consider serving it in mason jars for a portable picnic version, or layer it parfait-style in clear glasses to show off those gorgeous red and white stripes.
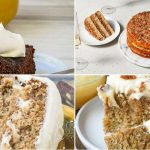
Carrot Cake with Cashew Frosting
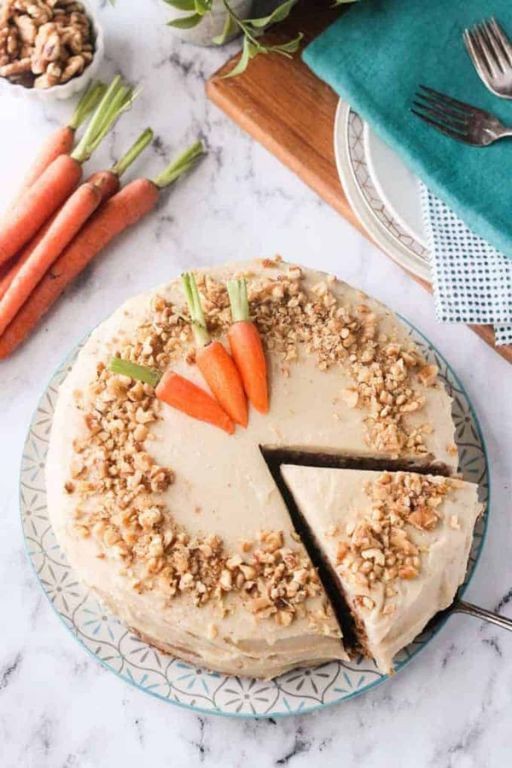
Sometimes you just need a dessert that feels like a warm hug, and this carrot cake with cashew frosting is exactly that. I first made this for my sister’s birthday last fall when she was craving something cozy but dairy-free, and now it’s become our family’s go-to celebration cake. There’s something magical about how the spices mingle with the sweet carrots and creamy frosting.
Ingredients
– 2 cups all-purpose flour
– 1 1/2 cups granulated sugar
– 1 tsp baking soda
– 1 tsp baking powder
– 1 tsp ground cinnamon
– 1/2 tsp ground nutmeg
– 1/2 tsp salt
– 3 large eggs
– 1 cup vegetable oil
– 2 tsp vanilla extract
– 3 cups grated carrots
– 1 cup raw cashews
– 1/4 cup maple syrup
– 2 tbsp lemon juice
– 1/4 cup water
Instructions
1. Preheat your oven to 350°F and grease two 9-inch round cake pans.
2. Whisk together 2 cups all-purpose flour, 1 1/2 cups granulated sugar, 1 tsp baking soda, 1 tsp baking powder, 1 tsp ground cinnamon, 1/2 tsp ground nutmeg, and 1/2 tsp salt in a large bowl.
3. In a separate bowl, beat 3 large eggs until frothy, then gradually mix in 1 cup vegetable oil and 2 tsp vanilla extract.
4. Combine the wet ingredients with the dry ingredients, stirring just until no flour streaks remain.
5. Fold in 3 cups grated carrots until evenly distributed throughout the batter.
6. Divide the batter evenly between the prepared pans and smooth the tops with a spatula.
7. Bake at 350°F for 30-35 minutes until a toothpick inserted into the center comes out clean.
8. Cool the cakes in their pans for 15 minutes, then transfer to a wire rack to cool completely.
9. Soak 1 cup raw cashews in hot water for 30 minutes to soften them for easier blending.
10. Drain the cashews and blend with 1/4 cup maple syrup, 2 tbsp lemon juice, and 1/4 cup water until completely smooth and creamy.
11. Spread the cashew frosting evenly over the cooled cake layers when stacking them.
12. Refrigerate the frosted cake for at least 1 hour to set the frosting before serving.
Moist and warmly spiced, this cake has the perfect crumb that pairs beautifully with the subtly sweet cashew frosting. I love serving thick slices with a sprinkle of toasted coconut or chopped walnuts for extra texture, and it’s even better the next day when the flavors have fully melded together.
Dark Chocolate Truffles
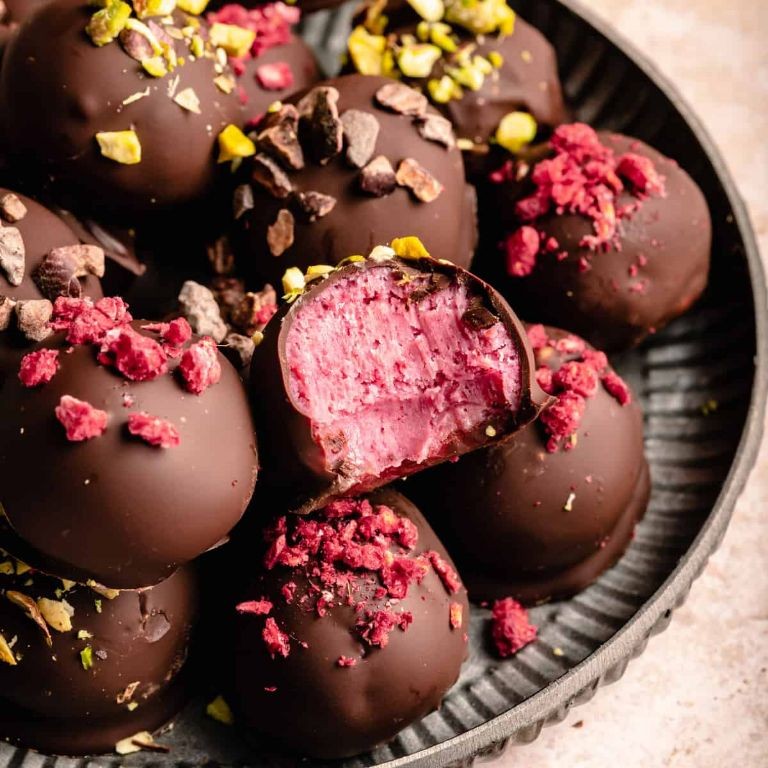
Kind of like that friend who always has emergency chocolate stashed away, I keep a secret supply of dark chocolate in my pantry for moments when only something decadent will do. These truffles are my go-to when I want to feel fancy without spending hours in the kitchen—they’re surprisingly simple but always impress. I actually started making them after a holiday party where store-bought truffles tasted more like wax than chocolate, and I’ve been hooked on homemade ever since.
Ingredients
– 8 ounces dark chocolate
– 1/2 cup heavy cream
– 2 tablespoons unsalted butter
– 1/4 cup cocoa powder
Instructions
1. Chop 8 ounces of dark chocolate into small, uniform pieces using a sharp knife.
2. Heat 1/2 cup heavy cream in a small saucepan over medium heat until it reaches 180°F on a kitchen thermometer.
3. Pour the hot cream over the chopped chocolate and let it sit undisturbed for 3 minutes.
4. Add 2 tablespoons unsalted butter to the chocolate mixture.
5. Whisk the mixture slowly from the center outward until completely smooth and glossy.
6. Cover the bowl with plastic wrap, pressing it directly onto the surface of the chocolate.
7. Refrigerate the mixture for exactly 2 hours until firm but still pliable.
8. Scoop tablespoon-sized portions of the chilled chocolate using a small cookie scoop.
9. Roll each portion between your palms into smooth, round balls.
10. Place 1/4 cup cocoa powder in a shallow bowl.
11. Roll each truffle in cocoa powder until evenly coated.
12. Arrange the finished truffles in a single layer on a parchment-lined baking sheet.
13. Refrigerate truffles for 30 minutes before serving to set the final texture.
Our homemade truffles develop an incredible velvety melt-in-your-mouth quality that store-bought versions can’t match. The deep cocoa coating provides a pleasant bitterness that perfectly balances the rich, creamy ganache center. I love serving these alongside strong coffee or crumbling them over vanilla ice cream for an instant dessert upgrade.
Pecan Pie Bars
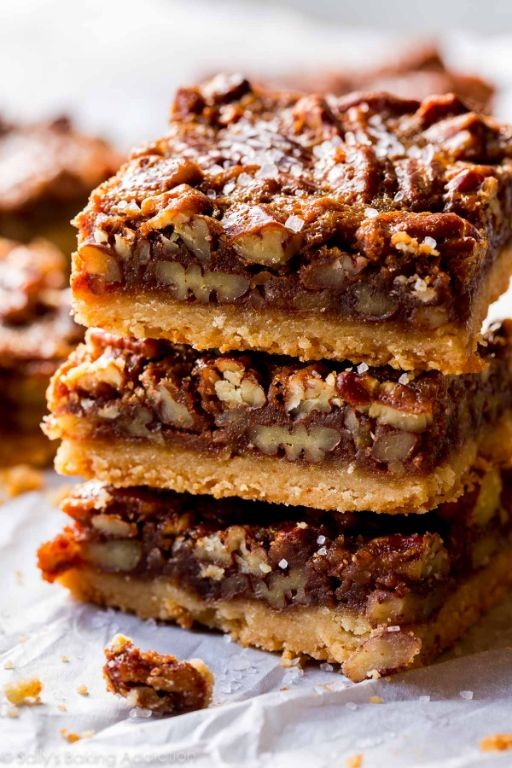
Oh my goodness, these pecan pie bars have become my absolute go-to dessert for every fall gathering since I first experimented with them after my grandmother’s traditional pie recipe felt too fussy for a quick potluck. Over the years, I’ve learned that making them in bar form not only saves time but also makes them perfectly portable for everything from Thanksgiving dinner to casual weekend get-togethers, and I always keep the ingredients on hand for last-minute baking emergencies.
Ingredients
– 2 cups all-purpose flour
– 1/2 cup granulated sugar
– 1/2 teaspoon salt
– 3/4 cup unsalted butter, cold and cubed
– 3 large eggs
– 1 cup light corn syrup
– 1 cup packed light brown sugar
– 2 teaspoons vanilla extract
– 2 cups pecan halves
Instructions
1. Preheat your oven to 350°F and line a 9×13-inch baking pan with parchment paper, letting the edges hang over for easy removal later.
2. Combine 2 cups all-purpose flour, 1/2 cup granulated sugar, and 1/2 teaspoon salt in a large bowl.
3. Add 3/4 cup cold, cubed unsalted butter to the flour mixture and use a pastry cutter or your fingers to work it in until the mixture resembles coarse crumbs.
4. Press the crumb mixture firmly and evenly into the bottom of the prepared baking pan to form the crust.
5. Bake the crust at 350°F for 15 minutes, or until the edges are just starting to turn lightly golden.
6. While the crust bakes, whisk together 3 large eggs, 1 cup light corn syrup, 1 cup packed light brown sugar, and 2 teaspoons vanilla extract in a medium bowl until smooth.
7. Stir 2 cups pecan halves into the egg mixture until they are fully coated.
8. Pour the pecan filling evenly over the hot crust as soon as it comes out of the oven, spreading it carefully with a spatula to cover the surface.
9. Return the pan to the oven and bake at 350°F for 25–30 minutes, or until the filling is set and doesn’t jiggle when you gently shake the pan.
10. Let the bars cool completely in the pan on a wire rack for at least 2 hours to allow the filling to firm up before slicing.
11. Use the parchment paper overhang to lift the entire slab out of the pan, then cut into 24 even bars with a sharp knife. My favorite part is that chewy, caramel-like filling paired with the buttery shortbread crust—it’s like all the best parts of pecan pie in one neat, handheld bite. Many times, I’ve served these warm with a scoop of vanilla ice cream for an extra decadent treat, or simply enjoyed them with a cup of coffee as an afternoon pick-me-up.
Vanilla Bean Panna Cotta
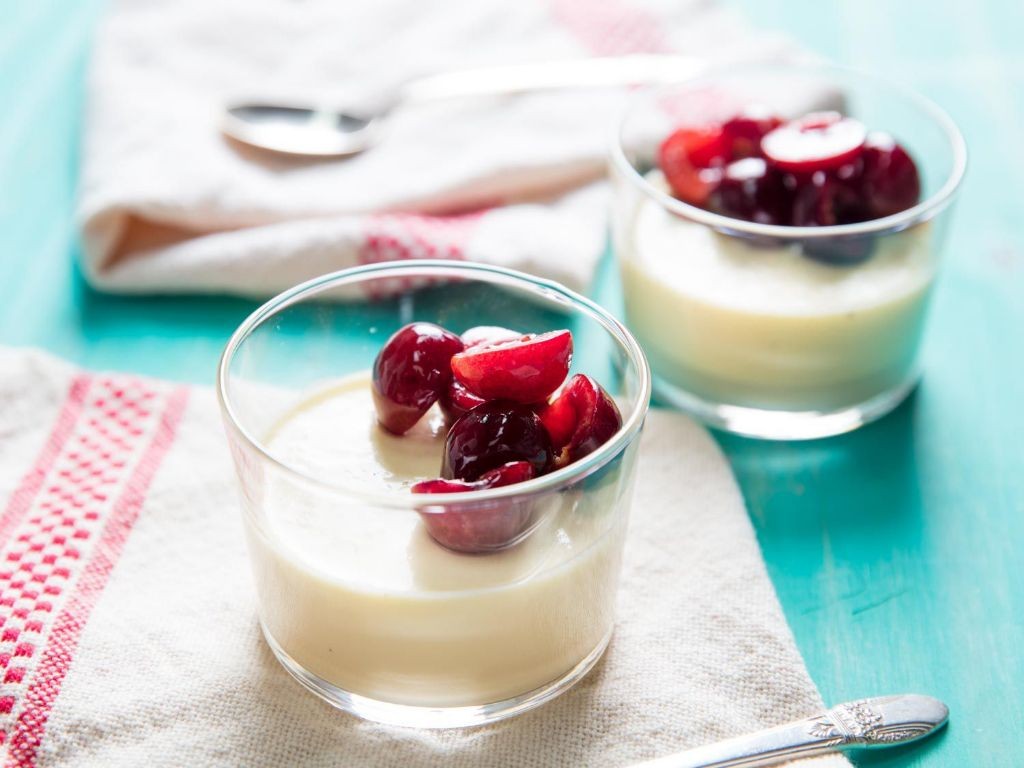
Baking has always been my therapy, but sometimes I crave something elegant that doesn’t require turning on the oven. Vanilla bean panna cotta became my go-to dessert during those sweltering summer months when even the thought of baking made me sweat – it’s the perfect make-ahead treat that always impresses guests without stressing out the host.
Ingredients
– 2 cups heavy cream
– 1/2 cup granulated sugar
– 1 packet (2 1/4 tsp) unflavored gelatin
– 3 tbsp cold water
– 1 vanilla bean
– 1 tsp vanilla extract
Instructions
1. Sprinkle gelatin over cold water in a small bowl and let bloom for 5 minutes until it resembles wet sand.
2. Split vanilla bean lengthwise and scrape out seeds using the back of your knife – save both seeds and pod.
3. Combine heavy cream, sugar, vanilla seeds, and empty pod in a saucepan over medium heat.
4. Heat mixture until it reaches 170°F on a digital thermometer, stirring constantly to dissolve sugar completely.
5. Remove from heat and whisk in bloomed gelatin until no lumps remain – this ensures perfectly smooth texture.
6. Stir in vanilla extract and let mixture cool to 110°F, about 15-20 minutes.
7. Strain through a fine-mesh sieve into a pouring vessel to remove vanilla pod and any undissolved gelatin bits.
8. Divide mixture evenly among 6 ramekins or serving glasses.
9. Cover with plastic wrap, making sure wrap doesn’t touch the surface, and refrigerate for at least 6 hours or overnight until fully set.
10. To serve, run a thin knife around the edge of each ramekin and invert onto plates, or serve directly in glasses.
So silky and sophisticated, this panna cotta melts on your tongue with pure vanilla essence. I love serving it with fresh berry compote or a drizzle of honey for contrast, though it’s perfectly elegant all on its own.
Chocolate Covered Strawberries
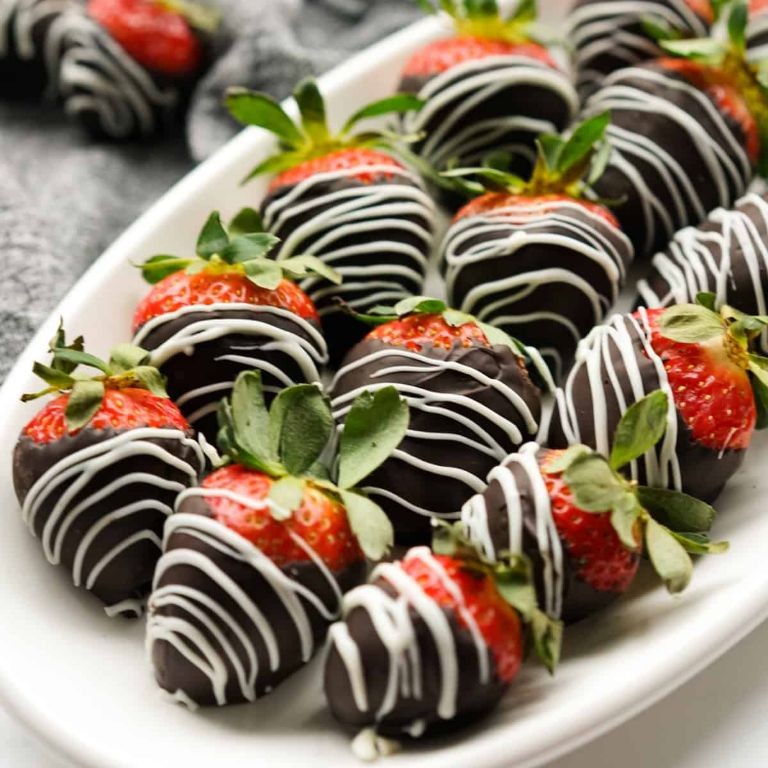
Aren’t chocolate covered strawberries just the perfect little treat? I always make these when I need a quick dessert that looks fancy but requires minimal effort—they’re my go-to for last-minute dinner parties or when I’m craving something sweet without the baking mess. There’s something magical about that crisp chocolate shell giving way to the juicy strawberry beneath.
Ingredients
– 1 pound fresh strawberries
– 8 ounces semi-sweet chocolate chips
– 1 tablespoon coconut oil
Instructions
1. Line a baking sheet with parchment paper and set it aside.
2. Rinse 1 pound of fresh strawberries under cool water and pat them completely dry with paper towels.
3. Place 8 ounces of semi-sweet chocolate chips and 1 tablespoon of coconut oil in a microwave-safe bowl.
4. Microwave the chocolate mixture on high power for 30 seconds, then stir thoroughly.
5. Continue microwaving in 15-second intervals, stirring after each interval, until the chocolate is completely melted and smooth.
6. Hold each strawberry by the stem and dip it into the melted chocolate, swirling to coat about three-quarters of the berry.
7. Allow excess chocolate to drip back into the bowl by gently shaking the strawberry.
8. Place each coated strawberry on the prepared parchment-lined baking sheet.
9. Refrigerate the strawberries for 20-25 minutes until the chocolate coating is completely set and firm to the touch.
You’ll love how the glossy chocolate shell cracks perfectly when you bite into these, revealing the sweet, juicy strawberry inside. They’re fantastic served chilled with coffee after dinner, or try drizzling any leftover melted chocolate over them for an extra decorative touch before refrigerating.