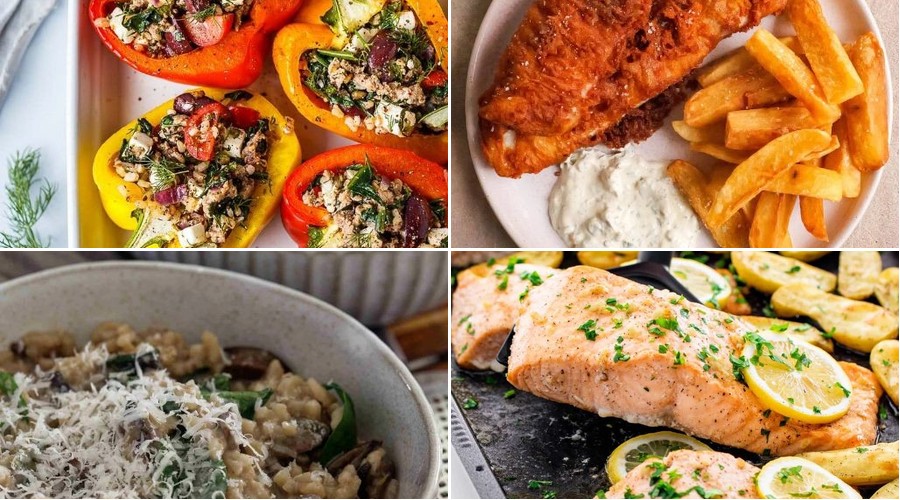
As Good Friday approaches, many of us look forward to observing this solemn day with meaningful meals that honor tradition while delighting our taste buds. Whether you’re planning a simple family supper or a more elaborate feast, this collection of 20 delicious recipes offers everything from classic fish dishes to comforting meatless favorites that will make your observance both memorable and delicious. Let’s explore these inspiring options together!
Classic Fish and Chips with Tartar Sauce

Diving into the world of British comfort food, this classic fish and chips recipe delivers perfectly crispy beer-battered cod alongside golden, fluffy fries, all served with a tangy homemade tartar sauce. During our cooking session, I’ll guide you through each technique with precision, ensuring even beginners achieve that satisfying crunch and tender flakiness we all love. Let’s begin by preparing our ingredients and equipment for a seamless cooking experience.
Ingredients
– 1.5 lbs cod fillets
– 4 large russet potatoes
– 1.5 cups all-purpose flour
– 1 cup cold beer
– 1 egg
– 1 tsp baking powder
– 2 quarts vegetable oil
– 1 cup mayonnaise
– 2 tbsp chopped dill pickles
– 1 tbsp capers
– 1 tbsp lemon juice
– 1 tsp Dijon mustard
– 1/2 tsp paprika
– Salt to taste
Instructions
1. Peel the russet potatoes and cut them into 1/2-inch thick batons.
2. Rinse the potato batons under cold water for 2 minutes to remove excess starch.
3. Pat the potato batons completely dry with paper towels.
4. Heat vegetable oil in a deep pot to 325°F, using a thermometer for accuracy.
5. Fry the potato batons in batches for 4 minutes until pale golden but still soft.
6. Remove the partially cooked fries with a slotted spoon and drain on a wire rack.
7. Increase the oil temperature to 375°F for the final frying stage.
8. Pat the cod fillets dry with paper towels and season both sides with salt.
9. Combine 1 cup flour, baking powder, and paprika in a medium bowl.
10. Whisk the cold beer and egg together in a separate bowl until frothy.
11. Gradually pour the wet ingredients into the dry ingredients, stirring until just combined.
12. Dredge each cod fillet in the remaining 1/2 cup flour, shaking off excess.
13. Dip the floured cod fillets into the beer batter, coating completely.
14. Carefully lower battered cod into the 375°F oil, frying two pieces at a time.
15. Fry the cod for 5-6 minutes until golden brown and crispy, turning once.
16. Remove the fried cod and drain on the wire rack beside the oven.
17. Return the partially cooked fries to the 375°F oil and fry for 3 more minutes.
18. Remove the crispy fries when they reach deep golden brown color.
19. Combine mayonnaise, chopped dill pickles, capers, lemon juice, and Dijon mustard in a small bowl.
20. Stir the tartar sauce ingredients until fully incorporated.
21. Season the tartar sauce with salt and refrigerate until serving.
The contrast between the shatteringly crisp beer batter and the moist, flaky cod creates an irresistible texture experience, while the homemade tartar sauce cuts through the richness with its bright, briny notes. For a modern twist, serve your fish and chips wrapped in newspaper-style parchment paper with malt vinegar for sprinkling, maintaining that authentic chip shop feel while elevating the presentation for home dining.
Garlic Butter Baked Salmon
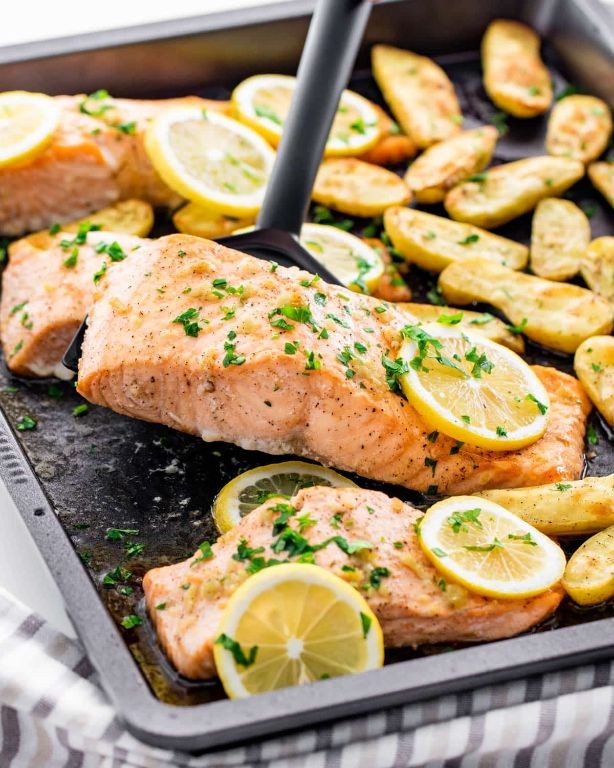
Mastering a simple yet impressive seafood dish can transform your weeknight dinners. Garlic Butter Baked Salmon delivers restaurant-quality flavor with minimal effort, combining rich butter, aromatic garlic, and tender salmon fillets. This method ensures perfectly cooked fish every time, even for kitchen beginners.
Ingredients
– 4 (6-ounce) salmon fillets
– 4 tablespoons unsalted butter
– 4 cloves garlic
– 1 tablespoon fresh lemon juice
– 1 teaspoon dried parsley
– 1/2 teaspoon salt
– 1/4 teaspoon black pepper
Instructions
1. Preheat your oven to 400°F and position the rack in the center.
2. Pat the salmon fillets completely dry with paper towels to ensure proper browning.
3. Arrange the salmon fillets skin-side down in a single layer in a 9×13-inch baking dish.
4. Mince the garlic cloves finely to release maximum flavor.
5. Melt the butter in a small saucepan over medium heat for 1-2 minutes.
6. Stir the minced garlic into the melted butter and cook for 30 seconds until fragrant.
7. Remove the saucepan from heat and whisk in the lemon juice, dried parsley, salt, and black pepper.
8. Brush the garlic butter mixture evenly over the top and sides of each salmon fillet.
9. Bake the salmon at 400°F for 12-15 minutes until the internal temperature reaches 145°F.
10. Check for doneness by observing opaque flesh that flakes easily with a fork.
11. Let the salmon rest for 3 minutes before serving to allow juices to redistribute.
Your salmon will emerge with a moist, flaky interior and a beautifully caramelized garlic butter crust. You’ll notice the buttery garlic flavor penetrates every bite while the lemon provides a bright counterpoint. Try serving it over creamy polenta or alongside roasted asparagus for a complete meal that feels both elegant and comforting.
Creamy Tuscan Garlic Shrimp Pasta
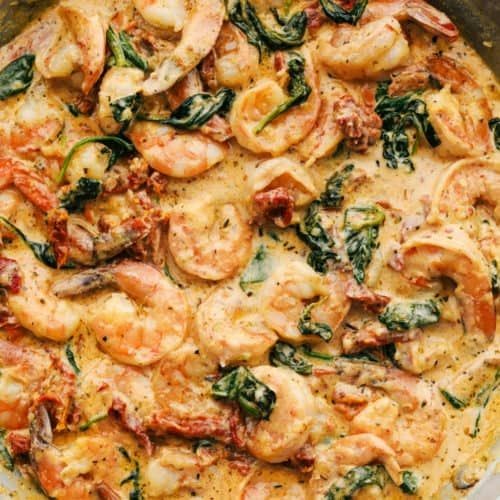
Savor the rich flavors of Italy with this comforting pasta dish that combines succulent shrimp with a creamy garlic sauce. Simply follow these clear steps to create a restaurant-quality meal in your own kitchen, perfect for both weeknight dinners and special occasions. You’ll be amazed at how easily these ingredients come together into something truly spectacular.
Ingredients
– 12 ounces fettuccine pasta
– 1 pound large shrimp, peeled and deveined
– 2 tablespoons olive oil
– 4 cloves garlic, minced
– 1 cup heavy cream
– 1/2 cup grated Parmesan cheese
– 1 cup chopped spinach
– 1/4 cup sun-dried tomatoes, chopped
– 1 teaspoon Italian seasoning
– 1/2 teaspoon salt
– 1/4 teaspoon black pepper
– 2 tablespoons butter
Instructions
1. Bring a large pot of salted water to a rolling boil over high heat.
2. Add the fettuccine pasta to the boiling water and cook for 8-10 minutes until al dente, stirring occasionally to prevent sticking.
3. While pasta cooks, pat the shrimp completely dry with paper towels to ensure proper searing.
4. Heat olive oil in a large skillet over medium-high heat until shimmering.
5. Add shrimp to the hot skillet in a single layer, cooking for 2 minutes per side until pink and opaque.
6. Transfer cooked shrimp to a clean plate, being careful not to overcrowd the pan during cooking.
7. Reduce heat to medium and add butter to the same skillet.
8. Add minced garlic and cook for 1 minute until fragrant but not browned.
9. Pour in heavy cream and bring to a gentle simmer, stirring constantly.
10. Whisk in Parmesan cheese until completely melted and smooth.
11. Stir in Italian seasoning, salt, and black pepper.
12. Add chopped spinach and sun-dried tomatoes, cooking for 2 minutes until spinach wilts.
13. Drain the cooked pasta, reserving 1/2 cup of pasta water.
14. Return cooked shrimp to the skillet with the sauce.
15. Add drained pasta to the skillet, tossing to coat evenly with the sauce.
16. If the sauce is too thick, gradually add reserved pasta water 2 tablespoons at a time until desired consistency is reached.
17. Cook for 1 final minute, stirring constantly to combine all elements.
Enjoy the luxurious creaminess that coats each strand of pasta, complemented by the tender shrimp and vibrant pops of sun-dried tomato. Each bite delivers a perfect balance of garlicky richness and fresh spinach, making this dish feel both indulgent and wholesome. Consider serving it with crusty bread to soak up every last drop of the delicious sauce.
Lemon Herb Roasted Cod
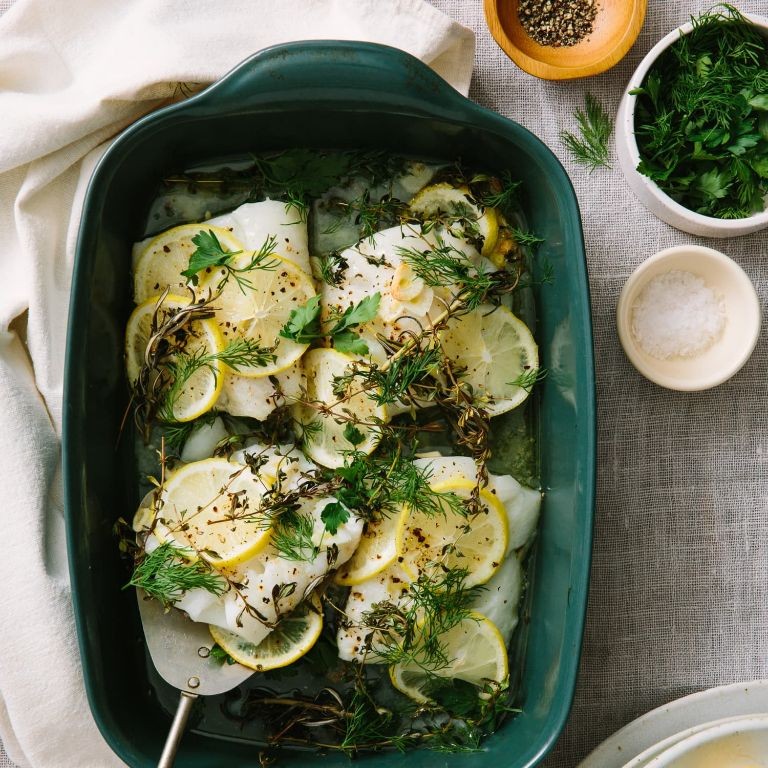
Haven’t you noticed how a simple roasted fish can transform an ordinary weeknight into something special? Lemon herb roasted cod is exactly that kind of magic—flaky, bright, and surprisingly simple to master. Let me walk you through each step so you can create this restaurant-quality dish right in your own kitchen.
Ingredients
– 4 (6-ounce) cod fillets
– 2 tablespoons olive oil
– 1 lemon
– 2 cloves garlic
– 1 tablespoon fresh parsley
– 1 teaspoon fresh thyme
– 1/2 teaspoon salt
– 1/4 teaspoon black pepper
Instructions
1. Preheat your oven to 400°F and position a rack in the center.
2. Pat the cod fillets completely dry with paper towels to ensure proper browning.
3. Drizzle 1 tablespoon olive oil evenly over both sides of each fillet.
4. Sprinkle salt and black pepper evenly over all surfaces of the fish.
5. Mince the garlic cloves until they form fine, uniform pieces.
6. Chop the fresh parsley until you have 1 tablespoon of finely chopped leaves.
7. Strip the thyme leaves from their stems until you have 1 teaspoon.
8. Zest the entire lemon using a microplane, being careful to avoid the bitter white pith.
9. Combine the minced garlic, chopped parsley, thyme leaves, and lemon zest in a small bowl.
10. Cut the zested lemon in half and squeeze both halves to extract 2 tablespoons of juice.
11. Add the remaining 1 tablespoon olive oil to the herb mixture and stir to combine.
12. Spread the herb mixture evenly over the top surface of each cod fillet.
13. Place the prepared fillets on a parchment-lined baking sheet, ensuring they don’t touch.
14. Roast in the preheated oven for 12-15 minutes until the fish flakes easily with a fork.
15. Drizzle the fresh lemon juice over the hot fish immediately after removing from the oven.
Once plated, the cod reveals pearly white flakes that separate cleanly at the gentlest touch of your fork. The bright lemon cuts through the richness while the herbs create an aromatic crust that crisps beautifully against the tender fish. For a complete meal, serve it alongside roasted asparagus or over a bed of lemon-infused quinoa to catch every last bit of the flavorful juices.
Spicy Cajun Shrimp and Grits
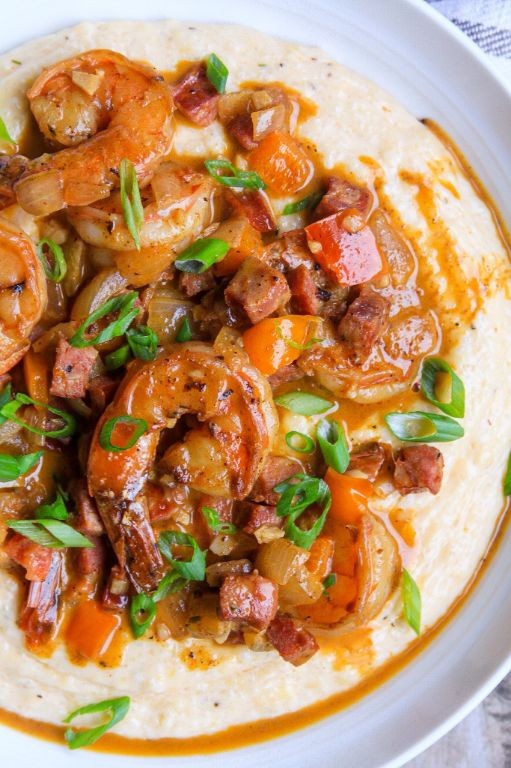
A classic Southern comfort dish, this Spicy Cajun Shrimp and Grits combines creamy, cheesy grits with perfectly seasoned shrimp for a satisfying meal that’s surprisingly simple to master. Always start by preparing your ingredients before heating any pans to ensure a smooth cooking process. This methodical approach guarantees perfectly cooked shrimp and creamy grits every time.
Ingredients
– 1 cup stone-ground grits
– 4 cups water
– 1 tsp salt
– 1 cup shredded sharp cheddar cheese
– 2 tbsp unsalted butter
– 1 lb large shrimp, peeled and deveined
– 2 tbsp olive oil
– 1 tbsp Cajun seasoning
– 2 cloves garlic, minced
– 1/4 cup chopped green onions
– 1 tbsp lemon juice
Instructions
1. Combine 1 cup grits, 4 cups water, and 1 tsp salt in a medium saucepan.
2. Bring the mixture to a boil over medium-high heat, stirring constantly with a whisk.
3. Reduce heat to low and simmer for 20-25 minutes, stirring every 5 minutes to prevent sticking.
4. Stir in 1 cup shredded cheddar cheese and 2 tbsp butter until completely melted and smooth.
5. Pat 1 lb shrimp completely dry with paper towels to ensure proper searing.
6. Toss the dried shrimp with 1 tbsp Cajun seasoning until evenly coated.
7. Heat 2 tbsp olive oil in a large skillet over medium-high heat until shimmering.
8. Add the seasoned shrimp in a single layer and cook for 2 minutes without moving them.
9. Flip each shrimp and cook for another 1-2 minutes until pink and opaque.
10. Add 2 cloves minced garlic and cook for 30 seconds until fragrant.
11. Remove the skillet from heat and stir in 1/4 cup chopped green onions and 1 tbsp lemon juice.
12. Divide the creamy grits among four bowls and top with the spicy shrimp mixture.
Buttery, creamy grits provide the perfect base for the spicy, garlicky shrimp that develop a beautiful sear from proper drying. The contrast between the smooth grits and firm shrimp creates an exceptional texture experience. For a creative twist, serve this dish in individual cast iron skillets to keep everything warm throughout your meal.
Baked Parmesan Crusted Tilapia
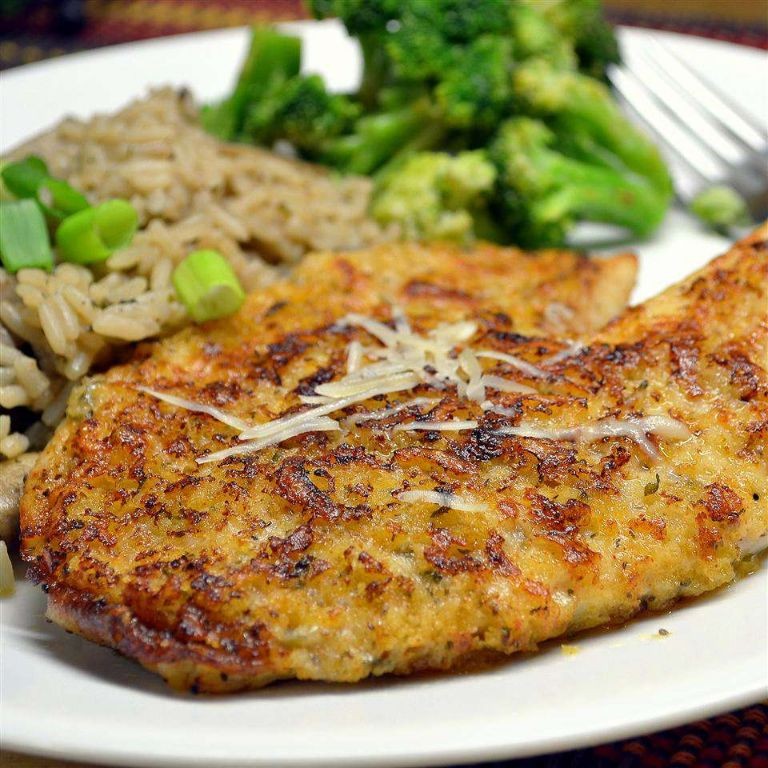
Now, let’s create a simple yet impressive baked fish dish that’s perfect for busy weeknights. Nothing beats the combination of crispy parmesan coating and tender tilapia fillets, and I’ll guide you through each step to ensure perfect results every time. This recipe requires minimal prep time and delivers restaurant-quality flavor right from your own oven.
Ingredients
– 4 tilapia fillets (6 ounces each)
– 1/2 cup grated Parmesan cheese
– 1/4 cup all-purpose flour
– 1/4 cup panko breadcrumbs
– 1 teaspoon garlic powder
– 1/2 teaspoon paprika
– 1/4 teaspoon black pepper
– 1/4 teaspoon salt
– 1 large egg
– 2 tablespoons olive oil
– 1 lemon
Instructions
1. Preheat your oven to 400°F and line a baking sheet with parchment paper.
2. Pat the tilapia fillets completely dry with paper towels to ensure the coating adheres properly.
3. In a shallow bowl, combine the Parmesan cheese, flour, panko breadcrumbs, garlic powder, paprika, black pepper, and salt.
4. Whisk the egg in a separate shallow bowl until smooth and uniform.
5. Dip each tilapia fillet first into the egg mixture, coating both sides evenly.
6. Immediately transfer the egg-coated fillet to the Parmesan mixture, pressing gently to help the coating adhere to all surfaces.
7. Place the coated fillets on the prepared baking sheet, ensuring they don’t touch each other for even cooking.
8. Drizzle the olive oil evenly over the top of each coated fillet to promote browning.
9. Bake for 12-15 minutes until the coating is golden brown and the fish flakes easily with a fork.
10. Cut the lemon into wedges for serving alongside the finished fish.
Outstanding results await with this parmesan-crusted tilapia! The exterior develops a satisfying crunch that gives way to moist, flaky fish beneath. Try serving it over a bed of lemon rice or alongside roasted asparagus for a complete meal that feels both elegant and comforting.
Vegetable Lentil Soup with Crusty Bread
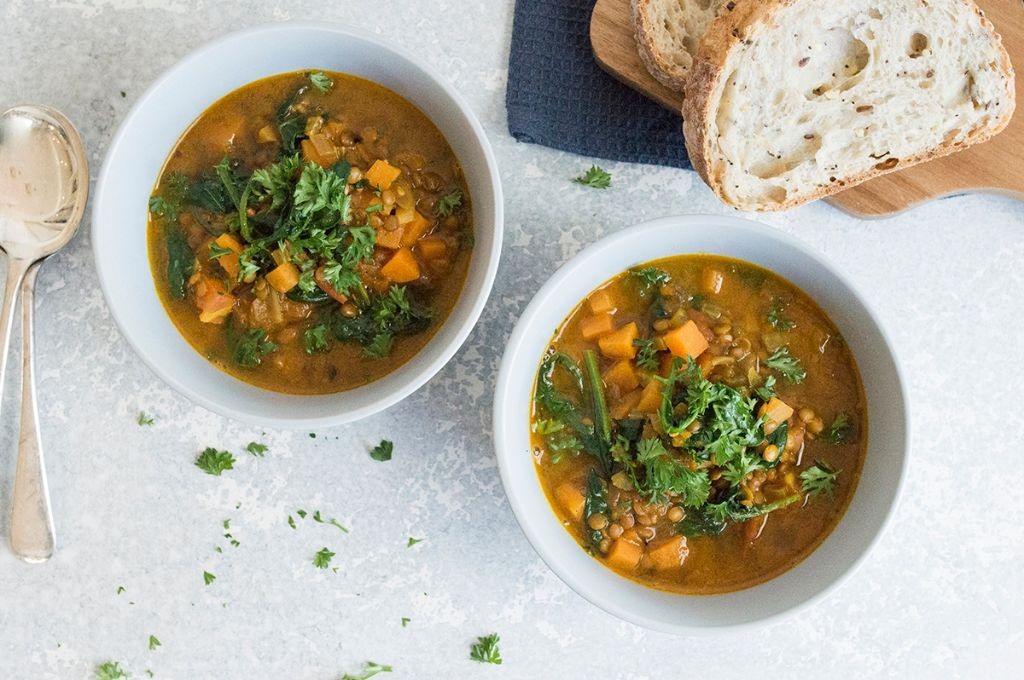
Haven’t we all craved a comforting, nourishing meal that comes together with minimal fuss? This vegetable lentil soup delivers exactly that, combining wholesome ingredients into a satisfying one-pot wonder that’s perfect for chilly days or busy weeknights.
Ingredients
– 2 tbsp olive oil
– 1 medium yellow onion
– 2 medium carrots
– 2 celery stalks
– 3 cloves garlic
– 1 cup brown lentils
– 6 cups vegetable broth
– 1 (14.5 oz) can diced tomatoes
– 1 tsp dried thyme
– 1 bay leaf
– 1 tsp salt
– 1/2 tsp black pepper
– 4 slices crusty bread
Instructions
1. Heat 2 tablespoons of olive oil in a large pot over medium heat until shimmering.
2. Dice 1 medium yellow onion, 2 medium carrots, and 2 celery stalks into 1/4-inch pieces.
3. Add the diced vegetables to the hot oil and cook for 8 minutes, stirring occasionally, until softened.
4. Mince 3 cloves of garlic and add to the pot, cooking for 1 minute until fragrant.
5. Rinse 1 cup of brown lentils under cold water and drain thoroughly.
6. Add the rinsed lentils to the pot along with 6 cups of vegetable broth, 1 can of diced tomatoes, 1 teaspoon of dried thyme, 1 bay leaf, 1 teaspoon of salt, and 1/2 teaspoon of black pepper.
7. Bring the soup to a boil over high heat, then reduce to a simmer and cover the pot.
8. Simmer for 35 minutes, stirring occasionally, until the lentils are tender but not mushy.
9. While the soup simmers, preheat your oven to 375°F.
10. Place 4 slices of crusty bread on a baking sheet and bake for 8-10 minutes until golden and crisp.
11. Remove the bay leaf from the finished soup and discard.
12. Ladle the hot soup into bowls and serve immediately with the toasted bread on the side.
You’ll love how the tender lentils create a hearty base while the vegetables maintain just enough texture to keep each spoonful interesting. The crusty bread is perfect for dipping and soaking up every last bit of the flavorful broth, making this simple soup feel like a complete, restaurant-quality meal.
Grilled Lemon Garlic Scallops
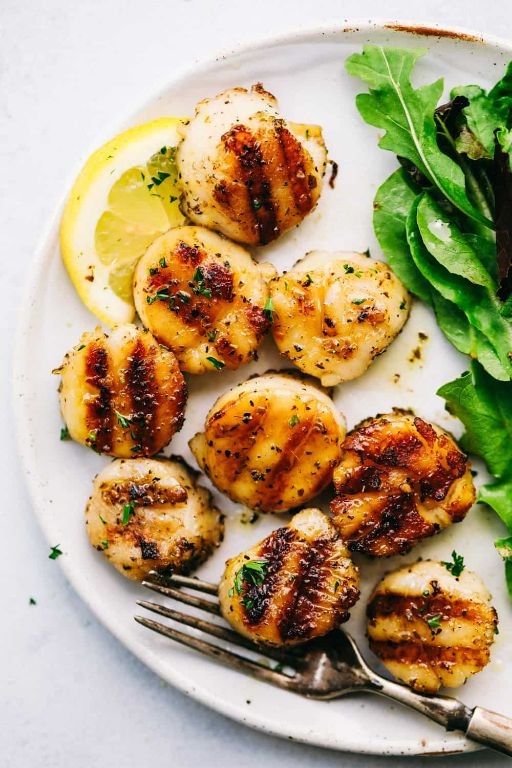
Bursting with bright citrus and savory garlic, these grilled scallops transform simple ingredients into an elegant meal that feels restaurant-worthy. By following these methodical steps, even beginners can achieve perfectly seared scallops with beautiful grill marks and tender interiors. Let’s walk through the process together to ensure your seafood turns out flawless every time.
Ingredients
– 1 pound large sea scallops
– 3 tablespoons olive oil
– 2 tablespoons fresh lemon juice
– 3 cloves garlic, minced
– 1 teaspoon salt
– ½ teaspoon black pepper
– 2 tablespoons chopped fresh parsley
Instructions
1. Pat the scallops completely dry with paper towels to ensure proper searing.
2. In a medium bowl, whisk together olive oil, lemon juice, minced garlic, salt, and black pepper.
3. Add the dried scallops to the marinade and toss gently to coat evenly.
4. Let the scallops marinate at room temperature for 15 minutes while you preheat the grill.
5. Preheat your grill to medium-high heat, approximately 400°F.
6. Place scallops directly on the hot grill grates, spacing them 1 inch apart.
7. Grill for 2 minutes without moving them to develop grill marks.
8. Flip each scallop using tongs and grill for another 2 minutes.
9. Remove scallops from the grill when they reach an internal temperature of 115°F and appear opaque.
10. Transfer the grilled scallops to a serving platter and sprinkle with chopped fresh parsley.
Velvety yet firm, these scallops offer a satisfying bite that contrasts beautifully with their caramelized exterior. The lemon-garlic marinade permeates each morsel, creating a bright, savory flavor profile that pairs wonderfully with creamy risotto or crisp salad greens. For an impressive presentation, serve them atop zucchini noodles drizzled with the remaining marinade.
Crispy Beer-Battered Fish Tacos

Sometimes the best meals come from combining simple techniques with fresh ingredients, and these crispy beer-battered fish tacos are the perfect example. Start by preparing your ingredients in an organized manner, which will make the cooking process smooth and enjoyable for even first-time cooks. This method ensures you can focus on each step without rushing.
Ingredients
– 1 lb cod fillets
– 1 cup all-purpose flour
– 1 cup lager beer
– 1 tsp baking powder
– 1 tsp salt
– 1/2 tsp black pepper
– 1/4 tsp paprika
– 2 cups vegetable oil
– 8 corn tortillas
– 1 cup shredded cabbage
– 1/2 cup cilantro leaves
– 1 lime, cut into wedges
– 1/4 cup mayonnaise
– 1 tbsp hot sauce
Instructions
1. Cut 1 lb cod fillets into 3-inch long strips, about 1-inch wide.
2. Pat the cod strips completely dry with paper towels to ensure the batter adheres properly.
3. In a medium bowl, whisk together 1 cup all-purpose flour, 1 tsp baking powder, 1 tsp salt, 1/2 tsp black pepper, and 1/4 tsp paprika.
4. Pour 1 cup lager beer into the dry ingredients and whisk until just combined; a few lumps are fine and will create a lighter texture.
5. Heat 2 cups vegetable oil in a heavy-bottomed pot to 375°F, using a deep-fry thermometer for accuracy.
6. Dip one cod strip into the batter, letting excess drip back into the bowl.
7. Carefully lower the battered fish into the hot oil using tongs.
8. Fry for 3-4 minutes until golden brown and crispy, flipping halfway through cooking.
9. Remove the fish with a slotted spoon and drain on a wire rack set over a baking sheet; this keeps them crisp rather than soggy.
10. Repeat steps 6-9 with remaining fish, working in batches to avoid overcrowding the pot.
11. Warm 8 corn tortillas in a dry skillet over medium heat for 30 seconds per side until pliable.
12. Mix 1/4 cup mayonnaise with 1 tbsp hot sauce in a small bowl to create a spicy crema.
13. Assemble tacos by placing one piece of fried fish in each warm tortilla.
14. Top each taco with shredded cabbage, cilantro leaves, and a drizzle of spicy crema.
15. Serve immediately with lime wedges for squeezing over the top.
Golden, crunchy fish paired with cool cabbage and zesty lime creates a wonderful contrast in every bite. The light beer batter stays remarkably crisp against the soft tortillas, while the spicy crema adds just enough heat to balance the mild cod. For a fun twist, set up a taco bar with extra toppings like pickled onions or avocado slices so everyone can customize their perfect taco.
Herbed Butter Roasted Potatoes
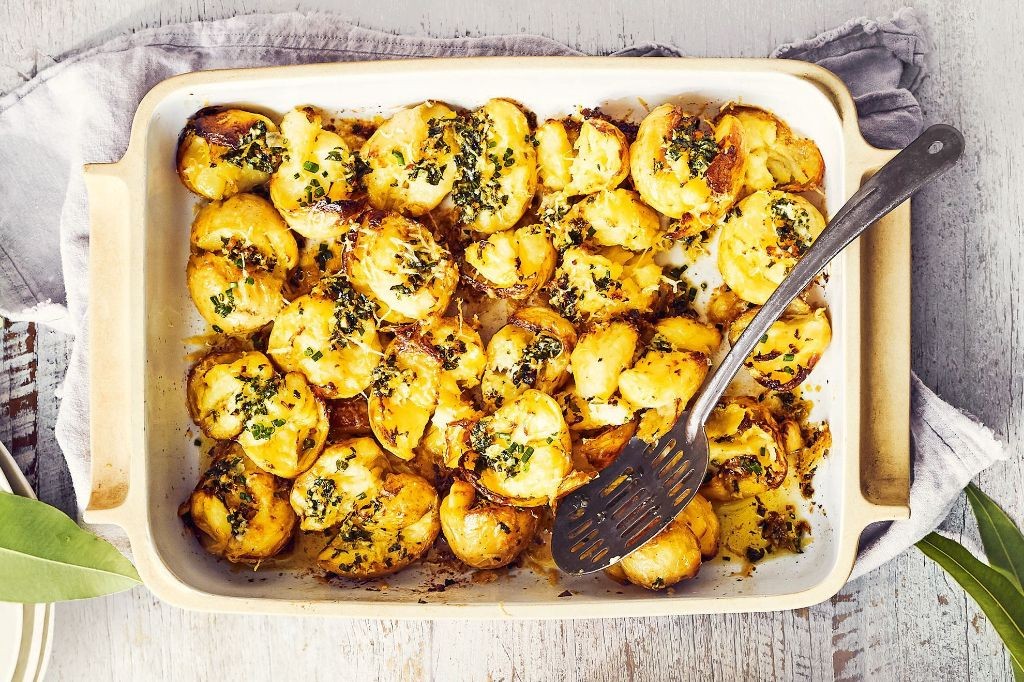
Many home cooks overlook how simple techniques can transform humble potatoes into a spectacular side dish. Mastering the art of roasting with herbed butter creates potatoes with crispy exteriors and fluffy interiors that will become your new favorite. My methodical approach ensures even beginners achieve perfect results every single time.
Ingredients
– 2 pounds baby potatoes
– 4 tablespoons unsalted butter
– 2 tablespoons olive oil
– 3 cloves garlic
– 1 tablespoon fresh rosemary
– 1 tablespoon fresh thyme
– 1 teaspoon kosher salt
– ½ teaspoon black pepper
Instructions
1. Preheat your oven to 425°F and position one rack in the center.
2. Wash 2 pounds of baby potatoes thoroughly under cold running water.
3. Pat the potatoes completely dry with paper towels to ensure proper crisping.
4. Cut larger potatoes in half to create uniform pieces that cook evenly.
5. Mince 3 cloves of garlic finely to distribute flavor throughout the dish.
6. Chop 1 tablespoon each of fresh rosemary and thyme, avoiding woody stems.
7. Melt 4 tablespoons of unsalted butter in a small saucepan over low heat.
8. Whisk 2 tablespoons of olive oil into the melted butter until fully combined.
9. Stir the minced garlic and chopped herbs into the butter-oil mixture.
10. Add 1 teaspoon of kosher salt and ½ teaspoon of black pepper to the herbed butter.
11. Place the dried potatoes in a large mixing bowl.
12. Pour the herbed butter mixture over the potatoes, coating every surface.
13. Toss the potatoes for 2 full minutes to ensure even coating and seasoning.
14. Arrange the potatoes in a single layer on a rimmed baking sheet.
15. Roast the potatoes at 425°F for 25 minutes without disturbing them.
16. Flip each potato using tongs to expose the uncooked sides to heat.
17. Continue roasting for another 20-25 minutes until golden brown and crispy.
18. Test doneness by piercing a potato with a fork—it should slide in easily.
19. Transfer the potatoes to a serving dish immediately to prevent sogginess.
Zesty garlic and aromatic herbs infuse these potatoes with incredible flavor that complements any main course. The contrast between the crackling-crisp exterior and cloud-soft interior makes each bite truly memorable. For an elegant presentation, garnish with additional fresh herbs and serve alongside grilled meats or as part of a holiday feast.
Creamy Mushroom and Spinach Risotto
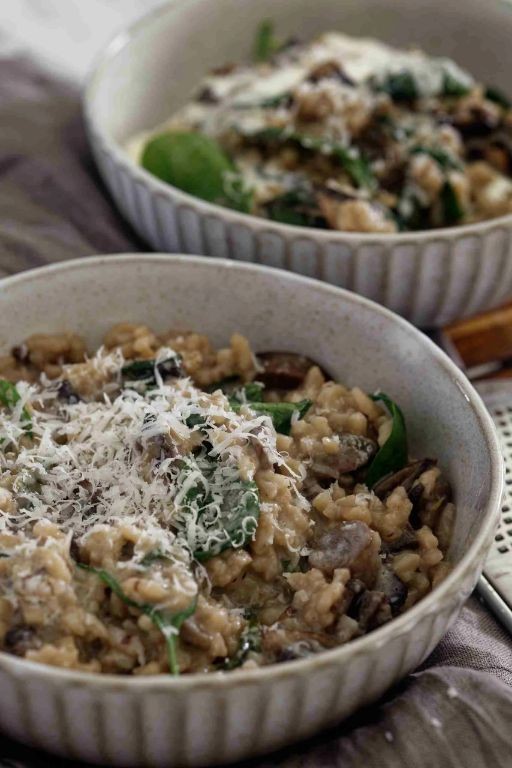
Keeping risotto creamy and perfectly cooked is easier than you think when you follow these methodical steps. Knowing when to add broth and how to stir makes all the difference between a good risotto and a great one. Let’s walk through this comforting mushroom and spinach version together, one simple action at a time.
Ingredients
– 1 tbsp olive oil
– 1 tbsp unsalted butter
– 1 medium yellow onion
– 2 cloves garlic
– 8 oz cremini mushrooms
– 1 ½ cups Arborio rice
– ½ cup dry white wine
– 4 cups chicken broth
– 2 cups fresh spinach
– ½ cup grated Parmesan cheese
– ¼ cup heavy cream
– ½ tsp salt
– ¼ tsp black pepper
Instructions
1. Heat 1 tablespoon olive oil and 1 tablespoon unsalted butter in a large, heavy-bottomed pot over medium heat until the butter melts completely.
2. Dice 1 medium yellow onion and mince 2 cloves garlic while the butter melts.
3. Add the diced onion to the pot and cook for 4-5 minutes until translucent, stirring occasionally with a wooden spoon.
4. Stir in the minced garlic and cook for 1 minute until fragrant.
5. Slice 8 ounces cremini mushrooms into ¼-inch thick pieces.
6. Add the sliced mushrooms to the pot and cook for 6-7 minutes until they release their liquid and begin to brown.
7. Pour 1 ½ cups Arborio rice into the pot and toast for 2 minutes, stirring constantly until the rice edges look translucent.
8. Tip: Toasting the rice helps it maintain a firm center while absorbing liquid evenly.
9. Pour ½ cup dry white wine into the pot and stir continuously until the wine is fully absorbed, about 2 minutes.
10. Heat 4 cups chicken broth in a separate saucepan until it simmers at 180°F, then reduce heat to low to keep warm.
11. Add ½ cup of warm broth to the rice and stir constantly until the liquid is almost completely absorbed, about 3-4 minutes.
12. Tip: Keep the broth warm to maintain a consistent cooking temperature and prevent the rice from cooling.
13. Continue adding broth ½ cup at a time, stirring constantly after each addition until absorbed before adding the next portion.
14. Repeat this process for 18-20 minutes until the rice is tender but still slightly firm to the bite.
15. Tip: Test the rice by biting a grain – it should be creamy outside with a slight resistance inside, not mushy.
16. Stir in 2 cups fresh spinach and cook for 2 minutes until the spinach wilts completely.
17. Remove the pot from heat and stir in ½ cup grated Parmesan cheese, ¼ cup heavy cream, ½ teaspoon salt, and ¼ teaspoon black pepper.
18. Let the risotto rest for 2 minutes off heat to allow the flavors to meld.
Now your risotto should have a luxurious, velvety texture that coats each grain of rice perfectly. Notice how the earthy mushrooms balance with the fresh spinach and rich Parmesan, creating layers of flavor in every spoonful. Try serving it in shallow bowls topped with extra Parmesan and a drizzle of olive oil for an elegant presentation that highlights its creamy consistency.
Baked Lemon Garlic Butter Shrimp
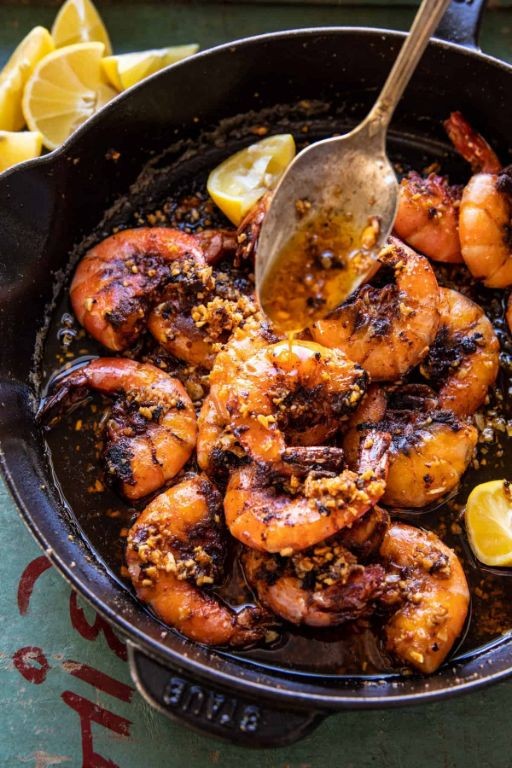
Whether you’re new to cooking seafood or simply want a foolproof weeknight dinner, this baked lemon garlic butter shrimp delivers restaurant-quality results with minimal effort. With just a few simple ingredients and straightforward steps, you’ll have a vibrant, flavorful dish ready in under 20 minutes that’s perfect for busy evenings when you crave something special but don’t want to spend hours in the kitchen.
Ingredients
– 1 lb large raw shrimp, peeled and deveined
– 4 tbsp unsalted butter, melted
– 4 cloves garlic, minced
– 1 lemon, juiced
– 1/2 tsp salt
– 1/4 tsp black pepper
– 1/4 tsp red pepper flakes
– 2 tbsp fresh parsley, chopped
Instructions
1. Preheat your oven to 400°F and position the rack in the center of the oven for even heating.
2. Pat the shrimp completely dry with paper towels to ensure proper browning and texture.
3. In a medium bowl, combine the melted butter, minced garlic, lemon juice, salt, black pepper, and red pepper flakes.
4. Add the dried shrimp to the butter mixture and toss until evenly coated.
5. Arrange the shrimp in a single layer in a 9×13-inch baking dish, making sure they don’t overlap.
6. Pour any remaining butter mixture over the shrimp in the baking dish.
7. Bake at 400°F for 8-10 minutes until the shrimp turn pink and opaque throughout.
8. Remove the baking dish from the oven and immediately sprinkle with fresh parsley.
9. Let the shrimp rest for 2 minutes before serving to allow the flavors to meld.
Vibrant and succulent, these shrimp emerge from the oven with a perfect balance of bright lemon, rich garlic butter, and subtle heat. The quick baking method preserves their tender texture while creating a flavorful sauce that clings beautifully to each piece. Serve them over creamy polenta to soak up the delicious pan juices, or toss with fresh pasta for an elegant yet effortless meal that feels far more complex than its simple preparation suggests.
Classic Tuna Nicoise Salad
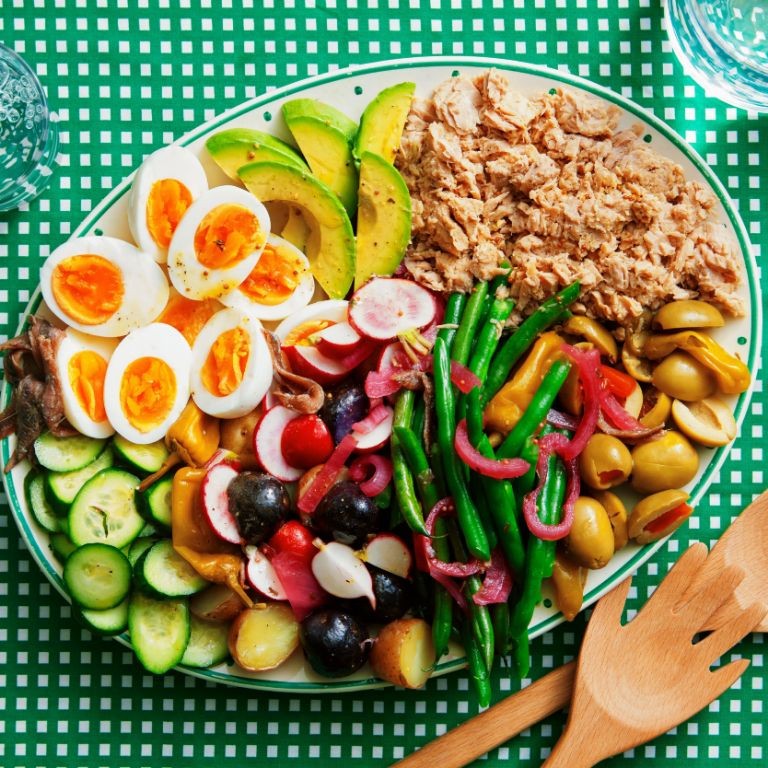
Looking for a satisfying lunch that feels both elegant and approachable? Let’s build a Classic Tuna Niçoise Salad together, layer by layer. This methodical approach ensures each component shines while coming together in perfect harmony.
Ingredients
– 1 lb small red potatoes
– 1 tsp salt
– 8 oz green beans
– 4 large eggs
– 2 (5 oz) cans solid white tuna in water
– 3 tbsp olive oil
– 2 tbsp red wine vinegar
– 1 tsp Dijon mustard
– 1/4 tsp black pepper
– 1 head butter lettuce
– 1 pint cherry tomatoes
– 1/4 cup Niçoise olives
– 2 tbsp capers
Instructions
1. Place 1 lb small red potatoes in a medium saucepan and cover with cold water by 1 inch.
2. Add 1 tsp salt to the water and bring to a boil over high heat.
3. Reduce heat to medium and simmer potatoes for 12-15 minutes until easily pierced with a fork.
4. While potatoes cook, trim ends from 8 oz green beans and prepare an ice bath.
5. Transfer cooked potatoes to a colander using a slotted spoon, reserving boiling water.
6. Boil green beans in the same water for 3-4 minutes until bright green and crisp-tender.
7. Immediately plunge green beans into the ice bath to stop cooking and preserve color.
8. Carefully lower 4 large eggs into the boiling water and cook for 9 minutes for firm yolks.
9. Drain eggs and transfer to the ice bath for 5 minutes to cool completely.
10. Drain both cans of tuna thoroughly and flake with a fork in a small bowl.
11. Whisk together 3 tbsp olive oil, 2 tbsp red wine vinegar, 1 tsp Dijon mustard, and 1/4 tsp black pepper in a separate bowl.
12. Arrange leaves from 1 head butter lettuce on four serving plates as the base.
13. Quarter the cooled potatoes and distribute evenly among plates.
14. Drain green beans and arrange alongside potatoes.
15. Peel and halve the hard-boiled eggs, placing two halves on each plate.
16. Scatter 1 pint cherry tomatoes, 1/4 cup Niçoise olives, and 2 tbsp capers over each salad.
17. Divide flaked tuna among the four plates.
18. Drizzle the dressing evenly over each assembled salad. A perfectly composed Niçoise offers contrasting textures from crisp greens to tender potatoes and briny olives. The balanced vinaigrette enhances without overwhelming, making this salad substantial enough for dinner while remaining refreshingly light.
Roasted Vegetable Lasagna

Now, let’s create a comforting roasted vegetable lasagna that layers rich flavors and textures in every bite. This methodical approach ensures even beginners can achieve perfect results by roasting vegetables first to concentrate their sweetness before assembling.
Ingredients
– 1 lb lasagna noodles
– 2 cups ricotta cheese
– 2 cups shredded mozzarella cheese
– 1 cup grated Parmesan cheese
– 2 cups marinara sauce
– 2 medium zucchini, sliced
– 1 large eggplant, cubed
– 1 red bell pepper, sliced
– 1 yellow onion, sliced
– 3 tbsp olive oil
– 2 cloves garlic, minced
– 1 tsp dried oregano
– 1 tsp salt
– 1/2 tsp black pepper
Instructions
1. Preheat your oven to 425°F.
2. Toss zucchini, eggplant, bell pepper, and onion with 2 tablespoons olive oil, minced garlic, oregano, salt, and pepper on a large baking sheet.
3. Roast vegetables for 25 minutes until tender and lightly browned, stirring halfway through.
4. Cook lasagna noodles according to package directions until al dente, then drain and lay flat on parchment paper to prevent sticking.
5. Reduce oven temperature to 375°F.
6. Spread 1/2 cup marinara sauce evenly across the bottom of a 9×13 inch baking dish.
7. Arrange a single layer of cooked noodles over the sauce.
8. Spread 1 cup ricotta cheese evenly over the noodles using the back of a spoon.
9. Distribute half of the roasted vegetables over the ricotta layer.
10. Sprinkle 1/2 cup mozzarella and 1/4 cup Parmesan over the vegetables.
11. Repeat layers: sauce, noodles, remaining ricotta, remaining vegetables, and another 1/2 cup mozzarella with 1/4 cup Parmesan.
12. Top with final noodle layer, remaining marinara sauce, and remaining mozzarella and Parmesan cheeses.
13. Cover baking dish with aluminum foil and bake at 375°F for 30 minutes.
14. Remove foil and bake uncovered for 15 minutes until cheese is golden and bubbly.
15. Let lasagna rest for 15 minutes before slicing to allow layers to set properly.
What makes this lasagna exceptional is the way the roasted vegetables maintain slight firmness against the creamy cheeses, while the edges develop a satisfying crispness. The caramelized vegetable sweetness balances beautifully with the tangy marinara, creating layers that hold their structure when served. Consider pairing slices with a simple arugula salad dressed in lemon vinaigrette to cut through the richness.
Garlic Butter Clams with White Wine Sauce
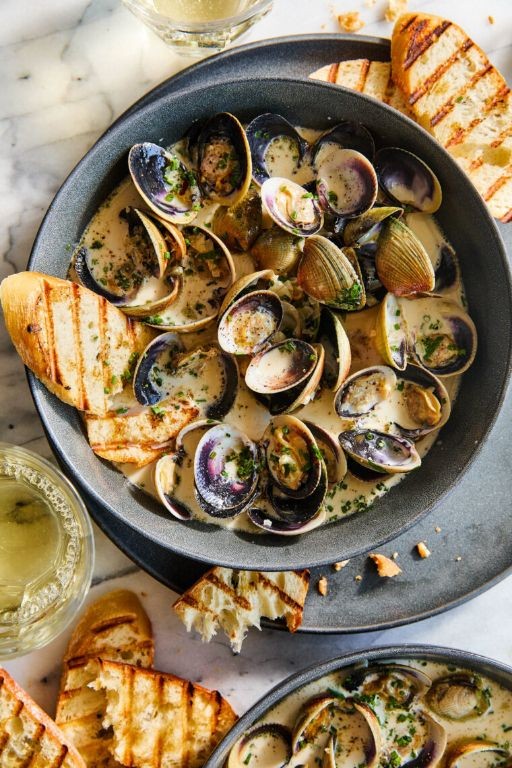
Unbelievably simple yet impressively elegant, garlic butter clams with white wine sauce transform basic ingredients into a restaurant-worthy dish that’s perfect for weeknight dinners or entertaining guests. Using just a handful of pantry staples, this recipe walks you through creating tender clams bathed in a rich, aromatic broth that’s perfect for sopping up with crusty bread. Follow these methodical steps to achieve perfectly cooked clams every time.
Ingredients
– 2 pounds fresh littleneck clams
– 3 tablespoons unsalted butter
– 4 cloves garlic, minced
– 1/2 cup dry white wine
– 1/4 cup chopped fresh parsley
– 1/4 teaspoon red pepper flakes
– 1 tablespoon olive oil
– 1/2 lemon
Instructions
1. Place clams in a large bowl filled with cold water and let them soak for 20 minutes to release any sand.
2. Scrub each clam thoroughly under running water using a stiff brush to remove any remaining debris.
3. Heat olive oil in a large, heavy-bottomed pot over medium-high heat until it shimmers.
4. Add minced garlic and cook for exactly 1 minute until fragrant but not browned.
5. Pour in white wine and bring to a rapid boil, cooking for 2 minutes to reduce slightly.
6. Add butter and stir continuously until completely melted and incorporated into the sauce.
7. Sprinkle in red pepper flakes and stir to distribute evenly throughout the sauce.
8. Carefully place all cleaned clams into the pot in a single layer.
9. Cover the pot tightly with a lid and steam clams for 6-8 minutes until shells open fully.
10. Discard any clams that remain closed after the cooking time.
11. Squeeze fresh lemon juice evenly over the cooked clams and sauce.
12. Sprinkle chopped parsley over the dish and gently stir to combine.
Fresh from the pot, these clams offer a delightful contrast of tender, briny meat against the rich, garlicky wine sauce that pools in the shells. The bright acidity from the lemon cuts through the butter beautifully, while the subtle heat from red pepper flakes adds depth without overwhelming the delicate seafood. Serve this directly from the cooking vessel with plenty of crusty bread for dipping, or spoon over al dente linguine to transform it into a complete meal.
Summary
Zesty, comforting, and deeply meaningful—these Good Friday recipes honor tradition while bringing families together around the table. We hope this collection inspires your holiday cooking! Try a few, leave a comment with your favorite, and don’t forget to share this roundup on Pinterest to spread the inspiration.