Ready to transform your Hamilton Beach ice cream maker into a creamy dream machine? Whether you’re craving classic vanilla or adventurous flavor combinations, this collection of 20 irresistible recipes will turn your kitchen into an ice cream paradise. From quick weeknight treats to show-stopping desserts, get ready to scoop up some serious deliciousness—your sweet tooth will thank you!
Classic Vanilla Bean Ice Cream

Zesty as a summer daydream and twice as satisfying, this classic vanilla bean ice cream is the frozen equivalent of a warm hug—only much, much cooler. Forget the store-bought stuff; we’re diving into a creamy, dreamy homemade version that’ll make your taste buds do a happy dance. Let’s churn up some magic!
Ingredients
– 2 cups heavy cream
– 1 cup whole milk
– 3/4 cup granulated sugar
– 1/4 tsp kosher salt
– 1 vanilla bean
– 6 large egg yolks
– 1 tsp pure vanilla extract
Instructions
1. Split the vanilla bean lengthwise and scrape out the seeds using the back of a knife.
2. Combine the heavy cream, whole milk, sugar, salt, vanilla bean seeds, and the scraped pod in a medium saucepan.
3. Heat the mixture over medium heat, stirring occasionally, until it reaches 170°F on a kitchen thermometer.
4. Whisk the egg yolks in a separate bowl until pale and slightly thickened.
5. Slowly pour 1 cup of the hot cream mixture into the egg yolks while whisking constantly to temper them.
6. Pour the tempered yolk mixture back into the saucepan with the remaining cream.
7. Cook over medium-low heat, stirring continuously with a wooden spoon, until the custard thickens and coats the back of the spoon (about 175–180°F).
8. Strain the custard through a fine-mesh sieve into a clean bowl to remove the vanilla bean pod and any cooked egg bits.
9. Stir in the vanilla extract until fully incorporated.
10. Cover the bowl with plastic wrap, pressing it directly onto the surface of the custard to prevent a skin from forming.
11. Chill the custard in the refrigerator for at least 4 hours or until it reaches 40°F.
12. Pour the chilled custard into an ice cream maker and churn according to the manufacturer’s instructions until it reaches a soft-serve consistency (about 20–25 minutes).
13. Transfer the churned ice cream to an airtight container and freeze for at least 4 hours or until firm.
Buttery smooth and speckled with real vanilla beans, this ice cream boasts a rich, velvety texture that melts luxuriously on the tongue. Serve it sandwiched between chewy chocolate chip cookies or crowned with a drizzle of warm caramel for an indulgent twist. Trust us, your spoon will thank you.
Strawberry Cheesecake Ice Cream
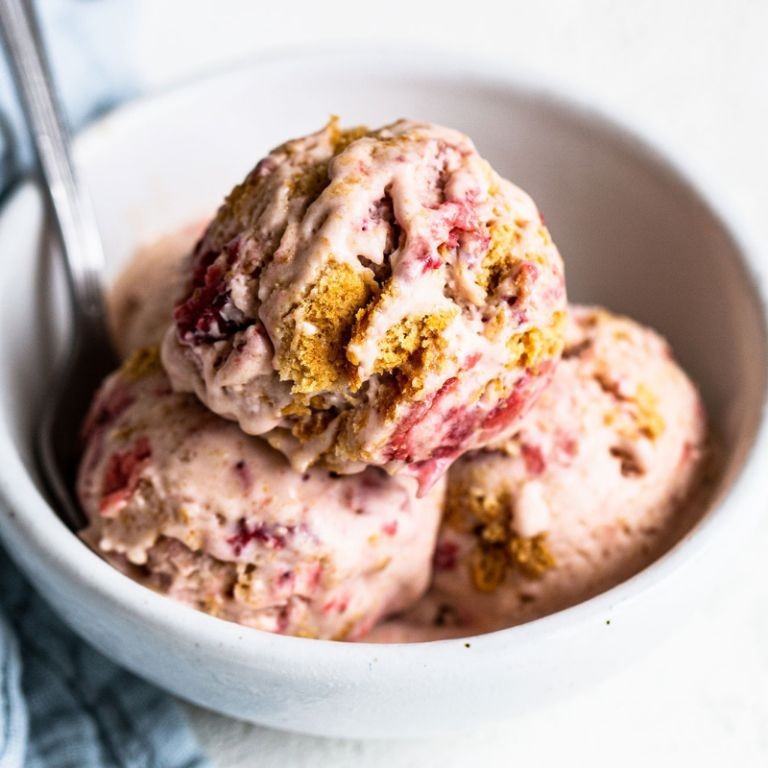
Brace yourselves, dessert lovers, because we’re about to turn your freezer into the most happening spot in the house with this ridiculously creamy strawberry cheesecake ice cream that basically screams summer in every spoonful. Forget boring vanilla—this frozen masterpiece combines the tangy punch of cream cheese with sweet, jammy strawberries and buttery graham cracker crumbs for a dessert that’ll have you sneaking spoonfuls straight from the container (no judgment here). Trust me, your taste buds are about to throw a party, and everyone’s invited!
Ingredients
– 2 cups heavy cream
– 1 cup whole milk
– 8 ounces cream cheese, softened
– 3/4 cup granulated sugar
– 1 teaspoon vanilla extract
– 1/4 teaspoon salt
– 1 cup fresh strawberries, hulled and chopped
– 1/4 cup graham cracker crumbs
Instructions
1. In a large mixing bowl, beat the softened cream cheese with an electric mixer on medium speed until completely smooth and lump-free, about 2 minutes.
2. Gradually add the granulated sugar to the cream cheese while continuing to beat, scraping down the sides of the bowl once, until fully incorporated and the mixture is creamy.
3. Pour in the heavy cream, whole milk, vanilla extract, and salt, then beat on low speed just until the mixture is uniformly combined, being careful not to overmix.
4. Transfer the ice cream base to your ice cream maker and churn according to the manufacturer’s instructions, typically about 20–25 minutes, until it reaches a soft-serve consistency.
5. While the ice cream churns, toss the chopped strawberries with 1 tablespoon of the sugar from the measured amount in a small bowl and let them macerate for 10 minutes to release their juices.
6. Gently fold the macerated strawberries and graham cracker crumbs into the churned ice cream using a spatula, ensuring even distribution without deflating the mixture.
7. Spoon the ice cream into a freezer-safe container, press a piece of parchment paper directly onto the surface to prevent ice crystals, and freeze for at least 4 hours or until firm.
Finally, scoop this dreamy creation into bowls and get ready for a texture that’s luxuriously smooth with little bursts of strawberry and crunchy graham cracker surprises. For a next-level treat, crumble extra graham crackers over the top or sandwich it between two cookies for an epic ice cream sandwich—because why should summer have all the fun?
Mint Chocolate Chip Ice Cream
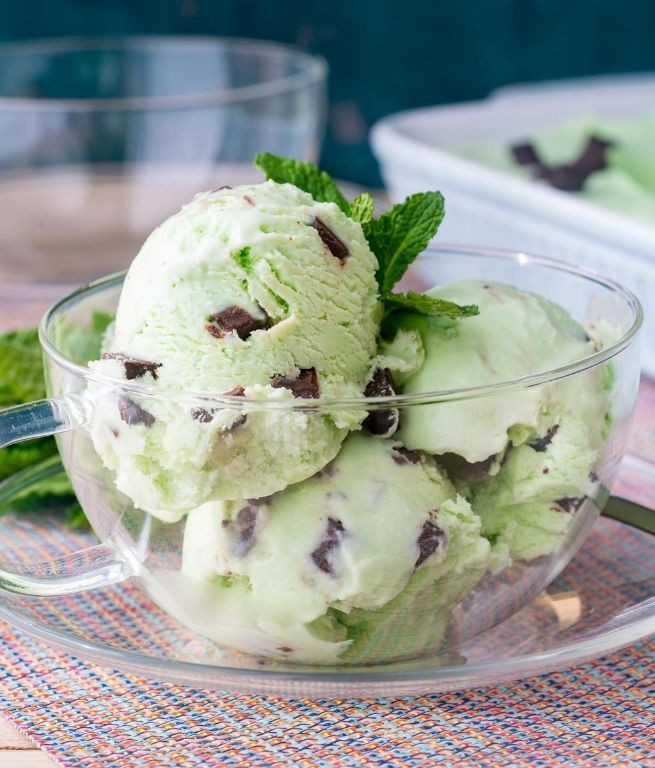
Zesty, cool, and utterly irresistible—this homemade mint chocolate chip ice cream is about to become your freezer’s new VIP resident. Forget the store-bought stuff with its questionable green hue and artificial aftertaste; we’re crafting a creamy, dreamy version that actually tastes like fresh mint leaves and rich chocolate. Get ready to churn up some serious magic that’ll make you the hero of every summer gathering (or let’s be real, Tuesday night).
Ingredients
– 2 cups heavy cream
– 1 cup whole milk
– 3/4 cup granulated sugar
– 1/4 tsp salt
– 2 tsp peppermint extract
– 6 drops green food coloring (optional)
– 4 oz semisweet chocolate bars
Instructions
1. Pour 2 cups heavy cream and 1 cup whole milk into a medium saucepan.
2. Whisk in 3/4 cup granulated sugar and 1/4 tsp salt until fully dissolved.
3. Heat the mixture over medium heat until it reaches 170°F, stirring constantly with a spatula to prevent scorching.
4. Remove from heat and stir in 2 tsp peppermint extract and 6 drops green food coloring if using.
5. Transfer the mixture to a large bowl and cover with plastic wrap pressed directly against the surface to prevent skin formation.
6. Chill in refrigerator for at least 4 hours or until temperature drops to 40°F.
7. Chop 4 oz semisweet chocolate bars into small, irregular chunks using a sharp knife for better texture distribution.
8. Pour chilled mixture into ice cream maker and churn according to manufacturer’s instructions until thickened to soft-serve consistency (about 25-30 minutes).
9. Add chocolate chunks during the last 2 minutes of churning to ensure even distribution without overmixing.
10. Transfer ice cream to an airtight container and freeze for 4-6 hours until firm enough to scoop.
Heavenly doesn’t even begin to describe the velvety texture that melts across your tongue, releasing waves of authentic mint freshness punctuated by satisfying chocolate cracks. The semisweet chunks provide the perfect bitter contrast to the sweet cream base, creating a symphony in every spoonful. Try sandwiching it between chewy chocolate chip cookies or crumbling it over warm brownies for an epic temperature contrast that’ll make your taste buds sing.
Cookies and Cream Ice Cream

Oh, the glorious union of crunchy cookies and creamy perfection that makes you question all your life choices—why didn’t we make this sooner? This no-churn cookies and cream ice cream is so ridiculously easy, you’ll be tempted to whip it up in your pajamas at midnight (we won’t judge). Let’s turn that sweet tooth into a sweet reality!
Ingredients
- 2 cups heavy cream
- 14 oz sweetened condensed milk
- 1 tsp vanilla extract
- 15 Oreo cookies
Instructions
- Place a 9×5-inch loaf pan in the freezer to chill while you prepare the mixture.
- Pour 2 cups heavy cream into a large mixing bowl and beat with an electric mixer on medium-high speed until stiff peaks form, about 3–4 minutes.
- Gently fold in 14 oz sweetened condensed milk and 1 tsp vanilla extract using a spatula until fully incorporated.
- Place 15 Oreo cookies in a sealed plastic bag and crush them into coarse chunks using a rolling pin.
- Fold the crushed Oreo pieces into the cream mixture until evenly distributed, being careful not to overmix.
- Transfer the mixture to the chilled loaf pan and spread it evenly with a spatula.
- Cover the pan tightly with plastic wrap, pressing it directly onto the surface of the ice cream to prevent ice crystals.
- Freeze the ice cream for at least 6 hours or until firm to the touch.
Let this frozen marvel blow your mind with its velvety texture and satisfying cookie crunch in every spoonful. Serve it sandwiched between two chocolate chip cookies for an epic ice cream sandwich, or crumble extra Oreos on top because, let’s be real, there’s no such thing as too many cookies!
Salted Caramel Swirl Ice Cream
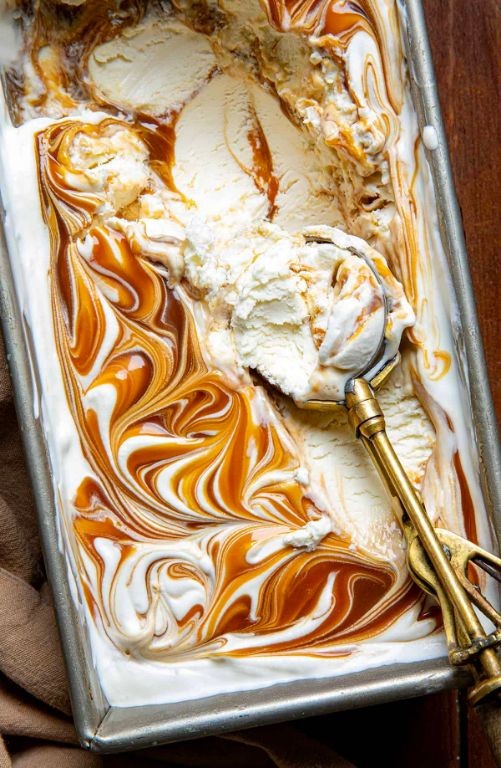
Unbelievably, we’ve cracked the code to homemade salted caramel swirl ice cream that’ll make you question why you ever settled for the store-bought stuff. This dangerously delicious frozen treat combines silky vanilla base with ribbons of salty-sweet caramel in a way that might just ruin all other desserts for you forever. Get ready to become the ice cream hero your freezer deserves!
Ingredients
- 2 cups heavy cream
- 1 cup whole milk
- 3/4 cup granulated sugar
- 6 large egg yolks
- 1 teaspoon vanilla extract
- 1/2 teaspoon fine sea salt
- 1/2 cup salted caramel sauce
Instructions
- Combine 2 cups heavy cream, 1 cup whole milk, and 3/4 cup granulated sugar in a medium saucepan over medium heat.
- Heat the mixture while stirring constantly until the sugar dissolves completely and tiny bubbles form around the edges, about 5-7 minutes.
- Whisk 6 large egg yolks in a separate bowl until pale yellow and slightly thickened.
- Slowly pour about 1 cup of the hot cream mixture into the egg yolks while whisking vigorously to temper them.
- Pour the tempered egg mixture back into the saucepan with the remaining cream mixture.
- Cook over medium-low heat, stirring constantly with a wooden spoon, until the mixture thickens enough to coat the back of the spoon, about 8-10 minutes.
- Immediately remove the custard from heat and stir in 1 teaspoon vanilla extract and 1/2 teaspoon fine sea salt.
- Pour the custard through a fine-mesh strainer into a clean bowl to remove any cooked egg bits.
- Cover the bowl with plastic wrap, pressing it directly onto the surface of the custard to prevent a skin from forming.
- Refrigerate the custard for at least 4 hours or until completely chilled to 40°F.
- Pour the chilled custard into your ice cream maker and churn according to manufacturer’s instructions until it reaches soft-serve consistency, about 20-25 minutes.
- Transfer one-third of the churned ice cream to a freezer-safe container.
- Drizzle 2 tablespoons of salted caramel sauce over the ice cream layer.
- Repeat the layering process two more times, ending with a caramel drizzle on top.
- Use a knife or skewer to gently swirl the caramel through the ice cream, being careful not to overmix.
- Cover the container with parchment paper pressed directly on the surface, then seal with an airtight lid.
- Freeze the ice cream for at least 6 hours or until firm enough to scoop.
Finally, prepare for pure bliss when you scoop into that perfect contrast of creamy vanilla and salty-sweet caramel ribbons. The texture should be luxuriously smooth with those gorgeous caramel swirls creating little pockets of gooey goodness throughout. Try serving it sandwiched between two chewy chocolate chip cookies or crumbled over warm apple pie for an epic dessert experience that’ll have everyone begging for your secret recipe.
Peanut Butter Cup Ice Cream
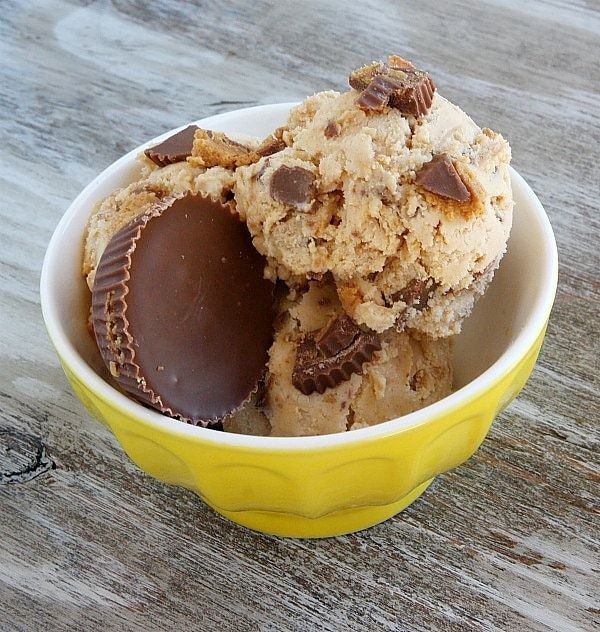
Ever had one of those days where you’re pretty sure peanut butter cups and ice cream were separated at birth and deserve a glorious reunion? Enter this ridiculously creamy, dreamy peanut butter cup ice cream that’s basically a frozen hug for your soul. It’s the kind of treat that makes you forget you ever had a bad day—or at least makes it taste a whole lot better.
Ingredients
– 2 cups heavy cream
– 1 cup whole milk
– 3/4 cup granulated sugar
– 1/4 cup creamy peanut butter
– 1 tsp vanilla extract
– 1/2 cup chopped peanut butter cups
Instructions
1. Combine 2 cups heavy cream, 1 cup whole milk, 3/4 cup granulated sugar, and 1/4 cup creamy peanut butter in a medium saucepan.
2. Heat the mixture over medium heat, whisking constantly, until the sugar dissolves completely and the peanut butter is fully incorporated—about 5 minutes.
3. Remove the saucepan from heat and stir in 1 tsp vanilla extract.
4. Pour the mixture into a large bowl and let it cool to room temperature, about 30 minutes.
5. Cover the bowl with plastic wrap and refrigerate for at least 4 hours or until thoroughly chilled.
6. Pour the chilled base into your ice cream maker and churn according to the manufacturer’s instructions, usually 20–25 minutes.
7. Fold in 1/2 cup chopped peanut butter cups during the last 2 minutes of churning to distribute them evenly without overmixing.
8. Transfer the soft ice cream to a freezer-safe container, press a piece of parchment paper directly onto the surface to prevent ice crystals, and freeze for at least 4 hours or until firm.
Just imagine that first spoonful: velvety ice cream with ribbons of peanut butter and crunchy chocolate bits that melt on your tongue. Serve it in waffle cones for extra crunch, or layer it between chocolate cookies for an epic ice cream sandwich—because why should happiness have limits?
Coconut Mango Sorbet

Zesty, tropical, and ridiculously refreshing—this coconut mango sorbet is basically a vacation in a bowl, minus the sunburn and overpriced airport snacks. If your summer needs a serious upgrade (and let’s be real, whose doesn’t?), this frosty treat is here to save the day with zero churn required.
Ingredients
- 2 cups frozen mango chunks
- 1 cup canned coconut milk
- 1/2 cup granulated sugar
- 2 tbsp fresh lime juice
- 1/4 cup shredded coconut, toasted
Instructions
- Combine 2 cups frozen mango chunks, 1 cup canned coconut milk, 1/2 cup granulated sugar, and 2 tbsp fresh lime juice in a high-speed blender.
- Blend on high for 45–60 seconds until completely smooth, scraping down the sides halfway through if needed.
- Pour the mixture into a 9×5-inch loaf pan lined with parchment paper for easy removal.
- Spread the mixture evenly with a spatula, then cover the pan tightly with plastic wrap.
- Freeze for at least 4 hours or until firm to the touch.
- While the sorbet sets, toast 1/4 cup shredded coconut in a dry skillet over medium heat for 3–4 minutes, stirring constantly until golden brown.
- Let the toasted coconut cool completely before storing in an airtight container.
- Remove the sorbet from the freezer and let it sit at room temperature for 5–7 minutes to soften slightly before scooping.
- Serve scoops of sorbet in chilled bowls, sprinkling toasted coconut over the top.
Just imagine: each spoonful is silky-smooth with bursts of sunny mango and creamy coconut, all brightened by that zingy lime kick. Try serving it in hollowed-out coconut halves for a seriously Instagram-worthy moment, or layer it with fresh berries for a vibrant parfait—this sorbet is basically summer’s best hype man.
Lemon Blueberry Ice Cream

Finally, a frozen dessert that actually understands your need for both sunshine and sweetness! This lemon blueberry ice cream is basically summer in a scoop, with zesty citrus dancing with juicy berries in a creamy dreamscape. Forget boring vanilla—this vibrant treat will have your taste buds doing cartwheels from the first lick.
Ingredients
– 2 cups heavy cream
– 1 cup whole milk
– 3/4 cup granulated sugar
– 1/4 cup fresh lemon juice
– 1 tablespoon lemon zest
– 1 cup fresh blueberries
– 1/4 cup water
– 1/4 teaspoon salt
– 6 large egg yolks
Instructions
1. Combine 1 cup blueberries, 1/4 cup water, and 2 tablespoons sugar in a small saucepan over medium heat.
2. Cook the blueberry mixture for 8-10 minutes, stirring frequently until berries burst and sauce thickens slightly.
3. Strain the blueberry sauce through a fine-mesh sieve into a bowl, pressing with a spatula to extract all liquid.
4. Chill the blueberry syrup in refrigerator for 30 minutes until completely cool.
5. Whisk 6 egg yolks with remaining sugar in a medium bowl until pale and thickened.
6. Heat 2 cups heavy cream, 1 cup whole milk, and 1/4 teaspoon salt in a saucepan over medium heat until steaming (about 160°F).
7. Slowly pour half the hot cream mixture into the egg yolks while whisking constantly to temper them.
8. Pour the tempered egg mixture back into the saucepan with remaining cream.
9. Cook the custard over medium-low heat for 5-7 minutes, stirring constantly with a wooden spoon until it coats the back of the spoon.
10. Immediately strain the custard through a fine-mesh sieve into a clean bowl.
11. Stir in 1/4 cup fresh lemon juice and 1 tablespoon lemon zest until fully incorporated.
12. Chill the lemon custard in refrigerator for at least 4 hours or until completely cold.
13. Pour the chilled custard into your ice cream maker and churn according to manufacturer’s instructions.
14. During the last 5 minutes of churning, slowly drizzle in the chilled blueberry syrup to create swirls.
15. Transfer the ice cream to an airtight container and freeze for 4-6 hours until firm.
The resulting texture is gloriously creamy with bright lemon notes cutting through the sweet blueberry ribbons. Each scoop delivers that perfect balance of tart and sweet that makes you close your eyes and savor. Try serving it sandwiched between two lemon shortbread cookies or crumbled over a warm blueberry crisp for maximum dessert euphoria!
Banana Nutella Swirl Ice Cream
C’mon, let’s be real—the only thing better than sneaking spoonfuls of Nutella straight from the jar is swirling it into creamy, dreamy homemade ice cream with ripe bananas. This frozen masterpiece is basically a hug for your taste buds, blending sweet banana vibes with that hazelnut-chocolate magic we all secretly worship. Trust me, your freezer (and your inner child) will thank you profusely.
Ingredients
– 2 cups heavy cream
– 1 cup whole milk
– 3/4 cup granulated sugar
– 4 large ripe bananas, mashed
– 1/2 cup Nutella
– 1 teaspoon vanilla extract
– 1/4 teaspoon salt
Instructions
1. Combine 2 cups heavy cream, 1 cup whole milk, 3/4 cup granulated sugar, and 1/4 teaspoon salt in a medium saucepan over medium heat.
2. Whisk continuously for 5-7 minutes until the sugar fully dissolves and the mixture is warm to the touch (about 120°F)—do not let it boil.
3. Remove the saucepan from heat and stir in 1 teaspoon vanilla extract.
4. Transfer the mixture to a large bowl and let it cool to room temperature, about 30 minutes.
5. Mash 4 large ripe bananas thoroughly with a fork until smooth, with only small lumps remaining.
6. Whisk the mashed bananas into the cooled cream mixture until fully incorporated.
7. Cover the bowl with plastic wrap and chill in the refrigerator for at least 4 hours or until completely cold (below 40°F).
8. Pour the chilled mixture into an ice cream maker and churn according to manufacturer’s instructions, about 20-25 minutes, until it reaches a soft-serve consistency.
9. Warm 1/2 cup Nutella in a microwave-safe bowl for 15-20 seconds until slightly runny but not hot.
10. Layer one-third of the churned ice cream into a loaf pan, then drizzle one-third of the warmed Nutella over the top.
11. Repeat layering twice more, ending with a Nutella drizzle.
12. Use a knife or skewer to gently swirl the Nutella through the ice cream, creating ribbons—avoid overmixing to maintain distinct swirls.
13. Cover the pan tightly with plastic wrap or an airtight lid and freeze for at least 6 hours or until firm. How incredible is that velvety texture, with creamy banana ice cream hugging those rich Nutella ribbons? Serve it sandwiched between chewy chocolate chip cookies or crumbled over warm waffles for a next-level dessert experience.
Raspberry White Chocolate Ice Cream
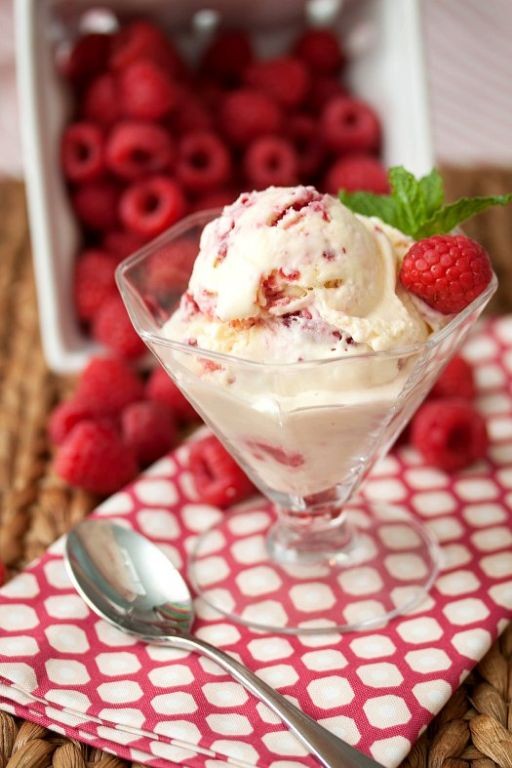
Venture beyond basic vanilla and prepare your taste buds for a flavor rollercoaster that’s part fruity fiesta, part creamy dream! This raspberry white chocolate ice cream is the frozen confection that will make your freezer the most popular appliance in the house, blending tart berry zing with luxurious sweet chunks in a dessert so good, it should probably be illegal.
Ingredients
– 2 cups heavy cream
– 1 cup whole milk
– 3/4 cup granulated sugar
– 1/4 tsp salt
– 1 tsp vanilla extract
– 1 1/2 cups fresh raspberries
– 4 oz chopped white chocolate
Instructions
1. Combine 2 cups heavy cream, 1 cup whole milk, 3/4 cup granulated sugar, and 1/4 tsp salt in a medium saucepan.
2. Heat the mixture over medium heat, stirring constantly with a whisk, until the sugar completely dissolves and tiny bubbles form around the edge of the pan (about 5-7 minutes).
3. Remove the saucepan from heat and stir in 1 tsp vanilla extract.
4. Pour the mixture through a fine-mesh strainer into a clean bowl to remove any undissolved sugar crystals.
5. Cover the bowl with plastic wrap, pressing it directly against the surface of the cream mixture to prevent a skin from forming.
6. Refrigerate the base for at least 4 hours or until completely chilled to 40°F.
7. While the base chills, mash 1 1/2 cups fresh raspberries with a fork until broken down but still slightly chunky.
8. Stir the mashed raspberries into the chilled ice cream base until fully incorporated.
9. Pour the raspberry base into your ice cream maker and churn according to manufacturer’s instructions until it reaches soft-serve consistency (about 20-25 minutes).
10. During the last 2 minutes of churning, add 4 oz chopped white chocolate through the feed opening.
11. Transfer the churned ice cream to an airtight container, smoothing the top with a spatula.
12. Freeze for at least 4 hours or until firm enough to scoop.
Prepare for a textural masterpiece where velvety cream meets vibrant raspberry swirls and surprise pockets of melted white chocolate. This frozen delight transforms ordinary cones into gourmet experiences, or try sandwiching it between two chewy chocolate chip cookies for an epic ice cream sandwich upgrade that’ll have everyone begging for your secret recipe.
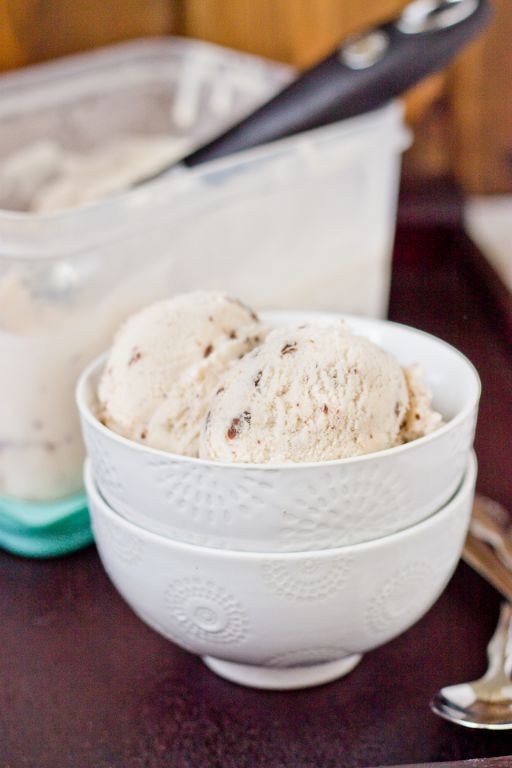
Maple Walnut Ice Cream
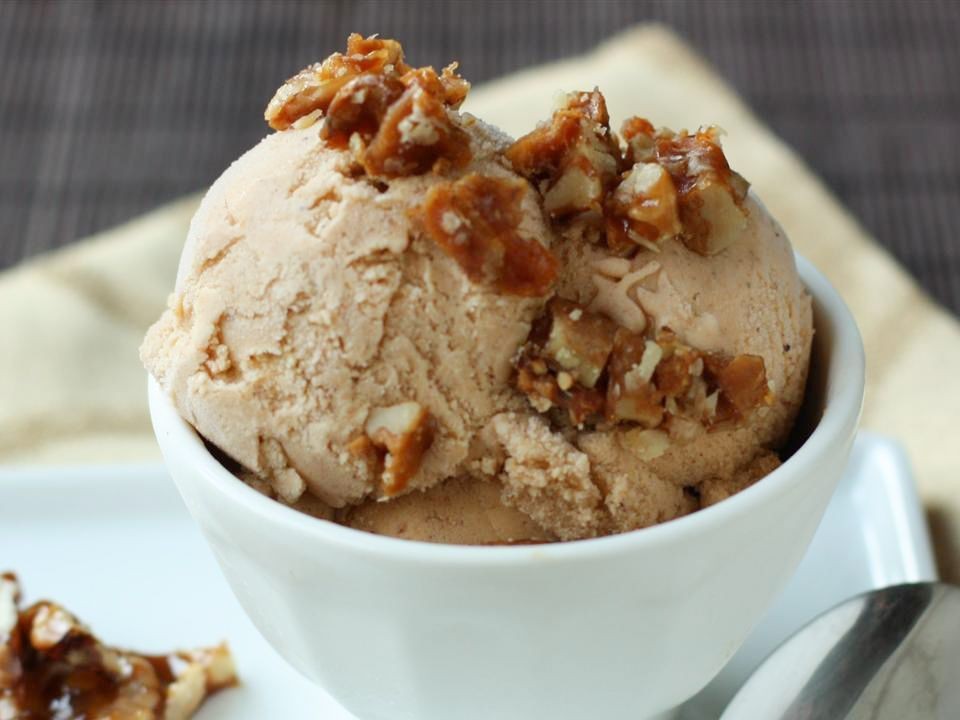
Tired of the same old vanilla routine? This maple walnut ice cream is about to become your freezer’s new VIP guest—a sweet, nutty escape that’ll have you questioning why you ever settled for plain Jane desserts. Just imagine creamy maple goodness with crunchy toasted walnuts that practically beg to be devoured straight from the container (we won’t judge).
Ingredients
– 2 cups heavy cream
– 1 cup whole milk
– 3/4 cup pure maple syrup
– 1/4 cup granulated sugar
– 1/2 tsp salt
– 1 tsp vanilla extract
– 1 cup chopped walnuts
Instructions
1. Preheat your oven to 350°F and spread the chopped walnuts evenly on a baking sheet.
2. Toast the walnuts in the oven for 8-10 minutes until fragrant and lightly golden, stirring halfway through.
3. Combine the heavy cream, whole milk, maple syrup, granulated sugar, and salt in a medium saucepan.
4. Heat the mixture over medium heat, stirring constantly with a whisk until the sugar completely dissolves and tiny bubbles form around the edges (about 5-7 minutes).
5. Remove the saucepan from heat and stir in the vanilla extract.
6. Transfer the mixture to a large bowl and cover it with plastic wrap pressed directly against the surface to prevent a skin from forming.
7. Chill the mixture in the refrigerator for at least 4 hours or until it reaches 40°F.
8. Pour the chilled mixture into your ice cream maker and churn according to manufacturer’s instructions until it reaches soft-serve consistency (about 20-25 minutes).
9. Fold the toasted walnuts into the churned ice cream using a spatula until evenly distributed.
10. Transfer the ice cream to an airtight container and freeze for at least 4 hours or until firm.
Just try resisting this dreamy creation—the velvety maple base delivers caramel-like depth while those toasted walnuts provide the perfect crunchy counterpoint. Jazz it up by sandwiching scoops between warm oatmeal cookies or crumbling it over morning pancakes for breakfast-dessert fusion that’ll make your taste buds do a happy dance.
Tiramisu Ice Cream
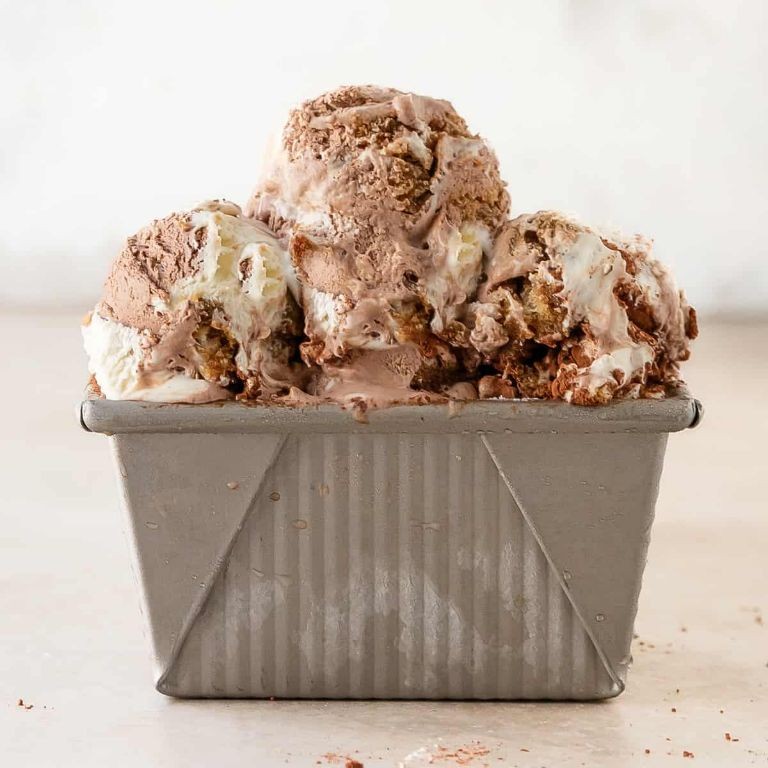
Tired of choosing between your coffee addiction and your ice cream obsession? This tiramisu ice cream is the caffeinated, creamy superhero that swoops in to save dessert time from boring decisions. Think ladyfingers doing the backstroke in a pool of mascarpone clouds, with espresso rain falling from above—it’s basically a dessert vacation in your freezer.
Ingredients
– 2 cups heavy cream
– 1 cup whole milk
– 3/4 cup granulated sugar
– 8 oz mascarpone cheese
– 1/4 cup brewed espresso, cooled
– 2 tbsp coffee liqueur
– 1 tsp vanilla extract
– 12 ladyfinger cookies
– 2 tbsp cocoa powder
Instructions
1. Combine 2 cups heavy cream, 1 cup whole milk, and 3/4 cup granulated sugar in a saucepan over medium heat.
2. Heat the mixture while stirring constantly until the sugar completely dissolves and tiny bubbles form around the edges, about 5-7 minutes.
3. Remove the saucepan from heat and whisk in 8 oz mascarpone cheese until smooth and fully incorporated.
4. Stir in 1/4 cup cooled brewed espresso, 2 tbsp coffee liqueur, and 1 tsp vanilla extract.
5. Transfer the mixture to a bowl and refrigerate for at least 4 hours until completely chilled to 40°F.
6. Pour the chilled mixture into an ice cream maker and churn according to manufacturer’s instructions until it reaches soft-serve consistency, about 25-30 minutes.
7. Break 12 ladyfinger cookies into 1-inch pieces while the ice cream churns.
8. Layer half of the churned ice cream into a 9×5 inch loaf pan.
9. Sprinkle half of the broken ladyfinger pieces evenly over the ice cream layer.
10. Top with remaining ice cream and smooth the surface with a spatula.
11. Arrange the remaining ladyfinger pieces on top in a single layer.
12. Sift 2 tbsp cocoa powder evenly over the entire surface using a fine-mesh sieve.
13. Cover the pan tightly with plastic wrap, pressing it directly against the ice cream surface.
14. Freeze for at least 6 hours or until firm enough to scoop.
15. Let the ice cream sit at room temperature for 5-10 minutes before scooping for easier serving.
Seriously, this frozen wonder delivers that perfect tiramisu texture—creamy mascarpone base with satisfying cookie crunch and bitter cocoa contrast. Serve it in espresso cups for an extra coffee kick, or sandwich it between waffle cones for the ultimate dessert hybrid that’ll make you question why regular ice cream even exists.
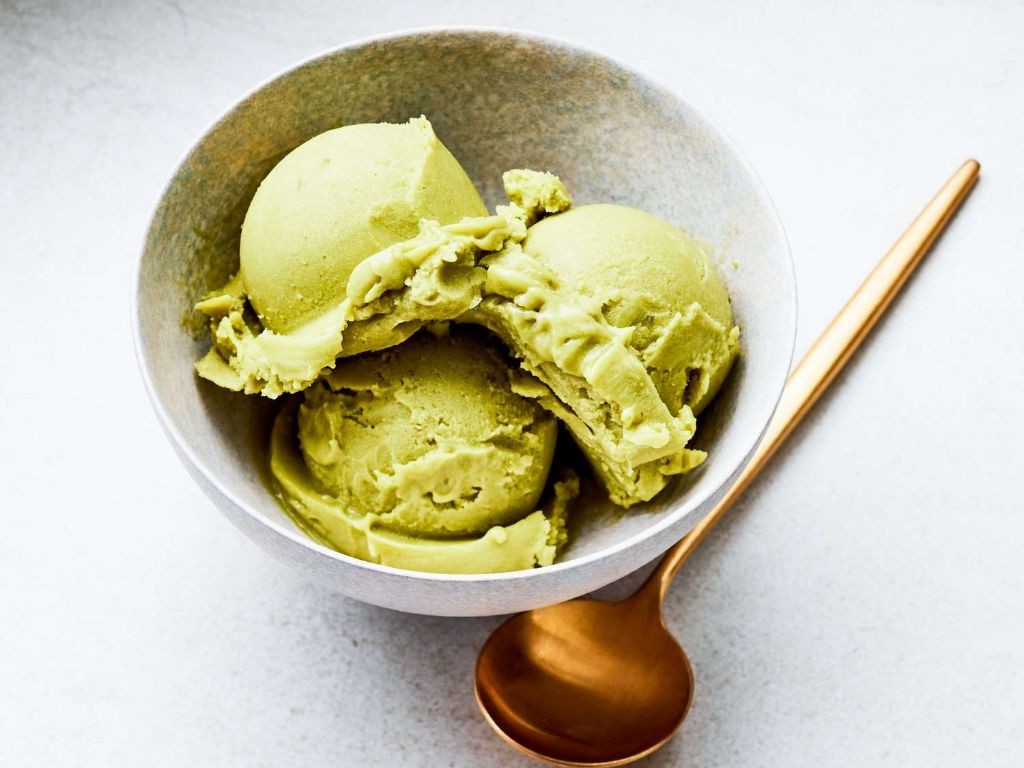
Matcha Green Tea Ice Cream
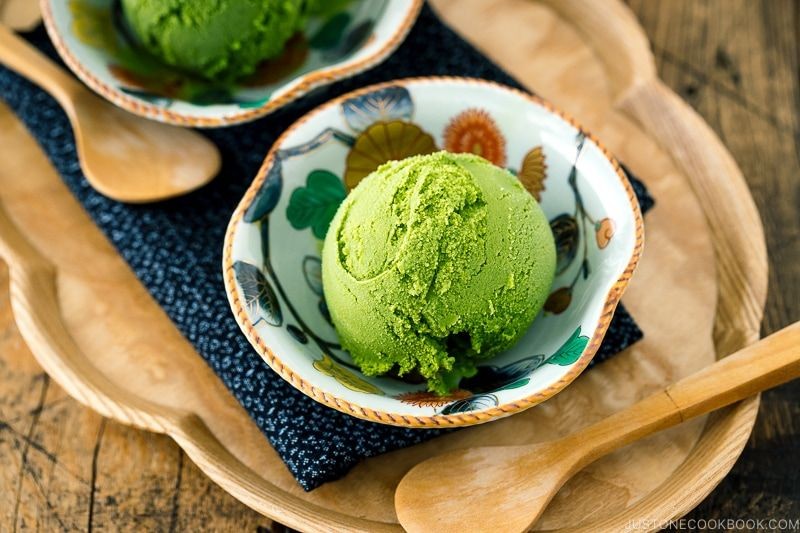
Ready to trade your basic vanilla for something that’ll make your taste buds do a happy dance? This matcha green tea ice cream is the vibrant, sophisticated cousin of your childhood freezer staple—with just enough earthy elegance to make you feel fancy without requiring a culinary degree. Seriously, who needs a fancy dessert parlor when you can whip up this creamy dream in your own kitchen?
Ingredients
– 2 cups heavy cream
– 1 cup whole milk
– 3/4 cup granulated sugar
– 2 tbsp matcha green tea powder
– 1 tsp vanilla extract
– 1/4 tsp salt
– 4 large egg yolks
Instructions
1. Whisk together 2 cups heavy cream, 1 cup whole milk, 3/4 cup granulated sugar, 2 tbsp matcha powder, 1 tsp vanilla extract, and 1/4 tsp salt in a medium saucepan until the matcha is fully dissolved and no green clumps remain.
2. Heat the mixture over medium heat, stirring constantly with a wooden spoon, until it reaches 170°F on a kitchen thermometer—this prevents scalding and ensures even flavor distribution.
3. While the cream mixture heats, vigorously whisk 4 large egg yolks in a separate bowl until they become pale yellow and slightly thickened, about 2 minutes.
4. Slowly pour 1/2 cup of the hot cream mixture into the egg yolks while continuously whisking to temper them and prevent scrambling.
5. Pour the tempered egg mixture back into the saucepan with the remaining cream, whisking constantly to combine.
6. Cook over low heat, stirring continuously, until the custard thickens enough to coat the back of a spoon and reaches 175°F, about 5-7 minutes.
7. Immediately strain the custard through a fine-mesh sieve into a clean bowl to remove any potential egg bits for ultra-smooth texture.
8. Press plastic wrap directly onto the surface of the custard to prevent a skin from forming, then refrigerate for at least 4 hours or until completely chilled.
9. Pour the chilled custard into your ice cream maker and churn according to manufacturer’s instructions until it reaches soft-serve consistency, about 20-25 minutes.
10. Transfer the ice cream to an airtight container, press parchment paper directly onto the surface, and freeze for at least 6 hours or until firm.
Velvety smooth with that distinctive earthy-sweet matcha kick, this ice cream delivers serious sophistication in every scoop. Try serving it sandwiched between chewy mochi wrappers or crumbled over a warm brownie for that perfect temperature contrast—because sometimes the best culinary adventures happen right in your own freezer.
Oreo Cookie Dough Ice Cream
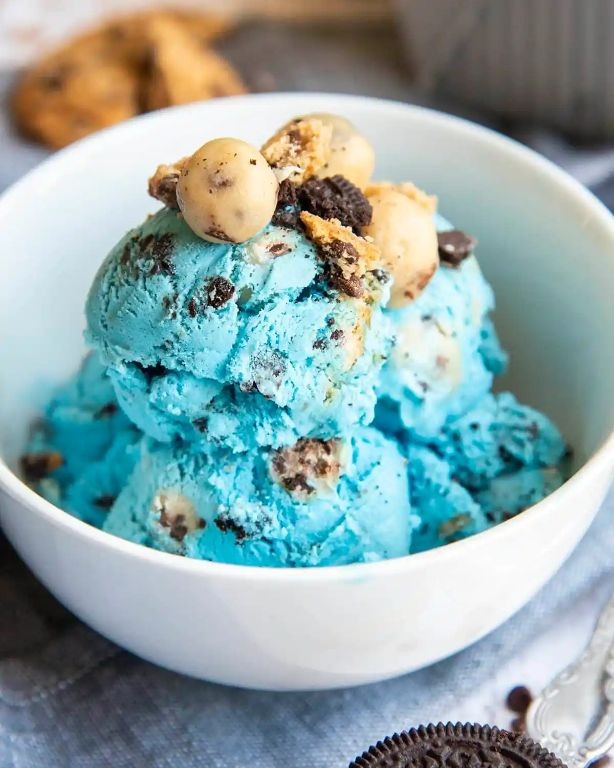
Craving something that combines childhood nostalgia with grown-up dessert sophistication? Look no further than this dangerously delicious Oreo cookie dough ice cream, where chunks of edible cookie dough meet creamy vanilla perfection in a frozen symphony you’ll want to eat straight from the container.
Ingredients
- 2 cups heavy cream
- 1 (14 oz) can sweetened condensed milk
- 1 tsp vanilla extract
- 1/2 cup unsalted butter, softened
- 1/2 cup brown sugar
- 2 tbsp all-purpose flour
- 2 tbsp milk
- 1/2 tsp vanilla extract
- 1 cup crushed Oreo cookies
- 1/2 cup mini chocolate chips
Instructions
- Beat 2 cups heavy cream in a chilled bowl with an electric mixer on high speed until stiff peaks form, about 3-4 minutes.
- Gently fold in 1 can sweetened condensed milk and 1 tsp vanilla extract until fully incorporated, being careful not to deflate the whipped cream.
- In a separate bowl, cream together 1/2 cup softened unsalted butter and 1/2 cup brown sugar until light and fluffy, about 2 minutes.
- Mix in 2 tbsp all-purpose flour, 2 tbsp milk, and 1/2 tsp vanilla extract until a smooth cookie dough forms.
- Fold 1 cup crushed Oreo cookies and 1/2 cup mini chocolate chips into the cookie dough mixture until evenly distributed.
- Drop teaspoon-sized chunks of the cookie dough throughout the ice cream base, gently folding to create swirls.
- Pour the mixture into a 9×5-inch loaf pan lined with parchment paper, spreading it evenly with a spatula.
- Cover the pan tightly with plastic wrap, pressing it directly against the surface of the ice cream to prevent ice crystals from forming.
- Freeze for at least 6 hours or until firm enough to scoop.
Nothing beats the contrast between the creamy, smooth ice cream base and those irresistible chunks of soft, chocolatey cookie dough. Serve it sandwiched between two chocolate chip cookies for the ultimate ice cream sandwich experience, or simply grab a spoon and dive right in—we won’t judge!
Avocado Lime Ice Cream
Hang onto your spoons, folks, because we’re about to dive into the creamiest, dreamiest dessert that’ll make you question every life choice that didn’t involve avocado ice cream sooner. This isn’t your grandma’s frozen treat—it’s a zesty, velvety revelation that’ll have you licking the bowl clean and maybe even considering a spoon heist.
Ingredients
– 2 ripe avocados
– 1 cup heavy cream
– 1/2 cup granulated sugar
– 1/4 cup fresh lime juice
– 1 tbsp lime zest
– 1 tsp vanilla extract
– 1/4 tsp salt
Instructions
1. Cut 2 ripe avocados in half, remove pits, and scoop flesh into a blender.
2. Add 1 cup heavy cream, 1/2 cup granulated sugar, 1/4 cup fresh lime juice, 1 tbsp lime zest, 1 tsp vanilla extract, and 1/4 tsp salt to the blender.
3. Blend on high speed for 2 minutes until completely smooth and no avocado chunks remain.
4. Pour mixture into a loaf pan or ice cream container, scraping blender with a spatula to get all the mixture.
5. Cover container tightly with plastic wrap pressed directly against the surface of the mixture to prevent ice crystals from forming.
6. Freeze for at least 6 hours or until firm enough to scoop.
7. Remove from freezer and let sit at room temperature for 5 minutes before scooping to soften slightly.
8. Scoop into bowls or cones using an ice cream scoop dipped in warm water between servings for cleaner scoops.
Velvety smooth with a surprising creaminess that’ll make you forget this contains vegetables, this ice cream delivers the perfect tangy-sweet punch that dances on your taste buds. Serve it sandwiched between two chewy chocolate chip cookies for an epic ice cream sandwich, or crumble some graham crackers on top for a frozen key lime pie vibe that’ll have everyone begging for your secret.
Summary
Delightful homemade ice cream adventures await with these 20 creamy recipes! Your Hamilton Beach ice cream maker is the key to creating sweet memories and delicious treats perfect for any occasion. We’d love to hear which recipes become your family favorites—please leave a comment below and share this roundup on Pinterest to spread the frozen joy!