Get ready to fall in love with artichokes all over again! Whether you’re looking for quick weeknight dinners, impressive party appetizers, or cozy comfort food, these versatile veggies are about to become your new kitchen staple. We’ve gathered 20 mouthwatering recipes that prove healthy eating doesn’t mean sacrificing flavor. From breakfast to dinner and everything in between, prepare to discover delicious ways to enjoy artichokes in every meal.
Garlic Lemon Roasted Artichokes
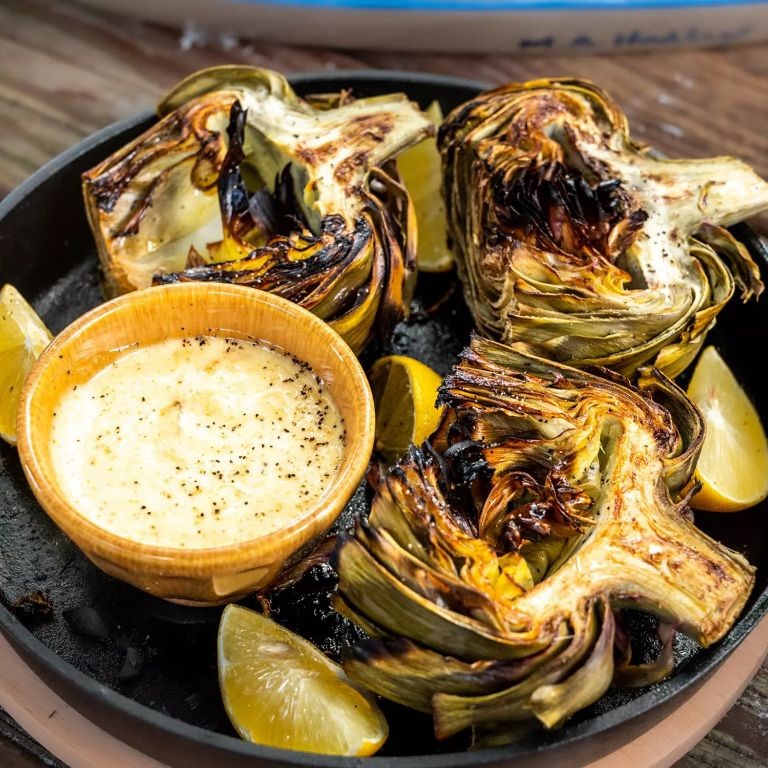
Ready to transform those intimidating artichokes into the star of your dinner table? These garlic lemon roasted artichokes are so ridiculously delicious, they’ll make you wonder why you ever bothered with anything else. Let’s turn those spiky globes into tender, flavor-packed perfection that even your pickiest eater will devour.
Ingredients
For the artichokes:
– 4 large artichokes
– 2 tbsp olive oil
– 1 tsp salt
For the garlic lemon mixture:
– 4 cloves garlic, minced
– 1/4 cup fresh lemon juice
– 2 tbsp olive oil
– 1 tsp black pepper
Instructions
1. Preheat your oven to 400°F.
2. Cut 1 inch off the top of each artichoke using a sharp knife.
3. Snip the thorny tips off the remaining leaves with kitchen shears.
4. Trim the stems to about 1/2 inch long.
5. Cut each artichoke in half lengthwise.
6. Use a spoon to scoop out the fuzzy choke from the center of each half. (Tip: Don’t skip removing the choke—it’s inedible and will ruin your eating experience!)
7. Brush the cut sides of the artichokes with 2 tbsp olive oil.
8. Sprinkle the artichokes evenly with 1 tsp salt.
9. Place the artichokes cut-side down on a baking sheet.
10. Roast for 25 minutes at 400°F until the edges begin to brown.
11. While roasting, whisk together 4 cloves minced garlic, 1/4 cup lemon juice, 2 tbsp olive oil, and 1 tsp black pepper in a small bowl.
12. Remove the baking sheet from the oven after 25 minutes. (Tip: The artichoke leaves should pull away easily when done—this is your visual cue for perfect roasting!)
13. Flip the artichokes cut-side up using tongs.
14. Brush the garlic lemon mixture evenly over all the artichoke halves.
15. Return to the oven and roast for another 10 minutes at 400°F.
16. Test for doneness by piercing the heart with a fork—it should slide in easily. (Tip: If the fork meets resistance, roast for 5 more minutes until perfectly tender!)
Just imagine biting into those crispy-edged leaves giving way to the melt-in-your-mouth heart, all drenched in that zesty garlic lemon goodness. Serve these beauties as a stunning appetizer with aioli for dipping, or chop them up and toss with pasta for an instant gourmet upgrade that’ll have everyone begging for the recipe.
Spinach and Artichoke Stuffed Chicken

Prepare to meet your new dinner party superstar—this spinach and artichoke stuffed chicken turns basic poultry into a showstopping main course that’ll have everyone begging for the recipe (and maybe your cooking secrets). Packed with creamy, cheesy goodness and baked to golden perfection, it’s the kind of dish that makes you look like a culinary genius without breaking a sweat.
Ingredients
- For the filling:
- 1 cup frozen chopped spinach, thawed and squeezed dry
- 1 cup canned artichoke hearts, drained and chopped
- 4 oz cream cheese, softened
- 1/2 cup shredded mozzarella cheese
- 1/4 cup grated Parmesan cheese
- 1/4 cup mayonnaise
- 1 garlic clove, minced
- 1/2 tsp onion powder
- 1/4 tsp black pepper
- For the chicken:
- 4 boneless, skinless chicken breasts (about 6 oz each)
- 1 tbsp olive oil
- 1/2 tsp salt
- 1/4 tsp paprika
Instructions
- Preheat your oven to 375°F and lightly grease a 9×13-inch baking dish.
- In a medium bowl, combine the spinach, artichoke hearts, cream cheese, mozzarella, Parmesan, mayonnaise, garlic, onion powder, and black pepper until well mixed. Tip: Squeezing the spinach thoroughly prevents a watery filling.
- Place each chicken breast on a cutting board and use a sharp knife to slice a horizontal pocket through the thickest part, being careful not to cut all the way through.
- Season the outside of each chicken breast evenly with salt and paprika.
- Divide the spinach-artichoke mixture evenly among the chicken pockets, using about 1/4 cup per breast.
- Secure the openings of each chicken breast with 2-3 toothpicks to keep the filling inside during baking.
- Drizzle the olive oil over the top of the stuffed chicken breasts.
- Bake in the preheated oven for 25-30 minutes, or until the internal temperature reaches 165°F on an instant-read thermometer. Tip: Checking the temperature ensures juicy, perfectly cooked chicken every time.
- Switch the oven to broil and cook for an additional 2-3 minutes until the tops are golden brown. Tip: Watch closely during broiling to prevent burning.
- Remove from the oven and let rest for 5 minutes before carefully removing the toothpicks.
Buttery, creamy filling oozes from tender chicken with every slice, while the golden exterior adds just the right crunch. Serve it alongside garlic mashed potatoes to soak up the cheesy goodness or slice it over a bed of fresh greens for a lighter twist that still feels indulgent.
Quinoa Artichoke Salad with Lemon Vinaigrette
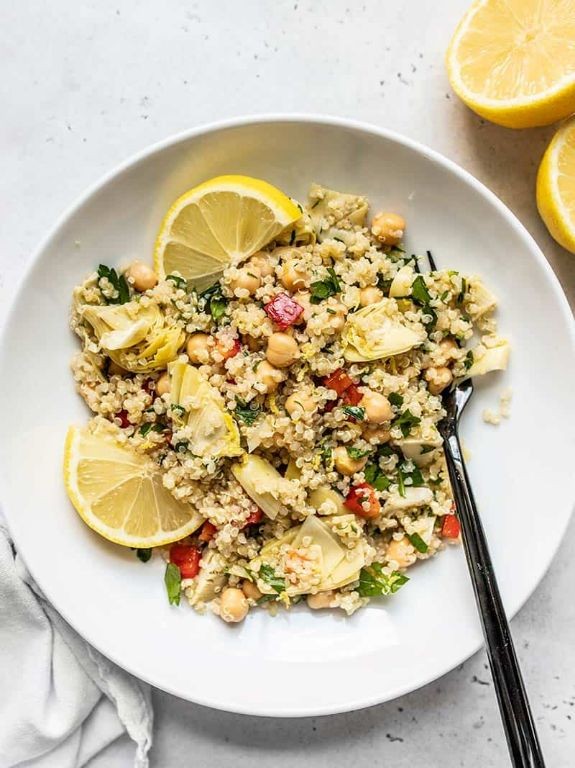
Naturally, we’ve all faced that moment when our salad game needs a serious upgrade from the sad desk lettuce situation. This quinoa artichoke number is here to rescue your lunch routine with more personality than a TikTok food influencer. Get ready for a flavor party that’ll make your taste buds do a happy dance!
Ingredients
For the quinoa base:
– 1 cup quinoa
– 2 cups water
– 1/2 tsp salt
For the salad mix-ins:
– 1 can (14 oz) artichoke hearts, drained and chopped
– 1 cup cherry tomatoes, halved
– 1/2 cup chopped red onion
– 1/4 cup chopped fresh parsley
For the lemon vinaigrette:
– 1/4 cup olive oil
– 3 tbsp fresh lemon juice
– 1 tsp Dijon mustard
– 1/2 tsp salt
– 1/4 tsp black pepper
Instructions
1. Rinse 1 cup quinoa under cold water in a fine-mesh strainer for 1 minute to remove the bitter coating.
2. Combine rinsed quinoa, 2 cups water, and 1/2 tsp salt in a medium saucepan.
3. Bring quinoa mixture to a boil over high heat, then immediately reduce heat to low and cover with a tight-fitting lid.
4. Simmer quinoa for 15 minutes until all liquid is absorbed and little “tails” appear around each grain.
5. Remove quinoa from heat and let it stand covered for 5 minutes to finish steaming.
6. Fluff quinoa with a fork and spread it on a baking sheet to cool completely to room temperature.
7. While quinoa cools, drain 1 can artichoke hearts and chop them into bite-sized pieces.
8. Cut 1 cup cherry tomatoes in half using a sharp knife.
9. Finely chop 1/2 cup red onion and 1/4 cup fresh parsley.
10. In a small bowl, whisk together 1/4 cup olive oil and 3 tbsp fresh lemon juice until emulsified.
11. Add 1 tsp Dijon mustard, 1/2 tsp salt, and 1/4 tsp black pepper to the dressing, whisking vigorously for 30 seconds.
12. Combine cooled quinoa, chopped artichokes, halved tomatoes, red onion, and parsley in a large mixing bowl.
13. Pour the lemon vinaigrette over the salad mixture and toss gently until everything is evenly coated.
14. Let the salad rest for 10 minutes before serving to allow flavors to meld.
Very few salads can boast this perfect textural symphony—fluffy quinoa meets tender artichokes with little tomato explosions! The zesty lemon vinaigrette cuts through everything like a citrus superhero. Try scooping it into lettuce cups for a crunchy handheld situation, or pile it high alongside grilled chicken for the main event treatment.
Artichoke and White Bean Dip
Gather ’round, dip enthusiasts, because we’re about to transform your snack game from “meh” to “more, please!” with a creation so creamy and dreamy, your veggie platter will finally feel seen. This isn’t just another dip—it’s the life of the party that even your pickiest friend will secretly adore.
Ingredients
For the roasted garlic:
- 1 head of garlic
- 1 tbsp olive oil
For the dip base:
- 1 (14 oz) can artichoke hearts, drained and chopped
- 1 (15 oz) can white beans, drained and rinsed
- 1/2 cup plain Greek yogurt
- 1/4 cup grated Parmesan cheese
- 2 tbsp lemon juice
- 1 tbsp olive oil
- 1/2 tsp smoked paprika
- 1/4 tsp salt
- 1/4 tsp black pepper
Instructions
- Preheat your oven to 400°F.
- Slice the top off the head of garlic to expose the cloves.
- Drizzle 1 tbsp olive oil over the exposed garlic cloves.
- Wrap the garlic tightly in aluminum foil.
- Roast the garlic for 30 minutes until the cloves are soft and golden brown.
- Allow the roasted garlic to cool for 10 minutes until safe to handle.
- Squeeze the softened garlic cloves from their skins into a food processor.
- Add the chopped artichoke hearts, white beans, Greek yogurt, Parmesan cheese, lemon juice, 1 tbsp olive oil, smoked paprika, salt, and black pepper to the food processor.
- Pulse the mixture 5 times until roughly combined.
- Process the mixture continuously for 45 seconds until smooth and creamy.
- Transfer the dip to a serving bowl.
- Refrigerate the dip for at least 1 hour to allow the flavors to meld.
Velvety smooth with a subtle smokiness, this dip boasts a creamy texture that clings perfectly to crunchy pita chips while delivering bright, tangy notes from the lemon and yogurt. Try scooping it with crispy roasted potato wedges for a heartier approach, or spread it thick on toasted baguette slices for an instant crostini upgrade that’ll make you the undisputed appetizer champion.
Grilled Artichokes with Herb Yogurt Sauce
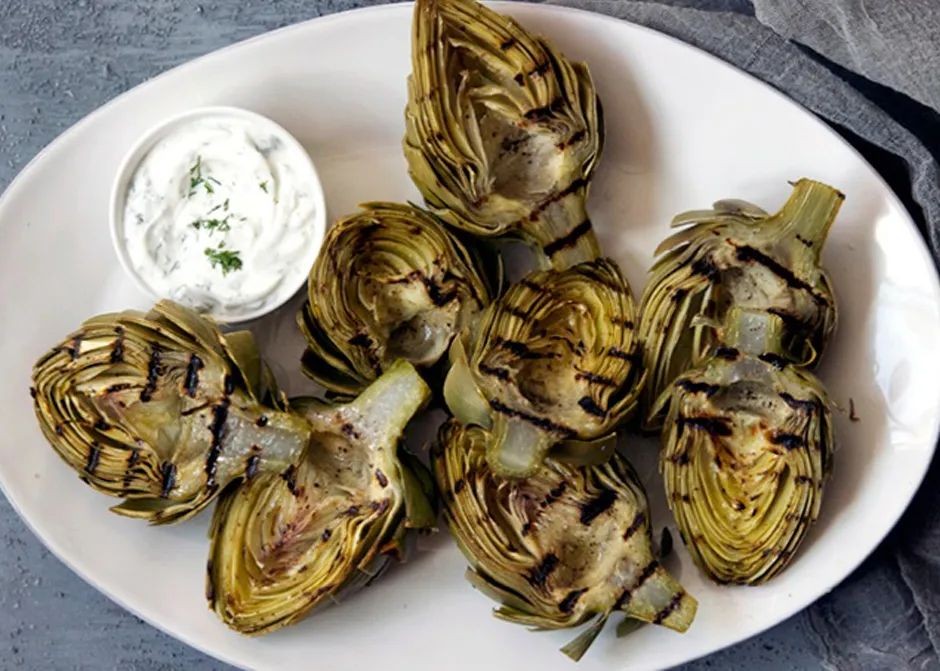
Seriously, who decided artichokes should be so intimidating? These spiky green globes might look like medieval weapons, but once you grill them up and dunk ’em in herby yogurt sauce, they transform into the ultimate backyard hero. Let’s turn those armored veggies into the star of your next cookout!
Ingredients
For the artichokes:
– 4 large artichokes
– 1 lemon, halved
– 2 tablespoons olive oil
– 1 teaspoon salt
– 1/2 teaspoon black pepper
For the herb yogurt sauce:
– 1 cup plain Greek yogurt
– 2 tablespoons chopped fresh dill
– 2 tablespoons chopped fresh mint
– 1 garlic clove, minced
– 1 tablespoon lemon juice
– 1/4 teaspoon salt
Instructions
1. Fill a large pot with water and bring to a boil over high heat.
2. Cut 1 inch off the top of each artichoke and trim the stem to 1/2 inch.
3. Rub all cut surfaces immediately with lemon halves to prevent browning.
4. Place artichokes in the boiling water and cook for 20 minutes until outer leaves pull away easily.
5. Remove artichokes from water and let cool until handleable, about 10 minutes.
6. Cut each artichoke in half lengthwise and scoop out the fuzzy choke with a spoon.
7. Brush cut sides with olive oil and season with salt and pepper.
8. Preheat grill to medium-high heat (400°F).
9. Place artichokes cut-side down on the grill and cook for 5 minutes.
10. Flip artichokes and grill for another 5 minutes until lightly charred.
11. While artichokes grill, combine Greek yogurt, dill, mint, garlic, lemon juice, and salt in a small bowl.
12. Whisk sauce ingredients until fully incorporated.
13. Remove artichokes from grill and arrange on a serving platter.
14. Serve immediately with herb yogurt sauce for dipping.
Remarkably tender leaves with smoky grill marks give way to that signature meaty heart, while the cool yogurt sauce cuts through with herby freshness. Try serving these as edible dippers for your next game day spread—just watch them disappear faster than your team’s lead!
Artichoke and Kale Stuffed Portobello Mushrooms

Aren’t you tired of the same old stuffed mushrooms that show up at every potluck? These Artichoke and Kale Stuffed Portobello Mushrooms are here to rescue your taste buds from mediocrity with a veggie-packed punch that’ll make you forget mushrooms were ever boring.
Ingredients
For the mushroom prep:
– 4 large portobello mushroom caps
– 2 tablespoons olive oil
– 1/2 teaspoon salt
– 1/4 teaspoon black pepper
For the filling:
– 1 cup chopped kale
– 1 cup canned artichoke hearts, drained and chopped
– 1/2 cup grated Parmesan cheese
– 1/4 cup breadcrumbs
– 1/4 cup mayonnaise
– 2 cloves garlic, minced
– 1 teaspoon lemon juice
Instructions
1. Preheat your oven to 375°F and line a baking sheet with parchment paper.
2. Carefully remove the stems from portobello mushrooms and use a spoon to scrape out the gills—this prevents your mushrooms from getting watery during baking.
3. Brush both sides of each mushroom cap with olive oil, then sprinkle with salt and pepper.
4. Place mushrooms gill-side up on the prepared baking sheet and bake for 10 minutes—they should release some liquid and become slightly tender.
5. While mushrooms bake, combine kale, artichoke hearts, Parmesan, breadcrumbs, mayonnaise, garlic, and lemon juice in a medium bowl.
6. Mix the filling thoroughly until all ingredients are evenly distributed and the kale is well-coated.
7. Remove mushrooms from oven and carefully drain any accumulated liquid from the caps.
8. Divide the filling mixture evenly among the four mushroom caps, pressing gently to pack it in.
9. Return stuffed mushrooms to the oven and bake for 18-20 minutes until the filling is golden brown and bubbly.
10. Let mushrooms rest for 3-5 minutes before serving—this allows the filling to set and prevents burned mouths (we’ve all been there). Perfectly plump and packed with personality, these mushrooms deliver a satisfying crunch from the breadcrumbs against the tender artichoke and kale medley. Serve them as a show-stopping appetizer or pair with a simple salad for a vegetarian main that actually fills you up.
Mediterranean Artichoke Pasta Salad
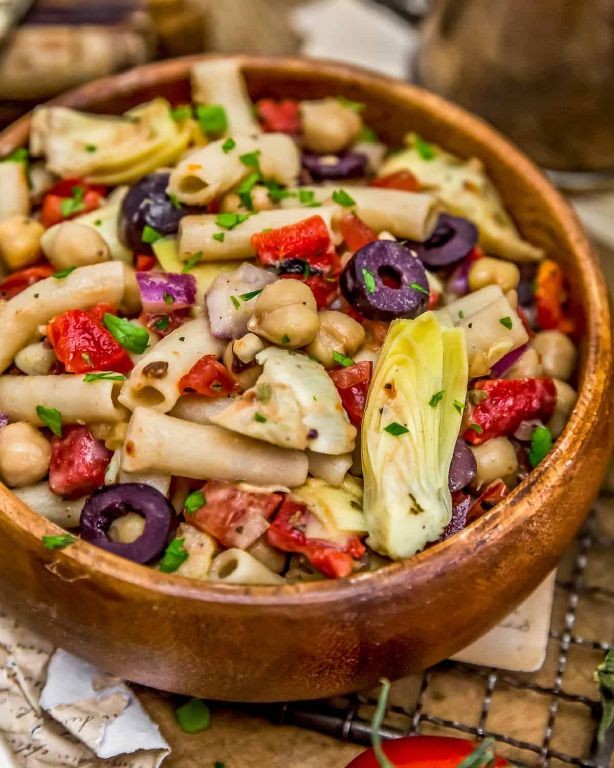
Heads up, pasta salad skeptics: this Mediterranean Artichoke Pasta Salad is about to become your new warm-weather obsession. Imagine tender pasta mingling with briny artichokes, juicy tomatoes, and a zesty lemon-herb dressing that’s basically sunshine in a bowl. It’s the kind of dish that’ll have you sneaking forkfuls straight from the fridge—no judgment here!
Ingredients
- For the pasta and vegetables:
- 8 oz fusilli pasta
- 1 (14 oz) can artichoke hearts, drained and quartered
- 1 cup cherry tomatoes, halved
- 1/2 cup Kalamata olives, pitted and halved
- 1/4 cup red onion, finely diced
- For the dressing:
- 1/4 cup extra virgin olive oil
- 3 tbsp fresh lemon juice
- 2 tbsp fresh parsley, chopped
- 1 tsp dried oregano
- 1/2 tsp salt
- 1/4 tsp black pepper
Instructions
- Bring a large pot of salted water to a rolling boil over high heat.
- Add the fusilli pasta to the boiling water and cook for 9–11 minutes, stirring occasionally, until al dente (tip: check a piece a minute early to avoid mushy pasta).
- Drain the pasta in a colander and rinse under cold water for 1 minute to stop the cooking process.
- Transfer the cooled pasta to a large mixing bowl.
- Add the quartered artichoke hearts, halved cherry tomatoes, halved Kalamata olives, and diced red onion to the bowl.
- In a small bowl, whisk together the extra virgin olive oil, fresh lemon juice, chopped parsley, dried oregano, salt, and black pepper until fully combined (tip: emulsify the dressing by whisking vigorously for 30 seconds).
- Pour the dressing over the pasta and vegetables.
- Toss everything gently but thoroughly with a large spoon or salad tongs until evenly coated.
- Cover the bowl with plastic wrap and refrigerate for at least 30 minutes to let the flavors meld (tip: chilling firms up the textures and makes the salad even more refreshing).
Bright, tangy, and bursting with Mediterranean flair, this salad boasts a satisfying chew from the pasta and a lively crunch from the veggies. Serve it piled high on a platter with grilled chicken skewers for a complete meal, or pack it for a picnic where it’ll effortlessly steal the spotlight.
Artichoke and Avocado Toast

Fancy a toast that’s basically a party in your mouth? Meet the Artichoke and Avocado Toast—a creamy, zesty masterpiece that’ll make your taste buds do a happy dance. Forget boring breakfasts; this is the upgrade you never knew you needed, packed with flavor and fun vibes.
Ingredients
- For the base:
- 2 slices of sourdough bread
- 1 tablespoon olive oil
- For the avocado spread:
- 1 ripe avocado
- 1 tablespoon lime juice
- 1/4 teaspoon salt
- For the artichoke topping:
- 1/2 cup canned artichoke hearts, drained and chopped
- 1/4 cup crumbled feta cheese
- 1 tablespoon chopped fresh parsley
- 1/8 teaspoon black pepper
Instructions
- Preheat your oven to 400°F.
- Brush both sides of the sourdough bread slices evenly with 1 tablespoon of olive oil.
- Place the bread slices on a baking sheet.
- Bake the bread for 8–10 minutes, or until the edges are golden brown and crispy.
- Remove the baking sheet from the oven using oven mitts.
- Let the toast cool on the baking sheet for 2 minutes to avoid burning your fingers.
- Cut the ripe avocado in half lengthwise and remove the pit.
- Scoop the avocado flesh into a small bowl.
- Add 1 tablespoon of lime juice and 1/4 teaspoon of salt to the bowl.
- Mash the avocado mixture with a fork until smooth but slightly chunky for texture.
- Spread the avocado mixture evenly onto the toasted sourdough slices.
- In a separate bowl, combine 1/2 cup of chopped artichoke hearts, 1/4 cup of crumbled feta cheese, 1 tablespoon of chopped parsley, and 1/8 teaspoon of black pepper.
- Top each avocado-covered toast with the artichoke mixture, pressing lightly to adhere.
- Serve immediately for the best crunch and freshness.
Delightfully creamy avocado meets tangy artichoke and feta in every bite, with a crispy sourdough base that holds up to the toppings. The lime adds a zesty kick that cuts through the richness, making it perfect for brunch or a quick snack. Try stacking an extra slice for a hearty open-faced sandwich, or pair it with a sunny-side-up egg for a protein boost—it’s as versatile as it is delicious.
Baked Artichoke and Feta Frittata

Let’s be real—most breakfasts are either sad desk granola or a frantic drive-thru situation. This baked artichoke and feta frittata is your delicious rebellion, a one-pan wonder that’s basically a flavor party in your mouth and requires zero fancy chef skills.
Ingredients
For the Egg Base:
– 8 large eggs
– 1/4 cup whole milk
– 1/2 tsp salt
– 1/4 tsp black pepper
For the Filling:
– 1 tbsp olive oil
– 1/2 cup chopped yellow onion
– 1 (14 oz) can artichoke hearts, drained and chopped
– 4 oz crumbled feta cheese
– 2 tbsp chopped fresh dill
Instructions
1. Preheat your oven to 375°F.
2. Crack 8 large eggs into a large mixing bowl.
3. Pour 1/4 cup whole milk into the bowl with the eggs.
4. Add 1/2 tsp salt and 1/4 tsp black pepper to the egg mixture.
5. Whisk the eggs, milk, salt, and pepper vigorously for 1 full minute until fully combined and slightly frothy. Tip: Whisking well incorporates air for a fluffier frittata.
6. Heat 1 tbsp olive oil in a 10-inch oven-safe skillet over medium heat for 1 minute.
7. Add 1/2 cup chopped yellow onion to the hot skillet.
8. Sauté the onion for 4-5 minutes, stirring occasionally, until softened and translucent.
9. Add 1 (14 oz) can of drained, chopped artichoke hearts to the skillet with the onion.
10. Cook the artichokes and onion together for 2 minutes, stirring once, to warm through.
11. Spread the onion and artichoke mixture evenly across the bottom of the skillet.
12. Sprinkle 4 oz crumbled feta cheese evenly over the vegetable layer.
13. Sprinkle 2 tbsp chopped fresh dill evenly over the feta.
14. Pour the prepared egg mixture evenly over all the ingredients in the skillet.
15. Let the frittata cook on the stovetop, without stirring, for 3-4 minutes until the edges just begin to set. Tip: This initial stovetop cook gives the bottom a lovely golden crust.
16. Transfer the skillet to the preheated 375°F oven.
17. Bake for 18-20 minutes until the center is fully set, doesn’t jiggle when shaken, and the top is lightly golden. Tip: Check doneness by inserting a knife in the center—it should come out clean.
18. Remove the skillet from the oven and let the frittata rest for 5 minutes before slicing. The result is a gloriously fluffy, savory masterpiece with creamy pockets of feta and tender artichoke bites. Serve it warm or at room temperature, maybe with a zesty side salad, because you’re fancy like that now.
Artichoke and Chickpea Buddha Bowl
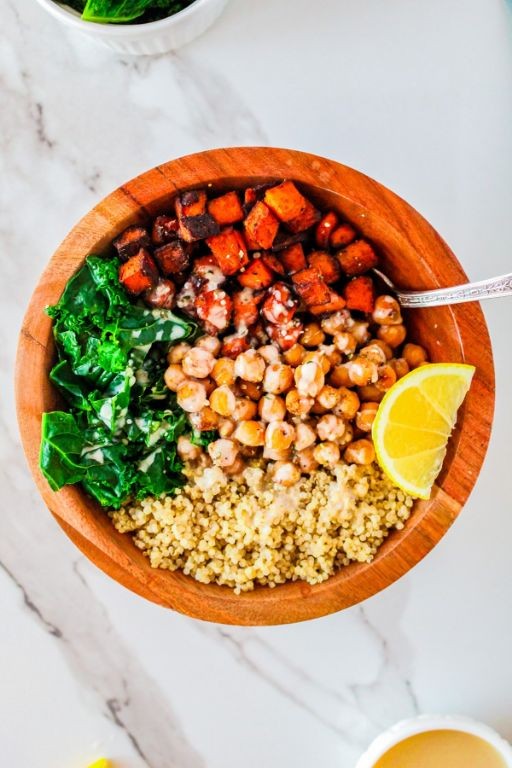
Yikes, your lunch routine needs a serious glow-up, and this artichoke and chickpea Buddha bowl is here to save the day with zero meditation required—just pure, unapologetic flavor fireworks.
Ingredients
For the Roasted Veggies & Chickpeas
- 1 (15-ounce) can chickpeas, rinsed and drained
- 1 (14-ounce) can artichoke hearts, quartered
- 1 cup cherry tomatoes, halved
- 2 tablespoons olive oil
- 1 teaspoon garlic powder
- 1/2 teaspoon smoked paprika
For the Lemon-Tahini Dressing
- 1/4 cup tahini
- 3 tablespoons lemon juice
- 2 tablespoons water
- 1/2 teaspoon maple syrup
- 1/4 teaspoon salt
For Assembly
- 2 cups cooked quinoa
- 1 avocado, sliced
- 1/4 cup chopped fresh parsley
Instructions
- Preheat your oven to 400°F and line a baking sheet with parchment paper.
- Pat the rinsed chickpeas completely dry with a paper towel to ensure they crisp up nicely in the oven.
- In a large bowl, toss the chickpeas, artichoke hearts, and cherry tomatoes with olive oil, garlic powder, and smoked paprika until evenly coated.
- Spread the mixture in a single layer on the prepared baking sheet, making sure nothing is overcrowded.
- Roast for 20–25 minutes, or until the chickpeas are golden and the tomatoes have started to burst open.
- While the veggies roast, whisk together the tahini, lemon juice, water, maple syrup, and salt in a small bowl until smooth and creamy.
- If the dressing is too thick, add another tablespoon of water and whisk again—it should drizzle easily off a spoon.
- Divide the cooked quinoa evenly between two bowls as your base layer.
- Top the quinoa with the roasted chickpea and veggie mixture, arranging them in colorful sections for maximum visual appeal.
- Add sliced avocado and a generous sprinkle of fresh parsley to each bowl.
- Drizzle the lemon-tahini dressing liberally over everything right before serving to keep the ingredients crisp.
Just imagine that first bite: creamy avocado meets zesty dressing, while roasted chickpeas add a satisfying crunch against tender artichoke hearts. Serve it piled high in a wide, shallow bowl so you can Instagram the rainbow—or just devour it straight from the pan, no judgment here.
Lemon Garlic Artichoke Soup

Kick your taste buds into high gear with this zesty lemon garlic artichoke soup that’s basically a warm hug in a bowl—if that hug came with a sassy lemon twist and a garlicky wink. Forget boring soups; this one’s here to shake up your lunch routine with bold flavors that’ll make you wonder why you ever settled for plain old tomato.
Ingredients
- For the base: 2 tbsp olive oil, 1 medium onion (chopped), 4 cloves garlic (minced)
- For the soup: 14 oz canned artichoke hearts (drained and chopped), 4 cups vegetable broth, 1 cup heavy cream, 1 lemon (juiced), 1 tsp salt, 1/2 tsp black pepper
- For garnish: 2 tbsp fresh parsley (chopped), 1 lemon (sliced)
Instructions
- Heat 2 tbsp olive oil in a large pot over medium heat until it shimmers.
- Add 1 chopped onion and cook for 5–7 minutes, stirring occasionally, until translucent and fragrant.
- Stir in 4 minced garlic cloves and cook for 1 minute until golden but not browned—watch closely to avoid bitterness.
- Add 14 oz chopped artichoke hearts and sauté for 3 minutes to soften them slightly.
- Pour in 4 cups vegetable broth and bring to a boil over high heat.
- Reduce heat to low, cover the pot, and simmer for 15 minutes to let the flavors meld.
- Use an immersion blender to purée the soup until smooth, or carefully transfer to a countertop blender in batches (tip: leave the lid vented to prevent steam buildup).
- Stir in 1 cup heavy cream, the juice of 1 lemon, 1 tsp salt, and 1/2 tsp black pepper.
- Heat the soup for 3–5 minutes over low heat until warmed through, but do not boil to avoid curdling the cream.
- Ladle into bowls and garnish with 2 tbsp fresh parsley and lemon slices for a bright finish (tip: a squeeze of extra lemon juice right before serving enhances the zing).
Ready to dive in? This soup boasts a velvety texture that’s rich from the cream yet lifted by the tart lemon, while the artichoke adds a subtle earthiness that’s downright addictive. Serve it with crusty bread for dipping, or get fancy by topping it with crispy croutons and a drizzle of olive oil—it’s so good, you might just lick the bowl.
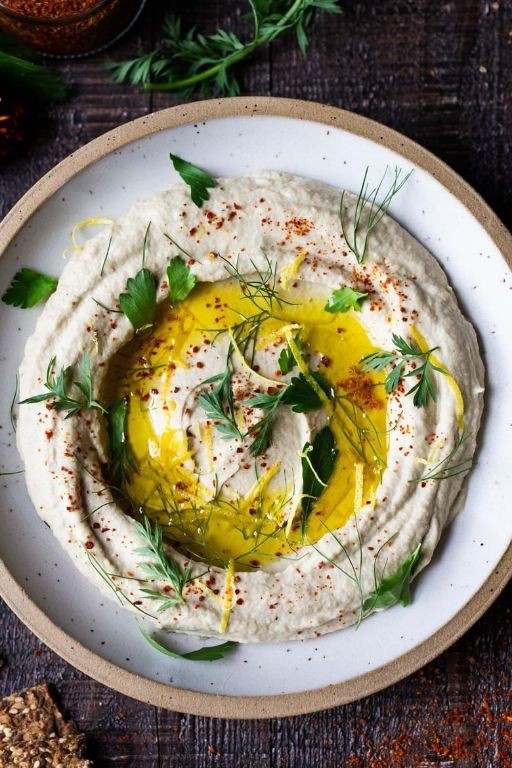
Artichoke and Sun-Dried Tomato Hummus

Virtually every hummus you’ve ever met is about to get seriously jealous. This artichoke and sun-dried tomato version is the party-loving, flavor-bombing superstar that’ll make your taste buds do a happy dance while your regular hummus cries in the corner.
Ingredients
For the Base Hummus:
- 2 (15-ounce) cans chickpeas, drained and rinsed
- 1/2 cup tahini
- 1/4 cup fresh lemon juice
- 2 garlic cloves, peeled
- 1/2 cup ice water
- 1/2 teaspoon salt
For the Flavor Add-Ins:
- 1 (14-ounce) can artichoke hearts, drained and patted dry
- 1/2 cup oil-packed sun-dried tomatoes, drained
- 2 tablespoons olive oil from the sun-dried tomato jar
- 1/4 teaspoon smoked paprika
Instructions
- Combine chickpeas, tahini, lemon juice, garlic cloves, and salt in a food processor.
- Process the mixture for 1 minute until it forms a coarse paste.
- With the processor running on low speed, slowly drizzle in the 1/2 cup ice water through the feed tube.
- Continue processing for 2 full minutes until the hummus becomes incredibly smooth and creamy.
- Add the drained artichoke hearts and sun-dried tomatoes to the food processor.
- Process for 45 seconds until the vegetables are fully incorporated but still slightly textured.
- Scrape down the sides of the bowl with a spatula to ensure even mixing.
- Add the 2 tablespoons olive oil and 1/4 teaspoon smoked paprika to the mixture.
- Process for another 30 seconds until everything is perfectly combined.
- Taste the hummus and adjust seasoning if needed, though the sun-dried tomatoes usually provide enough saltiness.
- Transfer the hummus to a serving bowl and let it rest at room temperature for 15 minutes before serving to allow the flavors to meld.
Fantastically creamy with delightful chunks of artichoke and bursts of tangy sun-dried tomato, this hummus has a smoky undertone that makes it dangerously addictive. Serve it with pita chips that are sturdy enough to handle the thick texture, or spread it on sandwiches for an instant flavor upgrade that’ll make lunch the best part of your day.
Stuffed Artichokes with Whole Grain Breadcrumbs
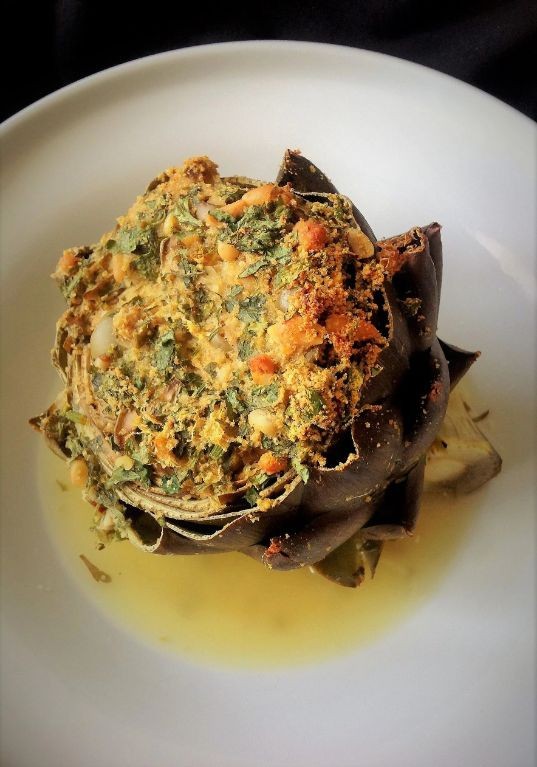
Prepare to meet the vegetable that thinks it’s a fancy appetizer! Stuffed artichokes are about to become your new party trick—they look impressive but are secretly simple to make, especially when we stuff them with hearty whole grain breadcrumbs that add a delightful crunch.
Ingredients
For the artichokes:
– 4 large artichokes
– 1 lemon, halved
– 2 tablespoons olive oil
– 1 teaspoon salt
For the stuffing:
– 2 cups whole grain breadcrumbs
– 1/2 cup grated Parmesan cheese
– 3 cloves garlic, minced
– 1/4 cup chopped fresh parsley
– 1/4 teaspoon black pepper
– 3 tablespoons olive oil
Instructions
1. Preheat your oven to 375°F.
2. Cut 1 inch off the top of each artichoke and trim the stem so they sit flat.
3. Rub all cut surfaces with the halved lemon to prevent browning.
4. Use kitchen shears to snip the sharp tips off the remaining outer leaves.
5. Gently pull the leaves apart to create space for stuffing.
6. In a medium bowl, combine whole grain breadcrumbs, grated Parmesan cheese, minced garlic, chopped fresh parsley, and black pepper.
7. Drizzle 3 tablespoons olive oil over the breadcrumb mixture and mix until evenly moistened.
8. Spoon the stuffing mixture between the artichoke leaves, pressing gently to pack it in.
9. Drizzle 2 tablespoons olive oil over the stuffed artichokes and sprinkle with 1 teaspoon salt.
10. Place artichokes in a baking dish and add 1 inch of water to the bottom.
11. Cover the dish tightly with aluminum foil and bake at 375°F for 45 minutes.
12. Remove the foil and bake for another 15 minutes until the tops are golden brown.
13. Test for doneness by pulling on a center leaf—it should come out easily.
14. Let rest for 5 minutes before serving.
Remarkably satisfying, these artichokes deliver a fantastic contrast between the tender, meaty leaves and the crispy, savory stuffing. The whole grain breadcrumbs add a nutty depth that pairs beautifully with the bright lemon notes. Try serving them as a centerpiece with a lemony aioli for dipping, or chop the leftovers into a gourmet salad the next day—if there are any leftovers!
Artichoke and Roasted Red Pepper Flatbread

Kick your basic pizza night to the curb, because this artichoke and roasted red pepper flatbread is about to become your new culinary obsession. It’s the perfect mash-up of tangy, savory, and downright delicious, guaranteed to make your taste buds do a happy dance. Let’s get this flavor party started!
Ingredients
For the Flatbread Base:
– 1 pre-baked flatbread crust (12-inch)
– 1 tbsp olive oil
For the Toppings:
– 1/2 cup jarred marinated artichoke hearts, drained and chopped
– 1/2 cup jarred roasted red peppers, drained and sliced
– 1 cup shredded mozzarella cheese
– 1/4 cup grated Parmesan cheese
– 2 tbsp chopped fresh basil
– 1/4 tsp red pepper flakes (optional)
Instructions
1. Preheat your oven to 425°F.
2. Place the pre-baked flatbread crust on a baking sheet.
3. Brush the entire surface of the flatbread with 1 tablespoon of olive oil.
4. Sprinkle 1 cup of shredded mozzarella cheese evenly over the oiled crust.
5. Distribute 1/2 cup of chopped artichoke hearts evenly over the cheese.
6. Arrange 1/2 cup of sliced roasted red peppers on top of the artichokes.
7. Sprinkle 1/4 cup of grated Parmesan cheese over the vegetables.
8. Add 1/4 teaspoon of red pepper flakes if using for a spicy kick.
9. Bake the flatbread in the preheated oven for 10–12 minutes, or until the cheese is fully melted and the crust edges are golden brown.
10. Remove the flatbread from the oven and let it cool for 2 minutes on the baking sheet.
11. Sprinkle 2 tablespoons of chopped fresh basil over the top.
12. Slice the flatbread into 8 pieces using a pizza cutter or sharp knife.
The flatbread boasts a crispy crust that gives way to a gooey, cheesy center, with the tangy artichokes and sweet roasted peppers creating a symphony of flavors. Serve it alongside a zesty arugula salad for a light meal, or cut it into smaller squares for the ultimate game-day appetizer that’ll disappear in seconds.
Artichoke and Lentil Stuffed Peppers
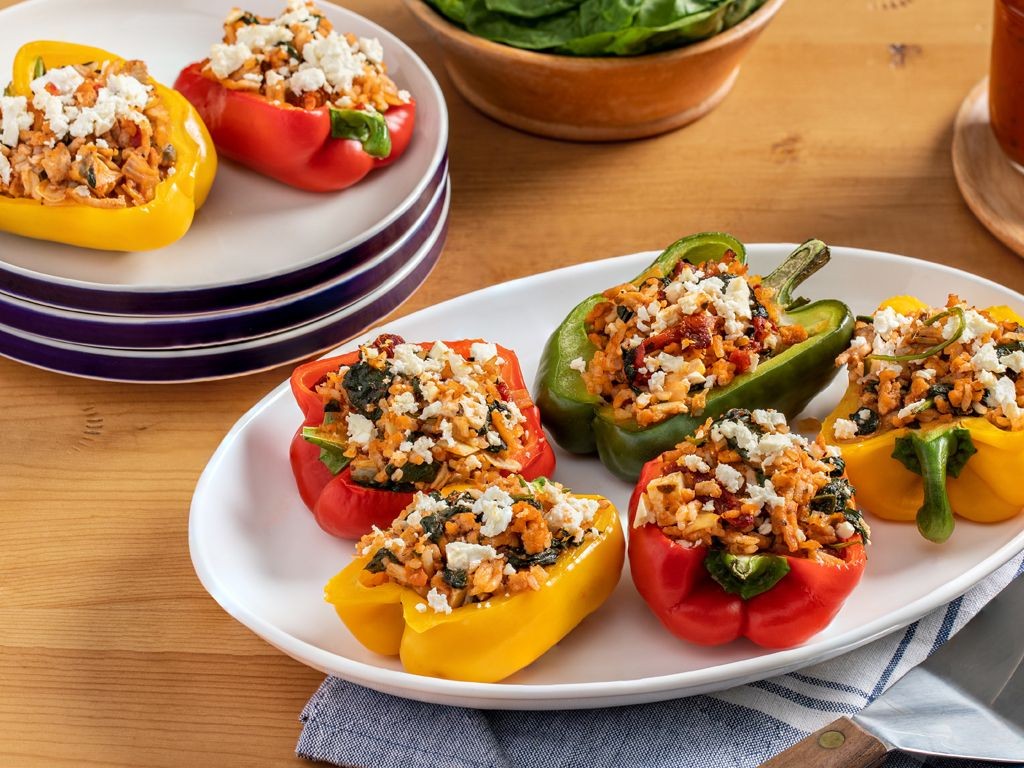
Oh, the humble bell pepper—nature’s edible bowl that’s just begging to be stuffed with something spectacular! Forget bland fillings; we’re loading these vibrant vessels with a hearty, savory mix of artichokes and lentils that’ll make your taste buds do a happy dance. Trust me, this dish is so good, you’ll want to write it a thank-you note.
Ingredients
For the peppers:
– 4 large bell peppers (any color)
– 1 tablespoon olive oil
– Salt to taste
For the filling:
– 1 cup brown lentils, rinsed
– 2 cups vegetable broth
– 1 (14-ounce) can artichoke hearts, drained and chopped
– 1 small yellow onion, diced
– 2 cloves garlic, minced
– 1 teaspoon dried oregano
– 1/2 teaspoon smoked paprika
– 1/4 cup grated Parmesan cheese
For topping:
– 1/2 cup shredded mozzarella cheese
Instructions
1. Preheat your oven to 375°F.
2. Slice the tops off the bell peppers and remove all seeds and membranes.
3. Brush the outside of each pepper with 1 tablespoon of olive oil and sprinkle lightly with salt.
4. Place the peppers upright in a baking dish and bake for 15 minutes to soften slightly.
5. While the peppers bake, combine 1 cup brown lentils and 2 cups vegetable broth in a saucepan.
6. Bring the lentil mixture to a boil, then reduce heat to low, cover, and simmer for 25 minutes until lentils are tender but not mushy.
7. In a skillet over medium heat, sauté 1 diced yellow onion until translucent, about 5 minutes.
8. Add 2 minced garlic cloves and cook for 1 more minute until fragrant.
9. Stir in 1 teaspoon dried oregano and 1/2 teaspoon smoked paprika.
10. Mix in the cooked lentils, 1 can chopped artichoke hearts, and 1/4 cup Parmesan cheese until well combined.
11. Remove the partially baked peppers from the oven and carefully fill each one with the lentil-artichoke mixture.
12. Top each stuffed pepper with 1/2 cup shredded mozzarella cheese divided evenly.
13. Return the peppers to the oven and bake for 20-25 minutes until the cheese is golden and bubbly.
14. Let the peppers rest for 5 minutes before serving to allow the filling to set.
Did you catch that glorious moment when the cheese turned golden? These peppers emerge from the oven with a satisfying contrast—tender-crisp shells giving way to a savory, textured filling where earthy lentils mingle with briny artichokes. Serve them sliced open like edible treasure chests, maybe with a dollop of cool Greek yogurt to balance the richness, and watch them disappear faster than weekend plans.
Artichoke and Asparagus Risotto
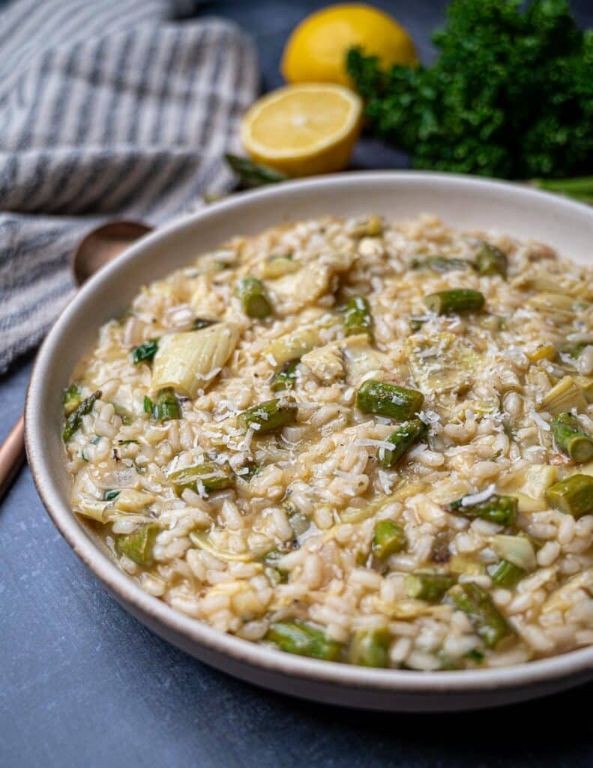
Kick your boring rice routine to the curb, because this artichoke and asparagus risotto is about to become your new culinary crush—creamy, dreamy, and packed with enough green goodness to make your taste buds do a happy dance.
Ingredients
For the Base
- 1 cup Arborio rice
- 4 cups vegetable broth
- 1/2 cup dry white wine
- 1 medium yellow onion, finely chopped
- 2 cloves garlic, minced
- 3 tablespoons olive oil
For the Vegetables and Finish
- 1 cup frozen artichoke hearts, thawed and quartered
- 1 bunch asparagus, trimmed and cut into 1-inch pieces
- 1/2 cup grated Parmesan cheese
- 2 tablespoons unsalted butter
- 1/4 cup chopped fresh parsley
- 1/2 teaspoon salt
- 1/4 teaspoon black pepper
Instructions
- Pour the vegetable broth into a medium saucepan and heat it over medium heat until it simmers, then reduce the heat to low to keep it warm.
- Heat the olive oil in a large, heavy-bottomed pot over medium heat until it shimmers.
- Add the chopped onion and cook for 4–5 minutes, stirring occasionally, until it turns translucent.
- Stir in the minced garlic and cook for 1 minute until fragrant.
- Add the Arborio rice to the pot and toast it for 2 minutes, stirring constantly, until the edges look slightly translucent. Tip: Toasting the rice helps it absorb liquid better without getting mushy.
- Pour in the white wine and cook, stirring continuously, until the liquid is fully absorbed, about 2–3 minutes.
- Ladle 1 cup of the warm broth into the rice and stir until most of the liquid is absorbed, about 4–5 minutes.
- Repeat adding broth 1/2 cup at a time, stirring after each addition until absorbed, for about 20–25 minutes total. Tip: Constant stirring releases the rice’s starches, creating that signature creamy texture.
- Stir in the asparagus pieces and cook for 3–4 minutes until bright green and tender-crisp.
- Add the artichoke hearts and cook for 2 more minutes until heated through.
- Remove the pot from the heat and stir in the Parmesan cheese, butter, salt, and black pepper until melted and combined.
- Fold in the chopped parsley. Tip: Taking the risotto off the heat before adding cheese prevents it from becoming greasy.
Zesty, velvety, and brimming with spring vibes, this risotto boasts a luxuriously creamy texture with pops of tender asparagus and earthy artichoke. Serve it in shallow bowls topped with extra Parmesan and a drizzle of olive oil for a restaurant-worthy finish, or pair it with grilled shrimp for a protein-packed twist that’ll have everyone begging for seconds.
Artichoke and Zucchini Noodles with Pesto
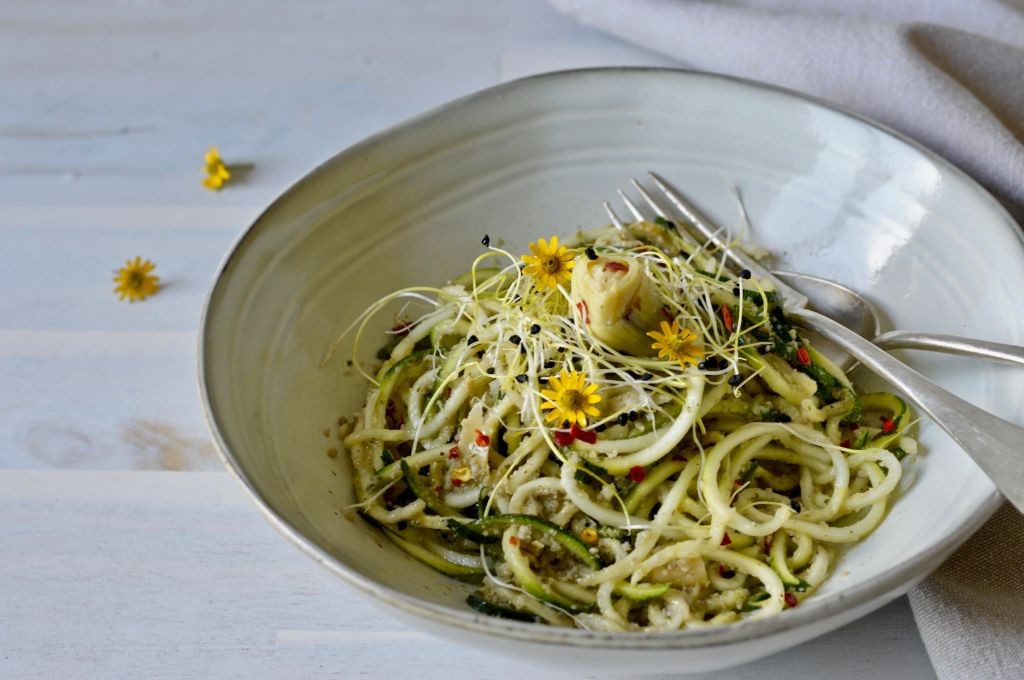
Sick of the same old pasta routine? Let’s spiralize our way to something spectacular with artichoke and zucchini noodles tossed in vibrant pesto—it’s the veggie-packed twist your dinner table has been dreaming of!
Ingredients
For the zucchini noodles:
– 4 medium zucchinis, spiralized into noodles
– 2 tbsp olive oil
– 1/2 tsp salt
For the pesto sauce:
– 2 cups fresh basil leaves
– 1/2 cup grated Parmesan cheese
– 1/3 cup pine nuts
– 2 garlic cloves, minced
– 1/2 cup olive oil
– 1 tbsp lemon juice
– 1/4 tsp black pepper
For assembly:
– 1 (14 oz) can artichoke hearts, drained and quartered
Instructions
1. Spiralize 4 medium zucchinis into noodles using a spiralizer, placing them in a large colander set over a bowl.
2. Sprinkle 1/2 tsp salt evenly over the zucchini noodles and let them sit for 10 minutes to draw out excess moisture—this prevents a watery sauce later.
3. While the zucchini rests, combine 2 cups fresh basil leaves, 1/2 cup grated Parmesan, 1/3 cup pine nuts, 2 minced garlic cloves, 1/2 cup olive oil, 1 tbsp lemon juice, and 1/4 tsp black pepper in a food processor.
4. Pulse the pesto ingredients for 30 seconds, scrape down the sides, then blend for another 30 seconds until smooth and emulsified.
5. Heat 2 tbsp olive oil in a large skillet over medium-high heat until shimmering, about 1 minute.
6. Pat the zucchini noodles dry with paper towels to remove released moisture, then add them to the skillet.
7. Sauté the zucchini noodles for 3–4 minutes, tossing frequently with tongs, until just tender but still al dente—overcooking makes them mushy.
8. Add the quartered artichoke hearts to the skillet and cook for 1 more minute to warm through.
9. Remove the skillet from heat and pour the prepared pesto over the zucchini and artichokes.
10. Toss everything gently until the noodles are evenly coated with pesto, using a folding motion to avoid breaking the zucchini strands.
Kindly note how the zucchini noodles hold their slight crunch against the creamy pesto, while the artichokes add a tender, briny bite. Serve it piled high in shallow bowls with an extra sprinkle of Parmesan, or chill it for a refreshing next-day lunch that somehow tastes even better.
Artichoke and Black Bean Tacos
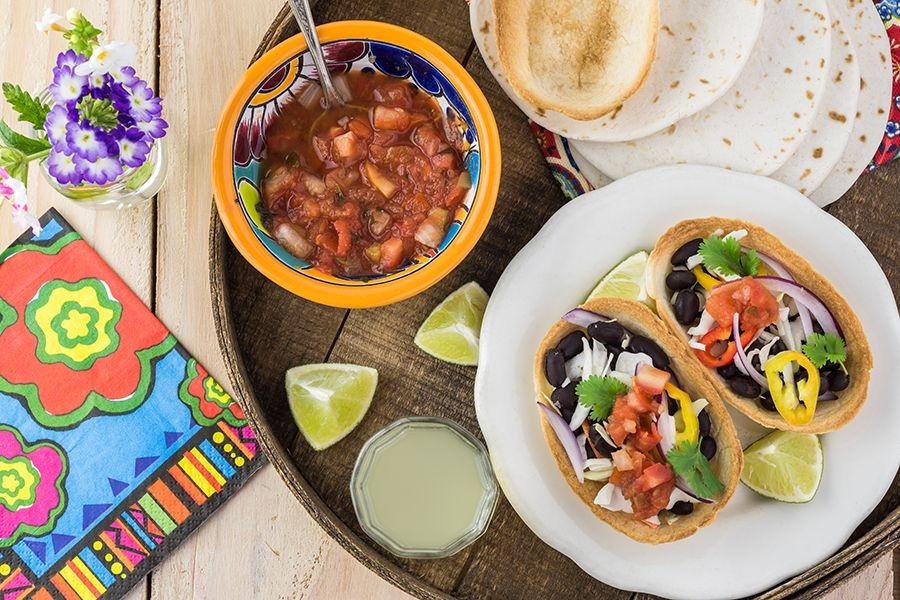
Gather ’round, taco enthusiasts! These artichoke and black bean tacos are about to become your new Tuesday night obsession—they’re so delicious, they might just upstage Taco Tuesday itself. Get ready for a flavor fiesta that’ll make your taste buds do a happy dance!
Ingredients
For the filling:
- 1 tablespoon olive oil
- 1 can (15 oz) black beans, drained and rinsed
- 1 can (14 oz) artichoke hearts, drained and chopped
- 1 teaspoon chili powder
- 1/2 teaspoon cumin
- 1/4 teaspoon garlic powder
- 1/4 teaspoon salt
For assembly:
- 8 small corn tortillas
- 1/2 cup shredded purple cabbage
- 1/4 cup crumbled cotija cheese
- 1/4 cup chopped fresh cilantro
- 1 lime, cut into wedges
Instructions
- Heat 1 tablespoon olive oil in a large skillet over medium heat for 1 minute until shimmering.
- Add the drained black beans and chopped artichoke hearts to the skillet.
- Sprinkle 1 teaspoon chili powder, 1/2 teaspoon cumin, 1/4 teaspoon garlic powder, and 1/4 teaspoon salt over the mixture.
- Cook for 6-8 minutes, stirring occasionally, until the artichokes are lightly browned and the beans are heated through. Tip: Don’t stir too frequently—letting the ingredients sit for a minute creates those delicious crispy bits!
- While the filling cooks, warm 8 corn tortillas in a dry skillet over medium heat for 30 seconds per side until pliable. Tip: Keep warmed tortillas wrapped in a clean kitchen towel to prevent them from drying out.
- Divide the hot filling evenly among the warmed tortillas.
- Top each taco with approximately 1 tablespoon shredded purple cabbage.
- Sprinkle 1/2 tablespoon crumbled cotija cheese over each taco.
- Garnish with 1/2 tablespoon chopped fresh cilantro per taco.
- Serve immediately with lime wedges for squeezing. Tip: Squeeze lime juice over the tacos right before eating to keep the cabbage crisp and bright!
Zesty, vibrant, and utterly satisfying—these tacos deliver a fantastic contrast between the creamy artichokes, hearty beans, and crunchy cabbage. The tangy lime and salty cotija cheese create a flavor party that’ll have you reaching for seconds before you’ve finished your first. Try stacking them high with extra cilantro and an extra squeeze of lime for maximum taco enjoyment!
Artichoke and Farro Salad with Fresh Herbs
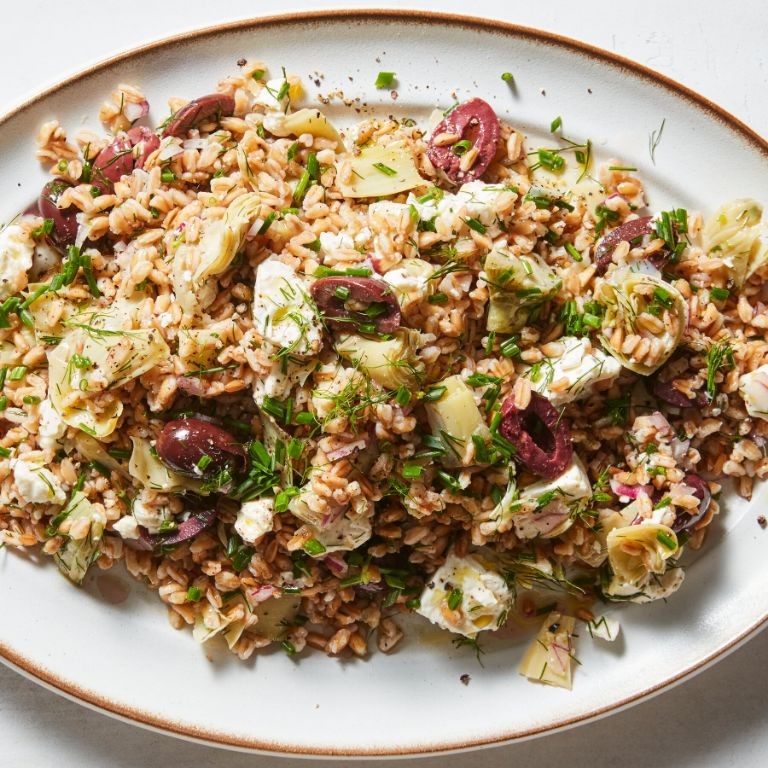
Heck yes, we’re diving fork-first into a salad that actually satisfies! This artichoke and farro situation is the lunch hero you’ve been dreaming about—packed with texture, zing, and enough herby freshness to make your taste buds throw a tiny parade.
Ingredients
- For the farro:
- 1 cup farro
- 3 cups water
- 1 tsp salt
- For the dressing:
- 1/4 cup olive oil
- 2 tbsp lemon juice
- 1 tsp Dijon mustard
- 1/2 tsp black pepper
- For the salad mix-ins:
- 1 (14 oz) can artichoke hearts, drained and chopped
- 1/2 cup chopped parsley
- 1/4 cup chopped mint
- 1/4 cup chopped dill
- 1/2 cup crumbled feta cheese
Instructions
- Rinse 1 cup farro under cold water in a fine-mesh strainer.
- Combine rinsed farro, 3 cups water, and 1 tsp salt in a medium saucepan.
- Bring to a boil over high heat, then reduce heat to low and cover.
- Simmer for 25 minutes until farro is tender but chewy (tip: taste a grain—it should have a pleasant bite, not mush).
- Drain any excess water and spread cooked farro on a baking sheet to cool completely.
- Whisk 1/4 cup olive oil, 2 tbsp lemon juice, 1 tsp Dijon mustard, and 1/2 tsp black pepper in a large bowl.
- Add cooled farro to the dressing and toss to coat evenly.
- Fold in 1 can drained and chopped artichoke hearts, 1/2 cup chopped parsley, 1/4 cup chopped mint, and 1/4 cup chopped dill (tip: tear herbs gently to release more fragrance).
- Gently mix in 1/2 cup crumbled feta cheese (tip: reserve a sprinkle for garnish if you’re feeling fancy).
- Chill salad in refrigerator for at least 30 minutes before serving.
Finally, behold your masterpiece! This salad boasts a fantastic chew from the farro, bright pops from the herbs, and a tangy dressing that ties it all together. Serve it piled high in a hollowed-out tomato for a edible bowl situation, or alongside grilled chicken for a protein-powered plate—either way, it’s a texture party in your mouth.
Artichoke and Cauliflower Rice Pilaf
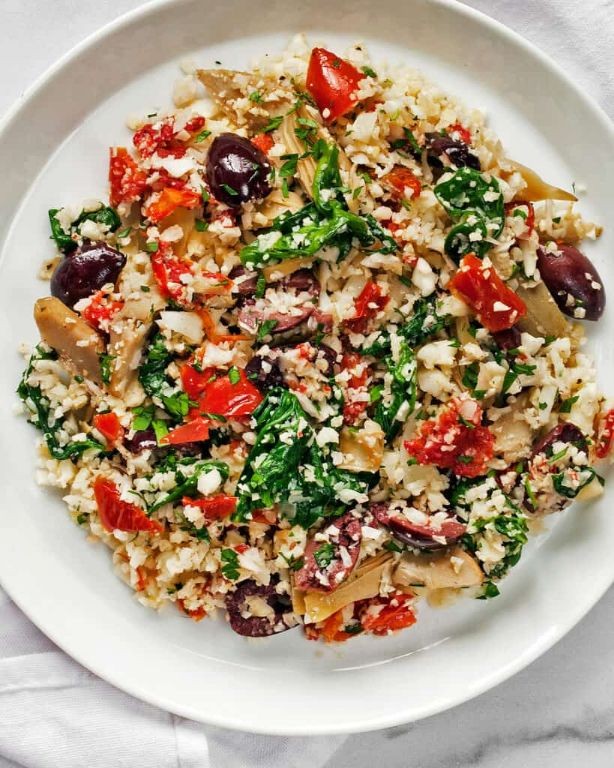
Kick those boring side dishes to the curb, folks, because this artichoke and cauliflower rice pilaf is about to become the Beyoncé of your dinner table—always stealing the show and leaving everyone wanting an encore. Who knew something so virtuous could pack this much personality? It’s the side dish that moonlights as the main event, proving that eating your veggies doesn’t have to feel like a chore.
Ingredients
For the base:
– 1 tbsp olive oil
– 1 small yellow onion, diced
– 2 cloves garlic, minced
– 4 cups cauliflower rice
– 1 cup vegetable broth
For the mix-ins:
– 1 (14 oz) can artichoke hearts, drained and quartered
– 1/4 cup chopped fresh parsley
– 2 tbsp lemon juice
– 1/2 tsp salt
– 1/4 tsp black pepper
Instructions
1. Heat 1 tbsp olive oil in a large skillet over medium heat until shimmering.
2. Add 1 small diced yellow onion and cook for 5 minutes, stirring occasionally, until translucent.
3. Add 2 minced garlic cloves and cook for 1 minute until fragrant.
4. Stir in 4 cups cauliflower rice and cook for 3 minutes, breaking up any clumps with your spoon.
5. Pour in 1 cup vegetable broth and bring to a simmer.
6. Reduce heat to medium-low, cover, and cook for 8 minutes until cauliflower is tender.
7. Uncover and stir in 1 can quartered artichoke hearts.
8. Cook uncovered for 3 minutes until most liquid has evaporated.
9. Remove from heat and stir in 1/4 cup chopped parsley, 2 tbsp lemon juice, 1/2 tsp salt, and 1/4 tsp black pepper.
Tip: Don’t skip cooking the cauliflower rice dry first—it prevents sogginess and gives that perfect pilaf texture.
Tip: Quarter the artichokes rather than leaving them whole for better distribution in every bite.
Tip: Let it sit off heat for 2 minutes before serving to allow flavors to meld beautifully.
Ultimately, you’ll be rewarded with a pilaf that’s simultaneously fluffy and substantial, where the cauliflower rice provides a nutty base for the bright, briny artichokes to shine. The lemon juice cuts through beautifully, making each forkful feel fresh and vibrant. Try stuffing it into bell peppers before baking at 375°F for 20 minutes, or serve it alongside grilled chicken where it’ll happily soak up any pan juices.
Summary
Ready to transform your meals? These 20 healthy artichoke recipes offer endless inspiration for breakfast, lunch, and dinner. We hope you find new favorites to add to your rotation! Don’t forget to leave a comment sharing which recipe you loved most and pin this article to your Pinterest boards so you can easily return to these delicious ideas.