
There’s something magical about firing up the indoor grill—it transforms simple ingredients into mouthwatering meals with those beautiful char marks we all love. Whether you’re craving quick weeknight dinners, hosting weekend gatherings, or just want to enjoy grilled flavors year-round, these 20 recipes will become your new go-tos. Get ready to discover delicious dishes that make every occasion feel special!
Indoor Grilled Garlic Butter Shrimp
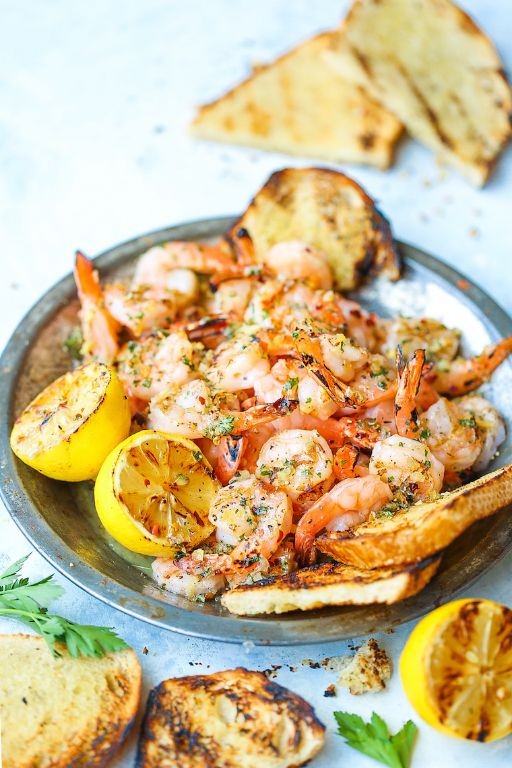
Finally, let’s tackle a restaurant favorite you can easily recreate at home—even without an outdoor grill. Follow these methodical steps for perfectly cooked Indoor Grilled Garlic Butter Shrimp that will impress any dinner guest. This approach ensures juicy, flavorful results every single time.
Ingredients
– 1 lb large raw shrimp, peeled and deveined (I always buy wild-caught for superior flavor)
– 3 tbsp unsalted butter (I prefer European-style for its rich taste)
– 4 garlic cloves, minced (fresh is essential—no jarred substitutes here)
– 1 tbsp fresh lemon juice (squeezed right before using for maximum brightness)
– 1 tsp smoked paprika (this adds that outdoor grill flavor we’re mimicking)
– ½ tsp kosher salt (I find it distributes more evenly than table salt)
– ¼ tsp black pepper, freshly ground
– 2 tbsp chopped fresh parsley (for that final fresh pop of color and flavor)
Instructions
1. Pat the shrimp completely dry with paper towels to ensure proper searing.
2. Season the shrimp evenly with smoked paprika, kosher salt, and black pepper.
3. Preheat a cast iron grill pan over medium-high heat for 5 minutes until smoking hot.
4. Place shrimp in a single layer on the hot grill pan, cooking for 2 minutes undisturbed.
5. Flip each shrimp using tongs and cook for exactly 1 more minute until opaque.
6. Transfer the cooked shrimp to a clean plate immediately to prevent overcooking.
7. Reduce the heat to medium and add butter to the same pan.
8. Cook the butter for 1 minute until foamy but not browned.
9. Add minced garlic and sauté for 30 seconds until fragrant but not burnt.
10. Remove the pan from heat and stir in fresh lemon juice.
11. Return the shrimp to the pan and toss gently to coat in the garlic butter sauce.
12. Sprinkle with fresh parsley and serve immediately.
Crispy-edged shrimp with tender interiors soak up the rich garlic butter beautifully. The smoky paprika creates that outdoor grill illusion while the lemon cuts through the richness perfectly. Try serving these over creamy polenta or tossing them with fresh pasta for a complete meal that feels restaurant-worthy.
Smoky BBQ Pulled Pork Sliders
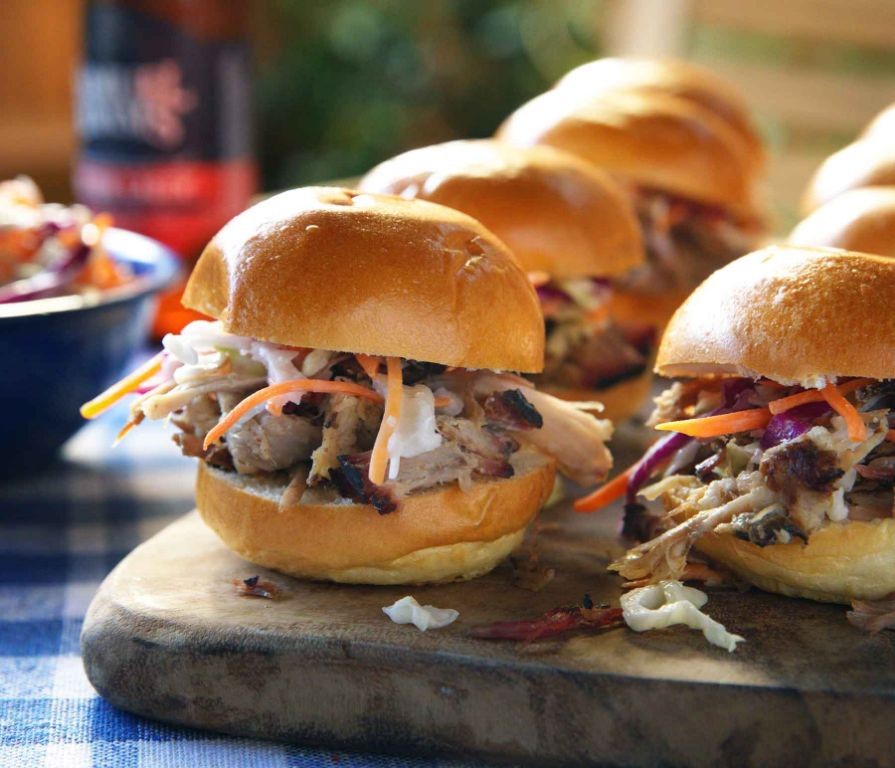
Brace yourself for the most tender, smoky pulled pork you’ll ever make at home. These sliders transform a humble pork shoulder into a crowd-pleasing masterpiece through slow, patient cooking. Even beginners can achieve barbecue joint-quality results with this methodical approach.
Ingredients
- 4 lb pork shoulder roast (I look for one with good marbling for maximum juiciness)
- 2 tbsp brown sugar (dark brown gives the best caramelization)
- 1 tbsp smoked paprika (this is where that signature smokiness comes from)
- 2 tsp garlic powder (fresh minced garlic can burn during long cooking)
- 1 tsp onion powder
- 1 tsp black pepper (freshly cracked makes a noticeable difference)
- 1 tsp salt (I use coarse kosher salt for better distribution)
- 1/2 cup apple cider vinegar (the acidity helps tenderize the meat)
- 1/4 cup ketchup (this forms the base of our simple BBQ sauce)
- 12 slider buns (brioche buns are my favorite for their buttery richness)
- 1 cup coleslaw (homemade or store-bought – I like the crunchy contrast)
Instructions
- Preheat your oven to 300°F and position the rack in the center.
- Pat the pork shoulder completely dry with paper towels to ensure proper browning.
- Combine brown sugar, smoked paprika, garlic powder, onion powder, black pepper, and salt in a small bowl.
- Rub the spice mixture evenly over all surfaces of the pork shoulder, pressing gently to adhere.
- Place the seasoned pork shoulder in a Dutch oven or oven-safe pot with the fat cap facing up.
- Cover the pot tightly with its lid and transfer to the preheated oven.
- Roast for 4 hours without opening the oven door to maintain consistent temperature.
- Check for doneness by inserting a fork into the meat – it should twist easily with no resistance.
- Transfer the pork to a cutting board, reserving all cooking juices in the pot.
- Use two forks to shred the pork, discarding any large pieces of fat.
- Whisk apple cider vinegar and ketchup into the reserved cooking juices to create the sauce.
- Return the shredded pork to the pot and stir to coat evenly with the sauce.
- Split the slider buns and arrange them cut-side up on a baking sheet.
- Toast the buns in the oven at 350°F for 3-4 minutes until lightly golden.
- Spoon the saucy pulled pork onto the bottom halves of the toasted buns.
- Top each slider with a generous tablespoon of coleslaw.
- Place the top bun halves over the coleslaw to complete the sliders.
Creating the perfect slider involves balancing textures and flavors. The tender, smoky pork contrasts beautifully with the crisp, cool coleslaw, while the soft brioche bun soaks up the tangy sauce. Consider serving these with pickle spears on the side for an extra burst of acidity that cuts through the richness.
Grilled Teriyaki Salmon with Pineapple
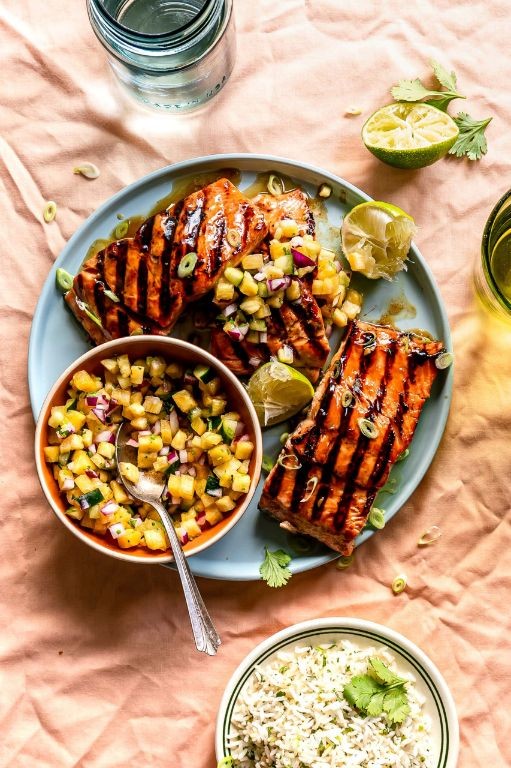
Unbelievably simple yet impressively flavorful, this grilled teriyaki salmon with pineapple transforms ordinary weeknight dinners into something special. Using just a handful of ingredients, you’ll create a dish that balances sweet, savory, and smoky notes perfectly. Let me guide you through each step to ensure your salmon turns out moist and flaky every time.
Ingredients
- 4 salmon fillets (6 oz each) – I prefer skin-on for extra crispy texture
- 1 cup teriyaki sauce – look for one with real ginger and garlic
- 2 tbsp olive oil – extra virgin adds nice fruity notes
- 1 fresh pineapple – sliced into 1-inch rings, core removed
- 2 tbsp brown sugar – this helps create that beautiful caramelized glaze
- 1 tsp sesame seeds – for that final decorative touch
Instructions
- Pat the salmon fillets completely dry with paper towels – this ensures proper searing and prevents steaming.
- Brush both sides of each salmon fillet evenly with 2 tablespoons of olive oil.
- Season the salmon fillets generously with salt and pepper on both sides.
- Preheat your grill to medium-high heat, approximately 400°F, and oil the grates thoroughly.
- Place pineapple rings directly on the hot grill and cook for 3-4 minutes per side until you see distinct grill marks.
- Transfer grilled pineapple to a cutting board and chop into 1-inch chunks.
- Place salmon fillets skin-side up on the grill and cook for exactly 4 minutes without moving them.
- Flip the salmon carefully using a spatula and immediately brush with ½ cup of teriyaki sauce.
- Sprinkle 1 tablespoon of brown sugar evenly over the sauced salmon fillets.
- Cook for another 4-5 minutes until the internal temperature reaches 125°F for medium doneness.
- Remove salmon from grill and let rest for 3 minutes – this allows juices to redistribute throughout the fish.
- Arrange grilled pineapple chunks around the plated salmon and drizzle with remaining teriyaki sauce.
- Sprinkle 1 teaspoon of sesame seeds over the entire dish for visual appeal and nutty flavor.
That tender, flaky salmon paired with caramelized pineapple creates a textural symphony in every bite. The sweet teriyaki glaze beautifully contrasts with the smoky char from the grill, making this dish feel both elegant and approachable. Try serving it over coconut rice or alongside grilled asparagus for a complete meal that will have everyone asking for seconds.
Indoor Grilled Portobello Mushroom Burgers
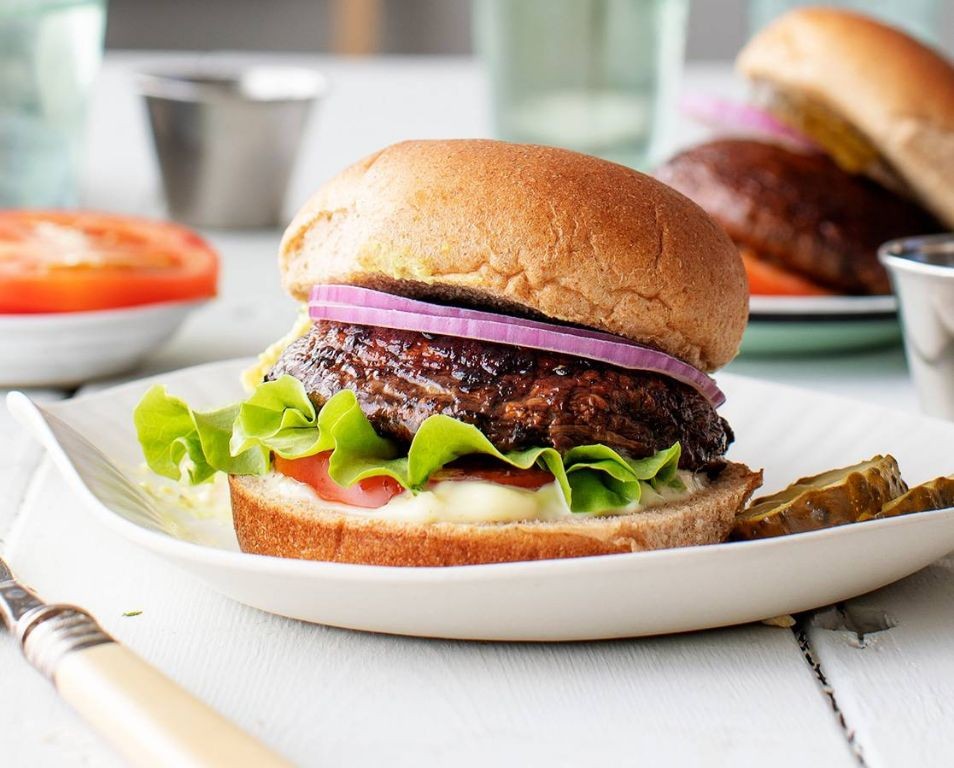
Whether you’re craving a meaty burger without the meat or just want to embrace mushroom season, these indoor grilled portobello burgers deliver incredible smoky flavor right from your stovetop. We’ll walk through each step methodically so even first-time mushroom cooks can achieve perfect results. You’ll be amazed how simple techniques transform these humble caps into juicy, satisfying burgers.
Ingredients
– 4 large portobello mushroom caps (look for ones with deep, dark gills)
– 3 tablespoons extra virgin olive oil (my go-to for its fruity notes)
– 2 tablespoons balsamic vinegar (the good stuff makes a difference)
– 2 teaspoons soy sauce (I prefer reduced-sodium for better control)
– 2 garlic cloves, minced (freshly minced releases the most flavor)
– 1 teaspoon smoked paprika (this is key for that grilled taste)
– 4 burger buns (brioche buns are my favorite for their softness)
– 4 slices provolone cheese (it melts beautifully over the mushrooms)
Instructions
1. Gently wipe the portobello caps with a damp paper towel to clean them, avoiding soaking which makes them watery.
2. Carefully remove the stems and use a spoon to scrape out the dark gills—this prevents bitterness and helps the marinade penetrate.
3. In a medium bowl, whisk together the olive oil, balsamic vinegar, soy sauce, minced garlic, and smoked paprika until fully combined.
4. Place the cleaned mushroom caps in the marinade, turning them several times to coat all surfaces evenly.
5. Let the mushrooms marinate for exactly 15 minutes at room temperature, turning them halfway through for even absorption.
6. Heat a grill pan over medium-high heat until droplets of water sizzle and evaporate immediately upon contact.
7. Place the marinated mushrooms gill-side down on the hot grill pan, hearing that satisfying sizzle.
8. Cook for 4-5 minutes until deep grill marks form and the edges begin to look tender.
9. Flip the mushrooms using tongs and cook another 4-5 minutes until they’re tender but still hold their shape.
10. Place one slice of provolone cheese on each mushroom during the last minute of cooking to melt perfectly.
11. While mushrooms cook, lightly toast the burger buns in a separate dry pan until golden brown, about 2 minutes per side.
12. Transfer the cheesy mushrooms to the toasted buns using a spatula, pouring any remaining pan juices over them.
You’ll notice the mushrooms have a surprisingly meaty texture that holds up beautifully against the melted provolone. The smoky paprika and balsamic create deep, complex flavors that make this feel far from a compromise burger. Try serving them with sweet potato fries or a crisp apple slaw for contrasting textures that elevate the whole meal.
Garlic Butter Grilled Steak Bites
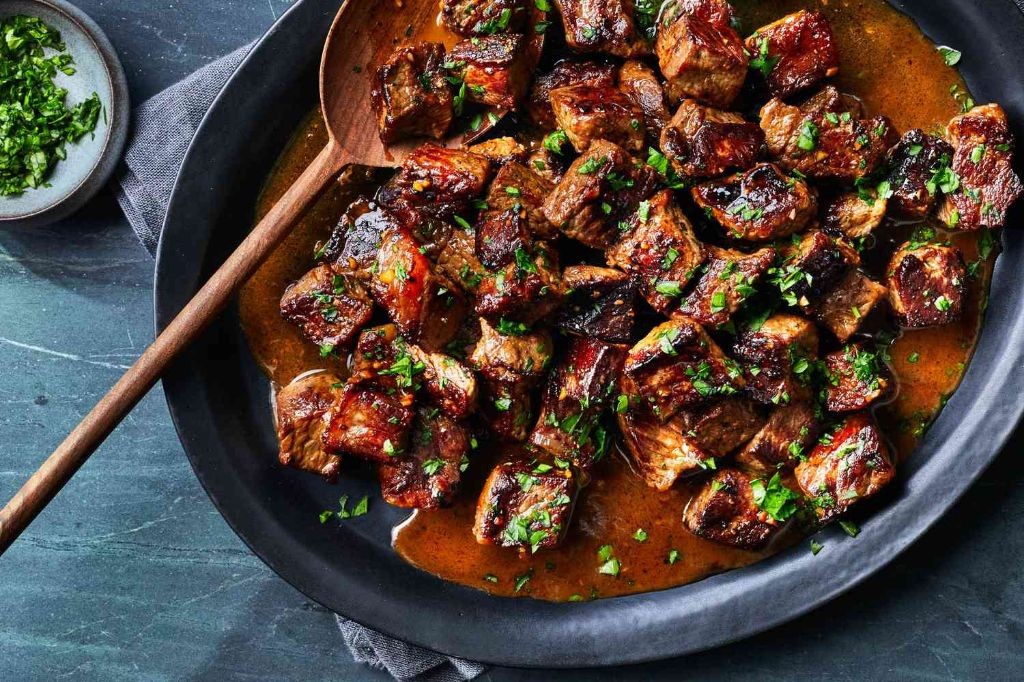
Zesty and satisfying, these garlic butter grilled steak bites transform simple ingredients into a restaurant-quality meal right in your backyard. Let’s walk through each step together to ensure perfectly seared, juicy steak every single time.
Ingredients
– 1.5 lbs sirloin steak, cut into 1-inch cubes (I prefer sirloin for its balance of flavor and tenderness)
– 3 tbsp unsalted butter (I always use unsalted to control the salt level)
– 4 garlic cloves, minced (fresh garlic makes all the difference here)
– 1 tbsp olive oil (extra virgin olive oil is my go-to for its fruity notes)
– 1 tsp kosher salt (I find kosher salt adheres better to meat than table salt)
– ½ tsp black pepper, freshly ground (freshly ground pepper has more aromatic oils)
– 2 tbsp fresh parsley, chopped (flat-leaf parsley holds up better to heat than curly)
Instructions
1. Pat the steak cubes completely dry with paper towels to ensure a proper sear.
2. Season the steak cubes evenly on all sides with kosher salt and freshly ground black pepper.
3. Preheat your grill to high heat, approximately 450°F, for 15 minutes with the lid closed.
4. Brush the grill grates lightly with olive oil to prevent sticking.
5. Place steak cubes in a single layer on the hot grill, leaving space between each piece.
6. Grill for 3 minutes without moving to develop a deep brown crust on one side.
7. Flip each steak cube using tongs and grill for another 3 minutes for medium-rare.
8. Transfer grilled steak bites to a clean bowl using tongs.
9. Melt unsalted butter in a small saucepan over medium heat on your stovetop.
10. Add minced garlic to the melted butter and cook for 1 minute until fragrant but not browned.
11. Pour the garlic butter sauce over the grilled steak bites in the bowl.
12. Toss the steak bites gently to coat evenly with the garlic butter sauce.
13. Sprinkle chopped fresh parsley over the steak bites and toss once more.
14. Let the steak bites rest for 5 minutes before serving to allow juices to redistribute.
Vibrantly golden with crisp-edged crusts giving way to tender, pink centers, these steak bites deliver a powerful garlic butter punch that mellows into rich savoriness. Serve them straight from the bowl with toothpicks for easy entertaining, or pile them over creamy mashed potatoes to soak up every drop of that glorious butter sauce.
Indoor Grilled Fish Tacos with Mango Salsa
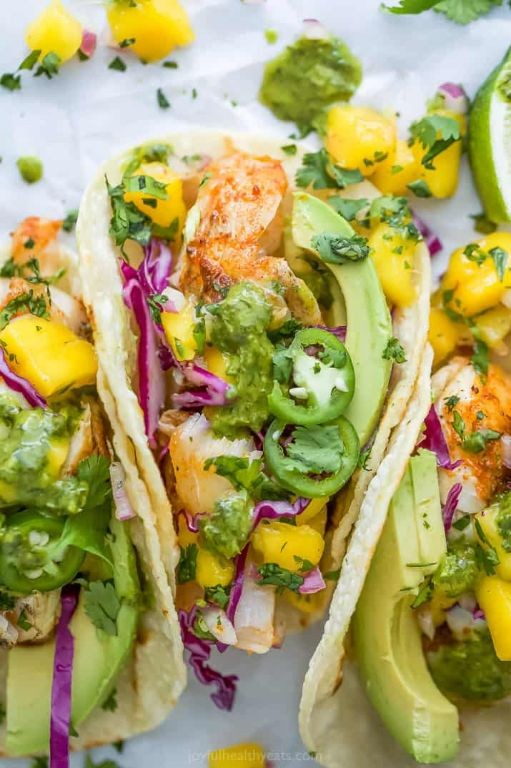
Now, let’s create these vibrant indoor grilled fish tacos that bring tropical flavors right to your kitchen, perfect for when outdoor grilling isn’t an option but you’re craving that smoky, fresh taste. Nothing beats the combination of flaky fish and sweet mango salsa wrapped in warm tortillas. This method ensures you get restaurant-quality results with simple indoor equipment.
Ingredients
– 1 lb white fish fillets like tilapia or cod (I find tilapia holds up beautifully for indoor cooking)
– 2 tbsp olive oil (extra virgin is my go-to for its fruity notes)
– 1 tsp chili powder
– 1/2 tsp cumin
– 1/2 tsp garlic powder
– 1/2 tsp salt
– 8 small corn tortillas (warmed tortillas make all the difference)
– 1 ripe mango, diced (choose one that gives slightly when pressed)
– 1/4 cup red onion, finely chopped
– 1 jalapeño, seeded and minced (remove seeds unless you like extra heat)
– 2 tbsp fresh cilantro, chopped
– 1 lime, juiced (freshly squeezed lime juice brightens everything up)
– 1/4 tsp salt
Instructions
1. Pat the fish fillets completely dry with paper towels to ensure proper searing.
2. Combine chili powder, cumin, garlic powder, and 1/2 teaspoon salt in a small bowl.
3. Rub the spice mixture evenly over both sides of the fish fillets.
4. Heat a grill pan or heavy skillet over medium-high heat until droplets of water sizzle immediately.
5. Brush the hot pan with 1 tablespoon of olive oil using a silicone brush.
6. Place fish fillets in the pan and cook for 3-4 minutes without moving them.
7. Flip the fish carefully using a thin spatula when the edges appear opaque.
8. Cook for another 3-4 minutes until the fish flakes easily with a fork.
9. Transfer the cooked fish to a clean plate and let rest for 2 minutes.
10. While fish rests, combine diced mango, red onion, jalapeño, cilantro, lime juice, and 1/4 teaspoon salt in a medium bowl.
11. Gently toss the mango salsa ingredients until well combined.
12. Warm the corn tortillas in a dry skillet over medium heat for 30 seconds per side.
13. Flake the rested fish into large chunks using two forks.
14. Divide the flaked fish evenly among the warmed tortillas.
15. Top each taco with 2 tablespoons of mango salsa.
Delightfully, the flaky fish contrasts beautifully with the crisp, sweet mango salsa, creating layers of texture in every bite. For a creative twist, serve these tacos with a side of black beans or chipotle crema, or pack them for a colorful lunch that travels surprisingly well.
Grilled Vegetable Panini with Pesto
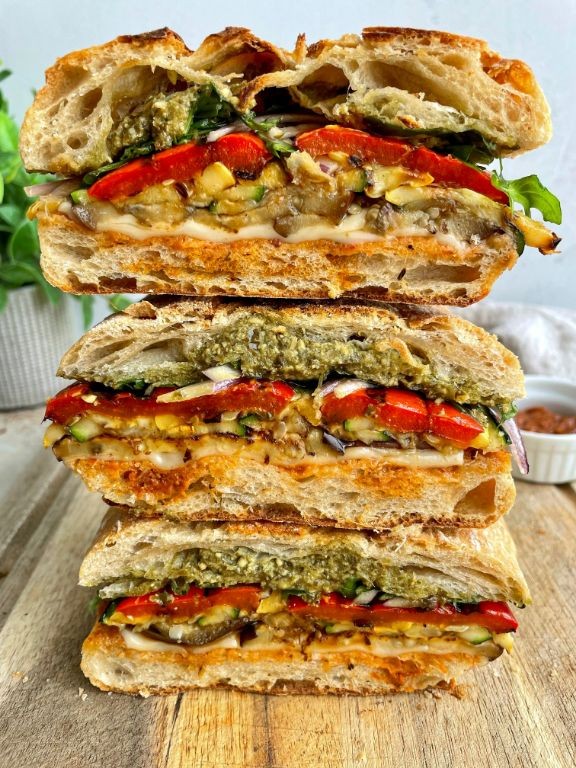
Nothing beats the satisfying crunch of a perfectly grilled panini, especially when it’s packed with colorful vegetables and vibrant pesto. Now let’s walk through this simple yet impressive sandwich step by step, perfect for beginners looking to master grilled vegetable techniques. You’ll be amazed at how these basic ingredients transform into something truly special.
Ingredients
– 2 tablespoons extra virgin olive oil (my go-to for its fruity notes)
– 1 medium zucchini, sliced lengthwise into ¼-inch strips (choose firm, glossy ones)
– 1 red bell pepper, seeded and quartered (I love the sweetness of red over green)
– 1 small red onion, sliced into ½-inch rounds (keep the root end intact for easier grilling)
– 4 slices provolone cheese (the mild meltiness is perfect here)
– ¼ cup prepared basil pesto (homemade or quality store-bought both work great)
– 4 slices sourdough bread (my favorite for its sturdy texture)
Instructions
1. Preheat your panini press to 375°F or heat a grill pan over medium-high heat.
2. Brush zucchini strips lightly with 1 tablespoon olive oil on both sides.
3. Place zucchini on the hot press or pan and grill for 3 minutes until you see clear grill marks.
4. Flip zucchini and grill for another 2 minutes until tender but still slightly firm.
5. Brush bell pepper quarters with remaining olive oil and place skin-side down on the grill.
6. Grill peppers for 4 minutes until skins begin to blister and char.
7. Flip peppers and grill for 3 more minutes until slightly softened.
8. Place onion rounds on the grill and cook for 3 minutes per side until lightly charred.
9. Remove all vegetables from heat and let rest for 2 minutes to redistribute juices.
10. Spread 1 tablespoon pesto evenly on two bread slices.
11. Layer grilled vegetables evenly over the pesto-covered slices.
12. Place two slices of provolone cheese over the vegetable layers.
13. Top with remaining bread slices and press sandwiches together gently.
14. Place assembled sandwiches in the panini press and grill for 4-5 minutes until bread is golden brown and cheese is melted.
15. Remove from press and let sandwiches rest for 1 minute before slicing.
Finally, that first bite reveals the wonderful contrast between the crispy, golden bread and the tender, smoky vegetables. The melted provolone binds everything together while the pesto adds a fresh, herbal brightness that cuts through the richness. For a fun twist, try serving these panini with a simple arugula salad dressed with lemon vinaigrette to complement the sandwich’s warm, savory flavors.
Smoky Grilled Lamb Chops with Mint Yogurt
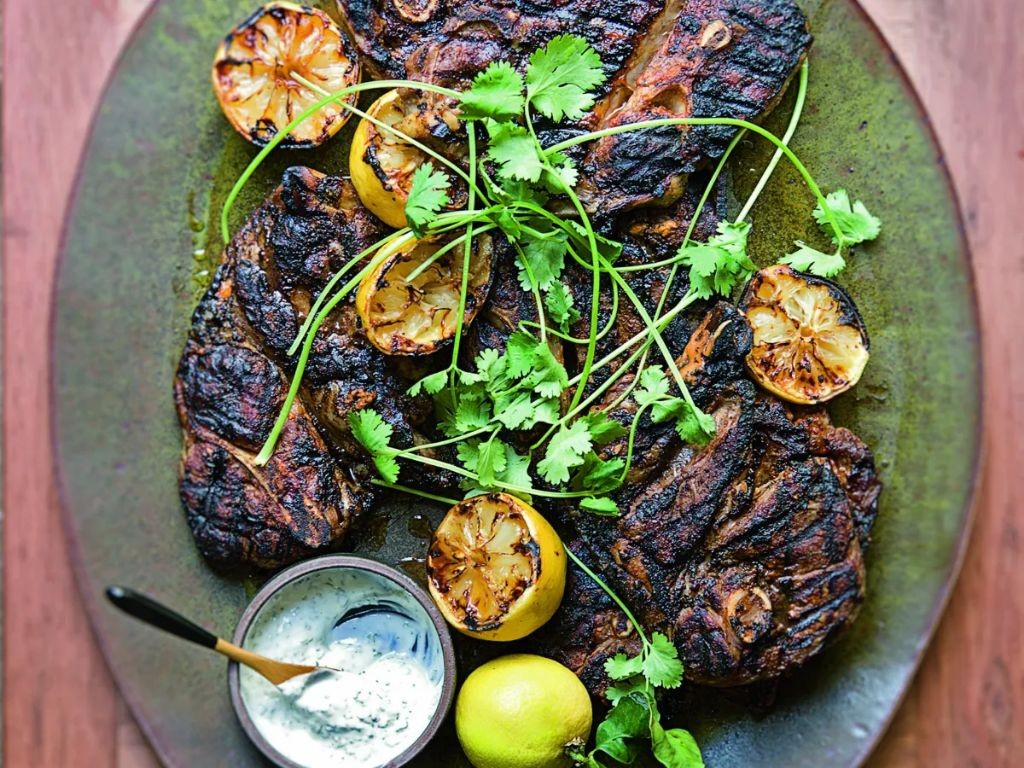
Cooking perfectly grilled lamb chops doesn’t require chef-level skills—just follow these straightforward steps for tender, smoky results every time. Creating this dish involves simple preparation and careful timing to achieve that beautiful charred exterior while keeping the interior juicy and flavorful. Let’s walk through the process together, from seasoning to serving.
Ingredients
- 8 lamb chops, about 1-inch thick (I find this thickness gives the perfect balance of char and juiciness)
- 2 tablespoons extra virgin olive oil (my go-to for its fruity notes that complement the lamb)
- 2 teaspoons smoked paprika (this creates that wonderful smoky flavor without needing specialty equipment)
- 1 teaspoon garlic powder (I prefer powder over fresh here as it won’t burn on the grill)
- 1 teaspoon kosher salt (the larger crystals adhere beautifully to the meat)
- ½ teaspoon black pepper, freshly ground (always grind it fresh for maximum aroma)
- 1 cup plain Greek yogurt (the thick texture holds up better than regular yogurt)
- ¼ cup fresh mint leaves, finely chopped (I grow mint in my garden specifically for this recipe)
- 1 tablespoon lemon juice (freshly squeezed makes all the difference)
- ¼ teaspoon salt for the yogurt sauce
Instructions
- Pat the lamb chops completely dry with paper towels to ensure proper browning.
- Brush both sides of each lamb chop evenly with the 2 tablespoons of olive oil.
- Combine the smoked paprika, garlic powder, 1 teaspoon kosher salt, and black pepper in a small bowl.
- Rub the spice mixture thoroughly over all surfaces of the lamb chops.
- Let the seasoned lamb chops rest at room temperature for 30 minutes to take the chill off—this helps them cook more evenly.
- While the lamb rests, prepare the mint yogurt by combining the Greek yogurt, chopped mint, lemon juice, and ¼ teaspoon salt in a medium bowl.
- Whisk the yogurt mixture until completely smooth and well combined.
- Refrigerate the mint yogurt sauce while you grill the lamb to allow the flavors to meld.
- Preheat your grill to medium-high heat, approximately 425°F, and clean the grates thoroughly.
- Place the lamb chops on the hot grill at a 45-degree angle to create attractive cross-hatch marks.
- Grill for 4 minutes without moving them to develop a good sear.
- Flip the lamb chops using tongs and grill for another 3-4 minutes for medium-rare (130°F internal temperature).
- Transfer the grilled lamb chops to a clean plate and let them rest for 5 minutes—this crucial step allows the juices to redistribute throughout the meat.
- Serve the rested lamb chops with the chilled mint yogurt sauce on the side.
These lamb chops emerge with a satisfying crust that gives way to tender, pink-centered meat. The smoky paprika creates depth while the cool mint yogurt provides a refreshing contrast that cuts through the richness. Try serving them over a bed of couscous with grilled vegetables for a complete meal that feels both elegant and approachable.
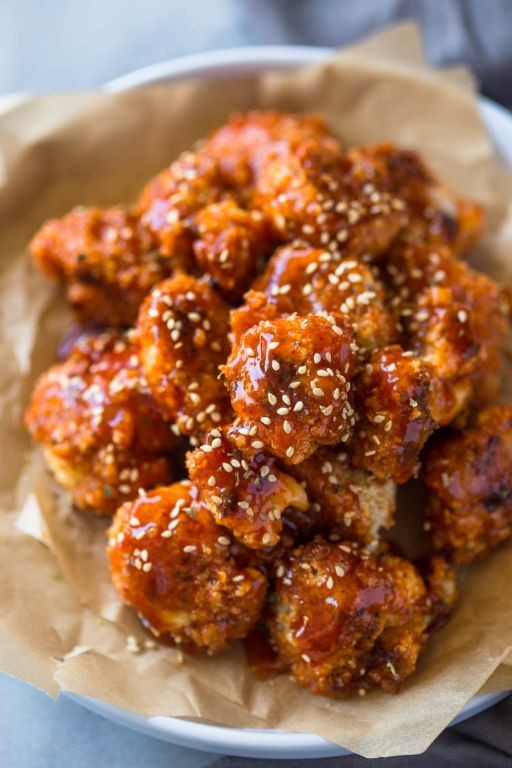
Grilled Honey Sriracha Cauliflower
Baking up something truly special doesn’t always require meat—sometimes, the humble cauliflower steals the show. Grilled Honey Sriracha Cauliflower combines sweet, spicy, and smoky flavors in a way that’s both approachable and impressive, perfect for weeknight dinners or weekend cookouts. Let’s walk through each step together, so you can master this dish with confidence.
Ingredients
– 1 large head of cauliflower, cut into 1-inch thick steaks (I find this size holds up best on the grill without falling apart)
– 3 tbsp extra virgin olive oil (my go-to for its fruity notes that complement the spice)
– 1/4 cup honey (local honey adds a lovely floral touch, if you have it)
– 2 tbsp Sriracha sauce (adjust based on your heat preference—I like it bold!)
– 2 tbsp soy sauce (use low-sodium to control saltiness)
– 2 cloves garlic, minced (freshly minced gives the best punch)
– 1 tsp smoked paprika (this adds a subtle smokiness even before grilling)
– 1/2 tsp black pepper, freshly ground (it makes a difference in flavor)
– 1/4 cup chopped green onions, for garnish (they add a fresh crunch at the end)
Instructions
1. Preheat your grill to medium-high heat, aiming for 400°F, and lightly oil the grates to prevent sticking.
2. In a small bowl, whisk together the honey, Sriracha, soy sauce, minced garlic, smoked paprika, and black pepper until fully combined.
3. Brush both sides of the cauliflower steaks evenly with the olive oil, ensuring they’re lightly coated to help with browning.
4. Place the cauliflower steaks directly on the preheated grill and cook for 5–7 minutes, until grill marks appear and the edges start to soften.
5. Flip the cauliflower carefully using tongs and grill for another 5–7 minutes, until tender but still firm—a fork should pierce easily without mushiness.
6. Brush the honey-Sriracha mixture generously over the top of the cauliflower steaks during the last 2 minutes of grilling to caramelize the glaze.
7. Remove the cauliflower from the grill and transfer to a serving plate, sprinkling with chopped green onions for a fresh finish.
A perfectly grilled cauliflower steak offers a tender-yet-meaty texture with a sticky, sweet-heat glaze that’s downright addictive. Serve it over a bed of quinoa for a complete meal, or slice it into strips and tuck into tacos with a squeeze of lime—it’s versatile enough to shine in any setting.
Indoor Grilled Chicken Fajitas

Tired of waiting for perfect grilling weather? These indoor grilled chicken fajitas deliver that smoky char you crave without ever stepping outside. Today we’ll walk through each step methodically to ensure your chicken stays juicy while developing that beautiful sear.
Ingredients
– 1.5 lbs chicken breasts (I always slice against the grain for maximum tenderness)
– 2 bell peppers, any color (I love using one red and one yellow for visual appeal)
– 1 large yellow onion (sweet varieties work beautifully here)
– 3 tbsp olive oil (extra virgin is my go-to for its fruity notes)
– 2 tbsp fajita seasoning (homemade blend beats store-bought every time)
– 1 tsp kosher salt (the larger crystals distribute more evenly)
– 8 flour tortillas (warmed tortillas make all the difference)
– 1 lime (freshly squeezed juice brightens everything up)
Instructions
1. Slice 1.5 lbs chicken breasts into ½-inch thick strips against the grain.
2. Cut 2 bell peppers and 1 large yellow onion into uniform ¼-inch strips.
3. Combine chicken strips with 3 tbsp olive oil, 2 tbsp fajita seasoning, and 1 tsp kosher salt in a bowl.
4. Marinate the chicken for 15 minutes at room temperature (tip: room temp meat sears better).
5. Heat a cast-iron skillet over medium-high heat until water droplets sizzle immediately.
6. Add marinated chicken in a single layer, cooking for 4 minutes undisturbed.
7. Flip chicken strips and cook for another 3 minutes until internal temperature reaches 165°F.
8. Remove chicken and add sliced peppers and onions to the hot skillet.
9. Cook vegetables for 6-7 minutes, stirring only occasionally to develop char (tip: less stirring means better caramelization).
10. Return chicken to skillet and toss with vegetables for 1 minute.
11. Warm 8 flour tortillas in a dry skillet for 30 seconds per side (tip: watch for light brown spots indicating perfect warmth).
12. Squeeze fresh lime juice over the chicken and vegetable mixture.
Gorgeous char marks contrast with the tender chicken, while the lime cuts through the richness beautifully. Serve these immediately with warm tortillas and let everyone build their own perfect bundles—the sizzling skillet makes for quite the tableside presentation.
Grilled Caprese Stuffed Avocados
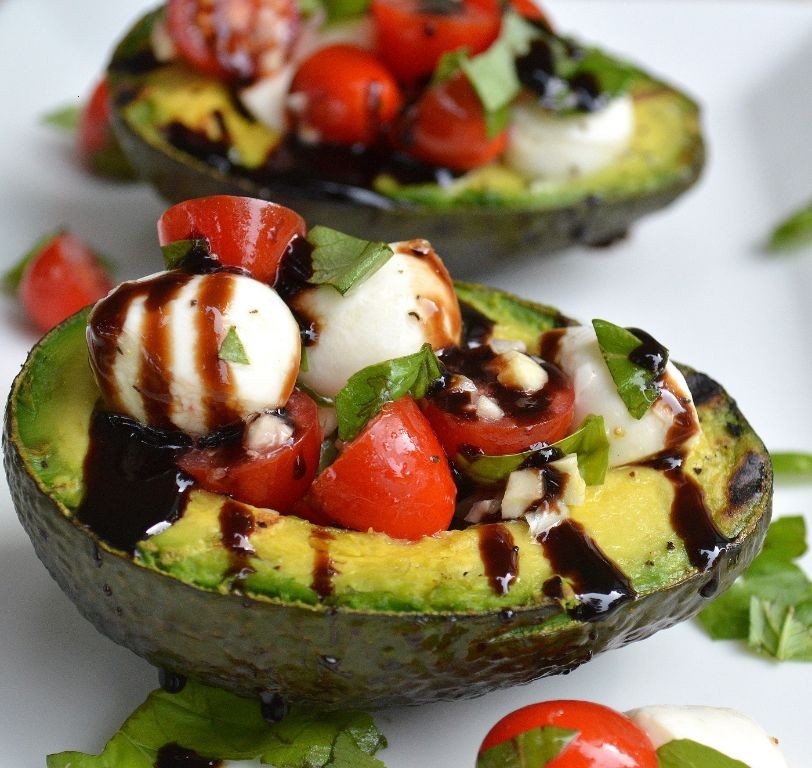
Keeping summer flavors fresh and vibrant can be a challenge, but these Grilled Caprese Stuffed Avocados bring together creamy, smoky, and tangy elements in one stunning dish. They’re perfect for a quick lunch or a standout side at your next barbecue. Let’s walk through each step to ensure yours turn out perfectly.
Ingredients
– 2 large, firm avocados (I find slightly underripe ones hold their shape better on the grill)
– 1 cup cherry tomatoes, halved (the sweet burst of color is worth it)
– 1/2 cup fresh mozzarella pearls (these tiny balls melt beautifully)
– 1/4 cup fresh basil leaves, chopped (tear, don’t cut, to avoid bruising)
– 2 tbsp extra virgin olive oil (my go-to for its fruity finish)
– 1 tbsp balsamic glaze (it adds a sweet-tart punch without being watery)
– 1/2 tsp garlic powder (for a subtle, evenly distributed kick)
– 1/4 tsp salt (I use fine sea salt to help it stick to the avocado)
Instructions
1. Preheat your grill to medium heat, aiming for 375°F, and lightly oil the grates to prevent sticking.
2. Halve the avocados lengthwise and remove the pits carefully with a spoon.
3. Brush the cut sides of the avocado halves with 1 tablespoon of olive oil to help them crisp up.
4. Place the avocado halves cut-side down on the grill and cook for 3–4 minutes, until you see clear grill marks.
5. Flip the avocados carefully using tongs and grill skin-side down for another 2 minutes to warm through.
6. In a medium bowl, combine the cherry tomatoes, mozzarella pearls, chopped basil, garlic powder, and salt.
7. Drizzle the remaining 1 tablespoon of olive oil over the tomato mixture and toss gently to coat.
8. Spoon the tomato and mozzarella mixture evenly into the grilled avocado halves.
9. Drizzle each stuffed avocado with balsamic glaze just before serving for a glossy finish.
Grilling the avocados adds a subtle smokiness that contrasts wonderfully with the cool, creamy interior. The juicy tomatoes and melted mozzarella create a burst of freshness in every bite. Serve these immediately alongside grilled chicken or over a bed of greens for a complete meal.
Spicy Grilled Shrimp and Chorizo Skewers
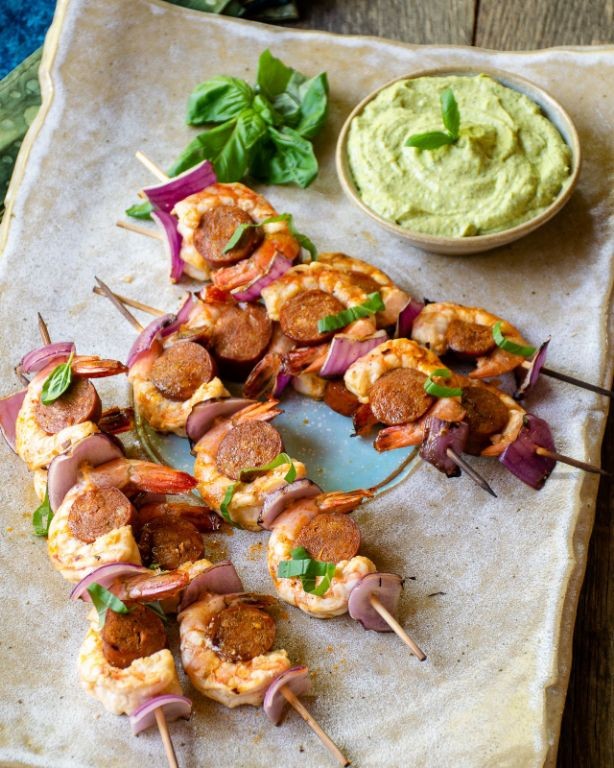
Grilling season calls for bold flavors and simple techniques that deliver impressive results every time. Get ready to master these vibrant skewers that combine smoky chorizo with perfectly grilled shrimp in a spicy marinade that will become your new summer favorite.
Ingredients
– 1 lb large raw shrimp, peeled and deveined (I always buy wild-caught for better flavor)
– 8 oz Spanish chorizo, sliced into ½-inch coins (the cured kind that doesn’t need cooking)
– 2 tbsp extra virgin olive oil (my go-to for marinades)
– 2 cloves garlic, minced (fresh is essential here)
– 1 tsp smoked paprika
– ½ tsp cayenne pepper (adjust if you’re sensitive to heat)
– 1 tbsp fresh lime juice
– 1 tsp kosher salt
– 1 red bell pepper, cut into 1-inch pieces
– 1 red onion, cut into 1-inch chunks
– 8 wooden skewers, soaked in water for 30 minutes
Instructions
1. Soak 8 wooden skewers in warm water for exactly 30 minutes to prevent burning.
2. Pat 1 lb shrimp completely dry with paper towels—this ensures better browning.
3. Whisk together 2 tbsp olive oil, 2 minced garlic cloves, 1 tsp smoked paprika, ½ tsp cayenne, 1 tbsp lime juice, and 1 tsp kosher salt in a medium bowl.
4. Add the dried shrimp to the marinade and toss to coat thoroughly.
5. Let shrimp marinate at room temperature for 15 minutes (no longer, or the lime juice will start to cook them).
6. Thread marinated shrimp, 8 oz chorizo coins, 1 red bell pepper pieces, and 1 red onion chunks alternately onto soaked skewers.
7. Preheat your grill to medium-high heat (400°F) and oil the grates.
8. Place skewers on the hot grill and cook for 2 minutes without moving them.
9. Flip skewers and grill for another 2-3 minutes until shrimp turn pink and opaque.
10. Remove skewers from grill when shrimp are fully cooked but still juicy.
Ready to serve these beauties straight from the grill—the chorizo releases its smoky oils while the shrimp stay tender with a spicy kick. I love serving them over cilantro-lime rice to soak up all the delicious drippings, or you can slide everything off the skewers into warm tortillas for incredible tacos.
Grilled Pineapple with Cinnamon Sugar
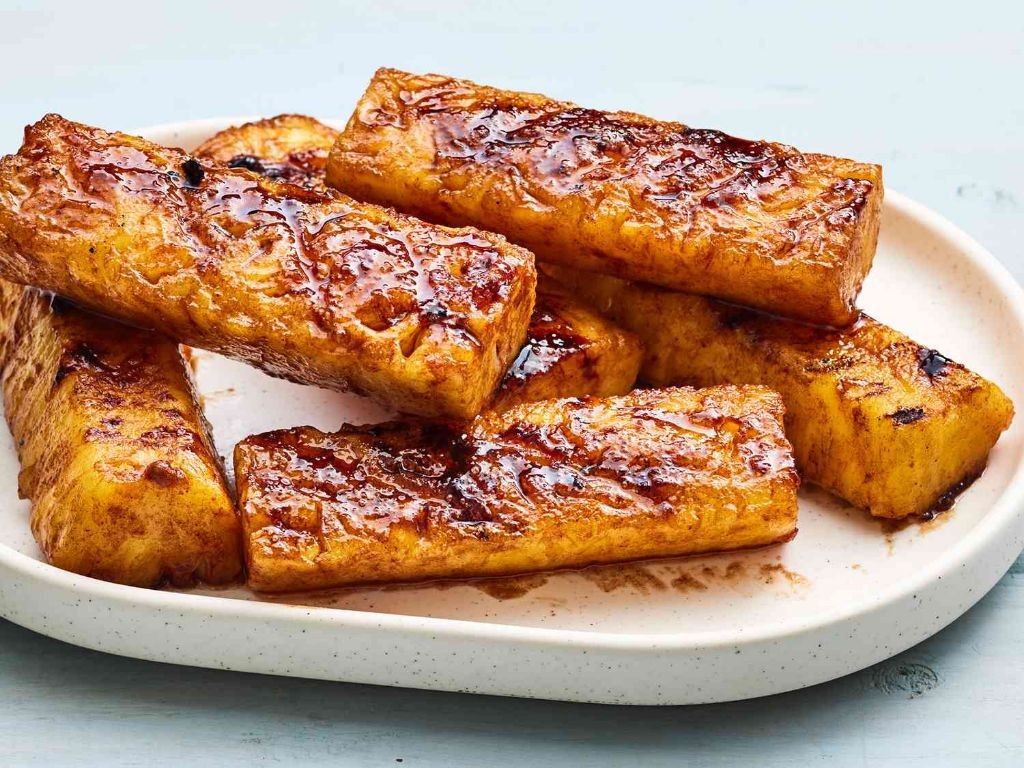
Venturing into grilled desserts opens up a world of caramelized possibilities, and this grilled pineapple with cinnamon sugar is the perfect starting point. I’ll walk you through each simple step to transform fresh pineapple into a warm, caramelized treat that feels both rustic and elegant. Let’s fire up the grill and create something magical together.
Ingredients
– 1 large fresh pineapple, peeled and cored (I look for one that smells sweet at the stem end)
– 2 tablespoons unsalted butter, melted (I prefer salted butter for a subtle contrast)
– 1/4 cup granulated sugar
– 1 teaspoon ground cinnamon
– Pinch of sea salt (this really makes the flavors pop)
Instructions
1. Preheat your grill to medium-high heat, approximately 400°F, and brush the grates clean with a grill brush.
2. Cut the peeled pineapple into 1-inch thick rings, patting them dry with paper towels to ensure good caramelization.
3. In a small bowl, whisk together the granulated sugar, cinnamon, and sea salt until fully combined.
4. Brush both sides of each pineapple ring with melted butter using a pastry brush.
5. Sprinkle the cinnamon sugar mixture evenly over both sides of each buttered pineapple ring.
6. Place the prepared pineapple rings directly on the preheated grill grates.
7. Grill for 4-5 minutes until you see clear grill marks and the sugar begins to caramelize.
8. Flip each pineapple ring carefully using tongs when the bottom has golden-brown char marks.
9. Grill for another 4-5 minutes until the second side shows similar caramelization and grill marks.
10. Transfer the grilled pineapple to a serving plate using a spatula.
Creating this dessert transforms the pineapple’s texture into something wonderfully tender with caramelized edges that contrast beautifully with the warm, spiced interior. Consider serving it alongside vanilla ice cream where the cold creaminess complements the warm fruit, or chop it over morning yogurt for a special breakfast treat that feels indulgent yet simple.
Indoor Grilled Turkey and Swiss Sliders
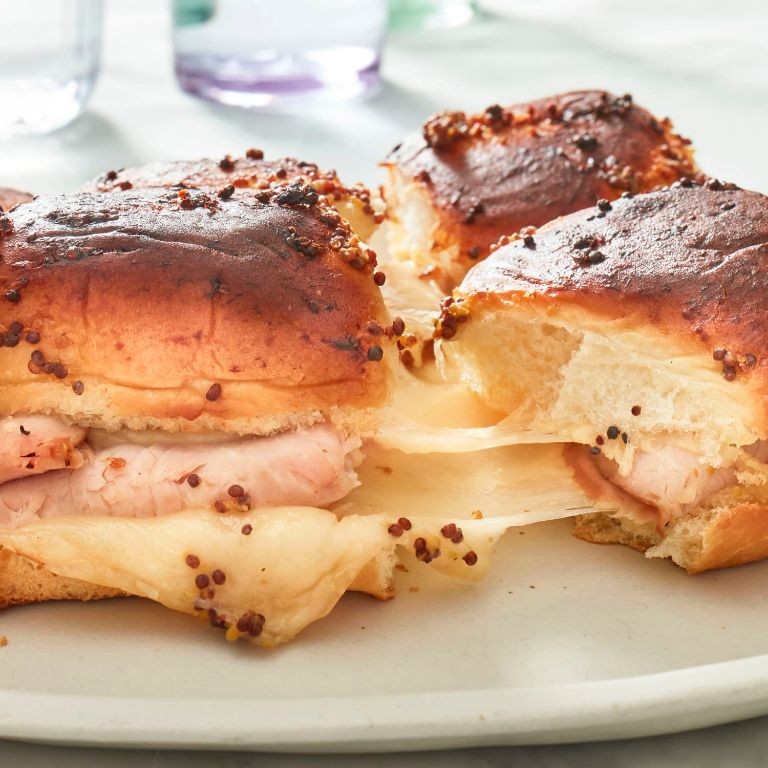
Baking these sliders indoors means you can enjoy that grilled flavor any time of year, no outdoor grill required. I’ll walk you through each step so you end up with perfectly melted, savory sliders that are sure to become a weeknight favorite. Let’s get started with the ingredients you’ll need.
Ingredients
– 1 pound ground turkey (I find 93% lean works best for juicy sliders)
– 1 tablespoon Worcestershire sauce (this adds a nice umami depth)
– 1 teaspoon garlic powder (fresh minced garlic works too, but powder distributes evenly)
– 1/2 teaspoon onion powder
– 1/2 teaspoon smoked paprika (my secret for that “grilled” smoky hint)
– 1/2 teaspoon salt (I use fine sea salt for even seasoning)
– 1/4 teaspoon black pepper (freshly ground if you have it)
– 12 small slider buns (I like potato rolls for their softness)
– 6 slices Swiss cheese (tear them in half to fit the sliders neatly)
– 2 tablespoons unsalted butter, melted (brush this on for a golden finish)
– 1 tablespoon Dijon mustard (optional, but it adds a tangy kick I love)
Instructions
1. Preheat your oven to 375°F (190°C) and line a baking sheet with parchment paper for easy cleanup.
2. In a medium bowl, combine the ground turkey, Worcestershire sauce, garlic powder, onion powder, smoked paprika, salt, and black pepper.
3. Mix the ingredients gently with your hands or a spoon until just combined; overmixing can make the turkey tough.
4. Divide the mixture into 12 equal portions and shape each into a small patty about 2 inches in diameter.
5. Place the patties on the prepared baking sheet, spacing them about 1 inch apart.
6. Bake the patties in the preheated oven for 12–15 minutes, or until the internal temperature reaches 165°F (74°C) on a meat thermometer.
7. While the patties bake, slice the slider buns in half horizontally and place the bottom halves on a separate baking sheet.
8. Remove the patties from the oven and place one on each bottom bun half.
9. Top each patty with a half-slice of Swiss cheese.
10. Return the sliders to the oven and bake for 2–3 minutes, just until the cheese is melted and bubbly.
11. In a small bowl, stir together the melted butter and Dijon mustard, if using.
12. Brush the butter mixture evenly over the top halves of the buns.
13. Place the top bun halves on the sliders and press gently to assemble.
14. Serve the sliders immediately while warm. Achieving that golden, buttery top adds a delightful crunch to each bite, while the smoky turkey and creamy Swiss cheese meld together for a comforting flavor. Try pairing them with a simple side salad or pickle spears for a balanced meal that’s easy to customize with extra toppings like caramelized onions.
Grilled Asparagus with Parmesan
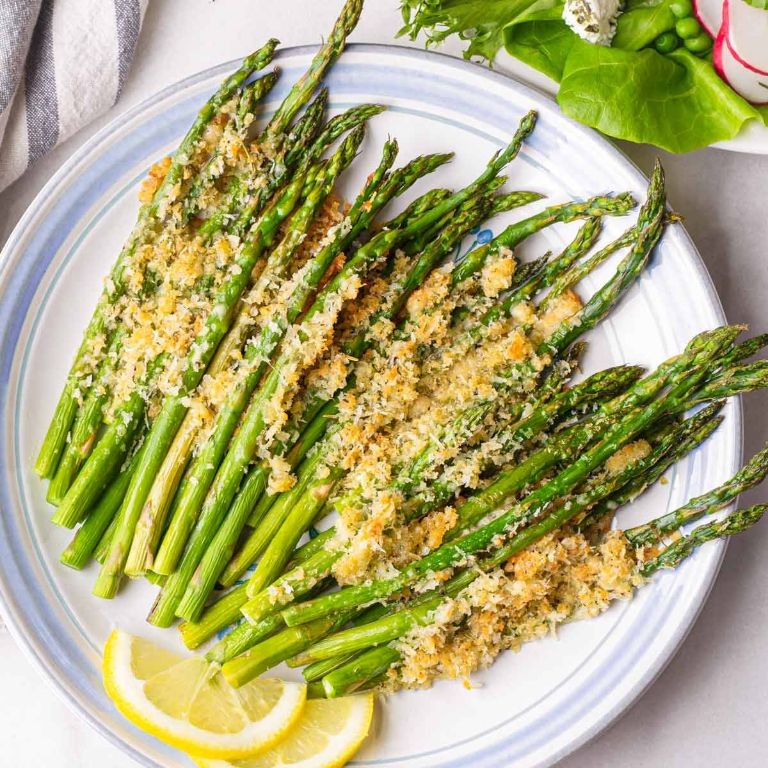
Brimming with springtime freshness, grilled asparagus with Parmesan transforms humble spears into an elegant side dish that pairs beautifully with everything from grilled chicken to pasta. This method ensures perfectly tender-crisp asparagus every time, with minimal effort required for maximum flavor payoff.
Ingredients
– 1 pound fresh asparagus spears, medium thickness works best for grilling
– 2 tablespoons extra virgin olive oil, my go-to for its fruity notes
– 1/2 teaspoon kosher salt, which dissolves better than table salt
– 1/4 teaspoon freshly ground black pepper, freshly cracked makes all the difference
– 1/4 cup freshly grated Parmesan cheese, never use the pre-shredded kind here
– 1 lemon, cut into wedges for serving
Instructions
1. Preheat your grill to medium-high heat, approximately 400°F.
2. Wash the asparagus spears thoroughly under cold running water.
3. Hold each asparagus spear at both ends and bend it until it snaps naturally at the tough woody point.
4. Pat the asparagus completely dry with paper towels to ensure proper oil coating.
5. Place the dried asparagus on a large baking sheet in a single layer.
6. Drizzle the olive oil evenly over all the asparagus spears.
7. Use your hands to toss the asparagus, ensuring every spear is lightly coated with oil.
8. Sprinkle the kosher salt and black pepper evenly over the oiled asparagus.
9. Place the seasoned asparagus perpendicular to the grill grates to prevent falling through.
10. Grill for 4-6 minutes, until bright green with noticeable grill marks.
11. Use tongs to flip each asparagus spear carefully.
12. Grill for another 3-5 minutes until tender but still slightly crisp.
13. Transfer the grilled asparagus to a serving platter using tongs.
14. Immediately sprinkle the freshly grated Parmesan cheese over the hot asparagus.
15. Arrange lemon wedges around the platter for squeezing over individual servings.
Outstandingly versatile, this asparagus boasts a delightful contrast between the smoky, slightly charred exterior and the tender-crisp interior that practically melts in your mouth. The nutty Parmesan creates a savory crust against the bright acidity of fresh lemon, making it equally at home beside steak or tossed into a grain bowl for lunch tomorrow.
Summary
Looking for delicious, versatile meals? These 20 indoor grill recipes deliver incredible flavor for any gathering or quiet night in. Fire up your grill and try your favorites—we’d love to hear which ones you enjoyed most in the comments below! Don’t forget to share this roundup on Pinterest so fellow home cooks can discover these tasty ideas too.