Ready to transform those leftover lemon peels into something spectacular? From brightening up weeknight dinners to adding zing to your favorite desserts, these 20 creative recipes will show you just how versatile this citrus powerhouse can be. Get ready to squeeze every last drop of flavor from your lemons—your taste buds are about to be delighted!
Lemon Peel Infused Olive Oil
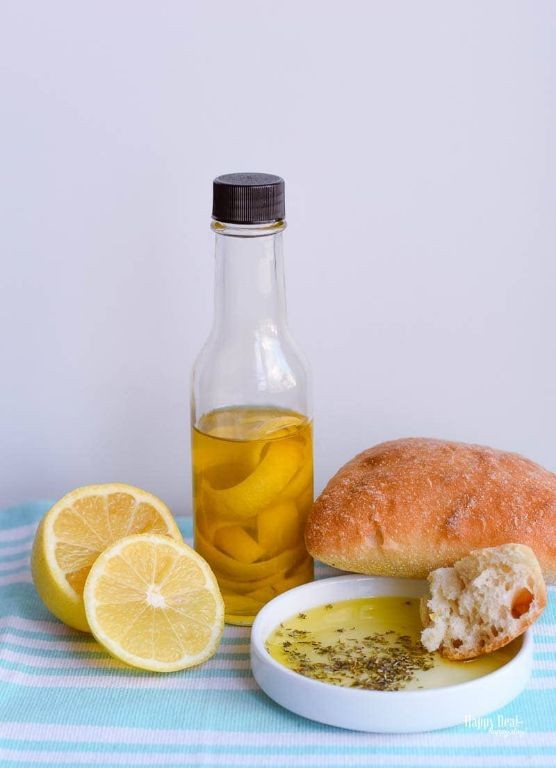
Now, let’s talk about the kitchen alchemy that turns humble lemon peels into liquid gold. This lemon peel infused olive oil is basically sunshine in a bottle, ready to elevate everything from salads to grilled chicken with its zesty personality. It’s so simple to make, you’ll wonder why you haven’t been bathing your food in this citrusy goodness all along.
Ingredients
– 2 cups extra virgin olive oil
– 4 large organic lemons
Instructions
1. Wash 4 large organic lemons thoroughly under cool running water to remove any wax or residue.
2. Use a vegetable peeler to remove only the yellow zest from the lemons, avoiding the bitter white pith beneath.
3. Combine 2 cups of extra virgin olive oil and all the lemon peels in a small saucepan.
4. Heat the mixture over the lowest possible heat setting for 25 minutes, maintaining the oil temperature between 120-130°F using a candy thermometer.
5. Remove the saucepan from heat and let the oil cool completely to room temperature, about 1 hour.
6. Strain the infused oil through a fine-mesh sieve into a clean glass jar, pressing gently on the peels to extract all the flavorful oil.
7. Discard the spent lemon peels and seal the jar tightly with a lid.
8. Store the infused oil in a cool, dark place for up to 2 weeks.
Lemon-infused olive oil brings a vibrant, citrus-forward flavor that dances across your palate with bright acidity and subtle bitterness. The texture remains beautifully fluid while carrying the essence of lemon in every drop. Try drizzling it over roasted vegetables, using it as a dipping oil for crusty bread, or even brushing it on fish before grilling for an instant flavor upgrade.
Candied Lemon Peel
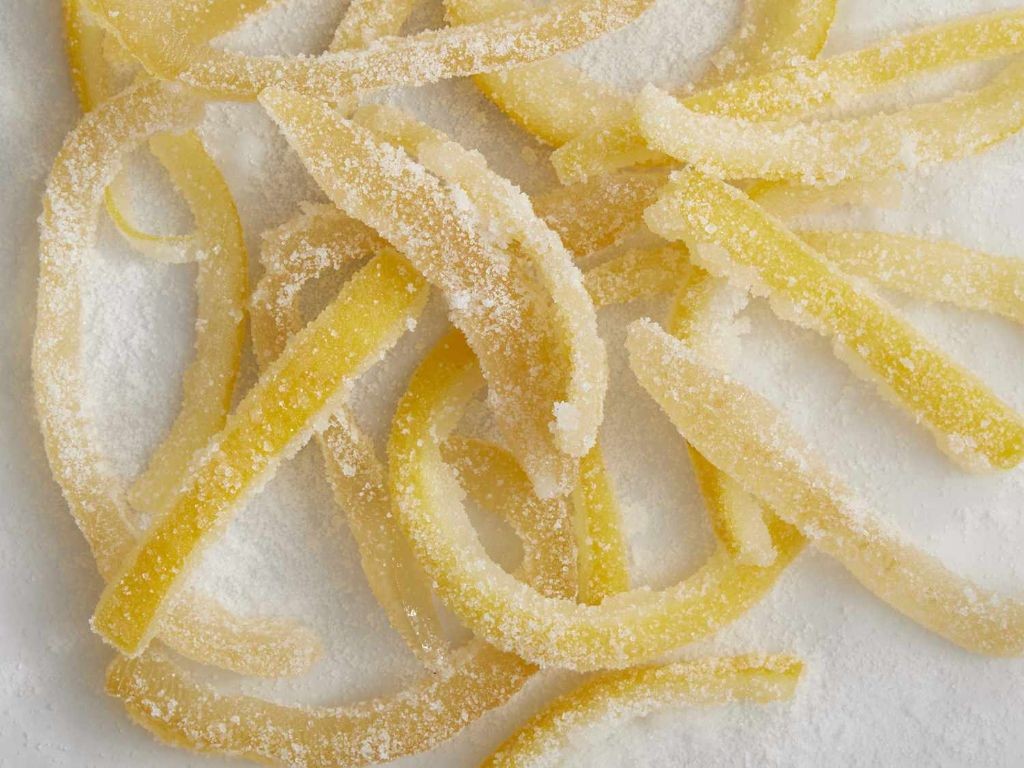
Nope, your lemon’s destiny isn’t just a sad squeeze into tea—it’s about to become the star of your snack drawer with these candied lemon peels. We’re transforming what you’d normally toss into glittering, sweet-tart strips of sunshine that’ll make your taste buds do a happy dance. Get ready to turn kitchen scraps into pure gold!
Ingredients
– 4 large lemons
– 2 cups granulated sugar
– 1 cup water
– 1/4 cup additional granulated sugar for coating
Instructions
1. Wash 4 large lemons thoroughly under cool running water to remove any wax or residue.
2. Use a sharp vegetable peeler to remove the yellow zest in long strips, avoiding the bitter white pith underneath.
3. Cut the peeled zest into 1/4-inch wide strips using a sharp knife.
4. Place the lemon strips in a medium saucepan and cover completely with cold water.
5. Bring the water to a boil over high heat, then drain immediately—this first boil helps remove bitterness.
6. Repeat the boiling and draining process two more times with fresh water each time.
7. Combine 2 cups granulated sugar and 1 cup water in the same saucepan, stirring until the sugar dissolves.
8. Add the blanched lemon strips to the sugar syrup and bring to a gentle simmer over medium-low heat.
9. Reduce heat to low and cook for 45 minutes, stirring occasionally, until the peels become translucent.
10. Use a slotted spoon to transfer the candied peels to a wire rack placed over a baking sheet, letting excess syrup drip off.
11. Let the peels dry for 2 hours at room temperature until tacky but not sticky.
12. Toss the partially dried peels in 1/4 cup additional granulated sugar until evenly coated.
13. Return the sugared peels to the wire rack and let dry completely for 6-8 hours or overnight.
Glittering with sugar crystals and packing a powerful citrus punch, these candied lemon peels deliver an addictive chew that’s both sweet and tart. Toss them into trail mix for an unexpected zing, chop them into cookie dough for bright bursts of flavor, or simply enjoy them as the sophisticated candy they are—your lemon peels have officially leveled up!
Lemon Peel Marmalade
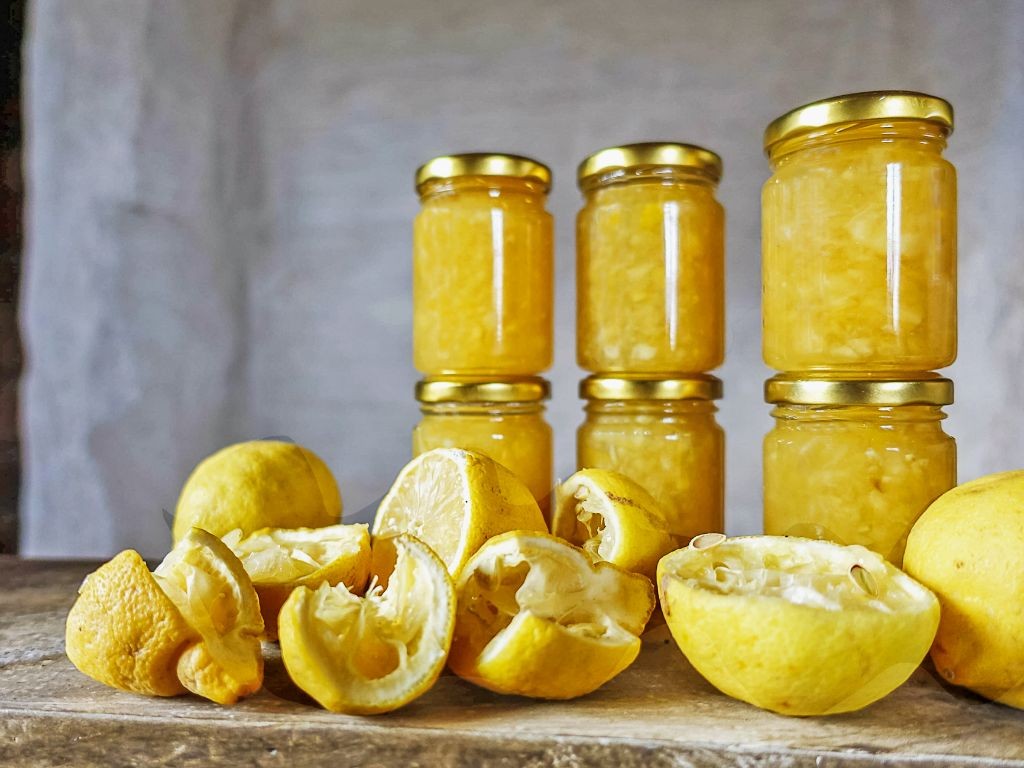
Jazz up your morning toast routine with something that packs more personality than your average condiment! This lemon peel marmalade delivers a citrusy punch that’ll wake up your taste buds faster than your morning alarm clock. It’s the kind of bright, tangy spread that turns boring breakfasts into vibrant affairs.
Ingredients
– 6 large lemons
– 4 cups granulated sugar
– 4 cups water
– 1 tbsp unsalted butter
Instructions
1. Wash 6 large lemons thoroughly under cool running water.
2. Use a vegetable peeler to remove the yellow zest from all lemons, avoiding the bitter white pith.
3. Slice the peeled zest into thin, uniform strips about 1/8-inch wide.
4. Juice the peeled lemons until you have 1 cup of fresh lemon juice.
5. Combine the zest strips, 1 cup lemon juice, 4 cups water, and 4 cups granulated sugar in a large, heavy-bottomed pot.
6. Stir the mixture continuously over medium heat until the sugar completely dissolves.
7. Increase heat to medium-high and bring the mixture to a rolling boil.
8. Reduce heat to maintain a gentle simmer and cook for 45-60 minutes, stirring occasionally.
9. Test for doneness by placing a small spoonful on a chilled plate – it should wrinkle when pushed with your finger.
10. Stir in 1 tablespoon unsalted butter to reduce foaming and create a glossy finish.
11. Remove the pot from heat and let the marmalade cool for 15 minutes.
12. Ladle the warm marmalade into sterilized jars, leaving 1/4-inch headspace.
13. Process jars in a boiling water bath for 10 minutes if canning for long-term storage.
Vibrantly textured with tender citrus strands suspended in a translucent gel, this marmalade balances sweet and tart in perfect harmony. Spread it on scones, swirl it into yogurt, or use it as a glaze for roasted chicken – its versatility matches its vibrant personality.
Lemon Peel Tea

Zesty, zingy, and downright zen-inducing—this lemon peel tea is the sunshine in a mug you didn’t know your soul was craving. Forget those sad, dusty tea bags; we’re making magic with what you usually toss in the compost. It’s the ultimate kitchen hack for when life gives you lemons (and you’ve already made all the lemonade).
Ingredients
- 4 large organic lemons
- 4 cups water
- 1/4 cup honey
- 1 cinnamon stick
- 4 whole cloves
Instructions
- Wash 4 large organic lemons thoroughly under cool running water to remove any wax or residue.
- Using a vegetable peeler, carefully remove the yellow zest from all lemons in long strips, avoiding the bitter white pith.
- Combine 4 cups water and the lemon peels in a medium saucepan over medium-high heat.
- Add 1 cinnamon stick and 4 whole cloves to the saucepan.
- Bring the mixture to a gentle boil at 212°F, then immediately reduce heat to low.
- Simmer uncovered for 15 minutes, allowing the citrus oils to fully infuse into the water.
- Strain the hot liquid through a fine-mesh sieve into a heatproof pitcher, pressing gently on the peels to extract maximum flavor.
- Stir in 1/4 cup honey until completely dissolved, adjusting sweetness if desired.
- Pour the tea into mugs and serve immediately while hot.
Glowing with golden warmth, this tea delivers a bright citrus punch softened by spicy undertones and honeyed sweetness. The texture is beautifully clear yet robust, perfect for sipping curled up on the couch or poured over ice with a sprig of fresh mint for a refreshing twist.
Lemon Peel Sugar Scrub
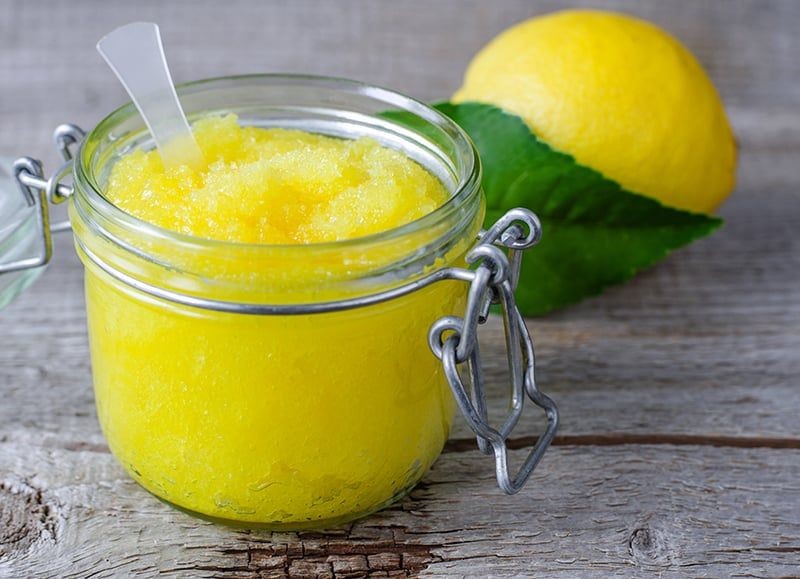
Zesty doesn’t even begin to describe this lemon peel sugar scrub that’s about to become your kitchen’s MVP. Who knew those leftover citrus peels could transform into such a glorious exfoliating treat that’ll make your skin sing show tunes? Consider this your official permission to play with your food in the most deliciously productive way possible.
Ingredients
– 1 cup granulated sugar
– 1/2 cup coconut oil
– 2 tbsp fresh lemon zest
– 1 tsp vanilla extract
Instructions
1. Measure 1 cup of granulated sugar into a medium mixing bowl.
2. Add 1/2 cup of coconut oil to the sugar—if your coconut oil is solid, microwave it for 15 seconds to soften it for easier mixing.
3. Zest one large lemon until you have 2 tablespoons of fresh lemon zest, being careful to avoid the bitter white pith.
4. Combine the lemon zest with the sugar and coconut oil mixture.
5. Stir in 1 teaspoon of vanilla extract until all ingredients are fully incorporated.
6. Mix vigorously for 2 minutes until the texture resembles wet sand with no dry sugar pockets remaining.
7. Transfer the scrub to an airtight glass jar, pressing it down gently to eliminate air bubbles.
8. Store the finished scrub in a cool, dark place for up to 2 weeks.
What makes this scrub truly magical is how the coarse sugar crystals dance with the silky coconut oil, creating the perfect balance between exfoliation and moisture. The bright lemon scent will have you feeling like you’re spa-ing in a citrus grove, while the vanilla adds a subtle warmth that makes this scrub feel downright luxurious. Try using it before a special event for glowing skin, or gift it to friends with a cute wooden spoon tied to the jar!
Lemon Peel and Herb Roasted Chicken

Ugh, is there anything more soul-satisfying than the smell of roasted chicken filling your kitchen? This lemon peel and herb version is basically a hug for your taste buds, delivering crispy skin and juicy meat that’ll make you feel like a culinary rockstar with minimal effort.
Ingredients
– 1 whole chicken (4-5 pounds)
– 2 tablespoons olive oil
– 1 tablespoon kosher salt
– 1 teaspoon black pepper
– 2 lemons
– 4 cloves garlic
– 3 sprigs fresh rosemary
– 4 sprigs fresh thyme
– 1 cup chicken broth
Instructions
1. Preheat your oven to 425°F and position a rack in the middle.
2. Pat the chicken completely dry inside and out with paper towels—this is crucial for crispy skin.
3. Rub the chicken all over with olive oil, then season evenly with salt and pepper.
4. Zest both lemons, then cut them into quarters.
5. Stuff the chicken cavity with lemon quarters, whole garlic cloves, rosemary, and thyme.
6. Truss the chicken legs together with kitchen twine to help it cook evenly.
7. Place the chicken breast-side up in a roasting pan and sprinkle the lemon zest over the top.
8. Roast for 20 minutes at 425°F to start crisping the skin.
9. Reduce oven temperature to 375°F and continue roasting for 60-75 minutes.
10. Check for doneness—the internal temperature should reach 165°F in the thickest part of the thigh.
11. Transfer the chicken to a cutting board and let it rest for 15 minutes; this allows juices to redistribute.
12. While resting, pour chicken broth into the roasting pan and scrape up browned bits for a simple pan sauce.
13. Carve the chicken and serve with the pan sauce. That golden skin shatters beautifully against the tender, herb-infused meat, while the lemon zest adds a bright zing that cuts through the richness. Try serving it over creamy polenta or with roasted vegetables to soak up every last drop of that incredible juice.
Lemon Peel Pasta

Ready to transform your pasta game with a zesty twist that’ll make your taste buds do a happy dance? This lemon peel pasta is the culinary equivalent of sunshine on a plate—bright, vibrant, and guaranteed to banish bland dinners forever. It’s so simple you’ll wonder why you haven’t been adding citrus to your carb-loading sessions all along.
Ingredients
– 12 ounces dried spaghetti
– 3 tablespoons olive oil
– 4 cloves garlic, minced
– 2 lemons, zested and juiced
– 1/2 cup grated Parmesan cheese
– 1/4 teaspoon red pepper flakes
– 1/4 cup chopped fresh parsley
– 1 teaspoon salt
– 1/2 teaspoon black pepper
Instructions
1. Bring a large pot of salted water to a rolling boil over high heat.
2. Add 12 ounces dried spaghetti to the boiling water and cook for 8-10 minutes until al dente (the pasta should still have a slight bite when tested).
3. While pasta cooks, heat 3 tablespoons olive oil in a large skillet over medium heat until shimmering.
4. Add 4 cloves minced garlic and 1/4 teaspoon red pepper flakes to the skillet, cooking for 1-2 minutes until fragrant but not browned.
5. Zest two lemons directly into the skillet, then squeeze their juice through a strainer to catch seeds.
6. Drain the cooked pasta, reserving 1/2 cup of the starchy pasta water.
7. Immediately transfer the hot pasta to the skillet with the lemon-garlic mixture.
8. Add 1/2 cup grated Parmesan cheese, 1/4 cup chopped fresh parsley, 1 teaspoon salt, and 1/2 teaspoon black pepper to the skillet.
9. Toss everything together vigorously, adding reserved pasta water 2 tablespoons at a time until the sauce coats the pasta beautifully.
10. Cook for 1-2 more minutes, tossing continuously, until the sauce emulsifies and clings to each strand.
Did you know the starchy pasta water is the secret weapon for creating restaurant-quality sauce that clings perfectly? The resulting dish delivers bright, citrus-forward flavors with just enough heat from the pepper flakes to keep things interesting. Serve it immediately with extra Parmesan for sprinkling, or toss in some grilled shrimp for a protein boost that turns this simple pasta into a complete meal.
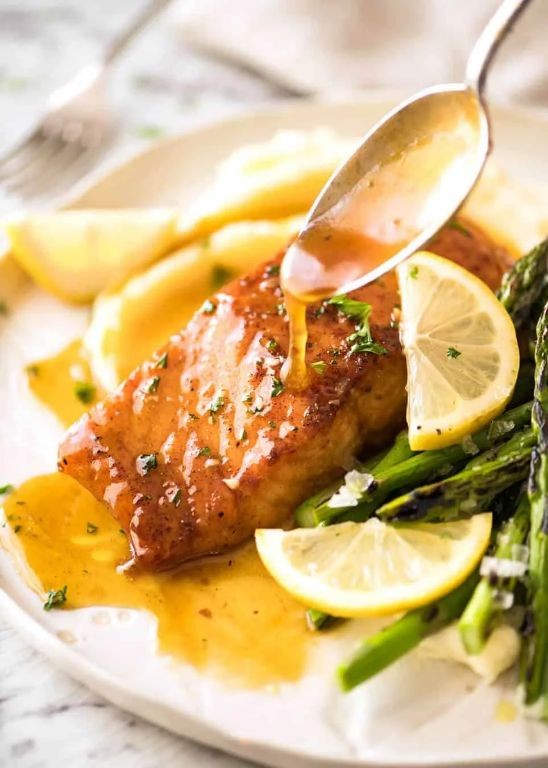
Lemon Peel and Honey Glazed Salmon
Zesty doesn’t even begin to cover this salmon situation, folks! We’re talking about a dish that’ll make your taste buds do a happy dance while simultaneously impressing anyone lucky enough to score an invite to your dinner table. This lemon peel and honey glazed salmon is basically sunshine on a plate with benefits.
Ingredients
– 4 salmon fillets (6 oz each)
– 2 tbsp olive oil
– 1 tsp salt
– 1/2 tsp black pepper
– 2 lemons
– 1/4 cup honey
– 2 cloves garlic
– 1 tsp fresh thyme
– 1/4 tsp red pepper flakes
Instructions
1. Preheat your oven to 400°F and line a baking sheet with parchment paper.
2. Pat the salmon fillets completely dry with paper towels—this ensures maximum crispiness!
3. Rub olive oil evenly over all sides of each salmon fillet.
4. Sprinkle salt and black pepper evenly over both sides of the fillets.
5. Zest both lemons using a microplane, being careful to avoid the bitter white pith.
6. Juice one lemon to yield approximately 3 tablespoons of fresh lemon juice.
7. Mince the garlic cloves finely until they resemble tiny flavor crystals.
8. In a small bowl, combine honey, lemon zest, lemon juice, minced garlic, fresh thyme, and red pepper flakes.
9. Place salmon fillets skin-side down on the prepared baking sheet.
10. Brush the honey-lemon mixture generously over the top and sides of each fillet.
11. Bake for 12-15 minutes until the salmon flakes easily with a fork and the glaze is bubbly.
12. Remove from oven and let rest for 3 minutes before serving—this allows the juices to redistribute perfectly.
What emerges from your oven is nothing short of magical—the sweet honey caramelizes into a sticky glaze while the lemon peel adds bright, zesty notes that cut through the richness. The salmon stays incredibly moist inside with that perfect flaky texture that practically begs to be paired with roasted asparagus or served over a bed of wild rice for a complete meal that’ll have everyone asking for seconds.
Lemon Peel and Garlic Butter Shrimp

Venture beyond basic shrimp scampi with this zesty, garlicky revelation that’ll make your taste buds do a happy dance. We’re talking plump, juicy shrimp bathed in a buttery lemon-garlic sauce so good, you’ll want to lick the pan (no judgment here). It’s the 15-minute wonder that tastes like you slaved for hours—your secret is safe with us.
Ingredients
- 1 lb large raw shrimp, peeled and deveined
- 4 tbsp unsalted butter
- 4 cloves garlic, minced
- 1 lemon, zested and juiced
- 1/4 cup dry white wine
- 2 tbsp fresh parsley, chopped
- 1/4 tsp red pepper flakes
- 1/2 tsp salt
- 1/4 tsp black pepper
- 1 tbsp olive oil
Instructions
- Pat the shrimp completely dry with paper towels to ensure a perfect sear.
- Season the shrimp evenly with salt and black pepper on both sides.
- Heat olive oil in a large skillet over medium-high heat until shimmering.
- Add shrimp in a single layer, cooking for 1-2 minutes per side until pink and opaque.
- Transfer shrimp to a plate, leaving any juices in the skillet.
- Reduce heat to medium and melt butter in the same skillet.
- Add minced garlic and red pepper flakes, sautéing for 30 seconds until fragrant but not browned.
- Pour in white wine, scraping up any browned bits from the bottom of the pan.
- Simmer the sauce for 2 minutes until slightly reduced.
- Stir in lemon zest and lemon juice until fully incorporated.
- Return shrimp to the skillet, tossing to coat in the sauce for 1 minute.
- Remove from heat and stir in fresh parsley just before serving. Really, the magic here is in the texture—tender shrimp with a slight snap, swimming in a bright, buttery sauce that clings to every curve. Serve it over angel hair pasta to soak up every last drop, or scoop it straight into a crusty bread bowl for maximum dipping potential.
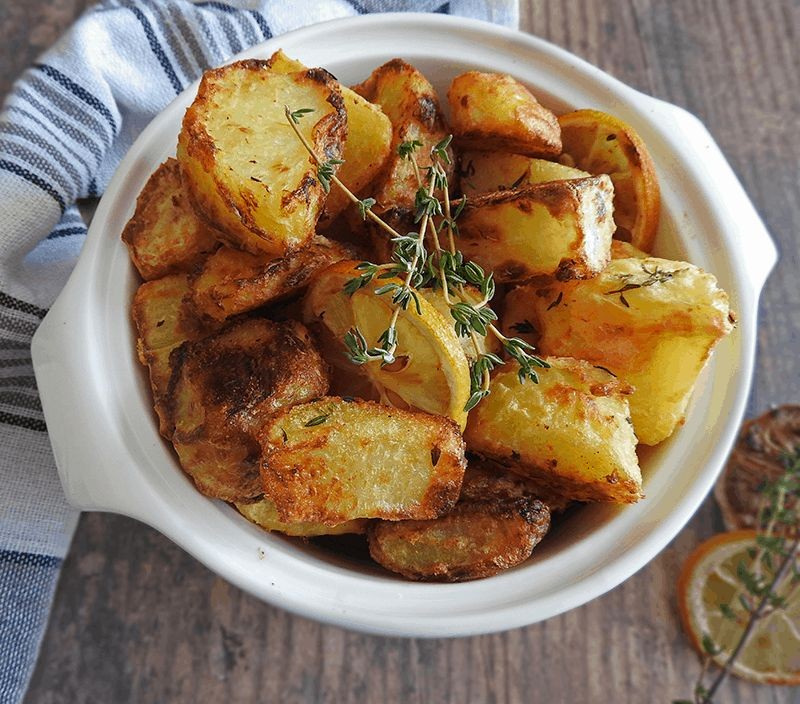
Lemon Peel and Thyme Roasted Potatoes
Get ready to meet the potato side dish that will steal the spotlight from your main course! These lemon peel and thyme roasted potatoes are the crispy, zesty upgrade your dinner table desperately needs. Seriously, your regular roasted potatoes are about to get seriously jealous of their fancy new sibling.Ingredients
– 2 lbs Yukon Gold potatoes
– 3 tbsp olive oil
– 2 tbsp fresh lemon zest
– 1 tbsp fresh thyme leaves
– 1 tsp kosher salt
– 1/2 tsp black pepper
– 2 cloves garlic, mincedInstructions
1. Preheat your oven to 425°F and position one rack in the center.
2. Scrub 2 lbs of Yukon Gold potatoes thoroughly under cold running water to remove any dirt.
3. Cut each potato into 1-inch cubes, keeping the pieces as uniform as possible for even cooking.
4. Place the potato cubes in a large mixing bowl and add 3 tbsp olive oil, tossing to coat every piece evenly.
5. Add 2 tbsp fresh lemon zest, 1 tbsp fresh thyme leaves, 1 tsp kosher salt, 1/2 tsp black pepper, and 2 cloves minced garlic to the bowl.
6. Toss everything together until the potatoes are evenly coated with all seasonings.
7. Spread the potatoes in a single layer on a large baking sheet, making sure they aren’t crowded.
8. Roast in the preheated 425°F oven for 25 minutes without disturbing them to develop a crispy crust.
9. Remove the baking sheet from the oven and use a spatula to flip each potato piece carefully.
10. Return the potatoes to the oven and continue roasting for another 15-20 minutes until golden brown and crispy.
11. Test for doneness by piercing a few pieces with a fork – they should be tender throughout.
12. Transfer the roasted potatoes to a serving dish immediately to prevent steaming on the hot pan.Unbelievably crispy on the outside while remaining fluffy inside, these potatoes deliver bright citrus notes that dance with earthy thyme in every bite. Try serving them alongside grilled chicken or fish, or get creative by tossing them into a breakfast hash with eggs for a morning upgrade that’ll make you question why you ever settled for boring potatoes.
Lemon Peel and Almond Cake

Vividly zesty and wonderfully nutty, this lemon peel and almond cake is the sunshine your dessert table desperately needs—it’s like a citrusy hug for your taste buds, minus the awkward small talk.Ingredients
– 1 cup all-purpose flour
– 1 cup almond flour
– 1 cup granulated sugar
– 1/2 cup unsalted butter, softened
– 3 large eggs
– 1/4 cup fresh lemon juice
– 2 tbsp finely grated lemon peel
– 1 tsp baking powder
– 1/4 tsp salt
– 1/2 cup sliced almondsInstructions
1. Preheat your oven to 350°F and grease a 9-inch round cake pan.
2. In a medium bowl, whisk together 1 cup all-purpose flour, 1 cup almond flour, 1 tsp baking powder, and 1/4 tsp salt until fully combined.
3. In a separate large bowl, use an electric mixer to cream 1/2 cup softened unsalted butter and 1 cup granulated sugar on medium speed for 2 minutes until light and fluffy.
4. Add 3 large eggs one at a time to the butter mixture, beating for 30 seconds after each addition until just incorporated.
5. Mix in 1/4 cup fresh lemon juice and 2 tbsp finely grated lemon peel on low speed until evenly distributed.
6. Gradually add the dry flour mixture to the wet ingredients, mixing on low speed for 1 minute until no streaks remain—do not overmix.
7. Pour the batter into the prepared pan and smooth the top with a spatula.
8. Sprinkle 1/2 cup sliced almonds evenly over the batter for a crunchy topping.
9. Bake at 350°F for 35–40 minutes, or until a toothpick inserted into the center comes out clean and the edges are golden brown.
10. Cool the cake in the pan on a wire rack for 15 minutes before transferring it out to cool completely.
Who knew something so simple could be so spectacular? The cake boasts a moist, tender crumb with a bright lemon zing, while the toasted almonds add a delightful crunch—serve it warm with a dusting of powdered sugar or alongside a scoop of vanilla ice cream for pure bliss.Lemon Peel and Ginger Smoothie

Tired of the same old green smoothie routine that tastes more like punishment than pleasure? This zesty lemon peel and ginger smoothie is about to shake up your blender game with a citrusy kick that’ll make your taste buds do a happy dance. Think of it as sunshine in a glass, but with enough ginger zing to wake you up faster than your morning alarm.Ingredients
– 1 cup plain Greek yogurt
– 1 cup frozen mango chunks
– 1 banana
– 2 tbsp fresh lemon juice
– 1 tbsp finely grated lemon peel
– 1 tbsp peeled, grated fresh ginger
– 1 tbsp honey
– ½ cup ice cubes
– ¼ cup waterInstructions
1. Combine 1 cup plain Greek yogurt, 1 cup frozen mango chunks, and 1 banana in your blender.
2. Add 2 tbsp fresh lemon juice and 1 tbsp finely grated lemon peel to the blender.
3. Peel and finely grate 1 tbsp fresh ginger directly into the mixture.
4. Pour in 1 tbsp honey for natural sweetness.
5. Add ½ cup ice cubes and ¼ cup water to help with blending consistency.
6. Secure the blender lid tightly and blend on high speed for 45-60 seconds until completely smooth.
7. Check consistency by tilting the blender—if it’s too thick, add 1 more tbsp water and blend for 15 seconds.
8. Pour immediately into glasses while still frothy.
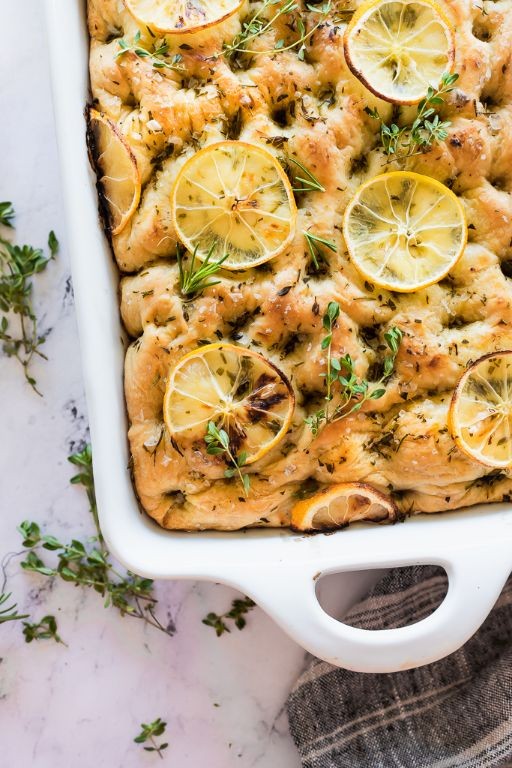
Velvety smooth with a delightful frothy crown, this vibrant yellow elixir delivers an exhilarating punch of citrus-forward brightness followed by ginger’s warming heat. Serve it in chilled mason jars with a thin lemon wheel perched on the rim for that extra Instagram-worthy flair, or pour it over additional ice for a more slushy, refreshing treat on warmer days.Lemon Peel and Rosemary Focaccia
Naturally, we’ve all stared longingly at store-bought focaccia, dreaming of a version that doesn’t taste like cardboard with a sprinkle of hope. This lemon peel and rosemary focaccia, however, is the fluffy, fragrant answer to your carb-loaded prayers—a golden, olive oil-kissed masterpiece that’s easier to make than explaining why you “accidentally” ate three slices before dinner.Ingredients
- 3 ½ cups all-purpose flour
- 1 ¼ cups warm water (110°F)
- 2 ¼ tsp active dry yeast
- 1 tbsp granulated sugar
- 1 tsp salt
- ¼ cup extra virgin olive oil
- 2 tbsp fresh rosemary leaves
- 2 tbsp lemon zest
- 1 tsp flaky sea salt
Instructions
- In a large bowl, combine warm water (110°F), yeast, and sugar, then let it sit for 5 minutes until foamy.
- Add flour and salt to the yeast mixture, stirring with a wooden spoon until a shaggy dough forms.
- Knead the dough on a floured surface for 8 minutes until smooth and elastic.
- Place the dough in a lightly oiled bowl, cover with a damp cloth, and let it rise in a warm spot for 1 hour or until doubled in size.
- Punch down the dough and transfer it to a greased 9×13-inch baking sheet.
- Stretch the dough to fit the pan, then use your fingertips to dimple the surface deeply.
- Drizzle 2 tablespoons of olive oil over the dough, ensuring it pools in the dimples.
- Sprinkle rosemary leaves, lemon zest, and flaky sea salt evenly across the top.
- Cover the pan and let the dough rise again for 30 minutes until puffy.
- Preheat the oven to 400°F while the dough completes its second rise.
- Bake for 20–25 minutes until the focaccia is golden brown and sounds hollow when tapped.
- Transfer the focaccia to a wire rack and let it cool for 10 minutes before slicing.
Zesty and aromatic, this focaccia boasts a crisp, olive oil-crisped crust that gives way to a tender, airy crumb. Serve it warm, torn into rustic chunks for dipping in herbed oil, or slice it horizontally to craft a show-stopping sandwich layered with prosciutto and arugula.
Lemon Peel and Vanilla Bean Syrup
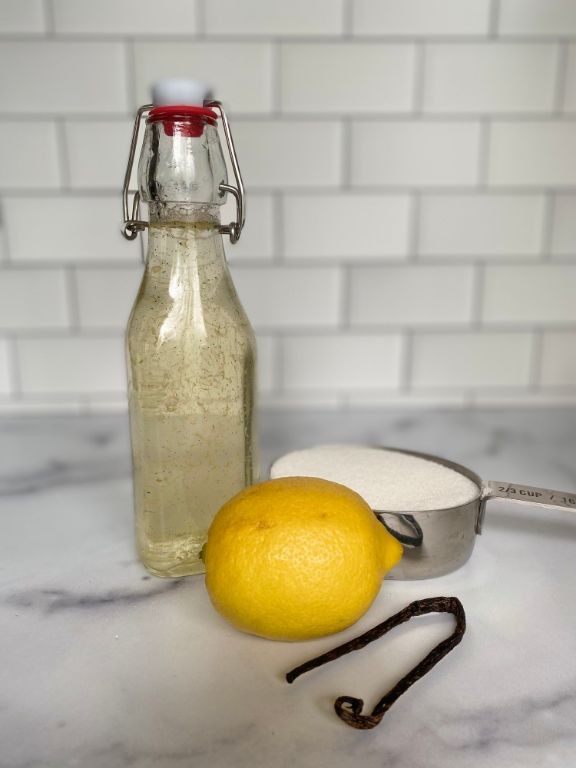
Oh, the things you can do with this liquid sunshine! This lemon peel and vanilla bean syrup is basically bottled happiness that will transform your morning coffee, cocktails, and even your Tuesday night yogurt from mundane to magnificent in one sweet, citrusy pour.Ingredients
– 1 cup granulated sugar
– 1 cup water
– 3 large lemons
– 1 whole vanilla beanInstructions
1. Wash 3 large lemons thoroughly under cool running water to remove any wax or residue.
2. Using a vegetable peeler, carefully peel only the yellow zest from the lemons, avoiding the bitter white pith beneath.
3. Split 1 whole vanilla bean lengthwise with a sharp paring knife to expose the tiny seeds inside.
4. Combine 1 cup granulated sugar and 1 cup water in a small saucepan over medium heat.
5. Stir the mixture continuously with a wooden spoon until the sugar completely dissolves, about 3-4 minutes.
6. Add the lemon peels and split vanilla bean to the saucepan.
7. Reduce heat to low and simmer gently for 15 minutes, stirring occasionally to prevent sticking.
8. Remove the saucepan from heat and let the syrup steep, uncovered, for 30 minutes to develop maximum flavor.
9. Strain the syrup through a fine-mesh sieve into a clean glass jar or bottle, pressing gently on the solids to extract all liquid.
10. Discard the used lemon peels and vanilla bean pod.
11. Let the syrup cool completely to room temperature before sealing the container.Velvety smooth with a perfect balance of bright citrus and warm vanilla, this syrup pours like liquid gold. Drizzle it over pancakes for a breakfast upgrade, swirl it into iced tea for instant sophistication, or get wild and mix it into a vodka cocktail that’ll make you feel like a professional bartender.
Lemon Peel and Dark Chocolate Bark
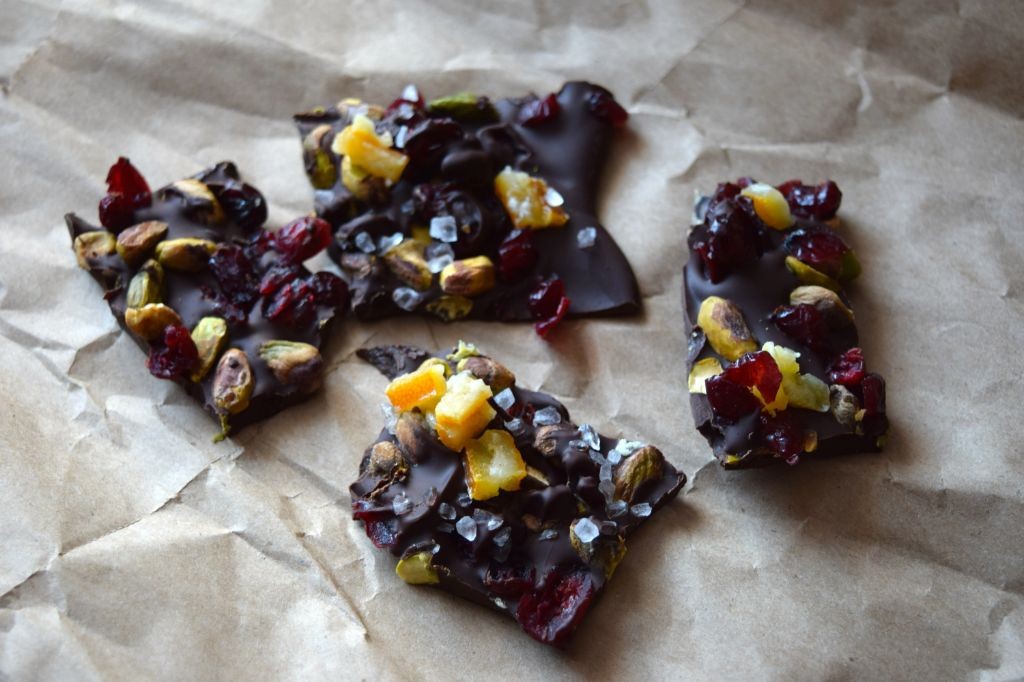
Oh, the glorious union of citrusy zing and rich chocolate—this lemon peel and dark chocolate bark is basically the food equivalent of finding twenty bucks in your winter coat pocket. It’s a no-bake, fuss-free treat that’ll make you feel like a kitchen wizard without the stress, and it’s perfect for gifting (or, let’s be real, hoarding for yourself). Seriously, this stuff is so addictive, you might need to hide it from your future self.Ingredients
– 12 ounces dark chocolate chips
– 1/4 cup finely chopped candied lemon peel
– 1/2 teaspoon flaky sea saltInstructions
1. Line a baking sheet with parchment paper, ensuring it lies flat to prevent chocolate from pooling unevenly.
2. Pour 12 ounces of dark chocolate chips into a microwave-safe bowl.
3. Microwave the chocolate on high for 30 seconds, then stir thoroughly with a spatula.
4. Repeat microwaving in 15-second intervals, stirring after each, until the chocolate is fully melted and smooth—this prevents scorching and ensures even texture.
5. Immediately pour the melted chocolate onto the prepared parchment paper.
6. Use a spatula to spread the chocolate into an even layer about 1/4 inch thick.
7. Sprinkle 1/4 cup of finely chopped candied lemon peel evenly over the chocolate surface.
8. Sprinkle 1/2 teaspoon of flaky sea salt evenly over the lemon peel and chocolate.
9. Gently press the toppings into the chocolate with your fingertips to help them adhere as it sets.
10. Transfer the baking sheet to the refrigerator and chill for 45 minutes, or until the bark is firm and breaks cleanly when snapped.
11. Remove the bark from the refrigerator and break it into irregular pieces by hand for a rustic, artisanal look.
Just imagine that satisfying snap as you break into this bark—the dark chocolate is luxuriously smooth, while the candied lemon peel adds a chewy, bright burst that cuts through the richness. Serve it alongside a strong espresso for an elegant pick-me-up, or crumble it over vanilla ice cream to instantly upgrade dessert.Lemon Peel and Lavender Scones

Unbelievably, we’ve managed to make scones that taste like a sunny afternoon in Provence without requiring a passport or dealing with airport security. These lemon peel and lavender scones are basically a vacation for your taste buds, combining zesty citrus with floral notes that’ll make you feel fancy without the pretentiousness. They’re the perfect excuse to drink tea with your pinky out while secretly wearing sweatpants.
Ingredients
- 2 cups all-purpose flour
- 1/3 cup granulated sugar
- 1 tbsp baking powder
- 1/2 tsp salt
- 1/2 cup cold unsalted butter
- 2 tsp dried culinary lavender
- 1 tbsp fresh lemon zest
- 1/2 cup heavy cream
- 1 large egg
- 1 tsp vanilla extract
Instructions
- Preheat your oven to 400°F and line a baking sheet with parchment paper.
- Whisk together 2 cups all-purpose flour, 1/3 cup granulated sugar, 1 tablespoon baking powder, and 1/2 teaspoon salt in a large bowl.
- Cut 1/2 cup cold unsalted butter into small cubes and work it into the dry ingredients using a pastry cutter or your fingers until the mixture resembles coarse crumbs.
- Gently stir in 2 teaspoons dried culinary lavender and 1 tablespoon fresh lemon zest until evenly distributed.
- In a separate bowl, whisk together 1/2 cup heavy cream, 1 large egg, and 1 teaspoon vanilla extract until well combined.
- Pour the wet ingredients into the dry ingredients and mix just until a shaggy dough forms—don’t overmix or your scones will be tough.
- Turn the dough out onto a lightly floured surface and gently pat it into a 1-inch thick circle.
- Use a sharp knife or bench scraper to cut the circle into 8 equal wedges, like you’re slicing a pizza.
- Arrange the wedges on your prepared baking sheet, leaving about 1 inch between each scone for even baking.
- Brush the tops of the scones with a little extra heavy cream to help them achieve that gorgeous golden-brown color.
- Bake for 15-18 minutes at 400°F until the tops are lightly golden and a toothpick inserted into the center comes out clean.
- Transfer the scones to a wire rack and let them cool for at least 10 minutes before serving—this allows the structure to set properly.
Heavenly doesn’t even begin to describe these scones—they strike the perfect balance between tender crumb and satisfying structure, with the bright lemon zest cutting through the subtle floral notes of lavender. Serve them warm with clotted cream and your favorite jam for maximum indulgence, or crumble them over vanilla ice cream for a dessert that’ll make you the star of any gathering.
Lemon Peel and Cinnamon Spiced Granola
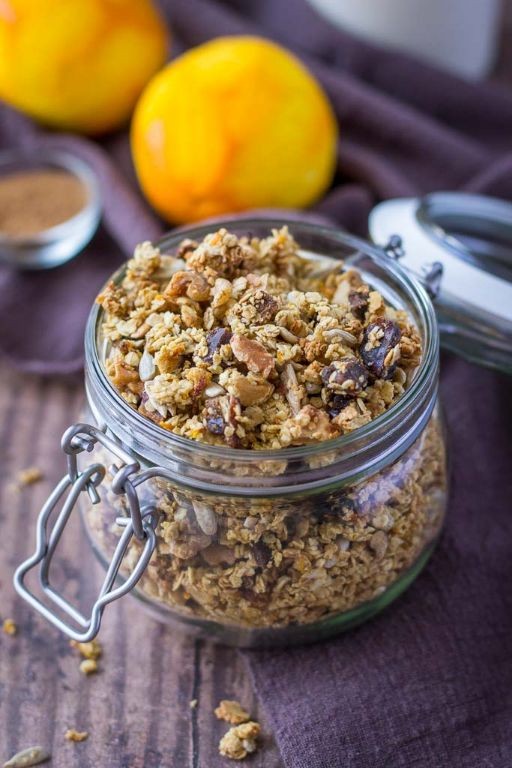
Hear ye, hear ye, fellow breakfast rebels! If you think granola has to be boring, prepare for your taste buds to do a happy dance. This zesty, spiced-up version will make you wonder why you ever settled for store-bought cardboard masquerading as breakfast.Ingredients
– 3 cups old-fashioned rolled oats
– 1 cup raw almonds
– 1/2 cup maple syrup
– 1/4 cup coconut oil
– 2 tablespoons lemon zest
– 1 tablespoon ground cinnamon
– 1 teaspoon vanilla extract
– 1/2 teaspoon sea saltInstructions
1. Preheat your oven to 325°F and line a large baking sheet with parchment paper.
2. In a large bowl, combine 3 cups old-fashioned rolled oats and 1 cup raw almonds.
3. In a small saucepan over medium heat, warm 1/2 cup maple syrup, 1/4 cup coconut oil, 2 tablespoons lemon zest, 1 tablespoon ground cinnamon, 1 teaspoon vanilla extract, and 1/2 teaspoon sea salt until the coconut oil melts completely.
4. Pour the warm liquid mixture over the oat-almond combination and stir until every piece is thoroughly coated.
5. Spread the mixture evenly on your prepared baking sheet in a single layer.
6. Bake for 20 minutes, then remove from oven and stir to ensure even browning.
7. Return to oven and bake for another 15-20 minutes until golden brown and fragrant.
8. Remove from oven and let cool completely on the baking sheet for about 45 minutes—this is crucial for achieving that signature crunch.
9. Once completely cool, break the granola into clusters and transfer to an airtight container.Who knew something so simple could deliver such spectacular results? The crispy clusters offer a satisfying crunch while the lemon peel provides a bright zing that perfectly balances the warm cinnamon spice. Try it sprinkled over Greek yogurt with fresh berries, or honestly, just eat it by the handful straight from the jar—we won’t judge.
Summary
Clearly, these 20 zesty lemon peel recipes prove that this humble ingredient can transform any dish from ordinary to extraordinary. We hope you’re inspired to add some citrus sparkle to your cooking! Don’t forget to share which recipes become your favorites in the comments below and pin this article to your Pinterest boards for easy reference. Happy cooking!