Holiday feasts don’t have to derail your healthy eating goals! This Thanksgiving, discover how to savor all the seasonal flavors you love while keeping things low carb. From creamy mashed cauliflower to savory stuffing alternatives, we’ve gathered 20 delicious recipes that will make your celebration both memorable and nourishing. Get ready to impress your guests with a feast that’s as good for you as it is tasty!
Cauliflower Mash with Garlic and Herbs

Falling into the rhythm of peeling garlic and chopping herbs feels like a quiet meditation today, a simple comfort that transforms humble cauliflower into something softly spectacular. There’s something deeply soothing about this mash, how it steams and blends into creamy perfection with just a few thoughtful touches. It’s the kind of dish that wraps you in warmth, gentle and nourishing from the first spoonful.
Ingredients
Cauliflower – 1 large head
Garlic – 4 cloves
Heavy cream – ½ cup
Unsalted butter – 3 tbsp
Fresh thyme – 1 tbsp
Salt – 1 tsp
Black pepper – ½ tsp
Instructions
1. Cut the cauliflower into 1-inch florets, discarding the tough core.
2. Place the florets in a large pot and add enough water to cover them by 1 inch.
3. Bring the water to a boil over high heat, then reduce to a simmer and cook for 10 minutes until the cauliflower is fork-tender.
4. While the cauliflower cooks, peel and mince the garlic cloves finely.
5. Strip the thyme leaves from their stems and chop them lightly.
6. Drain the cauliflower thoroughly in a colander, pressing gently to remove excess water for a creamier texture.
7. Transfer the drained cauliflower to a food processor or blender.
8. Add the minced garlic, heavy cream, unsalted butter, thyme, salt, and black pepper to the processor.
9. Blend on medium speed for 1 minute until completely smooth, scraping down the sides once to ensure even mixing.
10. Taste and adjust seasoning if needed, but avoid over-blending to prevent a gummy consistency.
11. Serve immediately or keep warm in a covered dish for up to 20 minutes. Perfectly velvety and rich with the earthy sweetness of roasted garlic, this mash cradles flavors like a soft blanket. Pair it with seared chicken or spoon it over roasted vegetables for a cozy, elegant touch that feels both humble and special.
Roasted Brussels Sprouts with Bacon
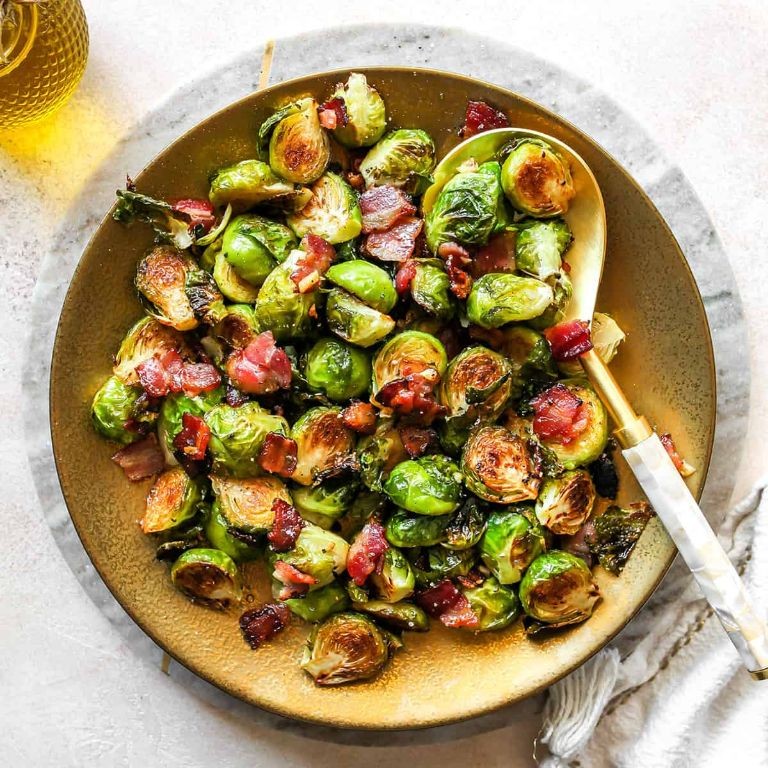
Holding this warm bowl in my hands, I remember how these humble sprouts transformed in the oven, their edges crisping while the bacon rendered its smoky fat into every crevice. There’s something quietly comforting about this simple preparation that turns ordinary evenings into something gently special.
Ingredients
Brussels sprouts – 1 lb
Bacon – 4 slices
Olive oil – 2 tbsp
Salt – ½ tsp
Black pepper – ¼ tsp
Instructions
1. Preheat your oven to 400°F.
2. Trim the stem ends from Brussels sprouts and cut each in half lengthwise.
3. Arrange sprouts cut-side down on a rimmed baking sheet in a single layer.
4. Drizzle olive oil evenly over the sprouts.
5. Season with salt and black pepper.
6. Cut bacon into ½-inch pieces and scatter evenly among the sprouts.
7. Roast for 20 minutes at 400°F until sprouts are tender when pierced with a fork.
8. Check for browning – sprouts should have deep golden-brown edges and caramelized bottoms.
9. Flip sprouts and bacon pieces using a spatula to ensure even cooking.
10. Continue roasting for 5-7 more minutes until bacon is crispy and sprouts are deeply browned.
11. Remove from oven and let rest for 2 minutes before serving.
My favorite part is that magical contrast between the crispy outer leaves and tender centers, with the bacon adding salty richness to each bite. Sometimes I’ll scatter these over creamy polenta or fold them into a grain bowl, where they become the star that ties everything together.
Low Carb Green Bean Casserole
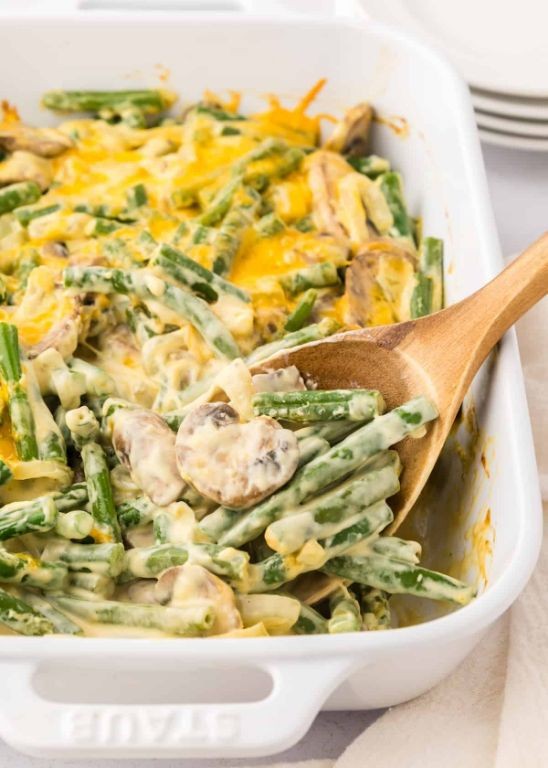
Keeping the kitchen quiet this afternoon, I find myself reaching for the familiar comfort of green beans, but wanting something lighter, something that won’t weigh down the soul. This low-carb version feels like a gentle whisper compared to the usual holiday shout.
Ingredients
Green beans – 1 lb
Heavy cream – 1 cup
Chicken broth – ½ cup
Almond flour – ¼ cup
Butter – 2 tbsp
Onion – 1 medium
Garlic – 2 cloves
Salt – 1 tsp
Black pepper – ½ tsp
Instructions
1. Preheat your oven to 375°F.
2. Trim the ends from 1 lb of green beans and cut them into 2-inch pieces.
3. Thinly slice 1 medium onion and mince 2 cloves of garlic.
4. Melt 2 tbsp of butter in a large oven-safe skillet over medium heat.
5. Add the sliced onion to the skillet and cook for 8-10 minutes until deeply golden and caramelized.
6. Stir in the minced garlic and cook for 1 minute until fragrant.
7. Sprinkle ¼ cup of almond flour over the onions and garlic, toasting it for 2 minutes to remove the raw flavor.
8. Gradually whisk in 1 cup of heavy cream and ½ cup of chicken broth until the sauce is smooth.
9. Bring the sauce to a gentle simmer and cook for 3-4 minutes until slightly thickened.
10. Add the trimmed green beans to the skillet, stirring to coat them evenly in the sauce.
11. Season the mixture with 1 tsp of salt and ½ tsp of black pepper, stirring to distribute.
12. Transfer the skillet to the preheated oven and bake for 25-30 minutes until the green beans are tender and the sauce is bubbly.
13. Remove from oven and let rest for 5 minutes before serving.
Draped in its creamy sauce, the casserole emerges with green beans that still have a pleasant bite, their freshness balancing the rich, savory depth. The almond flour thickens everything beautifully without heaviness, making it perfect alongside a simple roasted chicken or even topped with a soft-poached egg for a complete meal.
Creamy Garlic Parmesan Mushrooms
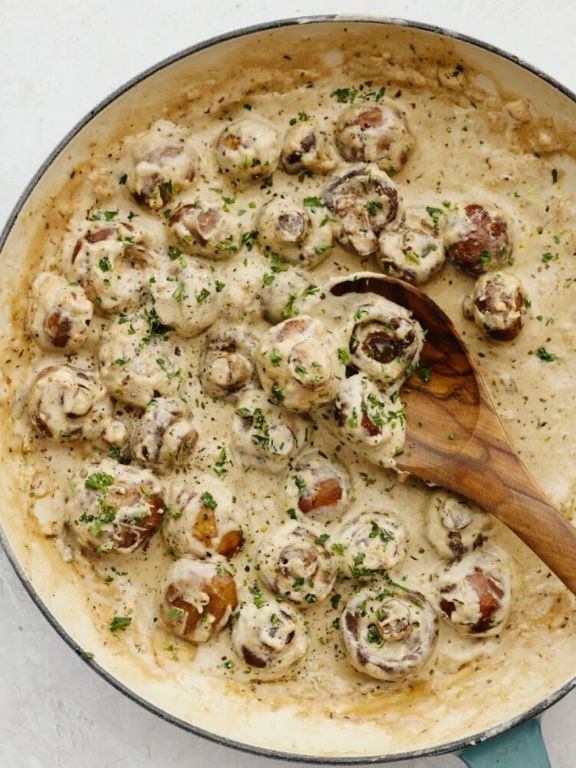
Never have I found such comfort in such simple ingredients, the way these mushrooms transform in the pan, releasing their earthy scent into the quiet kitchen air. It’s a gentle process, this alchemy of garlic and cream, one that asks for patience rather than haste. There’s something deeply soothing about watching them soften and shimmer, knowing a small, rich indulgence is just moments away.
Ingredients
– Olive oil – 2 tbsp
– Garlic – 3 cloves, minced
– Cremini mushrooms – 1 lb, sliced
– Heavy cream – ½ cup
– Grated Parmesan cheese – ¼ cup
– Salt – ½ tsp
– Black pepper – ¼ tsp
– Fresh parsley – 1 tbsp, chopped
Instructions
1. Heat 2 tbsp of olive oil in a large skillet over medium heat until it shimmers, about 2 minutes.
2. Add 3 cloves of minced garlic and sauté for 1 minute, stirring constantly, until fragrant but not browned.
3. Tip in 1 lb of sliced cremini mushrooms and cook for 8–10 minutes, stirring occasionally, until they release their liquid and turn golden brown.
4. Pour in ½ cup of heavy cream and bring to a gentle simmer, stirring to coat the mushrooms evenly.
5. Sprinkle in ¼ cup of grated Parmesan cheese, ½ tsp of salt, and ¼ tsp of black pepper, stirring continuously until the cheese melts and the sauce thickens slightly, about 2–3 minutes.
6. Remove the skillet from the heat and stir in 1 tbsp of chopped fresh parsley.
7. Serve immediately while warm. Perhaps spoon these velvety mushrooms over toasted sourdough, where their creamy, garlicky richness soaks into the crisp bread, or fold them into pasta for a cozy, effortless meal that feels like a quiet celebration.
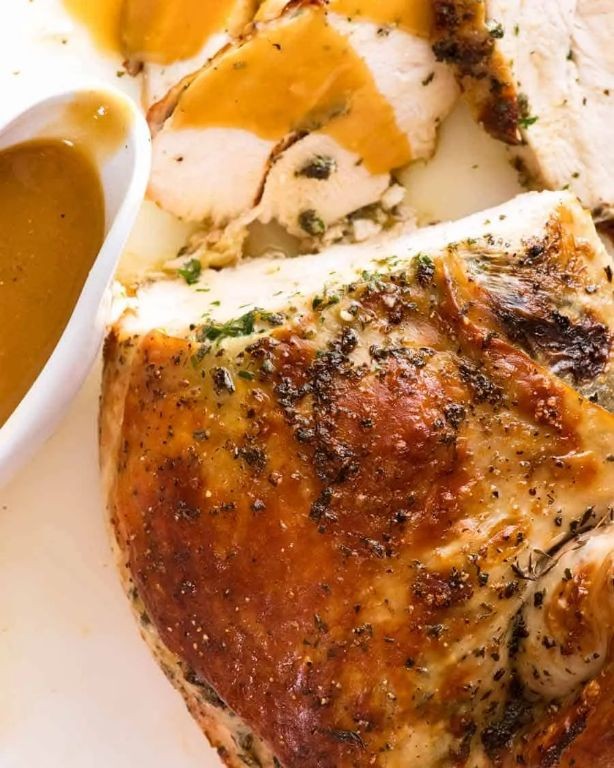
Herb-Roasted Turkey with Lemon Butter
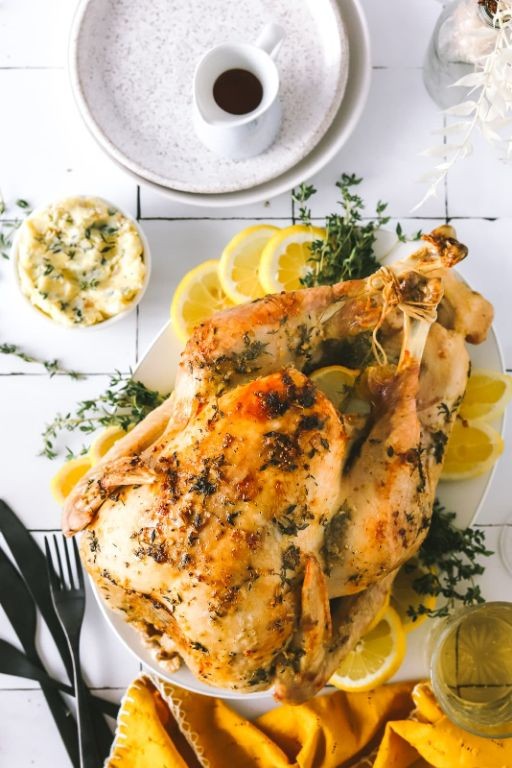
Zestful moments in the kitchen often arrive quietly, like the gentle aroma of herbs warming in the oven, and this herb-roasted turkey with lemon butter feels like one of those slow, comforting rituals worth savoring on a calm afternoon.
Ingredients
- Turkey – 1 (12-pound)
- Butter – ½ cup
- Lemon – 1
- Fresh rosemary – 2 sprigs
- Fresh thyme – 3 sprigs
- Salt – 1 tbsp
- Black pepper – 1 tsp
Instructions
- Preheat your oven to 325°F.
- Pat the turkey completely dry with paper towels, including the cavity, to help the skin crisp evenly.
- Zest the lemon into a small bowl, then juice it and add the juice to the zest.
- Melt the butter in a saucepan over low heat, then stir in the lemon zest and juice.
- Strip the rosemary and thyme leaves from their stems and finely chop them.
- Mix the chopped herbs, salt, and black pepper into the lemon butter.
- Brush the entire turkey, inside and out, with the lemon herb butter mixture, using all of it.
- Place the turkey breast-side up in a roasting pan fitted with a rack.
- Roast the turkey for 3 hours, or until a meat thermometer inserted into the thickest part of the thigh reads 165°F.
- Let the turkey rest for 30 minutes before carving to allow the juices to redistribute.
Perfectly golden and fragrant, the turkey emerges with a crisp skin that gives way to tender, moist meat infused with bright lemon and earthy herbs. Pair slices with roasted root vegetables or shred leftovers into a cozy grain bowl the next day, letting those subtle, savory notes linger a little longer.
Keto Stuffing with Almond Flour and Sausage
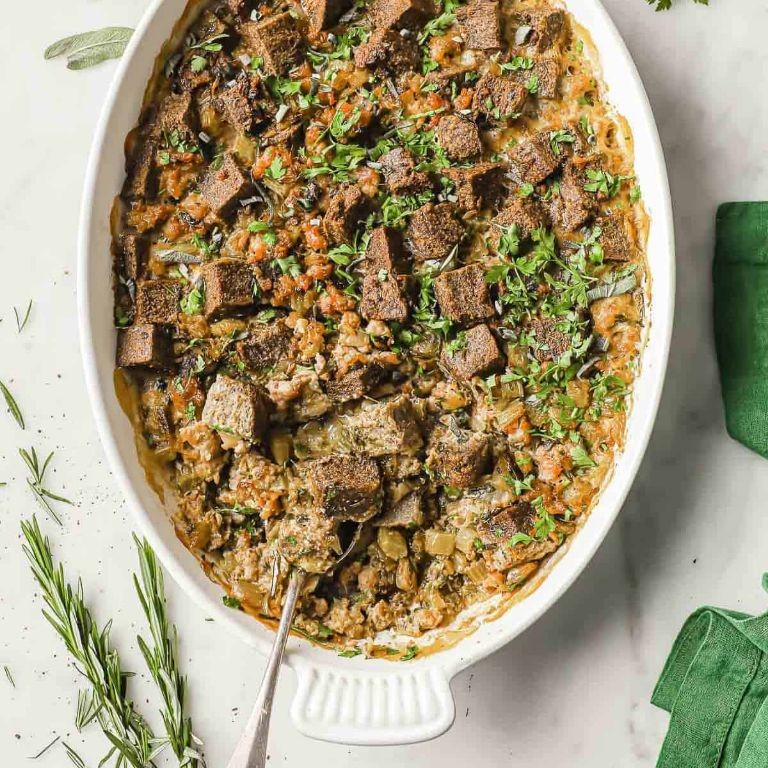
Sometimes I find myself craving the comforting embrace of holiday stuffing, even when the seasons don’t quite align. So I’ve been slowly perfecting this keto version in my quiet kitchen, letting the almond flour and sausage create their own kind of warmth. It feels like discovering a gentle secret that satisfies both tradition and new beginnings.
Ingredients
- Almond Flour – 2 cups
- Ground Sausage – 1 lb
- Celery – ½ cup chopped
- Onion – ½ cup chopped
- Eggs – 2 large
- Chicken Broth – ¾ cup
- Butter – 4 tbsp
- Sage – 1 tsp dried
- Salt – ½ tsp
- Black Pepper – ¼ tsp
Instructions
- Preheat your oven to 350°F and grease an 8×8 inch baking dish thoroughly.
- Brown 1 lb of ground sausage in a large skillet over medium heat for 8-10 minutes, breaking it into small crumbles with a spatula.
- Transfer the cooked sausage to a large mixing bowl using a slotted spoon, leaving 1 tablespoon of drippings in the skillet.
- Sauté ½ cup chopped celery and ½ cup chopped onion in the sausage drippings for 5-7 minutes until they become translucent.
- Add the sautéed vegetables to the mixing bowl with the sausage.
- Stir in 2 cups of almond flour, 1 tsp dried sage, ½ tsp salt, and ¼ tsp black pepper until evenly combined.
- Whisk 2 large eggs with ¾ cup chicken broth in a separate small bowl until fully incorporated.
- Pour the wet mixture over the dry ingredients and mix gently until everything is moistened.
- Transfer the stuffing mixture to your prepared baking dish and spread it evenly with a spatula.
- Dot the top with 4 tbsp of butter cut into small pieces.
- Bake uncovered at 350°F for 35-40 minutes until the top is golden brown and firm to the touch.
- Let the stuffing rest for 10 minutes before serving to allow the texture to set properly.
Hearty and satisfying, this stuffing develops a wonderfully crisp top layer while remaining moist underneath, with the sage and sausage creating a savory depth that feels both familiar and new. I love serving it alongside roasted chicken or even using it as a filling for stuffed peppers, finding comfort in how it bridges old traditions with new ways of eating.
Cheesy Cauliflower Gratin
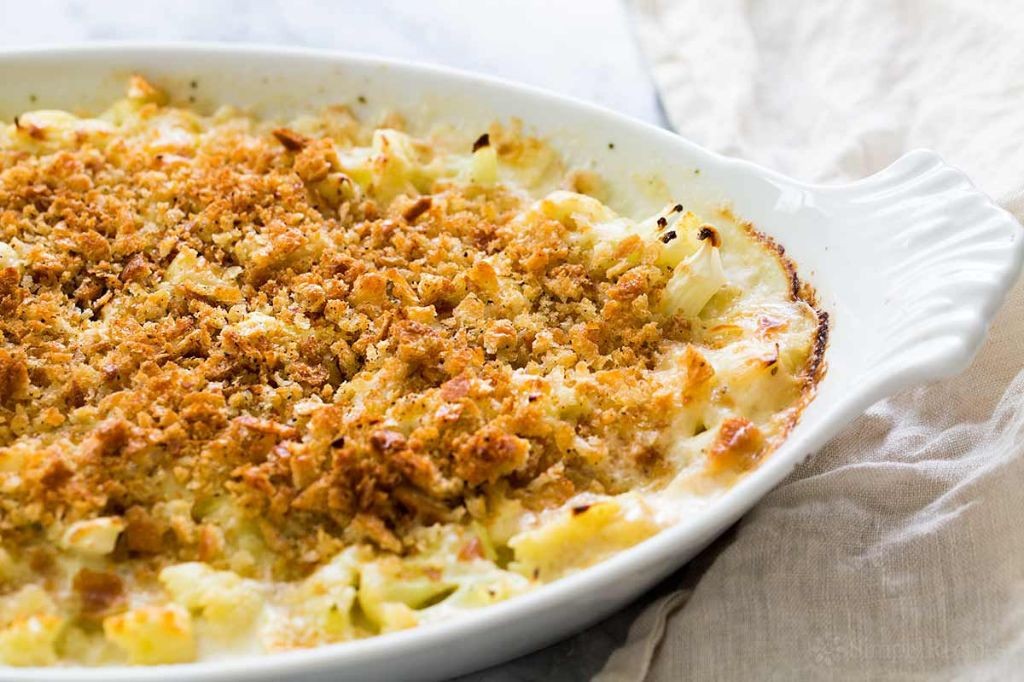
Dipping into the quiet kitchen on this crisp afternoon, I find myself craving something simple yet deeply comforting, something that wraps you in warmth without demanding too much effort. This cheesy cauliflower gratin feels like a gentle hug, a dish that whispers of cozy evenings and soft satisfaction.
Ingredients
– Cauliflower – 1 large head
– Heavy cream – 1 cup
– Sharp cheddar cheese – 1 ½ cups, shredded
– Butter – 2 tbsp
– Salt – 1 tsp
– Black pepper – ½ tsp
– Nutmeg – ¼ tsp
Instructions
1. Preheat your oven to 375°F and lightly grease a 9×13-inch baking dish with 1 tbsp of butter.
2. Cut the cauliflower into 1-inch florets, discarding the tough core.
3. Bring a large pot of salted water to a rolling boil over high heat.
4. Add the cauliflower florets and boil for exactly 5 minutes until just tender but not mushy.
5. Drain the cauliflower thoroughly in a colander, shaking gently to remove excess water.
6. Arrange the drained cauliflower in a single layer in the prepared baking dish.
7. In a small saucepan over medium heat, warm the heavy cream, remaining 1 tbsp butter, salt, black pepper, and nutmeg until the butter melts and the mixture is steaming, about 3 minutes.
8. Pour the warm cream mixture evenly over the cauliflower in the baking dish.
9. Sprinkle the shredded cheddar cheese uniformly over the top, covering all the cauliflower.
10. Bake at 375°F for 25-30 minutes until the cheese is golden brown and bubbly, and the edges are lightly crisped.
11. Remove from the oven and let it rest for 5 minutes before serving to allow the sauce to thicken slightly.
Each bite offers a tender crunch from the cauliflower, enveloped in a rich, velvety cheese sauce that’s subtly spiced with nutmeg. Enjoy it as a side to roasted chicken or spoon it over crusty bread for a simple, satisfying meal that feels both humble and indulgent.
Low Carb Cranberry Sauce with Stevia
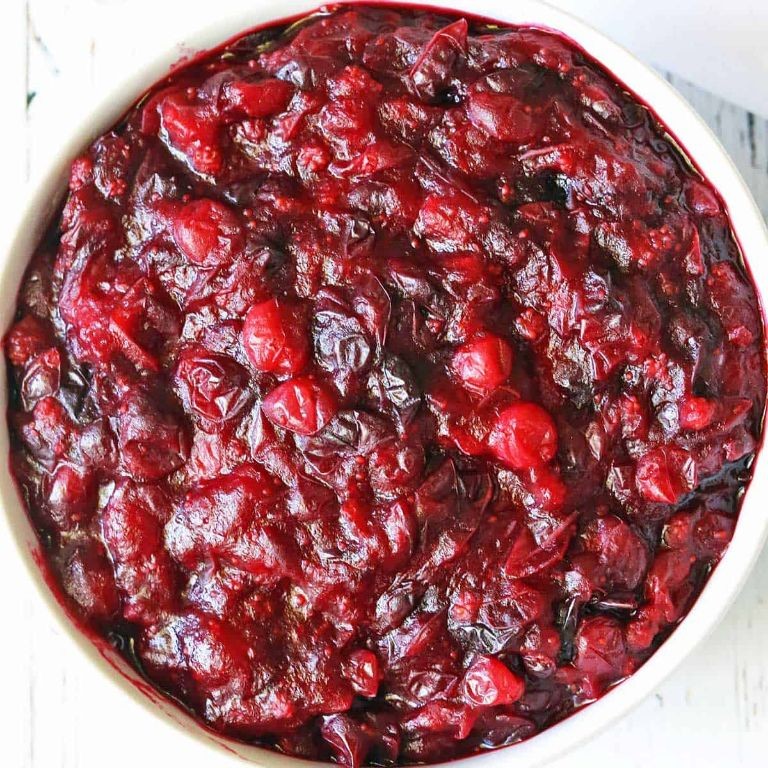
Cranberries shimmer like tiny rubies in the autumn light, their tartness holding memories of holidays past, yet this year calls for something gentler, something that won’t linger too heavily in the body. Creating this low-carb version feels like rewriting an old family recipe with softer ink, preserving the tradition while honoring present needs. There’s a quiet satisfaction in transforming these bright berries into a sauce that nourishes without overwhelm.
Ingredients
Fresh cranberries – 12 oz
Water – ½ cup
Stevia – ¼ cup
Lemon juice – 1 tbsp
Instructions
1. Rinse 12 oz fresh cranberries under cold running water in a colander, discarding any soft or discolored berries.
2. Combine rinsed cranberries and ½ cup water in a medium saucepan over medium heat.
3. Cook the cranberry-water mixture, stirring occasionally with a wooden spoon, until the berries begin to pop and release their juices, about 8-10 minutes.
4. Reduce heat to low and stir in ¼ cup stevia until fully dissolved into the berry mixture.
5. Continue cooking the sweetened cranberry mixture on low heat for 5 minutes, stirring frequently to prevent sticking.
6. Remove saucepan from heat and stir in 1 tbsp lemon juice until thoroughly incorporated.
7. Transfer the cranberry sauce to a heatproof bowl and let it cool completely at room temperature for 1 hour.
8. Cover the cooled cranberry sauce with plastic wrap and refrigerate for at least 4 hours before serving.
Deep crimson and jewel-like, this sauce maintains the cranberries’ natural tartness while the stevia provides a clean sweetness that doesn’t overwhelm. The texture remains pleasantly chunky with bursts of berry, perfect alongside roasted turkey or spread over cream cheese on low-carb crackers. For a festive twist, layer it with Greek yogurt and chopped nuts for a holiday parfait that feels both indulgent and light.
Pumpkin Spice Fat Bombs

Mmm, there’s something quietly comforting about the ritual of making these little treats as the afternoon light fades, a small pause to fold warmth and spice into something you can hold in your hand. It feels less like baking and more like a gentle, deliberate act of care, a way to capture the essence of the season in a single, no-fuss bite.
Ingredients
– Cream cheese – 8 oz
– Pumpkin puree – ½ cup
– Pumpkin pie spice – 2 tsp
– Vanilla extract – 1 tsp
– Salt – ¼ tsp
– Pecans – ½ cup, chopped
Instructions
1. Place 8 oz of cream cheese in a large mixing bowl and let it sit at room temperature for 30 minutes to soften completely.
2. Add ½ cup of pumpkin puree, 2 tsp of pumpkin pie spice, 1 tsp of vanilla extract, and ¼ tsp of salt to the bowl with the softened cream cheese.
3. Use an electric mixer on medium speed for 2 minutes, or until all the ingredients are fully incorporated and the mixture is smooth with no streaks. (Tip: Scrape down the sides of the bowl with a spatula halfway through to ensure everything is evenly mixed.)
4. Cover the bowl with plastic wrap and place it in the refrigerator to chill for 1 hour, which will make the mixture firmer and easier to handle.
5. Line a baking sheet with parchment paper.
6. Use a small cookie scoop or a tablespoon to portion the chilled mixture, rolling each portion between your palms to form a smooth, 1-inch ball.
7. Place the formed balls on the prepared baking sheet.
8. Chop ½ cup of pecans into small, fine pieces and place them in a small, shallow bowl.
9. Roll each pumpkin ball in the chopped pecans, gently pressing so the nuts adhere to the surface. (Tip: If the balls become too soft from the warmth of your hands, return the baking sheet to the refrigerator for 10 minutes to firm them up again.)
10. Arrange the coated balls in a single layer on the baking sheet.
11. Transfer the baking sheet to the freezer and freeze the fat bombs for at least 2 hours, or until they are completely solid. (Tip: For longer storage, transfer the frozen fat bombs to an airtight container or a freezer bag to prevent freezer burn and keep them fresh for up to 3 months.)
12. Remove the fat bombs from the freezer 5 minutes before serving to slightly soften.
But the real magic happens when you bite into one. The initial, satisfying crunch of the pecans gives way to a cool, creamy center that melts on the tongue, releasing a soft, spiced warmth that feels like a cozy autumn hug. They are delightful straight from the freezer, but for a different experience, try crumbling one over a bowl of warm oatmeal, letting the spiced cream melt into the grains.
Garlic Butter Roasted Radishes

Cradling a bowl of these humble roots, I’m reminded how winter’s simplest offerings often hold the most comfort. There’s something quietly transformative about roasting radishes, turning their peppery bite into something mellow and buttery, perfect for these shorter, colder days.
Ingredients
Radishes – 1 lb
Unsalted butter – 3 tbsp
Garlic – 3 cloves
Salt – ½ tsp
Black pepper – ¼ tsp
Instructions
1. Preheat your oven to 425°F.
2. Trim the tops and tails from 1 lb of radishes.
3. Cut larger radishes in half to ensure even cooking.
4. Melt 3 tbsp of unsalted butter in a small saucepan over low heat.
5. Mince 3 cloves of garlic finely.
6. Stir the minced garlic into the melted butter and cook for 1 minute until fragrant.
7. Toss the prepared radishes in the garlic butter mixture until evenly coated.
8. Spread the radishes in a single layer on a baking sheet.
9. Sprinkle ½ tsp of salt and ¼ tsp of black pepper evenly over the radishes.
10. Roast for 25-30 minutes, stirring halfway through, until tender and golden brown at the edges.
11. Remove from oven and let rest for 2 minutes before serving.
Really, the magic happens in that final roast—the sharp edges caramelize while the centers turn creamy and mild. Their texture becomes almost potato-like but with a delicate crispness at the edges, making them wonderful alongside roasted chicken or simply scattered over a bed of greens with the pan drippings drizzled over top.
Keto Dinner Rolls with Almond Flour

Cradling a warm dinner roll in your hands on a quiet evening feels like receiving a small, edible comfort. These keto rolls with almond flour emerged from my kitchen during a season of simplifying, when I craved bread’s gentle embrace without the heaviness. Making them became a meditative practice, each step unfolding like pages in a well-loved journal.
Ingredients
– Almond flour – 2 cups
– Baking powder – 1 tbsp
– Eggs – 3 large
– Butter – ¼ cup, melted
– Salt – ½ tsp
Instructions
1. Preheat your oven to 350°F and line a baking sheet with parchment paper.
2. Whisk almond flour, baking powder, and salt in a medium bowl until fully combined.
3. Crack eggs into a separate bowl and beat with a fork until uniform in color.
4. Pour melted butter into the eggs and whisk until emulsified.
5. Tip: Fold wet ingredients into dry with a spatula—gentle mixing prevents dense rolls.
6. Scoop dough into 8 equal portions using a ¼-cup measure.
7. Roll each portion between palms into smooth balls, placing them 2 inches apart on the baking sheet.
8. Tip: Wet your hands lightly to stop dough from sticking while shaping.
9. Bake for 18–22 minutes until tops are golden and a toothpick inserted comes out clean.
10. Tip: Let rolls cool on the sheet for 5 minutes—they firm up beautifully as they rest.
11. Transfer to a wire rack to cool completely before serving. Their tender crumb and subtle nuttiness pair wonderfully with softened herb butter or simply torn apart while still warm, releasing whispers of comfort with each soft pull.
Slow Cooker Turkey Breast with Herbs
There’s something quietly comforting about letting a slow cooker do the work while the house fills with the gentle scent of herbs and turkey. This simple dish feels like a warm hug on a busy day, requiring little effort for a tender, flavorful result. It’s the kind of meal that lets you step back and savor the slow, steady rhythm of cooking.
Ingredients
– Turkey breast – 1 (4-5 lb)
– Olive oil – 2 tbsp
– Salt – 1 tsp
– Black pepper – ½ tsp
– Dried rosemary – 1 tsp
– Dried thyme – 1 tsp
– Garlic powder – 1 tsp
– Chicken broth – ½ cup
Instructions
1. Pat the turkey breast completely dry with paper towels to help the skin crisp later.
2. Rub the olive oil evenly over the entire surface of the turkey breast.
3. In a small bowl, mix together the salt, black pepper, dried rosemary, dried thyme, and garlic powder.
4. Sprinkle the seasoning mixture evenly over the turkey breast, covering all sides.
5. Pour the chicken broth into the bottom of a 6-quart slow cooker.
6. Place the seasoned turkey breast into the slow cooker, breast-side up.
7. Cover the slow cooker with the lid and cook on low heat for 6 hours, or until the internal temperature reaches 165°F when measured with a meat thermometer inserted into the thickest part of the breast.
8. Carefully remove the turkey breast from the slow cooker and let it rest on a cutting board for 15 minutes before slicing to allow the juices to redistribute.
9. Slice the turkey breast against the grain into ½-inch thick pieces. Here the turkey will be incredibly tender, with the herbs creating a subtle, aromatic crust. Its juicy slices pair beautifully with mashed potatoes or tucked into sandwiches with a drizzle of the cooking juices.
Spicy Roasted Cauliflower Bites
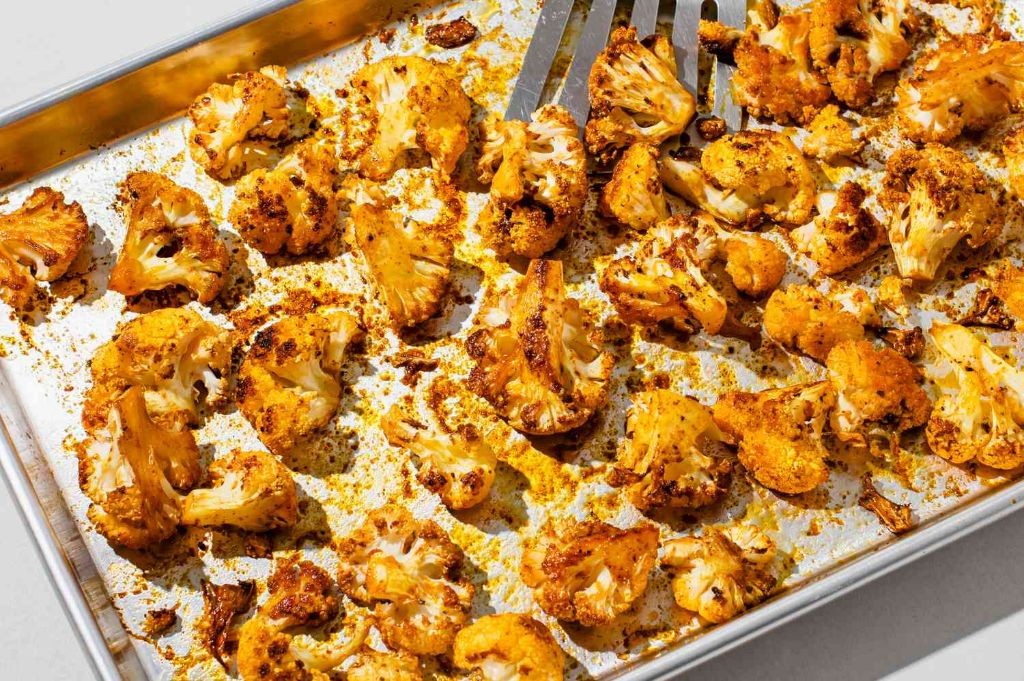
Zestful moments often arrive in quiet kitchens, where simple vegetables transform under careful hands. Today I’m making spicy roasted cauliflower bites, letting the oven work its slow magic while I watch golden edges curl like autumn leaves. There’s something deeply satisfying about this humble vegetable becoming crisp, caramelized, and wonderfully spicy.
Ingredients
Cauliflower – 1 head
Olive oil – 3 tbsp
Paprika – 2 tsp
Cayenne pepper – 1 tsp
Salt – 1 tsp
Instructions
1. Preheat your oven to 425°F and line a baking sheet with parchment paper.
2. Cut the cauliflower into bite-sized florets, making them roughly equal in size for even cooking.
3. Place cauliflower florets in a large mixing bowl.
4. Drizzle olive oil over the cauliflower and toss thoroughly to coat every surface.
5. Sprinkle paprika, cayenne pepper, and salt over the oiled cauliflower.
6. Use your hands to massage the spices evenly onto each floret, ensuring no spots remain bare.
7. Spread cauliflower in a single layer on the prepared baking sheet, leaving space between pieces.
8. Roast for 20 minutes at 425°F until edges begin browning.
9. Flip each piece carefully using tongs to expose unbrowned surfaces.
10. Continue roasting for another 15-20 minutes until deeply golden and crisp-tender.
11. Remove from oven when caramelized spots appear and edges feel slightly crispy to touch.
Unbelievably tender inside with crackling spice-kissed edges, these bites carry warmth that lingers pleasantly. I love serving them straight from the baking sheet with cool yogurt for dipping, or scattered over greens where their heat wilts the lettuce just slightly.
Creamy Spinach and Artichoke Dip

Years of hosting have taught me that the best gatherings often revolve around a single, comforting dish that brings everyone together around the table. You know the one—it’s warm, inviting, and disappears before you’ve even had a chance to properly introduce it. This creamy dip is that dish for me, a quiet constant in a noisy world.
Ingredients
– Cream cheese – 8 oz
– Sour cream – 1 cup
– Mayonnaise – ½ cup
– Frozen spinach – 10 oz, thawed
– Canned artichoke hearts – 14 oz, drained
– Garlic – 2 cloves, minced
– Mozzarella cheese – 1 cup, shredded
– Parmesan cheese – ½ cup, grated
– Salt – ½ tsp
– Black pepper – ¼ tsp
– Paprika – ½ tsp
Instructions
1. Preheat your oven to 375°F.
2. Squeeze all excess water from the thawed spinach using your hands or a clean kitchen towel until it is completely dry.
3. Chop the drained artichoke hearts into small, bite-sized pieces.
4. In a large mixing bowl, combine the cream cheese, sour cream, and mayonnaise, stirring until the mixture is completely smooth with no lumps.
5. Add the minced garlic, salt, black pepper, and paprika to the bowl, stirring for 30 seconds to evenly distribute the seasonings.
6. Fold in the dried spinach and chopped artichoke hearts until they are fully incorporated into the creamy base.
7. Mix in ¾ cup of the shredded mozzarella and all of the grated Parmesan cheese, reserving the remaining ¼ cup of mozzarella for the top.
8. Transfer the mixture to a 9-inch oven-safe baking dish, spreading it into an even layer with a spatula.
9. Sprinkle the reserved ¼ cup of mozzarella cheese evenly over the top of the dip.
10. Bake for 25 minutes at 375°F, or until the edges are bubbling and the top is golden brown.
11. Let the dip rest for 5 minutes outside the oven before serving to allow it to set slightly. Warm from the oven, it emerges with a golden, bubbly crust that gives way to a luxuriously smooth, velvety interior. The gentle tang of cream cheese and sour cream balances the earthy spinach and briny artichokes, creating a harmony that feels both familiar and special. I love serving it straight from the baking dish with thick-cut potato chips or spreading it generously on toasted baguette slices for a more substantial bite.
Low Carb Pecan Pie Bars
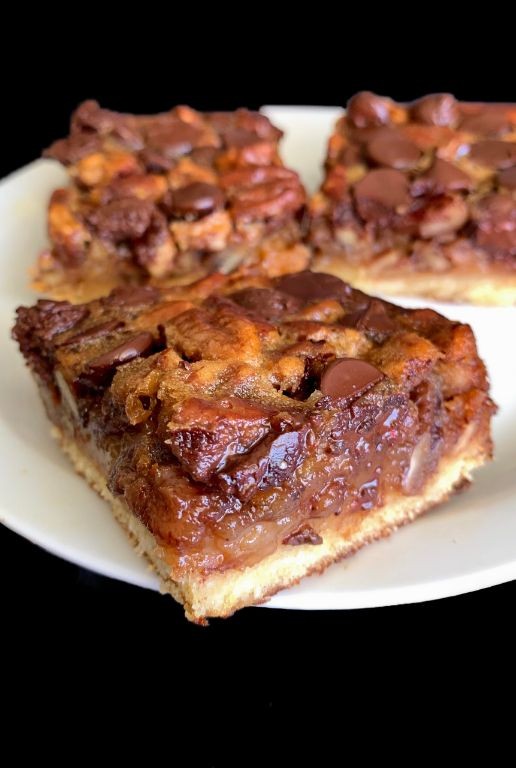
Oh, the quiet comfort that comes with autumn baking—the way the kitchen fills with warmth, the gentle crackle of toasted pecans, the sweet, earthy scent of maple and spice. These low-carb pecan pie bars are like a soft whisper of tradition, reimagined for slower, more mindful moments.
Ingredients
– Almond flour – 1 ½ cups
– Butter – ½ cup
– Erythritol – ¾ cup
– Eggs – 2 large
– Pecans – 1 cup
– Maple extract – 1 tsp
– Salt – ¼ tsp
Instructions
1. Preheat your oven to 350°F and line an 8×8-inch baking pan with parchment paper, letting the edges overhang for easy removal later.
2. Combine 1 ½ cups almond flour, ¼ cup melted butter, and ¼ cup erythritol in a medium bowl, mixing until the texture resembles damp sand.
3. Press the almond flour mixture firmly and evenly into the bottom of the prepared pan—a flat-bottomed glass helps create a compact, smooth crust.
4. Bake the crust for 12 minutes, until the edges are lightly golden and the surface feels set to the touch.
5. While the crust bakes, whisk 2 large eggs, ½ cup erythritol, ¼ cup melted butter, 1 tsp maple extract, and ¼ tsp salt in a separate bowl until fully blended and slightly frothy.
6. Stir 1 cup pecans into the egg mixture, coating them evenly to prevent sinking during baking.
7. Pour the pecan filling over the hot crust, spreading it gently with a spatula to cover the surface completely.
8. Return the pan to the oven and bake for 20–22 minutes, until the filling is set and no longer jiggles in the center when lightly shaken.
9. Cool the bars completely in the pan on a wire rack for at least 1 hour—this patience ensures clean slices and developed flavor.
10. Use the parchment overhang to lift the slab from the pan, then slice into 12 bars with a sharp knife wiped clean between cuts for neat edges.
You’ll find these bars carry the rich, buttery crunch of toasted pecans against a subtly sweet, tender base—a harmony that feels both nostalgic and new. Serve them slightly warmed with a drizzle of sugar-free caramel or crumbled over Greek yogurt for a playful twist.
Baked Parmesan Crusted Salmon

Vividly remembering the first time I prepared this dish, the warmth of the oven filled my quiet kitchen, transforming simple ingredients into something deeply comforting. There’s a gentle rhythm to preparing salmon this way, each step feeling like a quiet meditation that yields such satisfying results.
Ingredients
Salmon fillets – 4 (6 oz each)
Olive oil – 2 tbsp
Parmesan cheese – ½ cup, grated
Breadcrumbs – ¼ cup
Garlic powder – 1 tsp
Paprika – ½ tsp
Salt – ¾ tsp
Black pepper – ¼ tsp
Lemon – 1, cut into wedges
Instructions
1. Preheat your oven to 400°F and line a baking sheet with parchment paper.
2. Pat the salmon fillets completely dry with paper towels to ensure the crust adheres properly.
3. Brush both sides of each salmon fillet evenly with olive oil.
4. In a small bowl, combine grated Parmesan cheese, breadcrumbs, garlic powder, paprika, salt, and black pepper.
5. Press the Parmesan mixture firmly onto the top surface of each salmon fillet, creating an even layer about ¼-inch thick.
6. Arrange the coated salmon fillets on the prepared baking sheet, leaving 2 inches between each piece for even cooking.
7. Bake at 400°F for 12-15 minutes until the internal temperature reaches 145°F and the crust is golden brown.
8. Let the salmon rest for 3 minutes before serving to allow the juices to redistribute throughout the flesh.
9. Serve immediately with fresh lemon wedges for squeezing over the top.
Remarkably, the Parmesan crust forms a delicate, crispy shell that gives way to moist, flaky salmon beneath. The savory cheese complements the fish’s natural richness beautifully, while the lemon brightens each bite. Consider serving it over a bed of creamy polenta or alongside roasted asparagus for a complete meal that feels both elegant and utterly comforting.
Avocado Deviled Eggs with Bacon

Holding these warm eggshells in my palms, I remember how my grandmother would make deviled eggs for every family gathering, her hands moving with the same gentle rhythm as she peeled each one. Today, I’m adding creamy avocado and crispy bacon to her classic recipe, creating something familiar yet new. It feels like honoring tradition while making it my own.
Ingredients
Eggs – 6 large
Bacon – 4 slices
Avocado – 1 medium
Mayonnaise – ¼ cup
Dijon mustard – 1 tsp
White vinegar – 1 tsp
Paprika – ½ tsp
Salt – ¼ tsp
Instructions
1. Place 6 large eggs in a single layer in a saucepan and cover with cold water by 1 inch.
2. Bring the water to a rolling boil over high heat, then immediately remove the pan from heat.
3. Cover the pan and let the eggs sit for 12 minutes exactly for perfectly cooked yolks.
4. Transfer the eggs to an ice water bath and let them cool completely for 15 minutes to stop the cooking process.
5. Gently tap each egg on the counter and roll it between your palms to crack the shell evenly.
6. Peel the eggs under cool running water, starting from the wider end where the air pocket helps loosen the membrane.
7. Slice each peeled egg in half lengthwise and carefully pop out the yolks into a medium bowl.
8. Arrange the empty egg white halves on a serving platter.
9. Cook 4 bacon slices in a skillet over medium heat for 8-10 minutes until crispy and browned.
10. Transfer the bacon to a paper towel-lined plate to drain excess grease.
11. Crumble the cooled bacon into small pieces.
12. Mash the egg yolks with a fork until they form fine crumbs.
13. Halve 1 medium avocado, remove the pit, and scoop the flesh into the bowl with the yolks.
14. Add ¼ cup mayonnaise, 1 tsp Dijon mustard, 1 tsp white vinegar, and ¼ tsp salt to the bowl.
15. Mash and stir the mixture until completely smooth and well combined.
16. Spoon or pipe the avocado-yolk filling into the egg white halves.
17. Sprinkle ½ tsp paprika evenly over the filled eggs.
18. Top each deviled egg with crumbled bacon pieces.
Often, the first bite surprises with its cool creaminess giving way to the smoky saltiness of bacon. The avocado makes the filling exceptionally smooth, almost velvety, while the paprika adds just a whisper of warmth. I like serving these on a wooden board with radish slices and fresh dill scattered around, the colors echoing an autumn landscape.
Keto Pumpkin Cheesecake
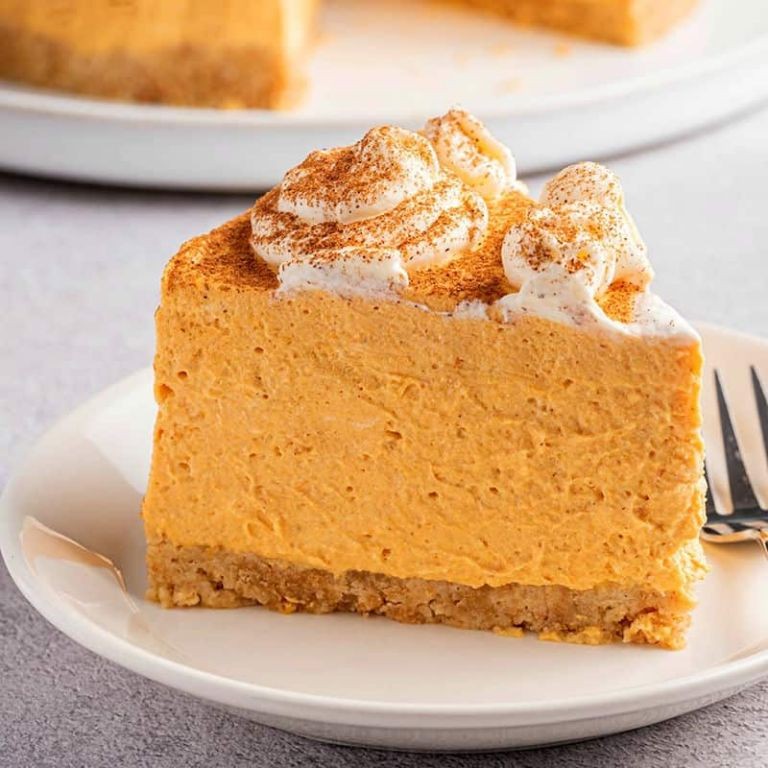
Mellow autumn afternoons like this one always draw me toward the kitchen, where the gentle ritual of baking becomes a quiet meditation. There’s something deeply comforting about transforming simple ingredients into a dessert that feels both indulgent and nourishing. Today, that ritual centers around a keto pumpkin cheesecake, its spiced aroma already beginning to fill the room with warmth.
Ingredients
Almond flour – 1 ½ cups
Butter – ½ cup
Erythritol – 1 cup
Cream cheese – 16 oz
Pumpkin puree – 1 cup
Eggs – 3
Vanilla extract – 1 tsp
Pumpkin pie spice – 2 tsp
Instructions
1. Preheat your oven to 350°F and grease a 9-inch springform pan thoroughly.
2. Combine 1 ½ cups almond flour and ½ cup melted butter in a medium bowl until the mixture resembles wet sand.
3. Press the almond flour mixture firmly into the bottom of the prepared pan using the flat bottom of a measuring cup to create an even crust layer.
4. Bake the crust for 10 minutes at 350°F until lightly golden around the edges, then remove from oven and cool completely.
5. In a large mixing bowl, beat 16 oz cream cheese with 1 cup erythritol using an electric mixer on medium speed for 3 minutes until completely smooth and no lumps remain.
6. Add 1 cup pumpkin puree, 2 tsp pumpkin pie spice, and 1 tsp vanilla extract to the cream cheese mixture, beating for 1 minute until fully incorporated.
7. Crack 3 eggs into a separate small bowl to check for shell fragments before adding to the batter one at a time, mixing just until each egg disappears to prevent overbeating.
8. Pour the filling over the cooled crust and smooth the top with a spatula, tapping the pan gently on the counter to release any air bubbles.
9. Bake at 350°F for 45-50 minutes until the edges are set but the center still jiggles slightly when you gently shake the pan.
10. Turn off the oven, crack the door open with a wooden spoon, and let the cheesecake cool slowly inside for 1 hour to prevent cracking.
11. Transfer the cheesecake to the refrigerator and chill for at least 4 hours, though overnight yields the best texture and flavor development. Overnight, the flavors deepen into a rich harmony of spice and cream, while the texture firms into that perfect cheesecake density we all crave. Served chilled with a dusting of cinnamon or a dollop of whipped cream, each slice offers that classic autumn comfort without the heaviness of traditional desserts.
Summary
Making a healthy Thanksgiving feast is easier than ever with these 20 delicious low-carb recipes! From savory mains to satisfying sides and desserts, there’s something for everyone to enjoy. We’d love to hear which recipes become your family favorites—leave a comment below and don’t forget to share this roundup on Pinterest so others can discover these tasty, healthy options too!