Now is the perfect time to explore delicious, lowfat vegetable recipes that make healthy eating exciting! Whether you’re looking for quick weeknight dinners, seasonal favorites, or comforting dishes that satisfy without the guilt, this collection has something for everyone. Get ready to discover 20 mouthwatering recipes that prove nutritious food can be absolutely delicious—let’s dive in and find your next favorite meal!
Lowfat Roasted Garlic Cauliflower
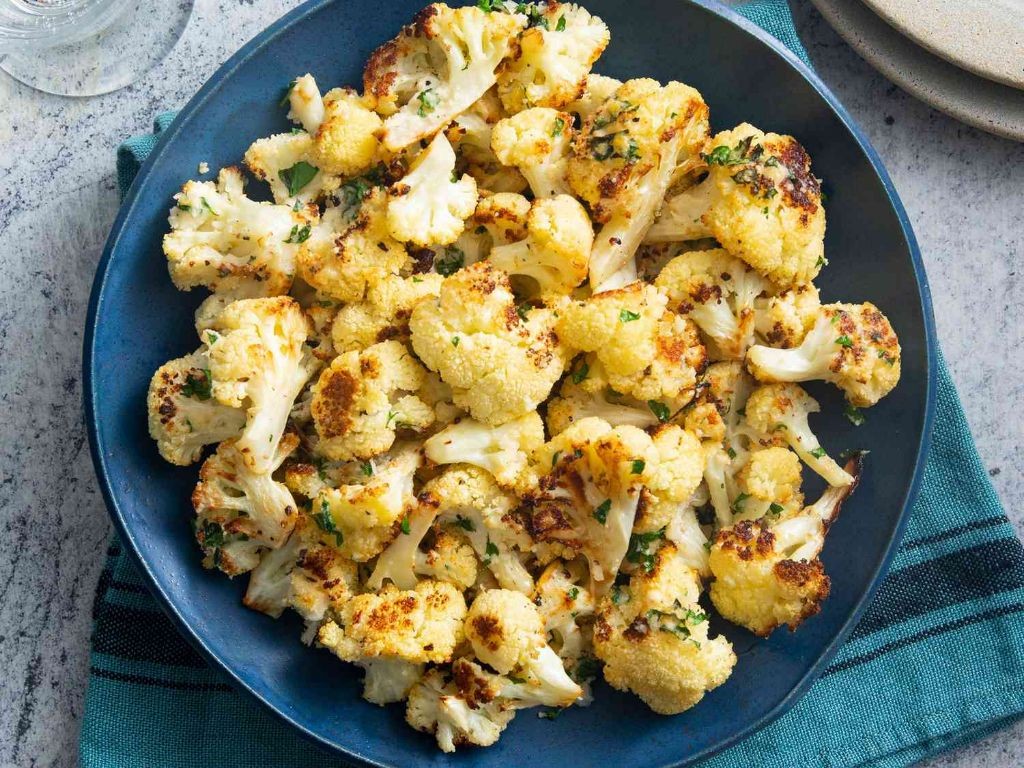
Wandering through the farmers market last weekend, I spotted the most beautiful cauliflower heads and immediately knew I had to create this simple yet spectacular side dish. As someone who’s always trying to balance flavor with healthier choices, this roasted garlic cauliflower has become my go-to for busy weeknights when I want something satisfying without the guilt. There’s something magical about how roasting transforms humble cauliflower into something truly special.
Ingredients
– 1 large head of fresh, crisp cauliflower
– 3 tablespoons of golden extra virgin olive oil
– 4 cloves of aromatic fresh garlic, minced
– 1 teaspoon of coarse kosher salt
– ½ teaspoon of freshly cracked black pepper
– 1 tablespoon of bright, zesty lemon juice
– 2 tablespoons of freshly chopped Italian parsley
Instructions
1. Preheat your oven to 425°F and line a large baking sheet with parchment paper.
2. Cut the cauliflower into evenly sized 1-inch florets, making sure to remove any tough stems.
3. In a large mixing bowl, combine the olive oil, minced garlic, salt, and pepper, whisking until well blended.
4. Add the cauliflower florets to the bowl and toss thoroughly until every piece is coated with the garlic oil mixture.
5. Spread the cauliflower in a single layer on the prepared baking sheet, ensuring pieces aren’t touching.
6. Roast for 20-25 minutes until the edges are deeply golden brown and the florets are tender when pierced with a fork.
7. Remove the baking sheet from the oven and immediately drizzle with fresh lemon juice.
8. Sprinkle the chopped parsley over the hot cauliflower and toss gently to distribute.
Keeping this dish simple lets the natural sweetness of the roasted cauliflower shine through, while the garlic becomes mellow and almost nutty after its time in the oven. I love how the crispy edges contrast with the tender centers, and sometimes I’ll serve it over creamy polenta or alongside grilled chicken for a complete meal that always gets rave reviews.
Zucchini Noodles with Light Tomato Basil Sauce
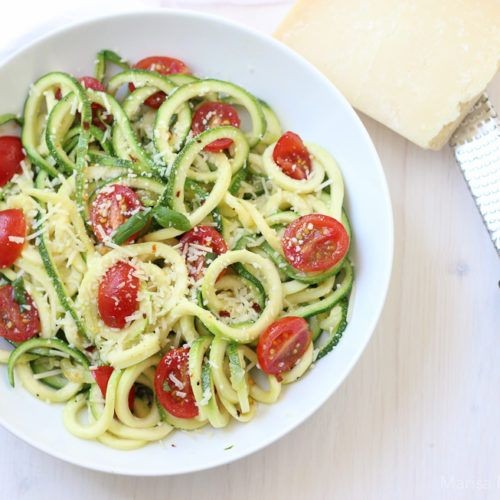
Over the years, I’ve learned that the simplest meals often become the most cherished, especially when they come together in under 20 minutes on a busy weeknight. This zucchini noodle dish is one of those go-to recipes that never fails to satisfy—light, fresh, and packed with garden flavors that make you feel good from the inside out.
Ingredients
- 4 medium-sized firm zucchini
- 2 tablespoons rich extra virgin olive oil
- 3 cloves aromatic garlic, minced
- 1 can (14.5 ounces) vibrant crushed tomatoes
- 1/4 cup fresh basil leaves, thinly sliced
- 1/2 teaspoon fine sea salt
- 1/4 teaspoon cracked black pepper
- 1/4 cup freshly grated Parmesan cheese
Instructions
- Using a spiralizer, create zucchini noodles from all 4 zucchini and set them aside in a large bowl.
- Heat 2 tablespoons of rich extra virgin olive oil in a large skillet over medium heat until it shimmers, about 1 minute.
- Add 3 cloves of minced aromatic garlic to the skillet and sauté for 45–60 seconds until fragrant but not browned.
- Pour in 1 can of vibrant crushed tomatoes, stirring to combine with the garlic and oil.
- Season the sauce with 1/2 teaspoon fine sea salt and 1/4 teaspoon cracked black pepper, stirring thoroughly.
- Simmer the sauce uncovered for 8–10 minutes, stirring occasionally, until it thickens slightly and deepens in color.
- Stir in the thinly sliced fresh basil leaves, reserving a few for garnish.
- Add the zucchini noodles to the skillet, tossing gently with tongs to coat them evenly in the sauce.
- Cook for 2–3 minutes, just until the zucchini noodles soften but still retain a slight crunch.
- Remove the skillet from heat and sprinkle with 1/4 cup freshly grated Parmesan cheese.
But what truly makes this dish shine is its delicate balance—the zucchini noodles offer a tender yet satisfying bite, while the tomato basil sauce brings a bright, herbaceous freshness. I love serving it straight from the skillet with an extra sprinkle of Parmesan and a side of crusty bread to soak up every last drop of sauce.
Steamed Asian-Style Bok Choy with Ginger
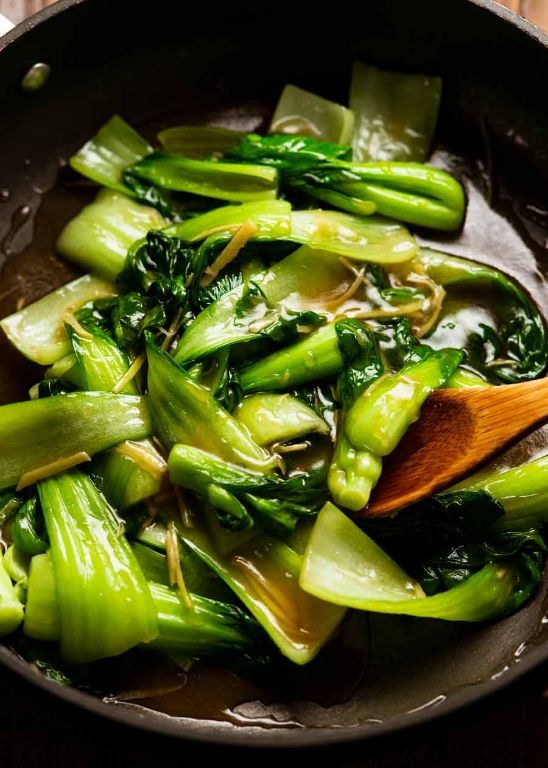
Recently, I found myself craving something light yet flavorful after a week of heavy comfort foods—you know how it goes when autumn settles in. This steamed bok choy with ginger has become my go-to reset button, and it’s so simple that even my most kitchen-averse friends have mastered it. There’s something magical about how the steam coaxes out the natural sweetness of the greens while the ginger adds that gentle kick.
Ingredients
– 1 pound fresh baby bok choy with crisp, emerald-green leaves
– 2 tablespoons finely grated fresh ginger root with its zesty, aromatic punch
– 3 tablespoons premium soy sauce with its deep, savory umami
– 1 tablespoon toasted sesame oil with its rich, nutty fragrance
– 1 tablespoon unseasoned rice vinegar for a bright, tangy lift
– 2 thinly sliced scallions with their fresh, mild bite
Instructions
1. Rinse 1 pound of fresh baby bok choy thoroughly under cold running water to remove any grit, gently separating the leaves while keeping the base intact.
2. Fill a large pot with 1 inch of water and bring it to a vigorous boil over high heat, which should take about 5–7 minutes.
3. Arrange the rinsed bok choy in a single layer in a steamer basket, ensuring the stems face downward for even cooking.
4. Carefully place the steamer basket over the boiling water, cover the pot tightly with a lid, and steam for exactly 4 minutes until the leaves are wilted and the stems are tender-crisp. Tip: Avoid overcooking to preserve that vibrant green color and slight crunch.
5. While the bok choy steams, whisk together 2 tablespoons of finely grated fresh ginger, 3 tablespoons of premium soy sauce, 1 tablespoon of toasted sesame oil, and 1 tablespoon of unseasoned rice vinegar in a small bowl until fully combined.
6. Transfer the steamed bok choy to a serving platter using tongs, draining any excess water by tilting the steamer basket slightly over the sink.
7. Drizzle the ginger-soy mixture evenly over the warm bok choy, coating each leaf. Tip: Pour the sauce while the bok choy is hot to help it absorb the flavors more deeply.
8. Garnish with 2 thinly sliced scallions scattered across the top for a pop of color and freshness. Tip: Serve immediately to enjoy the contrast between the warm greens and cool, crisp scallions.
Very tender stems and silky leaves soak up the gingery sauce, creating a harmony of savory and bright notes that make this dish feel both wholesome and elegant. I love pairing it with grilled salmon or spooning it over a bowl of jasmine rice to turn a simple side into a satisfying meal.
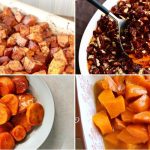
Baked Sweet Potato Fries with Rosemary
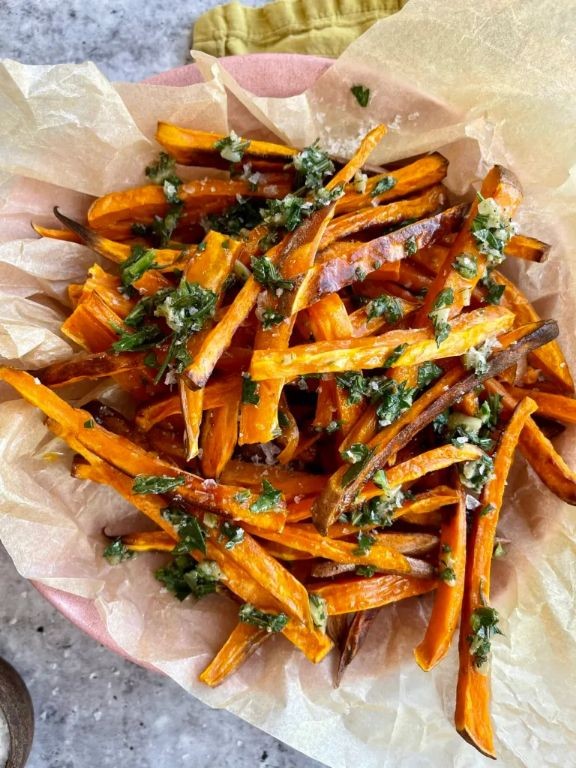
During my college days, I’d often crave something crispy and satisfying but didn’t want to feel guilty afterward—that’s when I perfected these baked sweet potato fries with rosemary. There’s something magical about how the earthy sweetness of the potatoes pairs with the piney fragrance of fresh rosemary.
Ingredients
- 2 large, vibrant orange sweet potatoes
- 2 tablespoons rich extra virgin olive oil
- 1 tablespoon freshly chopped rosemary
- 1 teaspoon coarse kosher salt
- ½ teaspoon freshly cracked black pepper
- ¼ teaspoon aromatic garlic powder
Instructions
- Preheat your oven to 425°F and position one rack in the center.
- Scrub the sweet potatoes thoroughly under cool running water to remove any dirt.
- Pat the sweet potatoes completely dry with clean kitchen towels.
- Slice each sweet potato lengthwise into ¼-inch thick planks using a sharp chef’s knife.
- Cut each plank into ¼-inch wide fry-shaped sticks, keeping them as uniform as possible for even cooking.
- Transfer the sweet potato sticks to a large mixing bowl.
- Drizzle the extra virgin olive oil over the sweet potatoes, making sure each piece gets lightly coated.
- Sprinkle the freshly chopped rosemary, coarse kosher salt, freshly cracked black pepper, and aromatic garlic powder over the oiled sweet potatoes.
- Toss everything together with your hands until every fry is evenly seasoned.
- Arrange the fries in a single layer on a parchment-lined baking sheet, ensuring they don’t touch—this is my secret for maximum crispiness.
- Bake on the center rack for 15 minutes, then flip each fry carefully using kitchen tongs.
- Return to the oven and bake for another 10-15 minutes until the edges are caramelized and crispy.
- Remove from the oven and let rest for 5 minutes on the baking sheet—they’ll continue crisping up as they cool.
Here’s what makes these fries special: the edges get delightfully crispy while the centers stay tender and sweet. Honestly, I love serving these alongside grilled chicken sandwiches or crumbling them over a fresh green salad for unexpected texture—the rosemary makes them feel elegant enough for dinner parties too.
Lowfat Spinach and Mushroom Stir-Fry
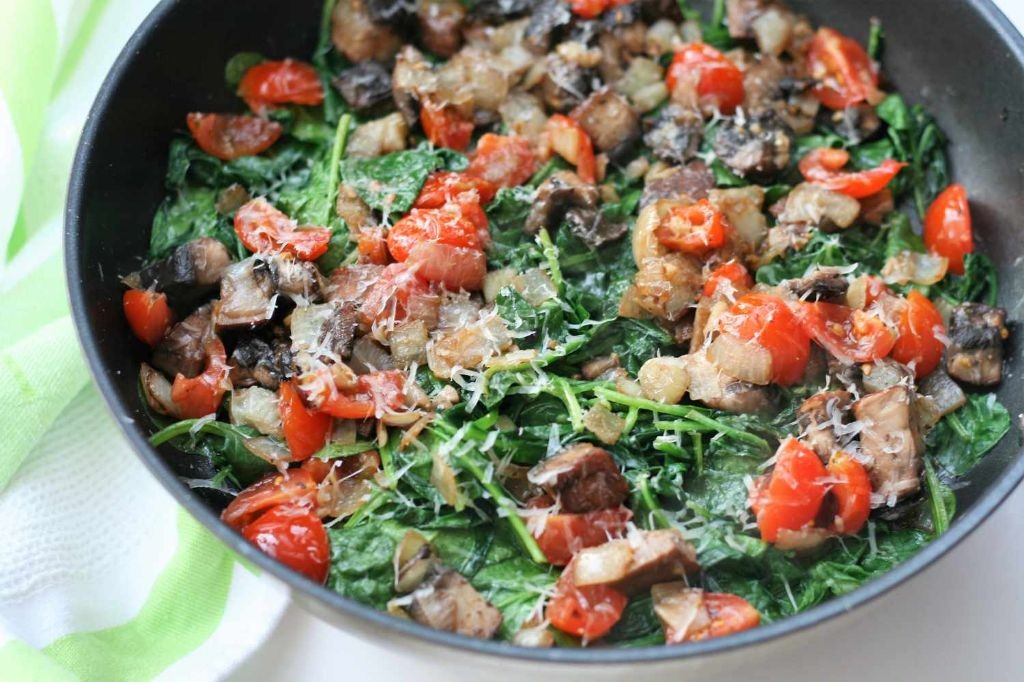
Very rarely do I find a weeknight dinner that satisfies both my craving for something healthy and my need for quick comfort food, but this spinach and mushroom stir-fry has become my go-to. Just last Tuesday, after a particularly long day of recipe testing, I whipped this up in under 20 minutes while still managing to answer emails—proof that delicious doesn’t have to mean complicated.
Ingredients
- 1 tablespoon rich toasted sesame oil
- 2 cloves fragrant garlic, minced
- 1 tablespoon freshly grated ginger
- 8 ounces earthy cremini mushrooms, sliced
- 5 ounces vibrant baby spinach
- 2 tablespoons savory low-sodium soy sauce
- 1 teaspoon sweet maple syrup
- 1 teaspoon bright rice vinegar
- 1 teaspoon nutty sesame seeds
Instructions
- Heat 1 tablespoon of rich toasted sesame oil in a large skillet or wok over medium-high heat until it shimmers, about 1 minute.
- Add 2 cloves of fragrant minced garlic and 1 tablespoon of freshly grated ginger, stirring constantly for 30 seconds until aromatic but not browned.
- Tip in 8 ounces of earthy sliced cremini mushrooms, spreading them in a single layer to ensure even browning.
- Cook mushrooms undisturbed for 3–4 minutes until they release their liquid and develop golden-brown edges.
- Stir in 5 ounces of vibrant baby spinach, wilting it in batches if necessary, for 1–2 minutes until fully softened.
- Pour in 2 tablespoons of savory low-sodium soy sauce, 1 teaspoon of sweet maple syrup, and 1 teaspoon of bright rice vinegar, tossing to coat everything evenly.
- Continue cooking for 1 more minute until the sauce lightly glazes the vegetables.
- Remove from heat and sprinkle with 1 teaspoon of nutty sesame seeds for a final flavor boost.
Out of the pan, this stir-fry delivers a wonderful contrast: the meaty mushrooms hold their shape against the silky spinach, while the glaze adds a salty-sweet punch that clings to every bite. I love serving it over quinoa for extra protein or stuffing it into warm tortillas with a dollop of Greek yogurt for a quick wrap—leftovers never stand a chance!
Spicy Lowfat Kale and Chickpea Curry
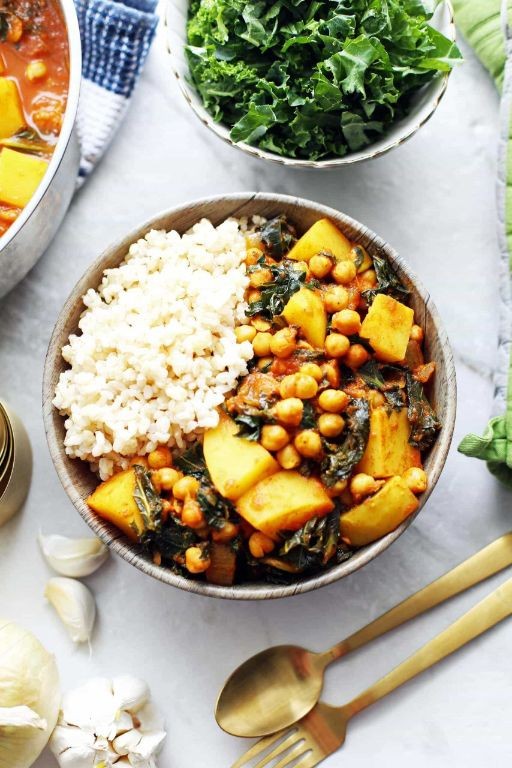
Bursting with flavor yet surprisingly light, this curry has become my go-to weeknight dinner when I want something satisfying without feeling weighed down. I first discovered this combination during a busy workweek when my fridge was looking sparse—just some wilting kale and a lonely can of chickpeas staring back at me. Now it’s my secret weapon for turning simple ingredients into something truly special.
Ingredients
– 1 tablespoon fragrant coconut oil
– 1 large yellow onion, finely diced
– 3 cloves fresh garlic, minced
– 1 tablespoon freshly grated ginger
– 2 tablespoons rich red curry paste
– 1 (15-ounce) can plump chickpeas, drained and rinsed
– 1 (14-ounce) can creamy coconut milk
– 4 cups fresh curly kale, stems removed and roughly chopped
– 1 tablespoon fresh lime juice
– 1/4 cup chopped fresh cilantro
Instructions
1. Heat 1 tablespoon of fragrant coconut oil in a large skillet over medium heat until it shimmers.
2. Add 1 large finely diced yellow onion and cook for 5 minutes, stirring occasionally, until translucent and fragrant.
3. Stir in 3 cloves of minced fresh garlic and 1 tablespoon of freshly grated ginger, cooking for 1 minute until aromatic.
4. Mix in 2 tablespoons of rich red curry paste, coating the onion mixture thoroughly and cooking for 30 seconds to bloom the spices.
5. Pour in 1 can of creamy coconut milk, scraping any browned bits from the bottom of the skillet.
6. Add 1 can of plump chickpeas to the skillet, stirring to combine.
7. Bring the mixture to a gentle simmer, then reduce heat to low and cook uncovered for 10 minutes to allow flavors to meld.
8. Stir in 4 cups of fresh curly kale, wilting it into the curry for 3-4 minutes until bright green and tender.
9. Remove from heat and stir in 1 tablespoon of fresh lime juice.
10. Garnish with 1/4 cup of chopped fresh cilantro before serving.
Really love how the creamy coconut milk creates the perfect base for the hearty chickpeas and tender kale to shine. The texture is wonderfully balanced—creamy yet light, with just enough bite from the chickpeas to keep things interesting. I often serve this over cauliflower rice for a complete low-carb meal, or with naan bread for dipping into every last bit of that flavorful sauce.
Light Broccoli and Carrot Slaw
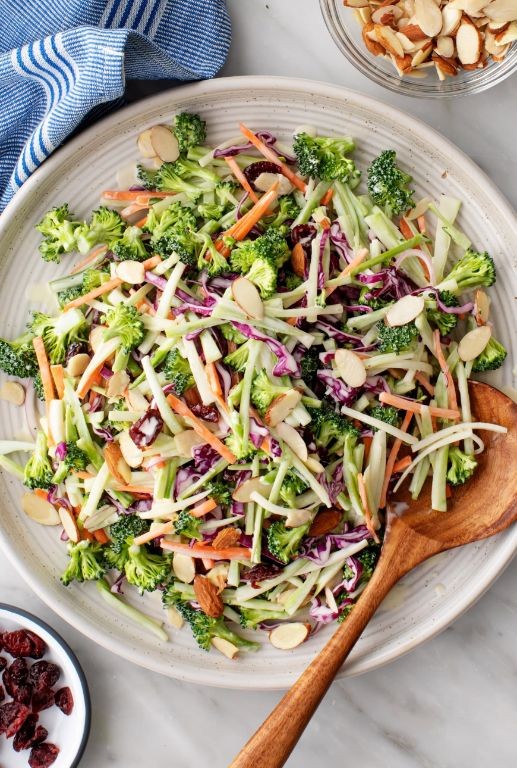
Diving into my fridge this afternoon, I realized I had a beautiful bunch of broccoli and some vibrant carrots just begging to be transformed into something fresh and crunchy. This light broccoli and carrot slaw has become my go-to side dish for busy weeknights when I want something healthy but don’t feel like spending hours in the kitchen. Honestly, it’s saved me from ordering takeout more times than I can count!
Ingredients
– 4 cups fresh broccoli florets, chopped into bite-sized pieces
– 2 large carrots, peeled and shredded into thin ribbons
– 1/4 cup creamy mayonnaise
– 2 tablespoons tangy apple cider vinegar
– 1 tablespoon sweet honey
– 1/2 teaspoon coarse sea salt
– 1/4 teaspoon freshly ground black pepper
– 1/4 cup roasted sunflower seeds for crunch
Instructions
1. Wash the fresh broccoli florets under cold running water and pat them completely dry with paper towels.
2. Chop the broccoli florets into small, bite-sized pieces using a sharp chef’s knife.
3. Peel the large carrots completely to remove the outer skin.
4. Shred the peeled carrots into thin, uniform ribbons using the large holes of a box grater.
5. Combine the chopped broccoli and shredded carrots in a large mixing bowl.
6. In a separate small bowl, whisk together the creamy mayonnaise, tangy apple cider vinegar, and sweet honey until the mixture becomes smooth and emulsified.
7. Pour the dressing over the broccoli and carrot mixture in the large bowl.
8. Sprinkle the coarse sea salt and freshly ground black pepper evenly over the slaw.
9. Toss all ingredients thoroughly with salad tongs until every piece is coated with dressing.
10. Cover the bowl tightly with plastic wrap and refrigerate the slaw for exactly 30 minutes to allow the flavors to meld.
11. Remove the slaw from the refrigerator and sprinkle the roasted sunflower seeds over the top.
12. Gently toss the slaw one final time to distribute the sunflower seeds evenly.
This slaw delivers the most satisfying crunch with every bite, and the sweet-tangy dressing perfectly balances the earthy vegetables. Try serving it alongside grilled chicken or spooned into lettuce cups for a low-carb lunch option that feels anything but boring.
Herbed Green Beans with Lemon Zest
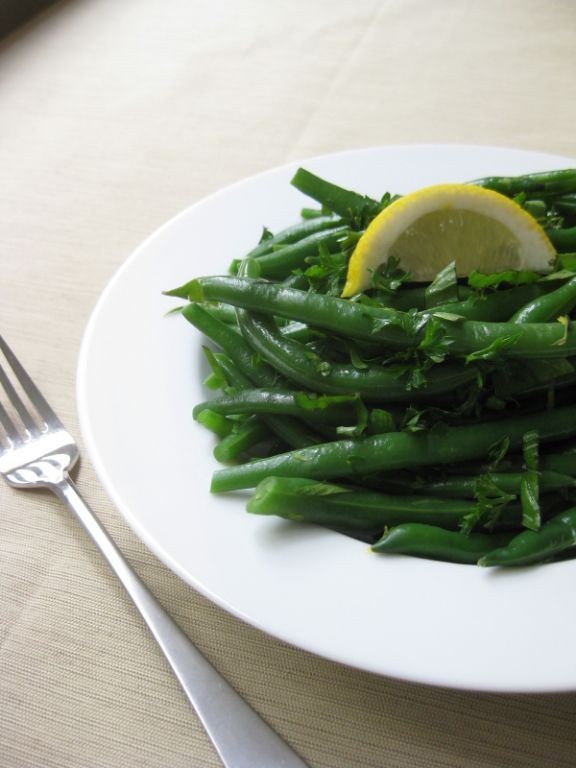
Just last week, I found myself staring at a beautiful bunch of green beans at the farmers market, their vibrant color calling out for something special—and that’s when I remembered this simple yet stunning side dish that never fails to impress dinner guests. Honestly, I make these herbed green beans at least twice a month because they’re so versatile and always disappear from the plate first.
Ingredients
– 1 pound fresh, crisp green beans, ends trimmed
– 2 tablespoons rich extra virgin olive oil
– 3 cloves aromatic garlic, thinly sliced
– 1 tablespoon freshly squeezed lemon juice
– 1 teaspoon bright lemon zest
– 1 tablespoon chopped fresh, fragrant parsley
– 1 teaspoon chopped woody rosemary
– ½ teaspoon coarse kosher salt
– ¼ teaspoon freshly cracked black pepper
Instructions
1. Bring a large pot of salted water to a rolling boil over high heat.
2. Carefully add the trimmed green beans to the boiling water and cook for exactly 4 minutes until they turn bright green and are tender-crisp.
3. Immediately drain the green beans and transfer them to a bowl of ice water to stop the cooking process—this preserves their vibrant color and perfect texture.
4. Heat the extra virgin olive oil in a large skillet over medium heat until it shimmers.
5. Add the thinly sliced garlic to the skillet and cook for 1 minute until fragrant but not browned.
6. Drain the cooled green beans thoroughly and add them to the skillet.
7. Toss the green beans in the garlic oil for 2 minutes until they’re heated through and lightly coated.
8. Remove the skillet from heat and stir in the freshly squeezed lemon juice.
9. Sprinkle the bright lemon zest over the green beans.
10. Add the chopped fresh parsley and woody rosemary, tossing to distribute evenly.
11. Season with coarse kosher salt and freshly cracked black pepper, tossing one final time to combine.
Last night, I served these alongside grilled salmon, and the way the lemon zest brightened up the entire meal was absolutely magical. The beans maintain that perfect snap while the herbs create this beautiful, fragrant coating that makes you want to eat them straight from the pan—trust me, I’ve done it more than once!
Lowfat Stuffed Bell Peppers with Quinoa
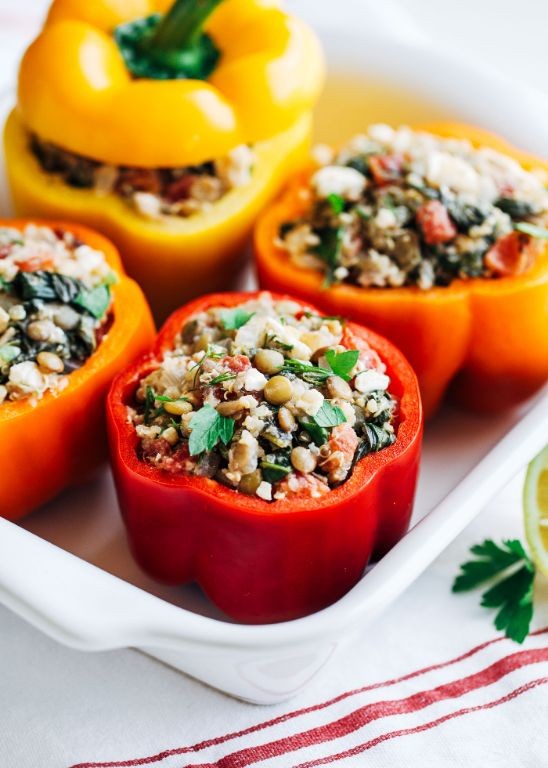
Tired of healthy meals that taste like punishment? These lowfat stuffed bell peppers have been my go-to weeknight dinner ever since my neighbor brought over a basket of gorgeous rainbow bell peppers from her garden. I’ve tweaked this recipe over countless batches to achieve that perfect balance where you don’t even miss the heavy cheese or oil.
Ingredients
– 4 large, vibrant bell peppers (mixed colors)
– 1 cup uncooked quinoa
– 1 pound lean ground turkey
– 1 medium yellow onion, finely diced
– 2 cloves fresh garlic, minced
– 1 (14.5 oz) can fire-roasted diced tomatoes, undrained
– 1 cup reduced-sodium chicken broth
– 2 tablespoons rich extra virgin olive oil
– 1 teaspoon smoked paprika
– ½ teaspoon dried oregano
– ¼ teaspoon freshly ground black pepper
– ¼ cup fresh parsley, chopped
Instructions
1. Preheat your oven to 375°F and lightly grease a 9×13 inch baking dish with olive oil.
2. Carefully slice the tops off all 4 bell peppers and remove the seeds and membranes, creating hollow pepper cups.
3. Rinse 1 cup of quinoa thoroughly in a fine-mesh strainer until the water runs clear to remove any bitter coating.
4. Heat 1 tablespoon of olive oil in a large skillet over medium-high heat until shimmering.
5. Add the diced onion and cook for 4-5 minutes until translucent and fragrant.
6. Add the minced garlic and cook for 1 minute until golden but not browned.
7. Add the ground turkey, breaking it apart with a wooden spoon, and cook for 6-7 minutes until no pink remains.
8. Stir in the smoked paprika, dried oregano, and black pepper until the turkey is evenly coated.
9. Pour in the undrained fire-roasted tomatoes, chicken broth, and rinsed quinoa, stirring to combine.
10. Bring the mixture to a boil, then reduce heat to low, cover, and simmer for 15 minutes until the quinoa has absorbed most of the liquid.
11. Remove the skillet from heat and stir in the fresh parsley until evenly distributed.
12. Spoon the quinoa mixture evenly into the prepared bell pepper cups, packing it down gently.
13. Arrange the stuffed peppers upright in the baking dish and drizzle with the remaining tablespoon of olive oil.
14. Cover the dish tightly with aluminum foil and bake at 375°F for 30 minutes.
15. Remove the foil and continue baking for another 10-15 minutes until the pepper edges are slightly charred and tender when pierced with a fork.
16. Let the peppers rest for 5 minutes before serving to allow the filling to set.
A perfectly cooked stuffed pepper should have a slight bite while the filling remains fluffy and moist. The smoky paprika really shines through against the sweet bell peppers, and I love serving these with a simple arugula salad for some peppery contrast. Leftovers reheat beautifully for lunch the next day—just pop them in the oven at 350°F for about 15 minutes to maintain that wonderful texture.
Roasted Brussels Sprouts with Garlic
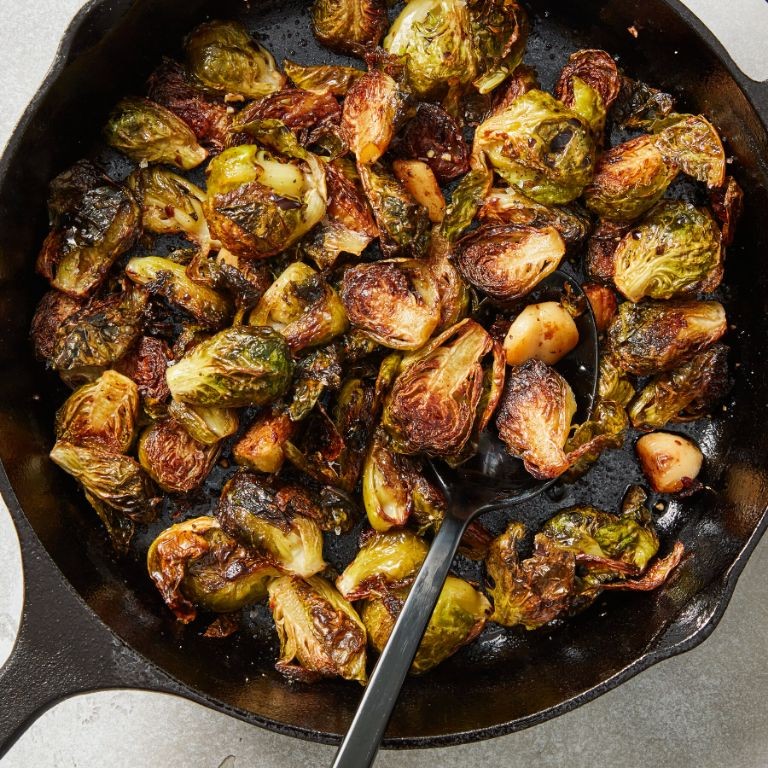
Growing up, I never understood the Brussels sprouts hype until I discovered the magic of roasting them with plenty of garlic. Now they’re my go-to side dish for everything from weeknight dinners to holiday feasts, and I’m convinced this method could convert even the most skeptical sprout-haters.
Ingredients
– 1 ½ pounds fresh Brussels sprouts, trimmed and halved
– 3 tablespoons rich extra virgin olive oil
– 6 large garlic cloves, thinly sliced
– 1 teaspoon coarse sea salt
– ½ teaspoon freshly cracked black pepper
– 2 tablespoons sweet balsamic glaze
Instructions
1. Preheat your oven to 400°F and line a large baking sheet with parchment paper.
2. Place the trimmed and halved Brussels sprouts in a large mixing bowl.
3. Drizzle the rich extra virgin olive oil over the Brussels sprouts and toss thoroughly to coat every piece.
4. Sprinkle the coarse sea salt and freshly cracked black pepper over the oiled sprouts, tossing again to distribute evenly.
5. Spread the seasoned Brussels sprouts in a single layer on your prepared baking sheet, making sure they aren’t crowded.
6. Roast the Brussels sprouts at 400°F for 15 minutes until they begin to soften and develop light browning on the edges.
7. Remove the baking sheet from the oven and scatter the thinly sliced garlic cloves evenly over the partially roasted sprouts.
8. Return the baking sheet to the oven and continue roasting for another 10-12 minutes until the Brussels sprouts are deeply caramelized and crispy around the edges.
9. Transfer the roasted Brussels sprouts and garlic to a serving bowl and drizzle with the sweet balsamic glaze, tossing gently to coat.
10. Serve immediately while hot and crispy. What makes this dish truly special is how the crispy, caramelized edges give way to tender centers that soak up the sweet balsamic and savory garlic flavors. I love serving these over creamy polenta or alongside roasted chicken for a complete meal that always earns compliments.
Lowfat Creamy Butternut Squash Soup

Vividly orange and velvety smooth, this lowfat creamy butternut squash soup has become my go-to comfort food as the autumn leaves begin to fall. I first discovered this recipe during a cozy weekend when my kitchen was filled with the sweet, nutty aroma of roasting squash, and now it’s become my signature dish for chilly evenings. There’s something magical about how simple ingredients transform into such luxurious comfort in just one pot.
Ingredients
– 1 large butternut squash (about 3 pounds), peeled and cubed
– 1 tablespoon rich extra virgin olive oil
– 1 medium sweet yellow onion, finely diced
– 2 cloves fresh garlic, minced
– 4 cups low-sodium vegetable broth
– 1/2 cup plain Greek yogurt
– 1/4 teaspoon freshly grated nutmeg
– 1/2 teaspoon coarse sea salt
– 1/4 teaspoon freshly cracked black pepper
– 2 tablespoons pure maple syrup
Instructions
1. Preheat your oven to 400°F and line a baking sheet with parchment paper.
2. Toss the cubed butternut squash with olive oil and spread in a single layer on the baking sheet.
3. Roast for 25-30 minutes until the squash edges are caramelized and easily pierced with a fork.
4. While squash roasts, heat a large Dutch oven over medium heat and sauté the diced onion for 5-7 minutes until translucent.
5. Add the minced garlic and cook for 1 minute until fragrant, being careful not to burn it.
6. Transfer the roasted squash to the Dutch oven and pour in the vegetable broth.
7. Bring the mixture to a gentle boil, then reduce heat to low and simmer for 15 minutes.
8. Carefully blend the soup using an immersion blender until completely smooth and creamy.
9. Stir in the Greek yogurt, nutmeg, salt, pepper, and maple syrup until fully incorporated.
10. Heat the soup for 2-3 more minutes over low heat, but do not boil after adding yogurt.
But the real magic happens when you taste that first spoonful – the natural sweetness of the roasted squash pairs beautifully with the subtle tang from Greek yogurt. I love serving this soup with a drizzle of extra yogurt and some toasted pumpkin seeds for crunch, or sometimes I’ll swirl in a bit of chili oil for those who like a spicy kick. The texture remains luxuriously creamy despite being lowfat, proving that comfort food doesn’t need to be heavy to satisfy.
Grilled Portobello Mushroom Caps

Keeping my kitchen cool during summer grilling season is my secret weapon, and these grilled portobello mushroom caps have become my go-to meatless Monday star. I first discovered their magic when my vegetarian friend raved about their meaty texture, and now they’re a regular in my rotation—juicy, smoky, and surprisingly filling.
Ingredients
– 4 large portobello mushroom caps with firm, dark gills
– ¼ cup rich extra virgin olive oil
– 2 tbsp aged balsamic vinegar
– 3 cloves fresh garlic, finely minced
– 1 tsp coarse sea salt
– ½ tsp freshly cracked black pepper
– 2 tbsp chopped fresh parsley leaves
Instructions
1. Preheat your outdoor grill to medium-high heat (400°F) with the lid closed for 10 minutes.
2. Gently wipe the portobello caps with a damp paper towel to remove any dirt, avoiding soaking them to prevent sogginess.
3. Carefully remove the stems from the mushrooms using a small paring knife.
4. In a small bowl, whisk together the extra virgin olive oil, balsamic vinegar, minced garlic, sea salt, and black pepper until fully combined.
5. Use a pastry brush to generously coat both sides of each mushroom cap with the marinade mixture.
6. Place the mushrooms gill-side up on the preheated grill grate, spacing them 2 inches apart.
7. Close the grill lid and cook for 5 minutes to allow the mushrooms to steam and absorb smoke flavor.
8. Flip the mushrooms using tongs and cook gill-side down for another 4 minutes until grill marks appear.
9. Flip the mushrooms once more and cook for a final 2 minutes until tender when pierced with a fork.
10. Transfer the grilled mushrooms to a serving platter and immediately sprinkle with fresh chopped parsley.
Absolutely incredible how these transform—the caps become tender yet substantial, with deep umami notes from the grill. I love serving them over creamy polenta or stuffing them with herbed goat cheese for an elegant twist that always impresses dinner guests.
Light Cucumber and Avocado Salad
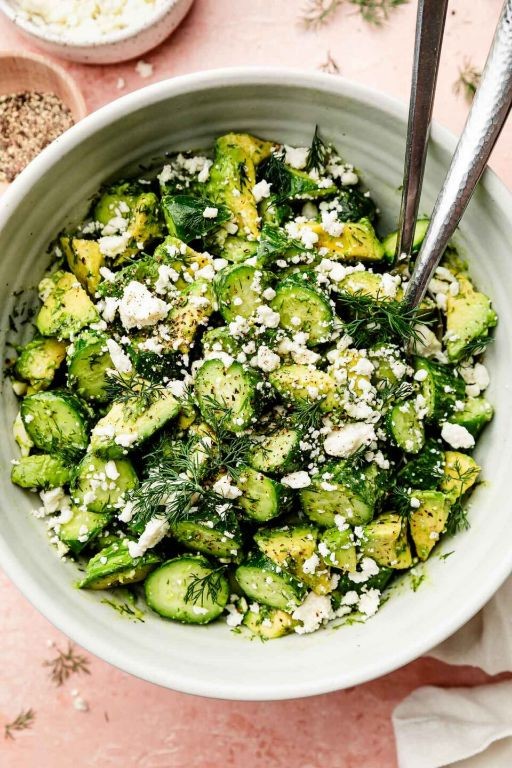
A perfect summer day always calls for something crisp, cool, and refreshing—which is exactly why this Light Cucumber and Avocado Salad has become my go-to. I first threw it together during a heatwave when turning on the oven felt like a crime, and now it’s a staple in my kitchen for those busy weeknights when I want something healthy but don’t want to fuss.
Ingredients
– 2 large English cucumbers, thinly sliced into crisp rounds
– 2 ripe Hass avocados, cubed into creamy chunks
– 1/4 cup fresh lime juice, freshly squeezed for bright acidity
– 2 tablespoons rich extra virgin olive oil
– 1/4 cup finely chopped fresh cilantro leaves
– 1/4 teaspoon fine sea salt
– 1/4 teaspoon freshly cracked black pepper
Instructions
1. Wash and dry 2 large English cucumbers thoroughly, then slice them into 1/8-inch thick rounds using a sharp knife or mandoline for evenness.
2. Halve 2 ripe Hass avocados, remove the pits, and carefully cube the flesh into 1/2-inch pieces directly into a large mixing bowl.
3. Add the cucumber slices to the bowl with the avocado.
4. In a small separate bowl, whisk together 1/4 cup fresh lime juice, 2 tablespoons rich extra virgin olive oil, 1/4 teaspoon fine sea salt, and 1/4 teaspoon freshly cracked black pepper until fully emulsified.
5. Pour the dressing over the cucumber and avocado mixture in the large bowl.
6. Gently toss the salad with a large spoon or your hands to coat all ingredients evenly without mashing the avocado.
7. Fold in 1/4 cup finely chopped fresh cilantro leaves until just combined.
8. Serve immediately to maintain the crisp texture of the cucumbers and prevent the avocado from browning.
Crunchy cucumbers and buttery avocado create a delightful contrast, while the zesty lime dressing ties everything together with a fresh kick. Consider serving it alongside grilled fish or stuffing it into tacos for an extra layer of cool creaminess.
Lowfat Ratatouille with Fresh Herbs
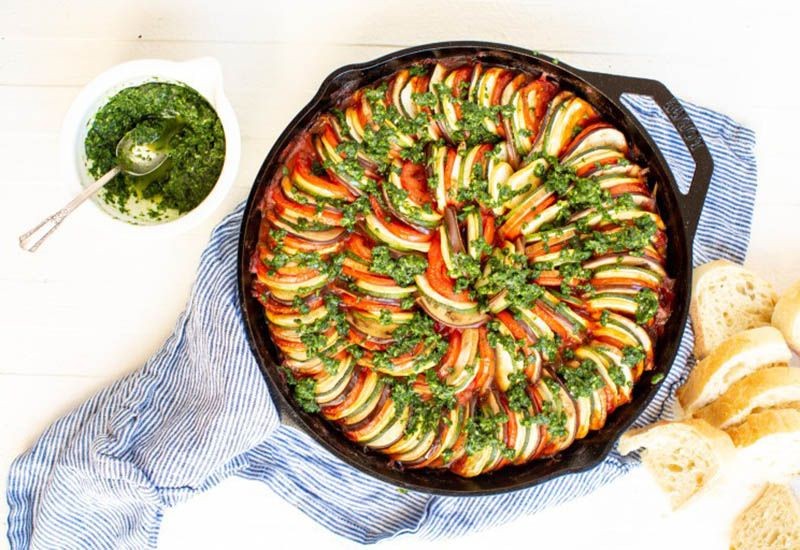
Keeping my kitchen light and bright has been my mission this season, and this lowfat ratatouille has become my go-to weeknight hero. I first discovered this version when my garden overflowed with summer squash and tomatoes, forcing me to get creative with preserving their fresh flavors without drowning them in oil. Now it’s my favorite way to use up that beautiful farmers’ market haul while keeping things healthy.
Ingredients
– 2 tablespoons rich extra virgin olive oil
– 1 large sweet yellow onion, thinly sliced
– 3 cloves aromatic garlic, minced
– 1 medium firm eggplant, cubed into 1-inch pieces
– 2 medium vibrant zucchini, sliced into half-moons
– 1 large red bell pepper, seeded and chopped
– 4 ripe plum tomatoes, roughly chopped
– 2 tablespoons fresh chopped basil leaves
– 1 tablespoon fresh chopped thyme
– 1 teaspoon coarse sea salt
– ½ teaspoon freshly cracked black pepper
Instructions
1. Preheat your oven to 375°F and position the rack in the center.
2. Heat 1 tablespoon of olive oil in a large oven-safe skillet over medium heat until it shimmers.
3. Add the sliced onion and cook for 5 minutes, stirring occasionally until translucent.
4. Stir in the minced garlic and cook for 1 minute until fragrant but not browned.
5. Add the cubed eggplant and remaining olive oil, tossing to coat evenly.
6. Cook the eggplant for 8 minutes, stirring every 2 minutes until slightly softened.
7. Mix in the zucchini slices and chopped bell pepper, distributing them evenly.
8. Cook the vegetables for 6 minutes, until they begin to release their natural juices.
9. Stir in the chopped tomatoes, sea salt, and black pepper, combining thoroughly.
10. Transfer the skillet to the preheated oven and bake uncovered for 25 minutes.
11. Remove the skillet from the oven using oven mitts and check that vegetables are tender when pierced with a fork.
12. Stir in the fresh basil and thyme, allowing the residual heat to wilt the herbs.
13. Let the ratatouille rest for 5 minutes before serving to allow flavors to meld.
You’ll love how the vegetables maintain their individual textures while melting together in the most satisfying way. The fresh herbs really shine through, giving this humble dish an elegant complexity that belies its simplicity. Try serving it over creamy polenta or alongside grilled chicken for a complete meal that feels both nourishing and indulgent.
Steamed Asparagus with Lemon and Almonds
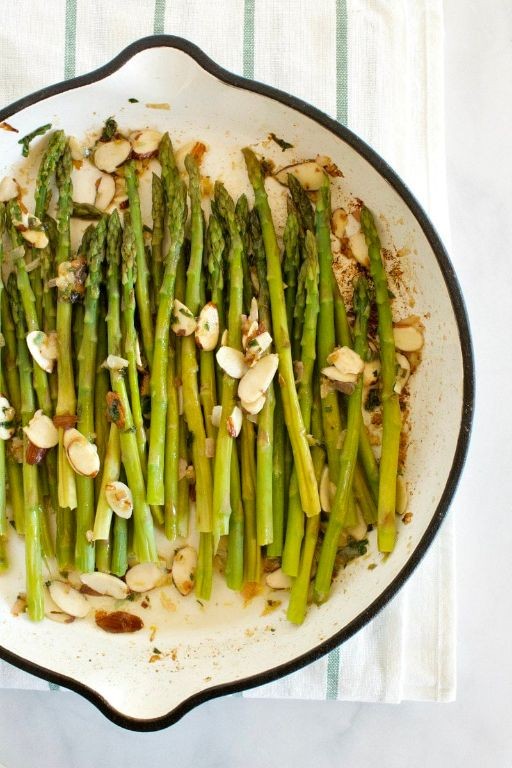
Cooking with seasonal vegetables always brings me back to my grandmother’s kitchen, where she taught me that sometimes the simplest preparations yield the most vibrant flavors. I remember her steaming asparagus from her garden and finishing it with a squeeze of lemon—a technique I’ve cherished and now enhanced with toasted almonds for extra crunch. This steamed asparagus with lemon and almonds has become my go-to side dish for busy weeknights and elegant dinners alike.
Ingredients
– 1 pound fresh, vibrant green asparagus spears with firm stalks
– 2 tablespoons rich extra virgin olive oil
– 1 fresh lemon with bright yellow skin
– ¼ cup raw whole almonds with their skins on
– ½ teaspoon coarse sea salt with large crystals
– ¼ teaspoon freshly cracked black pepper
Instructions
1. Rinse 1 pound of fresh, vibrant green asparagus spears under cool running water to remove any dirt.
2. Snap off the tough, woody ends of each asparagus spear where they naturally break—this ensures you’re only cooking the tender part.
3. Pour 1 inch of water into a large pot and insert a steamer basket, making sure the water level sits below the basket.
4. Place the trimmed asparagus spears in a single layer inside the steamer basket.
5. Cover the pot with a tight-fitting lid and turn the heat to high until the water reaches a rolling boil.
6. Once boiling, reduce the heat to medium and steam the asparagus for exactly 4 minutes until bright green and tender-crisp when pierced with a fork.
7. While the asparagus steams, heat a small dry skillet over medium heat for 2 minutes until a drop of water sizzles upon contact.
8. Add ¼ cup of raw whole almonds to the hot skillet and toast for 3-4 minutes, shaking the pan frequently until they become fragrant and develop light golden spots.
9. Immediately transfer the toasted almonds to a cutting board to prevent burning and let them cool for 2 minutes.
10. Coarsely chop the cooled almonds into small pieces using a sharp knife.
11. Cut the fresh lemon in half and squeeze both halves to yield approximately 2 tablespoons of fresh lemon juice, catching any seeds with your other hand.
12. When the asparagus is done steaming, carefully remove it from the pot using tongs and arrange it on a serving platter.
13. Drizzle 2 tablespoons of rich extra virgin olive oil evenly over the hot asparagus.
14. Sprinkle the steamed asparagus with ½ teaspoon of coarse sea salt and ¼ teaspoon of freshly cracked black pepper.
15. Pour the fresh lemon juice over the asparagus, making sure it coats the spears evenly.
16. Scatter the chopped toasted almonds across the top of the dressed asparagus.
Last night I served this alongside grilled salmon, and the way the bright lemon cuts through the richness of the fish creates a perfect balance. The almonds add this wonderful textural contrast to the tender-crisp asparagus that makes every bite interesting. Leftovers are fantastic chopped into a grain bowl the next day—the flavors meld together beautifully overnight.
Spaghetti Squash with Lowfat Marinara

You know, spaghetti squash has become my go-to comfort food when I want something satisfying but still light. I first discovered this magical vegetable during a fall farmers market trip a few years back, and now I make it almost weekly during squash season. There’s something so satisfying about scraping out those perfect noodle-like strands!
Ingredients
– 1 medium spaghetti squash (about 3 pounds), halved lengthwise and seeded
– 2 tablespoons rich extra virgin olive oil
– 1 teaspoon coarse sea salt
– ½ teaspoon freshly cracked black pepper
– 2 cups vibrant lowfat marinara sauce
– ¼ cup freshly grated Parmesan cheese
– 2 tablespoons chopped fresh basil leaves
Instructions
1. Preheat your oven to 400°F and line a baking sheet with parchment paper.
2. Brush the cut sides of the spaghetti squash halves with the rich extra virgin olive oil, making sure to coat all surfaces evenly.
3. Sprinkle the coarse sea salt and freshly cracked black pepper over the oiled squash halves.
4. Place the squash halves cut-side down on the prepared baking sheet.
5. Roast at 400°F for 35-45 minutes until the squash flesh is tender when pierced with a fork.
6. Remove the baking sheet from the oven and let the squash cool for 5-10 minutes until comfortable to handle.
7. Use a fork to scrape the squash flesh into strands, working from the edges toward the center.
8. Heat the vibrant lowfat marinara sauce in a saucepan over medium heat for 5-7 minutes until bubbling.
9. Combine the hot spaghetti squash strands with the heated marinara sauce in a large bowl.
10. Toss the mixture gently to coat all the squash strands evenly with sauce.
11. Sprinkle the freshly grated Parmesan cheese over the top of the dressed squash.
12. Garnish with the chopped fresh basil leaves just before serving.
Every bite delivers that wonderful al dente texture of the squash strands against the bright, tomato-forward sauce. The Parmesan adds just enough salty richness without overwhelming the dish’s lightness. I love serving this in the hollowed-out squash shells for a beautiful presentation that always impresses dinner guests.
Lowfat Carrot and Ginger Soup

Finally, as the crisp autumn air settles in, I find myself craving something warm and comforting that won’t weigh me down. This lowfat carrot and ginger soup has become my go-to recipe during busy weeknights when I want something nourishing but don’t have hours to spend in the kitchen. There’s something magical about how these simple ingredients transform into such vibrant, flavorful comfort in under an hour.
Ingredients
– 1 tablespoon fragrant extra virgin olive oil
– 1 large yellow onion, finely diced
– 2 cloves fresh garlic, minced
– 2 tablespoons freshly grated ginger root
– 2 pounds vibrant orange carrots, peeled and chopped
– 4 cups rich vegetable broth
– 1 cup creamy lowfat coconut milk
– ½ teaspoon coarse sea salt
– ¼ teaspoon freshly cracked black pepper
– 2 tablespoons freshly squeezed lemon juice
Instructions
1. Heat 1 tablespoon of fragrant extra virgin olive oil in a large Dutch oven over medium heat until shimmering.
2. Add 1 large finely diced yellow onion and cook for 5-7 minutes until translucent and fragrant.
3. Stir in 2 cloves of minced fresh garlic and 2 tablespoons of freshly grated ginger root, cooking for exactly 1 minute until aromatic.
4. Add 2 pounds of peeled and chopped vibrant orange carrots to the pot, stirring to coat with the aromatics.
5. Pour in 4 cups of rich vegetable broth, ensuring all carrots are submerged in the liquid.
6. Bring the mixture to a boil over high heat, then immediately reduce to a simmer.
7. Cover the pot and simmer for 25-30 minutes until carrots are fork-tender when pierced with a knife.
8. Carefully transfer the hot mixture to a blender in batches, filling only halfway to prevent splattering.
9. Blend on high speed for 2-3 minutes until completely smooth and velvety.
10. Return the pureed soup to the pot over low heat and stir in 1 cup of creamy lowfat coconut milk.
11. Season with ½ teaspoon of coarse sea salt and ¼ teaspoon of freshly cracked black pepper.
12. Finish by stirring in 2 tablespoons of freshly squeezed lemon juice just before serving.
Unbelievably creamy despite being lowfat, this soup has the perfect balance of sweet carrots and spicy ginger that creates layers of flavor in every spoonful. The vibrant orange color makes it beautiful served in shallow bowls, and I love topping it with a sprinkle of fresh herbs or a dollop of Greek yogurt for extra creaminess. It’s the kind of soup that tastes even better the next day, making it perfect for meal prep throughout the week.
Baked Stuffed Tomatoes with Herbed Quinoa
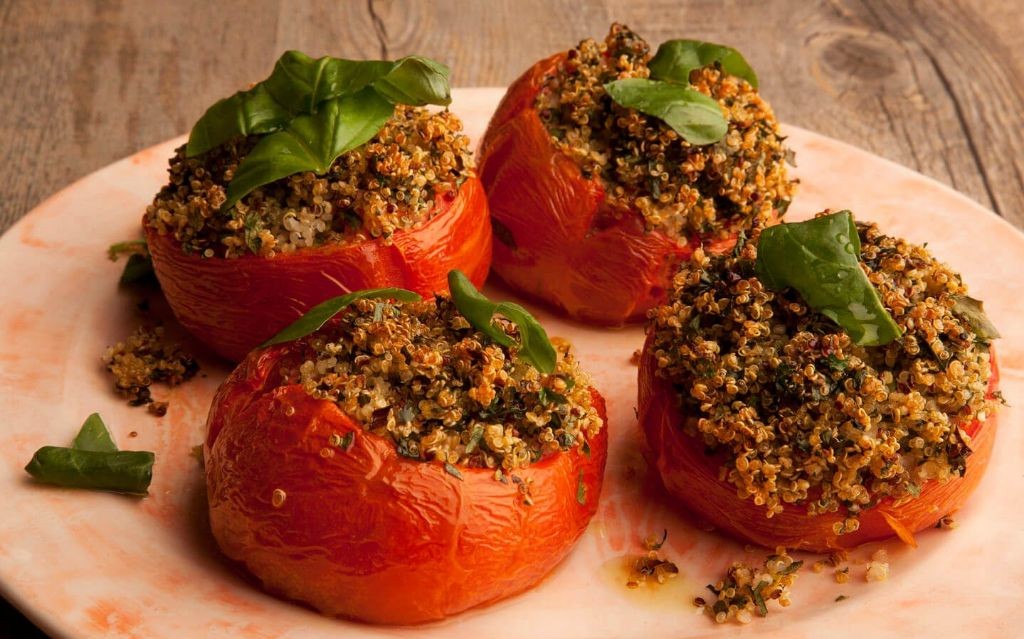
Remember those lazy summer afternoons when the farmers’ market tomatoes looked so perfect you just had to stuff them with something special? I’ve been experimenting with this baked stuffed tomato recipe for years, and this herbed quinoa version has become my absolute favorite for weeknight dinners and casual entertaining alike.
Ingredients
– 4 large, firm beefsteak tomatoes
– 1 cup uncooked quinoa
– 2 cups rich vegetable broth
– 2 tablespoons fragrant extra virgin olive oil
– 1 small yellow onion, finely diced
– 2 cloves fresh garlic, minced
– 1/4 cup freshly grated Parmesan cheese
– 2 tablespoons chopped fresh basil
– 1 tablespoon chopped fresh parsley
– 1/2 teaspoon coarse sea salt
– 1/4 teaspoon freshly cracked black pepper
Instructions
1. Preheat your oven to 375°F and lightly grease a baking dish with olive oil.
2. Slice the top 1/4 inch off each tomato and carefully scoop out the pulp and seeds, leaving a 1/4-inch thick shell.
3. Sprinkle the inside of each tomato shell with a pinch of salt and place them cut-side down on paper towels to drain for 15 minutes.
4. Rinse the quinoa thoroughly in a fine-mesh strainer until the water runs clear to remove any bitterness.
5. Heat 1 tablespoon olive oil in a medium saucepan over medium heat until shimmering.
6. Add the diced onion and cook for 4-5 minutes until translucent and fragrant.
7. Stir in the minced garlic and cook for 30 seconds until aromatic but not browned.
8. Add the rinsed quinoa to the pan and toast for 2 minutes, stirring constantly.
9. Pour in the vegetable broth and bring to a rolling boil.
10. Reduce heat to low, cover the pan, and simmer for 15 minutes until the quinoa has absorbed all the liquid.
11. Remove the quinoa from heat and let it stand covered for 5 minutes to finish steaming.
12. Fluff the quinoa with a fork, then stir in the remaining olive oil, Parmesan cheese, fresh herbs, salt, and pepper.
13. Pat the tomato shells dry and arrange them upright in the prepared baking dish.
14. Spoon the herbed quinoa mixture into each tomato shell, packing it gently but not too tightly.
15. Bake for 25-30 minutes until the tomatoes are tender but still hold their shape and the filling is heated through.
16. Let the stuffed tomatoes rest for 5 minutes before serving to allow the flavors to meld.
After resting, these tomatoes develop the most wonderful texture where the quinoa stays fluffy while the tomato walls become meltingly tender. The herbed filling creates this beautiful contrast against the sweet, roasted tomato flavor that makes each bite absolutely irresistible. I love serving these alongside grilled chicken or as the star of a vegetarian meal with a simple green salad.
Light Cabbage and Apple Slaw

Whenever I’m craving something crisp and refreshing that won’t weigh me down, this Light Cabbage and Apple Slaw is my absolute go-to. I first discovered this combination during a summer picnic when I needed a last-minute side dish, and now it’s become my signature potluck contribution that always disappears first. There’s something magical about how the sweet apples and tangy dressing transform humble cabbage into something truly special.
Ingredients
– 4 cups finely shredded green cabbage
– 2 crisp honeycrisp apples
– 1/3 cup creamy mayonnaise
– 2 tablespoons tangy apple cider vinegar
– 1 tablespoon pure honey
– 1/2 teaspoon coarse kosher salt
– 1/4 teaspoon freshly ground black pepper
– 1/4 cup toasted walnuts
Instructions
1. Core 2 crisp honeycrisp apples and slice them into thin matchsticks using a sharp chef’s knife.
2. Place 4 cups of finely shredded green cabbage in a large mixing bowl.
3. Add the apple matchsticks to the cabbage in the bowl.
4. In a separate small bowl, whisk together 1/3 cup creamy mayonnaise and 2 tablespoons tangy apple cider vinegar until smooth.
5. Drizzle 1 tablespoon pure honey into the dressing mixture and whisk vigorously until fully incorporated.
6. Sprinkle 1/2 teaspoon coarse kosher salt and 1/4 teaspoon freshly ground black pepper into the dressing.
7. Pour the prepared dressing over the cabbage and apple mixture in the large bowl.
8. Using clean hands or salad tongs, toss everything together until every piece is evenly coated with dressing.
9. Roughly chop 1/4 cup toasted walnuts into small pieces.
10. Sprinkle the chopped walnuts over the dressed slaw.
11. Cover the bowl with plastic wrap and refrigerate for exactly 30 minutes to allow the flavors to meld.
Something wonderful happens as this slaw chills – the cabbage softens just enough while maintaining its satisfying crunch, and the apples release their natural sweetness into the creamy dressing. I love serving this alongside grilled chicken or stuffing it into fish tacos for an extra layer of texture that really elevates the whole meal.
Summary
Gathering these 20 delicious lowfat vegetable recipes has been a joy! They prove healthy eating can be vibrant and satisfying. I hope you find new favorites to add to your rotation. Try them out, then leave a comment sharing which ones you loved most. Don’t forget to pin this article on Pinterest to save these recipes for later and share with fellow food lovers!