
Sometimes those late-night cravings hit hard, and only the coziest comfort foods will do. Whether you’re craving cheesy pasta, savory snacks, or a sweet treat, we’ve gathered 18 delicious recipes perfect for your midnight diner moments. Get ready to satisfy those hunger pangs with easy, comforting dishes that hit the spot every time. Let’s dive into these tasty ideas!
Classic Grilled Cheese with Tomato Soup

Oh, the glorious duo that’s saved more rainy afternoons and lazy lunches than we can count—classic grilled cheese with tomato soup. It’s the ultimate comfort food hug, crispy on the outside, melty on the inside, and dunkable in a bowl of cozy red goodness. Let’s get this nostalgia party started!
Ingredients
- 4 slices of your favorite bread (sourdough is a game-changer!)
- 4 slices of sharp cheddar cheese
- 2 tablespoons of salted butter, softened
- 1 can (14.5 ounces) of crushed tomatoes
- 1 cup of vegetable broth
- 1/4 cup of heavy cream
- 1 small onion, finely chopped
- 2 cloves of garlic, minced
- 1 tablespoon of olive oil
- 1 teaspoon of dried basil
- 1/2 teaspoon of sugar
- A pinch of salt and black pepper
Instructions
- Heat 1 tablespoon of olive oil in a medium saucepan over medium heat until it shimmers.
- Add the finely chopped onion and cook for 5 minutes, stirring occasionally, until it turns translucent.
- Stir in the minced garlic and cook for 1 minute until fragrant—don’t let it brown!
- Pour in the crushed tomatoes, vegetable broth, dried basil, sugar, salt, and black pepper.
- Bring the soup to a gentle boil, then reduce the heat to low and let it simmer uncovered for 15 minutes.
- While the soup simmers, spread softened butter evenly on one side of each bread slice.
- Place two bread slices buttered-side down in a large skillet over medium-low heat.
- Top each with two slices of cheddar cheese, then cover with the remaining bread slices, buttered-side up.
- Cook the sandwiches for 3–4 minutes per side, pressing down gently with a spatula, until the bread is golden brown and the cheese starts to ooze.
- Remove the soup from heat and stir in the heavy cream until fully incorporated.
- Ladle the soup into bowls and serve immediately with the grilled cheese sandwiches.
Ah, the magic is in that crispy, buttery bread giving way to a river of molten cheddar, while the soup’s velvety texture and tangy-sweet notes make every dunk feel like a victory. Try tearing the sandwich into chunks and floating them in the soup for a deconstructed delight—it’s messy, glorious, and totally worth the napkin pile.
Garlic Butter Shrimp and Grits
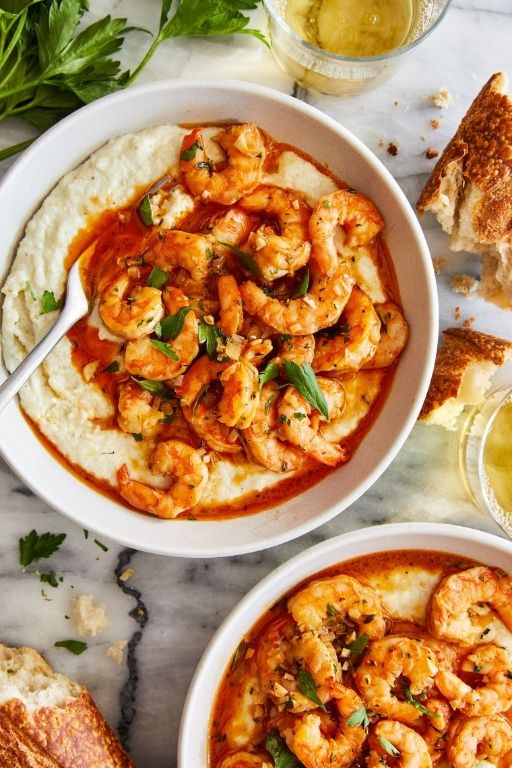
Heaven help your taste buds, because we’re about to dive fork-first into a dish that’s basically a warm hug from the South. Garlic Butter Shrimp and Grits is here to solve your ‘what’s for dinner’ dilemma with zero fuss and maximum flavor—prepare for your kitchen to smell like a five-star restaurant, and your stomach to thank you profusely.
Ingredients
– 1 cup of stone-ground grits (the good stuff, not the instant kind)
– 4 cups of water (for grits duty)
– A generous pinch of salt (because bland grits are a crime)
– 1 pound of large shrimp, peeled and deveined (tails on or off, your call)
– 4 tablespoons of unsalted butter (divided for maximum buttery goodness)
– 4 cloves of garlic, minced (fresh is best, no jarred nonsense)
– A splash of fresh lemon juice (about 1 tablespoon, from a real lemon)
– A couple of tablespoons of chopped fresh parsley (for that pop of green)
Instructions
1. Pour 4 cups of water into a medium saucepan and bring it to a rolling boil over high heat.
2. Whisk in 1 cup of stone-ground grits and a generous pinch of salt, then reduce the heat to low.
3. Cover the saucepan and simmer the grits for 25 minutes, stirring every 5 minutes to prevent sticking—this low-and-slow method ensures creamy, lump-free grits.
4. While the grits cook, pat 1 pound of large shrimp dry with paper towels to help them sear nicely instead of steaming.
5. Melt 2 tablespoons of unsalted butter in a large skillet over medium-high heat until it sizzles lightly.
6. Add the shrimp to the skillet in a single layer and cook for 2 minutes per side, until they turn pink and opaque—don’t overcrowd the pan, or they’ll steam instead of sear.
7. Stir in 4 cloves of minced garlic and cook for 1 minute until fragrant, being careful not to burn it.
8. Remove the skillet from heat and stir in the remaining 2 tablespoons of butter, a splash of fresh lemon juice, and a couple of tablespoons of chopped parsley until the butter melts into a glossy sauce.
9. Divide the creamy grits into bowls and top with the garlic butter shrimp and sauce.
Let’s be real: the creamy, corn-kissed grits are the perfect pillow for those juicy, garlicky shrimp swimming in buttery sauce. Serve it straight from the skillet for a rustic vibe, or fancy it up with a extra parsley sprinkle and lemon wedge for your Instagram story—either way, it’s comfort food that doesn’t play around.
Loaded Nachos with Homemade Queso
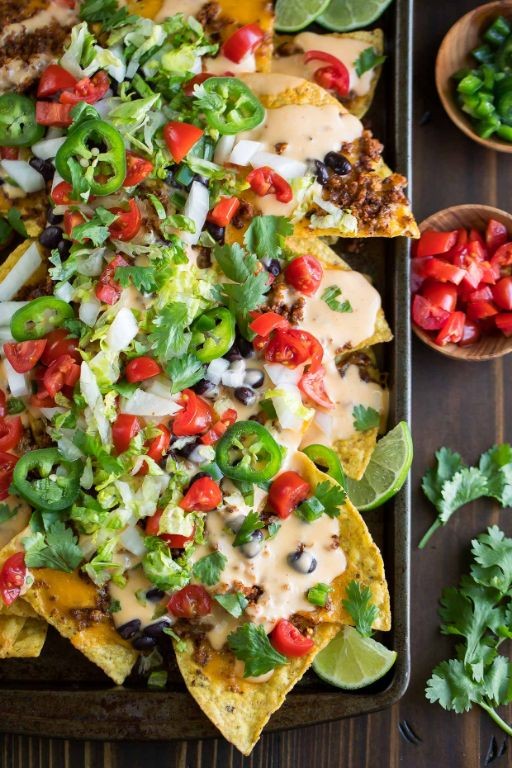
Every time I think I’ve reached peak snack perfection, these loaded nachos with homemade queso come along and prove me deliciously wrong. Imagine crispy tortilla chips smothered in a cheese sauce so good it should probably be illegal, then piled high with all your favorite toppings—this is the snack that dreams (and serious cravings) are made of.
Ingredients
– A big bag of your favorite tortilla chips
– 2 cups of shredded cheddar cheese
– 1 tablespoon of all-purpose flour
– 1 cup of whole milk
– A couple of tablespoons of diced pickled jalapeños
– Half a pound of ground beef
– 1 teaspoon of chili powder
– A generous pinch of salt
– A dollop of sour cream
– A handful of chopped fresh cilantro
Instructions
1. Preheat your oven to 375°F so it’s ready to melt everything into gooey perfection.
2. Brown the half pound of ground beef in a skillet over medium-high heat for about 8-10 minutes, breaking it up with a spoon as it cooks.
3. Sprinkle 1 teaspoon of chili powder and a generous pinch of salt over the beef, stir to coat evenly, and cook for 1 more minute.
4. Tip: For extra flavor, drain any excess grease from the beef before adding spices to keep your nachos from getting soggy.
5. In a saucepan, whisk together 1 tablespoon of all-purpose flour and 1 cup of whole milk over medium heat until smooth.
6. Gradually stir in 2 cups of shredded cheddar cheese until fully melted and the sauce thickens, which should take about 5-7 minutes.
7. Tip: If your queso starts to thicken too much, add a splash more milk to reach that perfect dippable consistency.
8. Spread a single layer of tortilla chips on a baking sheet to ensure every chip gets its fair share of toppings.
9. Drizzle the homemade queso evenly over the chips, making sure to cover those edges—no chip left behind!
10. Scatter the seasoned ground beef and a couple of tablespoons of diced pickled jalapeños over the cheesy chips.
11. Bake in the preheated oven for 5-7 minutes, just until the cheese is bubbly and the chips are lightly golden.
12. Tip: Watch closely during baking to avoid burnt edges; nachos go from perfect to tragic in seconds.
13. Remove from the oven and immediately add a dollop of sour cream and a handful of chopped fresh cilantro on top.
Crispy, cheesy, and packed with a kick from the jalapeños, these nachos deliver a texture party in every bite. Serve them straight from the baking sheet for a fun, communal snack that’s perfect for game day or whenever you need a serious flavor boost.
Spicy Ramen with Soft-Boiled Egg

Let’s be real—sometimes you need a bowl of ramen that kicks you awake better than your morning alarm. This spicy ramen with a jammy soft-boiled egg is here to save your soul (and your taste buds) from bland noodle despair. It’s the kind of cozy chaos that makes you forget it’s only Tuesday.
Ingredients
– A couple of packs of instant ramen noodles (because we’re keeping it real)
– 4 cups of chicken broth, because flavor matters
– 2 cloves of garlic, minced like you’re venting about your day
– 1 tablespoon of soy sauce for that salty hug
– 1 teaspoon of chili oil, or more if you’re feeling dangerous
– 2 eggs, because everything’s better with a runny yolk
– A handful of sliced green onions for a fresh crunch
– A splash of sesame oil to make it all sing
Instructions
1. Bring 4 cups of chicken broth to a rolling boil in a medium pot over high heat.
2. Add the minced garlic and 1 tablespoon of soy sauce to the boiling broth, stirring once to combine.
3. Gently lower 2 eggs into the broth using a spoon, and boil them for exactly 7 minutes for a perfectly jammy yolk.
4. While the eggs boil, place the ramen noodles in a separate bowl and cover them with hot water from a kettle, letting them soak for 3 minutes until tender.
5. Remove the eggs from the broth with a slotted spoon and immediately transfer them to an ice bath to stop the cooking process.
6. Drain the soaked noodles and divide them between two bowls.
7. Stir 1 teaspoon of chili oil into the hot broth, then ladle the broth over the noodles in each bowl.
8. Peel the soft-boiled eggs, slice them in half lengthwise, and place one egg half in each bowl.
9. Top each bowl with a handful of sliced green onions and a splash of sesame oil.
Glide that spoon through the silky broth and twirl those noodles—each slurp is a spicy, savory hug with a creamy egg surprise. Serve it with extra chili oil on the side for daredevils, or pair it with crispy seaweed snacks for crunch-tastic contrast.
Breakfast-for-Dinner Pancakes with Maple Syrup
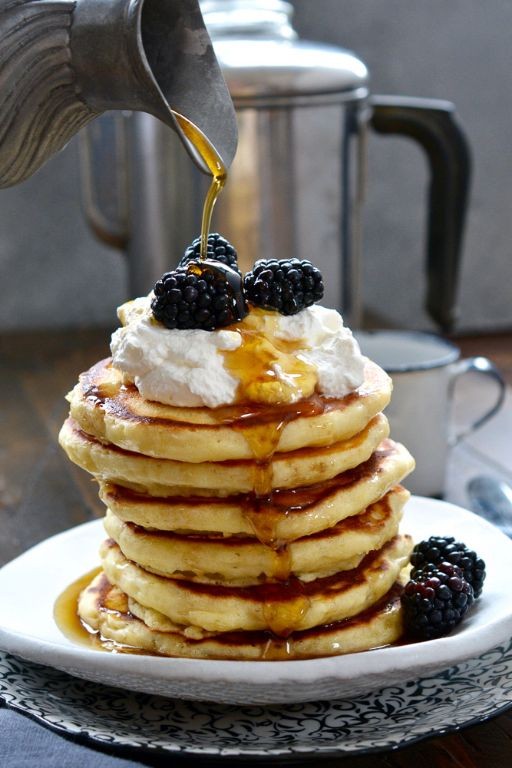
Rise and shine, breakfast rebels! Who says pancakes are just for mornings? We’re flipping the script (and the flapjacks) with this glorious dinner-time pancake adventure that’s basically dessert masquerading as a meal. Get ready to break all the rules and soak your evening in maple goodness.
Ingredients
– 2 cups of all-purpose flour (the trusty foundation)
– 2 tablespoons of baking powder (for maximum fluffiness)
– A good pinch of salt (to keep things interesting)
– 2 large eggs (the binding superstars)
– 1½ cups of whole milk (none of that skimmed nonsense)
– 3 tablespoons of melted butter (because butter makes everything better)
– A generous glug of maple syrup for serving (the liquid gold)
– A couple of tablespoons of vegetable oil for cooking (the non-stick hero)
Instructions
1. Whisk together 2 cups of all-purpose flour, 2 tablespoons of baking powder, and a good pinch of salt in a large bowl until well combined.
2. Crack 2 large eggs into a separate bowl and beat them until they’re pale and frothy.
3. Pour 1½ cups of whole milk and 3 tablespoons of melted butter into the beaten eggs, whisking continuously until the mixture is smooth.
4. Tip: Don’t overmix the batter – a few lumps are perfectly fine and will give you fluffier pancakes.
5. Pour the wet ingredients into the dry ingredients and gently fold together until just combined.
6. Heat a large non-stick skillet or griddle over medium heat and add 1 tablespoon of vegetable oil.
7. Test if the pan is ready by sprinkling a few drops of water – they should sizzle and dance across the surface.
8. Pour ¼ cup of batter onto the hot skillet for each pancake, leaving space between them.
9. Cook for 2-3 minutes until bubbles form on the surface and the edges look set.
10. Tip: Wait for those bubbles to pop and stay open before flipping – that’s your golden ticket to perfect browning.
11. Flip the pancakes carefully and cook for another 1-2 minutes until golden brown on both sides.
12. Transfer cooked pancakes to a warm plate and repeat with remaining batter, adding more oil as needed.
13. Tip: Keep finished pancakes in a 200°F oven to stay warm and fabulous while you cook the rest.
14. Stack those beauties high and drown them in a generous glug of maple syrup.
Keep that stack towering! These pancakes emerge with crispy edges giving way to cloud-like centers that practically melt in your mouth. The maple syrup doesn’t just coat – it soaks deep, creating pockets of sweet caramelization in every fluffy bite. Try serving them with crispy bacon wedged between layers for the ultimate sweet-salty dinner rebellion.
Cheesy Tater Tot Casserole
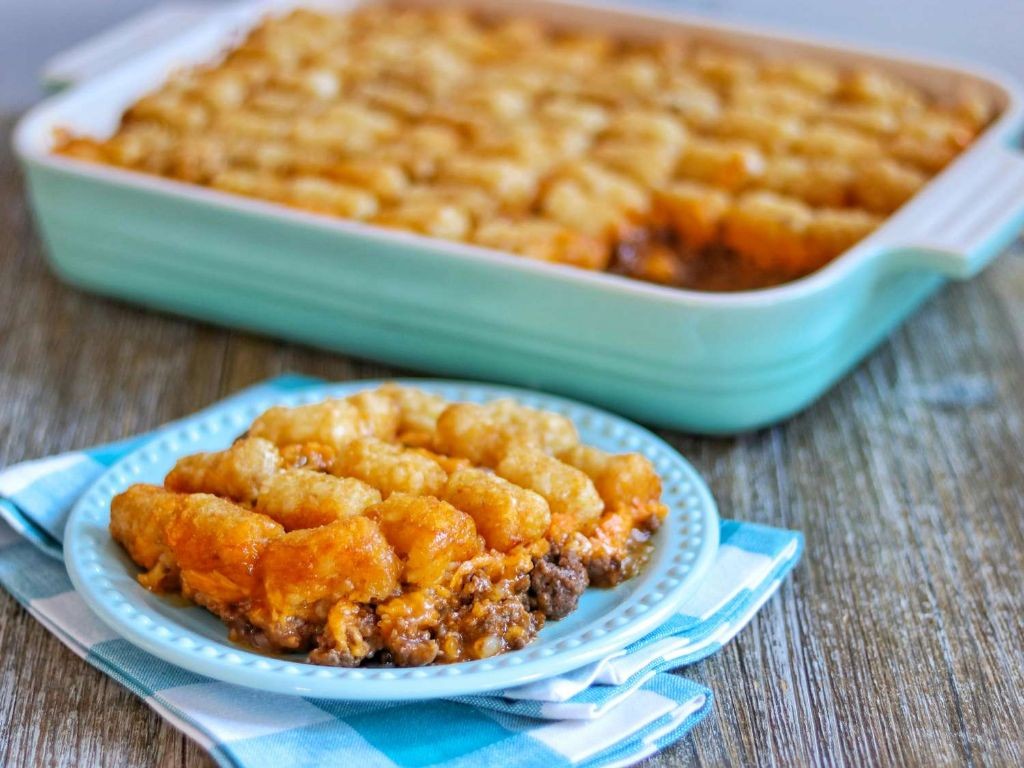
Darlings, gather ’round because we’re about to transform your humble tater tots into a glorious, cheese-laden masterpiece that’ll have your family begging for seconds before it even hits the table. This is the kind of comfort food that hugs you from the inside out—no fancy techniques required, just pure, unapologetic deliciousness.
Ingredients
– A pound of ground beef
– One finely chopped yellow onion
– A couple of minced garlic cloves
– A 10.5-ounce can of cream of mushroom soup
– A generous splash of milk
– A 32-ounce bag of frozen tater tots
– Two cups of shredded cheddar cheese
– A sprinkle of salt and black pepper
Instructions
1. Preheat your oven to 375°F—this ensures everything bakes evenly and gets that golden crust we’re after.
2. Brown the ground beef in a large skillet over medium-high heat for 8-10 minutes, breaking it up with a spoon until no pink remains.
3. Toss in the chopped onion and cook for another 5 minutes until it turns translucent and smells amazing.
4. Stir in the minced garlic and cook for just 1 minute—garlic burns fast, so keep an eye on it!
5. Drain any excess grease from the skillet (pro tip: tilt the pan and use a spoon to remove it for a less greasy casserole).
6. Add the cream of mushroom soup, milk, salt, and pepper, stirring until everything is beautifully combined.
7. Transfer this meaty mixture to a 9×13-inch baking dish, spreading it into an even layer.
8. Arrange the frozen tater tots in a single layer over the meat mixture—get creative with patterns if you’re feeling fancy!
9. Bake uncovered for 25 minutes until the tots start getting crispy around the edges.
10. Sprinkle the shredded cheddar cheese evenly over the top (another pro tip: shred your own cheese—it melts so much creamier than pre-shredded).
11. Return to the oven and bake for another 10-15 minutes until the cheese is bubbly and lightly golden.
12. Let it rest for 5 minutes before serving—this helps the layers set and makes serving much cleaner.
And just like that, you’ve got a casserole that’s crispy on top, creamy in the middle, and packed with savory beef flavor in every bite. Serve it straight from the dish with a simple green salad to cut through the richness, or go full comfort mode and pair it with buttery cornbread for the ultimate cozy meal.
Beef and Bean Chili with Cornbread
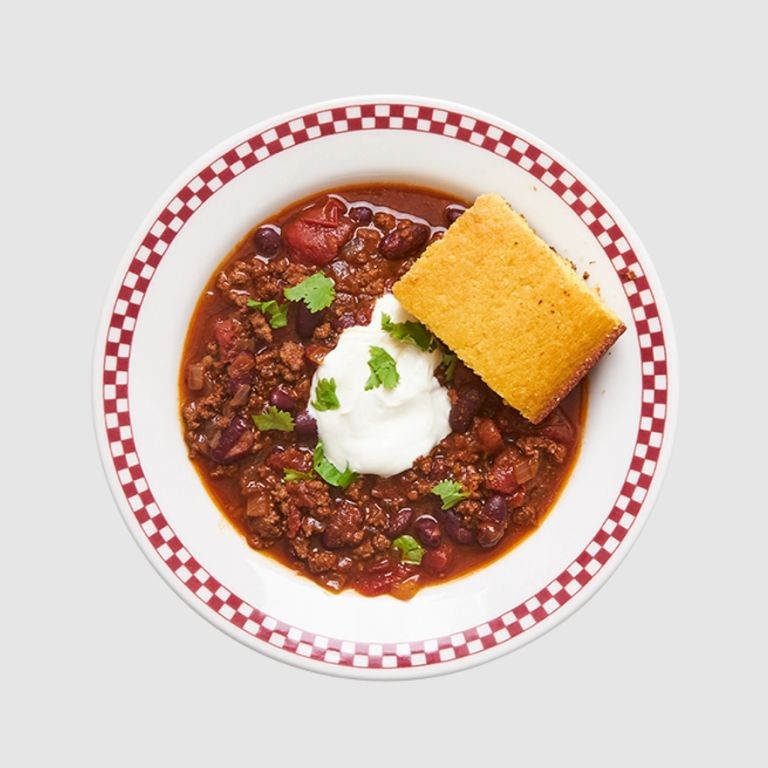
Hearty doesn’t even begin to cover this soul-warming masterpiece that’ll have your taste buds doing a happy dance while your stomach throws a gratitude party. Picture this: spicy, beefy goodness cozied up with beans in a rich tomato bath, all snuggled under a fluffy cornbread blanket that’s basically edible sunshine.
Ingredients
- A couple of pounds of ground beef
- One big yellow onion, chopped up
- A few cloves of garlic, minced
- A couple of cans of kidney beans, drained
- One can of diced tomatoes
- A good glug of beef broth
- A generous sprinkle of chili powder
- A pinch of cumin
- A dash of paprika
- A cup of cornmeal
- A cup of all-purpose flour
- A tablespoon of baking powder
- A big pinch of salt
- A couple of eggs
- A cup of milk
- A quarter cup of melted butter
Instructions
- Brown 2 pounds of ground beef in a large oven-safe pot over medium-high heat for 8-10 minutes until no pink remains.
- Add 1 chopped yellow onion and cook for 5 minutes until translucent.
- Stir in 3 minced garlic cloves and cook for 1 minute until fragrant.
- Mix in 2 drained cans of kidney beans, 1 can of diced tomatoes, and 2 cups of beef broth.
- Season with 2 tablespoons of chili powder, 1 teaspoon of cumin, and 1 teaspoon of paprika.
- Simmer uncovered for 20 minutes, stirring occasionally. Tip: For deeper flavor, let the chili bubble gently rather than boiling vigorously.
- While chili simmers, whisk together 1 cup cornmeal, 1 cup flour, 1 tablespoon baking powder, and 1 teaspoon salt in a bowl.
- In another bowl, beat 2 eggs with 1 cup milk and ¼ cup melted butter.
- Combine wet and dry ingredients until just mixed – don’t over-stir! Tip: Lumpy batter makes fluffier cornbread.
- Drop cornbread batter by spoonfuls over the simmering chili.
- Transfer the pot to a 375°F preheated oven and bake for 20-25 minutes until cornbread is golden and a toothpick comes out clean. Tip: Don’t peek during the first 15 minutes – that steam is precious!
Get ready for that magical moment when your spoon breaks through the golden cornbread crust into the spicy, beefy abyss below. The contrast between the fluffy, slightly sweet topping and the robust, tomato-rich chili creates a texture party in every bite. Seriously, serve this in bowls so deep you might need a ladder, and watch everyone’s winter blues vanish with each comforting spoonful.
Midnight Philly Cheesesteak Sandwich

Just when you thought your late-night cravings couldn’t get any more dramatic, along comes this glorious mess of a sandwich that’s basically a culinary hug at midnight. Picture this: you’re staring into the fridge’s glowing abyss, your stomach singing the song of its people, and suddenly—inspiration strikes with the force of a thousand hungry college students.
Ingredients
– 1 pound of thinly sliced ribeye steak (because we’re fancy like that)
– 2 hoagie rolls, because one is just a sad cry for help
– 1 large yellow onion, sliced into those perfect half-moons
– 1 green bell pepper, because we eat our vegetables like adults
– 8 slices of provolone cheese (go ahead, I won’t judge if you sneak an extra)
– 2 tablespoons of vegetable oil for the sizzle
– A generous splash of Worcestershire sauce for that umami magic
– A couple of tablespoons of butter because butter makes everything better
– Salt and pepper to make your taste buds do a happy dance
Instructions
1. Heat 2 tablespoons of vegetable oil in a large skillet over medium-high heat until it shimmers like disco glitter.
2. Add your sliced onion and green bell pepper to the skillet, cooking for 5-7 minutes until they’re softened and slightly caramelized—this is where the flavor party starts.
3. Push the veggies to one side of the skillet and add your thinly sliced ribeye steak to the empty space.
4. Cook the steak for 3-4 minutes without moving it, letting it develop that beautiful brown crust we all dream about.
5. Flip the steak and cook for another 2-3 minutes until it’s no longer pink—pro tip: resist the urge to constantly stir, or you’ll steam instead of sear.
6. Mix the steak with the vegetables in the skillet, then add a generous splash of Worcestershire sauce and season with salt and pepper.
7. Divide the meat and veggie mixture into two equal portions right there in the skillet.
8. Top each portion with 4 slices of provolone cheese, then cover the skillet and remove from heat for 2 minutes—the cheese will melt into glorious gooeyness.
9. While the cheese is melting, slice your hoagie rolls lengthwise without cutting all the way through, then butter the insides.
10. Toast the buttered hoagie rolls in a separate skillet over medium heat for 2-3 minutes until golden brown and crispy—this prevents soggy bread syndrome.
11. Use a spatula to transfer each cheesy steak portion into the toasted hoagie rolls, embracing the beautiful mess.
This glorious creation delivers the perfect textural symphony—crispy bread giving way to tender steak, sweet caramelized onions, and that provolone pulling like edible silk. Try serving it with a side of pickle spears for that tangy contrast, or honestly, just eat it over the sink like the masterpiece it is.
Homestyle Mac and Cheese with Bacon
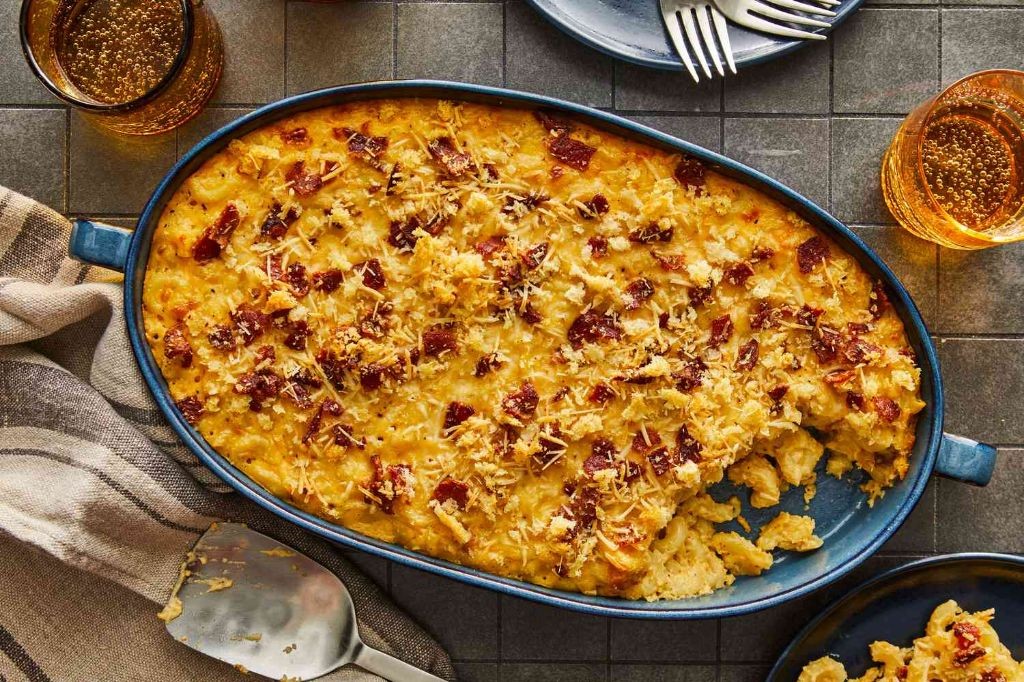
Comfort food just got a major upgrade, folks! This isn’t your average boxed mac – we’re talking about the kind of homestyle mac and cheese with bacon that makes you want to cancel all your plans and have a serious relationship with your bowl. It’s cheesy, it’s smoky, and it’s guaranteed to be the star of any dinner table.
Ingredients
– A box of elbow macaroni
– A good handful of bacon, chopped up
– A couple of tablespoons of butter
– A couple of tablespoons of all-purpose flour
– 2 cups of whole milk
– A big splash of heavy cream
– A generous 2 cups of shredded sharp cheddar cheese
– A half cup of grated Parmesan cheese
– A pinch of salt and black pepper
Instructions
1. Preheat your oven to 375°F (190°C).
2. Bring a large pot of salted water to a rolling boil.
3. Add the elbow macaroni to the boiling water and cook for exactly 7 minutes, until al dente (it will finish cooking in the oven!).
4. While the pasta cooks, chop the bacon into small pieces.
5. Cook the chopped bacon in a large skillet over medium heat for 8-10 minutes until crispy, then transfer to a paper towel-lined plate.
6. Drain the cooked macaroni and set it aside.
7. In the same pot, melt the butter over medium heat.
8. Whisk in the all-purpose flour and cook for 1 minute until golden and bubbly to make your roux.
9. Slowly pour in the whole milk while whisking constantly to prevent lumps.
10. Add the heavy cream and continue whisking until the sauce thickens enough to coat the back of a spoon, about 3-4 minutes.
11. Remove the pot from heat and stir in the shredded sharp cheddar and grated Parmesan until completely melted and smooth.
12. Season the cheese sauce with a pinch of salt and black pepper.
13. Fold the cooked macaroni and crispy bacon into the cheese sauce until everything is well combined.
14. Transfer the mac and cheese mixture to a greased baking dish.
15. Bake for 20-25 minutes until the top is golden brown and bubbly. Here’s the final result: creamy, dreamy mac and cheese with that perfect crispy bacon crunch in every bite. Honestly, you might want to make a double batch because this dish disappears faster than your motivation to go to the gym on a Monday.
Fried Egg and Avocado Toast
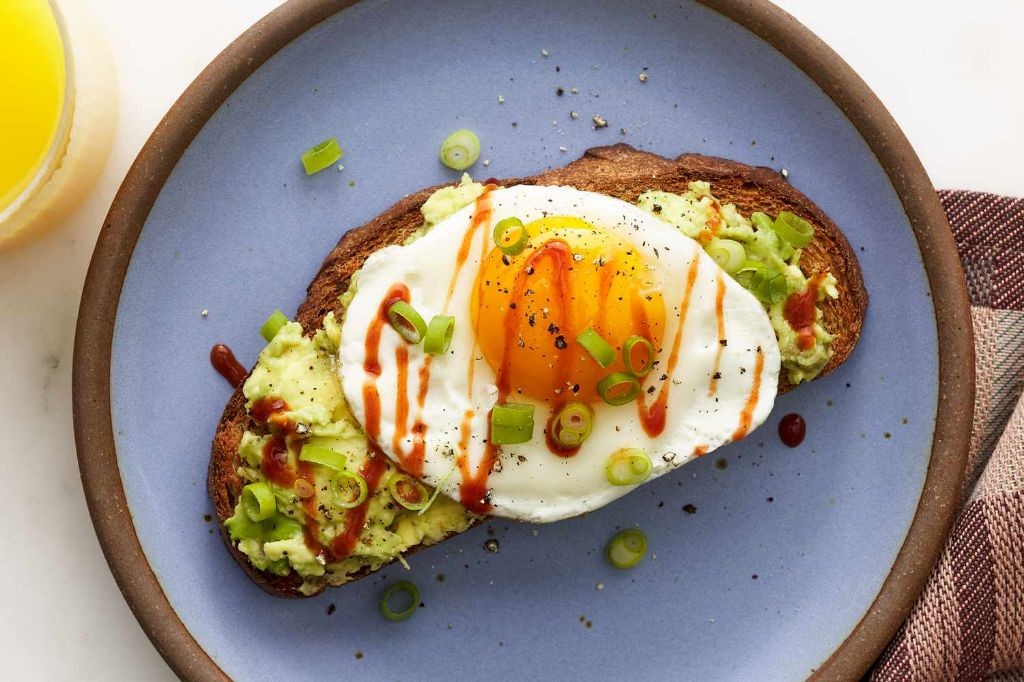
Just when you thought avocado toast couldn’t get any more glorious, along comes this fried egg upgrade that’ll make your taste buds do a happy dance. Seriously, this isn’t just breakfast—it’s a flavor party where the avocado brings the guac and the egg brings the sunny-side-up vibes.
Ingredients
- 2 slices of your favorite bread (sourdough is my ride-or-die)
- 1 perfectly ripe avocado
- 2 large eggs
- A generous glug of olive oil (about 1 tablespoon)
- A couple of pinches of flaky sea salt
- A few cracks of black pepper
- A squeeze of fresh lemon juice (about 1 teaspoon)
- A sprinkle of red pepper flakes if you’re feeling spicy
Instructions
- Heat a non-stick skillet over medium heat and add that glug of olive oil.
- While the pan heats up, toast your bread slices until golden and crisp—this prevents soggy toast syndrome.
- Crack each egg into a small bowl first to avoid shell surprises, then gently slide them into the hot skillet.
- Cook the eggs for 2-3 minutes until the whites are fully set but the yolks are still gloriously runny.
- Meanwhile, halve the avocado, remove the pit, and scoop the flesh into a small bowl.
- Mash the avocado with a fork, then stir in the lemon juice, a pinch of salt, and pepper—the acid keeps it bright green.
- Spread the mashed avocado evenly onto your toasted bread slices.
- Carefully place one fried egg on top of each avocado-slathered toast.
- Finish with another pinch of flaky salt, black pepper, and red pepper flakes if using.
What you get is this magical contrast of creamy avocado against that crisp toast, with the rich yolk bursting over everything like edible sunshine. Try stacking an extra slice for a double-decker situation, or add crispy bacon bits if you’re feeling extra—this dish is basically a blank canvas for your breakfast dreams.
Pulled Pork Sliders with Coleslaw

Hang onto your napkins, folks, because we’re diving into the glorious mess that is pulled pork sliders with coleslaw—the kind of food that makes you forget all about that sad desk salad you had for lunch.
Ingredients
– A 3-pound pork shoulder (because bigger is always better)
– A couple of tablespoons of olive oil
– A generous half cup of your favorite BBQ sauce
– A splash of apple cider vinegar
– A teaspoon of smoked paprika
– A big pinch of salt and black pepper
– A bag of slider buns (about 12, because sharing is optional)
– A bag of pre-shredded coleslaw mix
– A quarter cup of mayonnaise
– A tablespoon of honey
Instructions
1. Preheat your oven to 300°F—low and slow is the name of the game here.
2. Rub the pork shoulder all over with olive oil, smoked paprika, salt, and black pepper.
3. Place the pork in a roasting pan and pour apple cider vinegar around it (not over it—this keeps things moist without washing off the rub).
4. Cover the pan tightly with foil and roast for 4 hours, until the pork shreds easily with a fork.
5. Remove the pork from the oven and let it rest for 20 minutes—this keeps all those juicy flavors locked in.
6. While the pork rests, whisk together mayonnaise, honey, and a pinch of salt in a large bowl.
7. Toss the coleslaw mix into the mayo mixture until everything’s coated.
8. Shred the pork using two forks, pulling it apart into tender strands.
9. Stir the shredded pork with BBQ sauce until it’s saucy and irresistible.
10. Split the slider buns and lightly toast them for about 2 minutes until golden—this prevents sogginess.
11. Pile the saucy pork onto the bottom buns, top with a heap of coleslaw, and crown with the top buns.
Zesty, tangy, and gloriously messy, these sliders deliver a crunch from the slaw against the melt-in-your-mouth pork. Serve them with extra napkins and a side of smug satisfaction for mastering barbecue without a grill.
Korean BBQ Beef Tacos

Aren’t you tired of choosing between Korean BBQ night and taco Tuesday? Let’s throw a flavor fiesta where bulgogi and tortillas collide in the most delicious identity crisis ever. Get ready for Korean BBQ Beef Tacos—the culinary mashup your taste buds didn’t know they needed but will absolutely demand on repeat.
Ingredients
– 1 pound of thinly sliced beef sirloin
– 8 small flour tortillas
– 1/4 cup of soy sauce
– 2 tablespoons of brown sugar
– 1 tablespoon of sesame oil
– 3 minced garlic cloves
– 1 teaspoon of grated ginger
– 1 sliced jalapeño
– 1/2 cup of shredded purple cabbage
– 2 sliced green onions
– A big handful of fresh cilantro
– A generous squeeze of lime juice
Instructions
1. Whisk together 1/4 cup soy sauce, 2 tablespoons brown sugar, 1 tablespoon sesame oil, 3 minced garlic cloves, and 1 teaspoon grated ginger in a bowl.
2. Add 1 pound thinly sliced beef sirloin to the marinade, tossing to coat every piece thoroughly.
3. Let the beef marinate at room temperature for 20 minutes—this quick marinade hack maximizes flavor without overnight waiting.
4. Heat a large skillet over medium-high heat until a drop of water sizzles immediately.
5. Cook the marinated beef in the hot skillet for 2-3 minutes per side until caramelized and no longer pink.
6. Warm 8 small flour tortillas in a dry skillet for 30 seconds per side or until pliable and lightly toasted.
7. Divide the cooked beef evenly among the warmed tortillas.
8. Top each taco with shredded purple cabbage, sliced jalapeño, and sliced green onions.
9. Finish with fresh cilantro and a generous squeeze of lime juice over all tacos.
10. Serve immediately while the tortillas are still warm and the beef is juicy.
Vibrantly textured and explosively flavorful, these tacos deliver crunchy cabbage against tender beef with a kick of jalapeño heat. The sweet-savory marinade soaks into every bite, making these perfect for stacking high with extra fixings or serving alongside kimchi fries for the ultimate fusion feast.
Pepperoni Pizza Grilled Cheese
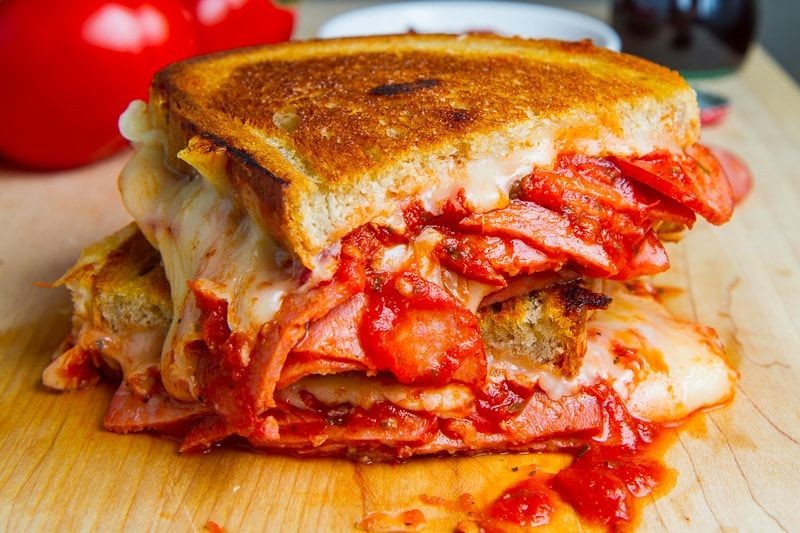
Now, who said you had to choose between pizza night and grilled cheese cravings? This glorious mashup combines the crispy, melty comfort of grilled cheese with the spicy, savory kick of pepperoni pizza—basically the best culinary decision you’ll make all week.
Ingredients
- 4 slices of your favorite sturdy bread (sourdough works wonders)
- A generous handful of shredded mozzarella cheese
- A couple of tablespoons of grated Parmesan cheese
- About 15–20 slices of pepperoni
- A splash of olive oil or a couple of tablespoons of softened butter for toasting
- 2–3 tablespoons of your go-to pizza or marinara sauce for dipping
Instructions
- Lay out all 4 slices of bread on a clean cutting board.
- Spread a thin layer of pizza sauce evenly over one side of each bread slice.
- Sprinkle a generous layer of shredded mozzarella cheese over the sauce on two of the bread slices.
- Arrange 7–10 pepperoni slices in a single layer over the mozzarella on those same two slices.
- Top the pepperoni with a light sprinkle of grated Parmesan cheese.
- Place the remaining two bread slices, sauce-side down, on top to form two sandwiches.
- Heat a non-stick skillet or griddle over medium-low heat for about 2 minutes.
- Brush the outside of each sandwich lightly with olive oil or spread softened butter evenly.
- Place both sandwiches in the preheated skillet and cook for 3–4 minutes, until the bottom is golden brown and crisp.
- Carefully flip each sandwich using a spatula and cook for another 3–4 minutes until the second side is equally golden and the cheese is fully melted.
- Remove the sandwiches from the skillet and let them rest for 1 minute on a cutting board before slicing.
- Cut each sandwich diagonally and serve immediately with extra pizza sauce on the side for dipping.
Keep that skillet on medium-low to avoid burning the bread before the cheese melts—patience is key here. The result is a crispy, gooey masterpiece with a spicy pepperoni punch that’s perfect for dunking into extra sauce. Try serving these dippers with a side of garlicky ranch or tucking them into a lunchbox for a surprise upgrade that’ll make any day feel like Friday.
Chocolate Chip Cookie Skillet Sundae

Virtually nothing beats that magical moment when warm, gooey chocolate chip cookies meet cold, creamy ice cream—except when it’s all baked together in one glorious skillet! This Chocolate Chip Cookie Skillet Sundae is basically your childhood dessert dreams on steroids, delivering that perfect hot-cold, crispy-chewy combo that’ll make you question every other dessert you’ve ever had. Consider this your official invitation to skip the boring bowl and dive spoon-first into edible happiness.
Ingredients
– 1 stick of unsalted butter, softened but not melted
– ½ cup of brown sugar, packed like you mean it
– ¼ cup of granulated sugar
– 1 large egg, straight from the fridge
– 1 teaspoon of vanilla extract (the real stuff, please!)
– 1 ¼ cups of all-purpose flour
– ½ teaspoon of baking soda
– A generous pinch of salt
– 1 cup of semi-sweet chocolate chips (because more is always better)
– 2 big scoops of vanilla ice cream
– A handful of rainbow sprinkles for maximum joy
Instructions
1. Preheat your oven to 350°F and grab a 10-inch cast iron skillet—no greasing needed, that’s the beauty of cast iron!
2. In a medium bowl, cream together the softened butter, brown sugar, and granulated sugar using a hand mixer on medium speed for exactly 2 minutes until light and fluffy.
3. Crack in the egg and add the vanilla extract, then mix for another 30 seconds until fully incorporated.
4. In a separate bowl, whisk together the flour, baking soda, and salt—this ensures your leavening is evenly distributed.
5. Gradually add the dry ingredients to the wet mixture, mixing on low speed just until the flour disappears; overmixing makes tough cookies!
6. Fold in the chocolate chips with a spatula until they’re evenly distributed throughout the dough.
7. Press the cookie dough evenly into the bottom of your skillet, making sure it reaches all the way to the edges.
8. Bake for 18-20 minutes until the edges are golden brown and the center appears slightly underbaked—it’ll continue cooking as it cools.
9. Let the skillet cool on a wire rack for 5 minutes (this prevents the ice cream from instantly melting into soup).
10. Top immediately with two scoops of vanilla ice cream and shower with rainbow sprinkles.
Let’s be real: that crackly cookie edge giving way to a fudgy center is pure texture heaven. The warm chocolate chips create little molten pockets that play perfectly against the cold ice cream, while the sprinkles add that festive crunch. For next-level presentation, bring the whole skillet to the table and let everyone dig in family-style—just be prepared to fight over the last spoonful!
Hot Honey Fried Chicken Sandwich

Jazz up your lunch game with this crispy, spicy, sweet masterpiece that’ll make your taste buds do a happy dance. Picture this: golden-brown chicken with a kick of heat followed by a honeyed hug—it’s basically a flavor party between two buns. Trust me, your boring sandwich days are officially over.
Ingredients
– A couple of boneless, skinless chicken breasts
– About 1 cup of all-purpose flour
– A generous pinch of salt and black pepper
– A splash of buttermilk (about 1/2 cup)
– A couple of tablespoons of hot sauce
– Enough vegetable oil to fill your skillet about 1 inch deep
– A good glug of honey (around 1/4 cup)
– A dash of red pepper flakes
– A couple of soft brioche buns
– A handful of pickle slices
– A few leaves of crisp lettuce
Instructions
1. Pat the chicken breasts completely dry with paper towels—this helps the coating stick better.
2. Season both sides of the chicken with salt and black pepper.
3. Pour the buttermilk and hot sauce into a shallow bowl, then whisk them together.
4. Place the flour in a separate shallow bowl.
5. Dip each chicken breast into the buttermilk mixture, making sure it’s fully coated.
6. Dredge the chicken in the flour, pressing gently to form a thick, even layer.
7. Heat the vegetable oil in a large skillet over medium-high heat until it reaches 350°F—test by dropping in a pinch of flour; if it sizzles, you’re good.
8. Carefully place the chicken in the hot oil and fry for 6–7 minutes per side, until golden brown and crispy.
9. Transfer the fried chicken to a wire rack set over a baking sheet; this keeps it from getting soggy.
10. In a small saucepan, warm the honey and red pepper flakes over low heat for 2–3 minutes, stirring until combined.
11. Brush the hot honey glaze generously over both sides of the fried chicken.
12. Lightly toast the brioche buns in a dry skillet for 1–2 minutes until golden.
13. Place a lettuce leaf on the bottom half of each bun.
14. Top with the glazed chicken and a few pickle slices.
15. Cap it with the top bun and press down gently. Nothing beats that first bite into the crunchy, juicy chicken with its fiery-sweet kick. Serve it up with extra pickles on the side for a tangy crunch, or crumble any leftovers over a salad tomorrow—waste not, want not!
French Onion Soup with Gruyère Crouton
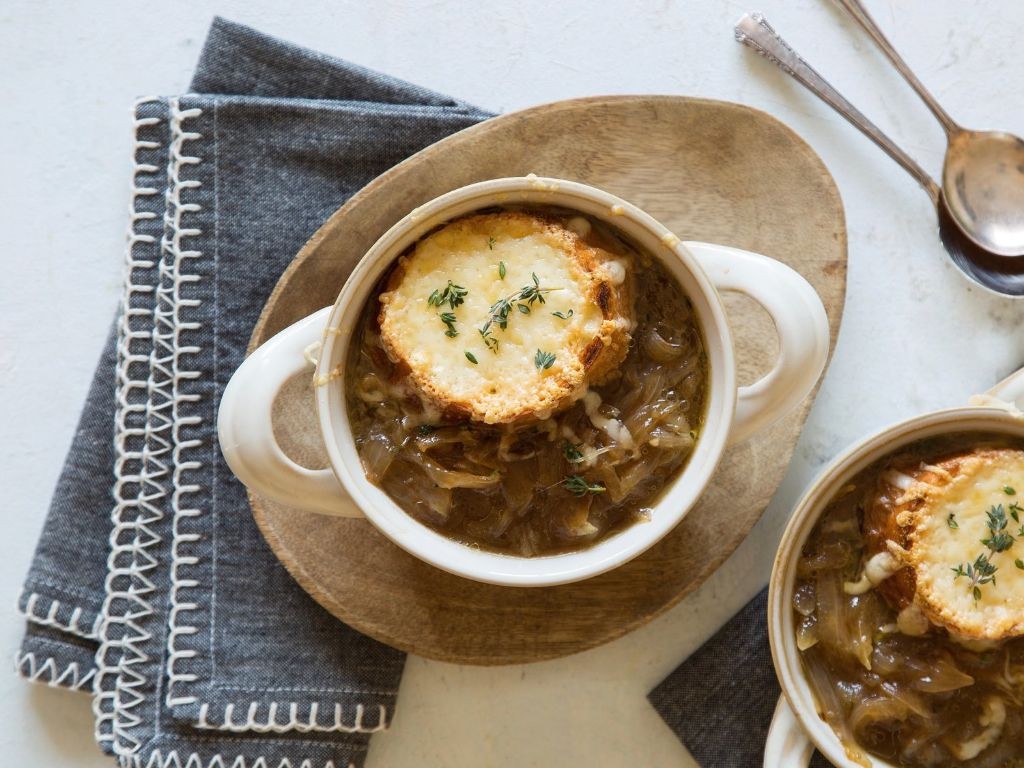
Yikes, who knew caramelized onions could be this dramatic? This French Onion Soup with Gruyère Crouton is basically a warm, cheesy hug in a bowl—the kind that makes you forget it’s Monday and your cat just knocked over your favorite plant. Let’s turn those humble onions into a star-studded, broth-soaked masterpiece that’ll have your taste buds doing a happy dance.
Ingredients
– A couple of large yellow onions, thinly sliced
– A generous glug of olive oil (about 2 tablespoons)
– A splash of dry white wine (around 1/4 cup)
– 4 cups of beef broth
– A pinch of fresh thyme leaves
– 2 slices of crusty baguette
– A handful of shredded Gruyère cheese (about 1 cup)
Instructions
1. Heat 2 tablespoons of olive oil in a large pot over medium-low heat.
2. Add the thinly sliced onions and cook for 30–40 minutes, stirring occasionally, until they turn deep golden brown and smell sweet—this slow caramelization is key for maximum flavor.
3. Pour in 1/4 cup of dry white wine to deglaze the pot, scraping up any browned bits from the bottom.
4. Add 4 cups of beef broth and a pinch of fresh thyme leaves, then bring the soup to a simmer.
5. Let it bubble gently for 20 minutes to let the flavors meld together beautifully.
6. While the soup simmers, toast 2 slices of crusty baguette in a 375°F oven for 5–7 minutes until crisp and golden.
7. Ladle the hot soup into oven-safe bowls, top each with a toasted baguette slice, and sprinkle a handful of shredded Gruyère cheese evenly over the top.
8. Broil the bowls for 2–3 minutes, watching closely until the cheese is bubbly and lightly browned—don’t walk away, or you’ll miss the cheesy magic!
Finally, that first spoonful delivers a silky, savory broth with sweet onion notes, all crowned by a crispy, cheesy crouton that’s pure comfort. Serve it with a side of bad jokes for the full cozy-cafe effect, or just dive in and let the Gruyère stretch like a foodie’s dream.
Summary
Satisfy those late-night cravings with these 18 comforting recipes perfect for your midnight diner moments. From quick snacks to hearty meals, there’s something for every craving. We hope you find new favorites to enjoy! Try these recipes, leave a comment sharing which ones you loved most, and don’t forget to pin this article on Pinterest to save for your next late-night cooking adventure.