Visions of elegant celebrations and royal-inspired desserts? You’ve come to the right place! Whether you’re planning a birthday party, bridal shower, or just want to add some magic to your weekend baking, these princess cake recipes transform ordinary occasions into unforgettable moments. Get ready to discover 20 delightful creations that will make you feel like royalty in your own kitchen—let’s dive into these enchanting treats!
Classic Swedish Princess Cake with Vanilla Custard
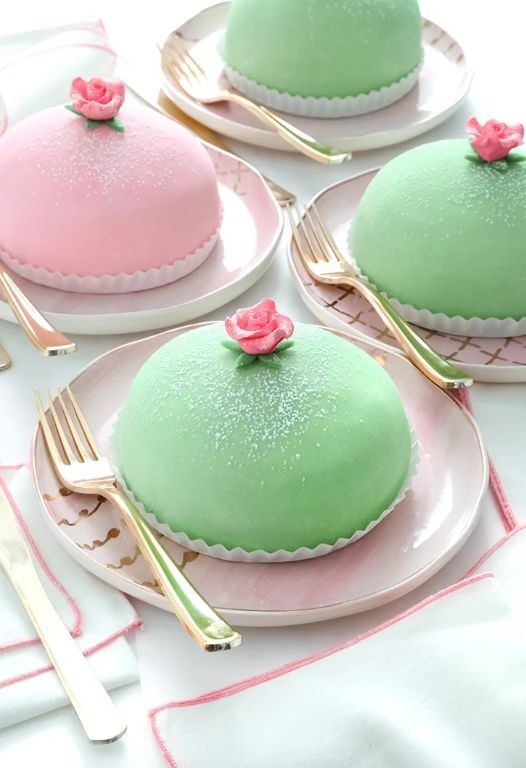
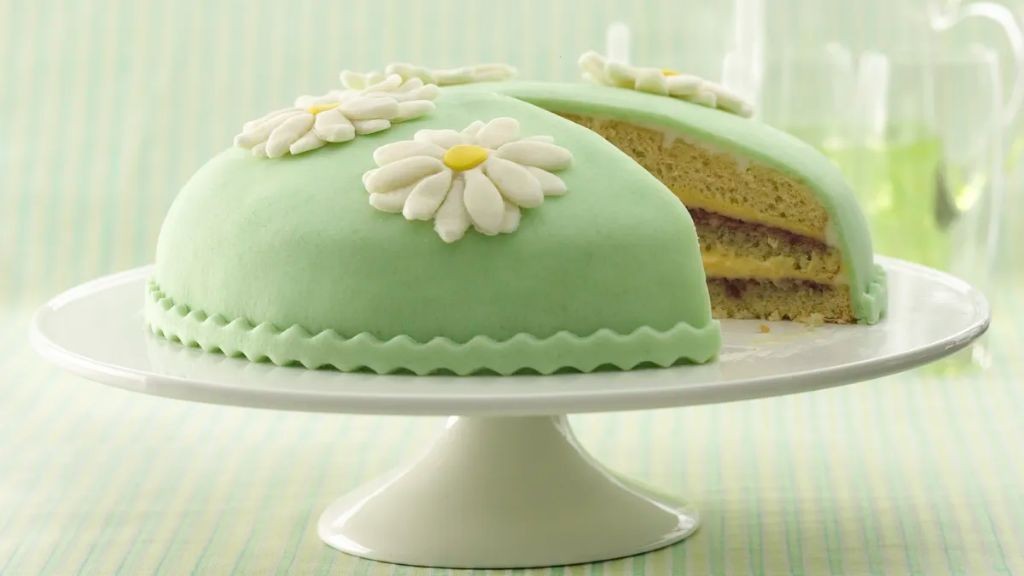
Prepare to be royally delighted by this Swedish Princess Cake, a confection so elegant it probably has its own tiny crown. This green-domed beauty with its layers of sponge cake, vanilla custard, and fluffy whipped cream is the dessert equivalent of a fairytale, minus the talking animals (unless you count your enthusiastic kitchen helpers).
Ingredients
- 1 ½ cups all-purpose flour
- 1 ½ tsp baking powder
- ¼ tsp salt
- 4 large eggs
- 1 cup granulated sugar
- ½ cup whole milk
- 1 tsp vanilla extract
- ½ cup unsalted butter
- 2 cups whole milk
- ½ cup granulated sugar
- ¼ cup cornstarch
- 4 large egg yolks
- 1 tsp vanilla extract
- 2 cups heavy whipping cream
- ¼ cup powdered sugar
- 1 cup marzipan
- 2 drops green food coloring
Instructions
- Preheat your oven to 350°F and grease two 8-inch round cake pans.
- Whisk together 1 ½ cups all-purpose flour, 1 ½ tsp baking powder, and ¼ tsp salt in a medium bowl.
- Beat 4 large eggs and 1 cup granulated sugar in a stand mixer on high speed for 5 minutes until pale and thick.
- Gently fold the dry ingredients into the egg mixture until just combined.
- Warm ½ cup whole milk and 1 tsp vanilla extract with ½ cup unsalted butter in a saucepan until butter melts.
- Fold the warm milk mixture into the batter until smooth.
- Divide the batter evenly between the prepared pans and bake for 25 minutes until golden and springy to the touch.
- Cool the cakes in their pans for 10 minutes, then transfer to a wire rack to cool completely.
- For the custard, heat 2 cups whole milk in a saucepan until steaming but not boiling.
- Whisk ½ cup granulated sugar, ¼ cup cornstarch, and 4 large egg yolks in a bowl until smooth.
- Slowly pour the hot milk into the egg mixture while whisking constantly to prevent curdling.
- Return the mixture to the saucepan and cook over medium heat for 5 minutes, stirring constantly, until thick and bubbling.
- Remove from heat and stir in 1 tsp vanilla extract, then press plastic wrap directly onto the surface and chill for 2 hours.
- Whip 2 cups heavy whipping cream with ¼ cup powdered sugar until stiff peaks form.
- Slice each cake layer horizontally to create four thin layers.
- Place one cake layer on a serving plate and spread with half of the chilled custard.
- Top with a second cake layer and spread with half of the whipped cream.
- Repeat the layers with remaining cake, custard, and whipped cream, doming the top slightly.
- Knead 1 cup marzipan with 2 drops green food coloring until evenly colored.
- Roll the marzipan into a 12-inch circle on a surface dusted with powdered sugar.
- Drape the marzipan over the assembled cake and smooth it gently to cover completely.
- Trim any excess marzipan from the bottom and decorate with a simple marzipan rose if desired.
Absolutely magical in both texture and taste, this cake offers a delightful contrast between the soft sponge, creamy custard, and pliable marzipan shell. Serve it chilled as a showstopping centerpiece at your next gathering, or be selfish and enjoy a generous slice with strong coffee while pretending you’re Scandinavian royalty.
Mini Princess Cakes with Raspberry Filling
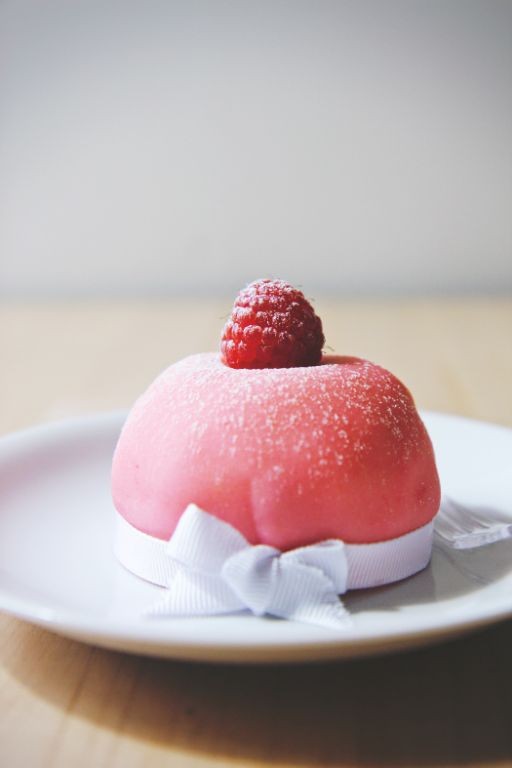
Zany as it sounds, these mini princess cakes are about to become the crowned jewels of your dessert table—tiny domes of sponge cake, raspberry filling, and whipped cream, all wrapped in a smooth marzipan blanket that’s almost too pretty to eat (but you’ll manage). Trust me, they’re the royal treatment your sweet tooth deserves.
Ingredients
– 1 cup all-purpose flour
– 1 tsp baking powder
– 1/4 tsp salt
– 3 large eggs
– 3/4 cup granulated sugar
– 1/4 cup whole milk
– 1/2 cup seedless raspberry jam
– 1 cup heavy cream
– 2 tbsp powdered sugar
– 1 tsp vanilla extract
– 8 oz marzipan
– Green food coloring
Instructions
1. Preheat your oven to 350°F and grease a 9×13-inch baking pan.
2. Whisk together 1 cup all-purpose flour, 1 tsp baking powder, and 1/4 tsp salt in a medium bowl.
3. Beat 3 large eggs and 3/4 cup granulated sugar in a separate bowl on high speed for 5 minutes until pale and thick.
4. Gently fold the dry ingredients into the egg mixture until just combined.
5. Stir in 1/4 cup whole milk until the batter is smooth.
6. Pour the batter into the prepared pan and bake for 18–20 minutes until a toothpick inserted in the center comes out clean.
7. Cool the cake completely in the pan on a wire rack for 1 hour.
8. Use a 2-inch round cutter to stamp out 12 cake circles from the cooled cake.
9. Slice each cake circle horizontally in half to create two layers.
10. Spread 2 tsp of seedless raspberry jam on the bottom half of each cake.
11. Whip 1 cup heavy cream, 2 tbsp powdered sugar, and 1 tsp vanilla extract on medium-high speed for 3–4 minutes until stiff peaks form.
12. Spoon 1 tbsp of whipped cream over the raspberry jam on each cake bottom.
13. Place the top cake layer over the whipped cream and press gently to adhere.
14. Tint 8 oz marzipan with green food coloring until evenly colored, then roll it out to 1/8-inch thickness on a surface dusted with powdered sugar.
15. Cut the marzipan into 12 circles slightly larger than the cakes using a 3-inch cutter.
16. Drape a marzipan circle over each assembled cake, smoothing it down the sides to cover completely.
17. Chill the cakes in the refrigerator for at least 30 minutes before serving to set the layers.
Dazzlingly delicate, these mini princess cakes offer a cloud-like texture from the airy sponge and whipped cream, punctuated by the bright tang of raspberry jam. Serve them on a tiered stand for a fairy-tale tea party, or surprise someone by tucking a candle into one for a birthday twist—they’re little edible works of art that vanish in seconds.
Chocolate Princess Cake with Whipped Cream Frosting
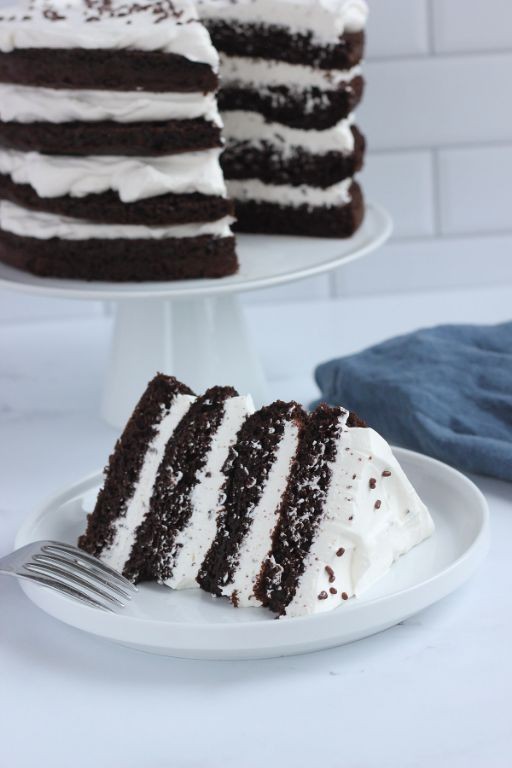
Venture into a dessert so royally delicious, it’ll make your taste buds pledge allegiance to the chocolate crown. This Chocolate Princess Cake with Whipped Cream Frosting is the stuff of fairy tales—minus the evil stepmother, plus a whole lot of creamy, dreamy goodness. Get ready to bake like you’re ruling the kingdom of confections!
Ingredients
– 2 cups all-purpose flour
– 1 3/4 cups granulated sugar
– 3/4 cup unsweetened cocoa powder
– 2 tsp baking soda
– 1 tsp baking powder
– 1 tsp salt
– 2 large eggs
– 1 cup buttermilk
– 1/2 cup vegetable oil
– 2 tsp vanilla extract
– 1 cup boiling water
– 2 cups heavy cream
– 1/2 cup powdered sugar
Instructions
1. Preheat your oven to 350°F and grease two 9-inch round cake pans.
2. In a large bowl, whisk together 2 cups all-purpose flour, 1 3/4 cups granulated sugar, 3/4 cup unsweetened cocoa powder, 2 tsp baking soda, 1 tsp baking powder, and 1 tsp salt until fully combined.
3. Add 2 large eggs, 1 cup buttermilk, 1/2 cup vegetable oil, and 2 tsp vanilla extract to the dry ingredients, mixing on medium speed for 2 minutes until smooth.
4. Carefully pour in 1 cup boiling water and stir by hand until the batter is thin and uniform—this tip ensures a moist, fudgy crumb.
5. Divide the batter evenly between the prepared pans and bake for 30–35 minutes, or until a toothpick inserted into the center comes out clean.
6. Let the cakes cool in the pans for 10 minutes, then transfer them to a wire rack to cool completely—this prevents sogginess and makes frosting easier.
7. In a chilled bowl, whip 2 cups heavy cream and 1/2 cup powdered sugar on high speed for 3–4 minutes until stiff peaks form.
8. Place one cake layer on a serving plate and spread a thick layer of whipped cream frosting over the top.
9. Stack the second cake layer and frost the entire cake with the remaining whipped cream, using a spatula for smooth sides—chill the cake for 1 hour before serving to set the frosting.
Keep this beauty chilled until serving; the whipped cream frosting stays light and airy, complementing the rich, moist chocolate layers. Slice it thick for a decadent treat, or crown it with fresh berries for a regal twist that’s fit for any celebration.
Strawberry Princess Cake with Fresh Berries
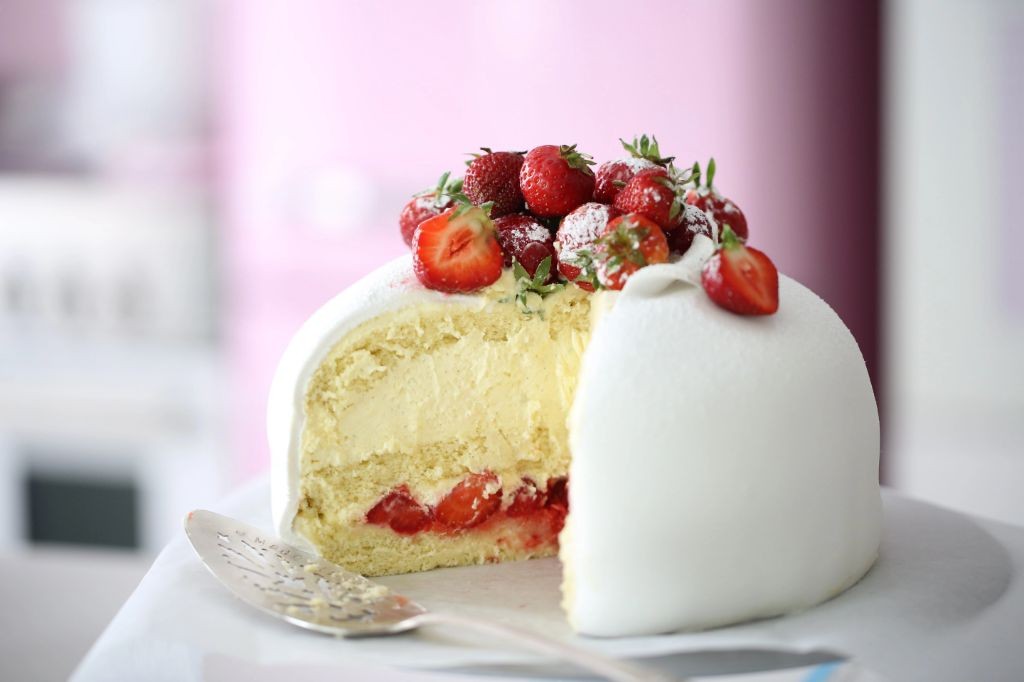
Zesty and utterly enchanting, this Strawberry Princess Cake with Fresh Berries is the dessert equivalent of finding a unicorn in your kitchen—magical, slightly unbelievable, and guaranteed to make you the ruler of any gathering. With layers as dreamy as a fairytale and berries that pop like confetti, it’s the kind of sweet masterpiece that’ll have everyone pledging allegiance to your baking crown. Get ready to whip up a slice of pure, unapologetic joy that’s fit for royalty (or just your very lucky friends).
Ingredients
– 2 cups all-purpose flour
– 1 1/2 cups granulated sugar
– 1/2 cup unsalted butter, softened
– 3 large eggs
– 1 cup whole milk
– 2 tsp baking powder
– 1 tsp vanilla extract
– 1/4 tsp salt
– 2 cups fresh strawberries, hulled and sliced
– 1 cup heavy whipping cream
– 1/4 cup powdered sugar
– 1 tbsp lemon juice
Instructions
1. Preheat your oven to 350°F and grease two 8-inch round cake pans.
2. In a large bowl, whisk together 2 cups all-purpose flour, 1 1/2 cups granulated sugar, 2 tsp baking powder, and 1/4 tsp salt until fully combined.
3. Add 1/2 cup softened unsalted butter, 3 large eggs, 1 cup whole milk, and 1 tsp vanilla extract to the dry ingredients.
4. Beat the mixture on medium speed for 2 minutes until the batter is smooth and no lumps remain.
5. Divide the batter evenly between the prepared pans, tapping them lightly on the counter to remove air bubbles.
6. Bake for 25–30 minutes, or until a toothpick inserted into the center comes out clean.
7. Cool the cakes in the pans for 10 minutes, then transfer them to a wire rack to cool completely.
8. In a chilled bowl, whip 1 cup heavy whipping cream with 1/4 cup powdered sugar until stiff peaks form.
9. Place one cake layer on a serving plate and spread half of the whipped cream over it evenly.
10. Arrange 1 cup of sliced fresh strawberries in a single layer over the whipped cream.
11. Top with the second cake layer and spread the remaining whipped cream over it.
12. Toss the remaining 1 cup sliced strawberries with 1 tbsp lemon juice to prevent browning.
13. Decoratively arrange the lemon-tossed strawberries on top of the cake.
14. Chill the assembled cake in the refrigerator for at least 1 hour before serving to set the layers.
Charming and irresistibly fluffy, this cake boasts layers that melt on your tongue with a sweet-tart berry burst in every bite. Serve it chilled with a drizzle of extra strawberry puree or crown it with edible flowers for a garden-party vibe that’s as Instagram-worthy as it is delicious.
Lemon Princess Cake with Citrus Glaze
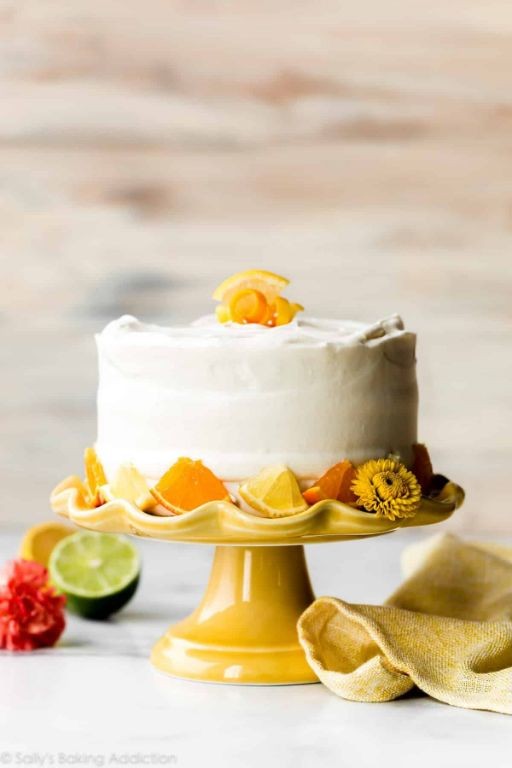
Zesty, zingy, and absolutely royal—this lemon princess cake is the citrusy monarch your dessert table has been waiting for, ready to dazzle taste buds with its sunny disposition and tangy charm. Imagine a cake so delightfully fluffy it could float away if not for the weight of its vibrant citrus glaze, making every slice a celebration of pure, unapologetic joy. It’s the kind of treat that turns an ordinary Tuesday into a lemon-scented fiesta, no crown required.
Ingredients
– 2 cups all-purpose flour
– 1 1/2 cups granulated sugar
– 1/2 cup unsalted butter, softened
– 3 large eggs
– 1 cup whole milk
– 1/4 cup fresh lemon juice
– 2 tsp baking powder
– 1/2 tsp salt
– 1 tbsp lemon zest
– 1 cup powdered sugar
– 2 tbsp fresh orange juice
Instructions
1. Preheat the oven to 350°F and grease a 9-inch round cake pan with butter, then lightly dust it with flour to prevent sticking.
2. In a large bowl, cream together 1 1/2 cups granulated sugar and 1/2 cup softened unsalted butter using an electric mixer on medium speed for 3 minutes until light and fluffy.
3. Add 3 large eggs one at a time, beating for 30 seconds after each addition to incorporate fully and ensure a smooth batter.
4. Whisk together 2 cups all-purpose flour, 2 tsp baking powder, and 1/2 tsp salt in a separate bowl to evenly distribute the leavening agents.
5. Alternately add the dry ingredients and 1 cup whole milk to the butter mixture in three parts, mixing on low speed just until combined after each addition to avoid overmixing.
6. Fold in 1/4 cup fresh lemon juice and 1 tbsp lemon zest with a spatula until the batter is uniform, being gentle to keep the air in the mixture.
7. Pour the batter into the prepared pan and tap it lightly on the counter to release any large air bubbles for an even bake.
8. Bake at 350°F for 30-35 minutes, or until a toothpick inserted into the center comes out clean with no wet crumbs.
9. Cool the cake in the pan on a wire rack for 15 minutes, then invert it onto the rack to cool completely to room temperature.
10. For the glaze, whisk 1 cup powdered sugar and 2 tbsp fresh orange juice in a small bowl until smooth and lump-free, adjusting with more juice if needed for a pourable consistency.
11. Drizzle the glaze evenly over the cooled cake, allowing it to drip down the sides for a rustic, inviting look.
Just baked, this cake boasts a tender crumb that melts in your mouth, complemented by the zesty glaze that adds a bright, sunny kick. Serve it with a dollop of whipped cream and extra lemon slices for a playful twist, or simply savor it as the star of your next gathering—it’s guaranteed to steal the spotlight.
Red Velvet Princess Cake with Cream Cheese Frosting
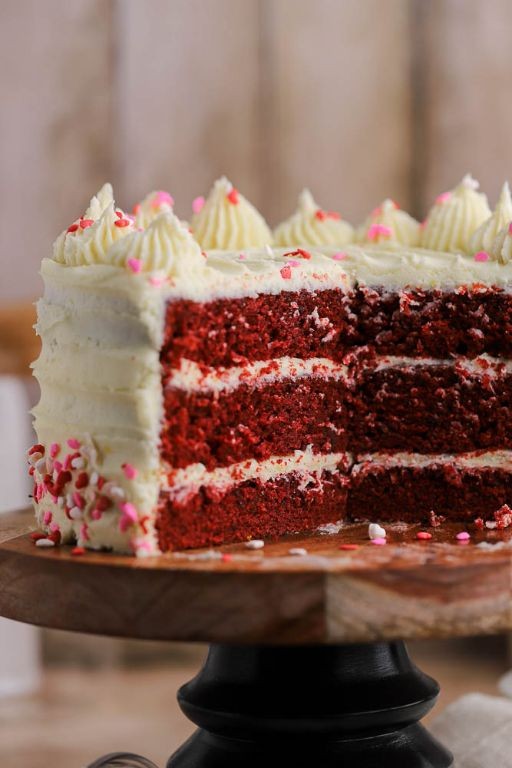
Jazzy, glamorous, and secretly simple—this red velvet princess cake is the diva of desserts that’ll have your taste buds bowing. With its vibrant crimson crumb and cloud-like cream cheese frosting, it’s the showstopper your next celebration desperately needs. Let’s bake a cake fit for royalty (or at least your very demanding cat).
Ingredients
– 2 1/2 cups all-purpose flour
– 1 1/2 cups granulated sugar
– 1 tsp baking soda
– 1 tsp salt
– 1 tbsp cocoa powder
– 1 1/2 cups vegetable oil
– 1 cup buttermilk
– 2 large eggs
– 2 tbsp red food coloring
– 1 tsp white vinegar
– 1 tsp vanilla extract
– 8 oz cream cheese
– 1/2 cup unsalted butter
– 4 cups powdered sugar
– 1 tsp vanilla extract
Instructions
1. Preheat your oven to 350°F and generously grease two 9-inch round cake pans.
2. Whisk together 2 1/2 cups all-purpose flour, 1 1/2 cups granulated sugar, 1 tsp baking soda, 1 tsp salt, and 1 tbsp cocoa powder in a large bowl until no lumps remain.
3. Pour 1 1/2 cups vegetable oil, 1 cup buttermilk, 2 large eggs, 2 tbsp red food coloring, 1 tsp white vinegar, and 1 tsp vanilla extract into the dry ingredients.
4. Mix on medium speed for 2 minutes until the batter is smooth and uniformly crimson—scrape the bowl’s sides halfway through to avoid hidden flour pockets.
5. Divide the batter evenly between the prepared pans and tap them lightly on the counter to release air bubbles.
6. Bake for 25–30 minutes until a toothpick inserted into the center comes out clean with no wet crumbs.
7. Cool the cakes in their pans on a wire rack for 15 minutes, then invert them onto the rack to cool completely—this prevents steaming and soggy bottoms.
8. Beat 8 oz cream cheese and 1/2 cup unsalted butter with an electric mixer on high for 3 minutes until fluffy and pale.
9. Gradually add 4 cups powdered sugar and 1 tsp vanilla extract, mixing on low initially to avoid a sugar cloud, then high for 2 minutes until the frosting is thick and spreadable.
10. Place one cake layer on a serving plate and spread a generous layer of frosting over the top with an offset spatula.
11. Top with the second cake layer and frost the entire cake smoothly, using a bench scraper for sharp edges if you’re feeling fancy.
12. Refrigerate the cake for at least 1 hour before slicing to let the frosting set firmly.
Glory awaits when you slice into this masterpiece—the velvety, moist crumb contrasts with the tangy, creamy frosting in a symphony of sweet and sharp. Serve it chilled with a sprinkle of edible glitter for extra princess pizzazz, or pair it with a strong coffee to balance the richness. Trust us, it’s the kind of cake that inspires impromptu tiara-wearing.
Pistachio Princess Cake with Rosewater Buttercream
Wondering how to make a dessert that’s basically royalty in cake form? This pistachio princess cake with rosewater buttercream is the regal treat your taste buds deserve—fluffy, floral, and fit for a queen (or just your next Tuesday). Trust me, it’s so good, you’ll want to crown yourself the official dessert monarch of your household.
Ingredients
– 2 cups all-purpose flour
– 1 cup granulated sugar
– 1/2 cup unsalted butter, softened
– 3 large eggs
– 1 cup whole milk
– 1/2 cup shelled pistachios, finely ground
– 2 tsp baking powder
– 1/2 tsp salt
– 1 tsp vanilla extract
– 1/2 cup unsalted butter, softened (for buttercream)
– 2 cups powdered sugar
– 2 tbsp rosewater
– 2 tbsp heavy cream
Instructions
1. Preheat your oven to 350°F and grease two 8-inch round cake pans.
2. In a large bowl, whisk together 2 cups all-purpose flour, 1 cup granulated sugar, 2 tsp baking powder, and 1/2 tsp salt until fully combined.
3. Add 1/2 cup softened unsalted butter, 3 large eggs, 1 cup whole milk, and 1 tsp vanilla extract to the dry ingredients.
4. Beat the mixture on medium speed for 2 minutes until smooth and creamy.
5. Fold in 1/2 cup finely ground pistachios gently with a spatula to avoid overmixing.
6. Divide the batter evenly between the prepared pans and tap them lightly on the counter to remove air bubbles.
7. Bake for 25–30 minutes, or until a toothpick inserted into the center comes out clean.
8. Let the cakes cool in the pans for 10 minutes, then transfer to a wire rack to cool completely.
9. For the buttercream, beat 1/2 cup softened unsalted butter in a bowl until fluffy, about 2 minutes.
10. Gradually add 2 cups powdered sugar, mixing on low speed to avoid a sugar cloud.
11. Pour in 2 tbsp rosewater and 2 tbsp heavy cream, then beat on high for 3 minutes until light and spreadable.
12. Place one cooled cake layer on a serving plate and spread a thick layer of buttercream on top.
13. Top with the second cake layer and frost the entire cake with the remaining buttercream.
14. Garnish with extra crushed pistachios if desired, pressing them gently onto the sides.
15. Chill the cake in the refrigerator for at least 1 hour before slicing to set the frosting.
Oh, the magic of this cake! Each slice offers a tender, nutty crumb that melts with the floral rosewater buttercream—it’s like a garden party in your mouth. Serve it with a pot of Earl Grey tea for a cozy afternoon or slice it thick for a birthday bash; either way, it’s a showstopper that’ll have everyone begging for the recipe.
Black Forest Princess Cake with Cherry Compote
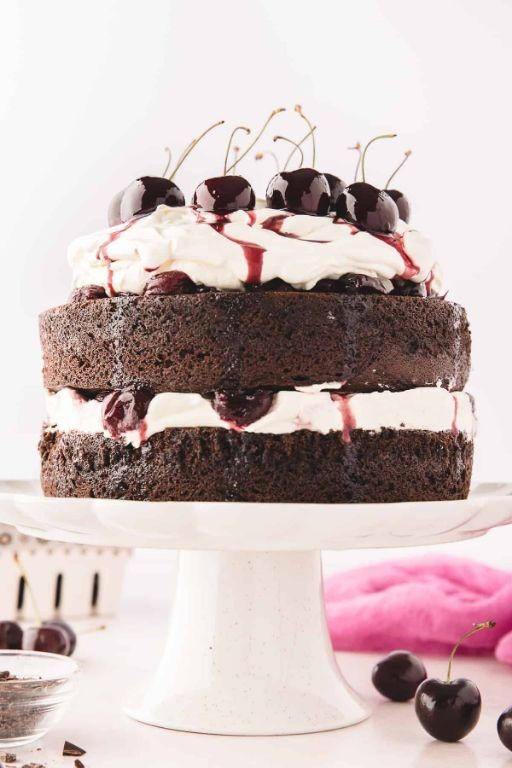
Swooping in to save your dessert game from the tyranny of boring cakes, this Black Forest Princess Cake with Cherry Compote is the dramatic, chocolate-covered hero your table deserves—think less fairy tale, more deliciously over-the-top reality show contestant who actually knows how to bake. Seriously, who needs a glass slipper when you can have layers of moist chocolate cake, whipped cream, and cherries that practically sing with flavor? It’s the kind of dessert that makes you want to crown yourself royalty, or at least pretend you have a personal pastry chef hiding in your pantry.
Ingredients
– 2 cups all-purpose flour
– 1 3/4 cups granulated sugar
– 3/4 cup unsweetened cocoa powder
– 2 tsp baking soda
– 1 tsp baking powder
– 1 tsp salt
– 2 large eggs
– 1 cup buttermilk
– 1/2 cup vegetable oil
– 2 tsp vanilla extract
– 1 cup boiling water
– 2 cups heavy cream
– 1/4 cup powdered sugar
– 1 lb fresh cherries, pitted
– 1/2 cup granulated sugar
– 1 tbsp lemon juice
– 1/2 cup dark chocolate shavings
Instructions
1. Preheat your oven to 350°F and grease two 9-inch round cake pans, then line them with parchment paper for easy removal later—trust me, this saves sanity.
2. Whisk together 2 cups all-purpose flour, 1 3/4 cups granulated sugar, 3/4 cup unsweetened cocoa powder, 2 tsp baking soda, 1 tsp baking powder, and 1 tsp salt in a large bowl until no lumps remain.
3. Add 2 large eggs, 1 cup buttermilk, 1/2 cup vegetable oil, and 2 tsp vanilla extract to the dry ingredients, then mix on medium speed until just combined; avoid overmixing to keep the cake tender.
4. Carefully pour in 1 cup boiling water and stir gently until the batter is smooth and thin—this step ensures a moist crumb, so don’t skip it.
5. Divide the batter evenly between the prepared pans and bake for 30–35 minutes, or until a toothpick inserted into the center comes out clean.
6. Let the cakes cool in the pans for 10 minutes, then transfer them to a wire rack to cool completely before assembling.
7. While the cakes cool, combine 1 lb pitted cherries, 1/2 cup granulated sugar, and 1 tbsp lemon juice in a saucepan over medium heat, stirring until the sugar dissolves and the cherries release their juices, about 8–10 minutes.
8. Remove the cherry compote from the heat and let it cool to room temperature; if it’s too runny, simmer it for another 2–3 minutes to thicken slightly.
9. Whip 2 cups heavy cream with 1/4 cup powdered sugar in a chilled bowl until stiff peaks form—this is key for a stable frosting that won’t deflate.
10. Place one cooled cake layer on a serving plate, spread half of the whipped cream over it, then spoon half of the cherry compote evenly on top.
11. Add the second cake layer, cover it with the remaining whipped cream, and top with the rest of the cherry compote, leaving a border for a rustic look.
12. Sprinkle 1/2 cup dark chocolate shavings over the top and sides of the cake for a final flourish. You’ll adore the way the rich chocolate layers meld with the tart cherry compote and airy cream, creating a texture that’s both decadent and light—serve it chilled with a sprinkle of extra shavings for a showstopping finish that’s perfect for impressing guests or treating yourself after a long day.
Caramel Princess Cake with Salted Caramel Drizzle
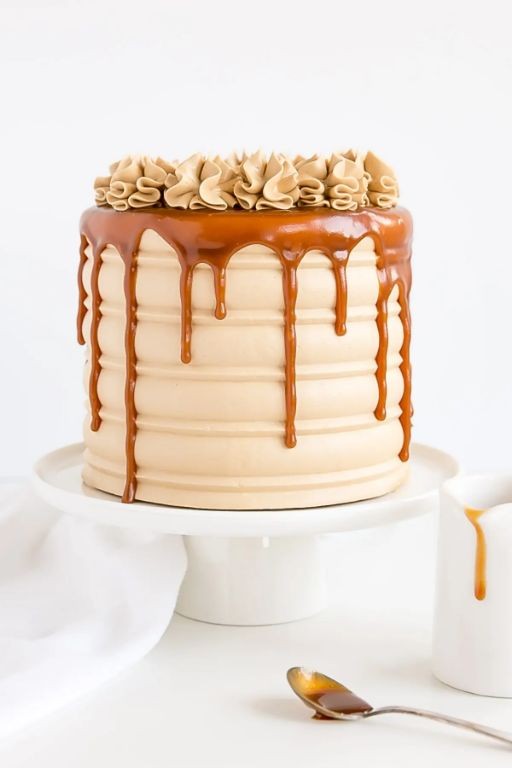
Cue the royal fanfare, because this caramel princess cake is about to become the undisputed ruler of your dessert table—a majestic vanilla sponge drenched in salted caramel that’s so good, it might just demand a crown.
Ingredients
– 1 ½ cups all-purpose flour
– 1 cup granulated sugar
– ½ cup unsalted butter, softened
– ¾ cup whole milk
– 3 large eggs
– 2 tsp baking powder
– 1 tsp vanilla extract
– ½ tsp salt
– 1 cup salted caramel sauce
– ¼ cup heavy cream
Instructions
1. Preheat your oven to 350°F and grease two 8-inch round cake pans.
2. In a large bowl, cream 1 cup granulated sugar and ½ cup softened unsalted butter together on medium speed for 3 minutes until light and fluffy.
3. Add 3 large eggs one at a time, mixing for 30 seconds after each addition until fully incorporated.
4. Whisk 1 ½ cups all-purpose flour, 2 tsp baking powder, and ½ tsp salt in a separate bowl to evenly distribute the leavening agents.
5. Alternate adding the dry ingredients and ¾ cup whole milk to the butter mixture in three parts, starting and ending with the dry ingredients, and mix on low speed until just combined.
6. Stir in 1 tsp vanilla extract until the batter is smooth, being careful not to overmix to avoid a dense cake.
7. Divide the batter evenly between the prepared pans and bake for 25–28 minutes until a toothpick inserted into the center comes out clean.
8. Let the cakes cool in the pans for 10 minutes, then transfer to a wire rack to cool completely to prevent tearing.
9. Warm 1 cup salted caramel sauce in a saucepan over low heat for 2 minutes until it’s pourable but not boiling.
10. Stir ¼ cup heavy cream into the warmed caramel until the mixture is smooth and glossy for a richer drizzle.
11. Place one cake layer on a serving plate and spread ⅓ of the caramel sauce evenly over the top.
12. Stack the second layer and pour the remaining caramel over the entire cake, allowing it to drip down the sides for a rustic, elegant look.
13. Let the cake set at room temperature for 20 minutes before slicing to allow the caramel to firm up slightly.
That first bite delivers a tender, cloud-like crumb that gives way to a buttery caramel river—serve it slightly warm with a scoop of vanilla ice cream to lean into the cozy, decadent vibes.
Almond Princess Cake with Marzipan Covering
Yikes, this isn’t your grandma’s fruitcake—this Almond Princess Cake with its marzipan covering is the regal dessert that actually deserves a throne at your table. Imagine layers of almond sponge cake embracing raspberry jam and vanilla pastry cream, all wrapped in that signature marzipan cloak that’s as smooth as a royal decree. It’s the kind of showstopper that makes other desserts bow in respect.
Ingredients
– 1 ½ cups all-purpose flour
– 1 cup granulated sugar
– ½ cup unsalted butter
– 3 large eggs
– 1 tsp almond extract
– 1 tsp baking powder
– ½ tsp salt
– ¾ cup whole milk
– ½ cup raspberry jam
– 1 cup vanilla pastry cream
– 12 oz marzipan
– 2 tbsp powdered sugar
Instructions
1. Preheat your oven to 350°F and grease two 8-inch round cake pans.
2. Whisk together 1 ½ cups all-purpose flour, 1 tsp baking powder, and ½ tsp salt in a medium bowl.
3. Cream ½ cup unsalted butter and 1 cup granulated sugar in a large bowl with an electric mixer on medium speed for 3 minutes until light and fluffy.
4. Beat in 3 large eggs one at a time, then mix in 1 tsp almond extract.
5. Alternate adding the dry ingredients and ¾ cup whole milk to the butter mixture, starting and ending with the dry ingredients, mixing just until combined after each addition.
6. Divide the batter evenly between the prepared pans and bake for 25–30 minutes until a toothpick inserted into the center comes out clean.
7. Cool the cakes in the pans for 10 minutes, then transfer to a wire rack to cool completely.
8. Spread ½ cup raspberry jam evenly over the top of one cake layer.
9. Top the jam-covered layer with 1 cup vanilla pastry cream, spreading it to the edges.
10. Place the second cake layer on top, pressing down gently to secure.
11. Dust a clean surface with 2 tbsp powdered sugar and roll out 12 oz marzipan into a ¼-inch thick circle large enough to cover the entire cake.
12. Drape the marzipan over the assembled cake, smoothing it gently with your hands to eliminate air bubbles and trim any excess from the bottom.
This beauty boasts a moist, almond-kissed crumb that plays perfectly with the tangy raspberry and creamy vanilla layers, all encased in that delightfully chewy marzipan shell. Serve it sliced thin to savor each luxurious layer, or crown it with fresh berries for a pop of color that’ll make your guests feel like royalty.
Passionfruit Princess Cake with Tropical Flavors

Finally, a cake that understands your need for tropical drama and princess-level fabulousness! This passionfruit princess cake isn’t just dessert—it’s a vacation on a plate, guaranteed to make your taste buds do the hula and forget all about that sad desk salad from lunch.
Ingredients
- 2 cups all-purpose flour
- 1 1/2 cups granulated sugar
- 1 cup unsalted butter
- 3/4 cup passionfruit pulp
- 1/2 cup coconut milk
- 4 large eggs
- 2 tsp baking powder
- 1 tsp vanilla extract
- 1/2 tsp salt
- 8 oz cream cheese
- 2 cups powdered sugar
- 1/2 cup heavy cream
- 1/4 cup toasted coconut flakes
- 2 tbsp fresh lime juice
Instructions
- Preheat your oven to 350°F and grease two 8-inch round cake pans.
- Whisk together 2 cups all-purpose flour, 1 1/2 cups granulated sugar, 2 tsp baking powder, and 1/2 tsp salt in a large bowl.
- Cream 1 cup unsalted butter with an electric mixer on medium speed until light and fluffy, about 3 minutes.
- Add 4 large eggs one at a time, beating well after each addition until fully incorporated.
- Mix in 3/4 cup passionfruit pulp, 1/2 cup coconut milk, and 1 tsp vanilla extract until the batter is smooth.
- Gradually add the dry ingredients to the wet ingredients, mixing on low speed just until combined—don’t overmix!
- Divide the batter evenly between the prepared pans and bake for 25-30 minutes until a toothpick inserted in the center comes out clean.
- Cool the cakes in their pans for 10 minutes, then transfer to a wire rack to cool completely.
- While cakes cool, beat 8 oz cream cheese with 2 cups powdered sugar until smooth and creamy.
- Whip 1/2 cup heavy cream to stiff peaks, then gently fold it into the cream cheese mixture to create a light frosting.
- Stir 2 tbsp fresh lime juice into the frosting to brighten the flavor and cut the sweetness.
- Place one cake layer on a serving plate and spread with 1/3 of the frosting.
- Top with the second cake layer and frost the top and sides with the remaining frosting.
- Sprinkle 1/4 cup toasted coconut flakes over the top of the cake for texture and tropical flair.
Absolutely magical how the tangy passionfruit cuts through the rich cream cheese frosting, while the toasted coconut adds that essential crunch. Serve this beauty chilled with extra passionfruit drizzled over each slice, or be extra and crown it with edible flowers for that true princess treatment!
Vanilla Bean Princess Cake with Edible Flowers
A cake so royally delicious it might just demand its own throne! This vanilla bean princess cake with edible flowers is the fairytale dessert your table deserves—fluffy layers, creamy filling, and a sprinkle of floral magic that’ll make you feel like culinary royalty without the crown drama.
Ingredients
– 2 cups all-purpose flour
– 1 1/2 cups granulated sugar
– 1/2 cup unsalted butter, softened
– 3/4 cup whole milk
– 3 large eggs
– 2 tsp baking powder
– 1/2 tsp salt
– 1 vanilla bean, seeds scraped
– 1 cup heavy cream
– 1/4 cup powdered sugar
– 1/2 cup raspberry jam
– 12 edible flowers (e.g., pansies or violets)
Instructions
1. Preheat your oven to 350°F and grease two 8-inch round cake pans.
2. In a large bowl, cream the softened butter and granulated sugar with an electric mixer on medium speed for 3 minutes until light and fluffy.
3. Beat in the eggs one at a time, mixing for 30 seconds after each addition until fully incorporated.
4. Stir in the scraped vanilla bean seeds and milk until the mixture is smooth.
5. In a separate bowl, whisk together the flour, baking powder, and salt for even distribution.
6. Gradually fold the dry ingredients into the wet mixture with a spatula, mixing just until no streaks remain—overmixing can lead to a dense cake.
7. Divide the batter evenly between the prepared pans and smooth the tops with a spatula.
8. Bake for 25–30 minutes, or until a toothpick inserted into the center comes out clean.
9. Cool the cakes in the pans on a wire rack for 10 minutes, then turn them out to cool completely to prevent sogginess.
10. In a chilled bowl, whip the heavy cream and powdered sugar with an electric mixer on high speed for 2–3 minutes until stiff peaks form.
11. Place one cake layer on a serving plate and spread the raspberry jam evenly over the top.
12. Spoon half of the whipped cream over the jam and gently spread it to the edges.
13. Top with the second cake layer and cover the entire cake with the remaining whipped cream.
14. Decorate the top with edible flowers, pressing them lightly into the cream for a secure fit.
15. Chill the assembled cake in the refrigerator for at least 1 hour before slicing to set the layers. Keep it refrigerated until serving to maintain the cream’s stability.
Kindly prepare for a dessert that’s as enchanting as it looks—each slice offers a tender crumb, bursts of berry sweetness, and a hint of floral elegance. Serve it at garden parties or as a centerpiece for brunch, and watch it vanish faster than a fairy tale ending!
Chai Spiced Princess Cake with Cardamom Cream
Nervous about baking something that looks straight out of a royal tea party? Fear not! This chai-spiced princess cake with cardamom cream is your ticket to dessert stardom—no tiara required, just a whisk and a sense of adventure. It’s the cozy, aromatic hug your taste buds deserve, blending warm spices with cloud-like cream in a way that’ll make you feel like royalty without the fuss of curtsying.
Ingredients
– 2 cups all-purpose flour
– 1 cup granulated sugar
– 1/2 cup unsalted butter
– 3 large eggs
– 1 cup whole milk
– 2 tsp baking powder
– 1 tsp ground cardamom
– 1 tsp ground cinnamon
– 1/2 tsp ground ginger
– 1/4 tsp ground cloves
– 1/4 tsp ground nutmeg
– 1 cup heavy cream
– 1/4 cup powdered sugar
– 1 tsp vanilla extract
Instructions
1. Preheat your oven to 350°F and grease a 9-inch round cake pan with butter.
2. In a large bowl, whisk together 2 cups all-purpose flour, 1 cup granulated sugar, 2 tsp baking powder, 1 tsp ground cardamom, 1 tsp ground cinnamon, 1/2 tsp ground ginger, 1/4 tsp ground cloves, and 1/4 tsp ground nutmeg until evenly combined.
3. Add 1/2 cup unsalted butter (softened) and 3 large eggs to the dry ingredients, then mix on medium speed for 2 minutes until the batter is smooth and pale.
4. Gradually pour in 1 cup whole milk while mixing on low speed, scraping the bowl’s sides to incorporate all ingredients—this prevents lumps and ensures a uniform texture.
5. Pour the batter into the prepared pan and tap it lightly on the counter to release air bubbles.
6. Bake for 30–35 minutes, or until a toothpick inserted into the center comes out clean and the cake’s edges pull away from the pan.
7. Let the cake cool in the pan for 10 minutes, then transfer it to a wire rack to cool completely for 1 hour.
8. While the cake cools, whip 1 cup heavy cream, 1/4 cup powdered sugar, and 1 tsp vanilla extract on high speed for 3–4 minutes until stiff peaks form—chill the bowl first for better volume.
9. Slice the cooled cake horizontally into two even layers using a serrated knife for clean cuts.
10. Spread the whipped cardamom cream evenly over the bottom layer, then carefully place the top layer over it.
11. Dust the assembled cake with additional powdered sugar for a simple, elegant finish.
Ready to dive in? This cake boasts a tender, spice-kissed crumb that melts with the airy cardamom cream, creating a harmony of warmth and sweetness. Serve it with a hot chai latte for a double dose of cozy, or slice it thin for a dainty afternoon treat that’s fit for any modern-day princess—or anyone who loves a good story with their dessert.
Peach Princess Cake with Whipped Mascarpone
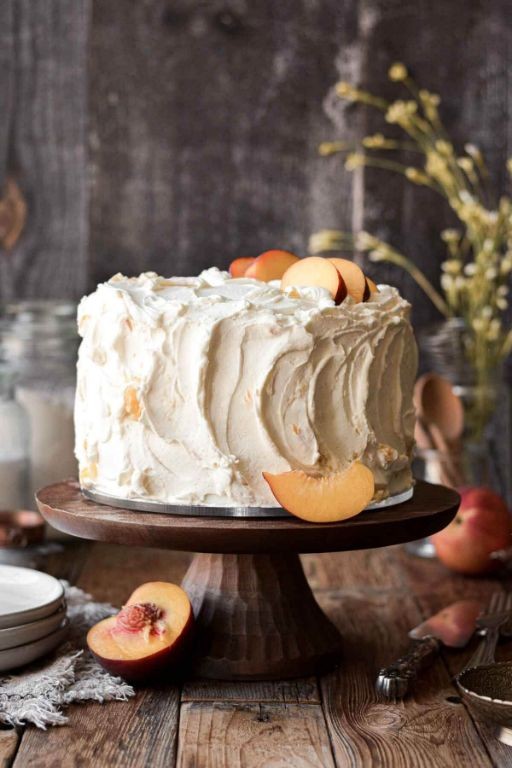
Haven’t we all dreamed of dessert royalty? This Peach Princess Cake with Whipped Mascarpone transforms humble peaches into regal treats that’ll have your taste buds bowing down. Get ready to create the most charming summer dessert that’s surprisingly simple to whip up!
Ingredients
– 1 ½ cups all-purpose flour
– 1 cup granulated sugar
– ½ cup unsalted butter, softened
– 2 large eggs
– 1 tsp baking powder
– ½ tsp salt
– ¾ cup whole milk
– 2 ripe peaches, sliced
– 8 oz mascarpone cheese
– 1 cup heavy cream
– ¼ cup powdered sugar
– 1 tsp vanilla extract
Instructions
1. Preheat your oven to 350°F and grease a 9-inch round cake pan.
2. Whisk together 1 ½ cups flour, 1 tsp baking powder, and ½ tsp salt in a medium bowl.
3. Cream ½ cup softened butter and 1 cup granulated sugar in a separate bowl until light and fluffy.
4. Beat in 2 eggs one at a time until fully incorporated.
5. Alternate adding the dry ingredients and ¾ cup milk to the butter mixture, beginning and ending with dry ingredients.
6. Pour the batter into the prepared pan and arrange sliced peaches in a circular pattern on top.
7. Bake for 35-40 minutes until a toothpick inserted in the center comes out clean.
8. Cool the cake in the pan for 15 minutes, then transfer to a wire rack to cool completely.
9. While the cake cools, whip 1 cup heavy cream with ¼ cup powdered sugar until soft peaks form.
10. Fold in 8 oz mascarpone cheese and 1 tsp vanilla extract until smooth and creamy.
11. Spread the whipped mascarpone frosting evenly over the cooled cake.
12. Refrigerate the finished cake for at least 30 minutes before serving to set the frosting.
Let’s be honest—this cake tastes like summer vacation in dessert form. The tender peach-studded cake pairs magically with the cloud-like mascarpone frosting, creating a texture contrast that’s pure bliss. Serve it chilled with extra peach slices on the side, or go full royalty and crown it with edible flowers for your next garden party!
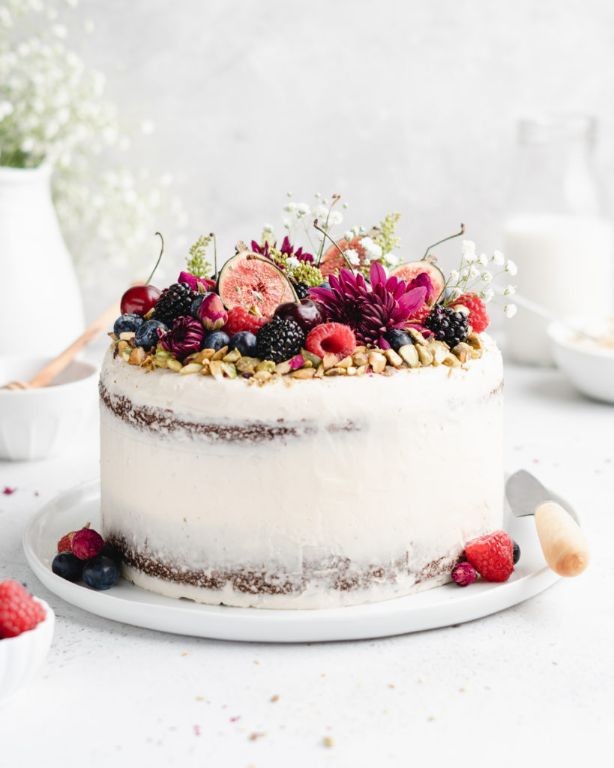
Raspberry Rose Princess Cake with Rose Petals

A cake so regal it practically demands a tiara and a throne! This raspberry rose princess cake combines floral elegance with fruity fun, creating a dessert that’s both Instagram-worthy and absolutely delicious. Get ready to impress your royal court (aka friends and family) with this stunning creation that’s surprisingly easy to master.
Ingredients
– 2 cups all-purpose flour
– 1 1/2 cups granulated sugar
– 3/4 cup unsalted butter, softened
– 3 large eggs
– 1 cup buttermilk
– 2 tsp baking powder
– 1/2 tsp salt
– 1 tbsp rose water
– 1 1/2 cups fresh raspberries
– 2 cups heavy cream
– 1/2 cup powdered sugar
– 1/4 cup dried rose petals
– Pink food coloring (optional)
Instructions
1. Preheat your oven to 350°F and grease two 8-inch round cake pans.
2. Whisk together 2 cups flour, 1 1/2 cups sugar, 2 tsp baking powder, and 1/2 tsp salt in a large bowl.
3. Beat 3/4 cup softened butter with an electric mixer until creamy, about 2 minutes.
4. Add 3 eggs one at a time, beating well after each addition.
5. Alternate adding the dry ingredients with 1 cup buttermilk, beginning and ending with dry ingredients.
6. Fold in 1 tbsp rose water and 1 cup raspberries gently to avoid crushing the berries.
7. Divide batter evenly between prepared pans and bake for 25-30 minutes until a toothpick inserted comes out clean.
8. Cool cakes in pans for 10 minutes, then transfer to wire racks to cool completely.
9. Whip 2 cups heavy cream with 1/2 cup powdered sugar until stiff peaks form.
10. Place one cake layer on a serving plate and spread with 1/3 of the whipped cream.
11. Top with second cake layer and frost the entire cake with remaining cream.
12. Arrange remaining 1/2 cup raspberries and 1/4 cup rose petals decoratively on top.
13. Refrigerate for at least 1 hour before serving to allow flavors to meld. Gorgeous layers of moist vanilla-rose cake alternate with clouds of whipped cream and bursts of tart raspberry. The floral notes from the rose water and petals create an elegant sophistication that pairs beautifully with the fresh fruit. Serve this beauty at bridal showers, birthday parties, or whenever you want to feel like royalty for the day!
White Chocolate Princess Cake with Strawberry Mousse
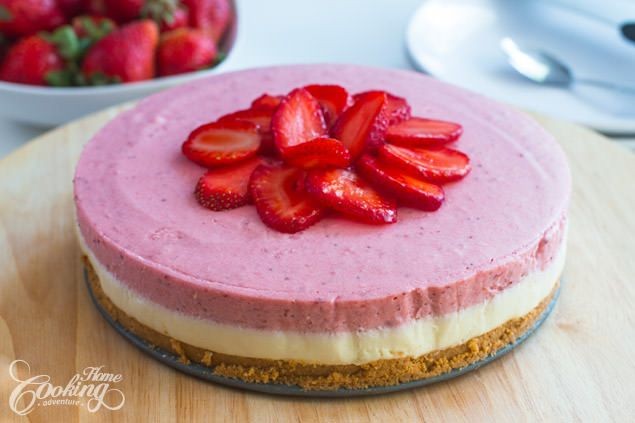
Yikes, have you ever met a cake so regal it demands a tiara? This White Chocolate Princess Cake with Strawberry Mousse is the dessert equivalent of a royal decree—fluffy, decadent, and guaranteed to make you feel like you’re dining in a castle (or at least your fanciest kitchen chair). It’s the kind of treat that turns Tuesday into a celebration, so grab your whisk and prepare to rule the dessert table.
Ingredients
– 2 cups all-purpose flour
– 1 1/2 cups granulated sugar
– 1 cup unsalted butter, softened
– 3/4 cup white chocolate chips
– 1/2 cup whole milk
– 3 large eggs
– 1 tsp vanilla extract
– 2 tsp baking powder
– 1/2 tsp salt
– 1 1/2 cups fresh strawberries, hulled
– 1 cup heavy cream
– 1/4 cup powdered sugar
– 1 packet unflavored gelatin
– 2 tbsp cold water
Instructions
1. Preheat your oven to 350°F and grease two 8-inch round cake pans.
2. In a large bowl, cream together 1 cup softened unsalted butter and 1 1/2 cups granulated sugar until light and fluffy, about 3 minutes.
3. Beat in 3 large eggs one at a time, then mix in 1 tsp vanilla extract.
4. Whisk together 2 cups all-purpose flour, 2 tsp baking powder, and 1/2 tsp salt in a separate bowl.
5. Gradually add the dry ingredients to the butter mixture, alternating with 1/2 cup whole milk, beginning and ending with the flour mixture.
6. Fold in 3/4 cup white chocolate chips until just combined.
7. Divide the batter evenly between the prepared pans and bake for 25–30 minutes, or until a toothpick inserted into the center comes out clean.
8. Let the cakes cool in the pans for 10 minutes, then transfer to a wire rack to cool completely.
9. For the mousse, sprinkle 1 packet unflavored gelatin over 2 tbsp cold water in a small bowl and let it bloom for 5 minutes.
10. Microwave the gelatin mixture for 15 seconds until dissolved, then set aside to cool slightly.
11. Puree 1 1/2 cups hulled strawberries in a blender until smooth.
12. In a chilled bowl, whip 1 cup heavy cream and 1/4 cup powdered sugar to stiff peaks.
13. Gently fold the strawberry puree and dissolved gelatin into the whipped cream until fully incorporated.
14. Place one cake layer on a serving plate and spread the strawberry mousse evenly over the top.
15. Top with the second cake layer and refrigerate for at least 2 hours to set the mousse.
Kindly note: This cake is a textural dream—the airy crumb melts into the cloud-like mousse, while the white chocolate adds a creamy sweetness that’s pure magic. Serve it chilled with extra strawberry slices on the side for a pop of color, or crown it with edible flowers to really lean into the royal vibe.
Summary
A delightful collection of princess cakes awaits your special celebrations! These enchanting recipes offer something magical for every baker, from classic Swedish torte to modern interpretations. We hope you’ll try these royal creations, share your favorite in the comments below, and pin your must-bake cakes to Pinterest. Happy baking!