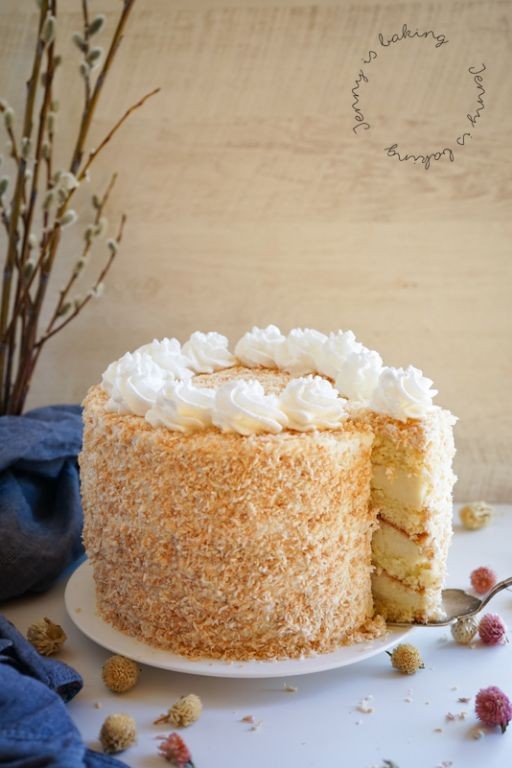
Get ready to sweeten your kitchen with the vibrant flavors of Puerto Rico! From creamy flan to crispy piononos, these authentic desserts bring tropical sunshine to your table. Whether you’re craving something rich and decadent or light and fruity, this collection has a treat for every sweet tooth. Let’s dive into these irresistible recipes that will transport your taste buds straight to the Caribbean!
Tembleque (Coconut Pudding)
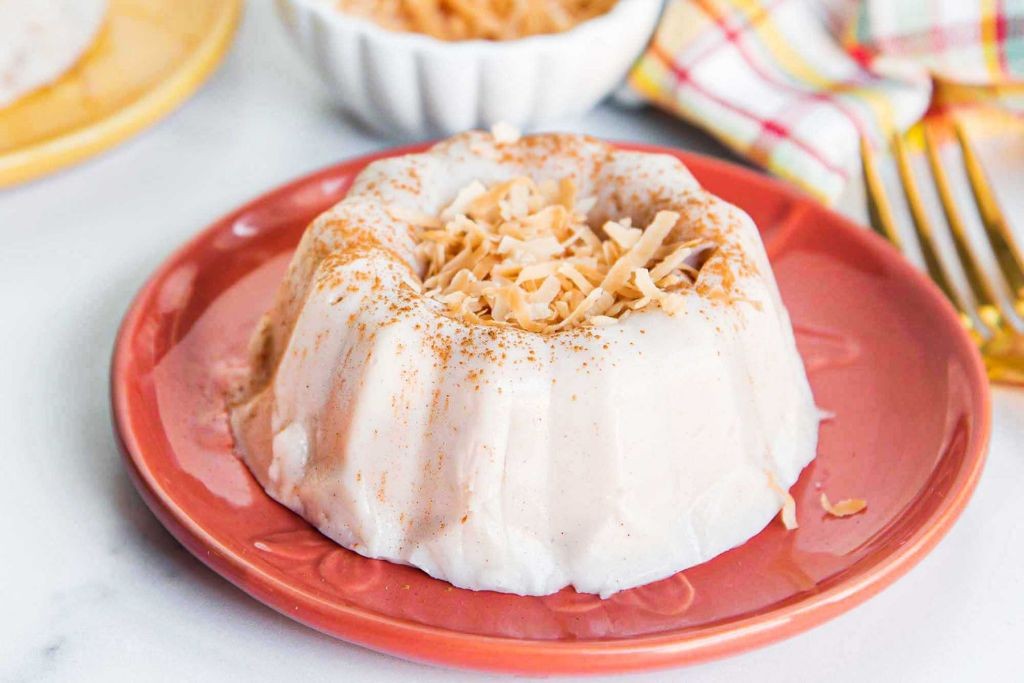
Perfect for when you’re craving something creamy and tropical without much fuss. This Puerto Rican coconut pudding is surprisingly simple to make, and it delivers that rich, silky texture you’d expect from a much more complicated dessert. You’ll be amazed how just a few ingredients transform into something so elegant.
Ingredients
- 4 cups coconut milk (I like using full-fat for that ultra-creamy texture)
- 1 cup granulated sugar (this gives it the perfect sweetness without being overwhelming)
- 1/2 cup cornstarch (this is our magic thickener – make sure it’s fresh and lump-free)
- 1 tsp vanilla extract (a splash of pure vanilla really elevates the coconut flavor)
- 1/4 tsp salt (just a pinch to balance all that sweetness)
- Ground cinnamon for dusting (I always keep my favorite cinnamon handy for that finishing touch)
Instructions
- Pour 3 cups of coconut milk into a medium saucepan and set it over medium heat.
- Whisk the remaining 1 cup of coconut milk with the cornstarch in a separate bowl until completely smooth and free of lumps.
- Heat the coconut milk in the saucepan until it reaches a gentle simmer, which should take about 5-7 minutes.
- Slowly pour the cornstarch mixture into the hot coconut milk while continuously whisking to prevent clumping.
- Add the sugar and salt to the saucepan, then switch to a silicone spatula for stirring.
- Cook the mixture for exactly 8 minutes, stirring constantly in a figure-eight pattern to ensure even cooking and prevent scorching on the bottom.
- Remove the saucepan from heat and stir in the vanilla extract until fully incorporated.
- Immediately pour the hot pudding into your preferred serving dishes or a single 8-inch pie dish.
- Let the pudding cool at room temperature for 30 minutes until a skin forms on the surface.
- Cover the pudding tightly with plastic wrap, pressing it directly against the surface to prevent a thick skin from forming.
- Refrigerate the pudding for at least 4 hours, or preferably overnight, until completely set and chilled through.
- Dust the top generously with ground cinnamon just before serving.
Ready to enjoy that incredible jiggle and silky smooth texture that makes tembleque so special. The coconut flavor really shines through with just the right amount of sweetness, and that cinnamon dusting adds the perfect warm spice note. Try serving it with fresh mango slices or toasted coconut flakes for an extra tropical twist that’ll make this dessert even more memorable.
Flan de Queso (Cheese Flan)
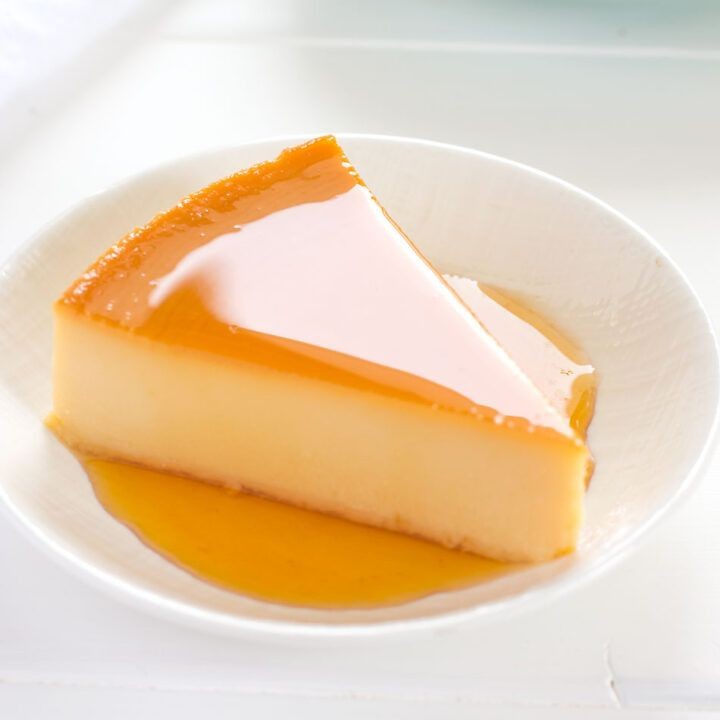
Wondering how to make a dessert that’s both creamy and impressively smooth? This Flan de Queso is your answer—it’s a rich, cheesy twist on classic flan that feels fancy but is totally doable at home. You’ll love how the caramel and cream cheese come together in each silky bite.
Ingredients
- 1 cup granulated sugar (for the caramel—watch it closely, it can burn fast!)
- 4 large eggs (I prefer room temp eggs here—they blend more smoothly into the mix)
- 1 (8 oz) package cream cheese, softened (leave it out for 30 minutes to make blending a breeze)
- 1 (14 oz) can sweetened condensed milk (this gives that signature sweetness and creaminess)
- 1 (12 oz) can evaporated milk (it adds a light, airy texture to the custard)
- 1 tsp vanilla extract (pure vanilla is my go-to for the best flavor)
Instructions
- Preheat your oven to 350°F.
- Place 1 cup granulated sugar in a small, heavy-bottomed saucepan over medium heat.
- Cook the sugar, stirring constantly with a heat-resistant spatula, until it melts into a deep amber liquid—this should take about 8–10 minutes. Tip: Don’t walk away; sugar can go from golden to burnt in seconds.
- Immediately pour the hot caramel into a 9-inch round cake pan, tilting to coat the bottom evenly.
- In a large mixing bowl, combine 4 large eggs, 1 package softened cream cheese, 1 can sweetened condensed milk, 1 can evaporated milk, and 1 tsp vanilla extract.
- Use an electric mixer on medium speed to blend everything until completely smooth and no lumps remain, about 2–3 minutes. Tip: Scrape the bowl’s sides halfway through to ensure everything is incorporated.
- Carefully pour the custard mixture over the caramel in the cake pan.
- Place the cake pan inside a larger roasting pan and fill the roasting pan with hot water until it reaches halfway up the sides of the cake pan. Tip: This water bath (baño maría) prevents cracking and ensures even, gentle cooking.
- Bake for 50–60 minutes, or until the center is set but still slightly jiggly when you gently shake the pan.
- Remove the flan from the oven and the water bath, then let it cool completely on a wire rack for about 1 hour.
- Cover the pan with plastic wrap and refrigerate for at least 4 hours, or overnight for the best texture.
- To serve, run a thin knife around the edges of the pan to loosen the flan.
- Invert a serving plate over the pan, hold them together firmly, and flip quickly to release the flan onto the plate.
Ready to dig in? The flan should be velvety and firm, with a sweet caramel sauce that pools around each slice. For a fun twist, top it with fresh berries or a sprinkle of sea salt to balance the richness—it’s a showstopper that’s as easy to love as it is to make.
Arroz con Dulce (Sweet Rice Pudding)
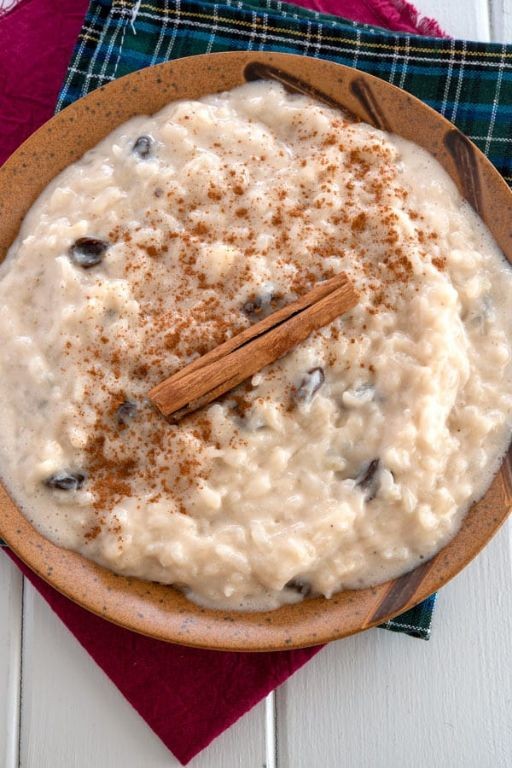
Let’s be real—sometimes you just need a warm, comforting bowl of something sweet. Arroz con Dulce is that cozy hug in dessert form, and it’s surprisingly simple to whip up. You’ll love how the cinnamon and coconut milk come together in this Puerto Rican classic.
Ingredients
– 1 cup short-grain white rice (I find it gives the creamiest texture)
– 1 (13.5 oz) can full-fat coconut milk (don’t skimp—this is where the magic happens)
– 2 cups water
– 1/2 cup granulated sugar
– 1/4 tsp salt (just a pinch to balance the sweetness)
– 1 cinnamon stick (whole is best for easy removal later)
– 1/4 cup raisins (I like to soak mine in warm water first so they plump up nicely)
– 1/2 tsp vanilla extract (pure vanilla makes all the difference here)
– 1/4 tsp ground cinnamon for dusting
Instructions
1. Rinse 1 cup short-grain white rice under cold water in a fine-mesh strainer until the water runs clear.
2. Combine the rinsed rice, 1 (13.5 oz) can full-fat coconut milk, 2 cups water, 1/2 cup granulated sugar, 1/4 tsp salt, and 1 cinnamon stick in a medium saucepan.
3. Bring the mixture to a boil over medium-high heat, stirring occasionally with a wooden spoon to prevent sticking.
4. Once boiling, immediately reduce the heat to low and cover the saucepan with a tight-fitting lid.
5. Simmer for 20 minutes without lifting the lid—this trapped steam is key for perfectly cooked rice.
6. After 20 minutes, remove the lid and check that the rice has absorbed most of the liquid and is tender.
7. Stir in 1/4 cup raisins and 1/2 tsp vanilla extract until fully incorporated.
8. Cook uncovered for 2-3 more minutes, stirring constantly, until the pudding reaches your desired thickness.
9. Remove the saucepan from heat and discard the cinnamon stick.
10. Let the pudding cool for 10 minutes—it will thicken further as it sits.
11. Transfer the Arroz con Dulce to serving bowls and sprinkle with 1/4 tsp ground cinnamon.
Serve this warm for the ultimate comfort food experience. The pudding should be creamy with just the right amount of sweetness, and the plump raisins add little bursts of flavor. I love it topped with extra cinnamon or even a drizzle of coconut cream for special occasions.
Majarete (Corn Pudding)
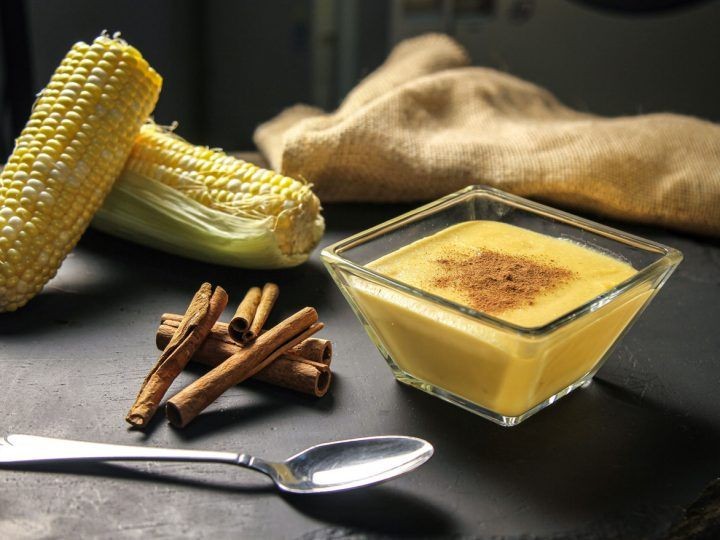
Tired of the same old desserts? This creamy Majarete, a traditional corn pudding, is about to become your new favorite comfort food. It’s surprisingly simple to make and has this amazing, silky texture that’s just so satisfying. You’re going to love how the sweet corn flavor really shines through.
Ingredients
– 4 cups of fresh or frozen corn kernels (thawed if frozen—fresh summer corn is fantastic if you have it)
– 4 cups of whole milk (I find whole milk gives it the richest, creamiest texture)
– 1 cup of granulated sugar (you can adjust this a tiny bit, but this is the sweet spot for me)
– 1/2 cup of cornstarch (this is our thickening hero, make sure it’s fresh)
– 1 teaspoon of vanilla extract (pure vanilla makes all the difference here)
– 1/2 teaspoon of ground cinnamon, plus extra for dusting (I love a little extra cinnamon on top)
– 1/4 teaspoon of salt (just a pinch to balance the sweetness)
– 2 tablespoons of unsalted butter (for that final rich, glossy finish)
Instructions
1. Combine the corn kernels and 2 cups of the whole milk in a blender and blend on high speed for 1 full minute until completely smooth.
2. Pour the blended corn mixture through a fine-mesh strainer into a large bowl, pressing down firmly with a spatula to extract all the liquid; discard the remaining solids.
3. Whisk the remaining 2 cups of whole milk, granulated sugar, cornstarch, vanilla extract, ground cinnamon, and salt into the strained corn milk until no lumps of cornstarch remain. Tip: Whisking the cornstarch with the cold milk first prevents it from clumping when heated.
4. Pour the entire mixture into a medium, heavy-bottomed saucepan.
5. Place the saucepan over medium heat and cook, whisking constantly, for 8-10 minutes.
6. Continue cooking and whisking as the mixture begins to thicken and large bubbles break the surface, which should take another 3-5 minutes. Tip: Constant whisking is key here to avoid any lumps and ensure a perfectly smooth pudding.
7. Once the pudding is very thick and coats the back of a spoon, remove the saucepan from the heat immediately.
8. Stir the unsalted butter into the hot pudding until it is fully melted and incorporated.
9. Quickly divide the hot pudding evenly between 6-8 individual serving dishes or ramekins. Tip: Working fast prevents a skin from forming on the surface before it cools.
10. Press a piece of plastic wrap directly onto the surface of each pudding to prevent a skin from forming.
11. Refrigerate the puddings for at least 4 hours, or until they are completely chilled and set. Ooh, that first cool, creamy spoonful is pure bliss. The texture is incredibly smooth and delicate, with the warm flavor of cinnamon perfectly complementing the sweet corn. Try serving it with a drizzle of caramel sauce or a few fresh berries for a beautiful and delicious twist.
Bienmesabe (Coconut and Almond Dessert)
Finally, you’ve found that perfect tropical dessert that’s surprisingly simple to make at home. Bienmesabe brings together creamy coconut and nutty almonds in a way that’ll transport you straight to the Caribbean with every spoonful. Trust me, this is the sweet treat you’ll want to make again and again.
Ingredients
– 1 cup sweetened shredded coconut (I love the extra moisture this adds)
– 1/2 cup almond flour (this gives the smoothest texture)
– 1 cup granulated sugar
– 2 cups whole milk (whole milk makes it extra creamy)
– 3 large egg yolks (room temperature blends better)
– 1 teaspoon vanilla extract (pure vanilla makes all the difference)
– 1/4 teaspoon ground cinnamon
– Pinch of salt (just a tiny bit to balance the sweetness)
Instructions
1. Combine the sweetened shredded coconut, almond flour, granulated sugar, whole milk, and pinch of salt in a medium saucepan.
2. Heat the mixture over medium heat, stirring constantly with a wooden spoon until the sugar completely dissolves, about 3-4 minutes.
3. Reduce the heat to low and simmer the mixture for 15 minutes, stirring occasionally to prevent sticking to the bottom.
4. Whisk the room temperature egg yolks in a separate small bowl until smooth and pale yellow.
5. Temper the egg yolks by slowly adding 1/2 cup of the hot coconut mixture to the yolks while whisking continuously.
6. Pour the tempered egg mixture back into the saucepan, stirring constantly to combine thoroughly.
7. Continue cooking over low heat for exactly 8 minutes, stirring constantly until the mixture thickens enough to coat the back of a spoon.
8. Remove the saucepan from heat and stir in the vanilla extract and ground cinnamon until fully incorporated.
9. Let the mixture cool in the saucepan for 10 minutes before transferring to serving dishes.
10. Cover the dessert with plastic wrap pressed directly against the surface to prevent a skin from forming.
11. Refrigerate for at least 4 hours, or until completely chilled and set.
Especially wonderful when served cold, this dessert has this incredible velvety texture that melts on your tongue. The coconut and almond flavors blend together so harmoniously, creating this tropical symphony that’s neither too sweet nor too heavy. Try serving it in small glasses with a sprinkle of toasted coconut on top for that perfect dinner party presentation.
Brazo Gitano (Puerto Rican Swiss Roll)
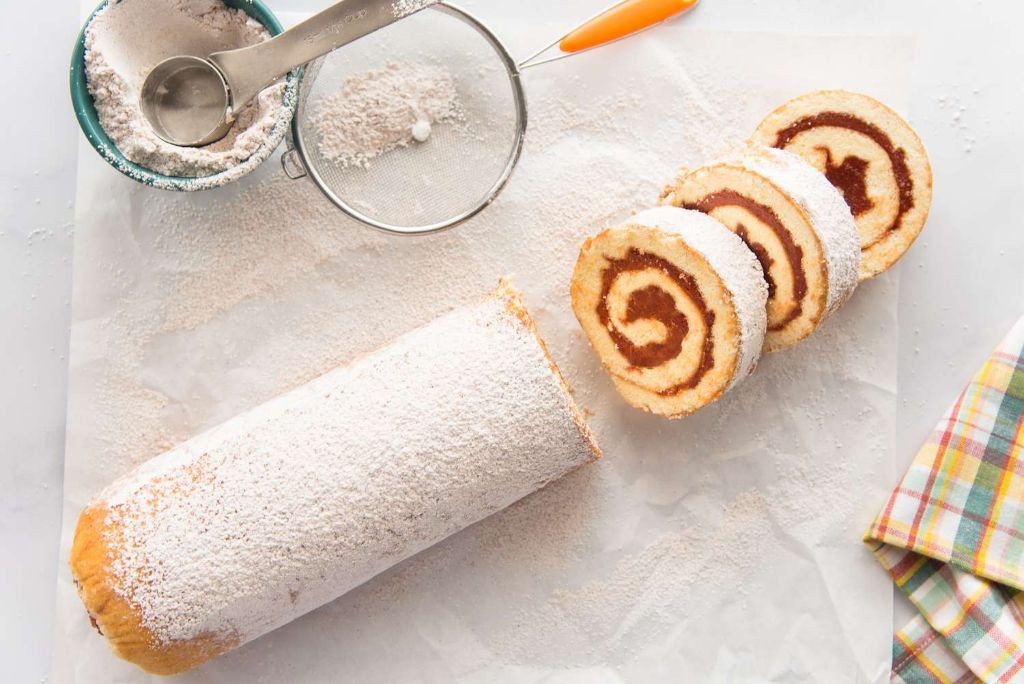
Ready to impress with a dessert that looks fancy but is totally doable? This Puerto Rican Swiss roll, called Brazo Gitano, is a light sponge cake rolled around sweet fillings. You’ll love how it comes together for any special occasion or just because you deserve something sweet.
Ingredients
- 4 large eggs, at room temperature (they whip up so much better this way)
- 3/4 cup granulated sugar, divided (I like to keep 1/4 cup separate for the egg whites)
- 1 tsp vanilla extract (the real stuff makes all the difference)
- 3/4 cup all-purpose flour, sifted (trust me, sifting prevents lumps)
- 1/4 tsp salt (just a pinch to balance the sweetness)
- 1 cup guava paste, softened (you can microwave it for 15 seconds to spread easier)
- Powdered sugar for dusting (be generous—it makes it look bakery-perfect)
Instructions
- Preheat your oven to 350°F and line a 10×15-inch jelly roll pan with parchment paper, lightly greasing the paper.
- Separate the egg whites from the yolks into two clean, dry bowls.
- Beat the egg whites on medium-high speed until soft peaks form, about 2-3 minutes.
- Gradually add 1/4 cup of the sugar to the egg whites while beating, continuing until stiff peaks form.
- In the other bowl, whisk the egg yolks with the remaining 1/2 cup sugar and vanilla until pale and thick, about 3 minutes.
- Gently fold the sifted flour and salt into the yolk mixture until just combined.
- Fold the whipped egg whites into the yolk-flour mixture in three additions, being careful not to deflate the batter.
- Spread the batter evenly into the prepared pan using an offset spatula.
- Bake for 12-15 minutes, until the cake springs back when lightly touched and is golden.
- While the cake bakes, lay a clean kitchen towel on the counter and dust it generously with powdered sugar.
- Immediately invert the hot cake onto the prepared towel and carefully peel off the parchment paper.
- Starting from one short end, tightly roll the cake up with the towel inside and let it cool completely on a wire rack, about 1 hour.
- Unroll the cooled cake and spread the softened guava paste evenly over the surface, leaving a 1-inch border.
- Re-roll the cake gently but firmly, using the towel to help guide it without the filling this time.
- Dust the finished roll with more powdered sugar before slicing and serving.
That tender sponge cake wrapped around sweet guava is pure magic. The texture stays incredibly soft, and the guava filling adds a tropical twist that’s not too sweet. Try serving it with a dollop of whipped cream or a sprinkle of toasted coconut for an extra special touch.
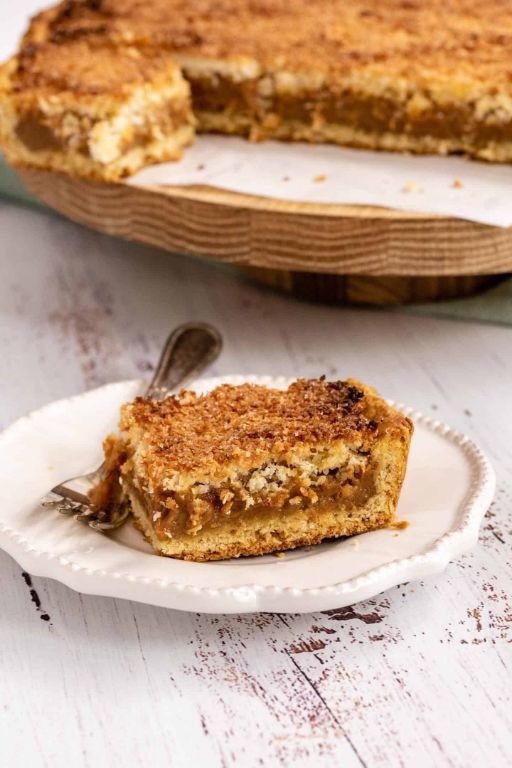
Barriguitas de Vieja (Sweet Pumpkin Fritters)
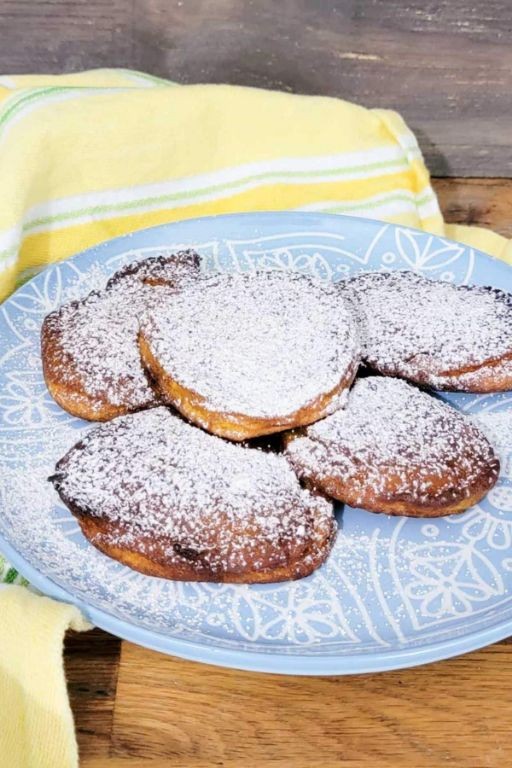
Haven’t you been craving something warm and cozy now that the weather’s cooling down? These Barriguitas de Vieja, or “little old lady bellies,” are the perfect sweet pumpkin fritters to satisfy that autumn craving. They’re surprisingly simple to make and fill your kitchen with the most incredible spicy-sweet aroma.
Ingredients
– 2 cups canned pumpkin puree (I always keep a few cans stocked for pumpkin emergencies)
– 1 cup all-purpose flour (I prefer unbleached for these)
– 1/2 cup granulated sugar
– 2 large eggs at room temperature (they incorporate much better when not cold)
– 1 teaspoon ground cinnamon
– 1/2 teaspoon ground nutmeg (freshly grated makes all the difference)
– 1/4 teaspoon ground cloves
– 1 teaspoon vanilla extract
– 1/2 teaspoon baking powder
– Vegetable oil for frying (about 2 cups – I use canola for its neutral flavor)
– Powdered sugar for dusting
Instructions
1. In a large mixing bowl, combine the pumpkin puree, granulated sugar, eggs, and vanilla extract until fully incorporated.
2. Add the flour, cinnamon, nutmeg, cloves, and baking powder to the wet ingredients.
3. Mix everything together until you have a thick, smooth batter with no dry spots – don’t overmix though!
4. Heat 2 inches of vegetable oil in a heavy-bottomed pot over medium heat until it reaches 350°F on a candy thermometer.
5. Test your oil temperature by dropping a tiny bit of batter in – it should sizzle immediately and float to the top.
6. Using two spoons, carefully drop tablespoon-sized portions of batter into the hot oil, working in batches of 4-5 fritters at a time.
7. Fry for 2-3 minutes until the bottoms are golden brown, then flip them over using a slotted spoon.
8. Cook for another 2-3 minutes until both sides are evenly browned and they’ve puffed up slightly.
9. Remove the fritters with a slotted spoon and drain them on a paper towel-lined plate.
10. Let them cool for about 5 minutes, then dust generously with powdered sugar using a fine mesh sieve.
Absolutely perfect when they’re still slightly warm! The outside gets this delicate crispness while the inside stays wonderfully soft and cake-like. I love serving these with a dollop of whipped cream or alongside my morning coffee – they make any ordinary day feel special.
Quesito (Cream Cheese Pastry)
Aren’t you always looking for that perfect sweet treat that feels fancy but is actually pretty simple? Quesito is like the Puerto Rican answer to a cream cheese Danish, with flaky pastry wrapped around sweet cream cheese filling. You’re going to love how these come together and disappear even faster.
Ingredients
– 1 package (17.3 oz) frozen puff pastry sheets, thawed (I like Pepperidge Farm brand for consistent flakiness)
– 8 oz cream cheese, softened to room temperature (this makes blending so much easier)
– 1/4 cup granulated sugar (I sometimes use a tablespoon extra if I want it sweeter)
– 1 large egg, separated (room temperature eggs whip up better)
– 1 tsp vanilla extract (pure vanilla really makes a difference here)
– 1/4 cup whole milk
– 1/4 cup powdered sugar for dusting
Instructions
1. Preheat your oven to 375°F and line a baking sheet with parchment paper.
2. In a medium bowl, beat the softened cream cheese with an electric mixer on medium speed until smooth, about 1 minute.
3. Add the granulated sugar and continue beating until fully incorporated and creamy.
4. Mix in the egg yolk and vanilla extract until the filling is completely smooth.
5. Unfold one puff pastry sheet on a lightly floured surface and roll it out slightly to smooth any creases.
6. Cut the pastry sheet into 6 equal rectangles using a sharp knife or pizza cutter.
7. Place about 1 tablespoon of the cream cheese mixture in the center of each rectangle.
8. Brush the edges of each pastry with the egg white using a pastry brush.
9. Fold each pastry rectangle in half diagonally to form triangles, pressing the edges firmly to seal.
10. Use a fork to crimp the edges all the way around each triangle for a secure seal.
11. Brush the tops of all the pastries with milk using your pastry brush.
12. Bake for 18-20 minutes until the pastries are puffed and golden brown.
13. Transfer the baked quesitos to a wire rack and let them cool for 10 minutes.
14. Dust the cooled quesitos generously with powdered sugar using a fine mesh sieve.
Perfectly flaky pastry gives way to that warm, sweet cream cheese center that’s just irresistible. These are amazing with your morning coffee, or try serving them with fresh berries for a beautiful brunch presentation that’ll impress everyone.
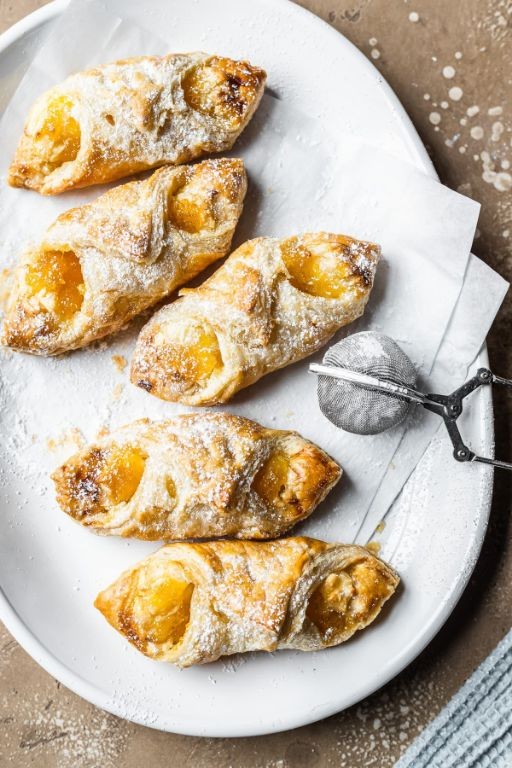
Pastelillos de Guayaba (Guava Turnovers)

Aren’t you tired of the same old desserts? These Pastelillos de Guayaba are about to become your new favorite sweet treat – they’re like little pockets of tropical sunshine that come together in no time. You’ll love how the flaky pastry contrasts with that sweet, tangy guava filling.
Ingredients
– 1 package (17.3 oz) frozen puff pastry sheets, thawed (I always keep a box in the freezer for last-minute baking)
– 1 cup guava paste, cut into ½-inch cubes (look for the pink blocks in the Latin foods aisle)
– 4 oz cream cheese, softened (room temp makes it easier to spread)
– 1 large egg, beaten (this gives them that beautiful golden shine)
– 2 tbsp granulated sugar for sprinkling (I like using coarse sugar for extra crunch)
– 1 tbsp water (just enough to thin the egg wash slightly)
Instructions
1. Preheat your oven to 400°F and line a baking sheet with parchment paper.
2. Unfold one puff pastry sheet on a lightly floured surface and roll it out to a 10×10-inch square.
3. Cut the pastry into 4 equal squares using a sharp knife or pizza cutter.
4. Place about 1 tablespoon of guava paste in the center of each square, leaving a ½-inch border.
5. Add 1 teaspoon of softened cream cheese right on top of the guava paste.
6. Brush the edges of each square with the beaten egg mixture using a pastry brush.
7. Fold each square diagonally to form triangles and press the edges firmly to seal.
8. Use a fork to crimp the edges all the way around each turnover.
9. Transfer the turnovers to your prepared baking sheet, spacing them about 2 inches apart.
10. Brush the tops of all turnovers with the remaining egg wash.
11. Sprinkle each turnover generously with granulated sugar.
12. Use a sharp knife to make 2-3 small slits in the top of each turnover for steam to escape.
13. Bake for 18-20 minutes until puffed and deep golden brown.
14. Let the turnovers cool on the baking sheet for 5 minutes before serving.
Fresh from the oven, these turnovers have the most incredible flaky layers that shatter when you bite into them. The warm guava filling gets deliciously gooey while the cream cheese adds a subtle tang that balances the sweetness perfectly. For an extra special treat, try serving them with a scoop of vanilla ice cream – the hot and cold combination is absolutely magical.
Budín de Pan (Puerto Rican Bread Pudding)

Venturing into Puerto Rican comfort food is always a treat, and Budín de Pan is the ultimate cozy dessert that transforms simple ingredients into something magical. You’ll love how this bread pudding turns day-old bread into a rich, custardy delight that feels both familiar and exciting.
Ingredients
– 6 cups day-old bread cubes (I save leftover bread all week for this)
– 4 large eggs at room temperature (they blend into the custard more smoothly)
– 1 (12 oz) can evaporated milk
– 1 (14 oz) can sweetened condensed milk
– 1 cup granulated sugar
– 1 cup whole milk (the richness makes all the difference)
– 1 tbsp vanilla extract
– 1 tsp ground cinnamon
– ½ tsp ground nutmeg
– ¼ cup raisins (optional, but I love the chewy bursts)
– 2 tbsp unsalted butter for greasing
Instructions
1. Preheat your oven to 350°F and generously grease a 9×13 inch baking dish with the 2 tablespoons of unsalted butter.
2. Place the 6 cups of day-old bread cubes evenly in the prepared baking dish.
3. In a large mixing bowl, whisk together the 4 large eggs until frothy and pale yellow.
4. Pour in the 12 oz can of evaporated milk, 14 oz can of sweetened condensed milk, and 1 cup of whole milk, whisking continuously.
5. Add the 1 cup of granulated sugar, 1 tablespoon of vanilla extract, 1 teaspoon of ground cinnamon, and ½ teaspoon of ground nutmeg, whisking until the sugar dissolves completely.
6. Stir in the ¼ cup of raisins if using, distributing them evenly throughout the mixture.
7. Slowly pour the custard mixture over the bread cubes in the baking dish, pressing down gently with a spatula to ensure all bread is submerged.
8. Let the mixture sit for 15 minutes so the bread fully absorbs the custard.
9. Place the baking dish in the preheated oven and bake for 45-50 minutes, or until the top is golden brown and a knife inserted in the center comes out clean.
10. Remove from the oven and let cool for at least 20 minutes before serving.
Out of the oven, this Budín de Pan emerges with a golden, slightly crisp top that gives way to a soft, custard-soaked interior. The cinnamon and nutmeg create a warm spice backdrop that pairs beautifully with the sweet creaminess. Try serving it warm with a drizzle of caramel sauce or a scoop of vanilla ice cream for an extra indulgent treat.
Suspiros (Meringue Cookies)
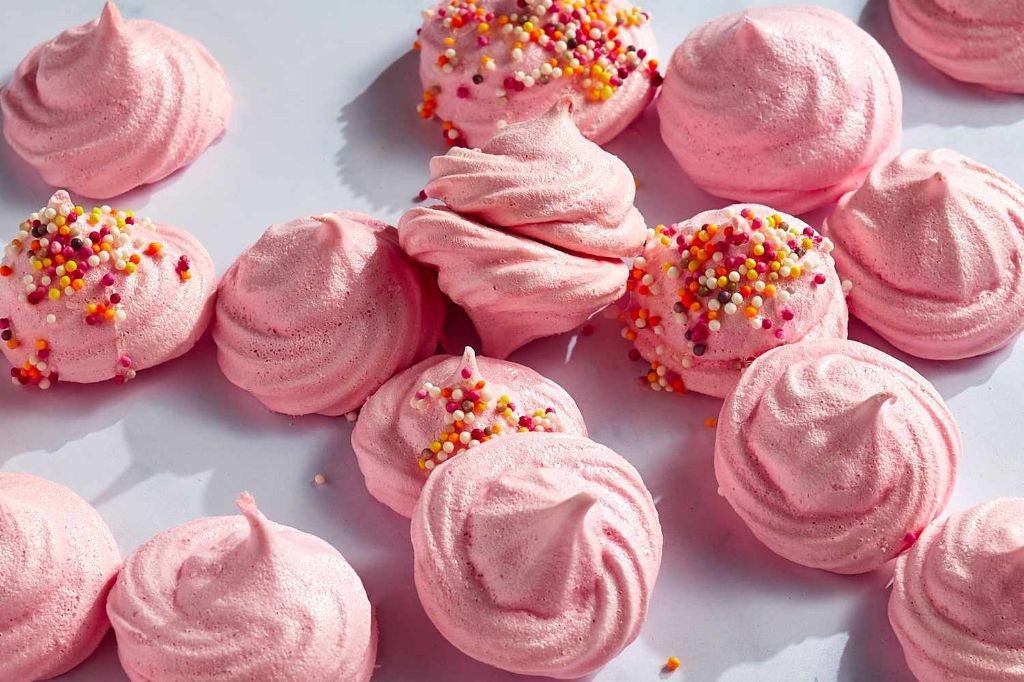
Baking these delicate Suspiros feels like creating edible clouds in your kitchen. They’re those perfect little meringue cookies that practically melt on your tongue, and honestly, they’re way easier to make than you might think. You’ll be amazed at how just a few simple ingredients transform into something so magical.
Ingredients
– 3 large egg whites at room temperature (they whip up so much better this way)
– 3/4 cup granulated sugar (I like using regular white sugar for that classic crisp texture)
– 1/4 teaspoon cream of tartar (this little helper keeps everything stable)
– 1/2 teaspoon pure vanilla extract (the real stuff makes all the difference)
Instructions
1. Preheat your oven to 200°F and line two baking sheets with parchment paper.
2. Separate 3 egg whites from the yolks, making sure no yolk gets into the whites.
3. Place the egg whites in a completely clean, dry mixing bowl—any grease can prevent proper whipping.
4. Add 1/4 teaspoon cream of tartar to the egg whites.
5. Using an electric mixer on medium speed, beat the egg whites until foamy and bubbly, about 1 minute.
6. Gradually add 3/4 cup sugar, about 1 tablespoon at a time, while continuing to beat.
7. Increase mixer speed to high and beat until stiff, glossy peaks form, about 5-7 minutes.
8. Add 1/2 teaspoon vanilla extract and beat for just 30 seconds more to incorporate.
9. Spoon or pipe the meringue onto prepared baking sheets in 1-inch mounds.
10. Bake at 200°F for 90 minutes—don’t open the oven door during this time.
11. Turn off the oven and let the cookies cool completely inside for at least 2 hours.
12. Gently remove the cooled cookies from the parchment paper.
Velvety and light as air, these suspiros have that perfect crisp shell that gives way to a marshmallow-soft center. I love serving them alongside strong coffee or crumbling them over ice cream for an elegant dessert upgrade. They store beautifully in an airtight container, staying wonderfully crisp for days.
Tarta de Coco (Coconut Tart)
Coconut lovers, get ready for your new favorite dessert! This tarta de coco brings tropical vibes right to your kitchen with its buttery crust and sweet coconut filling. You’ll be amazed how simple it is to make something that tastes so decadent.
Ingredients
– 1 ½ cups all-purpose flour (I like to spoon and level for accuracy)
– ½ cup unsalted butter, cold and cubed (straight from the fridge works best)
– ¼ cup granulated sugar
– 1 large egg, beaten (room temp helps with mixing)
– 2 cups sweetened shredded coconut
– 1 cup heavy cream (the rich kind makes all the difference)
– ¾ cup sweetened condensed milk (that iconic can we all love)
– 1 tsp vanilla extract (pure vanilla adds wonderful depth)
– ¼ tsp salt
Instructions
1. Preheat your oven to 350°F and grease a 9-inch tart pan with removable bottom.
2. Combine 1 ½ cups flour, ¼ cup sugar, and ¼ tsp salt in a large bowl.
3. Cut in ½ cup cold butter using a pastry cutter until mixture resembles coarse crumbs.
4. Add beaten egg and mix just until dough comes together—don’t overwork it.
5. Press dough evenly into the prepared tart pan, going up the sides about 1 inch.
6. Prick the bottom all over with a fork to prevent bubbling.
7. Bake the crust for 15 minutes at 350°F until lightly golden around edges.
8. While crust bakes, whisk together 2 cups coconut, 1 cup heavy cream, ¾ cup condensed milk, and 1 tsp vanilla in a bowl.
9. Remove crust from oven and pour coconut filling directly into the warm crust.
10. Return tart to oven and bake for 25-30 minutes at 350°F until filling is set and golden brown.
11. Cool completely in the pan on a wire rack for at least 2 hours before slicing.
Every bite delivers that perfect contrast between the crisp crust and creamy coconut center. Enjoy it slightly warm with a scoop of vanilla ice cream, or chilled straight from the fridge—it’s fantastic either way.
Dulce de Lechosa (Green Papaya Dessert)
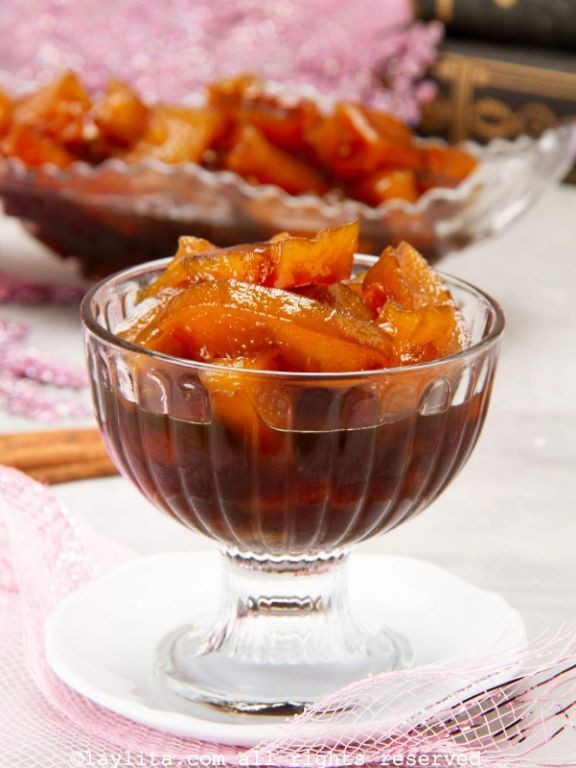
Finally, let’s talk about a dessert that sounds fancy but is surprisingly simple to make at home. Dulce de Lechosa transforms firm green papaya into a sweet, caramel-like treat that’s perfect for satisfying your sweet tooth. You’ll love how the papaya soaks up all that syrupy goodness.
Ingredients
– 1 medium green papaya (about 4 cups when peeled and sliced—look for one that’s rock-hard with no yellow spots)
– 1 cup granulated sugar (I like using white sugar for a clear syrup, but brown works too for a deeper flavor)
– 3 cups water (filtered is my go-to to avoid any off-tastes)
– 2 cinnamon sticks (these add warmth without being overpowering)
– 5 whole cloves (just a few—they pack a punch!)
– 1 tsp vanilla extract (pure vanilla gives the best aroma)
Instructions
1. Peel the green papaya thoroughly with a vegetable peeler, removing all the green skin.
2. Cut the papaya in half lengthwise and scoop out the seeds with a spoon.
3. Slice the papaya into ¼-inch thick half-moons—uniform pieces help them cook evenly.
4. In a large pot, combine the water, sugar, cinnamon sticks, and cloves.
5. Heat the mixture over medium-high heat, stirring occasionally, until the sugar fully dissolves—this takes about 3-4 minutes.
6. Add the sliced papaya to the pot in a single layer if possible.
7. Bring the syrup to a gentle boil, then immediately reduce the heat to low.
8. Simmer the papaya uncovered for 45 minutes, stirring gently every 10 minutes to prevent sticking.
9. After 45 minutes, stir in the vanilla extract.
10. Continue simmering for another 15 minutes until the papaya turns translucent and the syrup thickens slightly.
11. Remove the pot from heat and let it cool completely—the papaya will continue absorbing syrup as it cools.
12. Serve warm or chilled, discarding the cinnamon sticks and cloves before eating.
Velvety and fragrant, this dessert has a soft, almost candied texture that melts in your mouth. The papaya becomes tender but never mushy, with a delicate sweetness balanced by warm spice notes. Try it over vanilla ice cream or with a sprinkle of toasted coconut for extra crunch.
Besitos de Coco (Coconut Kisses)
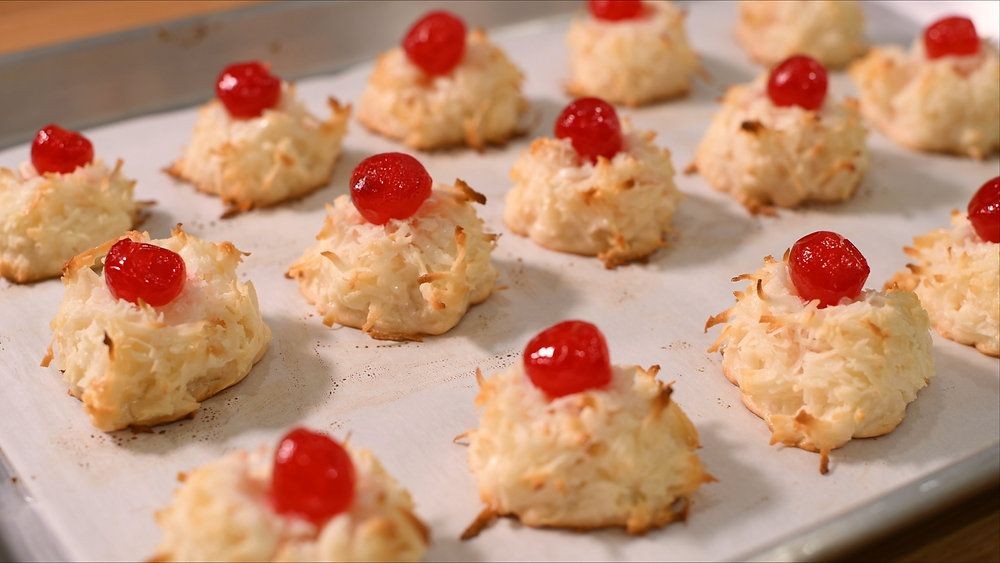
Remember those little coconut treats your abuela used to make? These besitos de coco are just like that—sweet, chewy bites of tropical goodness that melt in your mouth. They’re surprisingly simple to whip up with just a few pantry staples, and they always disappear fast at parties.
Ingredients
– 2 cups sweetened shredded coconut (I love the moist texture this gives)
– 1 (14 oz) can sweetened condensed milk (this creates that perfect chewy base)
– 1 tsp vanilla extract (pure vanilla makes all the difference here)
– 2 large egg whites at room temperature (they whip up much better this way)
– ¼ tsp cream of tartar (this helps stabilize the meringue)
– ¼ cup granulated sugar (for that delicate crispy exterior)
Instructions
1. Preheat your oven to 325°F and line a baking sheet with parchment paper.
2. In a medium bowl, combine the shredded coconut and sweetened condensed milk until fully incorporated.
3. Add the vanilla extract to the coconut mixture and stir until evenly distributed.
4. In a separate clean, dry bowl, beat the room temperature egg whites with an electric mixer on medium speed until foamy.
5. Add the cream of tartar to the egg whites and continue beating until soft peaks form.
6. Gradually add the granulated sugar while beating, continuing until stiff, glossy peaks form (this should take about 3-4 minutes total).
7. Gently fold the meringue into the coconut mixture using a spatula, being careful not to deflate the air bubbles.
8. Drop rounded tablespoonfuls of the mixture onto the prepared baking sheet, spacing them about 1 inch apart.
9. Bake for 18-20 minutes, or until the edges are golden brown and the tops are lightly toasted.
10. Let the cookies cool on the baking sheet for 5 minutes before transferring to a wire rack to cool completely.
Zesty with coconut flavor and delightfully chewy, these little kisses have that perfect contrast of crispy exterior and soft interior. Try serving them alongside strong coffee for an afternoon pick-me-up, or crumble them over vanilla ice cream for an easy dessert upgrade.
Coquito Cheesecake
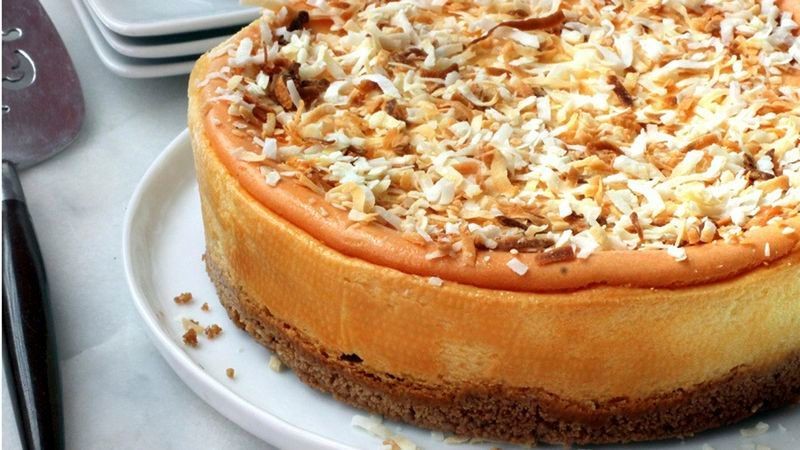
Keeping holiday traditions alive just got more delicious with this coquito cheesecake. You get all that creamy coconut-cinnamon magic you love from the Puerto Rican drink, but in sliceable cheesecake form that’s perfect for your festive table. It’s the dessert upgrade your holiday spread has been waiting for.
Ingredients
– 2 cups graham cracker crumbs (I like the honey kind for extra flavor)
– 1/2 cup unsalted butter, melted (salted works too if that’s what you have)
– 24 oz cream cheese, at room temperature (this is key for a smooth filling)
– 1 cup granulated sugar
– 3 large eggs, at room temperature (they blend in way better when not cold)
– 1 cup canned coconut milk, full-fat for maximum creaminess
– 1/2 cup sweetened condensed milk
– 1 tsp vanilla extract
– 1 tsp ground cinnamon
– 1/4 tsp ground nutmeg
– Pinch of salt
Instructions
1. Preheat your oven to 325°F.
2. Combine graham cracker crumbs and melted butter in a medium bowl until the mixture resembles wet sand.
3. Press the crumb mixture firmly into the bottom of a 9-inch springform pan.
4. Bake the crust for 10 minutes at 325°F until lightly golden.
5. Remove the crust from the oven and let it cool while you prepare the filling.
6. In a large bowl, beat the room temperature cream cheese with an electric mixer on medium speed for 2 minutes until smooth and creamy.
7. Gradually add the granulated sugar while continuing to beat for another 2 minutes.
8. Add eggs one at a time, beating just until each egg is incorporated before adding the next.
9. Pour in the coconut milk, sweetened condensed milk, and vanilla extract, then mix on low speed until combined.
10. Sprinkle in the cinnamon, nutmeg, and salt, then mix gently until the spices are evenly distributed throughout the batter.
11. Pour the filling over the cooled crust and smooth the top with a spatula.
12. Place the springform pan in a larger baking dish and create a water bath by pouring hot water into the larger dish until it reaches halfway up the sides of the springform pan.
13. Bake at 325°F for 60-70 minutes until the edges are set but the center still has a slight jiggle.
14. Turn off the oven and crack the door open, letting the cheesecake cool gradually in the oven for 1 hour.
15. Remove from the oven and run a knife around the edge of the pan to prevent cracking.
16. Refrigerate for at least 6 hours, or preferably overnight, before serving.
Making this coquito cheesecake creates the creamiest texture that melts on your tongue with every bite. The coconut and warm spices come through beautifully, making each slice taste like the holidays in dessert form. Try serving it with a sprinkle of extra cinnamon or toasted coconut flakes for that festive finishing touch.
Limbers (Puerto Rican Ice Pops)
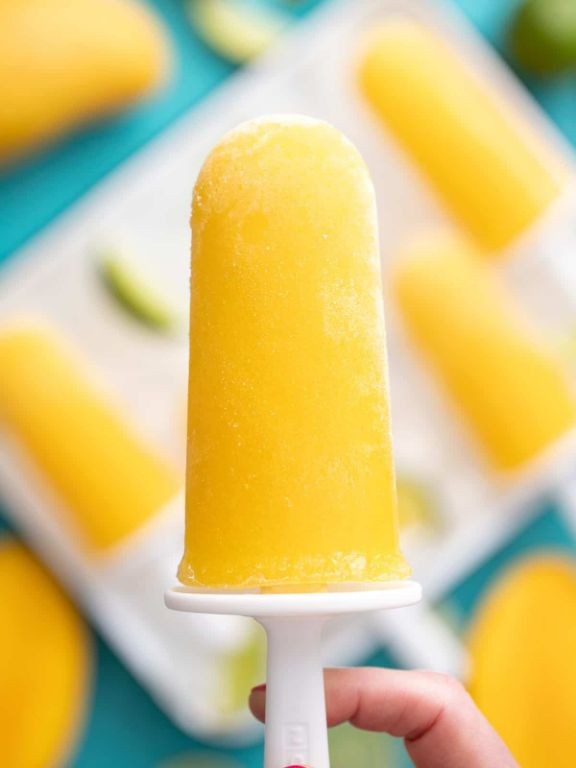
Kicking off our frozen treats series, let’s dive into Limbers—those vibrant Puerto Rican ice pops that are basically summer in a cup. You’ll love how simple they are to whip up, and they bring such a refreshing, tropical vibe to any gathering.
Ingredients
– 2 cups coconut milk (I like the full-fat version for extra creaminess)
– 1 cup granulated sugar (this sweetens it just right without being overpowering)
– 1/2 cup pineapple juice (freshly squeezed if you can—it makes a difference!)
– 1/4 cup lime juice (about 2-3 limes, and I always roll them first to get more juice out)
– 1 teaspoon vanilla extract (pure vanilla adds that warm, cozy note)
Instructions
1. Pour 2 cups coconut milk into a medium-sized mixing bowl.
2. Add 1 cup granulated sugar to the bowl and whisk vigorously for about 2 minutes until the sugar is fully dissolved and the mixture looks smooth.
3. Stir in 1/2 cup pineapple juice, 1/4 cup lime juice, and 1 teaspoon vanilla extract until everything is well combined.
4. Taste the mixture and adjust sweetness if needed, but avoid over-stirring to keep it light.
5. Carefully pour the mixture into ice pop molds, filling each one to about 1/4 inch from the top to allow for expansion.
6. Insert ice pop sticks into each mold, making sure they stand straight.
7. Place the molds in the freezer and freeze for at least 6 hours or until completely solid—overnight is best for that perfect icy texture.
8. To unmold, run the outside of the molds under warm water for 10-15 seconds, then gently pull out the limbers.
Perfect for beating the heat, these limbers have a tangy-sweet kick from the lime and pineapple that balances the creamy coconut base. Serve them poolside or crush them over shaved ice for a fun, slushy twist—either way, they’re sure to become your new favorite frozen treat.
Casquitos de Guayaba (Candied Guava Shells)
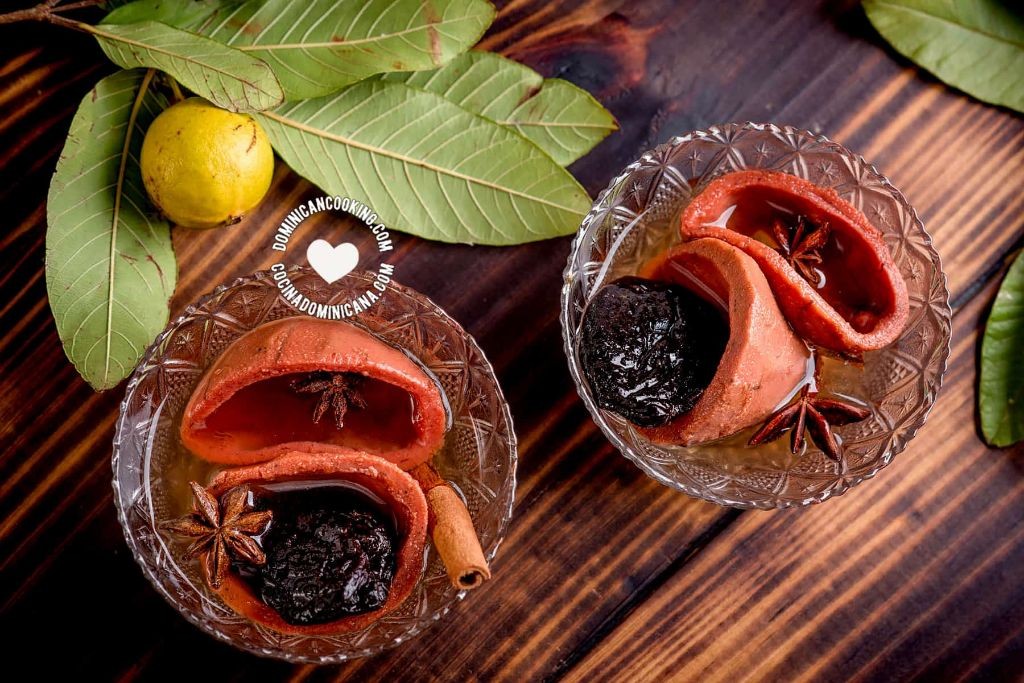
Zesty and sweet, these candied guava shells are one of those treats that transport you straight to tropical paradise. You’ll love how the guava’s natural floral notes shine through the simple syrup, creating a dessert that feels both fancy and completely approachable. They’re perfect for when you want something special without spending hours in the kitchen.
Ingredients
– 1 pound fresh guavas (look for ones that yield slightly to gentle pressure – they’ll have the best flavor)
– 1 cup granulated sugar (I like using organic cane sugar for a slightly deeper flavor)
– 1 cup water
– 1 tablespoon fresh lime juice (this little splash really brightens everything up)
– ½ teaspoon vanilla extract (pure vanilla makes all the difference here)
Instructions
1. Wash the guavas thoroughly under cool running water and pat them completely dry with paper towels.
2. Cut each guava in half lengthwise using a sharp knife, exposing the pink flesh and seeds inside.
3. Use a small spoon or melon baller to carefully scoop out the seedy centers, leaving about ¼-inch of flesh attached to the skin – this creates your “shells.”
4. Combine the sugar and water in a medium saucepan over medium heat, stirring constantly until the sugar completely dissolves (about 2-3 minutes).
5. Gently place the guava shells into the syrup, arranging them in a single layer if possible.
6. Reduce the heat to low and simmer the guavas for 25-30 minutes, occasionally spooning syrup over the tops to ensure even cooking.
7. Add the lime juice and vanilla extract to the syrup, giving everything a gentle stir to incorporate.
8. Continue simmering for another 15-20 minutes until the guava shells become translucent around the edges and the syrup thickens slightly.
9. Remove the saucepan from heat and let the guava shells cool completely in the syrup (this allows them to absorb maximum flavor).
10. Use a slotted spoon to transfer the candied guava shells to an airtight container, then pour the remaining syrup over them. Creamy and jewel-like, these candied guava shells have a wonderful chewy texture that’s not too sticky. Their floral sweetness pairs beautifully with sharp cheeses or makes an elegant topping for vanilla ice cream. I love keeping a jar in the fridge for spontaneous dessert emergencies – they only get better after a day or two.
Summary
Savor the vibrant flavors of Puerto Rico right in your own kitchen with these authentic dessert recipes! We hope this collection inspires you to bring a taste of the island to your table. Try your favorites, leave a comment sharing which recipe you loved most, and don’t forget to pin this article on Pinterest to share the sweetness with fellow food lovers. ¡Buen provecho!