Zesty, creamy, and utterly irresistible—cheese balls are the ultimate party starter that never goes out of style. Whether you’re hosting a holiday gathering, game day bash, or just craving some comfort food, these 20 recipes offer endless inspiration for every occasion. Get ready to impress your guests and elevate your appetizer game with these deliciously easy creations!
Classic Cheddar Cheese Ball with Pecans

Often overlooked but always a crowd-pleaser, this classic cheddar cheese ball comes together with minimal effort and delivers maximum flavor. Our step-by-step guide will walk you through creating this nostalgic appetizer that’s perfect for holiday gatherings or casual snacking.
Ingredients
– 2 blocks (8 ounces each) of cream cheese, softened to room temperature
– 2 cups of freshly shredded sharp cheddar cheese
– A couple of tablespoons of mayonnaise
– A splash of Worcestershire sauce
– A pinch of garlic powder
– A handful of finely chopped pecans for coating
Instructions
1. Place the softened cream cheese in a large mixing bowl.
2. Add the shredded cheddar cheese to the bowl.
3. Spoon in the mayonnaise.
4. Drizzle the Worcestershire sauce over the mixture.
5. Sprinkle the garlic powder evenly across the ingredients.
6. Use a sturdy spatula to combine all ingredients until fully incorporated and smooth. (Tip: Make sure your cream cheese is properly softened to avoid lumps in your final mixture.)
7. Transfer the cheese mixture onto a sheet of plastic wrap.
8. Use the plastic wrap to shape the mixture into a tight ball, twisting the wrap at the top to secure.
9. Refrigerate the wrapped cheese ball for at least 2 hours, or until firm enough to handle. (Tip: Chilling is crucial for the cheese ball to hold its shape when coated.)
10. Spread the chopped pecans in an even layer on a plate or shallow dish.
11. Unwrap the chilled cheese ball and roll it gently in the pecans, pressing lightly to ensure full coverage. (Tip: Toasting the pecans first will enhance their flavor and add a wonderful crunch.)
12. Transfer the coated cheese ball to a serving plate.
The finished cheese ball boasts a creamy, spreadable interior with a delightful nutty crunch from the pecan coating. Serve it with crisp crackers, apple slices, or celery sticks for a satisfying contrast in textures that highlights the sharp cheddar flavor.
Spicy Jalapeño Popper Cheese Ball
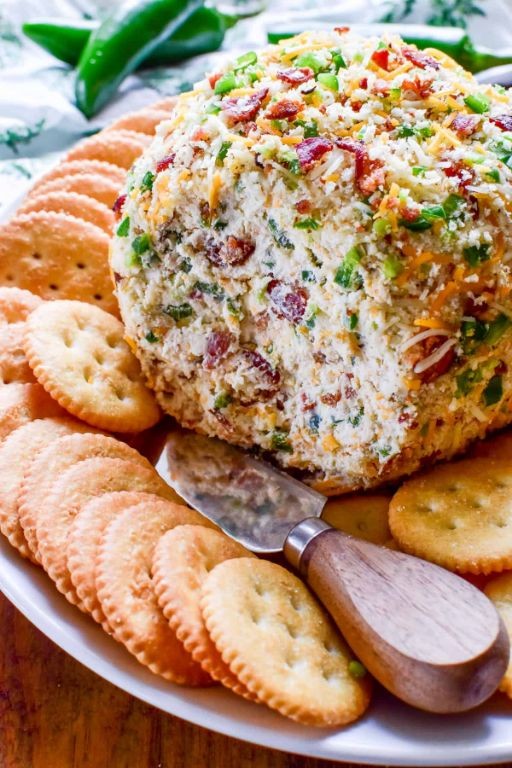
Now, let’s create a crowd-pleasing appetizer that combines creamy, spicy, and crunchy elements in one impressive cheese ball. This Spicy Jalapeño Popper Cheese Ball is perfect for parties or game day gatherings, and I’ll walk you through each simple step to ensure success.
Ingredients
– 2 blocks (8 ounces each) of cream cheese, softened
– 1 cup of shredded sharp cheddar cheese
– 4 medium jalapeños, finely chopped (remove seeds for less heat)
– 6 slices of crispy cooked bacon, crumbled
– 1/4 cup of finely chopped green onions
– 1 teaspoon of garlic powder
– A big pinch of salt
– 1/2 cup of chopped pecans for coating
Instructions
1. Place both blocks of softened cream cheese in a large mixing bowl. Tip: Let cream cheese sit at room temperature for 30 minutes—it mixes much easier when soft.
2. Add shredded cheddar cheese, chopped jalapeños, crumbled bacon, green onions, garlic powder, and salt to the bowl.
3. Use a sturdy spatula or your hands to thoroughly combine all ingredients until evenly distributed.
4. Transfer the mixture to the center of a large piece of plastic wrap.
5. Gather the edges of the plastic wrap and twist tightly to form the mixture into a ball shape.
6. Refrigerate the wrapped cheese ball for at least 2 hours, or until firm enough to handle. Tip: Chilling helps the flavors meld and makes coating easier.
7. Spread chopped pecans in an even layer on a small plate or cutting board.
8. Unwrap the chilled cheese ball and roll it gently in the pecans, pressing lightly to help them adhere.
9. Continue rolling until the entire surface is covered with pecans. Tip: If any spots remain bare, press additional pecans into those areas by hand.
10. Transfer the finished cheese ball to a serving plate.Much like your favorite jalapeño poppers, this cheese ball delivers a satisfying contrast between the cool, creamy interior and the crunchy nut coating. The sharp cheddar and smoky bacon balance the jalapeño’s heat beautifully, making it irresistible spread on crackers or vegetable sticks. For a fun twist, shape it into a football before coating for game day or serve alongside crisp apple slices to complement the spice.
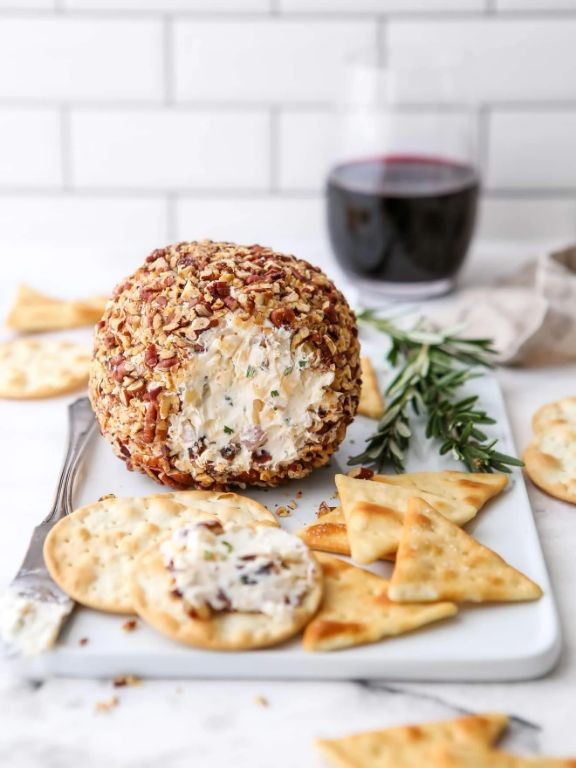
Garlic Herb Cheese Ball with Fresh Rosemary
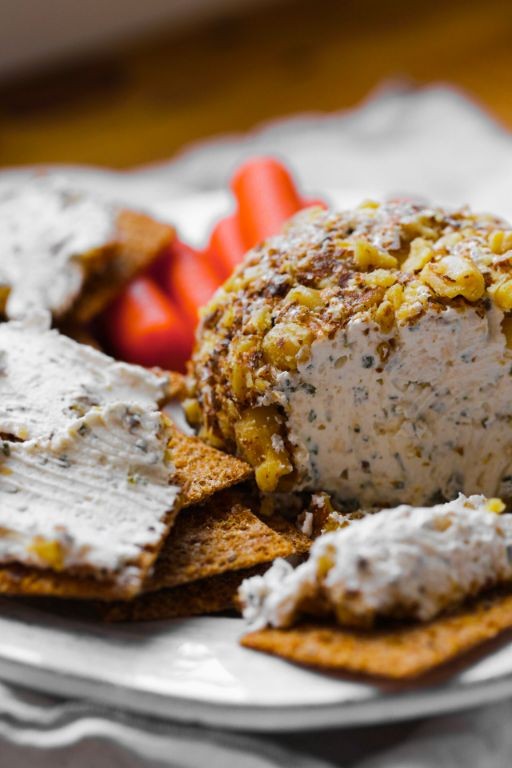
Understanding how to create a stunning cheese ball is simpler than you might think, and this garlic herb version with fresh rosemary will become your new go-to party appetizer that impresses guests with minimal effort.
Ingredients
– 2 packages (16 ounces total) of cream cheese, softened at room temperature
– 1 cup of shredded sharp cheddar cheese
– 4 cloves of garlic, minced very fine
– 2 tablespoons of fresh rosemary, chopped
– 1/4 cup of green onions, thinly sliced
– a good pinch of salt
– a couple of grinds of black pepper
– 1/2 cup of chopped pecans for coating
– your favorite crackers for serving
Instructions
1. Place the softened cream cheese in a medium mixing bowl. 2. Add the shredded cheddar cheese to the bowl. 3. Mix with a hand mixer on medium speed for about 1 minute until well combined and smooth. 4. Stir in the minced garlic using a spatula. 5. Add the chopped fresh rosemary and mix thoroughly. 6. Incorporate the sliced green onions into the cheese mixture. 7. Season with a pinch of salt and several grinds of black pepper, mixing until evenly distributed. 8. Tip: For the best flavor, let the mixture rest covered in the refrigerator for 30 minutes to allow the herbs to infuse. 9. Spread the chopped pecans in a thin layer on a small plate. 10. Scoop the chilled cheese mixture onto the pecans. 11. Gently roll and shape the cheese mixture into a ball, pressing lightly to ensure the pecans adhere to the entire surface. 12. Tip: If the cheese is too soft to handle, chill for another 15 minutes before shaping—this prevents sticking to your hands. 13. Wrap the formed cheese ball tightly in plastic wrap. 14. Refrigerate for at least 2 hours, or until firm. 15. Tip: For optimal texture, remove the cheese ball from the refrigerator 20 minutes before serving to slightly soften. 16. Unwrap the cheese ball and transfer it to a serving plate. 17. Arrange crackers around the cheese ball for dipping. Finally, this cheese ball boasts a creamy, spreadable texture with a robust garlic and herbal flavor that deepens as it chills. The crunchy pecan coating provides a delightful contrast to the smooth interior, making it perfect for spreading on crisp crackers or even using as a flavorful stuffing for celery sticks.
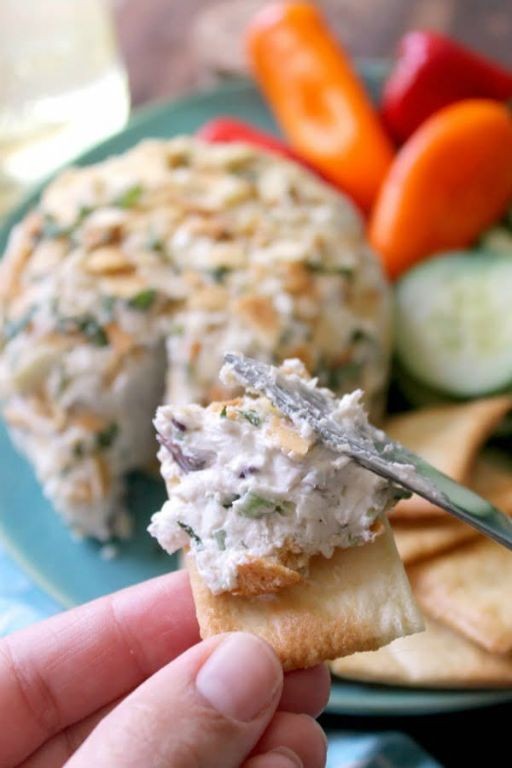
Bacon Ranch Cheese Ball with Chives
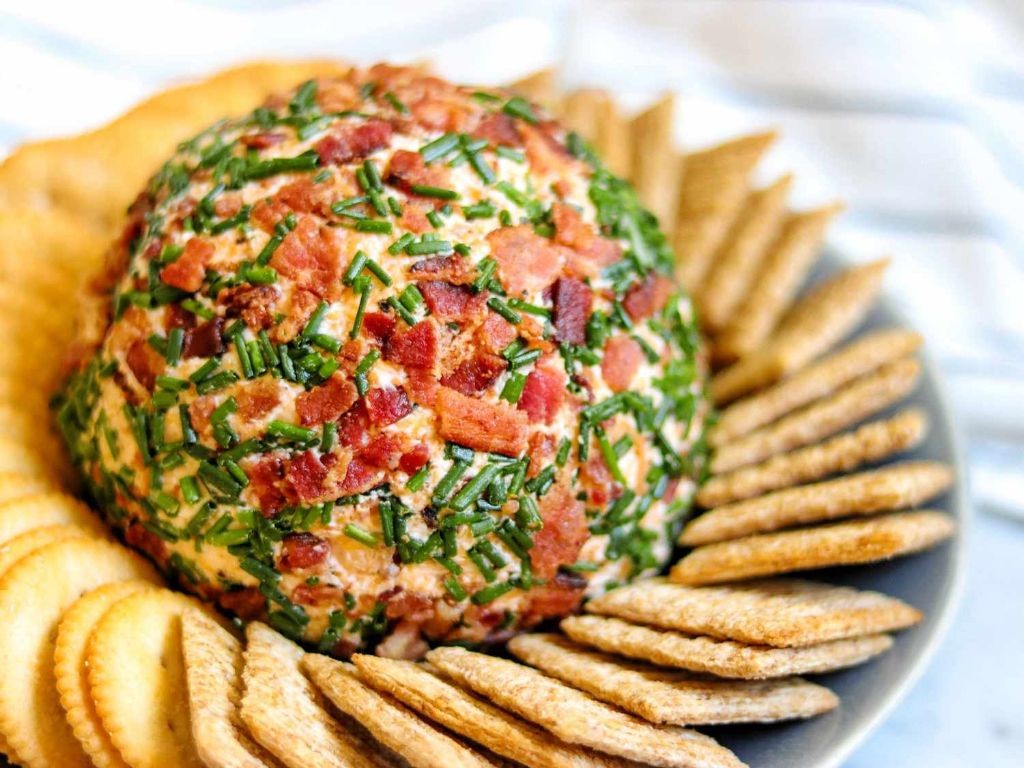
Only the most irresistible party appetizers combine creamy textures with savory flavors in such a simple preparation. Our bacon ranch cheese ball with chives delivers exactly that—a no-bake delight perfect for any gathering, from game day to potlucks, requiring just a few minutes of hands-on work before chilling transforms it into a spreadable masterpiece.
Ingredients
– Two 8-ounce blocks of cream cheese, softened to room temperature
– A heaping half-cup of real bacon bits
– One packet (1 ounce) of dry ranch seasoning mix
– A generous quarter-cup of finely chopped fresh chives
– A big splash (about 2 tablespoons) of milk, just to help it come together
– A couple of extra tablespoons of those bacon bits and a pinch more chives for rolling
Instructions
1. Place the softened cream cheese blocks into a large mixing bowl.
2. Add the heaping half-cup of bacon bits, the entire packet of ranch seasoning, and the quarter-cup of chopped chives to the bowl.
3. Pour in the 2 tablespoons of milk.
4. Use a sturdy spatula or an electric hand mixer on low speed to combine all ingredients until fully incorporated and smooth, which should take about 1–2 minutes. Tip: If the cream cheese is too cold, it will be lumpy; ensure it sits out for at least 30 minutes beforehand.
5. Lay a large piece of plastic wrap on your countertop.
6. Transfer the cheese mixture onto the center of the plastic wrap.
7. Use the plastic wrap to help you shape the mixture into a tight, round ball, twisting the wrap at the top to secure it.
8. Place the wrapped cheese ball in the refrigerator to chill for at least 2 hours, or until firm. Tip: Chilling is non-negotiable here—it makes the ball easy to handle and intensifies the flavors.
9. Spread the extra 2 tablespoons of bacon bits and the reserved pinch of chives on a small plate.
10. Unwrap the chilled cheese ball and roll it evenly in the bacon-chive mixture, pressing gently to adhere. Tip: For a prettier presentation, roll it twice to cover any bare spots.
11. Serve immediately or refrigerate again until ready to use, up to 3 days. Marvel at how the creamy, tangy base melds with the smoky bacon and herby chives, creating a texture that’s both spreadable and satisfyingly dense. Try serving it with crisp celery sticks, sturdy crackers, or even as a flavorful stuffing for mini bell peppers for a colorful twist.
Sun-Dried Tomato and Basil Cheese Ball
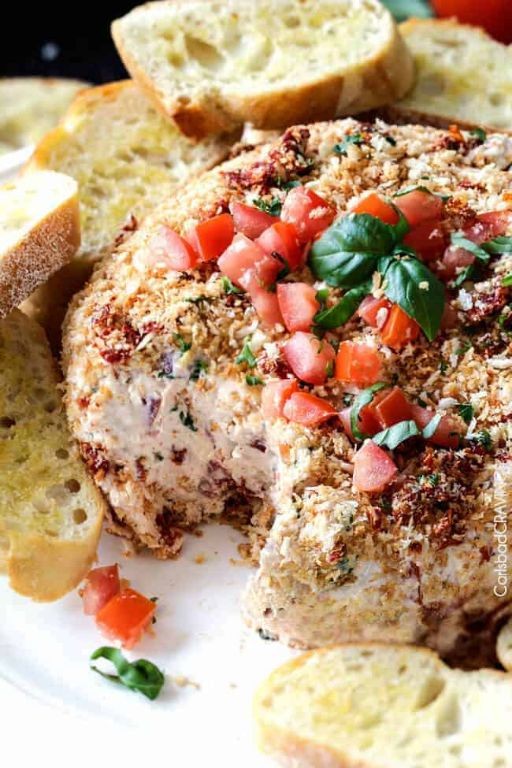
Unwrapping a block of cream cheese is the first step toward creating this crowd-pleasing appetizer that combines Mediterranean flavors in a perfectly spreadable form. This sun-dried tomato and basil cheese ball comes together with minimal effort but delivers maximum flavor, making it ideal for both casual gatherings and holiday parties. You’ll be amazed at how these simple ingredients transform into such an elegant centerpiece.
Ingredients
– One 8-ounce block of cream cheese, softened
– A heaping half-cup of shredded mozzarella cheese
– A quarter-cup of finely chopped sun-dried tomatoes packed in oil
– Two tablespoons of freshly chopped basil
– One minced garlic clove
– A quarter-cup of chopped walnuts
– A couple of crackers for serving
Instructions
1. Place the softened cream cheese block in a medium mixing bowl.
2. Add the shredded mozzarella cheese to the bowl.
3. Measure and add the quarter-cup of finely chopped sun-dried tomatoes.
4. Sprinkle in the two tablespoons of freshly chopped basil.
5. Mix all ingredients thoroughly with a spatula until completely combined, about 2 minutes of stirring.
6. Tip: If your cream cheese isn’t soft enough, microwave it for 15 seconds to make mixing easier.
7. Transfer the cheese mixture onto a sheet of plastic wrap.
8. Use the plastic wrap to shape the mixture into a smooth ball, applying even pressure with your hands.
9. Spread the quarter-cup of chopped walnuts on a small plate.
10. Unwrap the cheese ball and roll it gently in the walnuts until the surface is completely coated.
11. Tip: Press the walnuts gently into any bare spots to ensure full coverage.
12. Wrap the finished cheese ball tightly in fresh plastic wrap.
13. Refrigerate for at least 2 hours to allow flavors to meld and the ball to firm up.
14. Tip: For best flavor development, make this cheese ball the day before serving and refrigerate overnight.
15. Remove from refrigerator 30 minutes before serving to soften slightly.
16. Arrange the cheese ball on a serving plate with a couple of crackers alongside.
Zesty garlic and sweet sun-dried tomatoes create a vibrant flavor profile that contrasts beautifully with the creamy cheese base. The walnut coating adds satisfying crunch while the fresh basil provides herbal brightness that cuts through the richness. Serve this cheese ball with crusty bread slices or vegetable crudités for a colorful presentation that highlights the red and green ingredients within.
Everything Bagel Cheese Ball with Sesame Seeds
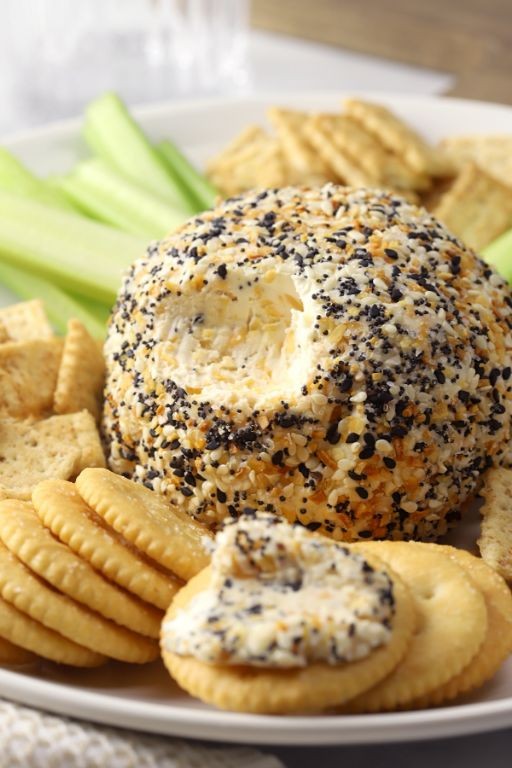
Haven’t we all faced that last-minute party panic? Here’s your lifesaver: an everything bagel cheese ball that comes together in minutes but tastes like you spent hours in the kitchen. This creamy, savory delight will have your guests thinking you’re a culinary genius.
Ingredients
– A couple of blocks of cream cheese (16 ounces total), softened
– About 2 cups of shredded sharp cheddar cheese
– A generous splash of Worcestershire sauce (around 1 tablespoon)
– A couple of minced garlic cloves
– A big handful of everything bagel seasoning (about ¼ cup)
– A tablespoon or so of sesame seeds for extra crunch
Instructions
1. Place both softened cream cheese blocks in a large mixing bowl.
2. Add the 2 cups of shredded cheddar cheese to the bowl.
3. Measure and pour 1 tablespoon of Worcestershire sauce over the cheeses.
4. Mince 2 garlic cloves and add them to the mixture.
5. Use a hand mixer on medium speed to combine all ingredients for exactly 2 minutes, or until completely smooth. (Tip: Make sure your cream cheese is at room temperature to avoid lumps.)
6. Transfer the cheese mixture onto a large piece of plastic wrap.
7. Gather the edges of the plastic wrap and twist tightly to form a ball shape.
8. Refrigerate the wrapped cheese ball for at least 2 hours, or until firm enough to hold its shape.
9. Combine ¼ cup everything bagel seasoning with 1 tablespoon sesame seeds on a small plate.
10. Unwrap the chilled cheese ball and roll it in the seasoning mixture, pressing gently to ensure full coverage. (Tip: Roll the ball between your palms briefly to help the seasoning adhere evenly.)
11. Transfer the finished cheese ball to a serving plate.
12. Let it sit at room temperature for 15 minutes before serving to allow the flavors to meld. (Tip: This resting time makes the cheese ball perfectly spreadable.)
My favorite thing about this cheese ball is how the creamy interior contrasts with the crunchy, savory coating. The sharp cheddar really shines through the cream cheese base, while the everything seasoning delivers that familiar bagel shop flavor. Try serving it with crisp apple slices or spreading it on toasted baguette rounds for different texture experiences.
Cranberry Walnut Cheese Ball with Orange Zest

Holiday gatherings call for effortless yet impressive appetizers that delight every palate. This cranberry walnut cheese ball with orange zest combines creamy, tangy, and nutty flavors in a simple make-ahead treat perfect for any festive table.
Ingredients
– 2 packages (8 ounces each) of cream cheese, softened
– 1 cup of dried cranberries
– 1 cup of finely chopped walnuts
– 2 tablespoons of orange zest
– 1/4 cup of green onions, thinly sliced
– A good pinch of salt
– A splash of Worcestershire sauce
– A couple of tablespoons of fresh orange juice
Instructions
1. Place the softened cream cheese in a medium mixing bowl.
2. Add the dried cranberries, chopped walnuts, orange zest, green onions, salt, Worcestershire sauce, and fresh orange juice to the bowl.
3. Use a spatula or your hands to mix all ingredients until fully combined and uniform in texture.
4. Tip: If the cream cheese is too firm, let it sit at room temperature for 30 minutes to soften—this makes mixing easier and prevents lumps.
5. Transfer the mixture onto a large piece of plastic wrap.
6. Shape the mixture into a ball by gathering the edges of the plastic wrap and twisting them tightly.
7. Chill the wrapped cheese ball in the refrigerator for at least 2 hours, or until firm.
8. Tip: For a neater shape, gently roll the chilled ball between your palms on a clean surface before serving.
9. Unwrap the cheese ball and place it on a serving plate.
10. Press additional chopped walnuts and dried cranberries onto the surface for extra crunch and visual appeal.
11. Tip: Serve with crackers, apple slices, or celery sticks for a balanced crunch that complements the creamy center.
Zesty orange brightens the rich cream cheese, while chewy cranberries and crunchy walnuts create a delightful texture contrast. Spread it on toasted baguette slices for a festive brunch, or pair with crisp pear wedges to highlight its sweet-tangy balance.
Buffalo Blue Cheese Ball with Celery Sticks
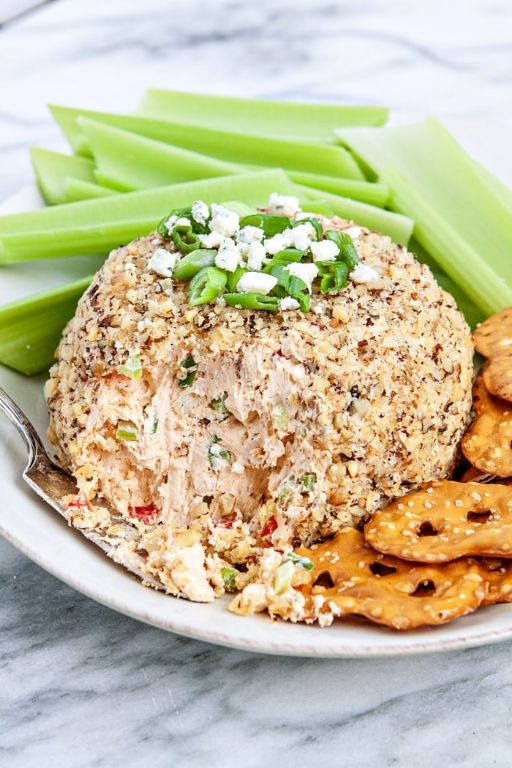
A perfect party appetizer that combines spicy, tangy, and creamy flavors in one irresistible bite. This buffalo blue cheese ball comes together with minimal effort but delivers maximum impact, making it ideal for game days, potlucks, or casual gatherings. Follow these simple steps to create a crowd-pleasing snack that’s sure to disappear quickly.
Ingredients
- Two 8-ounce blocks of cream cheese, softened at room temperature
- About 1/2 cup of Frank’s RedHot sauce
- A generous 1/2 cup of crumbled blue cheese
- A couple of green onions, finely chopped
- A big handful of chopped pecans
- A splash of Worcestershire sauce
- A pinch of garlic powder
- Fresh celery sticks for serving
Instructions
- Place the softened cream cheese in a large mixing bowl and beat it with an electric mixer on medium speed for 1–2 minutes until smooth and creamy.
- Pour in the Frank’s RedHot sauce, Worcestershire sauce, and garlic powder, then mix on low speed just until combined—overmixing can make the texture too loose.
- Fold in the crumbled blue cheese and chopped green onions with a spatula until evenly distributed throughout the mixture.
- Lay a large piece of plastic wrap on your counter and scoop the cheese mixture onto the center, shaping it roughly into a ball with the spatula.
- Wrap the plastic tightly around the ball, twisting the top to secure it, and chill in the refrigerator for at least 2 hours or until firm.
- Spread the chopped pecans on a plate and unwrap the chilled cheese ball, rolling it gently in the nuts to coat the entire surface.
- Transfer the coated ball to a serving dish and arrange fresh celery sticks around it for dipping.
With its creamy, slightly crumbly texture and bold blend of spicy buffalo heat and tangy blue cheese, this appetizer is a flavor explosion. Serve it alongside extra celery sticks or crisp apple slices for a refreshing contrast that balances the richness.
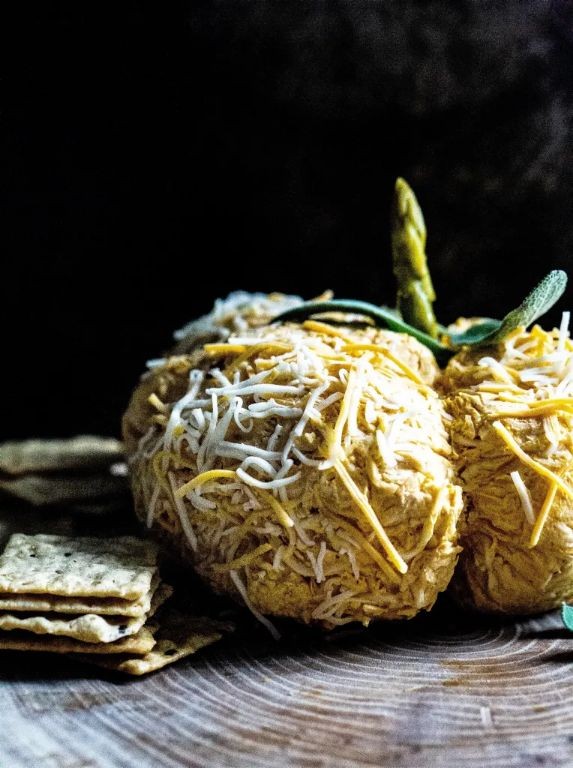
Smoked Gouda and Caramelized Onion Cheese Ball
Zesty and sophisticated, this smoked Gouda and caramelized onion cheese ball combines creamy, smoky flavors with sweet, slow-cooked onions for a crowd-pleasing appetizer. Let’s walk through each step methodically to ensure your cheese ball turns out perfectly smooth and flavorful. You’ll find that taking your time with the onions makes all the difference here.
Ingredients
– 8 ounces of softened cream cheese
– 1 cup of shredded smoked Gouda cheese
– A couple of tablespoons of unsalted butter
– 1 large yellow onion, thinly sliced
– A pinch of granulated sugar
– A splash of Worcestershire sauce
– 1/2 cup of chopped pecans
– A handful of fresh parsley, finely chopped
Instructions
1. Melt the butter in a skillet over medium-low heat.
2. Add the thinly sliced onion and cook, stirring occasionally, for about 25 minutes until the onions are soft and golden brown.
3. Sprinkle the pinch of sugar over the onions and continue cooking for another 5 minutes to enhance caramelization.
4. Remove the skillet from the heat and let the caramelized onions cool completely to room temperature.
5. In a medium mixing bowl, combine the softened cream cheese and shredded smoked Gouda until well blended.
6. Stir in the cooled caramelized onions and the splash of Worcestershire sauce until evenly distributed.
7. Tip: Chill the mixture in the refrigerator for 30 minutes to make it easier to shape.
8. Shape the chilled cheese mixture into a ball using your hands.
9. Tip: Wet your hands slightly to prevent the cheese from sticking.
10. Combine the chopped pecans and chopped parsley on a plate.
11. Roll the cheese ball in the pecan and parsley mixture, pressing gently to coat it evenly.
12. Tip: For best flavor, wrap the coated cheese ball in plastic wrap and refrigerate for at least 1 hour before serving.
13. Serve the cheese ball with crackers or sliced baguette.
A creamy, smoky base from the Gouda pairs beautifully with the sweet, tender onions, while the crunchy pecans add a delightful texture. Try serving it alongside apple slices for a sweet contrast, or spread it on toasted crostini for an elegant touch.
Pimento Cheese Ball with Cracked Black Pepper
This classic Southern appetizer comes together with just a few simple ingredients but delivers incredible flavor that will have everyone asking for the recipe. The combination of creamy cheese, tangy pimentos, and bold black pepper creates a perfect balance that’s ideal for any gathering. You’ll be amazed at how quickly this crowd-pleaser disappears from your snack table.
Ingredients
– 2 blocks of cream cheese (8 ounces each), softened at room temperature
– 2 cups of sharp cheddar cheese, freshly grated
– 1/2 cup of mayonnaise
– 1 small jar (4 ounces) of diced pimentos, thoroughly drained
– 2 teaspoons of Worcestershire sauce
– 1 teaspoon of garlic powder
– 1/2 teaspoon of onion powder
– A generous sprinkle of cracked black pepper (about 1 tablespoon)
– A big handful of chopped pecans for coating
Instructions
1. Place both blocks of softened cream cheese in a large mixing bowl.
2. Add the freshly grated cheddar cheese to the bowl.
3. Spoon in the mayonnaise and drained pimentos.
4. Drizzle the Worcestershire sauce over the mixture.
5. Sprinkle the garlic powder and onion powder evenly across the ingredients.
6. Using an electric mixer on medium speed, beat all ingredients together for about 2 minutes until completely smooth and well combined.
7. Tip: Make sure your cream cheese is properly softened to avoid lumps in your final mixture.
8. Transfer the cheese mixture onto a large piece of plastic wrap.
9. Use the plastic wrap to shape the cheese mixture into a tight ball, twisting the top to secure it.
10. Place the wrapped cheese ball in the refrigerator and chill for at least 2 hours, or until firm enough to handle.
11. Tip: Chilling the cheese ball before coating makes it much easier to work with and prevents sticking.
12. Spread the chopped pecans in an even layer on a small plate or cutting board.
13. Remove the chilled cheese ball from the refrigerator and unwrap it from the plastic.
14. Roll the cheese ball gently through the chopped pecans, pressing lightly to ensure they adhere to all surfaces.
15. Generously sprinkle the entire surface of the cheese ball with cracked black pepper, using your hands to gently press it into the coating.
16. Tip: For the best flavor, use freshly cracked black pepper rather than pre-ground pepper from a shaker.
17. Return the finished cheese ball to the refrigerator for another 30 minutes to set completely before serving.
Keep this pimento cheese ball refrigerated until ready to serve for the best texture and flavor. The creamy interior contrasts beautifully with the crunchy pecan coating, while the black pepper adds a subtle heat that complements the rich cheese. Consider serving it with crisp celery sticks, buttery crackers, or even as a spread for mini sliders at your next party.
Mexican Street Corn Cheese Ball with Cotija

Getting that authentic Mexican street corn flavor into a shareable appetizer is easier than you think with this creamy cheese ball. Gather your ingredients and let’s walk through creating this crowd-pleasing dish step by step.
Ingredients
– 2 packages (8 ounces each) of cream cheese, softened
– 1 cup of crumbled cotija cheese
– 1/2 cup of mayonnaise
– 2 tablespoons of lime juice
– 1 teaspoon of chili powder
– 1/4 teaspoon of smoked paprika
– 1/4 teaspoon of garlic powder
– 1/4 cup of finely chopped fresh cilantro
– 1/4 cup of finely chopped red onion
– 1 jalapeño, seeds removed and finely minced
– 1 cup of frozen corn kernels, thawed
Instructions
1. Place the softened cream cheese in a large mixing bowl.
2. Add the crumbled cotija cheese to the bowl.
3. Measure and add 1/2 cup of mayonnaise to the mixture.
4. Squeeze 2 tablespoons of fresh lime juice into the bowl.
5. Sprinkle 1 teaspoon of chili powder evenly over the ingredients.
6. Add 1/4 teaspoon of smoked paprika to the bowl.
7. Measure and add 1/4 teaspoon of garlic powder.
8. Finely chop 1/4 cup of fresh cilantro and add it to the mixture.
9. Dice 1/4 cup of red onion and incorporate it into the bowl.
10. Remove seeds from one jalapeño, mince it finely, and add to the mixture.
11. Add 1 cup of thawed frozen corn kernels to the bowl.
12. Use a rubber spatula to thoroughly combine all ingredients until evenly distributed.
13. Tip: Make sure your cream cheese is properly softened to room temperature for easier mixing and a smoother texture.
14. Transfer the mixture onto a large piece of plastic wrap.
15. Use the plastic wrap to shape the mixture into a tight ball, twisting the top to secure it.
16. Tip: The plastic wrap technique helps create a perfect round shape without sticking to your hands.
17. Refrigerate the wrapped cheese ball for at least 2 hours to firm up.
18. Tip: Don’t skip the chilling time – this allows the flavors to meld together and makes the cheese ball easier to handle when serving.
19. Remove the cheese ball from refrigerator and unwrap it carefully.
20. Place the cheese ball on your serving platter.
Before serving, this cheese ball delivers that classic Mexican street corn experience in every bite. The creamy interior contrasts beautifully with the slight crunch of corn and vegetables, while the cotija cheese provides that authentic salty tang. Try serving it with sturdy tortilla chips or spreading it on toasted baguette slices for different texture experiences.
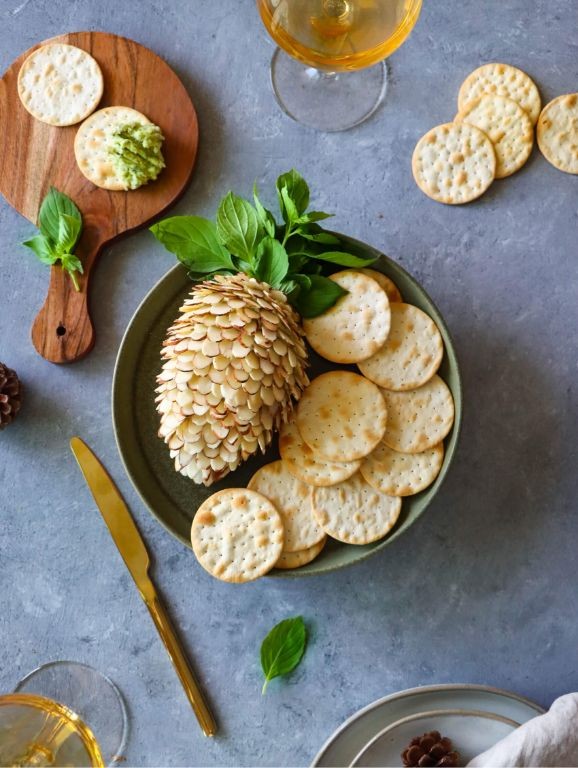
Pesto and Parmesan Cheese Ball with Pine Nuts
Crafting this pesto and Parmesan cheese ball is simpler than you might think, and the results are absolutely worth the minimal effort. Combining fresh basil, rich cheese, and crunchy pine nuts creates a showstopping appetizer that looks impressive but comes together in just minutes. Let me walk you through each step so you can confidently create this crowd-pleaser for your next gathering.
Ingredients
– About 2 cups of cream cheese straight from the fridge
– A generous half cup of freshly grated Parmesan cheese
– A good quarter cup of prepared pesto (homemade or store-bought works great)
– A couple tablespoons of pine nuts for toasting
– Just a splash of lemon juice to brighten everything up
Instructions
1. Place your cream cheese in a medium mixing bowl and let it sit at room temperature for 15 minutes to soften slightly.
2. While the cream cheese softens, spread the pine nuts in a single layer in a dry skillet over medium heat.
3. Toast the pine nuts for 3-4 minutes, shaking the pan frequently, until they turn golden brown and become fragrant.
4. Immediately transfer the toasted pine nuts to a plate to cool completely, which prevents them from burning.
5. Add the grated Parmesan cheese, pesto, and lemon juice to the softened cream cheese.
6. Mix everything together with a rubber spatula until fully combined and uniform in color.
7. Tip: If the mixture seems too soft to shape, chill it in the refrigerator for 20 minutes before proceeding.
8. Transfer the cheese mixture to a sheet of plastic wrap placed on your work surface.
9. Gather the edges of the plastic wrap and twist them together to form the mixture into a tight ball shape.
10. Unwrap the cheese ball and roll it in the cooled toasted pine nuts, pressing gently to help them adhere.
11. Tip: For easier serving later, place the finished cheese ball on your serving plate before refrigerating.
12. Cover the cheese ball loosely with plastic wrap and refrigerate for at least 2 hours to firm up.
13. Tip: For optimal flavor, remove the cheese ball from the refrigerator 30 minutes before serving to allow it to soften slightly.
Let this cheese ball come to room temperature before serving to really let the flavors shine. The creamy interior contrasts beautifully with the crunchy pine nut coating, while the pesto adds herbal brightness that cuts through the richness. Try serving it with crisp cucumber slices or toasted baguette rounds for different textural experiences.
Brie and Fig Cheese Ball with Honey Drizzle
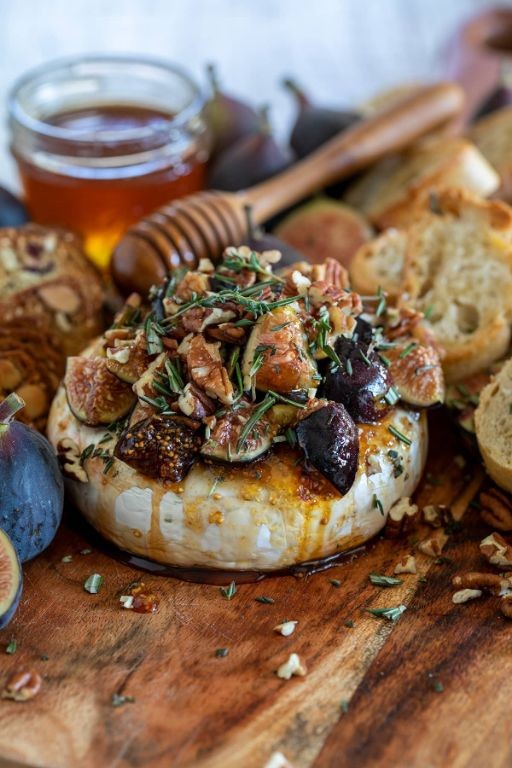
Keeping your holiday entertaining simple yet impressive is key, and this elegant cheese ball delivers both beauty and flavor with minimal effort. Kindly follow these straightforward steps to create a stunning appetizer that will have your guests asking for the recipe.
Ingredients
– A couple of 8-ounce wheels of creamy brie cheese
– About half a cup of finely chopped dried figs
– A generous splash of honey for drizzling
– A handful of chopped walnuts for coating
– A pinch of sea salt to balance the sweetness
Instructions
1. Remove the rind from both brie wheels using a sharp knife, cutting carefully around the edges. 2. Place the brie in a medium mixing bowl and let it sit at room temperature for 20 minutes to soften. 3. Add the chopped dried figs to the softened brie. 4. Mix thoroughly with a spatula until the figs are evenly distributed throughout the cheese. 5. Shape the mixture into a smooth ball with your hands, applying gentle but firm pressure. 6. Spread the chopped walnuts on a small plate in an even layer. 7. Roll the cheese ball through the walnuts, pressing lightly to ensure full coverage. 8. Transfer the coated cheese ball to a serving plate. 9. Drizzle honey in a zigzag pattern across the top of the cheese ball. 10. Sprinkle sea salt lightly over the honey drizzle. 11. Refrigerate the cheese ball for exactly 30 minutes to help it hold its shape before serving. Lusciously creamy brie melts in your mouth while the chewy figs provide delightful texture contrasts. The honey’s floral sweetness perfectly balances the salty cheese and earthy walnuts—try serving it with crisp apple slices or toasted baguette rounds for contrasting crunch.
Loaded Baked Potato Cheese Ball with Sour Cream
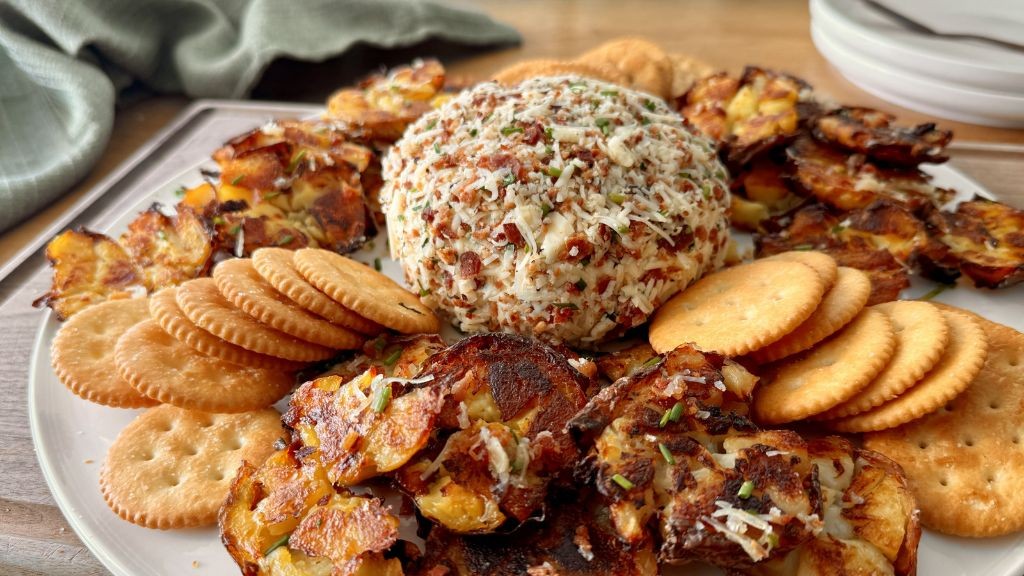
Ultimately, if you love the comforting flavors of a loaded baked potato but want something more party-friendly, these cheese balls are your answer. Understanding the step-by-step process will give you perfectly creamy, savory bites every time. Using simple ingredients and straightforward techniques, we’ll create these crowd-pleasing appetizers together.
Ingredients
– 2 large russet potatoes, peeled and cubed
– 1 cup shredded sharp cheddar cheese
– 4 slices cooked bacon, crumbled
– 1/4 cup finely chopped green onions
– 1/2 cup sour cream
– 1 teaspoon garlic powder
– 1/2 teaspoon black pepper
– 1/4 teaspoon salt
– A couple of tablespoons of chopped fresh chives for rolling
– A splash of milk if needed for consistency
Instructions
1. Place the peeled, cubed potatoes in a large pot and cover with cold water by about 1 inch.
2. Bring the water to a boil over high heat, then reduce to a simmer and cook for 15-18 minutes until the potatoes are fork-tender.
3. Drain the potatoes thoroughly in a colander and return them to the hot pot for 1 minute to evaporate excess moisture.
4. Mash the potatoes with a potato masher until completely smooth with no lumps remaining.
5. Let the mashed potatoes cool to room temperature, about 20-25 minutes, stirring occasionally.
6. Add the shredded cheddar cheese, crumbled bacon, chopped green onions, sour cream, garlic powder, black pepper, and salt to the cooled potatoes.
7. Mix everything together with a spatula until fully combined and uniform in texture.
8. Check the mixture’s consistency – if it’s too dry to hold together, add a splash of milk and mix again.
9. Cover the bowl with plastic wrap and refrigerate for 1 hour until firm enough to handle.
10. Using a 2-tablespoon cookie scoop, portion the mixture into 16 equal balls.
11. Roll each portion between your palms into smooth, round balls.
12. Spread the chopped fresh chives on a small plate and roll each cheese ball in the chives to coat evenly.
13. Arrange the coated cheese balls on a parchment-lined baking sheet.
14. Refrigerate the cheese balls for another 30 minutes to set completely before serving.
Really, the magic happens when you bite into these – the creamy potato center gives way to the sharp cheddar and smoky bacon, while the sour cream adds just the right tang. Rolling them in fresh chives provides that final baked potato finish that makes these irresistible. Try serving them alongside additional sour cream for dipping or arrange them on a platter with vegetable crudités for a complete party spread.
Chocolate Chip Dessert Cheese Ball with Graham Crackers
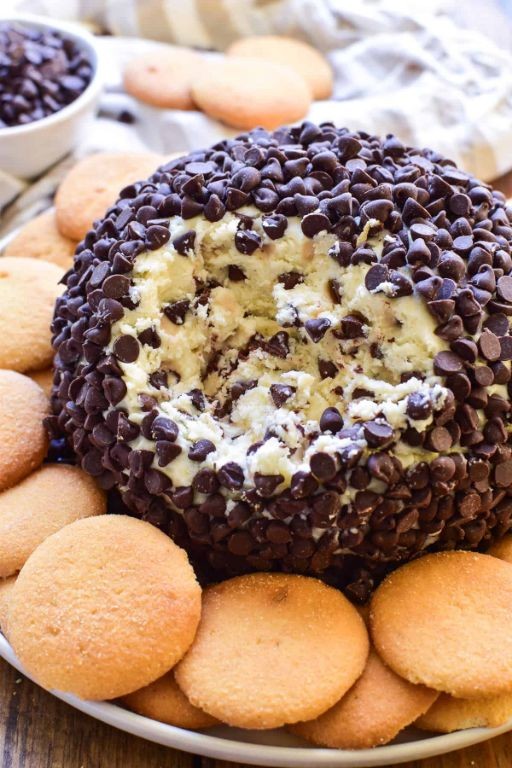
Sometimes the best desserts are the simplest ones to make, and this chocolate chip cheese ball proves just that. Simply mix a few basic ingredients together for a sweet, creamy treat that pairs perfectly with graham crackers. You’ll have a crowd-pleasing dessert ready in no time at all.
Ingredients
– 2 blocks (16 ounces total) of cream cheese, softened to room temperature
– 1 stick (½ cup) of unsalted butter, softened
– ¾ cup of powdered sugar
– A good splash (about 1 teaspoon) of vanilla extract
– A generous ½ cup of mini chocolate chips
– A couple of graham crackers for serving
Instructions
1. Place the softened cream cheese and butter in a large mixing bowl.
2. Use an electric mixer on medium speed to beat the cream cheese and butter together until completely smooth and well-combined, about 2 minutes. (Tip: Make sure both are truly soft for a lump-free mixture.)
3. Add the powdered sugar and vanilla extract to the bowl.
4. Beat on low speed initially to incorporate the powdered sugar, then increase to medium until the mixture is fluffy and uniform, about 1-2 minutes.
5. Switch to a spatula and gently fold in the mini chocolate chips until they are evenly distributed. (Tip: Reserve a tablespoon of chips to press onto the outside later for better presentation.)
6. Lay a large piece of plastic wrap on your counter.
7. Scoop the entire cheese ball mixture onto the center of the plastic wrap.
8. Use the plastic wrap to help you shape the mixture into a neat ball, wrapping it tightly.
9. Place the wrapped cheese ball in the refrigerator to chill and firm up for at least 2 hours, or until it holds its shape well. (Tip: Chilling is essential for the perfect scoopable texture.)
10. Unwrap the chilled cheese ball and place it on your serving plate.
11. If reserved, press the extra chocolate chips onto the surface for decoration.
12. Arrange graham crackers around the cheese ball for dipping.
Luxuriously creamy and studded with melty chocolate bits, this dessert cheese ball offers a delightful contrast to the crisp, slightly sweet graham crackers. For a fun twist, try rolling the finished ball in crushed graham cracker crumbs or serving it with apple slices for a fresh take.
Greek Feta Cheese Ball with Kalamata Olives
Haven’t you been searching for that perfect appetizer that looks impressive but comes together with minimal fuss? Greek Feta Cheese Ball with Kalamata Olives is your answer—a creamy, tangy spread that transports you straight to the Mediterranean with every bite. Let’s walk through this simple recipe together, perfect for your next gathering or a flavorful snack.
Ingredients
– 8 ounces of creamy feta cheese, crumbled
– 4 ounces of softened cream cheese
– A generous half cup of chopped Kalamata olives
– A couple of tablespoons of extra virgin olive oil
– A splash of fresh lemon juice (about 1 tablespoon)
– A teaspoon of dried oregano
– A pinch of black pepper
Instructions
1. Place the crumbled feta cheese and softened cream cheese in a medium mixing bowl.
2. Use a fork or hand mixer on low speed to blend the cheeses together for about 2 minutes until smooth and well combined.
3. Add the chopped Kalamata olives, extra virgin olive oil, fresh lemon juice, dried oregano, and black pepper to the cheese mixture.
4. Stir all ingredients with a spatula for 1-2 minutes until evenly distributed throughout the mixture.
5. Tip: If the mixture feels too stiff, add another tablespoon of olive oil to reach a spreadable consistency.
6. Transfer the mixture onto a large piece of plastic wrap.
7. Use the plastic wrap to shape the mixture into a tight ball, twisting the ends to secure it.
8. Tip: For easier shaping, chill the mixture in the refrigerator for 15 minutes before forming the ball.
9. Refrigerate the wrapped cheese ball for at least 2 hours, or until firm and hold its shape.
10. Tip: For optimal flavor, let the cheese ball sit at room temperature for 20 minutes before serving to soften slightly.
11. Unwrap the cheese ball and place it on a serving plate.
12. Drizzle with an additional teaspoon of olive oil and sprinkle with extra oregano if desired.
Now you’re ready to enjoy this delightful creation! Notice how the creamy, crumbly texture of the feta melds beautifully with the briny olives, creating a savory punch that’s irresistible. Serve it alongside crisp pita chips or fresh vegetable sticks for a satisfying crunch, or spread it on crusty bread for a simple yet elegant appetizer that always disappears fast.
Taco Cheese Ball with Crushed Tortilla Chips
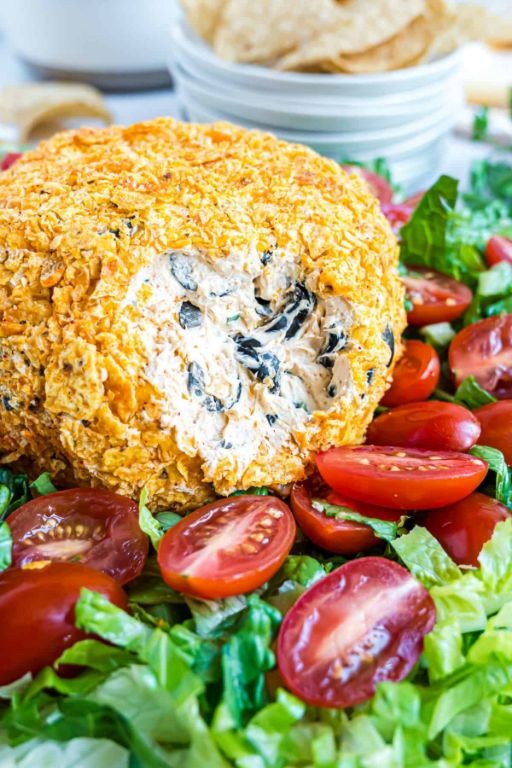
Savor the perfect party appetizer that combines all your favorite taco flavors in one irresistible, shareable cheese ball. Simply put, this crowd-pleasing creation brings together creamy cheese, zesty seasonings, and crunchy tortilla chips for a dip that’s guaranteed to disappear fast. Follow these straightforward steps to create your own taco-inspired masterpiece that’s as fun to make as it is to eat.
Ingredients
– 2 blocks (16 ounces total) of cream cheese, softened
– 1 packet (about 2 tablespoons) of taco seasoning
– 1 cup of shredded cheddar cheese
– 1/4 cup of finely chopped red onion
– 2 tablespoons of fresh lime juice
– A big handful of fresh cilantro, chopped
– 1 cup of crushed tortilla chips
Instructions
1. Place the softened cream cheese in a large mixing bowl.
2. Add the taco seasoning packet to the cream cheese.
3. Mix with a hand mixer on medium speed for about 1 minute until fully combined and smooth.
4. Tip: Make sure your cream cheese is truly softened to room temperature—this prevents lumps and makes mixing effortless.
5. Stir in the shredded cheddar cheese using a spatula.
6. Add the finely chopped red onion and mix until evenly distributed.
7. Pour in the fresh lime juice and stir to incorporate.
8. Fold in the chopped cilantro until just combined.
9. Tip: For the best texture, chill the mixture in the refrigerator for 30 minutes—this makes shaping much easier and prevents sticking.
10. Spread the crushed tortilla chips on a large plate or shallow bowl.
11. Remove the chilled cheese mixture from the refrigerator.
12. Use your hands to shape the mixture into a ball, about 6 inches in diameter.
13. Roll the cheese ball gently in the crushed tortilla chips, pressing lightly to adhere.
14. Tip: If the coating doesn’t stick well, lightly dampen your hands and pat the ball—this helps the chips cling without making it soggy.
15. Wrap the coated cheese ball tightly in plastic wrap.
16. Refrigerate for at least 1 hour before serving to allow flavors to meld.
17. Unwrap the cheese ball and transfer to a serving platter.
What makes this cheese ball truly special is the satisfying contrast between the cool, creamy interior and the salty, crunchy tortilla chip coating. The zesty lime and cilantro brighten up the rich cheese base, while the taco seasoning adds just the right amount of kick. For a fun twist, serve it surrounded by colorful veggie sticks or use it as a flavorful spread for mini tortillas at your next gathering.
Caramel Apple Cheese Ball with Cinnamon
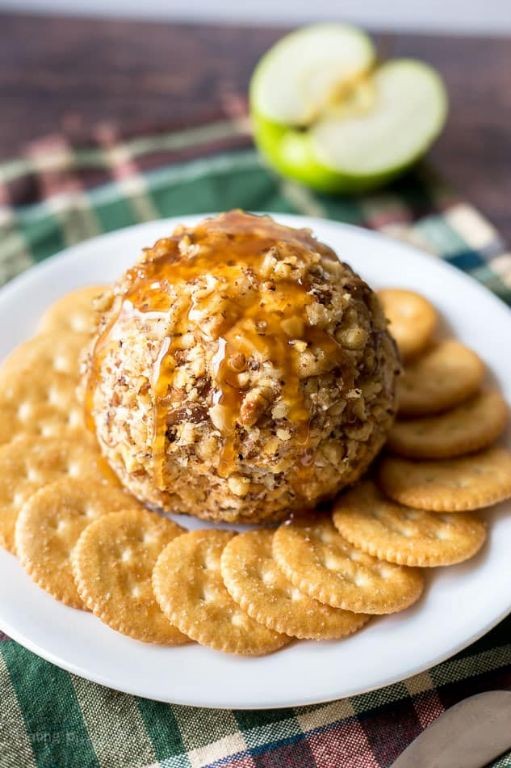
Making a sweet and savory appetizer has never been easier than with this caramel apple cheese ball. Many holiday gatherings call for a standout dish that balances creamy, crunchy, and spiced flavors, and this recipe delivers exactly that with minimal effort. Let’s walk through each step together to create a crowd-pleasing treat.
Ingredients
– 2 packages (8 ounces each) of cream cheese, softened
– 1/2 cup of caramel sauce, plus a little extra for drizzling
– 1/4 cup of powdered sugar
– 1 teaspoon of vanilla extract
– 1/2 teaspoon of ground cinnamon
– 1 medium apple, finely chopped
– 1/2 cup of chopped pecans
– A couple of graham crackers, crushed
Instructions
1. Place the softened cream cheese in a large mixing bowl.
2. Add 1/2 cup of caramel sauce, 1/4 cup of powdered sugar, 1 teaspoon of vanilla extract, and 1/2 teaspoon of ground cinnamon to the bowl.
3. Use an electric mixer on medium speed to beat the mixture for about 2 minutes, until it’s smooth and well combined. Tip: Softening the cream cheese at room temperature for 30 minutes prevents lumps.
4. Fold in the finely chopped apple with a spatula until evenly distributed.
5. Lay a large piece of plastic wrap on a flat surface.
6. Scoop the cheese mixture onto the plastic wrap and shape it into a ball using your hands.
7. Wrap the ball tightly in the plastic wrap and refrigerate it for at least 2 hours, or until firm. Tip: Chilling the ball makes it easier to handle and coat evenly.
8. Combine the chopped pecans and crushed graham crackers on a plate.
9. Unwrap the chilled cheese ball and roll it in the pecan-graham mixture, pressing gently to coat the entire surface.
10. Drizzle the top with additional caramel sauce just before serving. Tip: For a neat presentation, place the ball on a serving plate and use a spoon to drizzle the caramel in zigzag lines.
Here’s why this dish shines: the creamy cheese base contrasts with the crisp apple bits, while the cinnamon and caramel add warmth and sweetness. Try serving it with sliced apples or pretzel sticks for a fun, interactive appetizer that guests will love dipping and savoring.
Goat Cheese and Cranberry Pecan Cheese Ball

Every holiday gathering deserves a show-stopping appetizer that’s surprisingly simple to prepare. This creamy goat cheese ball with sweet cranberries and crunchy pecans comes together in minutes but looks like you spent hours in the kitchen. Even beginners can master this crowd-pleasing recipe with just a few basic steps.
Ingredients
– 8 ounces of creamy goat cheese
– 4 ounces of softened cream cheese
– ½ cup of dried cranberries, chopped
– ⅓ cup of toasted pecans, finely chopped
– 2 tablespoons of fresh parsley, minced
– 1 tablespoon of honey
– A good pinch of salt
– A couple of extra tablespoons of chopped pecans for rolling
Instructions
1. Place the goat cheese and cream cheese in a medium mixing bowl and let them sit at room temperature for 30 minutes to soften completely.
2. Add the chopped cranberries, ⅓ cup of pecans, parsley, honey, and salt to the cheese mixture.
3. Mix everything together using a rubber spatula until all ingredients are evenly distributed and the mixture holds together. Tip: If the cheese is still too firm, microwave it for 10 seconds to make mixing easier.
4. Transfer the cheese mixture onto a sheet of plastic wrap and shape it into a ball using your hands.
5. Spread the remaining 2 tablespoons of chopped pecans on a separate plate or cutting board.
6. Roll the cheese ball in the pecans, pressing gently to ensure they stick to the surface. Tip: Chill the cheese ball for 15 minutes first if it’s too soft to handle easily.
7. Wrap the coated cheese ball tightly in plastic wrap and refrigerate for at least 2 hours, or until firm. Tip: For best flavor, make this a day ahead to let the flavors meld together.
8. Remove from refrigerator 30 minutes before serving to allow the cheese to soften slightly. Keep this delightful appetizer chilled until ready to serve. Knowing how the creamy tang of goat cheese pairs perfectly with sweet cranberries and buttery pecans makes this cheese ball irresistible. The contrast between the smooth interior and crunchy coating creates wonderful texture in every bite. Try serving it with crisp apple slices, water crackers, or even spreading it on toasted baguette rounds for elegant holiday entertaining.
Savory Italian Cheese Ball with Prosciutto

Gathering friends for a casual get-together? This savory Italian cheese ball with prosciutto is your new go-to appetizer that comes together with minimal fuss and maximum flavor. Let me walk you through creating this impressive yet simple crowd-pleaser step by step.
Ingredients
– 2 packages (16 ounces total) of cream cheese, softened at room temperature
– About 1 cup of freshly grated Parmesan cheese
– A couple of cloves of garlic, minced super fine
– A generous handful of fresh parsley, chopped
– 6 thin slices of prosciutto, chopped into small bits
– A splash of balsamic glaze for drizzling
– Your favorite crackers or sliced baguette for serving
Instructions
1. Place both packages of softened cream cheese in a large mixing bowl.
2. Add the freshly grated Parmesan cheese to the bowl.
3. Mix the cheeses together using a hand mixer on medium speed for about 2 minutes until well combined and smooth.
4. Stir in the finely minced garlic and chopped fresh parsley with a spatula until evenly distributed.
5. Fold in the chopped prosciutto pieces, reserving about 2 tablespoons for garnish.
6. Line a small bowl with plastic wrap, letting the edges hang over the sides.
7. Transfer the cheese mixture into the lined bowl.
8. Gather the plastic wrap edges and twist tightly to form a ball shape.
9. Chill the wrapped cheese ball in the refrigerator for at least 2 hours, or until firm enough to hold its shape.
10. Unwrap the chilled cheese ball and place it on your serving plate.
11. Press the reserved prosciutto pieces evenly over the surface of the cheese ball.
12. Drizzle the balsamic glaze in a zigzag pattern over the top.
13. Serve immediately with crackers or sliced baguette.
You’ll love how the creamy, tangy cheese base contrasts with the salty prosciutto and sweet balsamic glaze. The texture stays firm enough to spread easily without crumbling. Try serving it surrounded by roasted cherry tomatoes and fresh basil leaves for a beautiful antipasto-style presentation that always impresses.
Summary
Unforgettable cheese balls await in this collection! Whether you’re hosting a party or craving a cozy snack, these 20 recipes deliver creamy perfection for every occasion. We’d love to hear which ones become your favorites—drop us a comment below and don’t forget to share this roundup on Pinterest so fellow cheese lovers can discover these delicious creations too!