
Hey there! If you’re navigating life with Crohn’s disease, you know how crucial gentle, nourishing meals can be for finding comfort and relief. We’ve gathered 18 soothing recipes designed to be easy on your digestive system while still being delicious and satisfying. From comforting soups to gentle mains, these dishes are here to support you. Ready to discover some new kitchen favorites? Let’s dive in!
Baked Salmon with Steamed Carrots and Mashed Potatoes

Yesterday evening, as the autumn chill settled in, I found myself craving something comforting yet healthy—the kind of meal that warms you from the inside out. That’s when I remembered this simple baked salmon with steamed carrots and mashed potatoes, a dish my mom used to make on busy weeknights when we needed both nourishment and a little TLC.
Ingredients
- 1 large salmon fillet (about 1 pound)
- 2 tablespoons of olive oil
- A generous squeeze of fresh lemon juice
- A pinch of salt and a few cracks of black pepper
- 4 medium-sized carrots, peeled and sliced into coins
- 3 large russet potatoes, peeled and cubed
- 1/4 cup of milk
- 2 tablespoons of butter
Instructions
- Preheat your oven to 400°F (200°C).
- Place the salmon fillet skin-side down on a baking sheet lined with parchment paper.
- Drizzle the salmon with 1 tablespoon of olive oil and the fresh lemon juice.
- Sprinkle the salmon with a pinch of salt and a few cracks of black pepper.
- Bake the salmon in the preheated oven for 12–15 minutes, until it flakes easily with a fork. (Tip: For extra flavor, add a slice of lemon on top while baking.)
- While the salmon bakes, place the peeled and cubed potatoes in a large pot and cover them with cold water.
- Bring the pot to a boil over high heat, then reduce to a simmer and cook for 15–20 minutes, until the potatoes are tender when pierced with a fork.
- Drain the potatoes thoroughly and return them to the pot.
- Add the milk, butter, and a pinch of salt to the potatoes.
- Mash the potatoes with a potato masher until smooth and creamy. (Tip: For fluffier mashed potatoes, heat the milk and butter before adding.)
- In a separate saucepan, add the sliced carrots and enough water to cover them halfway.
- Steam the carrots over medium heat for 8–10 minutes, until they are tender but still slightly crisp. (Tip: Don’t overcook the carrots to keep their bright color and nutrients.)
- Drain any remaining water from the carrots and toss them with the remaining 1 tablespoon of olive oil.
- Plate the mashed potatoes, top with the baked salmon, and arrange the steamed carrots alongside.
Flaky, buttery salmon pairs beautifully with the creamy mashed potatoes and sweet, tender carrots. For a fun twist, I sometimes serve this with a dollop of dill yogurt sauce or sprinkle everything with fresh parsley—it’s a meal that feels both elegant and utterly comforting, perfect for sharing with loved ones on a cozy night in.
Low-Fiber Banana Oatmeal

Craving something warm and comforting but need to keep things gentle on the digestive system? I’ve been making this low-fiber banana oatmeal for years, especially on those mornings when my stomach needs a break but my taste buds still want something satisfying. It’s become my go-to comfort breakfast that feels like a hug in a bowl.
Ingredients
– 1 cup of old-fashioned rolled oats
– 2 cups of water
– 1 ripe banana (the kind with lots of brown spots)
– A generous pinch of salt
– A splash of vanilla extract
– A couple of teaspoons of maple syrup
Instructions
1. Combine 1 cup of old-fashioned rolled oats and 2 cups of water in a medium saucepan.
2. Mash 1 ripe banana thoroughly with a fork until it forms a smooth paste.
3. Add the mashed banana to the saucepan with the oats and water.
4. Stir in a generous pinch of salt and a splash of vanilla extract.
5. Place the saucepan over medium heat and bring the mixture to a gentle boil, stirring occasionally.
6. Once boiling, reduce the heat to low and simmer for 5 minutes, stirring frequently to prevent sticking.
7. Add a couple of teaspoons of maple syrup and continue cooking for another 2-3 minutes until the oatmeal reaches your desired thickness.
8. Remove from heat and let it sit for 1 minute to allow the oats to fully absorb the liquid.
9. Serve immediately while warm.
Out of the pot, this oatmeal has the creamiest texture thanks to that mashed banana working its magic. The vanilla and maple syrup create this lovely sweetness that doesn’t overwhelm, while the banana flavor comes through in the most comforting way. I sometimes like to top it with a tiny sprinkle of cinnamon for an extra cozy touch, or serve it alongside some scrambled eggs for a more complete breakfast.
Soft Scrambled Eggs with White Toast

Breakfast doesn’t get more comforting than this classic combo that I find myself making at least three times a week. There’s something magical about how the creamy eggs and crisp toast come together—it’s my go-to when I need a quick, satisfying meal that feels like a warm hug. I actually learned this slow-scramble method from my grandmother, who insisted that patience is the secret ingredient most people skip.
Ingredients
– 3 large eggs
– A couple of tablespoons of whole milk
– A generous pat of butter (about 1 tablespoon)
– Two slices of your favorite bread
– A pinch of kosher salt
– A few cracks of fresh black pepper
Instructions
1. Crack 3 large eggs into a medium bowl and add 2 tablespoons of whole milk.
2. Whisk the eggs and milk vigorously for about 30 seconds until the mixture is completely uniform and pale yellow.
3. Heat a non-stick skillet over low heat (about 250°F) and add 1 tablespoon of butter.
4. Swirl the melting butter to coat the entire bottom of the skillet evenly.
5. Pour the egg mixture into the skillet and let it sit undisturbed for 20 seconds.
6. Begin gently pushing the eggs from the edges toward the center with a rubber spatula, creating soft folds.
7. Continue this folding motion every 15-20 seconds for about 8-10 minutes until the eggs form moist, creamy curds. Tip: Low heat is crucial here—if the eggs sizzle, your pan is too hot!
8. When the eggs are about 80% cooked (still slightly wet-looking), remove the skillet from heat.
9. Season the eggs with 1/4 teaspoon of kosher salt and several grinds of black pepper, then give one final gentle fold.
10. While the eggs rest, toast 2 slices of bread in a toaster set to medium until golden brown and crisp. Tip: I always listen for that perfect “snap” sound when the toast is ready.
11. Immediately butter the hot toast right after it pops up—the heat helps the butter melt beautifully into every nook.
12. Divide the scrambled eggs between the two slices of buttered toast.
Keep in mind that the residual heat will finish cooking the eggs to that perfect velvety texture you’re after. The creaminess of these eggs against the crisp, buttery toast creates this wonderful contrast that makes each bite interesting. Sometimes I’ll top mine with a sprinkle of chives or serve it alongside some pan-fried cherry tomatoes for a colorful twist.
Pureed Butternut Squash Soup

Haven’t we all craved a cozy, velvety soup when the air turns crisp? I whipped up this pureed butternut squash soup last weekend after a trip to the farmers’ market, and it’s become my go-to for chilly evenings—so simple, yet so satisfying.
Ingredients
– 1 large butternut squash, peeled and cubed
– 2 tablespoons of olive oil
– 1 medium yellow onion, chopped
– 2 cloves of garlic, minced
– 4 cups of vegetable broth
– A splash of heavy cream
– A pinch of salt and black pepper
– A couple of fresh sage leaves
Instructions
1. Preheat your oven to 400°F.
2. Toss the cubed butternut squash with 1 tablespoon of olive oil on a baking sheet.
3. Roast the squash for 25–30 minutes until it’s tender and lightly browned at the edges. (Tip: Roasting deepens the squash’s sweetness—don’t skip this step!)
4. Heat the remaining 1 tablespoon of olive oil in a large pot over medium heat.
5. Sauté the chopped onion for 5–7 minutes until it’s translucent and fragrant.
6. Add the minced garlic and cook for 1 more minute, stirring constantly to avoid burning.
7. Pour in the vegetable broth and bring it to a gentle boil.
8. Stir in the roasted squash and simmer for 10 minutes to let the flavors meld.
9. Carefully transfer the mixture to a blender and blend on high until completely smooth. (Tip: Hold the lid firmly with a towel to prevent hot splatters.)
10. Return the pureed soup to the pot and stir in the heavy cream.
11. Season with salt and black pepper, then toss in the sage leaves and let it simmer for another 5 minutes. (Tip: Fresh sage adds an earthy note—crumble it lightly for more flavor.)
12. Remove the pot from the heat and discard the sage leaves. Every spoonful of this soup is luxuriously smooth with a hint of sweetness from the squash, balanced by the savory broth. I love drizzling extra cream on top and serving it with crusty bread for dipping—it’s comfort in a bowl!
Boiled Chicken with White Rice
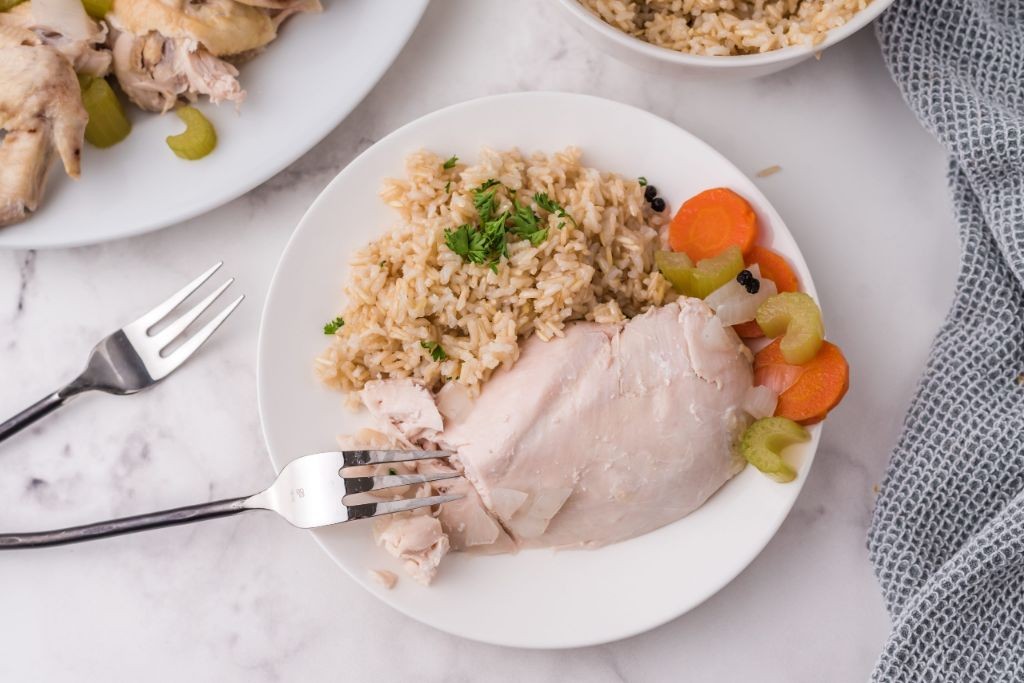
Boring chicken dinners? Not anymore! I’ve been making this simple boiled chicken with rice for years—it’s my go-to comfort meal after long days when I want something nourishing without fuss. My grandma taught me this method, and it never fails to hit the spot.
Ingredients
– A couple of boneless, skinless chicken breasts (about 1 pound total)
– 1 cup of long-grain white rice
– A splash of olive oil (about 1 tablespoon)
– A pinch of salt (about 1 teaspoon)
– 4 cups of water
– A handful of fresh parsley, chopped
Instructions
1. Rinse 1 cup of long-grain white rice under cold water in a fine-mesh strainer until the water runs clear to remove excess starch.
2. Place the rinsed rice in a medium saucepan with 2 cups of water and a pinch of salt.
3. Bring the rice to a boil over high heat, then reduce the heat to low, cover the pan, and simmer for 18 minutes until all the water is absorbed.
4. While the rice cooks, pat dry a couple of boneless, skinless chicken breasts with paper towels to ensure even cooking.
5. Heat a splash of olive oil in a large pot over medium-high heat until it shimmers.
6. Add the chicken breasts to the pot and sear for 3–4 minutes per side until golden brown.
7. Pour 2 cups of water into the pot with the chicken, ensuring it’s mostly submerged.
8. Bring the water to a boil, then reduce the heat to medium-low, cover the pot, and simmer for 15 minutes until the chicken reaches an internal temperature of 165°F on a meat thermometer.
9. Remove the chicken from the pot and let it rest on a cutting board for 5 minutes before slicing or shredding it.
10. Fluff the cooked rice with a fork and stir in a handful of chopped fresh parsley.
Never underestimate how tender this chicken turns out—it practically melts alongside the fluffy, parsley-flecked rice. I love serving it with a squeeze of lemon or over a bed of greens for a light twist.
Peeled and Steamed Applesauce
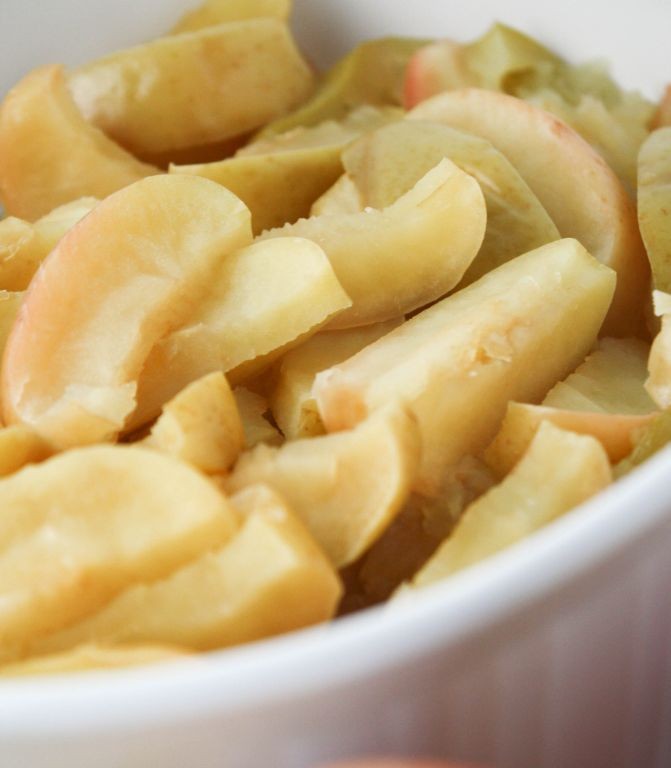
Perfectly simple and wonderfully comforting, this peeled and steamed applesauce reminds me of those crisp autumn afternoons when my grandma would fill the entire house with the sweet scent of simmering apples—it’s the kind of recipe that feels like a warm hug, and I love how effortlessly it comes together on even the busiest of days.
Ingredients
- About 4 large apples, peeled and cored
- A generous splash of water (around 1/4 cup)
- A couple of teaspoons of fresh lemon juice
- A pinch or two of ground cinnamon
Instructions
- Peel all 4 large apples completely, removing any tough skin.
- Core each apple carefully, discarding the seeds and stems.
- Chop the peeled and cored apples into roughly 1-inch chunks for even steaming.
- Place the apple chunks into a steamer basket set over a pot with about 1/4 cup of water—just enough to create steam without touching the apples.
- Cover the pot tightly with a lid to trap the steam.
- Steam the apples over medium heat for 15–20 minutes, or until they are fork-tender and easily mashable.
- Transfer the steamed apples to a mixing bowl, letting any excess water drip off.
- Add a couple of teaspoons of fresh lemon juice to the apples to brighten the flavor and prevent browning.
- Sprinkle in a pinch or two of ground cinnamon for a warm, aromatic touch.
- Mash the apples with a potato masher or fork until you reach your desired consistency—smooth for a silky sauce or slightly chunky for more texture.
You’ll love the velvety, soft texture and the naturally sweet flavor with just a hint of cinnamon warmth. Try serving it warm over oatmeal, swirling it into yogurt, or even as a simple side with roasted pork for a cozy, homemade touch.
Gentle Tofu and Rice Congee

Dreading the chilly November mornings lately, I found myself craving something warm and comforting that wouldn’t weigh me down. This gentle tofu and rice congee has become my go-to breakfast, reminding me of the simple rice porridge my grandmother used to make when I was feeling under the weather. It’s the kind of meal that feels like a warm hug from the inside out.
Ingredients
– 1 cup of jasmine rice
– 8 cups of vegetable broth
– A 14-ounce block of firm tofu
– A couple of green onions
– A big splash of soy sauce (about 2 tablespoons)
– A drizzle of sesame oil (around 1 tablespoon)
– A pinch of white pepper
Instructions
1. Rinse 1 cup of jasmine rice under cold running water until the water runs clear, which helps remove excess starch for a smoother congee.
2. Combine the rinsed rice and 8 cups of vegetable broth in a large pot over high heat.
3. Bring the mixture to a rolling boil, then immediately reduce the heat to low and cover the pot with a lid.
4. Simmer the congee for 1 hour, stirring every 15 minutes to prevent sticking to the bottom of the pot.
5. While the congee simmers, press the 14-ounce block of firm tofu between paper towels with a heavy plate on top for 20 minutes to remove excess water.
6. Cut the pressed tofu into ½-inch cubes after pressing is complete.
7. Thinly slice a couple of green onions, separating the white parts from the green parts.
8. After the congee has cooked for 1 hour, stir in the cubed tofu and white parts of the green onions.
9. Continue cooking for another 15 minutes until the rice grains have completely broken down and the congee has thickened to a porridge-like consistency.
10. Stir in a big splash of soy sauce (about 2 tablespoons), a drizzle of sesame oil (around 1 tablespoon), and a pinch of white pepper.
11. Remove the pot from heat and let it rest for 5 minutes before serving.
A silky, comforting bowl of this congee delivers the perfect balance of soft rice and tender tofu cubes that practically melt in your mouth. The subtle savory notes from the broth and soy sauce make each spoonful deeply satisfying, while the green onions add just the right fresh crunch. I love topping mine with an extra drizzle of chili oil or serving it alongside some quick-pickled vegetables for added texture and brightness.
Steamed Cod with Mashed Sweet Potatoes
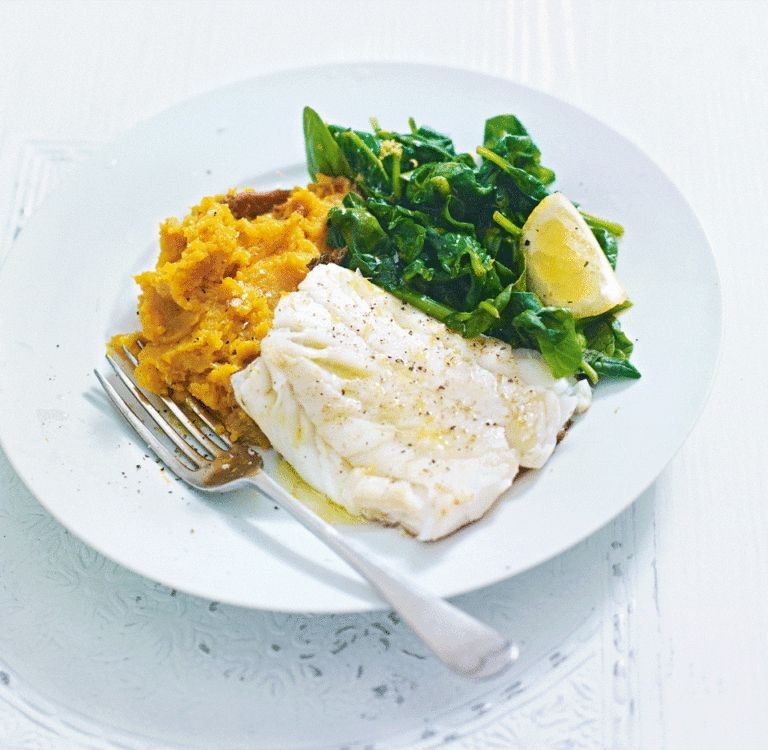
Just last Tuesday, I found myself staring at some beautiful cod fillets at the market and knew exactly what my comfort-food craving needed—something light yet satisfying. This steamed cod with mashed sweet potatoes has become my go-to weeknight dinner that feels fancy without the fuss. Honestly, it’s the kind of meal that makes you forget you’re eating healthy because every bite is just so darn good.
Ingredients
– 2 cod fillets (about 6 ounces each)
– 2 medium sweet potatoes
– a splash of olive oil (about 1 tablespoon)
– a couple of garlic cloves, minced
– a pinch of salt
– a squeeze of fresh lemon juice (about 1 tablespoon)
– a handful of fresh parsley, chopped
– 1/4 cup of water for steaming
Instructions
1. Peel the sweet potatoes and chop them into 1-inch cubes.
2. Place the sweet potato cubes in a pot and cover them with water.
3. Bring the water to a boil over high heat, then reduce to a simmer and cook for 15 minutes, or until the sweet potatoes are fork-tender.
4. While the sweet potatoes cook, pat the cod fillets dry with paper towels to remove excess moisture—this helps them steam evenly without becoming watery.
5. Season both sides of the cod fillets with a pinch of salt.
6. Pour 1/4 cup of water into a large skillet and bring it to a gentle simmer over medium heat.
7. Place the cod fillets in a single layer in the skillet, cover with a lid, and steam for 6–8 minutes, until the flesh is opaque and flakes easily with a fork.
8. Drain the cooked sweet potatoes and return them to the pot.
9. Add a splash of olive oil, the minced garlic, and a squeeze of fresh lemon juice to the sweet potatoes.
10. Mash the sweet potatoes with a potato masher until smooth, but don’t overmix—keeping a bit of texture makes them more interesting.
11. Stir in the chopped parsley just before serving to keep its bright flavor intact.
12. Transfer the mashed sweet potatoes to plates and top with the steamed cod fillets.
Here’s why I love this combo: the flaky, mild cod pairs perfectly with the subtly sweet mash, and a drizzle of extra lemon juice right at the end brightens everything up. Try serving it with a simple arugula salad on the side for a complete, colorful plate that’s as pretty as it is delicious.
Avocado and Banana Smoothie
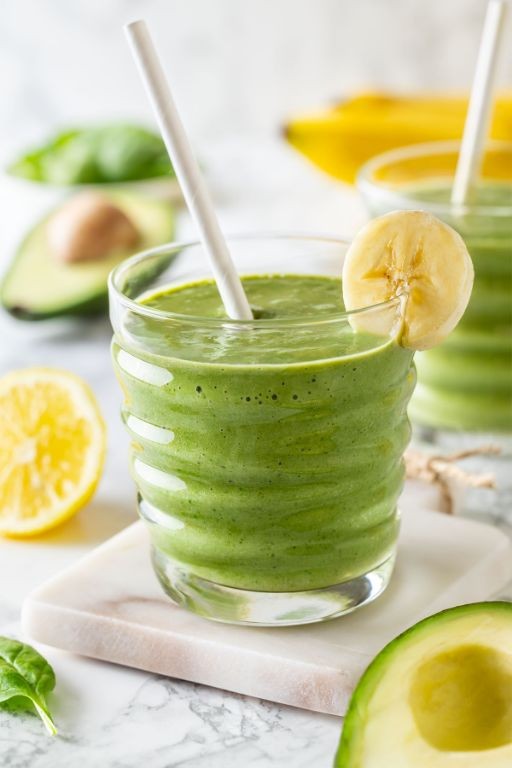
Remember those mornings when you’re rushing out the door but still want something nutritious? I created this avocado and banana smoothie during one of those hectic weeks when my blender became my best kitchen friend. It’s become my go-to breakfast that actually keeps me full until lunchtime.
Ingredients
– 1 ripe avocado, pitted and scooped
– 2 medium bananas, peeled and broken into chunks
– 1 cup of milk (I usually use whole milk)
– A big handful of ice cubes
– A generous drizzle of honey
– A squeeze of fresh lime juice
Instructions
1. Cut your ripe avocado in half, remove the pit, and scoop the green flesh into your blender.
2. Peel both bananas, break them into 2-inch chunks, and add them to the blender.
3. Pour in exactly 1 cup of milk – I find this creates the perfect creamy consistency without being too thick.
4. Add a big handful of ice cubes (about 1 cup’s worth) to make it chilled and refreshing.
5. Drizzle in about 2 tablespoons of honey for natural sweetness.
6. Squeeze the juice from half a lime directly into the blender to balance the richness.
7. Secure the blender lid tightly and blend on high speed for 45-60 seconds until completely smooth and frothy.
8. Check the consistency by stopping the blender and dipping a spoon – if it’s too thick, add another splash of milk and blend for 15 more seconds.
9. Pour immediately into your favorite glass while it’s still cold and frothy. Creamy and surprisingly filling, this smoothie has the perfect balance of rich avocado and sweet banana with just enough tang from the lime. I love serving it in a chilled mason jar with a fun paper straw for that coffee-shop vibe at home.
Boiled Egg Whites with Plain Toast

Very occasionally, I find myself craving the absolute simplest breakfast possible—something that feels clean, light, and requires zero fuss. That’s when I turn to this boiled egg white and plain toast combo, a meal I first started making during a busy freelance week when even scrambling eggs felt like too much effort. It’s my go-to for a no-frills, protein-packed start that never disappoints.
Ingredients
– A couple of large eggs
– A slice or two of your favorite plain bread
– A tiny pinch of salt
– A quick drizzle of olive oil
Instructions
1. Fill a small saucepan about halfway with water and place it on the stove over high heat.
2. Once the water reaches a rolling boil, carefully lower the eggs into the water using a spoon to avoid cracking them.
3. Set a timer for 10 minutes to achieve firm, fully cooked egg whites while keeping the yolks set but not chalky.
4. While the eggs boil, pop your bread slices into the toaster and set it to a medium setting for a golden-brown finish.
5. When the timer goes off, immediately transfer the boiled eggs to a bowl of ice water using a slotted spoon—this stops the cooking process and makes peeling much easier.
6. Let the eggs sit in the ice bath for at least 5 minutes until completely cool to the touch.
7. Gently tap each egg on the counter and roll it lightly to crack the shell, then peel under cool running water to help remove the shell cleanly.
8. Slice the peeled eggs in half and carefully scoop out the yolks, setting them aside for another use if desired.
9. Arrange the warm, toasted bread on a plate and drizzle it lightly with olive oil.
10. Place the boiled egg white halves on top of the toast and finish with a tiny pinch of salt.
You’ll love the contrast between the soft, slightly springy egg whites and the crisp, olive oil-kissed toast. For a little extra flair, I sometimes add a sprinkle of everything bagel seasoning or serve it with a side of simple arugula salad.
Skinless Roasted Turkey with White Pasta

Venturing into Thanksgiving prep this year, I decided to skip the traditional skin-on turkey after last year’s greasy disaster. This skinless roasted turkey with white pasta has become my new favorite holiday centerpiece—it’s surprisingly moist and lets the herbs really shine through without all that fatty skin getting in the way.
Ingredients
– One 12-pound turkey (skin removed, because who needs that mess?)- A good glug of olive oil, about ¼ cup- A couple of minced garlic cloves- A generous sprinkle of dried thyme and rosemary- A big pinch of salt and several cracks of black pepper- One pound of fettuccine pasta- Two cups of heavy cream- A handful of grated Parmesan cheese- A splash of white wine (about ½ cup)- One chopped onion
Instructions
1. Preheat your oven to 325°F.2. Pat the skinless turkey completely dry with paper towels—this helps the seasoning stick better and creates a nicer crust.3. Rub the entire turkey with olive oil, making sure to cover every surface.4. Mix the minced garlic, thyme, rosemary, salt, and pepper in a small bowl.5. Massage the herb mixture evenly over the turkey, including inside the cavity.6. Place the turkey breast-side up in a roasting pan.7. Roast the turkey for exactly 3 hours, or until a meat thermometer inserted into the thickest part of the thigh reads 165°F.8. While the turkey rests for 30 minutes (don’t skip this—it keeps the juices inside!), bring a large pot of salted water to a rolling boil.9. Cook the fettuccine according to package directions until al dente, about 10 minutes.10. Drain the pasta, reserving ½ cup of the starchy pasta water.11. In the same pot, sauté the chopped onion in 2 tablespoons of olive oil over medium heat until translucent, about 5 minutes.12. Pour in the white wine and let it reduce by half, scraping up any browned bits from the bottom.13. Add the heavy cream and bring to a gentle simmer.14. Stir in the Parmesan cheese until the sauce is smooth and slightly thickened.15. Toss the cooked fettuccine with the cream sauce, adding reserved pasta water if needed to reach your desired consistency.Finally, the tender, herb-infused turkey slices beautifully over the creamy pasta, creating this incredible contrast between the savory meat and rich sauce. I love serving this family-style right in the roasting pan—it makes for such a dramatic presentation that always gets oohs and ahhs from my guests.
Steamed Zucchini and Yellow Squash
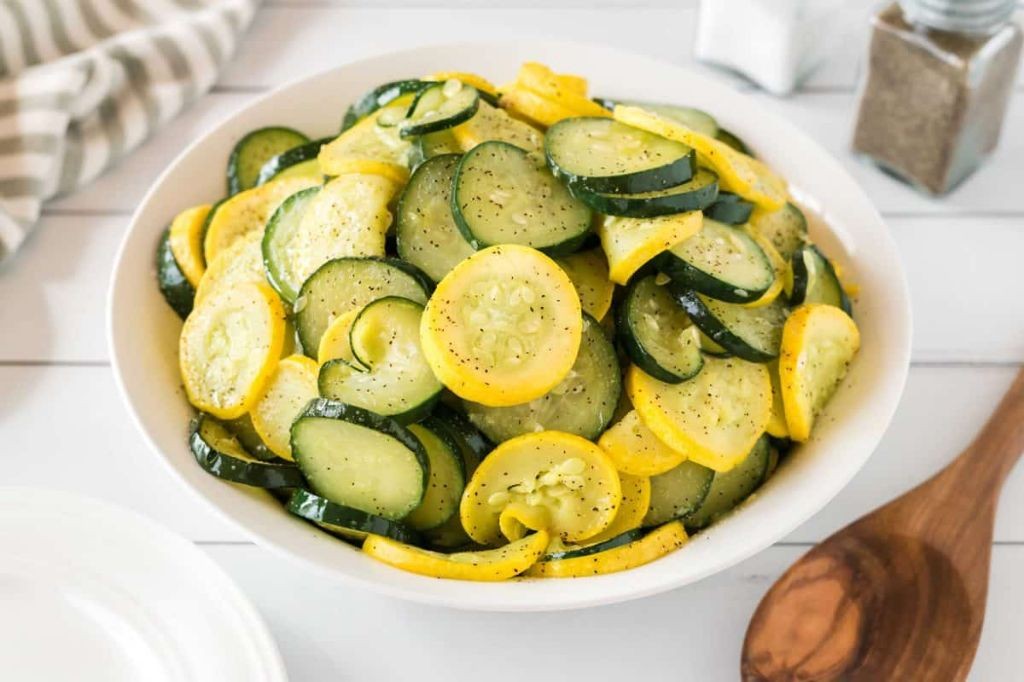
Zucchini and yellow squash have become my go-to summer vegetables, especially when I need something quick, healthy, and delicious on busy weeknights. I love how steaming them brings out their natural sweetness without any fuss—it’s the method I turn to when I want to keep things simple but flavorful. Honestly, this dish reminds me of my grandma’s garden, where she’d pick these veggies fresh and steam them right before dinner.
Ingredients
– A couple of medium zucchinis
– A couple of medium yellow squashes
– A splash of olive oil (about 1 tablespoon)
– A pinch of kosher salt (about 1/4 teaspoon)
– A pinch of black pepper (about 1/8 teaspoon)
– A squeeze of fresh lemon juice (about 1 tablespoon)
Instructions
1. Wash the zucchinis and yellow squashes thoroughly under cool running water.
2. Trim off both ends of each zucchini and yellow squash using a sharp knife.
3. Cut the zucchinis and yellow squashes into 1/4-inch thick rounds on a cutting board.
4. Pour 1 inch of water into a medium saucepan and place a steamer basket inside.
5. Bring the water to a boil over high heat, which should take about 3-4 minutes.
6. Arrange the zucchini and squash rounds in a single layer in the steamer basket.
7. Cover the saucepan with a tight-fitting lid and reduce heat to medium.
8. Steam the vegetables for exactly 5 minutes until they turn bright in color and are tender when pierced with a fork.
9. Carefully remove the steamer basket from the saucepan using oven mitts.
10. Transfer the steamed vegetables to a serving bowl using tongs.
11. Drizzle the olive oil over the warm vegetables while tossing gently.
12. Sprinkle the kosher salt and black pepper evenly over the mixture.
13. Squeeze the fresh lemon juice directly over the vegetables just before serving.
Vibrant and tender, these steamed vegetables have a lovely delicate texture that holds just enough bite to be satisfying. The lemon juice brightens everything up beautifully, making this simple dish feel special enough for company. I sometimes sprinkle grated Parmesan over the top or serve it alongside grilled chicken for a complete meal that never fails to please.
Lactose-Free Yogurt with Honey

Just the other day, I was craving something creamy but my stomach wasn’t having any of that dairy drama—enter this magical lactose-free yogurt bowl that’s become my go-to breakfast or afternoon pick-me-up. It’s so simple yet satisfying, and the best part is you probably have everything you need right in your kitchen already.
Ingredients
– A generous cup of plain lactose-free yogurt (I love the texture of Greek-style)
– A couple of tablespoons of raw honey
– A handful of your favorite granola
– A splash of vanilla extract
– A pinch of sea salt
Instructions
1. Scoop 1 cup of plain lactose-free yogurt into your favorite serving bowl.
2. Drizzle 2 tablespoons of raw honey over the yogurt in a circular pattern.
3. Sprinkle a handful of granola evenly across the surface.
4. Add 1 teaspoon of vanilla extract directly onto the yogurt.
5. Finish with a tiny pinch of sea salt to balance the sweetness.
6. Gently fold all ingredients together with a spoon until just combined, being careful not to overmix and lose the granola’s crunch.
7. Let the mixture sit for 2 minutes to allow the honey to incorporate fully.
Creamy, tangy yogurt meets that floral honey sweetness in the most delightful way—the granola adds this perfect crunch that makes each spoonful interesting. I love serving this in mason jars for a portable breakfast, or sometimes I’ll layer it with fresh berries for a pretty parfait effect that always impresses guests.
Pureed Pumpkin and Coconut Milk Soup

As the crisp autumn air settles in, I find myself craving the comforting warmth of seasonal soups, and this pureed pumpkin and coconut milk version has become my absolute favorite. There’s something magical about how the earthy pumpkin mingles with the creamy coconut milk—it’s like a cozy hug in a bowl that I make at least once a week during fall.
Ingredients
– A couple tablespoons of olive oil
– One medium yellow onion, chopped
– Two cloves of garlic, minced
– About 4 cups of pumpkin puree (I use the canned kind to save time)
– One 13.5-ounce can of full-fat coconut milk
– Three cups of vegetable broth
– A generous pinch of salt
– A few cracks of black pepper
– A splash of maple syrup
– A sprinkle of pumpkin pie spice
Instructions
1. Heat 2 tablespoons of olive oil in a large pot over medium heat until it shimmers.
2. Add the chopped onion and cook for 5-7 minutes, stirring occasionally, until the onion turns translucent and soft.
3. Stir in the minced garlic and cook for exactly 1 minute until fragrant but not browned.
4. Tip: Don’t let the garlic burn—it becomes bitter if cooked too long!
5. Pour in the pumpkin puree and stir constantly for 2 minutes to deepen its flavor.
6. Add the entire can of coconut milk, 3 cups of vegetable broth, salt, pepper, maple syrup, and pumpkin pie spice.
7. Bring the mixture to a gentle boil, then immediately reduce the heat to low.
8. Simmer uncovered for 20 minutes, stirring every 5 minutes to prevent sticking.
9. Carefully transfer the hot soup in batches to a blender, filling it only halfway each time.
10. Tip: Always remove the center cap from the blender lid and cover with a towel to allow steam to escape safely!
11. Blend each batch on high speed for 45-60 seconds until completely smooth and creamy.
12. Return all blended soup to the pot and heat through for 3-4 minutes until steaming hot.
13. Tip: For extra silkiness, strain the soup through a fine-mesh sieve—it removes any remaining fibrous bits.
14. Ladle the soup into bowls and serve immediately.
Unbelievably silky with a perfect balance between the earthy pumpkin and rich coconut cream, this soup feels luxurious yet comforting. I love serving it with toasted pumpkin seeds on top for crunch, or sometimes swirling in a dollop of Greek yogurt for tangy contrast—it transforms beautifully with different garnishes.
Soft-Cooked Green Beans with Olive Oil
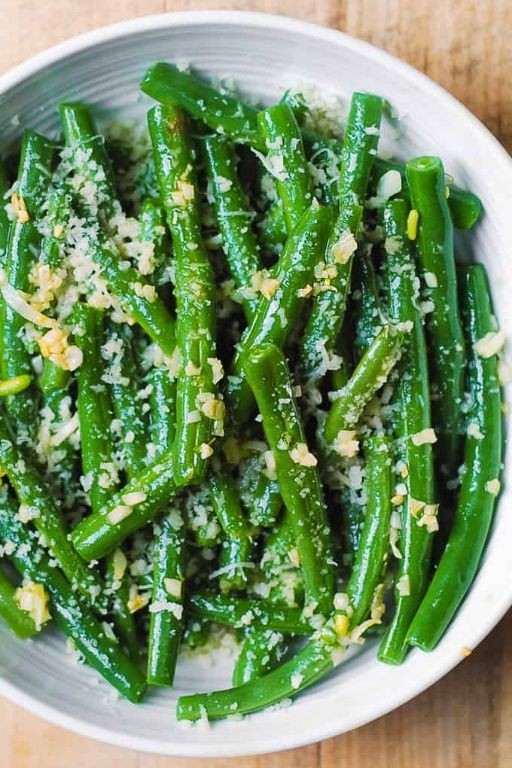
Zesty and vibrant, these soft-cooked green beans have become my go-to side dish ever since I discovered how a simple technique can transform them into something truly special. I first made these for a last-minute potluck when my garden was overflowing with beans, and now they’re requested at every family gathering.
Ingredients
- About a pound of fresh green beans, ends trimmed
- A good glug of extra virgin olive oil (roughly ¼ cup)
- A couple of garlic cloves, thinly sliced
- A generous pinch of kosher salt
- A splash of water (around ¼ cup)
- A squeeze of fresh lemon juice from half a lemon
Instructions
- Heat 2 tablespoons of olive oil in a large skillet over medium heat for 1 minute until shimmering.
- Add the sliced garlic and cook for exactly 1 minute, stirring constantly, until fragrant but not browned.
- Tip in all the trimmed green beans and toss to coat them evenly in the oil.
- Sprinkle the kosher salt evenly over the beans.
- Pour in ¼ cup of water and immediately cover the skillet with a tight-fitting lid.
- Reduce heat to medium-low and steam the beans for 8 minutes without lifting the lid. (Tip: This steaming method keeps them tender without getting mushy.)
- Remove the lid and increase heat to medium-high to evaporate any remaining water, about 2 minutes.
- Drizzle the remaining 2 tablespoons of olive oil over the beans and toss to combine.
- Cook uncovered for another 3 minutes, stirring occasionally, until the beans develop slight golden spots.
- Remove from heat and squeeze the lemon juice directly over the beans. (Tip: Adding lemon off the heat preserves its bright flavor.)
- Toss one final time to distribute the lemon juice evenly. (Tip: For extra flavor, let them sit for 5 minutes before serving to allow the oil and lemon to meld.)
Marvelously tender yet still holding their shape, these beans soak up the fruity olive oil and garlic essence beautifully. The lemon adds just enough brightness to cut through the richness, making them perfect alongside grilled chicken or tossed with pasta for a quick vegetarian meal. I love how the beans become almost buttery without any dairy—they’re comfort food that feels both rustic and elegant.
Baked White Fish with Steamed Parsnips
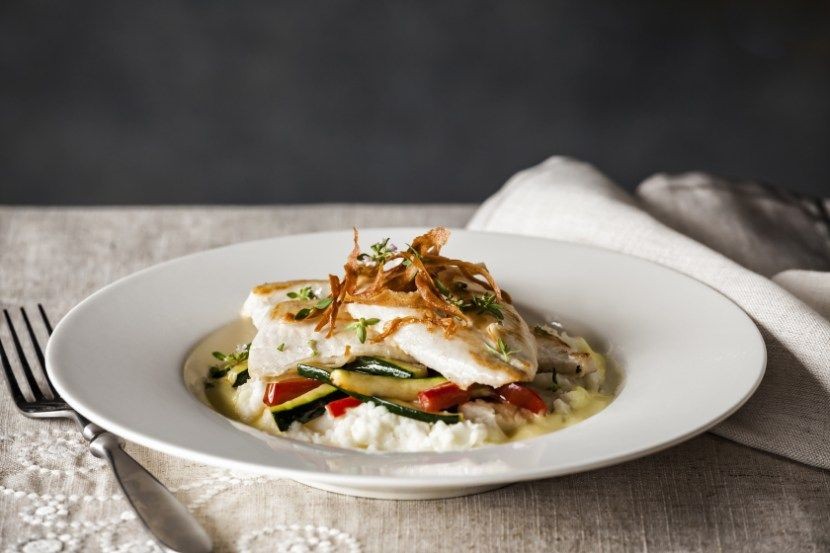
Oh my goodness, you guys, I can’t tell you how many times this baked white fish with steamed parsnips has saved my weeknight dinner routine. On busy evenings when I’m craving something healthy but don’t want to spend hours in the kitchen, this simple combo comes together in under 30 minutes and always hits the spot.
Ingredients
– 2 nice white fish fillets (about 6 ounces each)
– A couple of medium parsnips, peeled and chopped
– A good glug of olive oil (about 2 tablespoons)
– A generous squeeze of fresh lemon juice (about 1 tablespoon)
– A couple of garlic cloves, minced
– A pinch of salt and a few cracks of black pepper
– A sprinkle of fresh parsley, chopped
Instructions
1. Preheat your oven to 400°F and line a baking sheet with parchment paper.
2. Place the fish fillets on the prepared baking sheet and drizzle them with half of the olive oil.
3. Squeeze the fresh lemon juice evenly over both fillets.
4. Sprinkle the minced garlic, salt, and black pepper over the fish.
5. Bake the fish for 12-15 minutes until the flesh flakes easily with a fork and appears opaque throughout.
6. While the fish bakes, place the chopped parsnips in a steamer basket over boiling water.
7. Steam the parsnips for 8-10 minutes until they’re tender when pierced with a fork but still hold their shape.
8. Transfer the steamed parsnips to a bowl and toss them with the remaining olive oil.
9. Remove the baked fish from the oven and let it rest for 2 minutes before serving.
10. Arrange the fish and parsnips on plates and garnish with the chopped fresh parsley.
My favorite thing about this dish is how the flaky, delicate fish contrasts with the sweet, earthy parsnips – it’s a texture combination that never gets old. Sometimes I’ll serve it over a bed of quinoa or with a simple arugula salad for a complete meal that feels fancy but requires minimal effort.
Peeled and Steamed Pear Compote

Kind of like a warm hug in a bowl, this pear compote has been my go-to comfort dessert ever since my neighbor brought over a bushel of perfectly ripe Bartlett pears last fall. I love how the simple steaming method really lets the fruit’s natural sweetness shine through without needing much else.
Ingredients
– 4 medium pears (I prefer Bartlett when they’re in season)
– A good squeeze of fresh lemon juice (about 1 tablespoon)
– A couple tablespoons of honey
– A splash of water (about ¼ cup)
– A pinch of ground cinnamon
– A tiny sprinkle of salt
Instructions
1. Wash all 4 pears thoroughly under cool running water to remove any dirt or residue.
2. Use a vegetable peeler to carefully remove the skin from each pear, working from top to bottom.
3. Cut each peeled pear in half lengthwise using a sharp knife.
4. Use a small spoon or melon baller to scoop out the core and seeds from each pear half.
5. Squeeze fresh lemon juice evenly over all the pear halves to prevent browning.
6. Place the prepared pear halves in a single layer in a steamer basket.
7. Pour about ¼ cup of water into the bottom of your steaming pot.
8. Set the steamer basket over the water and cover the pot with a tight-fitting lid.
9. Turn the heat to medium-high and steam the pears for 15-18 minutes until they’re fork-tender but not mushy.
10. Carefully remove the steamed pears from the steamer and transfer them to a serving bowl.
11. Drizzle the honey evenly over the warm pears.
12. Sprinkle the cinnamon and salt over the pears.
13. Gently toss everything together until the pears are evenly coated with the honey and spices.
Really, the texture becomes wonderfully soft and almost melt-in-your-mouth while still holding its shape beautifully. I love serving this warm over vanilla ice cream for that classic hot-and-cold contrast, or spooning it over morning oatmeal for a naturally sweet start to the day.
Plain Rice Pudding with Cinnamon
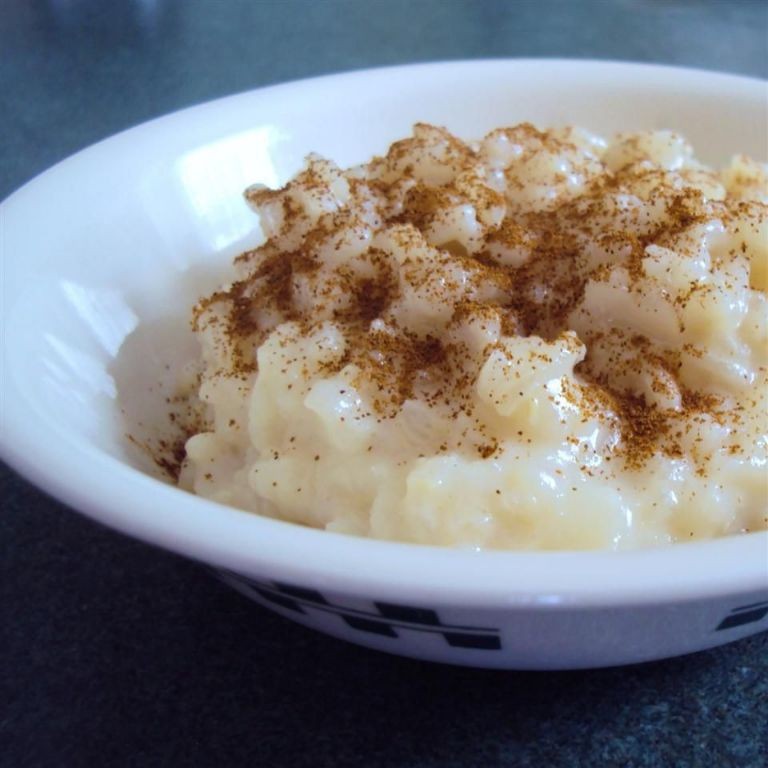
You know those chilly evenings when you just want something warm and comforting? Yesterday was exactly like that for me, so I whipped up this simple rice pudding that reminded me of my grandma’s kitchen. There’s something magical about how just a few basic ingredients can create such cozy nostalgia.
Ingredients
– 1 cup of white rice (the short-grain kind works best for that creamy texture)
– 4 cups of whole milk (don’t skimp here – it makes all the difference)
– ½ cup of white sugar
– A good pinch of salt
– 1 teaspoon of vanilla extract
– A generous sprinkle of ground cinnamon
Instructions
1. Rinse 1 cup of white rice under cold running water until the water runs clear, which helps remove excess starch.
2. Combine the rinsed rice, 4 cups of whole milk, ½ cup of white sugar, and a pinch of salt in a heavy-bottomed saucepan.
3. Bring the mixture to a gentle boil over medium-high heat, stirring occasionally to prevent sticking.
4. Once boiling, immediately reduce the heat to low and cover the saucepan with a tight-fitting lid.
5. Simmer for 45 minutes, stirring every 10 minutes to prevent the rice from clumping together.
6. After 45 minutes, remove the lid and check if the rice is tender and most of the milk has been absorbed.
7. Stir in 1 teaspoon of vanilla extract until fully incorporated.
8. Remove the saucepan from heat and let the pudding rest for 10 minutes to thicken further.
9. Transfer the rice pudding to serving bowls while still warm.
10. Sprinkle ground cinnamon generously over the top of each serving.
During those 45 minutes of simmering, your kitchen will fill with the most incredible warm, milky aroma. Don’t rush the resting time – it really helps the pudding achieve that perfect creamy consistency. Deeply comforting and wonderfully simple, this rice pudding develops an even richer flavor if you let it cool completely. I love serving it with a drizzle of honey or some fresh berries for a little extra sweetness.
Summary
Yes, these 18 soothing recipes offer delicious comfort while supporting your digestive health journey. We hope these gentle dishes bring you relief and nourishment. Try the recipes that appeal to you most, and let us know your favorites in the comments below! Don’t forget to share this helpful collection with others on Pinterest.