Eager to add some sweet magic to your St. Patrick’s Day festivities? You’re in luck! We’ve gathered 20 decadent dessert recipes that blend traditional Irish flavors with festive green touches—perfect for home cooks looking to impress. From rich chocolate Guinness cakes to creamy minty treats, these desserts promise to make your celebration unforgettable. Dive in and find your new favorite holiday indulgence!
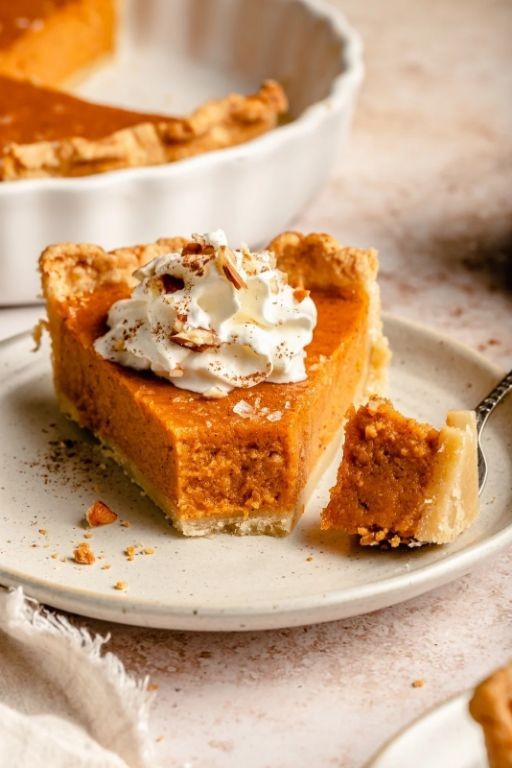
Irish Cream Cheesecake with Chocolate Ganache

Zesty yet sophisticated, this Irish cream cheesecake delivers pure indulgence. Whip up this showstopper dessert that balances creamy richness with deep chocolate notes. Your holiday table just found its new centerpiece.
Ingredients
- 2 cups graham cracker crumbs
- 6 tablespoons unsalted European-style butter, melted
- 1/4 cup granulated cane sugar
- 32 ounces full-fat cream cheese, room temperature
- 1 1/4 cups superfine sugar
- 4 large pasture-raised eggs, lightly beaten
- 1 cup premium Irish cream liqueur
- 1 tablespoon pure vanilla extract
- 1 cup heavy whipping cream
- 8 ounces semisweet chocolate couverture, finely chopped
- 1/4 cup unsalted European-style butter, cubed
Instructions
- Preheat your oven to 325°F and position the rack in the lower third.
- Combine graham cracker crumbs, melted butter, and granulated sugar in a medium bowl until the mixture resembles wet sand.
- Press the crust mixture firmly into the bottom of a 9-inch springform pan, using the flat bottom of a measuring cup to create an even layer.
- Bake the crust for 10 minutes at 325°F until lightly golden and fragrant.
- Cool the crust completely on a wire rack while preparing the filling.
- Using a stand mixer with the paddle attachment, beat the room-temperature cream cheese on medium speed for 3 minutes until completely smooth and free of lumps.
- Gradually add superfine sugar while mixing on low speed to prevent sugar dust.
- Add the lightly beaten eggs one at a time, mixing just until incorporated after each addition.
- Stream in Irish cream liqueur and vanilla extract with the mixer running on low.
- Scrape down the bowl thoroughly with a flexible spatula to ensure no unmixed ingredients remain at the bottom.
- Pour the filling over the cooled crust and smooth the surface with an offset spatula.
- Place the springform pan in a larger roasting pan and create a water bath by pouring hot water into the outer pan until it reaches halfway up the sides of the springform.
- Bake at 325°F for 60-70 minutes until the edges are set but the center still jiggles slightly when gently shaken.
- Turn off the oven and prop the door open with a wooden spoon, allowing the cheesecake to cool gradually in the oven for 1 hour.
- Remove from the oven and water bath, then cool completely to room temperature on a wire rack.
- Refrigerate the cheesecake for at least 6 hours, preferably overnight, to fully set.
- For the ganache, heat heavy cream in a small saucepan until it just begins to simmer around the edges.
- Pour the hot cream over the finely chopped chocolate in a heatproof bowl and let stand for 2 minutes to melt the chocolate.
- Whisk the chocolate and cream together starting from the center and moving outward until smooth and glossy.
- Whisk in the cubed butter until fully incorporated and the ganache reaches a pourable consistency.
- Pour the warm ganache over the chilled cheesecake, tilting the pan to create an even coating.
- Return the cheesecake to the refrigerator for 30 minutes to set the ganache.
This cheesecake achieves a velvety smooth texture that melts on the tongue while the chocolate ganache provides a satisfying snap. The Irish cream flavor develops beautifully during chilling, creating sophisticated layers of coffee and cream notes. Try serving thin slices with a dusting of cocoa powder and fresh raspberries for an elegant presentation that highlights the dessert’s complex flavor profile.
Shamrock Sugar Cookies with Mint Glaze
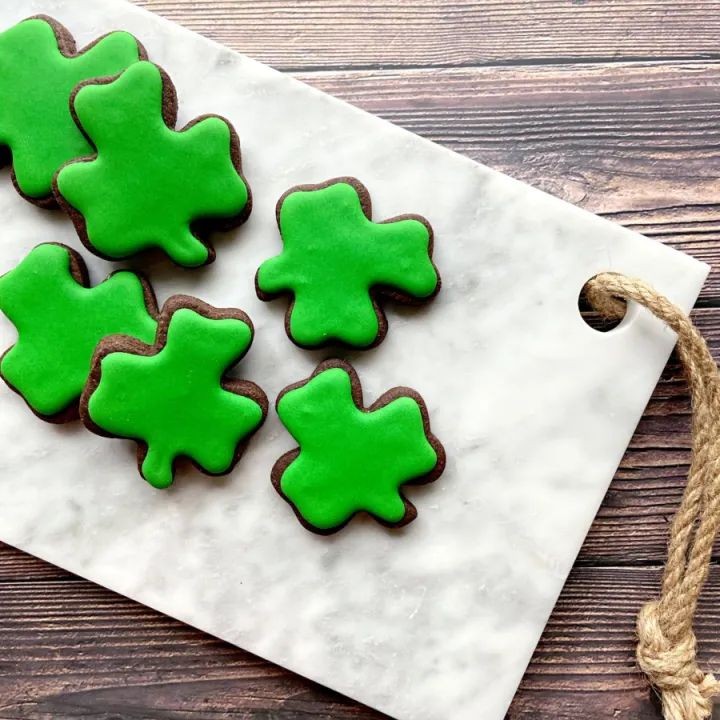
TikTok’s about to lose its mind over these shamrock sugar cookies with mint glaze. Transform basic ingredients into vibrant green masterpieces that’ll dominate your St. Patrick’s Day feed. Get ready for cookies so perfectly crisp yet tender they’ll break the internet.
Ingredients
– 2 ¾ cups all-purpose flour, sifted
– 1 cup European-style unsalted butter, softened to 68°F
– 1 ½ cups granulated sugar
– 2 pasture-raised eggs, lightly beaten
– 1 teaspoon pure vanilla extract
– 2 teaspoons baking powder
– ½ teaspoon fine sea salt
– Green gel food coloring
– 2 cups confectioners’ sugar, sifted
– 3 tablespoons whole milk
– ½ teaspoon pure peppermint extract
Instructions
1. Preheat your conventional oven to 350°F and line two baking sheets with parchment paper.
2. Cream the softened European-style unsalted butter and granulated sugar in a stand mixer fitted with the paddle attachment on medium-high speed for exactly 3 minutes until pale and fluffy.
3. Incorporate the lightly beaten pasture-raised eggs one at a time, mixing for 30 seconds after each addition until fully emulsified.
4. Add the pure vanilla extract and mix for 15 seconds to distribute evenly throughout the creamed mixture.
5. Whisk together the sifted all-purpose flour, baking powder, and fine sea salt in a separate bowl to ensure even leavening distribution.
6. Gradually add the dry ingredients to the wet mixture on low speed, mixing just until the dough comes together without overworking the gluten.
7. Add 8-10 drops of green gel food coloring and mix on medium speed for 45 seconds until the color is uniformly distributed.
8. Divide the dough into two equal portions, wrap each tightly in plastic wrap, and refrigerate for exactly 1 hour to firm up for clean cutting.
9. Roll out the chilled dough to ¼-inch thickness on a lightly floured surface using a French rolling pin.
10. Cut out shamrock shapes using a 3-inch cookie cutter, dipping the cutter in flour between each cut to prevent sticking.
11. Arrange the cut cookies 2 inches apart on the prepared baking sheets to allow for proper air circulation during baking.
12. Bake for 10-12 minutes until the edges are lightly golden but the centers remain pale.
13. Transfer the cookies to a wire cooling rack and let cool completely for 30 minutes before glazing.
14. Whisk together the sifted confectioners’ sugar, whole milk, and pure peppermint extract in a medium bowl until smooth and glossy.
15. Dip the top of each cooled cookie into the mint glaze, allowing excess to drip off before returning to the rack.
16. Let the glaze set for 45 minutes at room temperature until firm to the touch.
Keep these shamrock delights stored in an airtight container—their crisp edges give way to a surprisingly tender crumb that melts on the tongue. The vibrant green cookies deliver a buttery sweetness perfectly balanced by the refreshing peppermint glaze. Serve them stacked high on a vintage cake stand or crumbled over vanilla bean ice cream for an unexpected textural twist.
Guinness Chocolate Cupcakes with Baileys Frosting
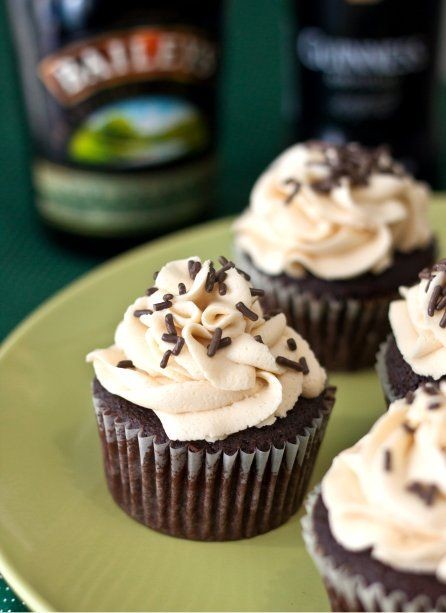
Every bite of these decadent cupcakes delivers rich chocolate depth amplified by dark stout and crowned with creamy Irish cream frosting. Elevate your baking game with this sophisticated twist on classic chocolate treats that balances bitter and sweet in perfect harmony.
Ingredients
– 1¾ cups all-purpose flour
– ¾ cup Dutch-process cocoa powder
– 1½ teaspoons baking soda
– ½ teaspoon fine sea salt
– ¾ cup European-style cultured unsalted butter, room temperature
– 1¼ cups granulated sugar
– 2 large pasture-raised eggs, lightly beaten
– 2 teaspoons pure vanilla extract
– 1 cup Guinness stout, room temperature
– ½ cup full-fat sour cream
– 8 ounces cream cheese, softened
– ½ cup European-style cultured unsalted butter, room temperature
– 3½ cups confectioners’ sugar, sifted
– ¼ cup Baileys Irish Cream
– 1 teaspoon pure vanilla extract
Instructions
1. Preheat your oven to 350°F and line a 12-cup muffin tin with parchment liners.
2. Whisk together 1¾ cups all-purpose flour, ¾ cup Dutch-process cocoa powder, 1½ teaspoons baking soda, and ½ teaspoon fine sea salt in a medium bowl until fully incorporated.
3. Cream ¾ cup room-temperature European-style cultured unsalted butter with 1¼ cups granulated sugar in a stand mixer fitted with the paddle attachment on medium-high speed for 3 minutes until pale and fluffy.
4. Gradually add 2 lightly beaten pasture-raised eggs to the butter mixture, mixing for 30 seconds after each addition until fully emulsified.
5. Mix in 2 teaspoons pure vanilla extract until just combined.
6. Alternate adding the dry ingredients with 1 cup room-temperature Guinness stout and ½ cup full-fat sour cream, beginning and ending with the dry ingredients, mixing on low speed until the batter is smooth and no streaks remain.
7. Divide the batter evenly among the 12 prepared muffin cups, filling each three-quarters full.
8. Bake for 18-20 minutes until a toothpick inserted into the center comes out with a few moist crumbs attached.
9. Transfer the cupcakes to a wire rack and cool completely for 1 hour before frosting.
10. Beat 8 ounces softened cream cheese with ½ cup room-temperature European-style cultured unsalted butter in a clean stand mixer bowl on medium speed for 2 minutes until completely smooth.
11. Gradually add 3½ cups sifted confectioners’ sugar on low speed until incorporated, then increase to medium-high and whip for 3 minutes until light and fluffy.
12. Mix in ¼ cup Baileys Irish Cream and 1 teaspoon pure vanilla extract until the frosting is uniform in texture.
13. Pipe or spread the Baileys frosting onto the completely cooled cupcakes using a pastry bag fitted with a star tip.
Masterful texture contrasts define these cupcakes—the tender, moist crumb gives way to the silky, boozy frosting that melts on the tongue. Serve them slightly chilled to let the Baileys flavor shine through, or garnish with chocolate shavings for an elegant presentation that elevates any gathering.
Lucky Charms Marshmallow Treats
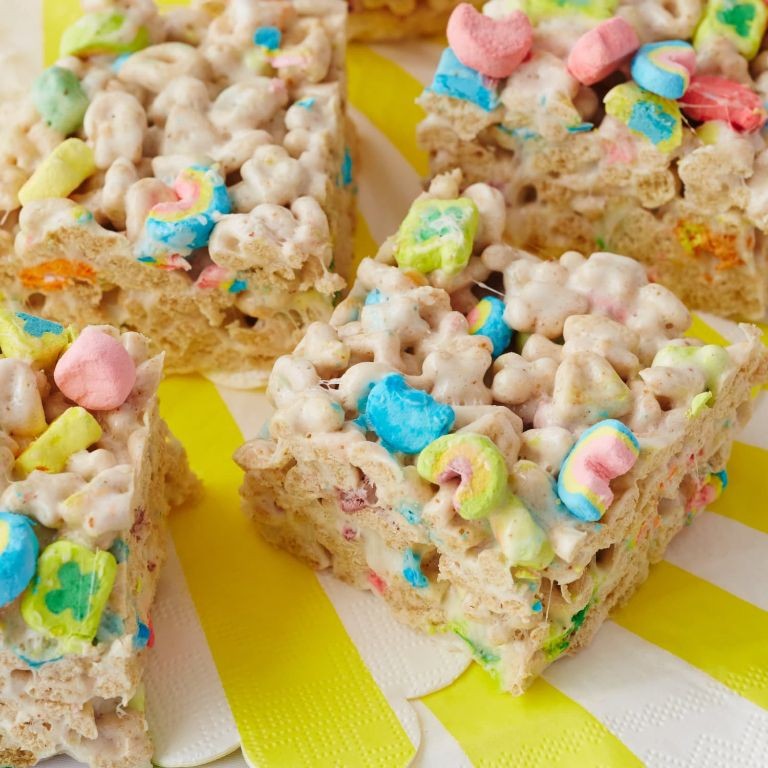
Y’all need this magical mashup in your life immediately. Transform nostalgic cereal into irresistible marshmallow bars that’ll disappear faster than your phone battery. Seriously addictive, dangerously easy.
Ingredients
– 6 cups Lucky Charms cereal
– 4 cups miniature marshmallows
– 3 tablespoons European-style unsalted butter
– 1/4 teaspoon fine sea salt
– Non-stick cooking spray
Instructions
1. Lightly coat a 9×13-inch baking dish with non-stick cooking spray using a pastry brush for even coverage.
2. Melt European-style unsalted butter in a large heavy-bottomed saucepan over medium-low heat, swirling constantly until fully liquefied.
3. Add miniature marshmallows and fine sea salt to the melted butter, stirring continuously with a heat-resistant spatula until completely smooth and glossy, about 4-5 minutes.
4. Immediately remove the saucepan from heat to prevent scorching.
5. Pour Lucky Charms cereal into the marshmallow mixture, folding gently with the spatula until every piece is evenly coated with marshmallow.
6. Transfer the coated cereal mixture to the prepared baking dish, spreading it into an even layer with lightly oiled hands to prevent sticking.
7. Press the mixture firmly into the pan using the bottom of a measuring cup to create compact, uniform bars.
8. Allow the treats to cool completely at room temperature for 2 hours until firm to the touch.
9. Cut into 2-inch squares using a sharp chef’s knife wiped clean between cuts for clean edges.
Buttery marshmallow envelops each colorful marshmallow and toasted oat piece with chewy perfection. The subtle saltiness balances the sweetness beautifully. Try stacking them with vanilla ice cream for an epic ice cream sandwich upgrade.
Irish Coffee Tiramisu with Whiskey Soaked Ladyfingers
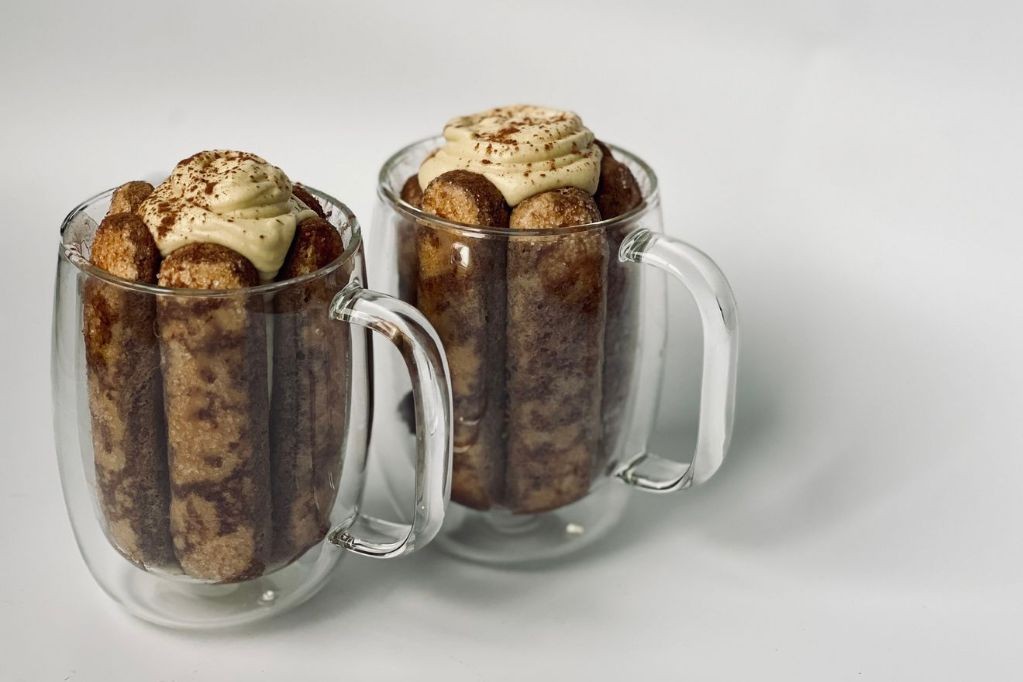
Ready to upgrade your dessert game? This Irish Coffee Tiramisu swaps traditional marsala for rich whiskey-soaked ladyfingers layered with espresso-kissed mascarpone. Rethink everything you know about classic tiramisu with this boozy, coffee-forward twist that’ll have everyone begging for seconds.
Ingredients
– 24 crisp ladyfinger cookies
– 1 cup strongly brewed espresso, cooled to 115°F
– 1/2 cup Irish whiskey
– 16 ounces high-quality mascarpone cheese, at room temperature
– 3/4 cup granulated sugar
– 6 pasture-raised eggs, separated
– 1/4 cup Dutch-process cocoa powder
– 1/2 cup heavy cream, cold
– 1 teaspoon pure vanilla extract
Instructions
1. Combine cooled espresso and Irish whiskey in a shallow bowl.
2. Dip each ladyfinger briefly into the espresso-whiskey mixture—just 2 seconds per side to prevent sogginess.
3. Arrange a single layer of soaked ladyfingers in the bottom of a 9×13-inch glass baking dish.
4. Separate egg yolks from whites into two clean, dry stainless steel bowls.
5. Whisk egg yolks with granulated sugar until pale and ribbon-like, about 4 minutes.
6. Fold room-temperature mascarpone into yolk mixture until fully incorporated and smooth.
7. Whip heavy cream with vanilla extract to stiff peaks in a chilled bowl.
8. Gently fold whipped cream into mascarpone mixture until no streaks remain.
9. Beat egg whites to stiff peaks, ensuring no trace of yolk contaminates the whites.
10. Carefully fold beaten egg whites into mascarpone-cream mixture in three additions.
11. Spread half the mascarpone cream over the ladyfinger layer in the baking dish.
12. Create a second layer with remaining soaked ladyfingers.
13. Top with remaining mascarpone cream, spreading evenly with an offset spatula.
14. Dust the surface generously with Dutch-process cocoa powder using a fine-mesh sieve.
15. Cover tightly with plastic wrap and refrigerate for at least 8 hours—preferably overnight—to allow flavors to meld. Expect an ethereal texture where whiskey-kissed ladyfingers meld with airy mascarpone cream. The espresso cuts through the richness while cocoa adds bittersweet balance. Serve chilled in individual glasses topped with chocolate shavings for an elegant presentation.
Green Velvet Cake with Cream Cheese Frosting
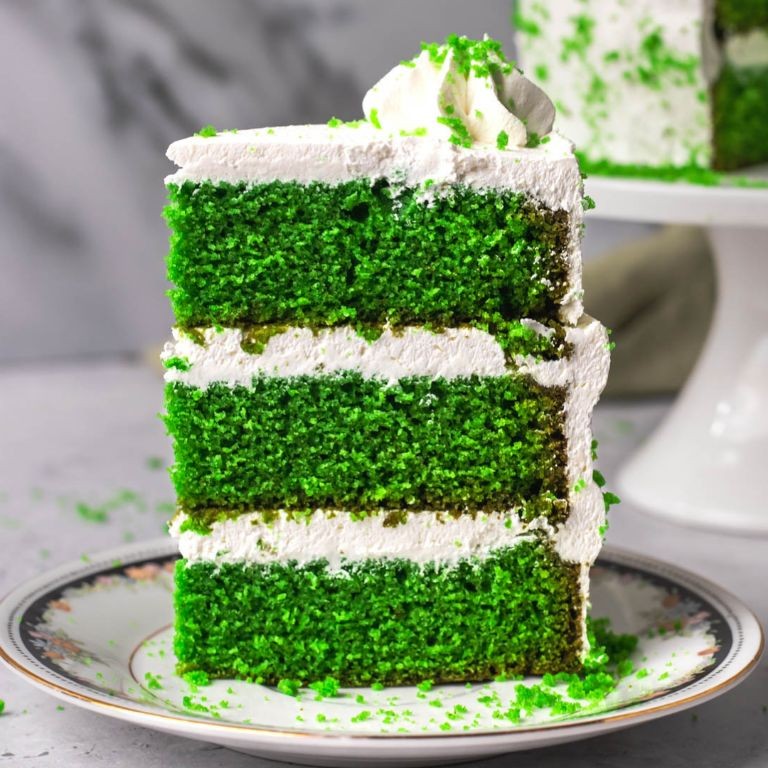
Scoop up this vibrant showstopper that blends rich cocoa with brilliant green hues. Whip up layers of moist, tender cake swirled with velvety cream cheese frosting. Get ready to bake the most eye-catching dessert that tastes as incredible as it looks.
Ingredients
– 2 ½ cups cake flour, sifted
– 1 ¾ cups granulated sugar
– 1 tsp baking soda
– 1 tsp fine sea salt
– 2 tbsp Dutch-process cocoa powder
– 1 cup buttermilk, room temperature
– ½ cup clarified butter, melted and cooled
– 2 large pasture-raised eggs, lightly beaten
– 1 tbsp white vinegar
– 2 tsp pure vanilla extract
– 1 oz green gel food coloring
– 8 oz full-fat cream cheese, softened
– ½ cup European-style unsalted butter, softened
– 4 cups confectioners’ sugar, sifted
– 1 tsp fresh lemon juice
Instructions
1. Preheat oven to 350°F and prepare three 8-inch round cake pans with parchment paper and butter.
2. Whisk together sifted cake flour, granulated sugar, baking soda, sea salt, and Dutch-process cocoa in a large bowl.
3. Combine buttermilk, clarified butter, lightly beaten pasture-raised eggs, white vinegar, and vanilla extract in a separate bowl.
4. Gradually incorporate wet ingredients into dry ingredients using a stand mixer on low speed for 30 seconds.
5. Scrape down bowl sides and mix on medium speed for exactly 2 minutes until smooth.
6. Fold in green gel food coloring until the batter achieves uniform emerald coloration.
7. Divide batter evenly among prepared pans using a kitchen scale for precision.
8. Bake for 22-25 minutes until cakes spring back when gently pressed and a toothpick inserted emerges clean.
9. Cool cakes in pans on wire racks for 15 minutes before inverting.
10. Beat softened cream cheese and European-style butter with paddle attachment until pale and fluffy.
11. Gradually add sifted confectioners’ sugar on low speed to prevent powder clouds.
12. Incorporate fresh lemon juice and beat on high for 3 minutes until frosting holds stiff peaks.
13. Level cooled cake layers using a serrated knife for even stacking.
14. Spread ¾ cup frosting between each layer using an offset spatula.
15. Apply thin crumb coat to exterior and refrigerate for 20 minutes to set.
16. Finish with remaining frosting, creating dramatic swoops with a bench scraper.
17. Refrigerate completed cake for 1 hour before slicing for clean cuts.
Achieve stunning marbled slices revealing vibrant green against snowy frosting. The tender crumb delivers subtle tang from buttermilk balanced by rich cocoa notes. Serve chilled with espresso or create mini trifles with crushed cake layers and extra frosting.
Pot of Gold Chocolate Truffles
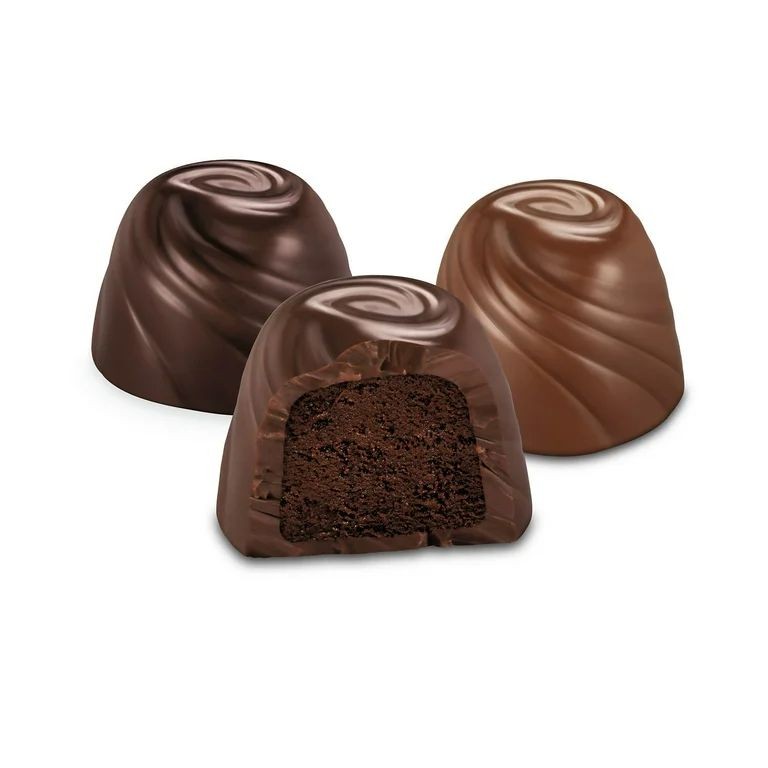
Let’s make these decadent Pot of Gold Chocolate Truffles that’ll have everyone begging for your secret. Luscious, rich, and surprisingly simple—these bite-sized beauties deliver maximum chocolate impact with minimal effort.
Ingredients
– 8 ounces high-quality dark chocolate (70% cacao), finely chopped
– 1/2 cup heavy cream
– 2 tablespoons unsalted European-style butter, softened
– 1 teaspoon pure vanilla extract
– 1/4 teaspoon fine sea salt
– 1/2 cup Dutch-process cocoa powder
– 1/4 cup crushed edible gold leaf
Instructions
1. Place finely chopped dark chocolate in a medium heatproof bowl.
2. Heat heavy cream in a small saucepan over medium heat until it reaches 185°F and small bubbles form around the edges.
3. Immediately pour the hot cream over the chopped chocolate and let stand undisturbed for 2 minutes.
4. Whisk the chocolate and cream mixture slowly from the center outward until completely smooth and emulsified.
5. Add softened butter, vanilla extract, and fine sea salt to the chocolate ganache.
6. Continue whisking until the butter is fully incorporated and the mixture becomes glossy.
7. Cover the bowl with plastic wrap, pressing it directly onto the surface of the ganache to prevent a skin from forming.
8. Refrigerate the ganache for exactly 2 hours until firm but still pliable.
9. Using a 1-tablespoon cookie scoop, portion the chilled ganache onto a parchment-lined baking sheet.
10. Roll each portion between your palms into perfect spheres, working quickly to prevent melting.
11. Place Dutch-process cocoa powder in one shallow bowl and crushed edible gold leaf in another.
12. Roll half the truffles in cocoa powder until completely coated, shaking off excess.
13. Roll the remaining truffles in crushed gold leaf, pressing gently to adhere.
14. Arrange finished truffles in paper candy cups and refrigerate for 30 minutes to set completely.
Velvety smooth centers give way to intense chocolate depth, while the dual coating options create stunning visual contrast. Serve these glistening gems alongside espresso martinis or tuck them into gift boxes lined with gold tissue paper for edible luxury that impresses.
St. Patrick’s Day Rainbow Jello Cups
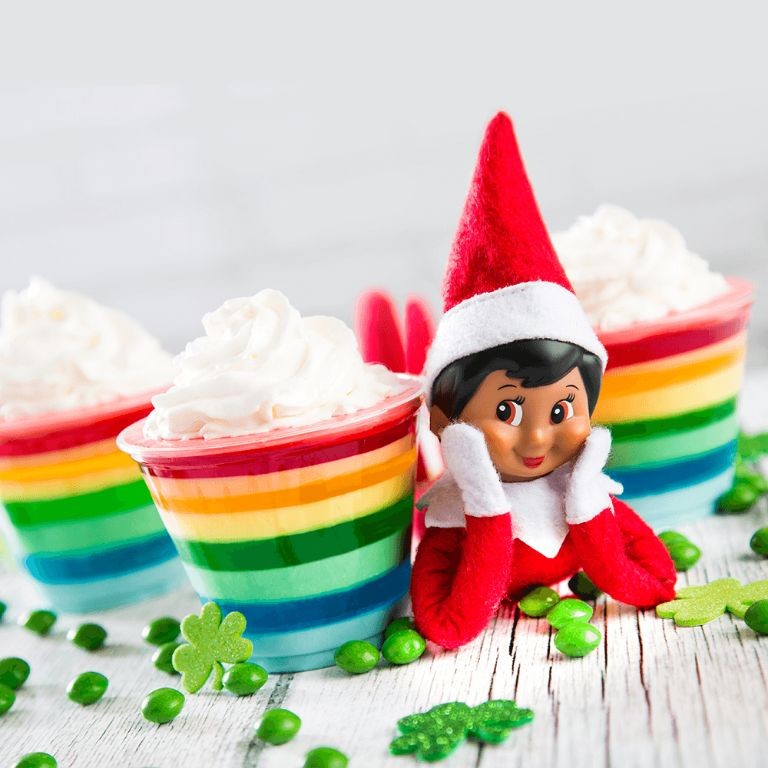
Satisfy your sweet tooth with these vibrant layered jello cups that’ll steal the show at any St. Patrick’s Day gathering. Build stunning rainbow layers using premium ingredients for maximum visual impact and flavor complexity. These cups deliver both nostalgia and modern dessert sophistication in every spoonful.
Ingredients
– 6 (0.25 oz) packets unflavored gelatin powder
– 4 cups granulated sugar
– 6 cups filtered water, divided
– 1 cup heavy cream
– 1 tablespoon pure vanilla extract
– 6 different food-grade gel colors (red, orange, yellow, green, blue, purple)
Instructions
1. Bloom 1 packet of unflavored gelatin powder in 1/2 cup cold filtered water for 5 minutes until hydrated.
2. Heat 1/2 cup filtered water to 180°F in a small saucepan.
3. Whisk bloomed gelatin into the heated water until completely dissolved and no granules remain.
4. Stir in 2/3 cup granulated sugar until fully incorporated into the gelatin mixture.
5. Add 1/2 cup room temperature filtered water to thin the gelatin base.
6. Mix in 1/6 of the heavy cream and 1/2 teaspoon vanilla extract for creamy texture.
7. Divide the base mixture evenly among 6 small bowls.
8. Add 1 gel color to each bowl, mixing thoroughly until color is uniform.
9. Pour the first colored layer into clear cups, filling to 1/6 capacity.
10. Refrigerate for exactly 25 minutes until set but still slightly tacky to touch.
11. Repeat steps 1-10 for remaining colors, pouring each new layer directly onto the previous set layer.
12. Chill completed rainbow cups for 2 hours minimum before serving.
Yield perfectly firm yet tender layers that melt on the tongue with creamy vanilla notes. The jewel-toned presentation makes these ideal for individual dessert service or as a stunning centerpiece. For extra flair, garnish with gold leaf or edible glitter before serving to elevate the festive presentation.
Irish Soda Bread Pudding with Whiskey Caramel Sauce
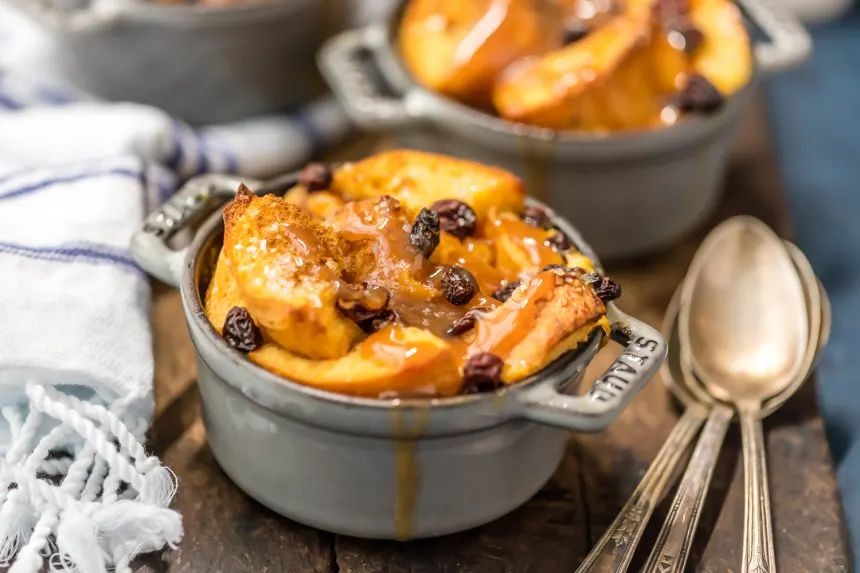
A leftover loaf transforms into the ultimate comfort dessert. Grab that day-old Irish soda bread and create magic with this boozy, caramel-kissed pudding. Your holiday table just found its new star.
Ingredients
- 6 cups day-old Irish soda bread, cut into 1-inch cubes
- 2 cups heavy cream
- 1 cup whole milk
- 4 large pasture-raised eggs, lightly beaten
- 3/4 cup granulated sugar
- 1 tsp pure vanilla extract
- 1/2 tsp fine sea salt
- 1/2 cup unsalted butter
- 1 cup dark brown sugar, packed
- 1/4 cup Irish whiskey
- 1/2 cup heavy cream
- 1/4 tsp flaky sea salt
Instructions
- Preheat your oven to 350°F and butter a 9×13-inch baking dish thoroughly.
- Arrange the soda bread cubes in a single layer within the prepared baking dish.
- Whisk together 2 cups heavy cream, whole milk, beaten eggs, granulated sugar, vanilla extract, and fine sea salt until completely homogeneous.
- Pour the custard mixture evenly over the bread cubes, ensuring all pieces are saturated.
- Press the bread down gently with a spatula to submerge any floating pieces.
- Let the pudding rest for 20 minutes to allow the bread to fully absorb the custard.
- Bake on the center rack for 45-50 minutes until the top is golden brown and the center barely jiggles when shaken.
- Cool the pudding on a wire rack for 25 minutes before serving.
- Melt unsalted butter in a heavy-bottomed saucepan over medium heat.
- Whisk in dark brown sugar and cook for 3 minutes until the sugar dissolves completely.
- Carefully pour in Irish whiskey—stand back as it may flame up momentarily.
- Simmer the mixture for 2 minutes to cook off the alcohol’s raw edge.
- Stream in 1/2 cup heavy cream while whisking constantly to prevent separation.
- Cook the sauce for 4 more minutes until it thickens enough to coat the back of a spoon.
- Remove from heat and stir in flaky sea salt.
Dense yet tender bread gives way to a custardy interior that soaks up the whiskey-kissed caramel beautifully. Serve warm with extra sauce drizzled over vanilla bean ice cream for contrasting temperatures. The flaky salt garnish provides bursts that cut through the richness perfectly.
Mint Chocolate Chip Ice Cream Pie
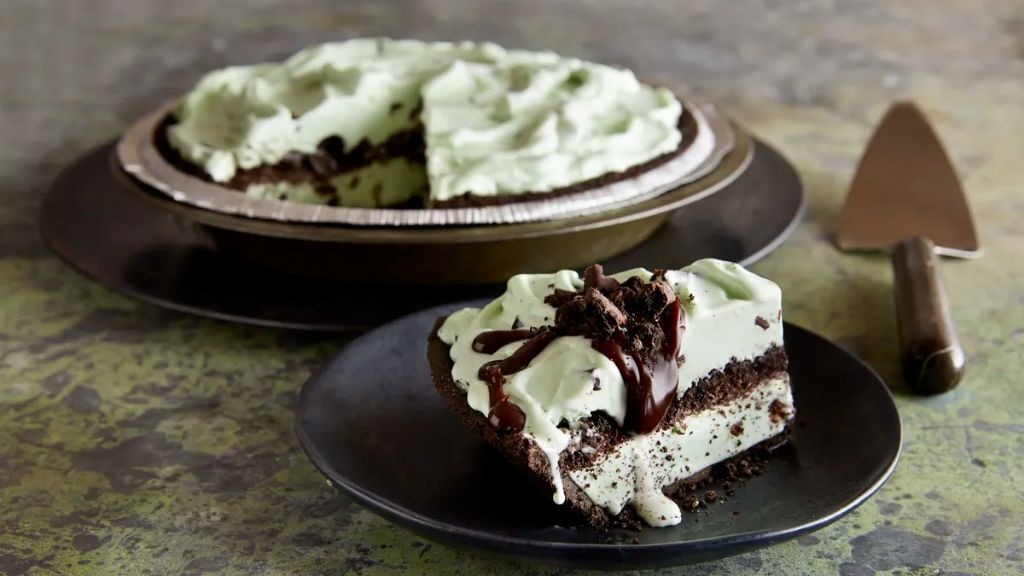
Whip up the ultimate summer dessert that’ll have everyone begging for seconds. This frozen masterpiece combines cool mint with rich chocolate in a showstopping pie that requires zero baking. Perfect for beating the heat while satisfying serious sweet cravings.
Ingredients
– 2 cups chocolate sandwich cookie crumbs
– 6 tablespoons unsalted European-style butter, melted
– 1 quart premium mint chocolate chip ice cream, softened
– 1 cup heavy whipping cream, chilled
– 2 tablespoons granulated sugar
– ½ cup dark chocolate shavings
– Fresh mint sprigs for garnish
Instructions
1. Combine 2 cups chocolate sandwich cookie crumbs with 6 tablespoons melted unsalted European-style butter in a medium mixing bowl.
2. Press the crumb mixture firmly into the bottom and up the sides of a 9-inch pie plate using the bottom of a measuring cup.
3. Chill the crust in the freezer for exactly 15 minutes to set completely.
4. Spread 1 quart softened premium mint chocolate chip ice cream evenly into the chilled crust using an offset spatula.
5. Freeze the pie for 2 hours until the ice cream layer is firm to the touch.
6. Whip 1 cup chilled heavy whipping cream with 2 tablespoons granulated sugar in a chilled metal bowl until stiff peaks form.
7. Spread the whipped cream over the frozen ice cream layer using a piping bag for decorative swirls.
8. Sprinkle ½ cup dark chocolate shavings evenly over the whipped cream topping.
9. Return the assembled pie to the freezer for 4 hours or until completely firm throughout.
10. Garnish with fresh mint sprigs just before serving.
Ultimate creamy texture meets refreshing mint in every slice. The contrast between the crunchy chocolate crust and smooth frozen filling creates pure dessert magic. Try serving with extra chocolate sauce drizzle or crushed candy canes for holiday variations.
Leprechaun Hat Chocolate Cake Pops
Every holiday needs magic, and these Leprechaun Hat Chocolate Cake Pops deliver exactly that. Transform basic cake into whimsical, bite-sized treasures that disappear faster than a pot of gold. Elevate your St. Patrick’s Day spread with these irresistible chocolate-dipped delights.
Ingredients
– 1 prepared 9-inch chocolate cake, cooled completely
– 3/4 cup Swiss dark chocolate ganache
– 16 oz high-quality dark chocolate couverture, finely chopped
– 2 tbsp clarified butter
– Green candy melts, tempered
– Gold luster dust
– 24 paper lollipop sticks
– Edible gold glitter
Instructions
1. Crumble the cooled chocolate cake into fine crumbs using your fingertips.
2. Combine cake crumbs with Swiss dark chocolate ganache until the mixture holds together when pressed.
3. Portion the mixture into 24 equal balls using a #60 scoop.
4. Roll each portion between your palms to form smooth, compact spheres.
5. Insert paper lollipop sticks halfway into each cake ball.
6. Chill the cake balls on a parchment-lined baking sheet at 40°F for 45 minutes until firm.
7. Temper the dark chocolate couverture to 88°F using a double boiler.
8. Stir clarified butter into the tempered chocolate until fully incorporated.
9. Dip each chilled cake ball into the tempered chocolate, rotating to coat completely.
10. Allow excess chocolate to drip off for exactly 10 seconds before setting on parchment.
11. Temper green candy melts to 84°F in a separate double boiler.
12. Pipe a 1-inch diameter circle of green candy melts onto parchment for each hat brim.
13. Immediately place chocolate-coated cake pops onto the wet candy melt circles at a 45-degree angle.
14. Pipe a small cone of green candy melts atop each cake pop to form hat shapes.
15. Dust hat cones with gold luster dust using a clean paintbrush.
16. Sprinkle edible gold glitter around hat brims while candy coating is still tacky.
17. Allow completed cake pops to set at room temperature for 2 hours until fully hardened.
Velvety chocolate cake centers melt against the crisp candy shell, creating perfect textural contrast. The rich dark chocolate coating balances the sweet green candy hats beautifully. Serve these standing upright in a bed of crushed Oreo “dirt” for an enchanting garden display that’ll have everyone reaching for more.
Emerald Isle Pistachio Pudding Parfaits
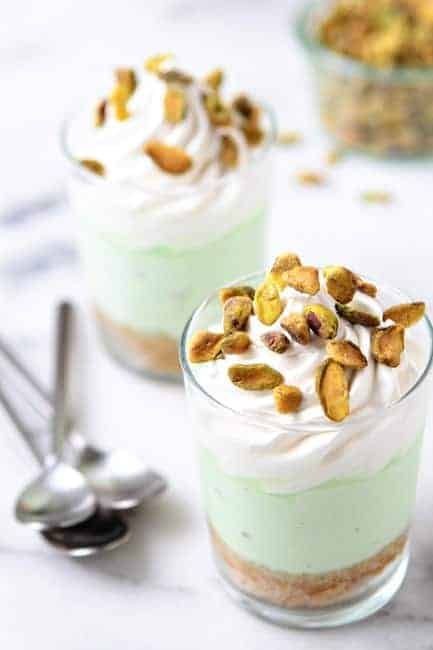
Make your dessert game legendary with these vibrant Emerald Isle Pistachio Pudding Parfaits. Master the art of layered elegance that’s guaranteed to dazzle your feed and satisfy every sweet tooth craving.
Ingredients
– 1 cup raw shelled pistachios, finely ground
– 2 cups heavy cream, chilled
– 3/4 cup granulated sugar
– 1/4 cup cornstarch
– 1/4 teaspoon fine sea salt
– 2 cups whole milk
– 3 large pasture-raised egg yolks, lightly beaten
– 1 teaspoon pure vanilla extract
– 1/2 cup crushed shortbread cookies
– Fresh mint sprigs for garnish
Instructions
1. Preheat your oven to 350°F and spread the ground pistachios in a single layer on a baking sheet.
2. Toast the pistachios for 5-7 minutes until fragrant and lightly golden, stirring halfway through to prevent burning.
3. Combine sugar, cornstarch, and sea salt in a medium saucepan, whisking thoroughly to eliminate lumps.
4. Gradually whisk in the whole milk until the mixture is completely smooth and uniform.
5. Cook the mixture over medium heat, stirring constantly with a silicone spatula, until it thickens and begins to bubble gently—about 6-8 minutes.
6. Temper the egg yolks by slowly pouring 1/2 cup of the hot milk mixture into them while whisking vigorously to prevent curdling.
7. Pour the tempered egg mixture back into the saucepan and continue cooking for 2 more minutes, stirring constantly until thickened to a pudding consistency.
8. Remove the saucepan from heat and stir in the toasted pistachios and vanilla extract until fully incorporated.
9. Transfer the pudding to a bowl and press plastic wrap directly onto the surface to prevent a skin from forming.
10. Chill the pudding in the refrigerator for at least 4 hours until completely cold and set.
11. Whip the chilled heavy cream in a stand mixer fitted with the whisk attachment on medium-high speed until stiff peaks form—about 3-4 minutes.
12. Layer the chilled pistachio pudding, whipped cream, and crushed shortbread cookies in parfait glasses, repeating the pattern until glasses are filled.
13. Garnish each parfait with fresh mint sprigs just before serving.
Savor the creamy, nutty layers that melt into buttery shortbread crunch. Serve these emerald beauties chilled for maximum texture contrast, or customize with dark chocolate shavings between layers for an indulgent twist.
Luck of the Irish Chocolate Mint Brownies
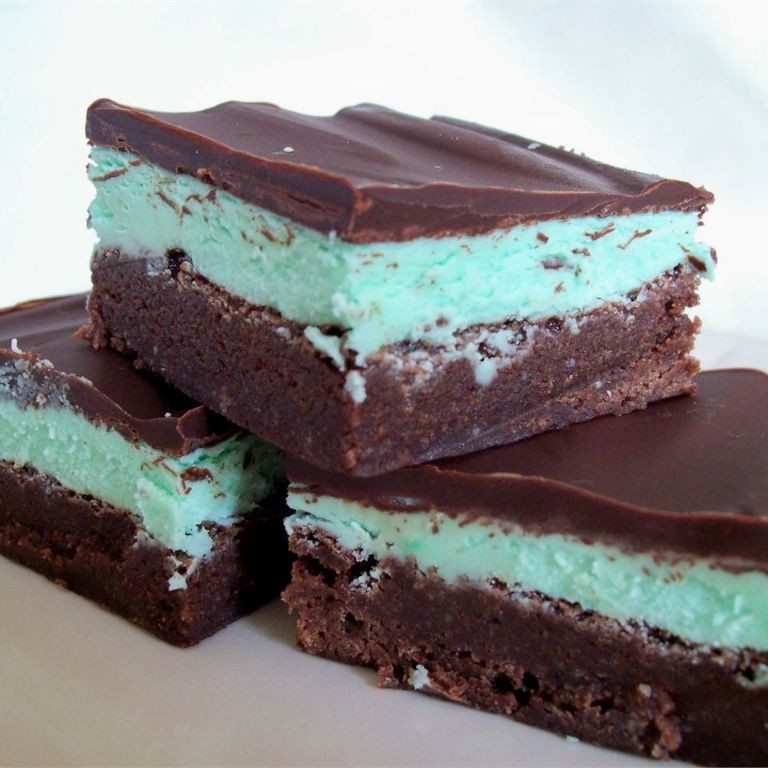
Just when you thought brownies couldn’t get better—meet your new St. Patrick’s Day obsession. These fudgy squares pack a minty punch that’ll make you feel lucky with every bite. Get ready to bake magic into every layer.
Ingredients
– 1 cup unsalted European-style butter, clarified
– 8 oz high-quality dark chocolate (70% cacao), finely chopped
– 1 ½ cups granulated cane sugar
– 4 pasture-raised eggs, lightly beaten
– 1 tsp pure vanilla extract
– ¾ cup Dutch-process cocoa powder
– ½ cup all-purpose flour, sifted
– ¼ tsp fine sea salt
– 1 cup premium white chocolate chips
– 2 tsp pure peppermint extract
– ½ cup heavy cream, chilled
– Green gel food coloring
Instructions
1. Preheat your oven to 350°F and line an 8×8-inch baking pan with parchment paper, leaving a 2-inch overhang on two sides.
2. Melt the clarified butter and dark chocolate together in a double boiler over simmering water, stirring constantly until completely smooth.
3. Remove the chocolate mixture from heat and whisk in the granulated cane sugar until fully incorporated.
4. Add the lightly beaten pasture-raised eggs one at a time, whisking vigorously after each addition to create a glossy emulsion.
5. Stir in the pure vanilla extract until just combined.
6. Sift the Dutch-process cocoa powder, sifted all-purpose flour, and fine sea salt directly into the wet ingredients.
7. Fold the dry ingredients into the batter using a spatula until no streaks remain, being careful not to overmix.
8. Pour the brownie batter into the prepared pan and spread evenly with an offset spatula.
9. Bake at 350°F for 25-28 minutes until the edges are set but the center still shows slight movement when gently shaken.
10. Transfer the pan to a wire rack and cool completely to room temperature, about 2 hours.
11. Combine the premium white chocolate chips, pure peppermint extract, chilled heavy cream, and 3 drops of green gel food coloring in a heatproof bowl.
12. Melt the mint layer ingredients over a double boiler, stirring constantly until smooth and uniformly green.
13. Pour the mint mixture over the cooled brownies and spread into an even layer with an offset spatula.
14. Chill the assembled brownies in the refrigerator for 1 hour until the mint layer is firm to the touch.
15. Use the parchment paper overhang to lift the brownies from the pan and transfer to a cutting board.
16. Cut into 16 squares using a sharp knife wiped clean between cuts for neat edges.
A fudgy, dense crumb gives way to that crisp mint shell in every perfect bite. The deep chocolate intensity balances beautifully with the refreshing peppermint kick. Serve these chilled with an Irish coffee for the ultimate festive pairing, or crumble over vanilla bean ice cream for an elevated dessert experience.
Irish Whiskey Apple Crumble
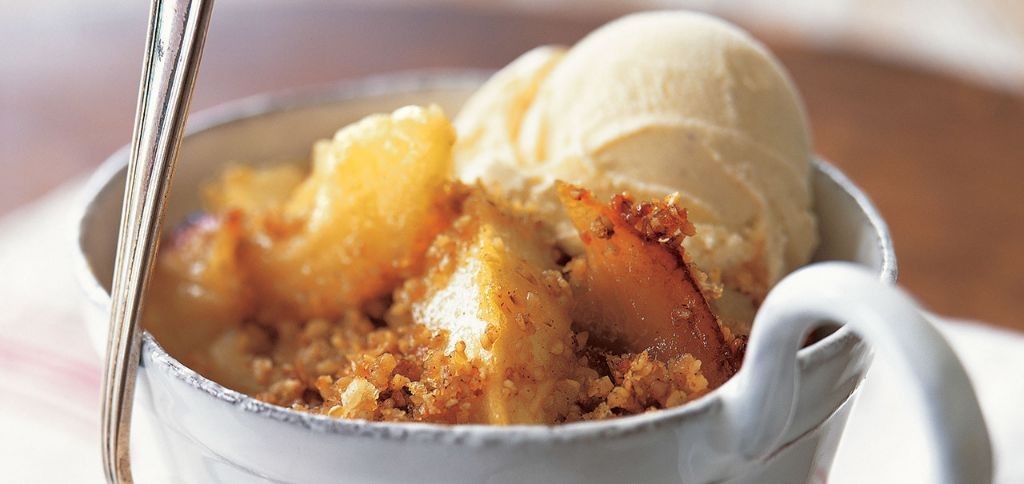
Elevate your fall dessert game with this Irish whiskey-spiked apple crumble. Embrace the warmth of spiced apples bubbling beneath a buttery oat crust. This isn’t your grandma’s crumble—it’s a modern twist that demands a scoop of vanilla ice cream.
Ingredients
- 2 lbs Granny Smith apples, peeled and thinly sliced
- 1/4 cup Irish whiskey
- 1/2 cup granulated sugar
- 1 tsp ground cinnamon
- 1/4 tsp freshly grated nutmeg
- 1 cup all-purpose flour
- 3/4 cup old-fashioned rolled oats
- 2/3 cup packed dark brown sugar
- 1/2 tsp fine sea salt
- 1/2 cup unsalted European-style butter, cold and cubed
- Vanilla bean ice cream, for serving
Instructions
- Preheat your oven to 375°F and position a rack in the center.
- Toss the thinly sliced Granny Smith apples with Irish whiskey, granulated sugar, cinnamon, and freshly grated nutmeg in a large mixing bowl.
- Transfer the apple mixture to a 9-inch ceramic baking dish, spreading it into an even layer.
- In a separate bowl, combine all-purpose flour, old-fashioned rolled oats, packed dark brown sugar, and fine sea salt.
- Add the cold, cubed European-style butter to the dry ingredients.
- Use your fingertips to rub the butter into the flour mixture until pea-sized crumbles form and the mixture looks like coarse sand.
- Sprinkle the crumble topping evenly over the apple mixture in the baking dish.
- Place the baking dish on a rimmed baking sheet to catch any potential bubble-overs.
- Bake for 40-45 minutes at 375°F until the topping is deeply golden brown and the filling is visibly bubbling around the edges.
- Remove from the oven and let rest on a wire cooling rack for 20 minutes to allow the filling to set.
Zestful caramel notes from the whiskey meld with tart apples beneath that shatteringly crisp oat topping. Serve it warm with a generous scoop of melting vanilla bean ice cream for that perfect hot-cold contrast, or try it alongside a sharp cheddar for an unexpectedly brilliant pairing.
Shamrock Shake No-Churn Ice Cream
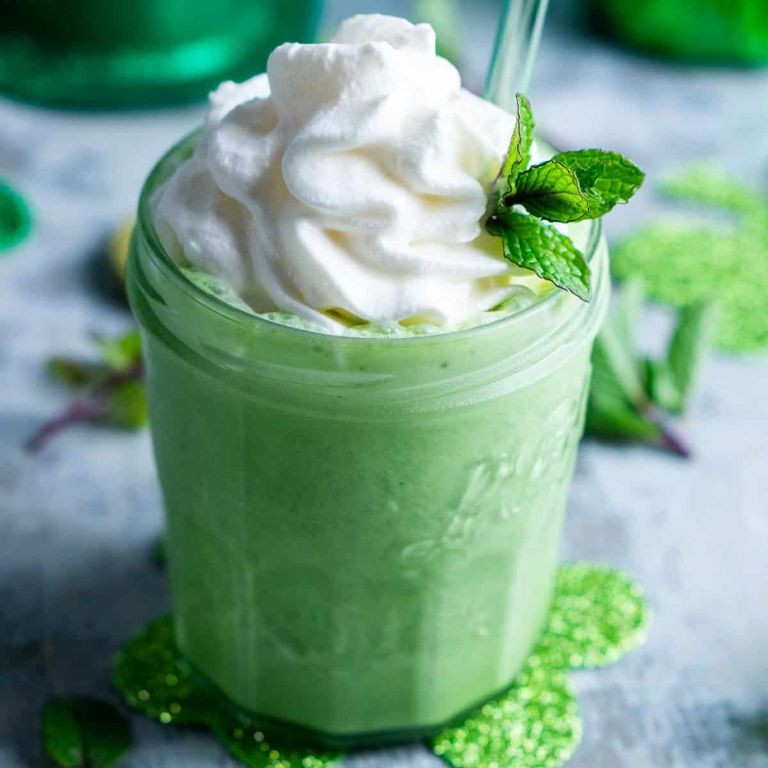
Kickstart your St. Patrick’s Day with this vibrant frozen treat that requires zero fancy equipment. This creamy mint masterpiece delivers that iconic fast-food flavor in luxurious homemade form. Get ready to impress with minimal effort and maximum wow factor.
Ingredients
– 2 cups heavy whipping cream
– 14 ounces sweetened condensed milk
– 1 teaspoon pure peppermint extract
– ½ teaspoon pure vanilla extract
– Green gel food coloring
– ½ cup crushed chocolate sandwich cookies
Instructions
1. Chill a 9×5-inch loaf pan in your freezer for 30 minutes.
2. Pour 2 cups heavy whipping cream into a large mixing bowl.
3. Whip the cream using an electric mixer on medium-high speed until stiff peaks form, about 3-4 minutes.
4. Gently fold in 14 ounces sweetened condensed milk using a rubber spatula until just combined.
5. Add 1 teaspoon pure peppermint extract and ½ teaspoon pure vanilla extract to the mixture.
6. Incorporate green gel food coloring until your desired shade is achieved, starting with 3-4 drops.
7. Transfer half of the mint mixture into your chilled loaf pan.
8. Sprinkle ¼ cup crushed chocolate sandwich cookies evenly over the first layer.
9. Top with remaining mint mixture and smooth the surface with an offset spatula.
10. Garnish with remaining ¼ cup crushed cookies, pressing them lightly into the surface.
11. Cover the pan tightly with plastic wrap, ensuring it touches the ice cream surface.
12. Freeze for at least 6 hours or until firm throughout.
13. Remove from freezer and let stand at room temperature for 5 minutes before scooping. You’ll achieve the creamiest texture by not overmixing when folding ingredients together. Gel food coloring provides vibrant color without watering down your base. Pressing plastic wrap directly onto the surface prevents ice crystals from forming.
Yield spoonfuls of this velvety, mint-forward cream studded with chocolate cookie crunch. Try serving in chilled glasses with extra cookie crumbles or sandwiched between waffle cones for an elevated twist.
Golden Chocolate Guinness Fudge
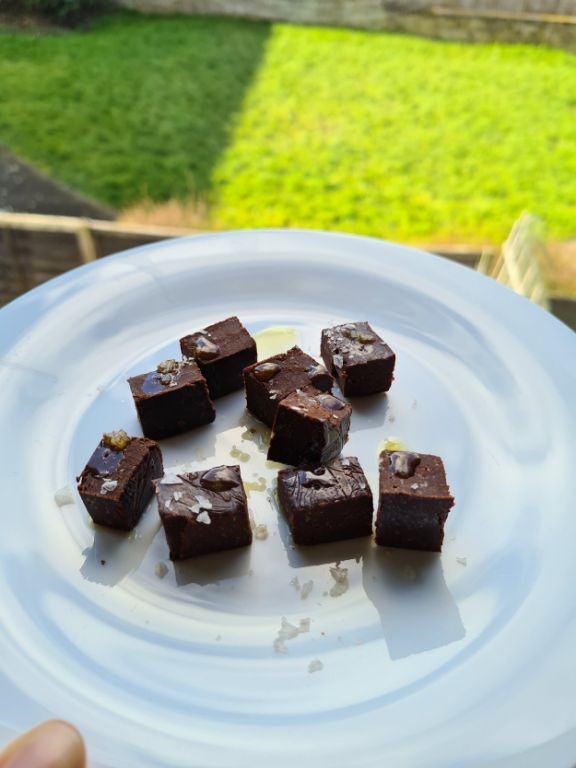
Just when you thought chocolate couldn’t get more decadent—this Guinness-spiked fudge delivers deep, complex flavor in every velvety bite. Jumpstart your holiday baking with this sophisticated twist that balances bitter stout with rich chocolate. Jolt your tastebuds with this unexpectedly elegant treat that’s surprisingly simple to master.
Ingredients
– 3 cups granulated sugar
– 1 cup European-style unsalted butter, cubed
– 1 cup heavy cream, at least 36% milkfat
– 12 ounces semisweet chocolate couverture, finely chopped
– 1 cup Guinness Extra Stout, reduced to ¼ cup
– 1 teaspoon pure vanilla extract
– ½ teaspoon Maldon sea salt flakes
Instructions
1. Pour Guinness into a small saucepan and simmer over medium heat until reduced to ¼ cup, approximately 12-15 minutes. Cool completely.
2. Line an 8×8-inch baking pan with parchment paper, allowing 2-inch overhang on two sides.
3. Combine sugar, butter, and heavy cream in a heavy-bottomed saucepan over medium heat.
4. Attach a candy thermometer to the pan and cook, stirring constantly with a heatproof spatula, until mixture reaches 235°F (soft-ball stage).
5. Immediately remove from heat and let stand undisturbed for 5 minutes to stop the cooking process.
6. Add chopped chocolate, reduced Guinness, and vanilla extract all at once.
7. Stir vigorously with a wooden spoon until chocolate is fully melted and mixture becomes thick and glossy, about 2-3 minutes.
8. Pour fudge into prepared pan and spread evenly with an offset spatula.
9. Sprinkle Maldon sea salt flakes evenly across the surface while fudge is still warm.
10. Refrigerate uncovered for at least 4 hours, or until completely firm to the touch.
11. Use parchment overhang to lift fudge from pan and transfer to a cutting board.
12. Cut into 1-inch squares with a sharp knife wiped clean between cuts for neat edges.
Perfectly smooth with a firm-yet-creamy texture that melts luxuriously on the tongue. The stout reduction adds subtle malty notes that complement the deep chocolate intensity without overwhelming sweetness. Present these elegant squares alongside strong coffee or as an unexpected finish to a rich meal—the sophisticated flavor profile surprises even the most discerning chocolate connoisseurs.
Rainbow Layered Irish Shortbread Bars
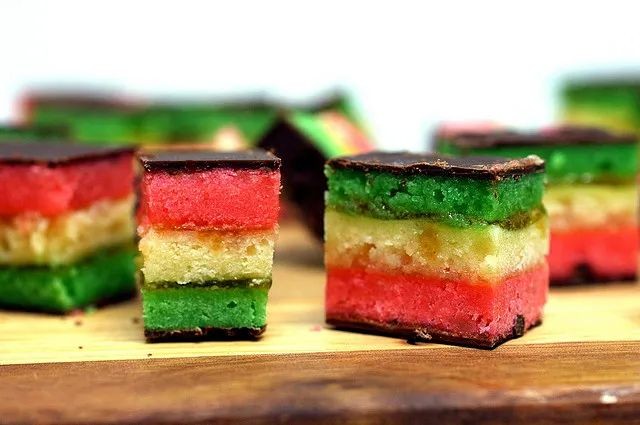
Just when you thought shortbread couldn’t get more addictive—these vibrant layers will stop your scroll. Jam-packed with buttery goodness and rainbow hues, these bars deliver serious visual drama. Get ready to bake your most Instagram-worthy treat yet.
Ingredients
- 2 cups all-purpose flour, sifted
- 1 cup European-style unsalted butter, softened
- 1/2 cup granulated sugar
- 1/4 cup light brown sugar, packed
- 1 teaspoon pure vanilla extract
- 1/4 teaspoon fine sea salt
- 6 different gel food colorings (red, orange, yellow, green, blue, purple)
- 1 large pasture-raised egg, lightly beaten for egg wash
- 1 tablespoon turbinado sugar for finishing
Instructions
- Preheat your oven to 325°F and line an 8×8-inch baking pan with parchment paper, leaving overhang on two sides.
- Combine sifted all-purpose flour, softened European-style unsalted butter, granulated sugar, packed light brown sugar, pure vanilla extract, and fine sea salt in a stand mixer fitted with paddle attachment.
- Mix on medium-low speed for precisely 2 minutes until the dough just comes together—do not overmix.
- Divide the dough into 6 equal portions using a kitchen scale for accuracy.
- Add a different gel food coloring to each portion, kneading gently until the color is fully incorporated and vibrant.
- Press the first colored layer evenly into the prepared pan using your fingertips.
- Repeat with remaining colored layers, pressing each firmly to eliminate air pockets between layers.
- Brush the surface evenly with lightly beaten pasture-raised egg wash using a pastry brush.
- Sprinkle turbinado sugar generously over the entire surface for caramelized crunch.
- Bake at 325°F for 35-40 minutes until the edges are golden brown but the center remains pale.
- Cool completely in the pan on a wire rack for 2 hours before slicing.
- Use the parchment overhang to lift the entire block from the pan for clean cutting.
- Slice into 16 bars using a sharp chef’s knife wiped clean between cuts.
Crisp yet tender layers shatter with each bite, revealing their buttery soul. The subtle caramel notes from turbinado sugar play against the pure vanilla backdrop beautifully. Serve these vibrant bars alongside espresso martinis for a sophisticated dessert pairing that’ll wow any gathering.
Colcannon-Inspired Sweet Potato Pie with Maple Whiskey Whipped Cream
Mash your expectations—this isn’t your grandma’s sweet potato pie. We’re fusing Irish colcannon’s cozy vibes with American dessert flair, then crowning it with boozy maple cream that’ll have you swooning. Get ready to redefine comfort food, one luxurious bite at a time.
Ingredients
- 2 large sweet potatoes, roasted and flesh scooped (about 2 cups)
- 1/2 cup unsalted European-style butter, melted
- 1/3 cup pure maple syrup, grade A dark
- 2 pasture-raised eggs, lightly beaten
- 1/2 cup heavy cream
- 1 tsp pure vanilla extract
- 1/2 tsp fine sea salt
- 1/4 tsp freshly grated nutmeg
- 1 pre-baked 9-inch pie crust, cooled
- 1 cup cold heavy cream
- 2 tbsp Irish whiskey
- 2 tbsp confectioners’ sugar
- 1/4 cup curly kale, finely chiffonaded
- 2 tbsp toasted pepitas
Instructions
- Preheat your oven to 400°F.
- Pierce sweet potatoes several times with a fork.
- Roast sweet potatoes directly on the oven rack for 45-50 minutes until tender when pierced with a knife.
- Cool sweet potatoes until handleable, about 15 minutes.
- Scoop flesh into a large mixing bowl, discarding skins.
- Add melted European-style butter to the sweet potato flesh.
- Mash with a potato ricer until completely smooth—this eliminates lumps for a silkier texture.
- Whisk in pure maple syrup until fully incorporated.
- Add lightly beaten pasture-raised eggs, mixing vigorously.
- Pour in 1/2 cup heavy cream and pure vanilla extract.
- Sprinkle fine sea salt and freshly grated nutmeg over the mixture.
- Fold everything together until homogenous.
- Pour filling into the pre-baked 9-inch pie crust.
- Bake at 350°F for 35-40 minutes until the center jiggles slightly but edges are set.
- Cool pie completely on a wire rack, about 2 hours.
- Chill a metal mixing bowl and whisk attachment for 10 minutes.
- Pour 1 cup cold heavy cream into the chilled bowl.
- Add Irish whiskey and confectioners’ sugar.
- Whip on medium-high speed until soft peaks form—don’t over-whip or the cream will break.
- Sprinkle finely chiffonaded curly kale over the pie filling.
- Top with dollops of maple whiskey whipped cream.
- Garnish with toasted pepitas for crunch.
That velvety sweet potato filling melts against the crisp kale’s earthy contrast, while the whiskey-kissed cream adds sophisticated warmth. Serve slices slightly chilled with an extra sprinkle of pepitas for textural drama that’ll make your guests ask for the recipe before they’ve finished their first bite.
Clover-Shaped Vanilla Bean Madeleines with Green Tea Glaze
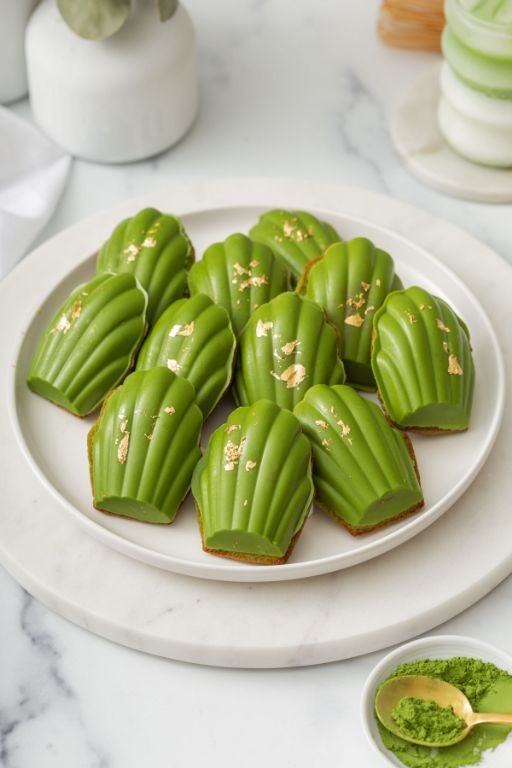
Forget basic madeleines—these clover-shaped beauties deliver elegant flavor in every buttery bite. Freshly ground vanilla bean paste and premium matcha create a sophisticated treat that’s surprisingly simple to master. Get ready to impress with these bakery-worthy delights that elevate afternoon tea to an art form.
Ingredients
– ¾ cup all-purpose flour
– ½ cup granulated sugar
– 2 pasture-raised eggs, lightly beaten
– 6 tablespoons clarified butter, cooled
– 1 teaspoon vanilla bean paste
– ¼ teaspoon fine sea salt
– 1 teaspoon baking powder
– 1 cup confectioners’ sugar
– 2 tablespoons culinary-grade matcha powder
– 3 tablespoons whole milk
Instructions
1. Preheat your oven to 375°F and thoroughly grease a clover-shaped madeleine pan with clarified butter.
2. Sift together the all-purpose flour, baking powder, and fine sea salt into a medium mixing bowl.
3. Whisk the lightly beaten pasture-raised eggs and granulated sugar in a separate bowl for exactly 3 minutes until pale and ribbon-like.
4. Fold the dry ingredients into the egg mixture using a spatula, being careful not to deflate the batter.
5. Drizzle in the cooled clarified butter and vanilla bean paste, folding gently until just incorporated.
6. Chill the batter in the refrigerator for 20 minutes to ensure proper hump formation during baking.
7. Spoon 1 tablespoon of batter into each clover mold, filling them three-quarters full.
8. Bake for 8-10 minutes until the edges are golden brown and the centers spring back when lightly touched.
9. Immediately unmold the madeleines onto a wire rack using a small offset spatula.
10. Sift confectioners’ sugar and matcha powder together in a small bowl to eliminate any lumps.
11. Gradually whisk in whole milk until the glaze reaches a smooth, pourable consistency.
12. Dip each cooled madeleine’s scalloped side into the green tea glaze, allowing excess to drip off.
13. Place glazed madeleines on a parchment-lined tray and let set for 15 minutes.
Glistening with that vibrant matcha finish, these madeleines offer a delicate crunch that gives way to an impossibly tender, buttery crumb. The vanilla bean’s floral notes beautifully balance the matcha’s earthy bitterness, creating a sophisticated flavor dance. Serve them alongside jasmine tea for an elevated pairing, or crumble over vanilla ice cream for an unexpected dessert twist.
Irish Cream Mousse with Espresso Caviar
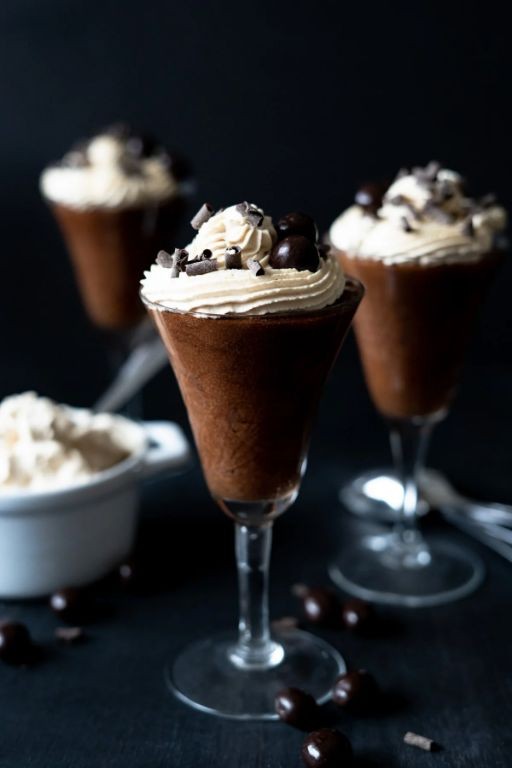
Zesty meets dreamy in this Irish cream mousse with espresso caviar. Whip up creamy indulgence spiked with coffee pearls that burst with flavor. Your dessert game just leveled up dramatically.
Ingredients
- 8 ounces high-quality white chocolate, finely chopped
- 1 ½ cups heavy cream, divided
- ½ cup Irish cream liqueur
- 3 large pasture-raised eggs, separated
- ¼ cup granulated sugar
- 1 tablespoon unflavored gelatin powder
- ¼ cup cold-brew espresso concentrate
- 2 tablespoons sodium alginate
- 4 cups filtered water
- 2 tablespoons food-grade calcium lactate
- Dark chocolate shavings for garnish
- Fresh mint sprigs for garnish
Instructions
- Bloom gelatin by sprinkling over ¼ cup cold heavy cream in a small bowl; let stand for 5 minutes until spongy.
- Melt white chocolate in a double boiler over gently simmering water, stirring constantly with a silicone spatula until completely smooth and registering 115°F on an instant-read thermometer.
- Whisk egg yolks and sugar in a medium bowl until pale and thickened, about 3 minutes of vigorous whisking.
- Heat remaining 1 ¼ cups heavy cream to 180°F in a saucepan, then temper into egg yolk mixture by slowly drizzling while whisking constantly.
- Return custard to saucepan and cook over medium-low heat, stirring constantly with a wooden spoon, until thickened and coating the back of the spoon at 165°F.
- Stir bloomed gelatin mixture into hot custard until completely dissolved.
- Fold melted white chocolate into custard base until fully incorporated and smooth.
- Cool mixture to room temperature, then whisk in Irish cream liqueur.
- Whip egg whites to stiff peaks in a clean, dry bowl using a stand mixer on medium-high speed.
- Gently fold whipped egg whites into chocolate mixture in three additions until no white streaks remain.
- Divide mousse among 6 serving glasses and chill for at least 4 hours or until set.
- Dissolve calcium lactate in filtered water to create a calcium bath.
- Blend sodium alginate with cold-brew espresso concentrate using an immersion blender until completely smooth and free of lumps.
- Rest espresso mixture for 30 minutes to release air bubbles, then transfer to a squeeze bottle.
- Drop small droplets of espresso mixture into the calcium bath from about 6 inches height, forming perfect spheres.
- Cure espresso caviar in calcium bath for 2 minutes, then remove with a slotted spoon and rinse gently in clean water.
- Top chilled mousse with espresso caviar just before serving.
- Garnish with dark chocolate shavings and fresh mint sprigs.
Not just visually stunning, this mousse delivers contrasting textures—silky smooth cream against the satisfying pop of espresso caviar. The rich white chocolate base perfectly balances the bold coffee burst, creating a sophisticated flavor experience. Serve in clear glasses to showcase the layers or pair with biscotti for added crunch.
Summary
Whether you’re hosting a party or enjoying a quiet celebration, these 20 decadent Saint Patrick’s desserts offer something special for everyone. We hope these festive recipes bring joy to your table! Try your favorites, leave a comment sharing which ones you loved, and don’t forget to pin this article on Pinterest to save these delicious ideas for next year’s celebrations.