Forget complicated crafts—salt dough is your new best friend for creative fun! This simple, versatile material transforms into endless DIY projects, from ornaments to keepsakes. Perfect for family activities or solo crafting sessions, these recipes promise hours of hands-on enjoyment. Ready to get your hands dirty and unleash your inner artist? Dive into these 20 inspiring ideas and start crafting memories today!
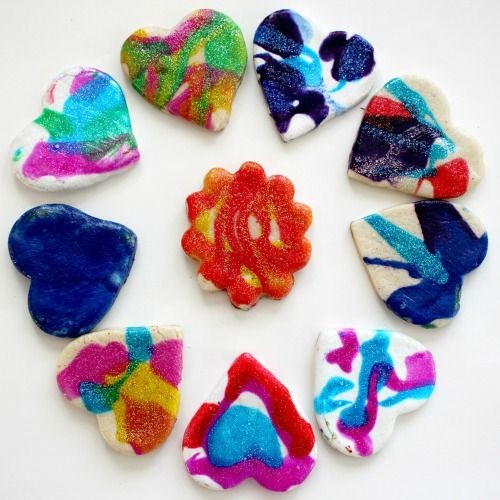
Salt Dough Ornaments
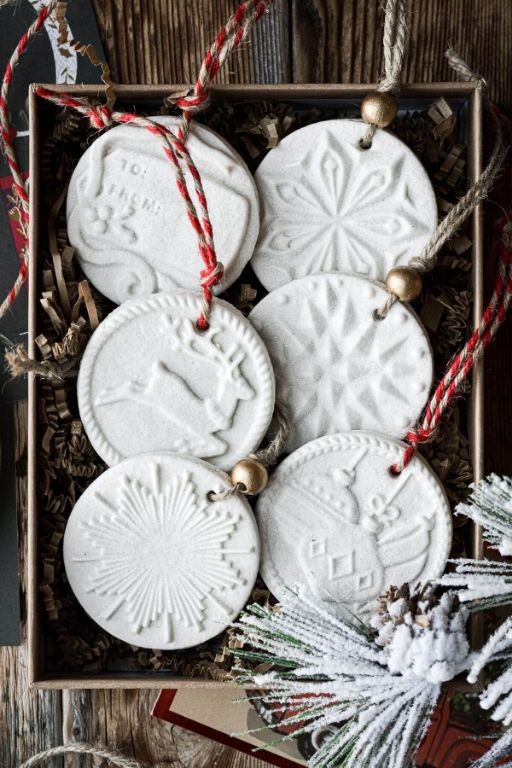
Sometimes the simplest traditions bring the deepest comfort, like these salt dough ornaments that carry the warmth of childhood memories and the quiet satisfaction of creating something lasting with your own hands. There’s a gentle magic in transforming basic pantry staples into delicate keepsakes that will adorn your home for seasons to come, each one holding the impression of a moment carefully preserved. Making them feels like pressing pause on the busy world outside, allowing you to shape something beautiful from flour, salt, and time.
Ingredients
– 2 cups all-purpose flour (plus extra for dusting)
– 1 cup table salt (fine grain works best for smooth ornaments)
– 1 cup warm water (about 110°F, or comfortably warm to touch)
– 1 tablespoon vegetable oil (or any neutral oil to prevent sticking)
– Optional: food coloring (add to water for tinted dough)
Instructions
1. Preheat your oven to 200°F and line two baking sheets with parchment paper.
2. Combine 2 cups all-purpose flour and 1 cup table salt in a large mixing bowl, whisking them together until fully incorporated.
3. Create a well in the center of the dry ingredients and pour in 1 cup warm water and 1 tablespoon vegetable oil.
4. Stir the mixture with a wooden spoon until a shaggy dough begins to form, scraping the sides of the bowl to incorporate all flour.
5. Turn the dough out onto a lightly floured surface and knead for 5-7 minutes until it becomes smooth and elastic, adding small amounts of flour if it feels sticky.
6. Roll the dough to ¼-inch thickness using a floured rolling pin, rotating it occasionally to prevent sticking.
7. Cut shapes using cookie cutters, pressing firmly and twisting slightly to ensure clean edges.
8. Use a straw to punch a hole near the top of each ornament for hanging, making sure the hole is at least ¼-inch from the edge.
9. Transfer the cut ornaments to prepared baking sheets using a spatula, leaving 1 inch between them for air circulation.
10. Bake for 2-3 hours until the ornaments are completely hard and dry, flipping them halfway through for even drying.
11. Turn off the oven and let the ornaments cool inside for 1 hour to prevent cracking from temperature shock.
12. Remove cooled ornaments from baking sheets and decorate with acrylic paints or seal with clear varnish if desired.
Now these delicate creations feel satisfyingly solid in your hand, their smooth surfaces ready to hold your artistic touch. Nothing captures the season’s spirit quite like these handmade treasures adorning your tree or gifted to loved ones, each one carrying the quiet story of its making.
Salt Dough Handprint Keepsakes

Evenings like these, when the light fades early and the house grows quiet, I find myself drawn to simple projects that capture fleeting moments. Making salt dough handprints feels like preserving time itself, creating tangible memories from flour, salt, and small hands. There’s something deeply comforting about this humble craft, where ordinary ingredients transform into cherished keepsakes.
Ingredients
– 2 cups all-purpose flour (plus extra for dusting)
– 1 cup table salt
– 1 cup warm water (about 110°F, or comfortably warm to touch)
– 1 tablespoon vegetable oil (or any neutral oil)
– Food coloring, optional (liquid or gel works well)
– Clear acrylic sealer spray, optional (for long-term preservation)
Instructions
1. Preheat your oven to 200°F and line a baking sheet with parchment paper.
2. In a large mixing bowl, combine 2 cups of all-purpose flour and 1 cup of table salt, whisking them together until fully incorporated.
3. Gradually pour in 1 cup of warm water while stirring continuously with a wooden spoon.
4. Add 1 tablespoon of vegetable oil to the mixture and continue stirring until a shaggy dough forms.
5. Turn the dough out onto a lightly floured surface and knead for 5-7 minutes until smooth and elastic. Tip: If the dough feels too sticky, add flour one tablespoon at a time; if too dry, add water by the teaspoon.
6. If using food coloring, divide the dough and knead in the color until evenly distributed, wearing gloves to prevent staining.
7. Roll the dough to ½-inch thickness using a rolling pin, ensuring an even surface for clean impressions.
8. Press a child’s hand firmly into the dough, holding for 10 seconds to create a deep, clear print. Tip: For best results, have the child relax their hand and press each finger individually.
9. Use a straw to poke a hole near the top of the dough if planning to hang the keepsake later.
10. Transfer the handprint to the prepared baking sheet using a spatula to avoid distortion.
11. Bake at 200°F for 2-3 hours, or until the dough is completely hard and sounds hollow when tapped. Tip: Check periodically and rotate the baking sheet for even drying, especially in humid climates.
12. Turn off the oven and let the handprint cool inside for 1 hour to prevent cracking from sudden temperature changes.
13. Once fully cooled, apply clear acrylic sealer spray in a well-ventilated area if desired, allowing it to dry completely between coats.
Preserving these handprints feels like holding onto whispers of childhood, their rough texture and pure white finish telling stories without words. They become more than decorations—tiny monuments to growth, perfect for gifting to grandparents or adding to a memory box where time stands still.
Salt Dough Christmas Decorations

Mixing flour and salt together on a quiet afternoon feels like returning to something simple and true, the way my grandmother would begin her holiday preparations long before December arrived. There’s a quiet magic in shaping these humble ingredients into keepsakes that hold memories in their textured surfaces, waiting to be painted and hung with care. As the dough comes together under my hands, I’m reminded how the simplest traditions often bring the deepest comfort, especially when shared with little ones who see wonder in every sprinkle of glitter.
Ingredients
– 4 cups all-purpose flour (plus extra for dusting, as needed)
– 1 cup table salt (fine grain works best for smooth dough)
– 1½ cups warm water (about 110°F—just warm to the touch)
– 2 tablespoons vegetable oil (or any neutral oil, to prevent sticking)
– Acrylic paints and clear sealant spray (for decorating after baking, if desired)
Instructions
1. Preheat your oven to 250°F—this low temperature helps the decorations dry slowly without browning.
2. In a large mixing bowl, combine 4 cups of all-purpose flour and 1 cup of table salt, whisking them together until fully blended.
3. Pour in 1½ cups of warm water and 2 tablespoons of vegetable oil, then stir with a wooden spoon until a shaggy dough forms.
4. Tip: If the dough feels too dry, add warm water 1 tablespoon at a time; if too sticky, sprinkle in extra flour gradually.
5. Turn the dough out onto a lightly floured surface and knead for 5–7 minutes, until it becomes smooth and pliable like modeling clay.
6. Roll the dough to ¼-inch thickness using a floured rolling pin, checking that it’s even to ensure uniform baking.
7. Cut shapes with cookie cutters, pressing firmly and twisting slightly to release clean edges.
8. Use a straw to poke a small hole near the top of each shape for hanging later—aim for ¼-inch diameter.
9. Tip: If the dough softens, chill it in the refrigerator for 10 minutes to make handling easier.
10. Arrange the shapes on a parchment-lined baking sheet, spacing them 1 inch apart to allow air circulation.
11. Bake for 2 hours, then flip each decoration and bake for another 1–2 hours until hard and completely dry.
12. Tip: To test for doneness, tap a decoration—it should sound hollow and show no give when pressed.
13. Let cool completely on a wire rack before decorating with acrylic paints and sealant, if desired. So sturdy and lightly textured, these ornaments feel solid in the hand yet carry a rustic warmth from their simple origins. String them with ribbon on the tree or nestle them into gift packages as handmade tokens of the season, their neutral palette inviting personal touches with paint or glitter.
Salt Dough Beads for Jewelry

Zestfully shaping something with my hands always brings me back to simpler moments, when time seemed to stretch like soft dough between my fingers. Today, I’m making salt dough beads for jewelry, a quiet craft that turns humble kitchen staples into wearable art. There’s something deeply satisfying about creating beauty from flour, salt, and water—each bead holding the memory of its making.
Ingredients
– 1 cup all-purpose flour (plus extra for dusting)
– 1/2 cup table salt (fine grain works best)
– 1/2 cup warm water (about 110°F, or comfortably warm to touch)
– 1 tablespoon vegetable oil (or any neutral oil, to prevent sticking)
– Food coloring, optional (gel colors give vibrant results)
– Clear sealant spray, optional (for waterproofing finished beads)
Instructions
1. Preheat your oven to 250°F and line a baking sheet with parchment paper.
2. Combine 1 cup all-purpose flour and 1/2 cup table salt in a medium mixing bowl, whisking until fully incorporated.
3. Create a well in the center of the dry ingredients and pour in 1/2 cup warm water and 1 tablespoon vegetable oil.
4. Stir the mixture with a wooden spoon until a shaggy dough forms, then knead by hand for 5 minutes until smooth and elastic.
5. Divide the dough into smaller portions if using food coloring, kneading in a few drops until evenly distributed.
6. Pinch off marble-sized pieces of dough and roll between your palms to form smooth spheres.
7. Use a toothpick or skewer to pierce through the center of each bead, rotating gently to create an even hole.
8. Arrange the beads on the prepared baking sheet, ensuring they don’t touch.
9. Bake at 250°F for 2 hours, rotating the pan halfway through for even drying.
10. Turn off the oven and let the beads cool completely inside for another hour to prevent cracking.
11. Once cooled, thread the beads onto jewelry wire or string to create necklaces or bracelets.
12. Apply 2-3 light coats of clear sealant spray if making waterproof jewelry, allowing each coat to dry completely.
Light and surprisingly durable, these beads have a rustic, stone-like texture that feels substantial yet comfortable against the skin. Their subtle granular surface catches the light differently than plastic or glass, giving handmade jewelry an organic warmth. String them with wooden spacers or mix with natural stones for earthy accessories that carry the quiet satisfaction of their creation.
Salt Dough Animal Figurines
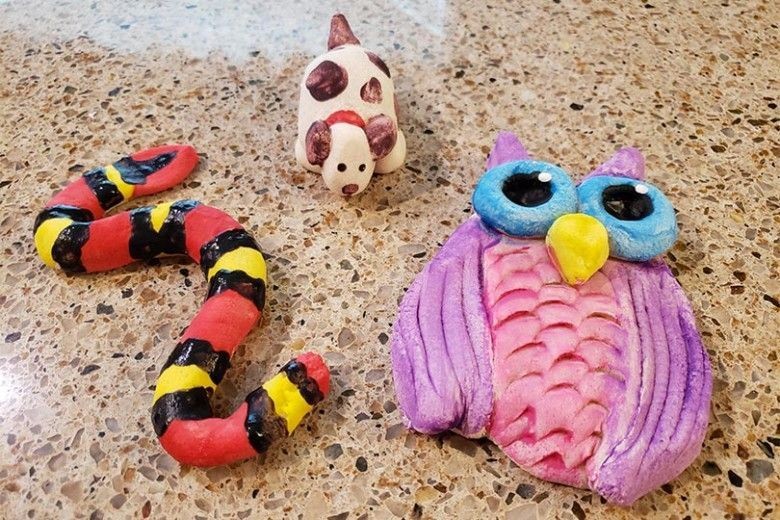
Perhaps there’s something quietly magical about returning to childhood crafts, especially when they involve creating tiny, edible creatures from the simplest of kitchen staples.
Ingredients
- 2 cups all-purpose flour
- 1 cup table salt
- 3/4 cup warm water (around 110°F, or warm to touch)
- 1 tbsp vegetable oil (or any neutral oil, to prevent sticking)
Instructions
- Preheat your oven to 200°F—this low temperature is crucial for drying the dough without browning it.
- In a large mixing bowl, combine the 2 cups of all-purpose flour and 1 cup of table salt, whisking them together until fully incorporated.
- Gradually pour in the 3/4 cup of warm water while stirring with a wooden spoon, mixing until a shaggy dough begins to form.
- Add the 1 tbsp of vegetable oil to the bowl, which will help keep the dough pliable and prevent it from cracking as you work.
- Turn the mixture out onto a lightly floured surface and knead it for 5–7 minutes, until it becomes smooth and elastic, like modeling clay.
- Pinch off small pieces of dough and shape them into animal figurines, such as turtles or birds, using your fingers to add details like ears or tails.
- Place the shaped figurines on a parchment-lined baking sheet, spacing them about 1 inch apart to allow for even air circulation.
- Bake the figurines in the preheated oven for 2–3 hours, or until they are completely hard and dry to the touch, rotating the tray halfway through for uniform drying.
- Remove the baking sheet from the oven and let the figurines cool completely on the tray for at least 1 hour before handling.
Kneading this simple dough yields creations that are firm yet lightweight, with a subtle, rustic charm. These salt dough animals carry a gentle, savory note from the salt, making them perfect for adorning a holiday table or gifting as handmade ornaments.
Salt Dough Picture Frames
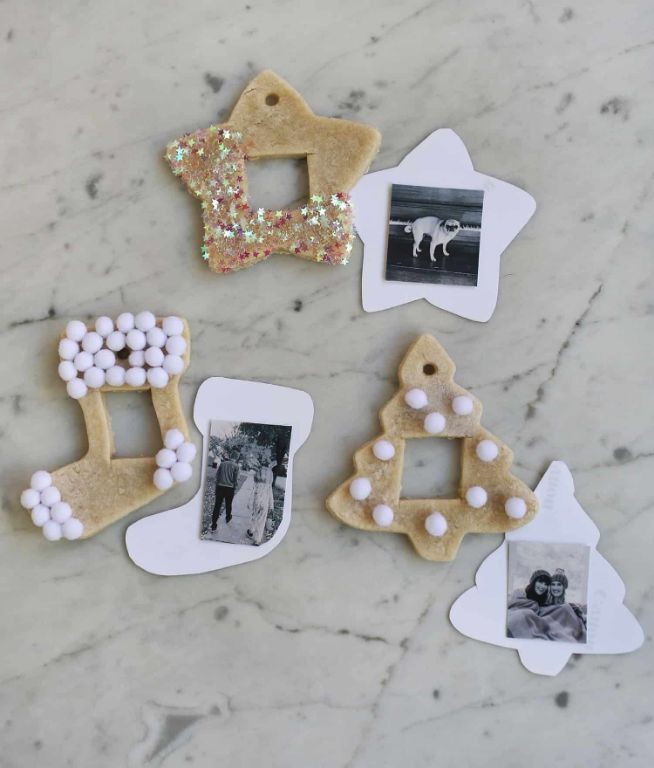
Holding this simple dough in my hands takes me back to childhood afternoons, when creating something beautiful required nothing more than flour, salt, and time. These salt dough picture frames carry that same gentle magic, transforming humble kitchen ingredients into lasting keepsakes for cherished photos. Making them feels like pressing pause on the busy world, each step a quiet meditation in craft.
Ingredients
– 2 cups all-purpose flour (plus extra for dusting)
– 1 cup table salt
– 3/4 cup warm water (about 110°F, or comfortably warm to touch)
– 1 tablespoon vegetable oil (or any neutral oil)
– Acrylic paints in your favorite colors (non-toxic, for decorating)
– Clear sealant spray (matte or glossy finish)
– Small photo that fits your frame (standard 4×6 inches or smaller)
Instructions
1. Combine 2 cups all-purpose flour and 1 cup table salt in a large mixing bowl, whisking thoroughly to eliminate any salt clumps.
2. Create a well in the center of the dry ingredients and pour in 3/4 cup warm water and 1 tablespoon vegetable oil.
3. Stir the mixture with a wooden spoon until a shaggy dough forms, then turn it out onto a lightly floured surface.
4. Knead the dough for 5-7 minutes until it becomes smooth and elastic, adding small amounts of flour if it feels sticky.
5. Roll the dough to 1/4-inch thickness using a rolling pin, ensuring an even surface for consistent baking.
6. Cut a rectangle measuring 8×10 inches for the frame back, then cut a smaller 5×7 inch rectangle from the center to create the frame opening.
7. Use cookie cutters or a knife to create decorative shapes from the remaining dough, pressing them gently onto the frame edges.
8. Poke several small holes in the top corners of the frame back using a skewer, creating hanging points for later.
9. Preheat your oven to 250°F and line a baking sheet with parchment paper.
10. Bake the frame for 2-3 hours until completely hard and dry, checking periodically for even coloring.
11. Remove the frame from the oven and let it cool completely on a wire rack for at least 1 hour.
12. Paint the cooled frame with acrylic paints, applying 2-3 thin coats and allowing each to dry completely.
13. Spray the painted frame with 2 light coats of clear sealant, waiting 15 minutes between applications for proper drying.
14. Attach your photo to the frame back using double-sided tape, aligning it carefully with the opening.
They emerge from the oven with a rustic, stone-like texture that feels substantial in your hands, the salt creating subtle crystalline patterns across the surface. These frames develop a lovely patina over time, their handmade imperfections telling the story of their creation. Try displaying them on a mantel with vintage family photos, or hang several together to create a gallery wall of precious memories.
Salt Dough Coasters
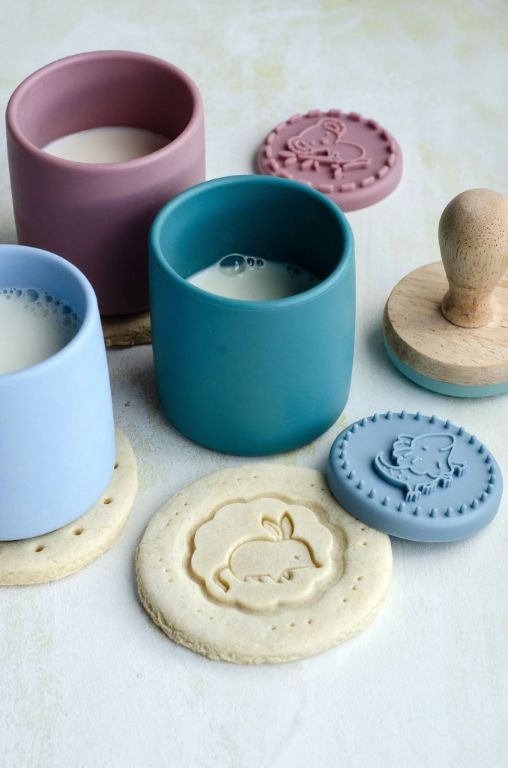
Mixing flour and salt together this afternoon felt like returning to something simple and elemental, the kind of quiet kitchen project that settles the mind while keeping the hands busy. These salt dough coasters emerge from the oven as rustic, personalized pieces that carry the gentle imprint of whatever natural treasures you press into them. There’s a humble beauty in creating something both practical and handmade, a small reminder of slow, intentional living.
Ingredients
– 1 cup all-purpose flour, plus extra for dusting
– 1/2 cup table salt
– 1/2 cup warm water (about 110°F)
– 1 tablespoon vegetable oil, or any neutral oil
Instructions
1. Preheat your oven to 250°F and line a baking sheet with parchment paper.
2. In a medium bowl, combine 1 cup all-purpose flour and 1/2 cup table salt with a whisk until fully incorporated.
3. Pour in 1/2 cup warm water and 1 tablespoon vegetable oil, then stir with a wooden spoon until a shaggy dough forms.
4. Turn the dough out onto a lightly floured surface and knead for 4–5 minutes until it becomes smooth and pliable.
5. Roll the dough to a 1/4-inch thickness using a floured rolling pin, checking occasionally to prevent sticking.
6. Cut the dough into 4-inch circles using a round cutter or the rim of a glass dipped in flour.
7. Press leaves, herbs, or textured fabrics gently into each coaster to create imprints, being careful not to pierce through.
8. Use a straw to poke a small hole near the top of each coaster if you plan to hang them later.
9. Arrange the coasters on the prepared baking sheet, spacing them 1 inch apart.
10. Bake for 2 hours at 250°F, then turn off the oven and let the coasters cool inside for 1 additional hour to prevent cracking.
11. Remove the coasters from the oven and allow them to cool completely on a wire rack.
12. Seal the cooled coasters with a food-safe sealant or mod podge, applying two thin coats and letting each dry fully.
Holding one of these finished coasters, you’ll notice its satisfying weight and slightly gritty texture, a subtle reminder of its simple ingredients. The surface feels solid and cool to the touch, perfect for protecting tabletops while adding a whisper of natural charm. Try grouping them with a pot of fresh herbs or tying them with twine for a handmade gift that carries the quiet magic of your kitchen.
Salt Dough Candle Holders
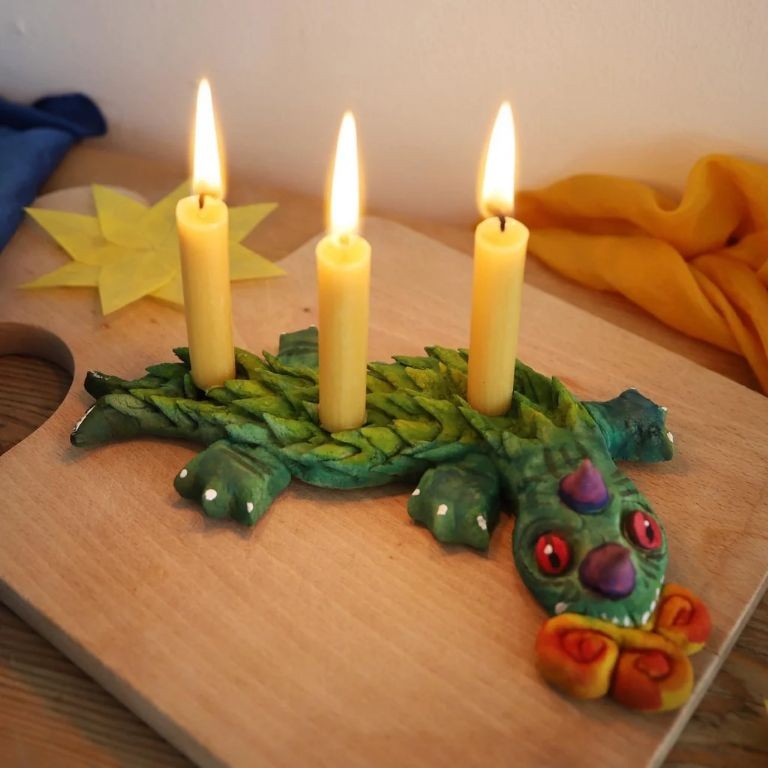
Under the soft glow of afternoon light, I find myself returning to this simple craft, the way one might revisit a favorite book. There’s something quietly grounding about shaping salt dough with your hands, transforming humble pantry staples into something that cradles warmth and light, a small anchor in the rush of days.
Ingredients
- 2 cups all-purpose flour (spooned and leveled for accuracy)
- 1 cup table salt (fine-grained for a smoother texture)
- 3/4 cup warm water (around 110°F, or warm to the touch)
- 1 tbsp vegetable oil (or any neutral oil, to prevent sticking)
Instructions
- Preheat your oven to 250°F, ensuring a low, gentle heat to dry the dough without browning it.
- In a large mixing bowl, whisk together the 2 cups of all-purpose flour and 1 cup of table salt until fully combined and no streaks remain.
- Pour the 3/4 cup of warm water and 1 tablespoon of vegetable oil into the dry ingredients.
- Stir the mixture with a wooden spoon until a shaggy dough begins to form and pull away from the sides of the bowl.
- Turn the dough out onto a lightly floured surface and knead it for 4-5 minutes, until it becomes smooth, pliable, and no longer sticky. Tip: If the dough feels too dry, add water 1 teaspoon at a time; if too sticky, sprinkle in a bit more flour.
- Divide the dough into four equal portions and roll each into a ball between your palms.
- Press your thumb firmly into the center of each ball, then gently widen the indentation with your fingers to form a cavity deep and wide enough to hold a tea light candle. Tip: Smooth the edges with a damp fingertip to prevent cracking as it bakes.
- Arrange the shaped holders on a parchment-lined baking sheet, spacing them about 2 inches apart.
- Bake the holders in the preheated 250°F oven for 2 hours, until they are completely hard and sound hollow when tapped lightly on the bottom. Tip: For extra durability, you can turn off the oven and let them cool inside for another hour to dry slowly.
- Remove the baking sheet from the oven and transfer the holders to a wire rack to cool completely to room temperature, about 1 hour.
Once cooled, they feel satisfyingly solid and slightly rough, like sun-baked clay, with a subtle mineral scent from the salt. Offering a rustic, earthy charm, they cradle a flickering tea light beautifully on a mantel or as a centerpiece, casting soft, dancing shadows that make even an ordinary evening feel quietly special.
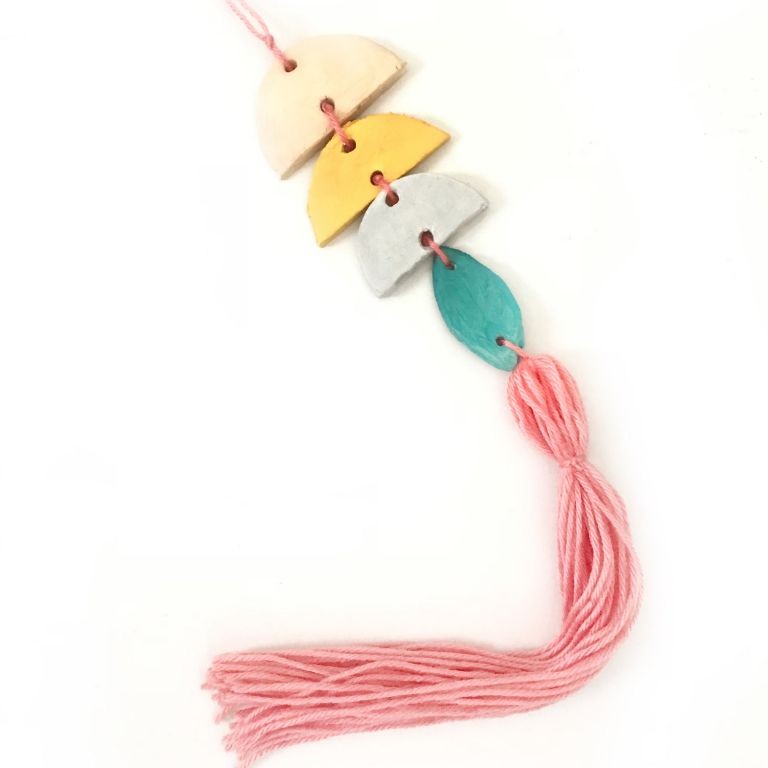
Salt Dough Garland

Every year around this time, I find myself drawn to simple kitchen projects that fill the house with warmth and the gentle rhythm of hands at work. Creating salt dough garlands feels like stitching together memories with flour and salt, each ornament holding the quiet satisfaction of something made slowly and with intention.
Ingredients
– 2 cups all-purpose flour (plus extra for dusting)
– 1 cup table salt
– 1 cup warm water (about 110°F, or comfortably warm to touch)
– 1 tablespoon vegetable oil (or any neutral oil, to prevent sticking)
– Food coloring, optional (gel works best for vibrant hues)
– Twine or ribbon for hanging
Instructions
1. Preheat your oven to 200°F—this low temperature ensures the dough dries slowly without browning.
2. In a large mixing bowl, combine 2 cups of all-purpose flour and 1 cup of table salt, whisking them together until fully incorporated.
3. Gradually pour in 1 cup of warm water while stirring continuously with a wooden spoon; the water should be warm enough to help the salt dissolve but not hot enough to cook the flour.
4. Add 1 tablespoon of vegetable oil to the mixture, which will make the dough more pliable and less likely to crack as it dries.
5. Knead the dough on a lightly floured surface for 5–7 minutes, until it becomes smooth and elastic, adding a sprinkle of extra flour if it feels too sticky.
6. If using food coloring, divide the dough into portions and knead in a few drops of gel coloring until evenly distributed, wearing gloves to avoid staining your hands.
7. Roll the dough to a ¼-inch thickness using a rolling pin, ensuring it’s uniform so ornaments dry at the same rate.
8. Cut shapes with cookie cutters or a knife, pressing firmly and twisting slightly to release clean edges.
9. Use a straw to poke a hole near the top of each shape for hanging, making sure it’s wide enough to thread twine later.
10. Arrange the shapes on a parchment-lined baking sheet, spacing them about 1 inch apart to allow air circulation.
11. Bake for 2–3 hours, flipping the ornaments halfway through, until they are hard and completely dry to the touch.
12. Let the ornaments cool completely on the baking sheet before handling, as they’re fragile when warm.
13. Thread twine or ribbon through the holes to assemble your garland, tying secure knots to keep ornaments in place. Gently rustic and lightly textured, these garlands carry the subtle grain of salt and the soft matte finish of baked dough. Hang them across a mantel or drape them over a windowsill where the light catches their handmade imperfections, and they’ll whisper of quiet afternoons spent creating something lasting from the simplest of ingredients.
Salt Dough Keychains
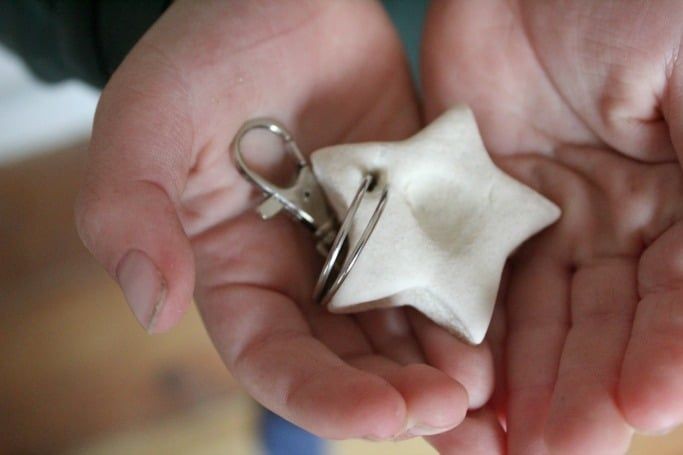
Zestfully, there’s something quietly grounding about shaping simple pantry staples into lasting keepsakes, a gentle craft that turns flour and salt into tiny, tangible memories. Making salt dough keychains feels like pressing pause on the day’s rush, your hands dusted white as you mold soft shapes destined to hold keys and moments alike. It’s a humble, heartfelt project that asks for little but gives back in warmth and whimsy, perfect for a slow afternoon alone or shared with little ones.
Ingredients
– 1 cup all-purpose flour (plus extra for dusting)
– 1/2 cup table salt
– 1/2 cup warm water (about 110°F, or comfortably warm to touch)
– 1 tbsp vegetable oil (or any neutral oil, to prevent sticking)
– Acrylic paints and clear sealant spray (optional, for decorating and preserving)
Instructions
1. Preheat your oven to 200°F—this low temperature slowly dries the dough without browning it.
2. In a medium bowl, whisk together 1 cup all-purpose flour and 1/2 cup table salt until fully combined.
3. Gradually pour in 1/2 cup warm water while stirring with a fork to form a shaggy dough.
4. Drizzle in 1 tbsp vegetable oil and knead the mixture by hand for 3–4 minutes until it becomes smooth and pliable; if it feels sticky, dust your surface lightly with extra flour.
5. Roll the dough out to 1/4-inch thickness on a floured surface, using a rolling pin for evenness.
6. Cut shapes using cookie cutters or a knife, then use a straw to poke a small hole near the top of each for the keychain loop.
7. Transfer the shapes to a parchment-lined baking sheet, spacing them 1 inch apart to allow air circulation.
8. Bake for 2–3 hours, flipping each piece halfway through, until they are hard and completely dry to the touch.
9. Let the keychains cool fully on a wire rack for 30 minutes before decorating, if desired.
10. Once cooled, thread a keychain ring through each hole and optionally seal with acrylic paint and clear spray for durability. Mostly, these keychains emerge firm and lightly textured, with a rustic, matte finish that feels solid in your palm. Their simplicity invites personal touches—a painted initial, a glossy seal—transforming them into tiny heirlooms that jingle with stories every time you reach for your keys.
Salt Dough Magnets
Remembering how my grandmother would press my small handprints into clay, I find myself returning to that same quiet magic with salt dough, crafting humble magnets that hold more than just notes on the refrigerator—they hold moments, simple and sweet.
Ingredients
– 1 cup all-purpose flour (plus extra for dusting)
– 1/2 cup table salt
– 1/2 cup warm water (about 110°F, or comfortably warm to the touch)
– 1 tbsp vegetable oil (or any neutral oil, to prevent sticking)
– 4-6 small round magnets (about 1/2-inch diameter, strong enough to hold paper)
– Acrylic paint in assorted colors (non-toxic, for safe decorating)
– Clear sealant spray (food-safe optional, for durability)
Instructions
1. Preheat your oven to 250°F, placing a rack in the center position for even heating.
2. In a medium mixing bowl, combine 1 cup all-purpose flour and 1/2 cup table salt, stirring with a fork until no clumps remain.
3. Pour in 1/2 cup warm water and 1 tbsp vegetable oil, mixing with a spoon until a shaggy dough forms.
4. Turn the dough onto a lightly floured surface and knead for 3-5 minutes, until it becomes smooth and pliable like modeling clay.
5. Roll the dough to 1/4-inch thickness using a rolling pin, dusting with extra flour if it sticks to the surface.
6. Cut shapes with cookie cutters or a knife, pressing firmly to create clean edges.
7. Press 1 small round magnet into the back of each shape, embedding it fully so it sits flush with the dough.
8. Arrange the shapes on a parchment-lined baking sheet, spacing them 1 inch apart to allow for air circulation.
9. Bake for 2 hours at 250°F, until the dough is hard and sounds hollow when tapped lightly.
10. Remove from the oven and cool completely on a wire rack for 30 minutes.
11. Paint the cooled shapes with acrylic paint, applying thin layers and letting each dry for 10 minutes between coats.
12. Spray with clear sealant in a well-ventilated area, holding the can 8 inches away and applying two light coats, drying for 1 hour between applications.
Here, the magnets emerge with a rustic, slightly grainy texture that whispers of handmade care, their surfaces ready to brighten kitchen memos or gift as tiny tokens of connection.
Salt Dough Bowls
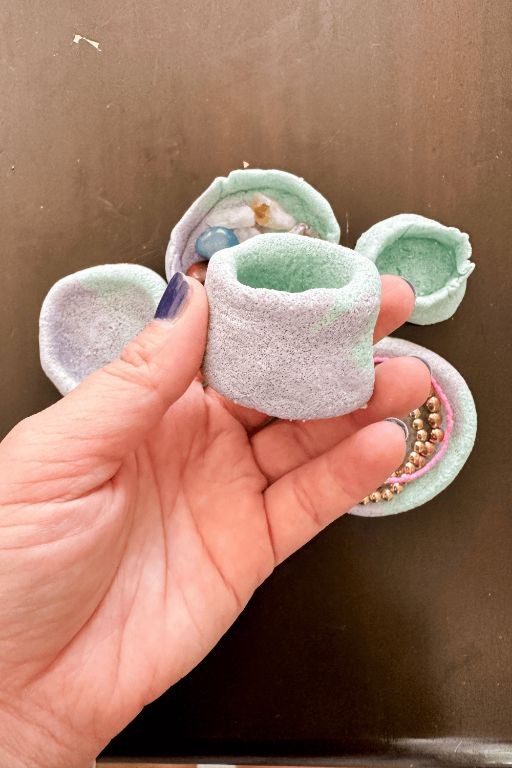
There’s something quietly meditative about working with your hands, about transforming simple pantry staples into something both beautiful and functional. Today, I found myself drawn back to the humble comfort of salt dough, its earthy scent and pliable texture a gentle reminder of slower, more intentional making.
Ingredients
– 4 cups all-purpose flour, plus extra for dusting
– 1 cup table salt
– 1 ½ cups warm water (around 110°F)
– 2 tablespoons vegetable oil, or any neutral oil
Instructions
1. Preheat your oven to 250°F, placing a rack in the center position for even, gentle heating.
2. In a large mixing bowl, whisk together 4 cups of all-purpose flour and 1 cup of table salt until fully combined and no streaks remain.
3. Create a well in the center of the dry ingredients and pour in 1 ½ cups of warm water and 2 tablespoons of vegetable oil.
4. Use a wooden spoon to stir the mixture until a shaggy dough begins to form and pull away from the sides of the bowl.
5. Lightly flour a clean work surface and turn the dough out onto it.
6. Knead the dough by hand for 8-10 minutes, until it becomes smooth, elastic, and no longer sticky, adding a light dusting of extra flour only if it sticks to your hands.
7. Divide the dough into 4 equal portions and roll each into a smooth ball.
8. Press your thumb into the center of one ball and gently press outward, rotating the dough to form a bowl shape with walls about ½-inch thick.
9. Repeat the shaping process with the remaining 3 dough balls, ensuring all bowls have a consistent thickness for even drying.
10. Arrange the shaped bowls on a parchment-lined baking sheet, spacing them at least 2 inches apart to allow for air circulation.
11. Place the baking sheet in the preheated oven and bake for 2 hours, until the bowls are completely dry, hard to the touch, and have a very pale golden color.
12. Turn off the oven and let the bowls cool inside for 1 hour to prevent cracking from rapid temperature changes.
13. Remove the baking sheet from the oven and transfer the bowls to a wire rack to cool completely to room temperature.
Using these bowls feels like holding a piece of baked earth—they are surprisingly sturdy with a satisfyingly rough, matte texture. Unadorned, they make perfect rustic vessels for dry goods or bread rolls, but a thin coat of food-safe sealant can transform them into unique, handcrafted serving pieces for nuts or small treats.
Salt Dough Wall Art
Perhaps there’s something quietly beautiful about creating with your hands, especially when the materials are as humble as flour and salt. Pressing this simple dough into shapes feels like a gentle meditation, a way to capture fleeting moments in something tangible that will last. This salt dough wall art becomes more than decoration—it’s a preserved memory, warm from the oven and ready to hold space on your wall.
Ingredients
– 2 cups all-purpose flour (plus extra for dusting)
– 1 cup table salt
– 1 cup warm water (around 110°F)
– 1 tbsp vegetable oil (or any neutral oil)
– Food coloring in your choice of colors (optional, for tinting)
– Clear acrylic sealer spray (for preserving finished pieces)
Instructions
1. Preheat your oven to 250°F—this low temperature prevents bubbling and ensures even drying.
2. Whisk together 2 cups all-purpose flour and 1 cup table salt in a large mixing bowl until fully combined.
3. Create a well in the center of your dry ingredients and pour in 1 cup warm water and 1 tbsp vegetable oil.
4. Stir the mixture with a wooden spoon until a shaggy dough forms, then knead by hand for 5-7 minutes until smooth and elastic.
5. Roll the dough to ¼-inch thickness on a lightly floured surface using a rolling pin.
6. Cut shapes using cookie cutters or a knife, transferring them to a parchment-lined baking sheet.
7. Use a straw to poke hanging holes near the top of each shape if you plan to display them.
8. Bake for 2 hours at 250°F, flipping pieces halfway through for even drying.
9. Remove from oven when pieces are hard and completely dry, then cool completely on a wire rack for 1 hour.
10. Apply 2-3 light coats of clear acrylic sealer spray, allowing 15 minutes drying time between coats. Zestfully textured with a rustic, grainy surface that catches the light, these creations carry the satisfying weight of handmade objects. The finished pieces develop a lovely matte finish that absorbs shadows beautifully, making them perfect for grouping in gallery walls or hanging individually where morning sun can highlight their subtle imperfections.
Salt Dough Fairy Houses
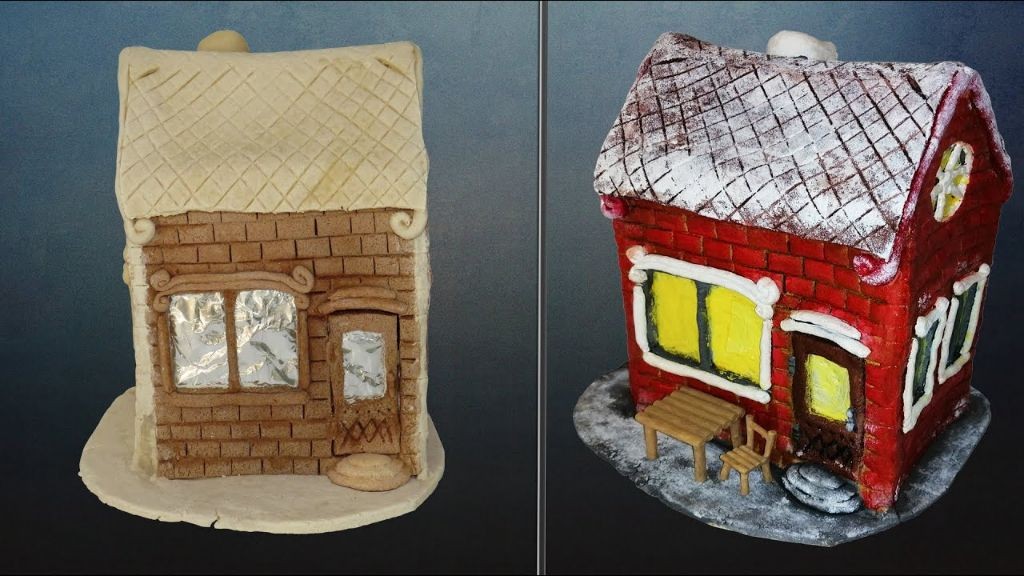
Nestled between the pages of my grandmother’s recipe box, I found this simple salt dough recipe that feels like making childhood memories tangible. There’s something quietly magical about transforming humble kitchen ingredients into delicate fairy houses that seem to whisper woodland secrets. Each tiny structure becomes a vessel for imagination, crafted slowly with hands that remember what it means to create just for the joy of it.
Ingredients
– 4 cups all-purpose flour (plus extra for dusting surfaces)
– 1 cup table salt
– 1½ cups warm water (about 110°F, or comfortably warm to touch)
– 2 tbsp vegetable oil (or any neutral oil to prevent sticking)
– Food coloring in earthy tones (optional, for tinting dough)
– Clear acrylic sealer spray (optional, for preserving finished pieces)
Instructions
1. Combine 4 cups all-purpose flour and 1 cup table salt in a large mixing bowl, whisking thoroughly to eliminate any salt clumps.
2. Create a well in the center of the dry ingredients and pour in 1½ cups warm water and 2 tbsp vegetable oil.
3. Mix with a wooden spoon until a shaggy dough forms, then knead by hand on a lightly floured surface for 8-10 minutes until smooth and elastic. Tip: The dough should feel like soft playdough—if too sticky, add flour 1 tbsp at a time; if too dry, sprinkle with water 1 tsp at a time.
4. Divide dough into portions and knead in food coloring if desired, working until color is fully incorporated with no marbling.
5. Preheat oven to 200°F and line two baking sheets with parchment paper.
6. Shape dough into fairy house components: roll walls to ¼-inch thickness, form conical roofs, and create tiny doors and windows using toothpicks for detail work.
7. Assemble houses on prepared baking sheets, pressing pieces together firmly and smoothing seams with damp fingers. Tip: Dampening connection points helps pieces adhere better during baking.
8. Bake for 2-3 hours until completely hard and dry, rotating pans halfway through for even drying. Tip: Test doneness by tapping gently—a hollow sound indicates fully dried dough.
9. Turn off oven and let houses cool inside for 1 hour to prevent cracking from temperature shock.
10. Apply clear acrylic sealer if using, spraying in thin, even coats according to product directions. Remember the satisfying crunch when breaking apart these fairy houses months later, their snowy white surfaces having captured tiny handprints and creative imperfections. Really, they become more than crafts—they’re time capsules of quiet afternoons, their rough texture and pure salt flavor giving way to stories that linger long after the dough has crumbled.
Salt Dough Holiday Wreaths

Zigzagging through holiday memories, I find myself returning to the simple comfort of salt dough creations. There’s something quietly grounding about shaping these wreaths by hand, each one holding space for reflection amid the season’s rush. Today, let’s craft these humble ornaments together, slowly and with intention.
Ingredients
– 2 cups all-purpose flour (plus extra for dusting)
– 1 cup table salt
– 1 cup warm water (about 110°F, or comfortably warm to touch)
– 1 tbsp vegetable oil (or any neutral oil, to prevent sticking)
– Green food coloring, 10-15 drops (adjust for desired shade)
– Red cinnamon candies, 12-15 pieces (for berry accents, optional)
– 1 large egg white, lightly beaten (for glossy finish, optional)
Instructions
1. Preheat your oven to 250°F—this low temperature slowly dries the dough without browning it.
2. In a large mixing bowl, whisk together 2 cups flour and 1 cup salt until fully combined.
3. Make a well in the center and pour in 1 cup warm water and 1 tbsp vegetable oil.
4. Stir with a wooden spoon until a shaggy dough forms, then knead on a floured surface for 5 minutes until smooth and elastic.
5. Divide the dough into 4 equal portions and knead 10-15 drops green food coloring into each until evenly tinted, wearing gloves to avoid stained hands.
6. Roll one portion into a rope about 12 inches long and ½-inch thick, keeping unused dough covered to prevent drying.
7. Curve the rope into a circle, overlapping the ends by 1 inch, and pinch firmly to seal—this creates the wreath base.
8. Repeat with remaining dough portions, placing wreaths 2 inches apart on a parchment-lined baking sheet.
9. Press 3-4 red cinnamon candies into each wreath as berry accents, if using, gently embedding them so they don’t fall off.
10. Bake at 250°F for 2 hours, rotating the sheet halfway through, until wreaths are hard and fully dry.
11. Cool completely on a wire rack, about 1 hour, then brush with beaten egg white for a subtle sheen, if desired.
Kneaded with care, these wreaths emerge firm yet lightweight, their earthy saltiness mingling with the faint spice of cinnamon candies. Hang them on a tree with rustic twine, or nestle them among evergreen branches for a handmade touch that whispers of quiet moments. They’ll last for seasons, growing more cherished with each year’s unpacking.
Salt Dough Gift Tags
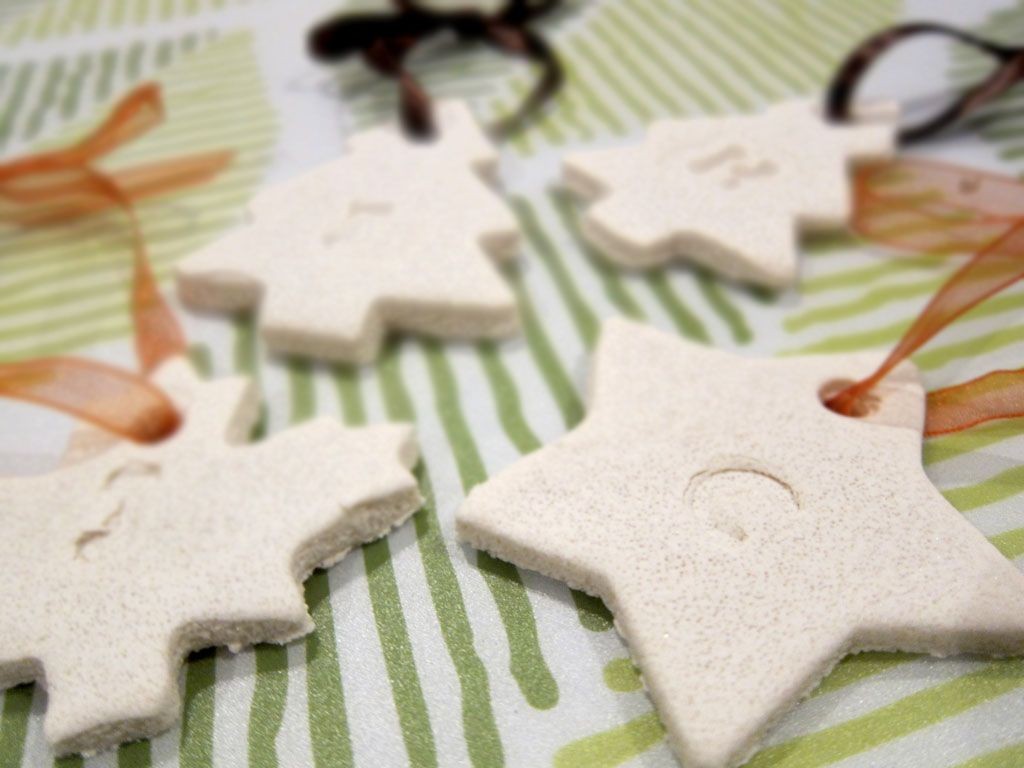
Kind of like finding an old letter tucked in a book, these salt dough gift tags carry that same quiet charm—simple, handmade tokens that whisper rather than shout, perfect for wrapping packages with personal warmth.
Ingredients
- 2 cups all-purpose flour (plus extra for dusting)
- 1 cup table salt
- ¾ cup warm water (about 110°F, or warm to the touch)
- 1 tablespoon vegetable oil (or any neutral oil, to prevent sticking)
Instructions
- Preheat your oven to 200°F—this low temperature slowly dries the dough without browning it.
- In a large mixing bowl, combine 2 cups all-purpose flour and 1 cup table salt, whisking briefly to evenly distribute the salt.
- Add ¾ cup warm water and 1 tablespoon vegetable oil to the dry ingredients, stirring with a wooden spoon until a shaggy dough forms.
- Lightly flour a clean countertop with extra all-purpose flour to prevent sticking.
- Turn the dough out onto the floured surface and knead for 4–5 minutes, until it becomes smooth and pliable—if it feels too dry, add water 1 teaspoon at a time.
- Roll the dough to ¼-inch thickness using a rolling pin, checking evenly with a ruler to avoid thin spots that may break.
- Cut the dough into gift tag shapes using cookie cutters or a knife, making each about 2–3 inches wide.
- Use a straw to poke a small hole near the top of each tag for threading ribbon later.
- Arrange the tags on a parchment-lined baking sheet, spacing them 1 inch apart to allow air circulation.
- Bake for 2–3 hours, flipping the tags halfway through, until they are hard and completely dry to the touch.
- Remove from the oven and let cool fully on a wire rack for 30 minutes before decorating.
Once cooled, these tags feel sturdy yet slightly gritty, like sun-baked clay, and their plain surface invites watercolor paints or handwritten names—tie them with twine to gifts, and they’ll hold memories long after the wrapping is gone.
Salt Dough Pendants

Often, in the quiet of an afternoon, I find myself drawn to simple projects that connect me to childhood memories and the satisfying feel of dough between my fingers. Salt dough pendants are one of those gentle crafts, perfect for creating personalized ornaments or gifts with a rustic, handmade charm.
Ingredients
– 2 cups all-purpose flour, plus extra for dusting
– 1 cup table salt
– 1 cup warm water (about 110°F)
– 1 tbsp vegetable oil, or any neutral oil
– Acrylic paint and clear sealant spray (optional, for decorating)
Instructions
1. Preheat your oven to 250°F to ensure it’s ready for slow, even baking.
2. In a large mixing bowl, combine 2 cups of all-purpose flour and 1 cup of table salt thoroughly with a whisk to avoid lumps.
3. Gradually pour in 1 cup of warm water while stirring continuously with a wooden spoon until a shaggy dough forms.
4. Add 1 tablespoon of vegetable oil to the mixture to improve the dough’s pliability and prevent cracking.
5. Knead the dough on a lightly floured surface for 5–7 minutes until it becomes smooth and elastic, adding a sprinkle of flour if it feels sticky.
6. Roll the dough out to a 1/4-inch thickness using a rolling pin, checking evenly with a ruler to ensure consistent pendant size.
7. Cut shapes from the dough with cookie cutters or a knife, making a small hole at the top of each with a straw for hanging later.
8. Place the pendants on a parchment-lined baking sheet, spacing them 1 inch apart to allow for air circulation.
9. Bake in the preheated oven for 2 hours, then check for hardness; if not fully firm, bake in 30-minute increments until they sound hollow when tapped.
10. Let the pendants cool completely on the baking sheet for 1 hour to prevent cracking from sudden temperature changes.
11. Decorate with acrylic paint if desired, applying thin coats and letting each dry for 15 minutes before adding details.
12. Seal the painted pendants with a clear spray sealant in a well-ventilated area, holding the can 8 inches away for even coverage.
Rough yet smooth to the touch, these pendants have a earthy, slightly gritty texture that evokes natural artistry. Their neutral base pairs beautifully with painted designs or simple twine hangers, making them ideal for adorning holiday trees or gifting as heartfelt keepsakes to friends.
Salt Dough Leaf Imprints
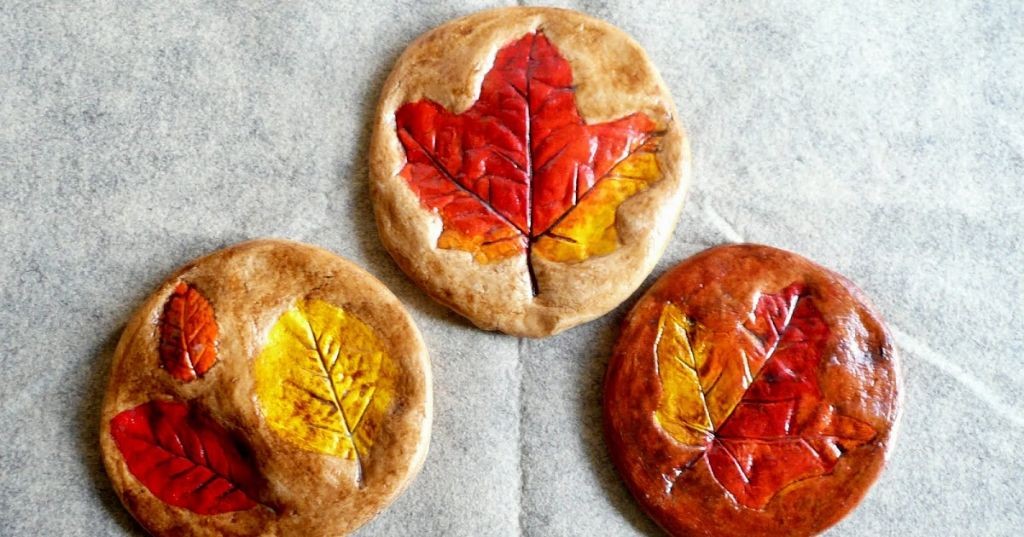
Tracing the delicate veins of autumn leaves in salt dough feels like preserving whispers of the season. There’s something quietly meditative about pressing each unique leaf into the soft surface, capturing nature’s intricate patterns before they fade. This simple craft invites us to slow down and notice the small, beautiful details we often rush past.
Ingredients
– 2 cups all-purpose flour (plus extra for dusting)
– 1 cup table salt
– 1 cup warm water (about 110°F, or comfortably warm to touch)
– Assorted autumn leaves (choose flat, sturdy varieties like maple or oak)
Instructions
1. Combine 2 cups all-purpose flour and 1 cup table salt in a large mixing bowl.
2. Gradually pour 1 cup warm water into the dry ingredients while stirring with a wooden spoon.
3. Knead the mixture on a lightly floured surface for 5-7 minutes until it forms a smooth, pliable ball that doesn’t stick to your hands.
4. Roll the dough to 1/4-inch thickness using a rolling pin, ensuring even consistency throughout.
5. Press clean, dry leaves vein-side down firmly into the dough surface for 10-15 seconds each.
6. Carefully lift each leaf straight up to reveal the imprinted pattern without smudging.
7. Use a knife or cookie cutter to cut around each leaf imprint, leaving 1/2-inch borders.
8. Transfer the cut dough shapes to a baking sheet lined with parchment paper.
9. Bake at 250°F for 2-3 hours until completely hard and dry to the touch.
10. Remove from oven and cool completely on a wire rack for 1 hour before handling.
The finished imprints emerge with satisfying crispness, their textured surfaces holding the memory of each leaf’s unique architecture. These pale, earthy creations make lovely natural ornaments or gift tags, their simplicity echoing the quiet beauty of bare branches against a November sky.
Salt Dough Name Plaques
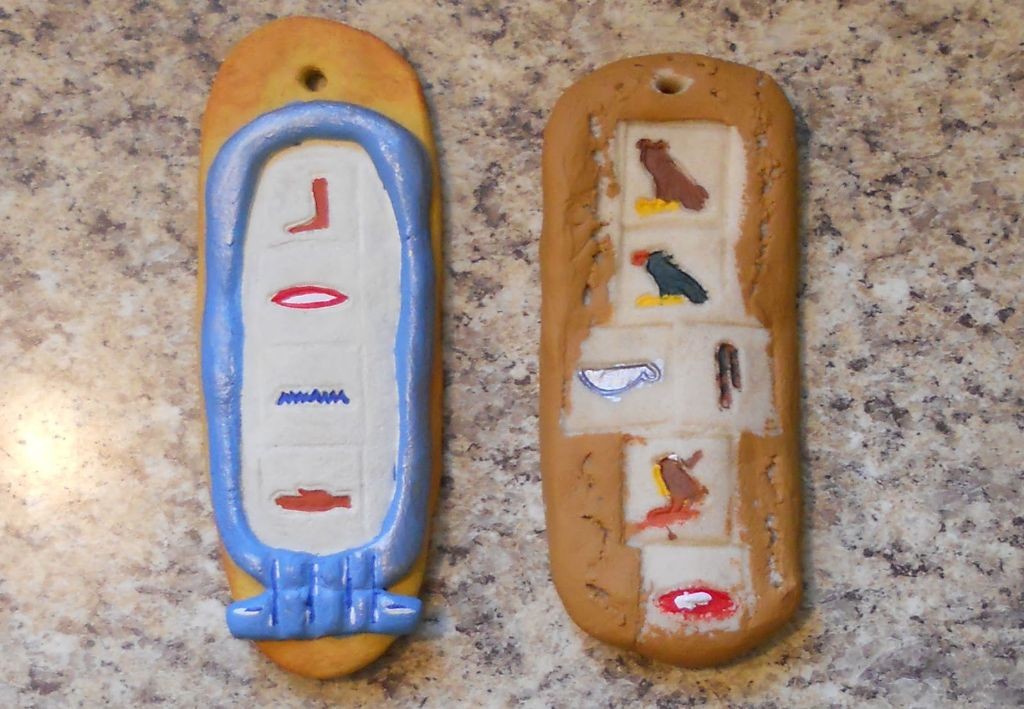
Holding this warm, textured dough in my hands takes me back to childhood afternoons when making something simple felt like creating treasure. There’s something quietly magical about transforming basic pantry staples into personalized keepsakes that carry the weight of memory in their humble form. These salt dough plaques become little monuments to moments, bearing names with gentle permanence.
Ingredients
– 2 cups all-purpose flour (plus extra for dusting)
– 1 cup table salt
– 1 cup warm water (about 110°F)
– 1 tablespoon vegetable oil (or any neutral oil)
– Acrylic paints in assorted colors (non-toxic varieties work well)
– Clear sealant spray (matte or glossy finish)
Instructions
1. Preheat your oven to 250°F and line a baking sheet with parchment paper.
2. Combine 2 cups all-purpose flour and 1 cup table salt in a large mixing bowl, whisking until fully incorporated.
3. Gradually pour in 1 cup warm water while stirring with a wooden spoon until a shaggy dough forms.
4. Add 1 tablespoon vegetable oil to the mixture and knead by hand for 5-7 minutes until the dough becomes smooth and elastic.
5. Lightly dust your work surface with flour and roll the dough to ¼-inch thickness using a rolling pin.
6. Cut the dough into desired plaque shapes using cookie cutters or a knife, making each piece approximately 4×6 inches.
7. Use a straw to punch a small hole near the top of each plaque if you plan to hang them later.
8. Transfer the shaped plaques to the prepared baking sheet, spacing them 1 inch apart.
9. Bake at 250°F for 2-3 hours until the plaques are completely hard and sound hollow when tapped.
10. Remove from oven and cool completely on a wire rack for 1 hour before decorating.
11. Paint the cooled plaques with acrylic paints, applying thin layers and allowing each to dry for 20 minutes between coats.
12. Spray finished plaques with clear sealant in a well-ventilated area, holding the can 8-10 inches away and applying two light coats.
My favorite part remains the transformation from soft pliability to solid permanence, the way these plaques develop a stone-like texture that belies their humble origins. The finished pieces carry a satisfying weight in your hand, their painted surfaces glowing under the sealant’s protective layer. Mount them on nursery walls as name markers, or arrange several together as a family gallery that grows with each new addition.
Salt Dough Miniature Food
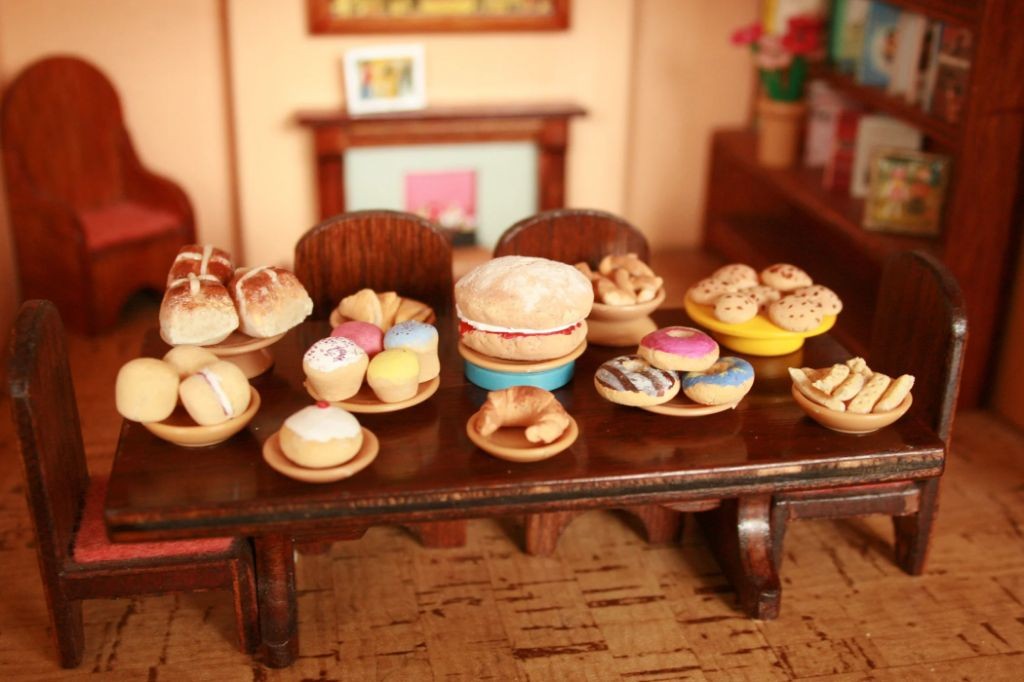
Looking back at childhood afternoons spent crafting, I remember how salt dough transformed ordinary kitchen ingredients into tiny, permanent keepsakes. There’s something quietly magical about watching flour and salt become miniature food replicas that last for years. Today feels like the perfect moment to revisit this simple, meditative craft.
Ingredients
– 2 cups all-purpose flour (plus extra for dusting)
– 1 cup table salt
– 3/4 cup warm water (about 110°F)
– 1 tbsp vegetable oil (or any neutral oil)
Instructions
1. Preheat your oven to 200°F and line a baking sheet with parchment paper.
2. In a large mixing bowl, combine 2 cups of all-purpose flour and 1 cup of table salt using a whisk.
3. Create a well in the center of the dry ingredients and pour in 3/4 cup of warm water.
4. Add 1 tablespoon of vegetable oil to the water in the well.
5. Use a wooden spoon to gradually incorporate the dry ingredients into the wet ingredients until a shaggy dough forms.
6. Lightly flour a clean work surface with additional all-purpose flour.
7. Transfer the dough mixture onto the floured surface and knead for 5-7 minutes until smooth and elastic.
8. Roll small portions of dough to 1/4-inch thickness using a rolling pin.
9. Use cookie cutters or a knife to shape the dough into miniature food forms like tiny fruits or vegetables.
10. Arrange the shaped dough pieces on the prepared baking sheet, leaving 1 inch between each piece.
11. Bake in the preheated oven for 2 hours until the pieces are completely hard and dry.
12. Turn off the oven and let the salt dough creations cool inside for 1 additional hour.
13. Remove the cooled pieces from the oven and allow them to reach room temperature on a wire rack.
Drying slowly in the low oven gives these miniature foods a firm, ceramic-like texture that holds intricate details beautifully. The plain white surface becomes a perfect canvas for acrylic paints if you want to add color later. These tiny creations make charming decorations for dollhouses, unique holiday ornaments, or thoughtful handmade gifts that carry the warmth of kitchen memories.
Summary
Versatile and budget-friendly, these salt dough recipes offer endless creative possibilities for family fun. We hope you’ll try making some of these crafts, share your favorites in the comments below, and pin your favorite projects to Pinterest for later. Happy crafting!