Ready to transform your dinner routine? Shredded chicken thighs are the ultimate kitchen hero—tender, juicy, and packed with flavor. Whether you’re craving quick weeknight meals, cozy comfort food, or impressive dishes for guests, this roundup has you covered. Dive in and discover 20 delicious ways to make every occasion tastier!
Spicy Shredded Chicken Thigh Tacos with Avocado Crema

Let’s create a taco night favorite that balances heat with cool creaminess. Learning to make these shredded chicken thigh tacos will give you a go-to recipe for casual dinners that still feel special.
Ingredients
- 1.5 lbs boneless, skinless chicken thighs – I find thighs stay juicier than breasts when shredded
- 2 tbsp olive oil – extra virgin is my kitchen staple for better flavor
- 1 tbsp chili powder – use the good stuff from the Mexican aisle
- 1 tsp cumin – freshly ground if you have it
- 1/2 tsp smoked paprika – this adds that subtle smokiness I love
- 3 cloves garlic, minced – fresh garlic makes all the difference
- 1/4 cup chicken broth – low sodium lets you control the salt
- 1 ripe avocado – pick one that yields slightly to pressure
- 1/4 cup sour cream – full fat creates the creamiest texture
- 2 tbsp lime juice – fresh squeezed beats bottled every time
- 8 small corn tortillas – I warm mine directly over the gas flame
- 1/4 cup chopped cilantro – stems removed for better texture
- 1/4 cup diced red onion – soak in cold water to tame the bite
Instructions
- Pat chicken thighs completely dry with paper towels – this ensures proper browning.
- Heat olive oil in a large skillet over medium-high heat until shimmering, about 2 minutes.
- Season chicken thighs evenly with chili powder, cumin, and smoked paprika on both sides.
- Place chicken in the hot skillet and cook for 6 minutes without moving to develop a golden crust.
- Flip chicken and cook for another 5 minutes until both sides are deeply browned.
- Add minced garlic to the skillet and cook for 30 seconds until fragrant.
- Pour in chicken broth and immediately reduce heat to low.
- Cover skillet and simmer for 20 minutes until chicken reaches 165°F internally.
- Transfer chicken to a cutting board, reserving the cooking liquid in the skillet.
- Use two forks to shred the chicken against the grain into bite-sized pieces.
- Return shredded chicken to the skillet with the reserved liquid and toss to coat.
- In a small bowl, scoop avocado flesh and mash with a fork until smooth.
- Whisk in sour cream and lime juice until the creama is completely uniform.
- Heat tortillas one at a time in a dry skillet for 15 seconds per side until pliable.
- Divide shredded chicken evenly among warmed tortillas.
- Drizzle each taco generously with avocado creama.
- Top with chopped cilantro and diced red onion for serving.
Succulent shredded chicken provides a satisfying texture against the cool, smooth avocado creama. The spicy seasoning melds beautifully with the bright lime and fresh herbs. Serve these immediately with extra lime wedges for squeezing over the top, and consider adding quick-pickled jalapeños for those who want extra heat.
Garlic Butter Shredded Chicken Thigh Pasta
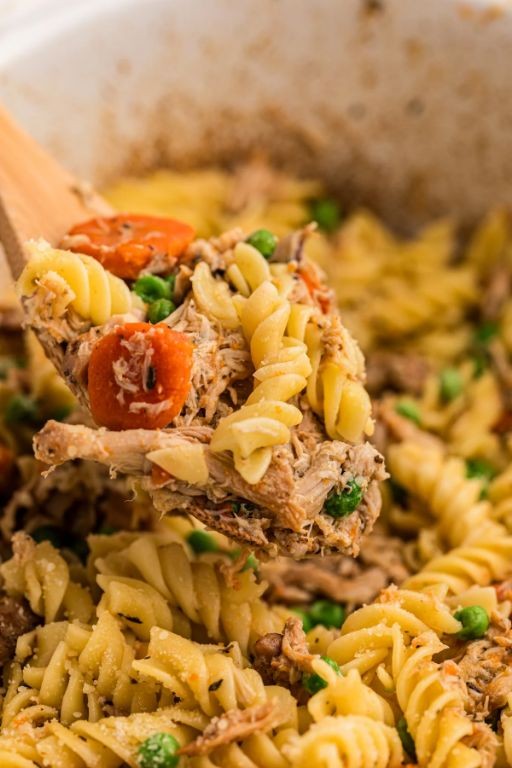
Even the busiest weeknights deserve a comforting pasta dish that feels special without requiring chef-level skills. Garlic Butter Shredded Chicken Thigh Pasta brings together tender chicken, rich garlic butter sauce, and perfectly cooked pasta in one satisfying skillet meal. Let’s walk through each step together to create this family favorite.
Ingredients
– 1.5 lbs boneless, skinless chicken thighs (I find thighs stay juicier than breasts)
– 12 oz linguine pasta (the ridges hold the sauce beautifully)
– 4 tbsp unsalted butter (I prefer unsalted to control the seasoning)
– 6 garlic cloves, minced (fresh garlic makes all the difference here)
– 1 cup heavy cream (room temperature blends more smoothly)
– 1/2 cup grated Parmesan cheese (freshly grated melts better)
– 2 tbsp chopped fresh parsley (adds that fresh pop of color and flavor)
– 1 tsp salt
– 1/2 tsp black pepper
– 1/2 tsp red pepper flakes (adjust to your preferred heat level)
Instructions
1. Bring a large pot of salted water to a rolling boil over high heat.
2. Add linguine to the boiling water and cook for 9 minutes until al dente, stirring occasionally to prevent sticking.
3. While pasta cooks, pat chicken thighs dry with paper towels and season both sides with salt and black pepper.
4. Melt 2 tablespoons of butter in a large skillet over medium-high heat until bubbling.
5. Place chicken thighs in the skillet and cook for 6 minutes without moving to develop a golden-brown crust.
6. Flip chicken thighs and cook for another 6 minutes until internal temperature reaches 165°F on an instant-read thermometer.
7. Transfer cooked chicken to a cutting board and let rest for 5 minutes to redistribute juices.
8. Reduce skillet heat to medium-low and add remaining 2 tablespoons of butter.
9. Add minced garlic to the skillet and cook for 1 minute until fragrant but not browned.
10. Pour heavy cream into the skillet and whisk continuously for 2 minutes until slightly thickened.
11. Shred the rested chicken using two forks, pulling against the grain for tender strands.
12. Add shredded chicken back to the skillet along with cooked linguine, Parmesan cheese, and red pepper flakes.
13. Toss everything together for 2 minutes until the pasta is evenly coated in the creamy sauce.
14. Stir in chopped parsley just before serving.
Let the creamy sauce cling to every strand of pasta while the shredded chicken provides tender bites throughout. The garlic butter base creates a rich foundation that’s balanced by the slight heat from red pepper flakes. For an elegant presentation, garnish with extra Parmesan and serve alongside a crisp green salad to cut through the richness.
Asian-Inspired Shredded Chicken Thigh Lettuce Wraps
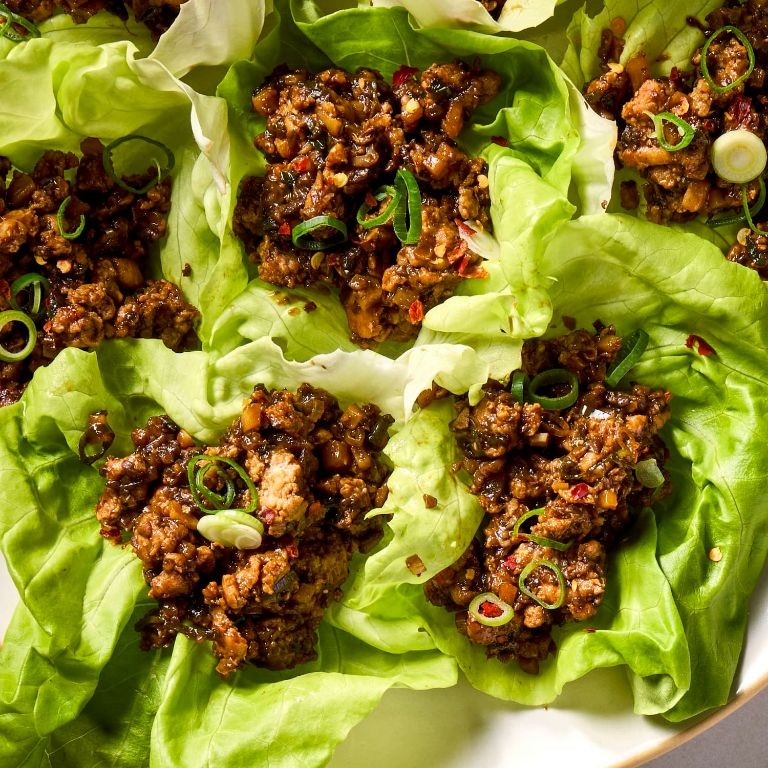
Ready to create restaurant-quality lettuce wraps right in your own kitchen? These Asian-inspired shredded chicken thigh wraps combine savory, sweet, and fresh flavors in a delightful handheld package that’s perfect for weeknight dinners or entertaining guests. Let’s walk through each step together to ensure your wraps turn out perfectly balanced and full of flavor.
Ingredients
– 1.5 lbs boneless, skinless chicken thighs (I find thighs stay juicier than breasts)
– 2 tbsp sesame oil (toasted sesame oil adds wonderful depth)
– 3 tbsp soy sauce (I prefer low-sodium to control saltiness)
– 2 tbsp rice vinegar
– 1 tbsp honey
– 3 cloves garlic, minced (fresh garlic makes all the difference)
– 1 tbsp fresh ginger, grated
– 8 large butter lettuce leaves (the cup-shaped ones work best)
– 2 green onions, thinly sliced
– 1/4 cup chopped cilantro
– 1/4 cup shredded carrots
Instructions
1. Place chicken thighs in a medium saucepan and cover with cold water by 1 inch.
2. Bring water to a boil over high heat, then reduce to a gentle simmer.
3. Cook chicken for 15 minutes at a steady simmer, skimming off any foam that rises to the surface.
4. Remove chicken from heat and let it rest in the hot cooking liquid for 5 minutes to finish cooking through.
5. Transfer chicken to a cutting board and shred using two forks, pulling against the grain.
6. Whisk together sesame oil, soy sauce, rice vinegar, honey, minced garlic, and grated ginger in a large bowl.
7. Add shredded chicken to the sauce mixture and toss until evenly coated.
8. Let the chicken marinate in the sauce for 10 minutes to absorb the flavors.
9. Wash and pat dry butter lettuce leaves, being careful not to tear them.
10. Arrange lettuce leaves on a serving platter with the cupped side facing up.
11. Spoon the marinated chicken mixture evenly among the lettuce cups.
12. Top each wrap with sliced green onions, chopped cilantro, and shredded carrots.
These wraps offer a wonderful contrast between the warm, savory chicken and the cool, crisp lettuce. The shredded texture of the chicken allows it to soak up the flavorful sauce beautifully, while the fresh toppings add brightness and crunch. Try serving them with extra sauce for dipping or alongside steamed jasmine rice for a more substantial meal.
Creamy Shredded Chicken Thigh and Mushroom Stroganoff
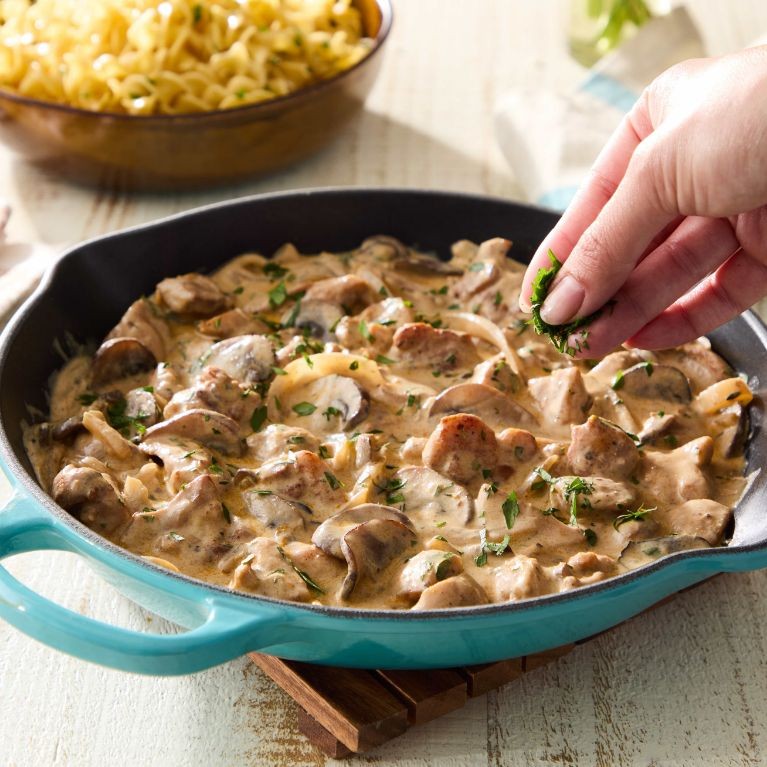
Ready to transform simple ingredients into a comforting masterpiece? This creamy shredded chicken thigh and mushroom stroganoff delivers rich, savory flavors with a methodical approach that ensures perfect results every time. Let’s walk through each step together to create this satisfying dish that’s sure to become a weeknight favorite.
Ingredients
– 1.5 lbs boneless, skinless chicken thighs (I find thighs stay juicier than breasts)
– 8 oz cremini mushrooms, sliced (baby bellas work beautifully here)
– 1 medium yellow onion, finely chopped
– 3 cloves garlic, minced (fresh garlic makes all the difference)
– 2 tbsp unsalted butter (I always use real butter for better flavor)
– 1 tbsp olive oil
– 1 cup chicken broth
– 1 cup sour cream, at room temperature (this prevents curdling)
– 2 tbsp all-purpose flour
– 1 tsp paprika
– 12 oz wide egg noodles
– Fresh parsley for garnish
Instructions
1. Place chicken thighs in a single layer in a large skillet and add enough water to cover them halfway.
2. Bring water to a boil over medium-high heat, then reduce to a simmer and cook for 15 minutes until chicken reaches 165°F internally.
3. Remove chicken from skillet and let rest until cool enough to handle, about 5 minutes.
4. Using two forks, shred chicken against the grain into bite-sized pieces.
5. Cook egg noodles according to package directions until al dente, then drain thoroughly.
6. Heat olive oil and butter in the same skillet over medium heat until butter melts and stops foaming.
7. Add chopped onions and cook for 4 minutes until translucent but not browned.
8. Add sliced mushrooms and cook for 6 minutes until they release their liquid and begin to brown.
9. Stir in minced garlic and cook for 1 minute until fragrant.
10. Sprinkle flour over the mushroom mixture and cook for 2 minutes while stirring constantly to remove raw flour taste.
11. Gradually pour in chicken broth while whisking to prevent lumps from forming.
12. Bring sauce to a gentle simmer and cook for 3 minutes until slightly thickened.
13. Remove skillet from heat and let cool for 2 minutes to prevent curdling.
14. Stir in room temperature sour cream until fully incorporated into the sauce.
15. Add shredded chicken and paprika to the sauce, stirring to combine all elements.
16. Return skillet to low heat and warm through for 3 minutes without boiling.
17. Season with salt and pepper to taste, then serve immediately over cooked egg noodles.
18. Garnish with fresh parsley before serving. Ultimate comfort in every bite, this stroganoff boasts tender shredded chicken swimming in a luxuriously creamy mushroom sauce that clings perfectly to each noodle. The gentle paprika warmth balances the rich sour cream base, creating layers of flavor that develop beautifully when served over buttery egg noodles. For a cozy twist, try serving it in shallow bowls with crusty bread for dipping into every last bit of that incredible sauce.
BBQ Shredded Chicken Thigh Sliders with Coleslaw
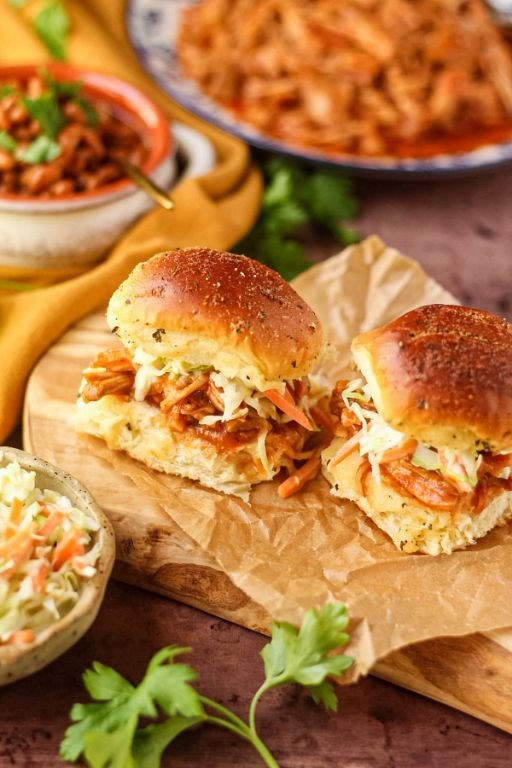
Here’s a foolproof method for creating the most tender, flavorful BBQ shredded chicken sliders you’ll ever make. Having perfected this recipe through countless summer cookouts, I’ll walk you through each step with precision so even first-time cooks can achieve restaurant-quality results. Pulling apart the chicken while it’s still warm ensures it soaks up every bit of that smoky barbecue sauce.
Ingredients
– 2 lbs boneless, skinless chicken thighs (I find thighs stay juicier than breasts during slow cooking)
– 1 cup your favorite BBQ sauce (I always use a smoky Kansas City style for that authentic flavor)
– 1/4 cup apple cider vinegar (this little splash cuts through the richness perfectly)
– 2 tbsp brown sugar (packed firmly – it helps create that beautiful caramelized crust)
– 1 tbsp smoked paprika (my secret weapon for instant smoky depth)
– 1 tsp garlic powder
– 1 tsp onion powder
– 1/2 tsp black pepper (freshly ground gives the best flavor)
– 1/2 tsp salt
– 12 slider buns (I prefer brioche for their buttery softness)
– 2 cups prepared coleslaw (homemade or quality store-bought both work great)
Instructions
1. Preheat your oven to 325°F using an oven thermometer to ensure accuracy.
2. Pat the chicken thighs completely dry with paper towels – this helps them brown better.
3. In a medium bowl, whisk together BBQ sauce, apple cider vinegar, brown sugar, smoked paprika, garlic powder, onion powder, black pepper, and salt until fully combined.
4. Arrange chicken thighs in a single layer in a 9×13 inch baking dish.
5. Pour the sauce mixture evenly over the chicken, making sure each piece is coated.
6. Cover the baking dish tightly with aluminum foil, creating a seal around the edges.
7. Place in the preheated oven and bake for 1 hour and 15 minutes.
8. Remove from oven and carefully uncover – watch for steam when removing the foil.
9. Using two forks, shred the chicken directly in the baking dish while it’s still hot.
10. Stir the shredded chicken thoroughly to coat every strand with the cooking juices.
11. Return to the oven uncovered and bake for another 15 minutes to thicken the sauce.
12. While the chicken finishes, lightly toast your slider buns – this prevents them from getting soggy.
13. Remove chicken from oven and let rest for 5 minutes to allow flavors to meld.
14. Assemble sliders by placing a generous portion of shredded chicken on the bottom bun.
15. Top with a heaping tablespoon of coleslaw, then crown with the top bun.
Perfectly balanced between smoky, sweet, and tangy, these sliders offer incredible textural contrast with tender shredded chicken against the crisp coleslaw. The beauty of this recipe lies in its versatility – try serving them open-faced with extra coleslaw on the side, or for a fun twist, use the leftover chicken mixture to make incredible BBQ chicken nachos the next day.
Lemon Herb Shredded Chicken Thigh Salad

Very few dishes offer the perfect balance of bright, zesty flavors and satisfying protein like this lemon herb shredded chicken thigh salad. Versatile enough for meal prep yet elegant for gatherings, this recipe walks you through creating tender, flavorful chicken and a vibrant dressing from scratch. Let’s build this refreshing salad together, step by step.
Ingredients
- 1.5 lbs boneless, skinless chicken thighs (I find thighs stay juicier than breasts when shredded)
- 3 tbsp extra virgin olive oil (my go-to for its fruity notes)
- 2 lemons (always roll them on the counter before juicing to get more yield)
- 2 garlic cloves, minced (freshly minced releases the best aroma)
- 1 tsp dried oregano
- 1/2 tsp salt
- 1/4 tsp black pepper
- 6 cups mixed greens (I love a blend of romaine and arugula for peppery contrast)
- 1/4 cup sliced red onion
- 1/4 cup chopped fresh parsley
Instructions
- Preheat your oven to 375°F and line a baking sheet with parchment paper.
- Pat the chicken thighs completely dry with paper towels to ensure a good sear.
- Rub the chicken thighs evenly with 1 tablespoon of olive oil, salt, and black pepper.
- Arrange the chicken thighs in a single layer on the prepared baking sheet.
- Bake for 25 minutes at 375°F until the internal temperature reaches 165°F when checked with a meat thermometer.
- Transfer the cooked chicken to a clean bowl and let it rest for 5 minutes to redistribute juices.
- Use two forks to shred the chicken thighs completely while still warm.
- In a small bowl, whisk together the juice of both lemons, remaining 2 tablespoons of olive oil, minced garlic, and dried oregano.
- Pour the lemon-herb dressing over the shredded chicken and toss to coat evenly.
- Add the mixed greens, sliced red onion, and chopped parsley to the bowl with the dressed chicken.
- Toss everything gently until the greens are lightly coated and ingredients are well combined.
Combining the warm, dressed chicken with the cool greens slightly wilts the lettuce for a tender-crisp texture. Citrusy and herbaceous flavors shine through each bite, making it feel both light and satisfying. Consider serving it stuffed in pita pockets or over quinoa for a heartier meal that still highlights the bright lemon notes.
Shredded Chicken Thigh Enchiladas with Green Sauce
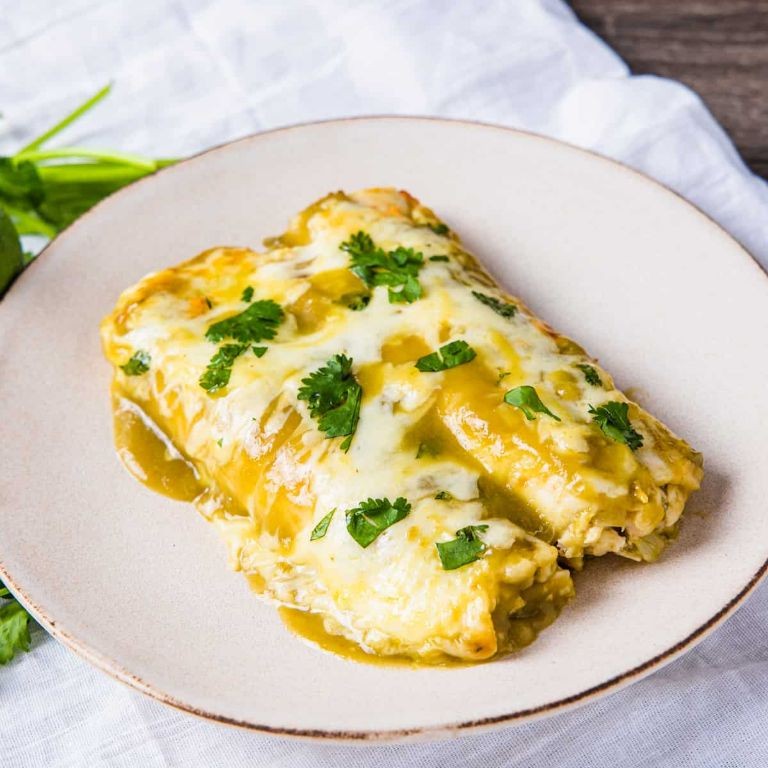
When you’re craving authentic Mexican flavors but short on time, these shredded chicken thigh enchiladas deliver restaurant-quality results with minimal fuss. We’ll walk through each stage methodically, ensuring even first-time enchilada makers achieve perfectly sauced, tender-filled tortillas every single time.
Ingredients
- 1.5 lbs bone-in chicken thighs (skin-on adds incredible flavor)
- 2 cups homemade or quality store-bought green enchilada sauce
- 8 corn tortillas (I find the 6-inch size easiest to roll)
- 1 cup shredded Monterey Jack cheese
- 1/2 cup finely diced white onion
- 2 tbsp vegetable oil
- 1 tsp kosher salt
- 1/2 tsp ground cumin
- 1/4 cup fresh cilantro leaves for garnish
Instructions
- Preheat your oven to 375°F and lightly grease a 9×13 inch baking dish.
- Season chicken thighs evenly with kosher salt and ground cumin on all sides.
- Heat vegetable oil in a large skillet over medium-high heat until shimmering but not smoking.
- Place chicken thighs skin-side down and cook undisturbed for 6-8 minutes until golden brown and crispy.
- Flip chicken and cook another 5 minutes until the other side develops color.
- Transfer chicken to a plate and carefully pour off all but 1 tablespoon of rendered fat from the skillet.
- Return chicken to skillet, add 1/2 cup water, cover, and reduce heat to low.
- Simmer gently for 25 minutes until chicken reaches 165°F internally and shreds easily with forks.
- Remove chicken from skillet, discard bones and skin, then shred meat using two forks.
- Warm corn tortillas one at a time in a dry skillet over medium heat for 15 seconds per side until pliable.
- Dip each warmed tortilla in green enchilada sauce, coating both sides lightly.
- Place 1/4 cup shredded chicken and 1 tablespoon diced onion in the center of each tortilla.
- Roll tortillas tightly around filling and place seam-side down in prepared baking dish.
- Pour remaining green sauce evenly over assembled enchiladas, making sure all edges are covered.
- Sprinkle shredded Monterey Jack cheese uniformly over the sauced enchiladas.
- Bake at 375°F for 18-20 minutes until cheese is bubbly and edges are lightly browned.
- Remove from oven and let rest for 5 minutes before serving to allow filling to set.
- Garnish with fresh cilantro leaves just before serving.
Our finished enchiladas emerge with the tortillas tender but still holding structure, while the chicken remains remarkably moist from our slow-braising method. The tangy green sauce cuts through the richness beautifully, creating layers of flavor that meld together during baking. For a stunning presentation, serve alongside crisp radish slices and creamy avocado wedges to complement the warm, cheesy interior.
Chipotle Shredded Chicken Thigh Stuffed Peppers
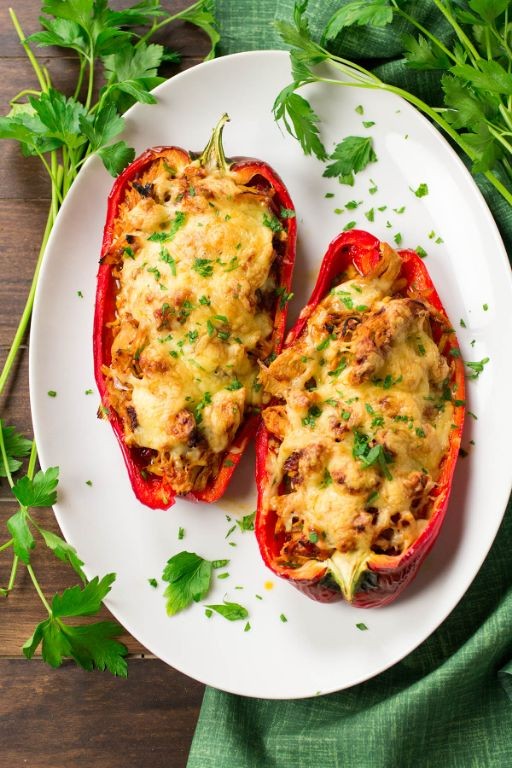
Preparing stuffed peppers might seem intimidating, but this chipotle shredded chicken version breaks it down into simple, manageable steps that even first-time cooks can master. Let’s walk through each stage together to create a flavorful, satisfying meal that will become a regular in your dinner rotation.
Ingredients
- 6 large bell peppers – I like using a mix of red, yellow, and orange for visual appeal
- 2 lbs boneless, skinless chicken thighs – they stay juicier than breasts during slow cooking
- 1 cup long-grain white rice – rinse it well to remove excess starch
- 1 can (7 oz) chipotle peppers in adobo sauce – my secret weapon for smoky heat
- 1 medium yellow onion, diced – sweet varieties work beautifully here
- 3 cloves garlic, minced – fresh is always better than jarred
- 1 cup chicken broth – low-sodium gives you better control over seasoning
- 1 cup shredded Monterey Jack cheese – it melts beautifully without separating
- 2 tbsp olive oil – extra virgin adds nice fruity notes
- 1 tsp cumin – toasting it first really wakes up the flavor
- 1/2 tsp salt – I prefer fine sea salt for even distribution
Instructions
- Preheat your oven to 375°F and lightly grease a 9×13 inch baking dish with olive oil.
- Cut the tops off all 6 bell peppers and remove the seeds and membranes, keeping the pepper bodies intact.
- Heat 1 tablespoon olive oil in a large skillet over medium-high heat until it shimmers.
- Season the chicken thighs evenly with 1/2 teaspoon salt and place them in the hot skillet.
- Sear the chicken for 4-5 minutes per side until golden brown, then transfer to a plate.
- Add the remaining olive oil to the same skillet and sauté the diced onion for 3-4 minutes until translucent.
- Stir in the minced garlic and cook for 1 minute until fragrant – don’t let it brown.
- Add 1 cup rinsed rice to the skillet and toast for 2 minutes, stirring constantly.
- Pour in 1 cup chicken broth and bring to a simmer, scraping up any browned bits from the bottom.
- Chop 2 chipotle peppers from the can and add them along with 2 tablespoons adobo sauce and 1 teaspoon cumin.
- Return the seared chicken thighs to the skillet, nestling them into the rice mixture.
- Cover the skillet and reduce heat to low, simmering for 25 minutes until rice is tender and chicken reaches 165°F internally.
- Remove the skillet from heat and shred the chicken using two forks, mixing it thoroughly with the rice.
- Stuff each prepared bell pepper with the chicken and rice mixture, packing it gently but firmly.
- Arrange the stuffed peppers in the prepared baking dish and cover tightly with foil.
- Bake at 375°F for 30 minutes until peppers are tender but still hold their shape.
- Remove the foil and sprinkle 1 cup shredded Monterey Jack cheese evenly over the peppers.
- Return to the oven uncovered for 8-10 minutes until cheese is melted and bubbly.
- Let the peppers rest for 5 minutes before serving to allow the filling to set.
When you cut into these peppers, the tender chicken shreds meld beautifully with the smoky chipotle rice, while the peppers provide a sweet, slightly crisp contrast. The melted Monterey Jack creates a creamy blanket that brings all the elements together perfectly. For a fun twist, try serving them with a dollop of cool sour cream or alongside a simple avocado salad to balance the heat.
Shredded Chicken Thigh and Rice Casserole
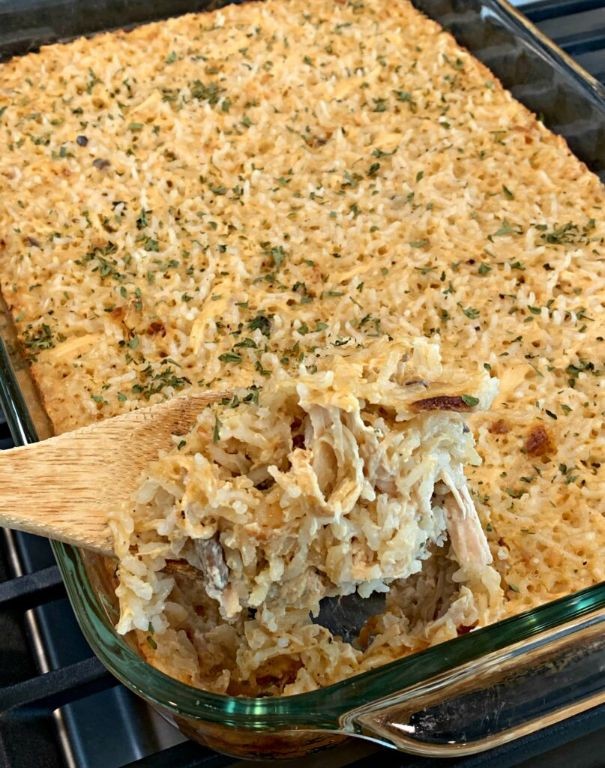
Casseroles are the ultimate comfort food that bring families together around the dinner table, and this shredded chicken thigh and rice version delivers both incredible flavor and foolproof preparation that even novice cooks can master with confidence. Combining tender chicken with perfectly cooked rice in one dish creates a satisfying meal that requires minimal cleanup while maximizing taste.
Ingredients
- 1.5 lbs bone-in, skin-on chicken thighs – I find the bones add incredible depth to the broth
- 1.5 cups long-grain white rice – this variety absorbs flavors beautifully without getting mushy
- 3 cups chicken broth – homemade if you have it, but quality store-bought works perfectly
- 1 medium yellow onion, diced – I always keep these chopped in my fridge for quick meals
- 3 cloves garlic, minced – fresh makes all the difference here
- 2 tbsp olive oil – extra virgin is my kitchen staple for its fruity notes
- 1 tsp dried thyme – crush it between your fingers to release the oils
- 1/2 tsp black pepper – freshly ground gives the best flavor
- 1 tsp salt – I prefer kosher for its clean taste
- 1 cup frozen peas – these add bright color and sweetness
Instructions
- Preheat your oven to 375°F and position the rack in the center for even heating.
- Pat the chicken thighs completely dry with paper towels – this ensures crispy skin.
- Season both sides of the chicken thighs evenly with the salt and black pepper.
- Heat the olive oil in a large oven-safe skillet over medium-high heat until it shimmers.
- Place the chicken thighs skin-side down in the hot oil and cook for 6 minutes without moving them.
- Flip the chicken thighs and cook for 4 more minutes until golden brown on both sides.
- Transfer the chicken to a clean plate, leaving the rendered fat in the skillet.
- Add the diced onion to the hot skillet and cook for 4 minutes until translucent and softened.
- Stir in the minced garlic and cook for 1 minute until fragrant but not browned.
- Add the rice to the skillet and stir constantly for 2 minutes to toast the grains.
- Pour in the chicken broth, scraping up any browned bits from the bottom of the skillet.
- Sprinkle in the dried thyme and stir everything together until well combined.
- Return the chicken thighs to the skillet, nestling them into the rice mixture skin-side up.
- Bring the liquid to a gentle boil, then immediately cover the skillet with a tight-fitting lid.
- Transfer the covered skillet to the preheated oven and bake for 25 minutes exactly.
- Remove the skillet from the oven and let it rest covered for 10 minutes – this allows the rice to finish absorbing liquid.
- Carefully remove the chicken thighs to a cutting board using tongs.
- Use two forks to shred the chicken, discarding the bones and skin if desired.
- Stir the frozen peas and shredded chicken back into the rice mixture until evenly distributed.
- Let the casserole sit for 5 minutes to warm the peas through before serving.
Resting the casserole before serving allows the flavors to meld beautifully while the rice achieves its ideal creamy-yet-distinct texture. The shredded chicken remains incredibly moist while the peas provide bursts of sweetness against the savory broth-infused rice. For a creative twist, try serving individual portions topped with a dollop of Greek yogurt and fresh chopped parsley for brightness.
Thai Peanut Shredded Chicken Thigh Noodle Bowl
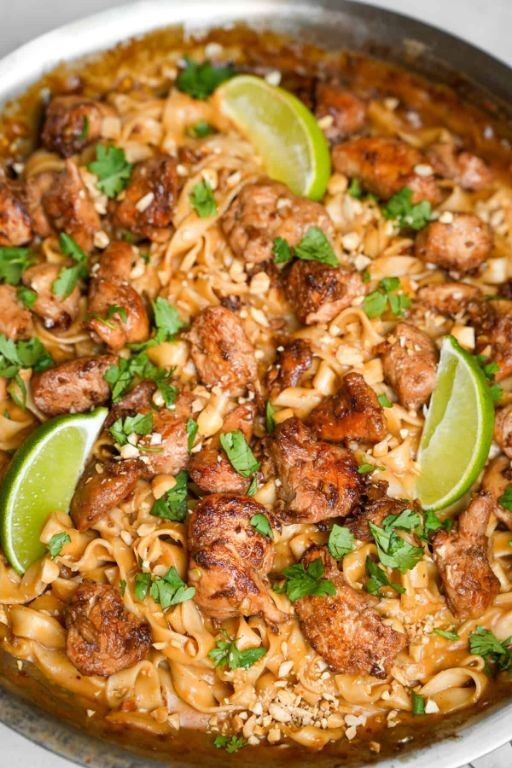
Gently pulling apart tender chicken thighs and tossing them with vibrant peanut sauce creates a noodle bowl that feels both comforting and excitingly fresh. This recipe walks you through each stage methodically, ensuring even first-time cooks achieve that perfect balance of savory, sweet, and nutty flavors. Let’s build this satisfying meal together, step by step.
Ingredients
- 1.5 lbs boneless, skinless chicken thighs (I find thighs stay juicier than breasts during simmering)
- 8 oz rice noodles (check the package width—I like the medium 1/8-inch ribbons for optimal sauce clinging)
- 1/2 cup smooth peanut butter (natural style gives a richer peanut flavor without added sugar)
- 1/4 cup low-sodium soy sauce (this lets you control saltiness better)
- 2 tbsp fresh lime juice (bottled just doesn’t provide the same bright zing)
- 1 tbsp grated ginger (I keep peeled ginger frozen for easy grating)
- 2 cloves garlic, minced (freshly minced releases the most aromatic oils)
- 1 tsp sriracha (add another teaspoon if you enjoy a noticeable kick)
- 1/4 cup chopped cilantro (stems and leaves both add great flavor)
- 2 green onions, thinly sliced (use the green parts for garnish and white parts in the sauce)
- 1 tbsp vegetable oil (a neutral oil prevents burning during searing)
- 4 cups water (for simmering the chicken to create a light broth base)
Instructions
- Heat 1 tbsp vegetable oil in a large Dutch oven or pot over medium-high heat until it shimmers, about 1 minute.
- Pat 1.5 lbs chicken thighs completely dry with paper towels—this ensures a proper sear without steaming.
- Place chicken thighs in the hot oil and sear for 3 minutes per side until golden brown crust forms.
- Pour 4 cups water into the pot, scraping any browned bits from the bottom with a wooden spoon.
- Bring liquid to a boil, then reduce heat to low, cover, and simmer chicken for 25 minutes until internal temperature reaches 165°F.
- While chicken simmers, whisk 1/2 cup peanut butter, 1/4 cup soy sauce, 2 tbsp lime juice, 1 tbsp grated ginger, 2 minced garlic cloves, and 1 tsp sriracha in a medium bowl until smooth.
- Place 8 oz rice noodles in a large heatproof bowl and cover with boiling water—let soak for 8 minutes until tender but still slightly chewy.
- Transfer cooked chicken to a cutting board using tongs, reserving 1/2 cup cooking liquid in the pot.
- Shred chicken with two forks, pulling against the grain for tender strands.
- Whisk the reserved 1/2 cup hot cooking liquid into the peanut sauce to thin it to pourable consistency.
- Drain soaked noodles thoroughly and divide among four bowls.
- Top noodles with shredded chicken, then pour peanut sauce evenly over each portion.
- Garnish with 1/4 cup chopped cilantro and 2 sliced green onions.
When you take that first bite, the slippery noodles coated in creamy peanut sauce give way to tender, savory chicken shreds. The fresh cilantro and green onions cut through the richness, while the lime keeps everything bright. For a fun twist, serve it with extra lime wedges and let everyone squeeze fresh juice over their bowl right at the table.
Shredded Chicken Thigh and Black Bean Quesadillas
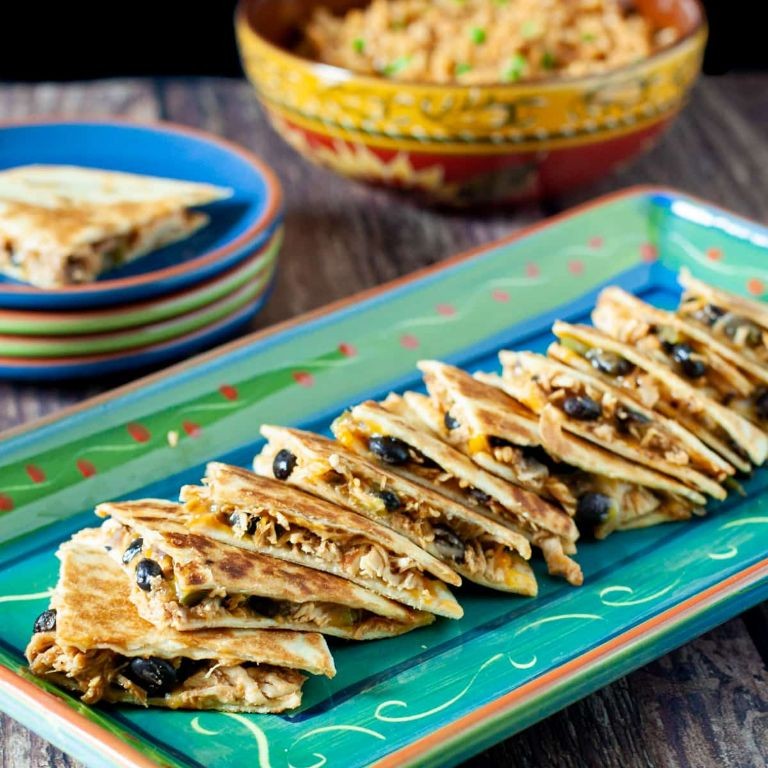
Very few weeknight dinners hit that perfect balance of satisfying protein, melty cheese, and crispy tortilla quite like these shredded chicken thigh and black bean quesadillas. Let’s walk through the simple process together, step by step, so you can make them perfectly every single time.
Ingredients
– 1.5 lbs boneless, skinless chicken thighs (I find thighs stay juicier than breasts when shredded)
– 1 tbsp chili powder
– 1 tsp ground cumin
– 1/2 tsp garlic powder
– 1/4 cup water
– 1 (15 oz) can black beans, rinsed and drained (rinsing removes that excess sodium)
– 1 cup shredded Monterey Jack cheese (this melts beautifully without getting greasy)
– 4 large (10-inch) flour tortillas
– 2 tbsp vegetable oil, divided (for that golden, crispy exterior)
Instructions
1. Place chicken thighs in a medium saucepan and sprinkle evenly with chili powder, cumin, and garlic powder.
2. Pour 1/4 cup water into the saucepan around the chicken (this creates steam to help cook the chicken through without drying it out).
3. Cover the saucepan and cook over medium heat for 20 minutes, until chicken is fully cooked and reaches 165°F internally.
4. Transfer cooked chicken to a cutting board, reserving any cooking liquid in the pan, and use two forks to shred the chicken completely.
5. Return the shredded chicken to the saucepan with the reserved cooking liquid and stir in the rinsed black beans.
6. Cook the chicken and bean mixture over medium heat, stirring constantly, for 3 minutes until heated through and liquid is absorbed.
7. Heat 1/2 tablespoon vegetable oil in a large non-stick skillet over medium heat until shimmering.
8. Place one tortilla in the skillet and sprinkle 1/4 cup cheese evenly over half of the tortilla.
9. Spoon one-quarter of the chicken and bean mixture over the cheese, then fold the empty half of the tortilla over the filling.
10. Cook for 2-3 minutes until the bottom is golden brown with crisp spots, then carefully flip using a spatula.
11. Cook for another 2-3 minutes until the second side is golden brown and the cheese is fully melted.
12. Transfer the cooked quesadilla to a cutting board and repeat steps 7-11 with remaining oil, tortillas, cheese, and filling.
13. Cut each quesadilla into 3 wedges using a sharp knife or pizza cutter. Just look at that beautiful layering of tender shredded chicken, creamy beans, and perfectly melted cheese against the crisp, golden tortilla. Serve these immediately with your favorite salsa or a cool dollop of sour cream for the ultimate textural contrast.
Shredded Chicken Thigh Pho with Fresh Herbs
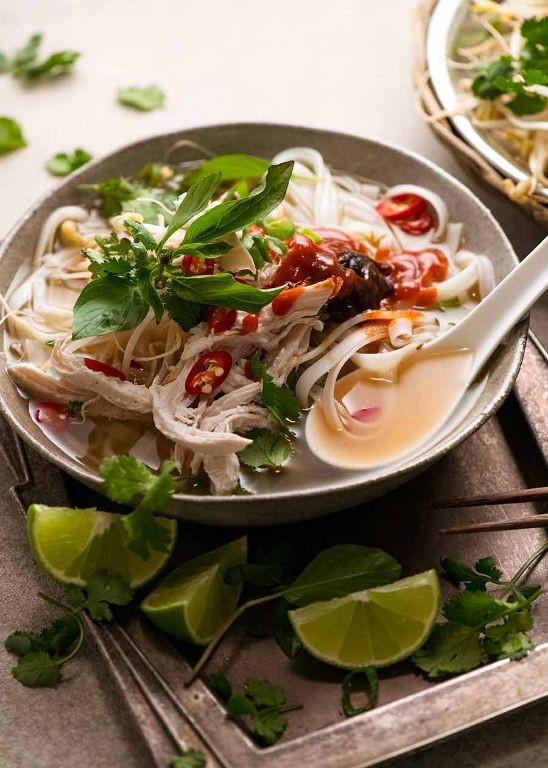
Nothing beats the comforting aroma of homemade pho simmering on the stove, especially when you use tender chicken thighs that shred beautifully. Now you can create this Vietnamese classic with a simplified approach that delivers maximum flavor without the all-day commitment. Let’s walk through each step together to build layers of savory depth in your own kitchen.
Ingredients
- 2 lbs bone-in chicken thighs (the bones add incredible richness to the broth)
- 8 cups cold water (starting cold helps extract more flavor from the bones)
- 1 large yellow onion, halved (I leave the skin on for that beautiful golden broth color)
- 3-inch piece of fresh ginger, sliced (don’t peel it – the skin adds earthy notes)
- 2 star anise pods (my secret for that authentic pho aroma)
- 1 cinnamon stick (just one – we’re aiming for subtle warmth)
- 3 cloves (stuck into the onion halves so they’re easy to remove later)
- 2 tbsp fish sauce (I prefer Red Boat brand for its clean, umami punch)
- 1 tbsp granulated sugar (just enough to balance the saltiness)
- 8 oz dried rice noodles (the flat ones soak up broth perfectly)
- Fresh herbs: handful each of Thai basil, cilantro, and mint (tear, don’t chop, to preserve their delicate oils)
- 2 limes, quartered (squeeze them right at the table for bright acidity)
- 2 jalapeños, thinly sliced (remove seeds if you prefer milder heat)
- Bean sprouts (I rinse them in ice water for extra crunch)
Instructions
- Place chicken thighs in a large stockpot and cover with 8 cups cold water.
- Set the pot over high heat and bring to a rolling boil, which should take about 12-15 minutes.
- Meanwhile, char the onion halves and ginger slices directly on a gas burner set to medium-high for 5 minutes per side until blackened spots appear.
- Once boiling, use a slotted spoon to skim off the gray foam that rises to the surface for a clearer broth.
- Reduce heat to maintain a gentle simmer where small bubbles occasionally break the surface.
- Add charred onion, ginger, star anise, cinnamon stick, and cloves to the pot.
- Simmer uncovered for 45 minutes – the chicken should be fully cooked and tender when pierced with a fork.
- While broth simmers, soak rice noodles in warm water for 20 minutes until pliable but not soft.
- Carefully remove chicken thighs with tongs and transfer to a cutting board to cool for 10 minutes.
- Strain the broth through a fine-mesh sieve into a clean pot, discarding solids.
- Shred chicken meat using two forks, discarding bones and skin.
- Stir fish sauce and sugar into the strained broth and return to a simmer.
- Drain soaked noodles and divide among 4 large bowls.
- Top each bowl with shredded chicken and ladle hot broth over everything.
- Arrange herbs, lime wedges, jalapeños, and bean sprouts on a separate platter for garnishing.
Using chicken thighs instead of breast keeps the meat incredibly moist even after simmering, while the charred aromatics create a broth with remarkable depth that tastes like it simmered for hours. The tender shredded chicken practically melts into the savory broth, creating a textural harmony with the chewy rice noodles and crisp bean sprouts. For a fun twist, try serving the pho with a side of crispy fried shallots or a drizzle of chili crisp oil to add another dimension of crunch and heat.
Shredded Chicken Thigh and Sweet Potato Hash
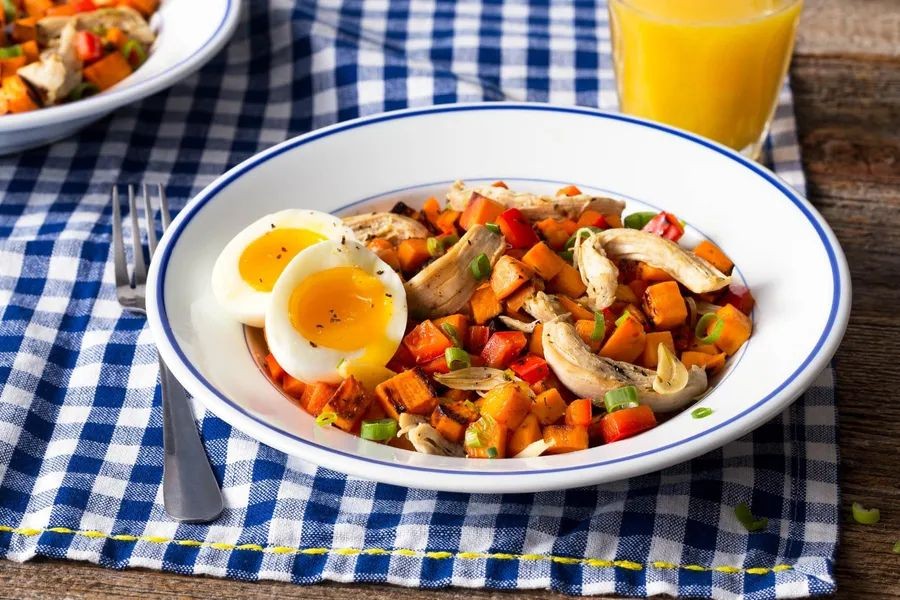
A perfectly balanced breakfast hash starts with the right foundation, and this shredded chicken thigh and sweet potato combination delivers both comfort and nutrition in one skillet. As we walk through each step together, you’ll discover how simple ingredients transform into a hearty meal that’s equally satisfying for weekend brunch or busy weekday mornings.
Ingredients
– 1.5 lbs bone-in chicken thighs (the bone adds incredible flavor to the meat)
– 2 medium sweet potatoes, peeled and diced into ½-inch cubes (I find this size cooks evenly without getting mushy)
– 1 large yellow onion, chopped (sweet varieties work beautifully here)
– 3 tablespoons extra virgin olive oil (my go-to for its fruity notes)
– 1 teaspoon smoked paprika (this adds that wonderful smoky depth)
– ½ teaspoon garlic powder (for consistent flavor throughout)
– ¼ teaspoon crushed red pepper flakes (adjust based on your heat preference)
– 1 teaspoon kosher salt (I prefer this over table salt for better distribution)
– ¼ cup chopped fresh parsley (added at the end for bright freshness)
Instructions
1. Preheat your oven to 375°F and pat the chicken thighs completely dry with paper towels.
2. Rub 1 tablespoon of olive oil over all sides of the chicken thighs and season evenly with ½ teaspoon of salt.
3. Place the chicken thighs skin-side up in a cold, oven-safe skillet and turn the burner to medium heat.
4. Cook the chicken for 6-8 minutes until the skin is golden brown and crispy, without moving it.
5. Flip the chicken and cook for another 3 minutes to lightly brown the other side.
6. Transfer the entire skillet to the preheated oven and bake for 25 minutes until the internal temperature reaches 165°F.
7. While the chicken bakes, heat the remaining 2 tablespoons of olive oil in a separate large skillet over medium heat.
8. Add the chopped onion and cook for 4-5 minutes until translucent and fragrant.
9. Add the diced sweet potatoes to the skillet in a single layer, spreading them out for even cooking.
10. Sprinkle the smoked paprika, garlic powder, red pepper flakes, and remaining ½ teaspoon of salt over the sweet potatoes.
11. Cook the sweet potato mixture for 15-18 minutes, stirring every 4-5 minutes, until the potatoes are tender and lightly browned.
12. Remove the chicken from the oven and let it rest for 5 minutes before handling.
13. Using two forks, shred the chicken meat, discarding the skin and bones.
14. Gently fold the shredded chicken into the sweet potato hash and cook together for 2 more minutes to combine flavors.
15. Stir in the fresh parsley just before serving. Using this resting technique ensures the chicken stays incredibly moist while shredding easily. The single-layer placement of sweet potatoes prevents steaming and promotes that desirable caramelization. Adding the parsley at the very end preserves its vibrant color and fresh flavor. Ultimately, you’ll love how the tender shredded chicken mingles with the sweet, caramelized potatoes, creating a texture that’s both comforting and sophisticated. Try serving it topped with a perfectly fried egg for extra richness, or wrap it in warm tortillas for a quick breakfast burrito that will become your new morning favorite.
Buffalo Shredded Chicken Thigh Flatbread

Preparing this Buffalo Shredded Chicken Thigh Flatbread requires just a few simple steps that build flavor beautifully. Let’s walk through the process together, starting with properly cooking our chicken thighs to achieve that perfect shreddable texture. You’ll be amazed at how quickly these components come together for a satisfying meal.
Ingredients
- 1.5 lbs bone-in chicken thighs – I find the bone adds incredible flavor during cooking
- 2 tbsp olive oil – extra virgin is my go-to for better flavor
- 1/2 cup buffalo sauce – Frank’s RedHot gives that classic tangy heat I love
- 2 flatbreads – store-bought works perfectly for quick weeknight meals
- 1 cup shredded mozzarella – I prefer whole milk for better melting
- 1/4 cup blue cheese crumbles – the bold flavor balances the spicy chicken beautifully
- 2 tbsp ranch dressing – homemade or your favorite brand works great
- 2 tbsp chopped celery – for that fresh, crunchy contrast
Instructions
- Preheat your oven to 375°F and line a baking sheet with parchment paper.
- Pat the chicken thighs completely dry with paper towels – this ensures proper browning.
- Heat olive oil in a large skillet over medium-high heat until it shimmers, about 2 minutes.
- Place chicken thighs skin-side down in the hot skillet and cook for 6-8 minutes until golden brown.
- Flip the chicken thighs and cook for another 6 minutes on the second side.
- Transfer the skillet to the preheated oven and bake for 20 minutes until internal temperature reaches 165°F.
- Remove chicken from oven and let rest for 5 minutes – this keeps the juices inside.
- Shred the chicken using two forks, discarding bones and skin.
- Toss the shredded chicken with buffalo sauce until thoroughly coated.
- Place flatbreads on the prepared baking sheet and top evenly with shredded mozzarella.
- Spread the buffalo chicken mixture over the cheese-covered flatbreads.
- Sprinkle blue cheese crumbles evenly over the chicken.
- Bake for 12-15 minutes until cheese is bubbly and edges are golden brown.
- Drizzle ranch dressing in zigzag patterns across the hot flatbreads.
- Scatter chopped celery over the top for fresh crunch.
Golden brown edges and melty cheese create the perfect textural contrast against the tender shredded chicken. The spicy buffalo sauce mellows beautifully when baked, while the cool ranch and crisp celery provide refreshing balance. Try serving these flatbreads cut into wedges for easy sharing, or pair with carrot sticks and extra ranch for dipping.
Shredded Chicken Thigh and Corn Chowder

Now that autumn’s chill is settling in, nothing warms the soul quite like a comforting bowl of soup. This shredded chicken thigh and corn chowder is my go-to for cozy evenings, combining tender meat with sweet corn in a creamy, satisfying broth that’s surprisingly simple to make from scratch.
Ingredients
– 1.5 lbs boneless, skinless chicken thighs (I find thighs stay juicier than breasts in soups)
– 2 tablespoons olive oil (extra virgin is my preferred choice for better flavor)
– 1 medium yellow onion, diced
– 2 cloves garlic, minced
– 4 cups chicken broth
– 3 cups frozen corn kernels (no need to thaw – they cook perfectly from frozen)
– 1 cup heavy cream
– 1 teaspoon dried thyme
– 1/2 teaspoon smoked paprika
– Salt and black pepper
Instructions
1. Pat the chicken thighs completely dry with paper towels – this helps them brown beautifully instead of steaming.
2. Heat olive oil in a large Dutch oven or heavy-bottomed pot over medium-high heat until shimmering.
3. Season chicken thighs generously with salt and pepper on both sides.
4. Place chicken in the hot oil and cook for 5-6 minutes per side until golden brown.
5. Transfer chicken to a clean plate – it won’t be fully cooked through yet, which is perfect.
6. Reduce heat to medium and add diced onion to the same pot, scraping up any browned bits from the chicken.
7. Cook onions for 4-5 minutes until translucent and softened.
8. Add minced garlic and cook for 1 minute until fragrant – be careful not to burn it.
9. Pour in chicken broth, using a wooden spoon to deglaze the pot completely.
10. Return chicken thighs to the pot along with any accumulated juices.
11. Bring the mixture to a gentle boil, then reduce heat to low and simmer covered for 25 minutes.
12. Remove chicken from the pot and let cool slightly on a cutting board.
13. While chicken cools, add frozen corn, dried thyme, and smoked paprika to the simmering broth.
14. Using two forks, shred the chicken into bite-sized pieces – it should pull apart easily.
15. Return shredded chicken to the pot and stir to combine.
16. Pour in heavy cream and stir gently until fully incorporated.
17. Simmer for 5 more minutes without boiling to allow flavors to meld.
18. Taste and adjust seasoning with additional salt and pepper if needed.
Rich and creamy with tender shreds of chicken throughout, this chowder’s texture is wonderfully balanced between hearty and smooth. The sweet corn pops against the smoky paprika background, making each spoonful more satisfying than the last. For a delightful twist, try topping with crispy bacon bits or serving alongside crusty bread for dipping into that luxurious broth.
Shredded Chicken Thigh Banh Mi Sandwich
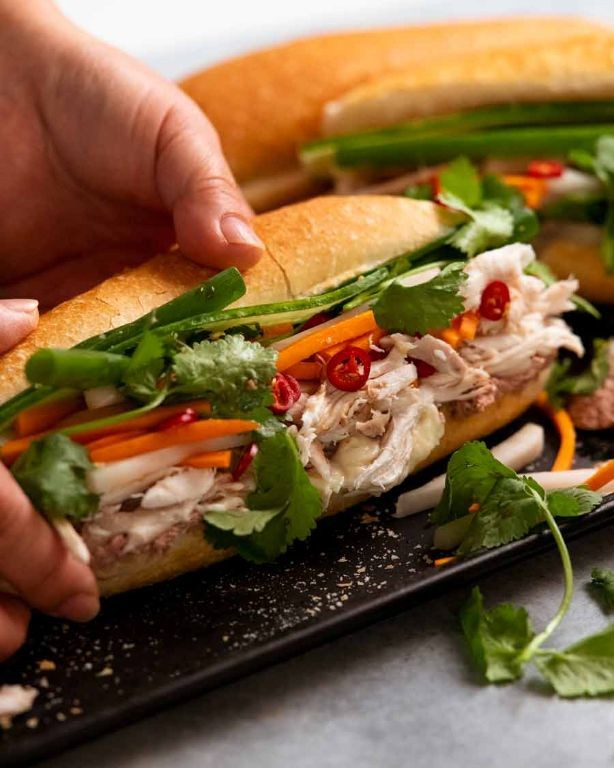
Ready to create a Vietnamese-inspired sandwich that’s bursting with flavor? Let’s build a Shredded Chicken Thigh Banh Mi step-by-step, focusing on tender meat, crisp veggies, and a tangy sauce that ties it all together. You’ll find this recipe straightforward, even if you’re new to assembling banh mi, so grab your ingredients and follow along for a delicious result.
Ingredients
- 1.5 lbs boneless, skinless chicken thighs (I find thighs stay juicier than breasts)
- 3 tbsp soy sauce (use reduced-sodium if you’re watching salt)
- 2 tbsp rice vinegar (this adds a bright, clean acidity)
- 1 tbsp honey (for a touch of sweetness that balances the savory notes)
- 2 cloves garlic, minced (fresh garlic makes all the difference here)
- 1 tsp grated ginger (I keep a knob in the freezer for easy grating)
- 1 tbsp vegetable oil (a neutral oil works best for searing)
- 2 French baguettes, about 12 inches each (look for ones with a crisp crust and soft interior)
- 1 cup shredded carrots (I shred them myself for the best texture)
- 1/2 cup thinly sliced cucumber (English cucumbers are my go-to for fewer seeds)
- 1/4 cup fresh cilantro leaves (don’t skip this—it adds a fresh, herbal punch)
- 2 tbsp mayonnaise (I prefer full-fat for creaminess)
- 1 tbsp sriracha (adjust to your heat preference)
Instructions
- Pat the chicken thighs dry with paper towels to ensure a good sear.
- In a medium bowl, whisk together soy sauce, rice vinegar, honey, minced garlic, and grated ginger to create the marinade.
- Add chicken thighs to the marinade, coating evenly, and let sit for 20 minutes at room temperature. Tip: Marinating at room temperature helps the flavors penetrate faster without overcooking the meat.
- Heat vegetable oil in a large skillet over medium-high heat until it shimmers, about 1 minute.
- Place chicken thighs in the skillet and cook for 6 minutes per side, or until internal temperature reaches 165°F on an instant-read thermometer.
- Transfer chicken to a cutting board and let rest for 5 minutes to retain juices.
- Use two forks to shred the chicken into bite-sized pieces. Tip: Shredding while warm makes the process easier and keeps the meat tender.
- Slice the baguettes horizontally, leaving one edge attached to form a hinge.
- In a small bowl, mix mayonnaise and sriracha until smooth, then spread evenly inside the baguettes.
- Layer shredded chicken, shredded carrots, sliced cucumber, and cilantro leaves into each baguette. Tip: Press down gently as you layer to compact the fillings and prevent them from falling out.
Unwrap your sandwich and notice the contrast between the warm, savory chicken and the cool, crisp vegetables. The baguette’s crust gives way to a soft interior that soaks up the spicy mayo, making each bite a mix of textures and flavors. For a fun twist, serve it with extra sriracha on the side or pair with a light salad to keep the meal fresh and satisfying.
Shredded Chicken Thigh and Spinach Stuffed Shells
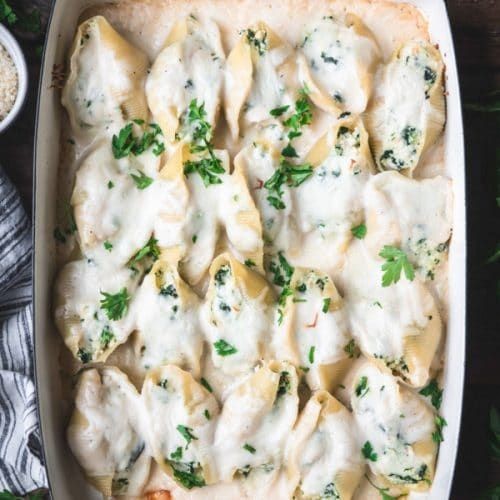
A comforting pasta dish that transforms simple ingredients into a satisfying meal, these stuffed shells combine tender shredded chicken with vibrant spinach in a creamy ricotta filling. Anyone can master this recipe by following these clear, methodical steps to create a dish that’s perfect for family dinners or entertaining guests.
Ingredients
– 12 jumbo pasta shells (I always cook a few extra in case some tear)
– 1 lb boneless, skinless chicken thighs (they stay juicier than breasts)
– 2 cups fresh spinach, roughly chopped
– 15 oz whole milk ricotta cheese (the extra fat content makes for creamier filling)
– 1 large egg, at room temperature for better incorporation
– 1/2 cup grated Parmesan cheese, plus extra for topping
– 2 cups marinara sauce (my homemade version works beautifully here)
– 2 tbsp extra virgin olive oil, my go-to for sautéing
– 2 cloves garlic, minced
– 1 tsp dried Italian seasoning
– 1/2 tsp salt
– 1/4 tsp black pepper
Instructions
1. Preheat your oven to 375°F to ensure it’s properly heated when needed.
2. Bring a large pot of salted water to a rolling boil over high heat.
3. Carefully add the jumbo pasta shells to the boiling water and cook for 9 minutes until al dente.
4. Drain the cooked shells and arrange them in a single layer on a baking sheet to prevent sticking.
5. Heat 1 tablespoon olive oil in a large skillet over medium-high heat until shimmering.
6. Season chicken thighs with 1/4 teaspoon salt and 1/8 teaspoon pepper on both sides.
7. Cook chicken thighs for 6-7 minutes per side until internal temperature reaches 165°F.
8. Transfer cooked chicken to a cutting board and let rest for 5 minutes to redistribute juices.
9. Using two forks, shred the chicken into bite-sized pieces.
10. In the same skillet, heat remaining olive oil over medium heat.
11. Add minced garlic and cook for 30 seconds until fragrant but not browned.
12. Add chopped spinach and cook for 2-3 minutes until wilted and bright green.
13. In a medium bowl, combine ricotta, egg, Parmesan, Italian seasoning, remaining salt and pepper.
14. Mix the ricotta mixture thoroughly until smooth and well-combined.
15. Fold the shredded chicken and cooked spinach into the ricotta mixture.
16. Spread 1 cup marinara sauce evenly across the bottom of a 9×13 inch baking dish.
17. Using a tablespoon, carefully fill each pasta shell with the chicken-spinach mixture.
18. Arrange the stuffed shells in a single layer over the sauce in the baking dish.
19. Pour remaining marinara sauce over the stuffed shells.
20. Sprinkle additional Parmesan cheese evenly over the top.
21. Cover the baking dish tightly with aluminum foil.
22. Bake at 375°F for 25 minutes until heated through and bubbly.
23. Remove foil and bake for 5 more minutes until cheese is lightly golden.
24. Let the stuffed shells rest for 10 minutes before serving to set properly.
Creamy ricotta creates a luxurious texture against the tender shredded chicken, while the spinach adds fresh flavor and vibrant color. Consider serving these shells alongside garlic bread for soaking up any extra sauce, or pair with a simple green salad for a complete meal that feels both comforting and elegant.
Shredded Chicken Thigh Curry with Coconut Milk
Understanding how to create a deeply flavorful curry doesn’t require professional training—just a methodical approach and quality ingredients. Using chicken thighs ensures a moist, tender result that stands up beautifully to simmering, while coconut milk adds a creamy richness that balances the spices perfectly. Let’s walk through this step-by-step so you can confidently recreate this comforting dish in your own kitchen.
Ingredients
- 1.5 lbs boneless, skinless chicken thighs (I prefer thighs over breasts for their richer flavor and resistance to drying out)
- 1 tbsp vegetable oil (a neutral oil works best here to let the spices shine)
- 1 medium yellow onion, diced (take your time with this—properly softened onions build the flavor foundation)
- 3 garlic cloves, minced (fresh garlic makes all the difference compared to jarred)
- 1 tbsp freshly grated ginger (I keep ginger root frozen for easy grating whenever needed)
- 2 tbsp curry powder (toast yours briefly in a dry pan first to awaken the flavors)
- 1 tsp ground turmeric (it’ll stain wooden spoons, so I use a metal one)
- 1/2 tsp cayenne pepper (adjust this based on your heat preference)
- 1 (13.5 oz) can full-fat coconut milk (don’t shake the can—we’ll use the thick cream separately)
- 1 cup chicken broth (low-sodium gives you better control over seasoning)
- 1 tbsp fish sauce (this is my secret umami booster—don’t skip it)
- 1 tbsp brown sugar (just enough to balance without making it sweet)
- 1/2 cup frozen peas (they brighten the dish and add nice color contrast)
- 1/4 cup chopped fresh cilantro (stems included—they pack great flavor)
- 1 tbsp fresh lime juice (always add citrus at the end to preserve its brightness)
Instructions
- Pat the chicken thighs completely dry with paper towels and cut them into 1-inch pieces.
- Heat the vegetable oil in a large Dutch oven or heavy-bottomed pot over medium-high heat until it shimmers.
- Add the chicken pieces in a single layer, working in batches if necessary to avoid crowding the pan.
- Cook the chicken for 4-5 minutes, turning once, until golden brown on both sides but not cooked through.
- Transfer the partially cooked chicken to a clean plate using tongs.
- Reduce the heat to medium and add the diced onion to the same pot.
- Cook the onions, stirring frequently, for 6-8 minutes until they become translucent and soft.
- Add the minced garlic and grated ginger, cooking for exactly 1 minute until fragrant but not browned.
- Sprinkle the curry powder, turmeric, and cayenne pepper over the onion mixture.
- Stir constantly for 30 seconds to toast the spices, which deepens their flavor profile.
- Open the can of coconut milk without shaking it and scoop out the thick cream from the top.
- Add just the coconut cream to the pot, stirring to combine with the spice mixture.
- Cook the coconut cream and spices together for 2 minutes until the oil begins to separate slightly.
- Pour in the remaining coconut milk from the can along with the chicken broth.
- Add the fish sauce and brown sugar, stirring until everything is well incorporated.
- Return the partially cooked chicken and any accumulated juices to the pot.
- Bring the curry to a gentle simmer, then reduce the heat to low.
- Cover the pot and simmer for 20 minutes to allow the chicken to become tender and absorb flavors.
- Uncover the pot and stir in the frozen peas, cooking for 3 more minutes until heated through.
- Remove the pot from heat and stir in the chopped cilantro and fresh lime juice.
Getting that perfect balance between creamy coconut and warm spices makes this curry truly special. The chicken becomes incredibly tender and shreds easily with a fork, while the peas add little bursts of sweetness against the savory backdrop. Serve it over jasmine rice to soak up every bit of the aromatic sauce, or try it with naan bread for a different textural experience that’s equally satisfying.
Shredded Chicken Thigh and Avocado Sushi Rolls
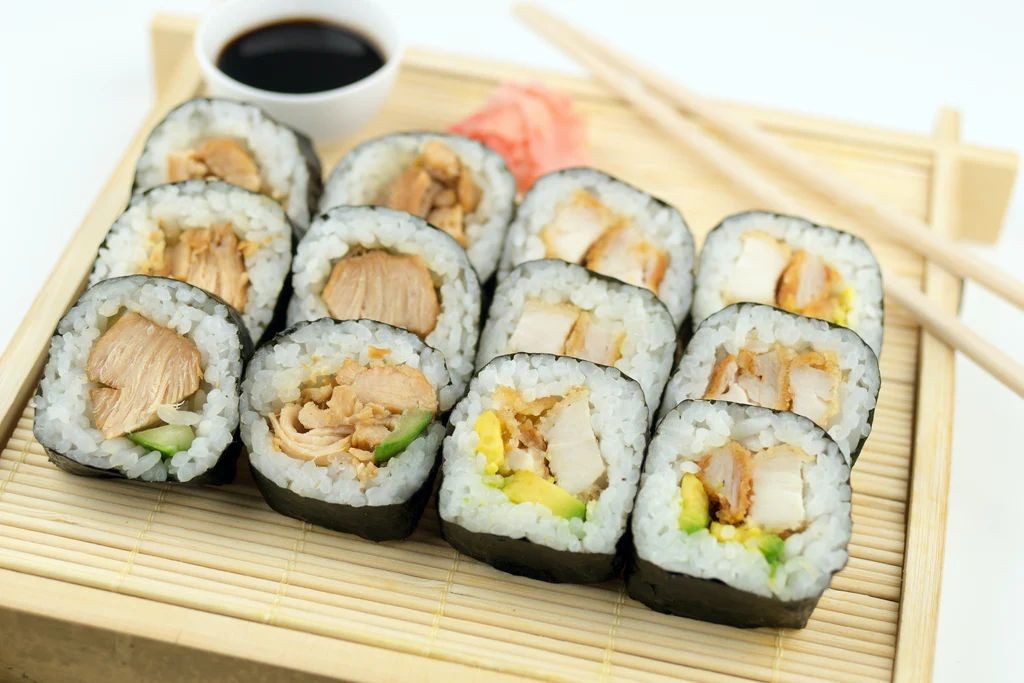
Just when you thought sushi couldn’t get more comforting, these shredded chicken thigh and avocado rolls bring a delightful twist to homemade sushi night. Join me as we walk through each simple step together, ensuring even first-time sushi makers achieve restaurant-quality results. You’ll be amazed how approachable this fusion creation truly is.
Ingredients
– 1 lb boneless, skinless chicken thighs (I find thighs stay juicier than breast meat)
– 2 cups sushi rice, rinsed until water runs clear (this removes excess starch for perfect texture)
– 2 ¼ cups water for cooking rice
– ¼ cup rice vinegar (the mild acidity balances everything beautifully)
– 2 tbsp granulated sugar
– 1 tsp salt
– 4 sheets nori seaweed (look for the crisp, dark green ones)
– 2 ripe avocados, slightly firm (they hold their shape better when slicing)
– 1 tbsp soy sauce
– 1 tsp sesame oil (my secret flavor booster)
– ½ cucumber, julienned
– Bamboo sushi mat wrapped in plastic wrap (prevents sticking and makes cleanup easier)
Instructions
1. Place chicken thighs in a medium saucepan and cover with water by 1 inch.
2. Bring water to a boil over high heat, then reduce to a simmer and cook for 20 minutes until chicken reaches 165°F internally.
3. Transfer cooked chicken to a bowl and shred using two forks while still warm.
4. Combine shredded chicken with soy sauce and sesame oil, mixing thoroughly.
5. Rinse sushi rice in a fine-mesh strainer until water runs completely clear.
6. Combine rinsed rice and 2 ¼ cups water in a rice cooker and cook according to manufacturer’s instructions.
7. Heat rice vinegar, sugar, and salt in a small saucepan over medium heat until dissolved.
8. Spread cooked rice evenly on a baking sheet and drizzle vinegar mixture over top.
9. Fold vinegar mixture into rice using a cutting motion with a rice paddle, cooling rice to room temperature.
10. Place one nori sheet shiny-side down on your prepared bamboo mat.
11. Wet your hands with water and spread ¾ cup seasoned rice evenly over nori, leaving 1-inch border at top.
12. Arrange shredded chicken mixture horizontally across lower third of rice.
13. Thinly slice avocado and place slices next to chicken.
14. Add julienned cucumber strips alongside avocado.
15. Lift bottom edge of bamboo mat and nori, rolling away from you while applying gentle pressure.
16. Continue rolling until seam meets nori, pressing firmly to seal.
17. Repeat process with remaining nori sheets and filling ingredients.
18. Use a sharp knife dipped in water to slice each roll into 8 even pieces.
Zesty, creamy avocado pairs wonderfully with the savory shredded chicken in these elegant rolls. The tender chicken texture contrasts beautifully with the crisp cucumber and slightly chewy rice. For a stunning presentation, arrange slices on a platter with pickled ginger and wasabi, or pack them for an impressive lunch that travels surprisingly well.
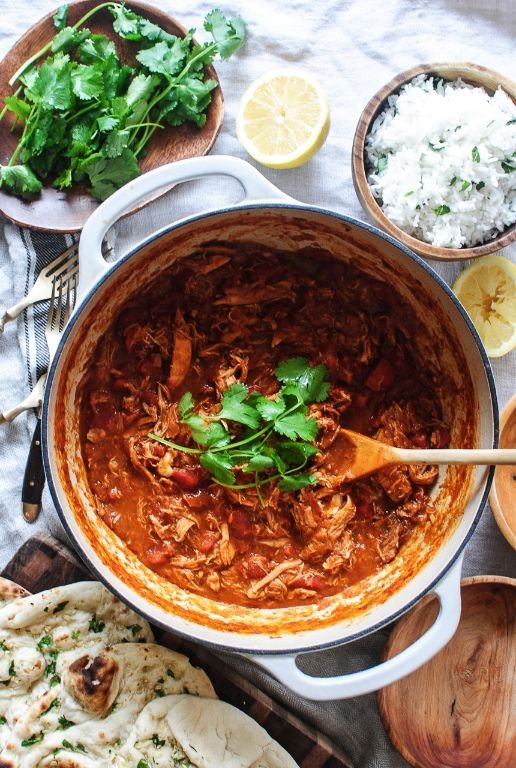
Shredded Chicken Thigh and White Bean Chili
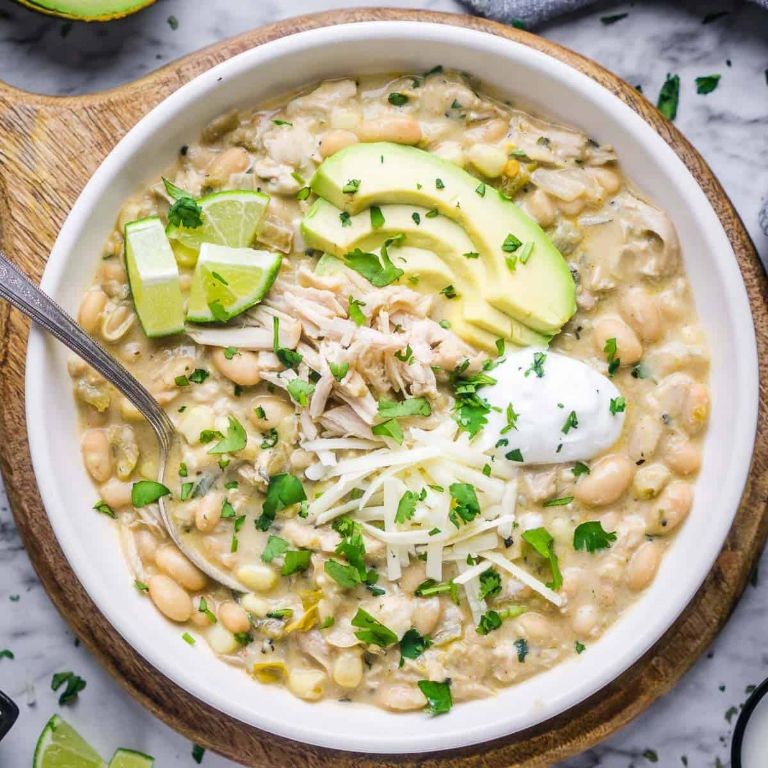
This shredded chicken thigh and white bean chili delivers comforting warmth with minimal fuss. Today we’ll build layers of flavor using simple techniques that guarantee success every time. Trust me, even beginner cooks will create something truly special with this methodical approach.
Ingredients
- 1.5 lbs boneless, skinless chicken thighs (they stay juicier than breasts)
- 2 tbsp olive oil (my go-to for sautéing)
- 1 large yellow onion, diced (sweet varieties work beautifully)
- 3 garlic cloves, minced (fresh makes all the difference)
- 2 tsp ground cumin (toast it briefly for deeper flavor)
- 1 tsp smoked paprika (my secret for that smoky undertone)
- 4 cups chicken broth (low-sodium lets you control seasoning)
- 2 (15 oz) cans white beans, drained and rinsed (cannellini are perfect)
- 1 (4 oz) can diced green chiles (mild for family-friendly heat)
- 1 tsp salt (add gradually and adjust at the end)
- ½ tsp black pepper (freshly cracked if possible)
- ¼ cup fresh cilantro, chopped (reserve some for garnish)
- 1 lime, cut into wedges (essential for brightening at serving)
Instructions
- Pat chicken thighs completely dry with paper towels—this ensures proper browning.
- Heat olive oil in a large Dutch oven over medium-high heat until shimmering, about 2 minutes.
- Season chicken with half the salt and pepper, then place in hot oil without crowding.
- Sear chicken for 5 minutes per side until golden brown crust forms, resisting the urge to move it.
- Transfer chicken to a clean plate, leaving drippings in the pot—those browned bits equal flavor.
- Reduce heat to medium and add diced onion, sautéing for 4 minutes until translucent.
- Add minced garlic and cook for 1 minute until fragrant but not browned.
- Sprinkle cumin and smoked paprika over onions, stirring constantly for 30 seconds to toast spices.
- Pour in chicken broth, scraping bottom vigorously to release all browned bits.
- Return chicken and accumulated juices to the pot, bringing liquid to a gentle boil.
- Reduce heat to low, cover, and simmer for 25 minutes until chicken reaches 165°F internally.
- Remove chicken to a cutting board, letting rest 5 minutes before shredding with two forks.
- Stir white beans, green chiles, remaining salt, and pepper into the simmering broth.
- Return shredded chicken to the pot along with chopped cilantro, simmering uncovered for 10 minutes.
Just before serving, squeeze fresh lime juice over each bowl to brighten the rich flavors. The tender shredded chicken melds beautifully with creamy beans in a broth that’s both hearty and nuanced. For a fun twist, serve over baked potatoes or with tortilla chips for dipping—the texture holds up beautifully to creative presentations.
Summary
Looking for delicious, versatile meal inspiration? These 20 shredded chicken thigh recipes offer something for every taste and occasion. We hope you find new family favorites! Don’t forget to leave a comment telling us which recipe you loved most and share this roundup on Pinterest to help other home cooks discover these flavorful dishes.