Easter, Mother’s Day, or just a sunny afternoon—spring is full of sweet reasons to bake! We’ve gathered 20 delightful cookie recipes bursting with fresh, seasonal flavors. From lemon zest to floral touches, these treats are perfect for sharing and celebrating. Ready to fill your kitchen with the scents of spring? Let’s dive into these delicious cookies!
Strawberry Thumbprint Cookies
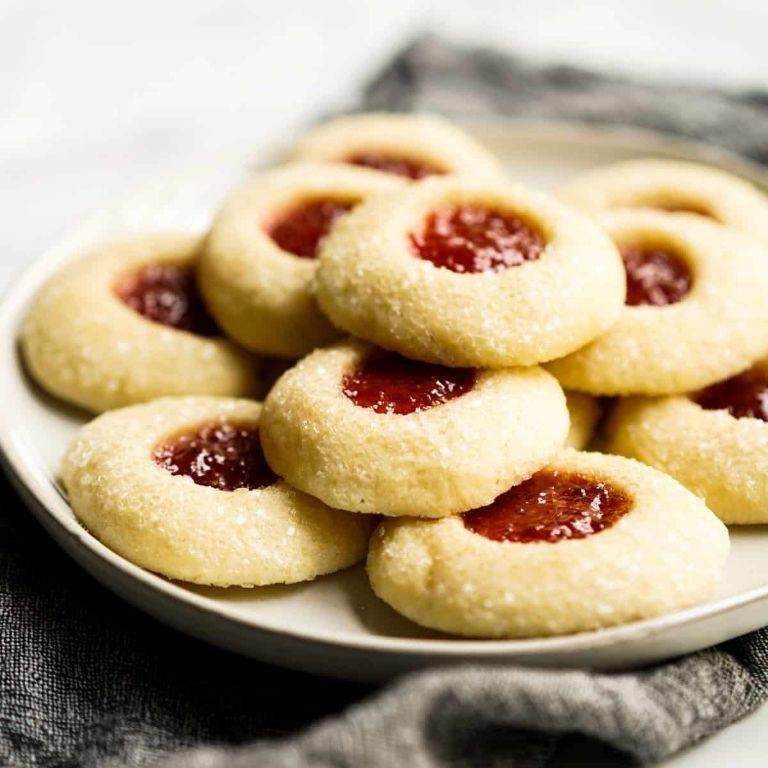
Holiday baking always brings back memories of my grandmother’s kitchen, and these strawberry thumbprint cookies were her signature treat that I’ve perfected over the years—they’re the perfect balance of buttery shortbread and sweet fruit filling that makes everyone ask for the recipe.
Ingredients
For the cookie dough:
- 1 cup unsalted butter, softened
- 2/3 cup granulated sugar
- 1 teaspoon vanilla extract
- 2 cups all-purpose flour
- 1/4 teaspoon salt
For the filling:
- 1/2 cup strawberry jam
Instructions
- Preheat your oven to 350°F and line two baking sheets with parchment paper.
- In a large mixing bowl, cream together 1 cup softened unsalted butter and 2/3 cup granulated sugar using an electric mixer on medium speed for 2 minutes until light and fluffy.
- Add 1 teaspoon vanilla extract to the butter mixture and mix for 30 seconds until fully incorporated.
- In a separate bowl, whisk together 2 cups all-purpose flour and 1/4 teaspoon salt.
- Gradually add the flour mixture to the butter mixture, mixing on low speed just until the dough comes together—be careful not to overmix.
- Roll the dough into 1-inch balls and place them 2 inches apart on the prepared baking sheets.
- Use your thumb to make a deep indentation in the center of each cookie ball.
- Fill each indentation with approximately 1/2 teaspoon of strawberry jam, being careful not to overfill.
- Bake the cookies for 12-14 minutes until the edges are lightly golden brown.
- Let the cookies cool on the baking sheets for 5 minutes before transferring them to a wire rack to cool completely.
Buttery and crumbly with that burst of strawberry sweetness in every bite, these cookies develop an even better texture when stored in an airtight container overnight—I love serving them alongside coffee for afternoon guests or packing them in decorative tins as homemade gifts.
Easter Sugar Cookies with Pastel Icing

Easter just wouldn’t be complete in our house without these cheerful sugar cookies! Every year, my kids and I spend the afternoon before Easter decorating these sweet treats, and I love how the simple act of swirling pastel icing brings back memories of my own childhood springtimes. There’s something magical about transforming basic dough into edible works of art that just screams “spring has sprung.”
Ingredients
For the Cookies:
– 2 ¾ cups all-purpose flour
– 1 teaspoon baking powder
– ½ teaspoon salt
– 1 cup unsalted butter, softened to room temperature
– 1 ½ cups granulated sugar
– 1 large egg
– 2 teaspoons vanilla extract
For the Pastel Icing:
– 3 cups powdered sugar
– 3 tablespoons whole milk
– 1 teaspoon vanilla extract
– Pink, yellow, and blue gel food coloring
Instructions
1. Preheat your oven to 375°F and line two baking sheets with parchment paper.
2. Whisk together 2 ¾ cups all-purpose flour, 1 teaspoon baking powder, and ½ teaspoon salt in a medium bowl until fully combined.
3. Beat 1 cup softened unsalted butter and 1 ½ cups granulated sugar in a large mixing bowl on medium speed for 2 minutes until light and fluffy.
4. Add 1 large egg and 2 teaspoons vanilla extract to the butter mixture, beating for 1 minute until smooth.
5. Gradually mix the dry ingredients into the wet ingredients on low speed until a soft dough forms.
6. Divide the dough in half, flatten each portion into a 1-inch thick disk, wrap in plastic wrap, and chill in the refrigerator for 30 minutes.
7. Roll one dough disk out on a floured surface to ¼-inch thickness using a rolling pin.
8. Cut out shapes with Easter-themed cookie cutters and transfer them to the prepared baking sheets using a spatula, spacing them 2 inches apart.
9. Bake for 8-10 minutes until the edges are just beginning to turn golden brown.
10. Cool the cookies on the baking sheets for 5 minutes before transferring to a wire rack to cool completely.
11. Whisk 3 cups powdered sugar, 3 tablespoons whole milk, and 1 teaspoon vanilla extract in a medium bowl until smooth for the icing.
12. Divide the icing into three small bowls and tint each with pink, yellow, and blue gel food coloring until pastel shades are achieved.
13. Spread or pipe the colored icing onto completely cooled cookies using a knife or piping bag.
14. Let the iced cookies sit at room temperature for 1 hour until the icing sets completely. Cookies come out wonderfully soft with just the right amount of chew, and the vanilla-kissed icing adds a sweet contrast that isn’t overwhelming. Consider stacking these pastel beauties in a clear jar as a charming centerpiece or tying them with ribbon for adorable edible gifts that capture the joy of the season.
Matcha White Chocolate Chip Cookies

Every time I bake these matcha white chocolate chip cookies, I’m transported back to that little tea shop in Portland where I first fell in love with the earthy, vibrant flavor of matcha. There’s something magical about how the slightly bitter matcha perfectly balances the sweet white chocolate—it’s become my go-to treat when I want to impress guests or simply indulge in some self-care baking therapy.
Ingredients
For the Dry Ingredients
– 2 ¼ cups all-purpose flour
– 1 tbsp high-quality matcha powder
– 1 tsp baking soda
– ½ tsp salt
For the Wet Ingredients
– ¾ cup unsalted butter, softened
– ¾ cup granulated sugar
– ¾ cup packed brown sugar
– 2 large eggs
– 1 tsp vanilla extract
For Mixing In
– 1 ½ cups white chocolate chips
Instructions
1. Preheat your oven to 375°F and line two baking sheets with parchment paper.
2. In a medium bowl, whisk together the all-purpose flour, matcha powder, baking soda, and salt until evenly combined and no green streaks remain.
3. In a separate large bowl, use an electric mixer to cream the softened butter, granulated sugar, and brown sugar together on medium speed for exactly 2 minutes until light and fluffy.
4. Add the eggs one at a time to the butter mixture, beating well after each addition until fully incorporated.
5. Mix in the vanilla extract until just combined.
6. Gradually add the dry ingredients to the wet ingredients, mixing on low speed until the dough just comes together—be careful not to overmix.
7. Gently fold in the white chocolate chips using a spatula until evenly distributed throughout the dough.
8. Using a cookie scoop or tablespoon, drop rounded balls of dough (about 1 ½ tablespoons each) onto the prepared baking sheets, spacing them 2 inches apart.
9. Bake for 9-11 minutes until the edges are lightly golden but the centers still look slightly soft.
10. Remove from the oven and let the cookies cool on the baking sheets for 5 minutes before transferring to a wire rack. For perfectly chewy cookies, I always pull them out when they still look a bit underdone in the center—they’ll continue to set as they cool. Freshly baked, these cookies have crisp edges with wonderfully soft, chewy centers that practically melt in your mouth. The vibrant green matcha provides an earthy depth that contrasts beautifully with the sweet, creamy white chocolate chips—they’re fantastic served warm with a cold glass of milk or crumbled over vanilla ice cream for an extra special dessert.
Raspberry Almond Linzer Cookies
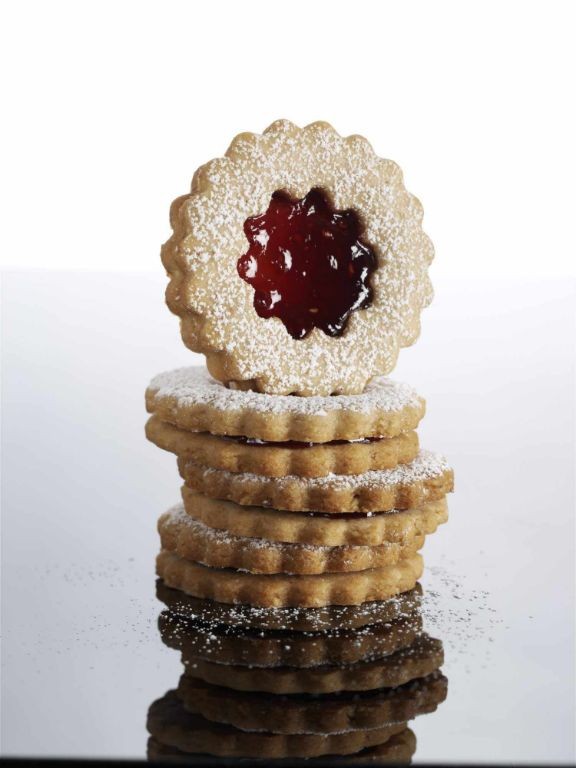
Gathering around the kitchen during the holiday season always reminds me of baking with my grandmother, and these Raspberry Almond Linzer Cookies are my modern twist on her classic jam thumbprints—they’re buttery, nutty, and just festive enough to feel special without being fussy.
Ingredients
For the cookie dough:
- 1 cup unsalted butter, softened
- 2/3 cup granulated sugar
- 1 large egg
- 1 tsp almond extract
- 2 1/2 cups all-purpose flour
- 1/2 cup almond flour
- 1/2 tsp salt
For assembly:
- 1/2 cup raspberry jam
- Powdered sugar for dusting
Instructions
- Preheat your oven to 350°F and line two baking sheets with parchment paper.
- In a large bowl, use an electric mixer to cream the softened butter and granulated sugar together on medium speed for 2 minutes, until light and fluffy.
- Beat in the egg and almond extract until fully combined, scraping down the sides of the bowl with a spatula to ensure everything is incorporated.
- In a separate bowl, whisk together the all-purpose flour, almond flour, and salt.
- Gradually add the dry ingredients to the butter mixture, mixing on low speed just until a soft dough forms—be careful not to overmix, which can make the cookies tough.
- Divide the dough in half, shape each half into a disk, wrap in plastic wrap, and chill in the refrigerator for 30 minutes to make rolling easier.
- On a lightly floured surface, roll one disk of dough to 1/4-inch thickness.
- Use a 2-inch round cookie cutter to cut out circles, placing them 1 inch apart on the prepared baking sheets.
- Use a smaller cutter (about 3/4-inch) to cut centers from half of the circles—these will be the tops.
- Bake for 10–12 minutes, until the edges are lightly golden; rotate the pans halfway through for even browning.
- Let the cookies cool on the baking sheets for 5 minutes before transferring to a wire rack to cool completely.
- Spread about 1/2 teaspoon of raspberry jam onto each solid cookie bottom.
- Dust the cut-out top cookies generously with powdered sugar using a fine-mesh sieve.
- Gently press a sugared top onto each jam-covered bottom to sandwich them together.
Finally, these cookies have a delicate, crumbly texture from the almond flour and a sweet-tart burst from the raspberry jam. For a creative twist, try serving them stacked on a cake stand with fresh mint sprigs or alongside a cup of spiced chai—they’re just as lovely for a cozy afternoon as they are for holiday gifting.
Carrot Cake Cookies with Cream Cheese Frosting
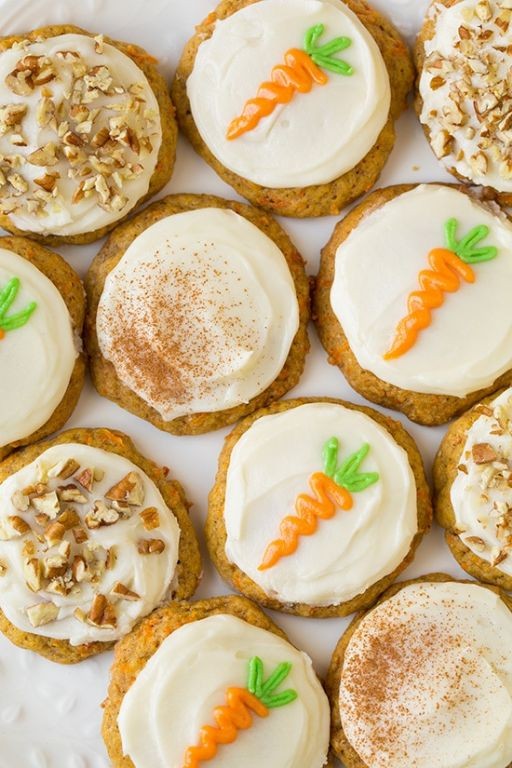
Perfect for when you want carrot cake vibes without committing to a whole layer cake, these carrot cake cookies have become my go-to treat for fall gatherings. I first made them for a last-minute potluck and now my friends request them every Thanksgiving—they’re that good!
Ingredients
For the Cookies
- 2 cups all-purpose flour
- 1 teaspoon baking soda
- 1/2 teaspoon salt
- 1 teaspoon ground cinnamon
- 1/2 cup unsalted butter, softened
- 3/4 cup brown sugar
- 1/4 cup granulated sugar
- 1 large egg
- 1 teaspoon vanilla extract
- 1 1/2 cups finely grated carrots
- 1/2 cup chopped walnuts
For the Cream Cheese Frosting
- 4 ounces cream cheese, softened
- 1/4 cup unsalted butter, softened
- 1 cup powdered sugar
- 1/2 teaspoon vanilla extract
Instructions
- Preheat your oven to 350°F and line two baking sheets with parchment paper.
- Whisk together 2 cups all-purpose flour, 1 teaspoon baking soda, 1/2 teaspoon salt, and 1 teaspoon ground cinnamon in a medium bowl.
- Beat 1/2 cup softened butter, 3/4 cup brown sugar, and 1/4 cup granulated sugar in a large bowl with an electric mixer on medium speed for 2 minutes until light and fluffy.
- Add 1 large egg and 1 teaspoon vanilla extract to the butter mixture, beating until fully incorporated.
- Gradually mix the dry ingredients into the wet ingredients on low speed until just combined.
- Fold in 1 1/2 cups finely grated carrots and 1/2 cup chopped walnuts with a spatula until evenly distributed.
- Drop rounded tablespoons of dough onto the prepared baking sheets, spacing them 2 inches apart.
- Bake for 12-14 minutes until the edges are lightly golden and the centers look set.
- Transfer the cookies to a wire rack and let them cool completely for 30 minutes.
- Beat 4 ounces softened cream cheese and 1/4 cup softened butter in a clean bowl with an electric mixer on medium speed for 1 minute until smooth.
- Gradually add 1 cup powdered sugar and 1/2 teaspoon vanilla extract, beating on low speed until the frosting is creamy and spreadable.
- Spread about 1 tablespoon of frosting onto each completely cooled cookie.
Heavenly doesn’t even begin to describe these—they’re soft and spiced with a slight chew from the carrots, while the tangy cream cheese frosting balances the sweetness perfectly. I love stacking them with the frosting sandwiched between two cookies for an extra-indulgent treat, or simply enjoying them with a hot cup of coffee for the ultimate cozy moment.
Earl Grey Tea Cookies with Honey Drizzle
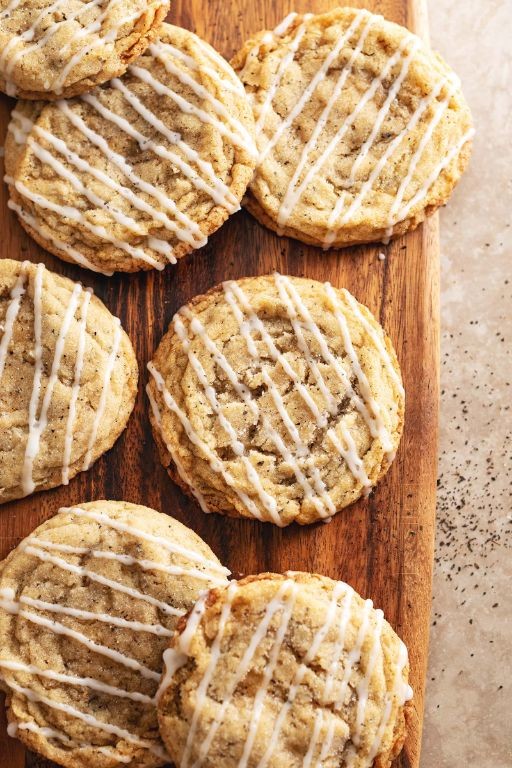
Ooh, there’s something magical about baking with tea—it fills the kitchen with the most comforting aroma, and these Earl Grey tea cookies are my latest obsession. I actually started making them during a rainy afternoon when I needed a cozy pick-me-up, and now they’re my go-to treat for quiet moments with a book.
Ingredients
For the cookie dough:
– 2 cups all-purpose flour
– 1/2 cup granulated sugar
– 1/2 cup unsalted butter, softened
– 1 large egg
– 2 tbsp finely ground Earl Grey tea leaves
– 1 tsp vanilla extract
– 1/2 tsp baking powder
– 1/4 tsp salt
For the honey drizzle:
– 3 tbsp honey
– 1 tbsp powdered sugar
Instructions
1. Preheat your oven to 350°F and line a baking sheet with parchment paper.
2. In a medium bowl, whisk together the flour, ground Earl Grey tea leaves, baking powder, and salt until fully combined.
3. In a separate large bowl, cream the softened butter and granulated sugar together using an electric mixer on medium speed for 2 minutes, until light and fluffy.
4. Beat in the egg and vanilla extract until the mixture is smooth and well incorporated.
5. Gradually add the dry ingredients to the wet ingredients, mixing on low speed just until a soft dough forms and no flour streaks remain.
6. Scoop tablespoon-sized portions of dough and roll them into balls, placing them 2 inches apart on the prepared baking sheet.
7. Use the bottom of a glass to gently flatten each dough ball to 1/4-inch thickness.
8. Bake the cookies for 10–12 minutes, until the edges are lightly golden and the centers look set.
9. Transfer the cookies to a wire rack and let them cool completely for 30 minutes.
10. In a small microwave-safe bowl, heat the honey for 15 seconds until it becomes slightly runny.
11. Whisk the powdered sugar into the warm honey until the mixture is smooth and drizzle-ready.
12. Drizzle the honey mixture over the cooled cookies in a zigzag pattern using a spoon or piping bag.
A delicate crispness gives way to a soft, fragrant center with every bite, the bergamot from the tea pairing beautifully with the sweet honey drizzle. I love serving these alongside a hot cup of coffee for a cozy contrast, or crumbling them over vanilla ice cream for an elegant dessert twist.
Lemon Blueberry Ricotta Cookies
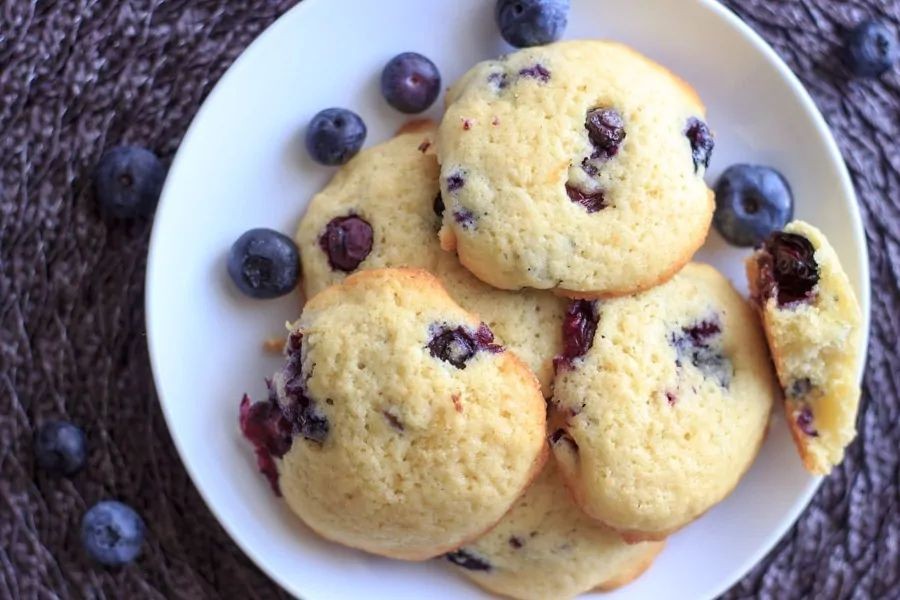
Every time I bake these lemon blueberry ricotta cookies, my kitchen fills with the most incredible citrusy aroma that reminds me of sunny summer mornings at my grandma’s house. I originally stumbled upon this recipe when I had leftover ricotta from making lasagna and decided to experiment—now they’re my go-to treat for book club meetings and weekend brunches.
Ingredients
For the cookie dough:
– 2 cups all-purpose flour
– 1 teaspoon baking powder
– ½ teaspoon salt
– ½ cup unsalted butter, softened to room temperature
– 1 cup granulated sugar
– 1 large egg
– 1 cup whole milk ricotta cheese
– Zest of 2 lemons
– 1 teaspoon vanilla extract
– 1 cup fresh blueberries
For the lemon glaze:
– 1 cup powdered sugar
– 2 tablespoons fresh lemon juice
– 1 tablespoon whole milk
Instructions
1. Preheat your oven to 375°F and line two baking sheets with parchment paper.
2. Whisk together 2 cups all-purpose flour, 1 teaspoon baking powder, and ½ teaspoon salt in a medium bowl.
3. Cream ½ cup softened unsalted butter and 1 cup granulated sugar in a large bowl using an electric mixer on medium speed for 3 minutes until light and fluffy.
4. Beat in 1 large egg until fully incorporated.
5. Mix in 1 cup whole milk ricotta cheese, zest of 2 lemons, and 1 teaspoon vanilla extract until smooth.
6. Gradually add the flour mixture to the wet ingredients, mixing on low speed until just combined.
7. Gently fold in 1 cup fresh blueberries by hand to avoid crushing them.
8. Drop rounded tablespoons of dough onto prepared baking sheets, spacing them 2 inches apart.
9. Bake at 375°F for 12-14 minutes until the edges are lightly golden but centers remain soft.
10. Transfer cookies to a wire rack and let cool completely for 30 minutes.
11. Whisk together 1 cup powdered sugar, 2 tablespoons fresh lemon juice, and 1 tablespoon whole milk in a small bowl until smooth.
12. Drizzle the lemon glaze over cooled cookies using a spoon.
13. Allow glaze to set for 20 minutes before serving.
Here’s what makes these cookies so special: they’re incredibly soft and cake-like with little bursts of juicy blueberries, while the lemon glaze adds just the right amount of tangy sweetness. I love serving them slightly warm with a dollop of whipped cream for an extra indulgent treat, or packing them in lunchboxes where they stay wonderfully moist thanks to the ricotta.
Rosewater Pistachio Cookies
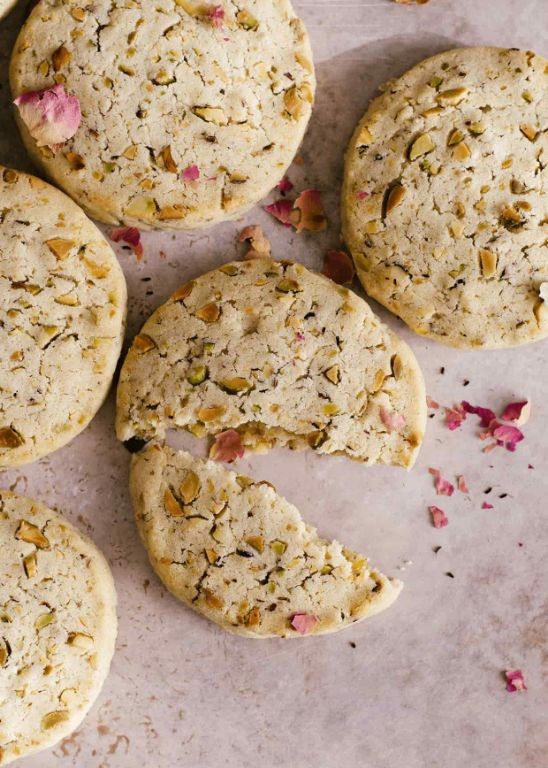
Unbelievably fragrant and delicate, these rosewater pistachio cookies have become my go-to treat for afternoon tea parties and holiday cookie exchanges. I first discovered this flavor combination at a Persian bakery in Los Angeles and have been obsessed with recreating that floral, nutty magic ever since—my kitchen always smells incredible when these are baking.
Ingredients
For the cookie dough:
- 1 cup unsalted butter, softened at room temperature
- 3/4 cup granulated sugar
- 1 large egg
- 2 teaspoons rosewater
- 2 cups all-purpose flour
- 1/2 teaspoon baking powder
- 1/4 teaspoon salt
For assembly:
- 1/2 cup shelled pistachios, finely chopped
- 1 tablespoon granulated sugar (for rolling)
Instructions
- Preheat your oven to 350°F and line two baking sheets with parchment paper.
- Using an electric mixer on medium speed, beat 1 cup softened butter and 3/4 cup granulated sugar together in a large bowl for exactly 2 minutes until light and fluffy.
- Add 1 large egg and 2 teaspoons rosewater to the butter mixture, then beat for 1 additional minute until fully incorporated.
- In a separate bowl, whisk together 2 cups all-purpose flour, 1/2 teaspoon baking powder, and 1/4 teaspoon salt.
- Gradually add the dry ingredients to the wet ingredients, mixing on low speed just until the dough comes together—be careful not to overmix.
- Combine 1/2 cup chopped pistachios and 1 tablespoon granulated sugar in a small bowl for the coating.
- Scoop 1 tablespoon of dough and roll it into a ball between your palms.
- Roll each dough ball in the pistachio-sugar mixture, pressing gently to help the nuts adhere.
- Place the coated dough balls 2 inches apart on prepared baking sheets.
- Bake for 12-14 minutes until the edges are just beginning to turn golden brown—the centers should still look slightly soft.
- Let cookies cool on baking sheets for 5 minutes before transferring to a wire rack to cool completely.
Crunchy pistachio coating gives way to a tender, melt-in-your-mouth interior with subtle floral notes that aren’t overpowering. These cookies pair beautifully with Earl Grey tea or crumbled over vanilla ice cream for an elegant dessert—I love gifting them in pretty glass jars tied with ribbon during the holidays.
Springtime Vanilla Bean Cutout Cookies
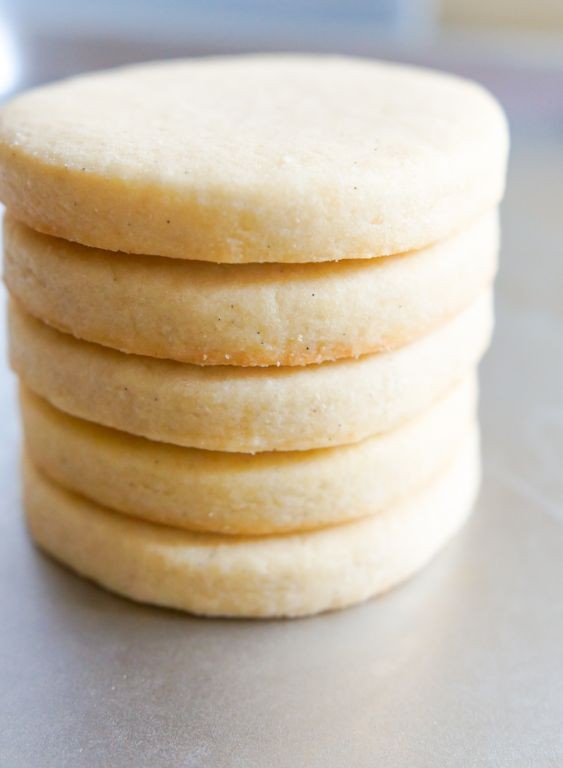
Kind of like finding that perfect spring dress, these vanilla bean cutout cookies are what I reach for when the weather warms up and I want something delicate, floral, and just a little bit fancy. My grandma always said the secret was in the real vanilla beans, and I’ve found she was absolutely right—it makes all the difference.
Ingredients
For the cookie dough:
– 2 ¾ cups all-purpose flour
– 1 cup unsalted butter, softened to room temperature
– ¾ cup granulated sugar
– 1 large egg
– 1 vanilla bean, seeds scraped
– ½ tsp baking powder
– ¼ tsp salt
For decorating (optional):
– 1 cup powdered sugar
– 2-3 tbsp milk
– Food coloring (optional)
Instructions
1. In a medium bowl, whisk together 2 ¾ cups all-purpose flour, ½ tsp baking powder, and ¼ tsp salt until fully combined.
2. In a separate large bowl, use an electric mixer on medium speed to cream 1 cup softened unsalted butter and ¾ cup granulated sugar together for 2-3 minutes, until the mixture is pale and fluffy.
3. Beat in 1 large egg and the seeds from 1 scraped vanilla bean until just incorporated.
4. Gradually add the dry flour mixture to the wet butter mixture, mixing on low speed until a soft dough forms and no dry streaks remain.
5. Divide the dough in half, shape each half into a disk, wrap tightly in plastic wrap, and refrigerate for at least 1 hour, or until firm. (Tip: Chilling the dough prevents the cookies from spreading too much in the oven.)
6. Preheat your oven to 350°F and line two baking sheets with parchment paper.
7. On a lightly floured surface, roll out one disk of dough to ¼-inch thickness.
8. Use cookie cutters to cut out shapes, then transfer them to the prepared baking sheets, spacing them about 1 inch apart.
9. Bake for 8-10 minutes, or until the edges are just barely starting to turn golden. (Tip: For even baking, rotate the baking sheets halfway through the cooking time.)
10. Let the cookies cool on the baking sheet for 5 minutes before transferring them to a wire rack to cool completely.
11. For the icing, whisk together 1 cup powdered sugar and 2-3 tbsp milk until smooth, adding food coloring if desired. (Tip: For a thicker icing that holds its shape, use less milk.)
12. Decorate the cooled cookies with the icing using a piping bag or a small spoon.
You’ll love how these cookies have a tender, slightly crisp texture that melts in your mouth, with the pure, aromatic flavor of vanilla shining through. They’re perfect for a spring tea party or just packaging up in a pretty box to gift to a neighbor—a little taste of sunshine.
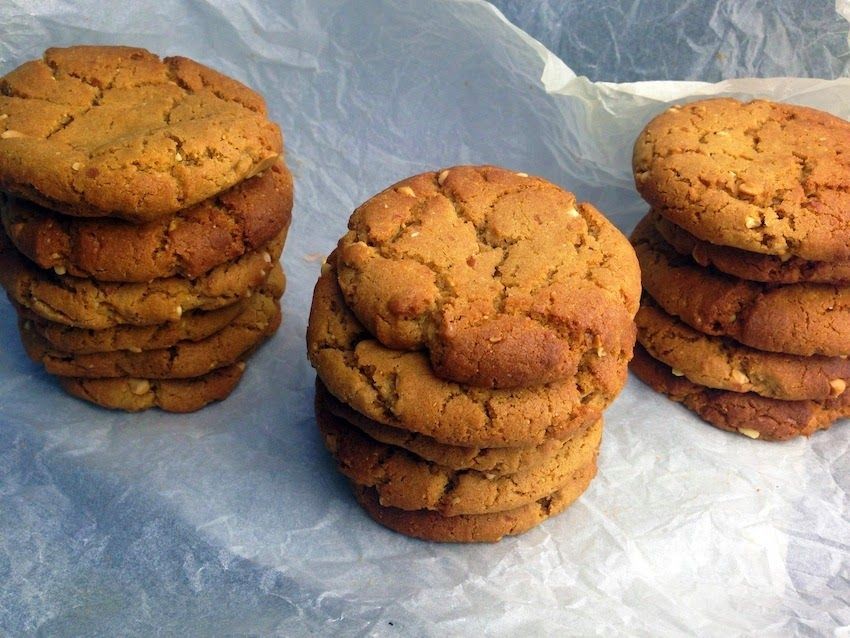
Orange Blossom Honey Cookies
Now, I have to confess something—I’m completely obsessed with finding ways to make classic recipes feel just a little more special, and these Orange Blossom Honey Cookies are my latest obsession. There’s something magical about that floral honey aroma filling your kitchen that makes even a Tuesday feel celebratory.
Ingredients
For the cookie dough:
– 2 cups all-purpose flour
– 1/2 teaspoon baking soda
– 1/4 teaspoon salt
– 3/4 cup unsalted butter, softened
– 1/2 cup granulated sugar
– 1/4 cup orange blossom honey
– 1 large egg
– 1 teaspoon vanilla extract
For finishing:
– 2 tablespoons orange blossom honey for drizzling
– 1 tablespoon granulated sugar for sprinkling
Instructions
1. Preheat your oven to 350°F and line two baking sheets with parchment paper.
2. Whisk together 2 cups all-purpose flour, 1/2 teaspoon baking soda, and 1/4 teaspoon salt in a medium bowl.
3. In a separate large bowl, beat 3/4 cup softened unsalted butter with 1/2 cup granulated sugar until light and fluffy, about 2 minutes.
4. Add 1/4 cup orange blossom honey, 1 large egg, and 1 teaspoon vanilla extract to the butter mixture, beating until fully combined.
5. Gradually mix the dry ingredients into the wet ingredients until just combined—don’t overmix!
6. Scoop tablespoon-sized portions of dough and roll them into balls, placing them 2 inches apart on prepared baking sheets.
7. Gently flatten each dough ball with the bottom of a glass dipped in the 1 tablespoon of granulated sugar to prevent sticking.
8. Bake for 10-12 minutes until the edges are lightly golden but centers still look slightly soft.
9. Transfer cookies to a wire rack and immediately drizzle with the remaining 2 tablespoons of orange blossom honey while still warm.
10. Let cookies cool completely on the rack, about 30 minutes, before serving.
Zesty and floral with the most delightful chewiness, these cookies have that perfect balance between crisp edges and soft centers. I love serving them alongside afternoon tea or crumbling them over vanilla ice cream for an instant dessert upgrade—they disappear faster than I can bake them!
Chocolate-Dipped Coconut Macaroons
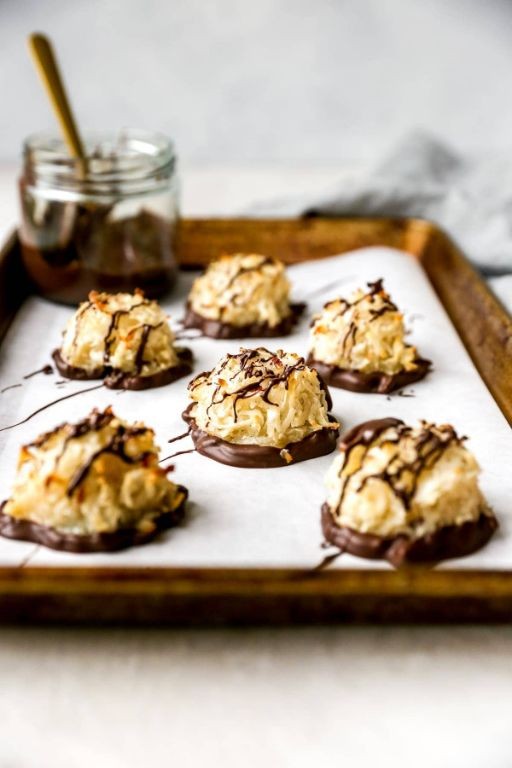
Kind of obsessed with how these chocolate-dipped coconut macaroons turn out every single time—they’re my go-to when I need a quick, impressive treat that feels fancy but comes together in minutes. I love how the chewy coconut center pairs with that crisp chocolate shell, and honestly, they’ve saved me from more than one last-minute potluck panic!
Ingredients
For the macaroons:
- 3 cups sweetened shredded coconut
- 3/4 cup granulated sugar
- 1/4 cup all-purpose flour
- 1/4 teaspoon salt
- 4 large egg whites
- 1 teaspoon vanilla extract
For the chocolate dip:
- 8 ounces semi-sweet chocolate chips
- 1 tablespoon coconut oil
Instructions
- Preheat your oven to 325°F and line a baking sheet with parchment paper.
- In a large bowl, combine 3 cups sweetened shredded coconut, 3/4 cup granulated sugar, 1/4 cup all-purpose flour, and 1/4 teaspoon salt.
- Add 4 large egg whites and 1 teaspoon vanilla extract to the bowl.
- Mix everything together until fully combined and the coconut is evenly coated.
- Use a 2-tablespoon cookie scoop to portion the mixture onto the prepared baking sheet, spacing them about 2 inches apart.
- Bake for 18–22 minutes, until the edges are golden brown and the tops are lightly toasted.
- Transfer the baking sheet to a wire rack and let the macaroons cool completely, about 30 minutes.
- In a microwave-safe bowl, combine 8 ounces semi-sweet chocolate chips and 1 tablespoon coconut oil.
- Microwave in 30-second intervals, stirring after each, until the chocolate is smooth and fully melted.
- Dip the bottom of each cooled macaroon into the melted chocolate, letting excess drip off.
- Place the dipped macaroons back on the parchment-lined sheet.
- Refrigerate for 15 minutes, or until the chocolate is set. Out of this world—the macaroons are chewy and tender inside with a satisfying crunch from the toasted coconut, while the chocolate adds a rich, glossy finish. I love serving them stacked on a cake stand for parties or just keeping a stash in the fridge for a sneaky sweet bite.
Lavender Honey Butter Cookies
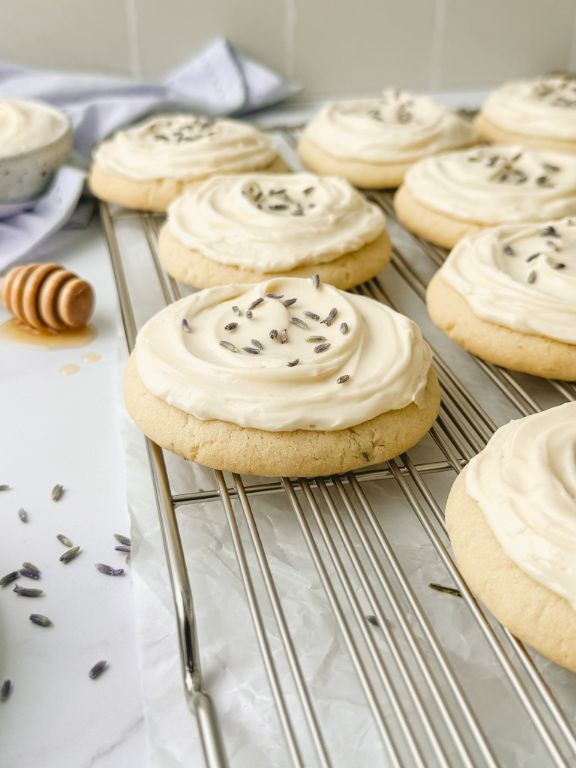
Vividly purple and delicately fragrant, these lavender honey butter cookies have become my go-to treat for afternoon tea. I first discovered this recipe during a visit to a lavender farm in Oregon, where the owner shared her grandmother’s secret for balancing floral notes with sweet honey. Now, I make these every Sunday while listening to jazz—it’s become my little kitchen ritual that makes the house smell absolutely heavenly.Ingredients
For the Cookie Dough:
- 1 cup unsalted butter, softened
- 3/4 cup granulated sugar
- 1/4 cup honey
- 1 large egg
- 2 teaspoons dried culinary lavender
- 2 1/4 cups all-purpose flour
- 1/2 teaspoon baking powder
- 1/4 teaspoon salt
For Rolling:
- 2 tablespoons granulated sugar
Instructions
- Preheat your oven to 350°F and line two baking sheets with parchment paper.
- Using an electric mixer on medium speed, cream together 1 cup softened butter and 3/4 cup granulated sugar until light and fluffy, about 2 minutes.
- Add 1/4 cup honey and 1 large egg to the butter mixture, beating until fully incorporated.
- Crush 2 teaspoons dried lavender between your palms to release its oils before adding to the wet ingredients.
- In a separate bowl, whisk together 2 1/4 cups flour, 1/2 teaspoon baking powder, and 1/4 teaspoon salt.
- Gradually add the dry ingredients to the wet mixture, mixing on low speed until just combined—don’t overmix.
- Cover the dough with plastic wrap and chill in refrigerator for 30 minutes to prevent spreading during baking.
- Place 2 tablespoons granulated sugar in a small bowl for rolling.
- Scoop 1 tablespoon of dough, roll into a ball between your palms, then roll in the sugar to coat completely.
- Place dough balls 2 inches apart on prepared baking sheets and flatten slightly with the bottom of a glass.
- Bake for 10-12 minutes until the edges are lightly golden but centers still look slightly soft.
- Let cookies cool on baking sheets for 5 minutes before transferring to wire racks to cool completely.
Out of the oven, these cookies emerge with crisp edges and tender centers that melt in your mouth. The lavender provides a subtle floral aroma that pairs beautifully with the rich honey sweetness, while the sugar coating adds a delightful crunch. I love serving them alongside Earl Grey tea or crumbling them over vanilla ice cream for an elegant dessert.
Cherry Blossom Shortbread Cookies
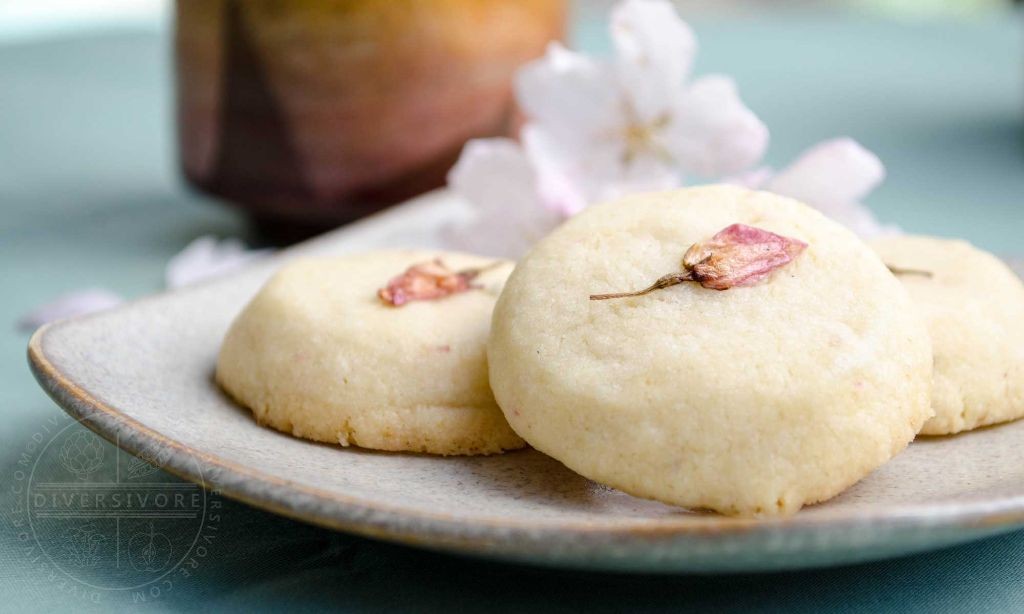
Crafting these Cherry Blossom Shortbread Cookies always transports me back to my first spring in Washington D.C., where I fell in love with the delicate pink blooms and wanted to capture their fleeting beauty in edible form. There’s something magical about transforming simple pantry staples into these elegant, buttery treats that look almost too pretty to eat—almost!Ingredients
For the shortbread dough:
- 1 cup unsalted butter, softened
- 1/2 cup granulated sugar
- 2 cups all-purpose flour
- 1/4 tsp salt
For the cherry blossom decoration:
- 1/4 cup powdered sugar
- 1 tbsp milk
- Pink food coloring
Instructions
- Preheat your oven to 325°F and line two baking sheets with parchment paper.
- Beat 1 cup softened unsalted butter and 1/2 cup granulated sugar together in a large bowl until light and fluffy, about 3 minutes.
- Gradually mix in 2 cups all-purpose flour and 1/4 tsp salt until just combined—be careful not to overmix.
- Roll the dough into 1-inch balls and place them 2 inches apart on prepared baking sheets.
- Use the bottom of a glass to gently flatten each ball to about 1/4-inch thickness.
- Bake for 15-18 minutes until the edges are just beginning to turn golden brown.
- Transfer cookies to a wire rack and let cool completely, about 30 minutes.
- Whisk together 1/4 cup powdered sugar and 1 tbsp milk in a small bowl until smooth.
- Add 2 drops of pink food coloring and stir until evenly distributed.
- Use a piping bag or zip-top bag with the corner snipped off to pipe cherry blossom designs onto cooled cookies.
- Let the icing set completely before serving, about 1 hour.
So wonderfully crumbly and buttery, these cookies practically melt in your mouth with each delicate bite. Serve them alongside floral teas for an elegant afternoon treat, or package them in clear cellophane bags tied with ribbon for the most charming homemade gifts that celebrate spring’s arrival in every nibble.
White Chocolate Cranberry Oatmeal Cookies

Finally, after years of testing countless oatmeal cookie recipes, I’ve perfected my ultimate holiday version—these White Chocolate Cranberry Oatmeal Cookies have become my go-to for cookie exchanges and cozy winter evenings. I actually started making these when my neighbor brought over some dried cranberries from her Thanksgiving leftovers, and now they’re a family tradition that fills my kitchen with the most incredible aroma.Ingredients
For the cookie dough:
- 1 cup unsalted butter, softened
- 1 cup brown sugar
- ½ cup granulated sugar
- 2 large eggs
- 1 teaspoon vanilla extract
- 2 cups all-purpose flour
- 1 teaspoon baking soda
- ½ teaspoon salt
- 2 cups old-fashioned oats
- 1 cup white chocolate chips
- ¾ cup dried cranberries
Instructions
- Preheat your oven to 350°F and line two baking sheets with parchment paper.
- In a large mixing bowl, cream together the softened butter, brown sugar, and granulated sugar for 2-3 minutes until light and fluffy.
- Beat in the eggs one at a time, then mix in the vanilla extract until fully incorporated.
- In a separate bowl, whisk together the flour, baking soda, and salt.
- Gradually add the dry ingredients to the wet ingredients, mixing just until combined—don’t overmix.
- Fold in the oats, white chocolate chips, and dried cranberries until evenly distributed throughout the dough.
- Using a cookie scoop or tablespoon, drop rounded balls of dough (about 2 tablespoons each) onto the prepared baking sheets, spacing them 2 inches apart.
- Bake for 10-12 minutes until the edges are golden brown but the centers still look slightly underdone.
- Remove from the oven and let the cookies cool on the baking sheets for 5 minutes before transferring to a wire rack.
Absolutely magical how these cookies balance chewy and crispy textures—the oats provide that wonderful hearty bite while the white chocolate melts into sweet pockets throughout. I love serving them slightly warm with a cold glass of milk, or crumbling them over vanilla ice cream for an instant dessert upgrade that always impresses guests.
Peach Melba Thumbprint Cookies
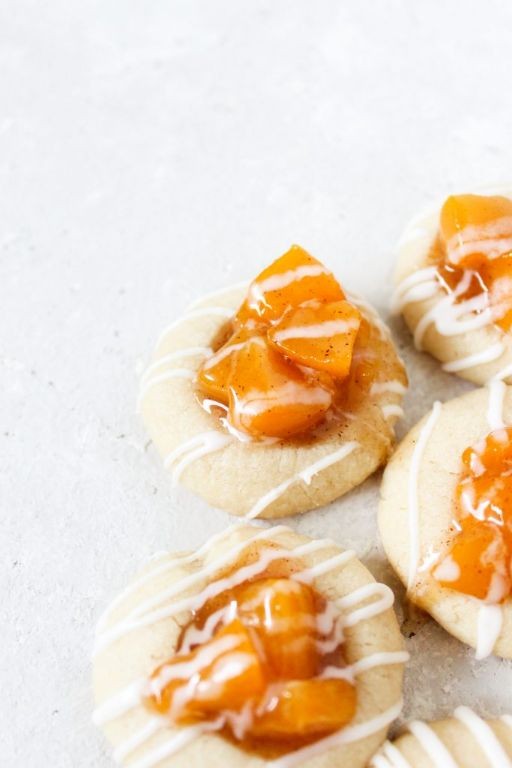
During peach season last summer, I found myself with a glut of ripe peaches and decided to put a nostalgic twist on classic thumbprint cookies. These Peach Melba Thumbprint Cookies combine the sweet juiciness of peaches with the tart brightness of raspberry—a perfect treat that always reminds me of baking with my grandmother.
Ingredients
- For the cookie dough:
- 1 cup all-purpose flour
- 1/2 cup unsalted butter, softened
- 1/4 cup granulated sugar
- 1 large egg yolk
- 1/2 teaspoon vanilla extract
- For the peach-raspberry filling:
- 1/2 cup fresh peaches, peeled and finely diced
- 1/4 cup raspberry jam
- 1 tablespoon lemon juice
Instructions
- Preheat your oven to 350°F and line a baking sheet with parchment paper.
- In a medium bowl, use an electric mixer to cream together 1/2 cup softened unsalted butter and 1/4 cup granulated sugar on medium speed for 2 minutes until light and fluffy.
- Add 1 large egg yolk and 1/2 teaspoon vanilla extract to the butter mixture, mixing for 1 minute until fully incorporated.
- Gradually mix in 1 cup all-purpose flour on low speed until a soft dough forms, being careful not to overmix.
- Roll the dough into 1-inch balls and place them 2 inches apart on the prepared baking sheet.
- Use your thumb to press a deep indentation into the center of each dough ball. Tip: Lightly flour your thumb to prevent sticking.
- In a small saucepan over medium heat, combine 1/2 cup diced peaches, 1/4 cup raspberry jam, and 1 tablespoon lemon juice.
- Cook the filling mixture for 5 minutes, stirring constantly, until the peaches soften and the jam melts into a thick sauce.
- Spoon 1 teaspoon of the warm peach-raspberry filling into each cookie indentation. Tip: Let the filling cool slightly to prevent it from running.
- Bake the cookies for 12-14 minutes until the edges are lightly golden. Tip: Rotate the baking sheet halfway through for even browning.
- Transfer the cookies to a wire rack and let them cool completely for 30 minutes before serving.
Golden and tender, these cookies have a buttery crumb that contrasts beautifully with the fruity filling. I love serving them slightly warm with a scoop of vanilla ice cream for an extra indulgent dessert that always disappears quickly.
Mint Chocolate Chip Sandwich Cookies
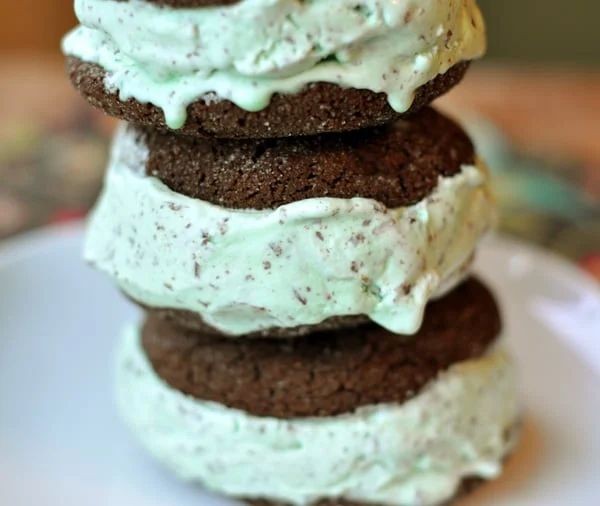
Perfectly balancing refreshing mint and rich chocolate, these sandwich cookies have become my go-to treat for holiday gatherings and summer picnics alike. I first discovered this magical combination when my daughter begged for “green cookies” for her birthday party, and now they’re requested at every family event. There’s something wonderfully nostalgic about that mint-chocolate pairing that takes me right back to childhood ice cream shop visits.
Ingredients
For the Cookies:
– 2 cups all-purpose flour
– 3/4 cup unsweetened cocoa powder
– 1 teaspoon baking soda
– 1/2 teaspoon salt
– 1 cup unsalted butter, softened to room temperature
– 1 cup granulated sugar
– 1 large egg
– 1 teaspoon vanilla extractFor the Mint Filling:
– 1/2 cup unsalted butter, softened to room temperature
– 2 cups powdered sugar
– 2 tablespoons heavy cream
– 1 teaspoon peppermint extract
– 6 drops green food coloring
– 1/2 cup mini chocolate chipsInstructions
1. Preheat your oven to 350°F and line two baking sheets with parchment paper.
2. Whisk together 2 cups all-purpose flour, 3/4 cup unsweetened cocoa powder, 1 teaspoon baking soda, and 1/2 teaspoon salt in a medium bowl.
3. Cream 1 cup softened unsalted butter with 1 cup granulated sugar in a large bowl using an electric mixer on medium speed for 2 minutes until light and fluffy.
4. Beat in 1 large egg and 1 teaspoon vanilla extract until fully incorporated.
5. Gradually mix the dry ingredients into the wet ingredients on low speed until a dough forms.
6. Scoop tablespoon-sized portions of dough and roll into balls, placing them 2 inches apart on prepared baking sheets.
7. Flatten each ball slightly with the bottom of a glass dipped in sugar to prevent sticking.
8. Bake for 10-12 minutes until the cookies look set around the edges but still slightly soft in the center.
9. Transfer cookies to a wire rack and cool completely for 30 minutes.
10. Beat 1/2 cup softened unsalted butter with 2 cups powdered sugar in a clean bowl until smooth.
11. Mix in 2 tablespoons heavy cream, 1 teaspoon peppermint extract, and 6 drops green food coloring until the filling is uniformly colored.
12. Fold 1/2 cup mini chocolate chips into the mint filling using a spatula.
13. Spread about 1 tablespoon of mint filling onto the flat side of one cooled cookie.
14. Press another cookie gently on top to create a sandwich, repeating with remaining cookies.Remarkably crisp chocolate cookies give way to that cool, creamy mint center studded with tiny chocolate bits. The contrast between the dark, slightly bitter cocoa and the sweet, refreshing filling creates this wonderful push-and-pull of flavors that keeps you reaching for just one more. I love serving these alongside coffee for an afternoon pick-me-up or stacking them high on a vintage cake stand for parties—they always disappear faster than anything else on the table.
Apricot Almond Biscotti
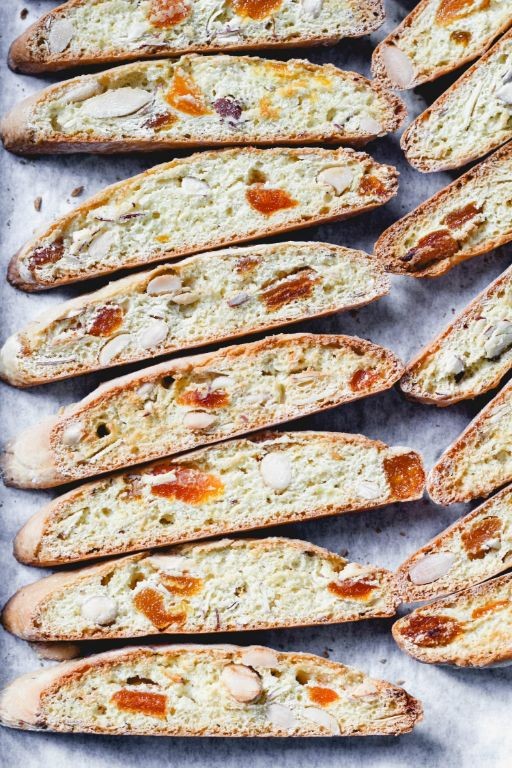
Remember that time I burned my first batch of biscotti because I was too impatient to let them cool properly? I’ve since learned that good things come to those who wait, especially when it comes to these delightful apricot almond biscotti that have become my go-to holiday treat.Ingredients
For the dough:
- 2 cups all-purpose flour
- 1 cup granulated sugar
- 1 teaspoon baking powder
- 1/4 teaspoon salt
- 3 large eggs
- 1 teaspoon vanilla extract
- 1 cup dried apricots, chopped
- 3/4 cup sliced almonds
Instructions
- Preheat your oven to 350°F and line a baking sheet with parchment paper.
- Whisk together 2 cups all-purpose flour, 1 cup granulated sugar, 1 teaspoon baking powder, and 1/4 teaspoon salt in a large bowl.
- Beat 3 large eggs with 1 teaspoon vanilla extract in a separate bowl until frothy.
- Combine the wet ingredients with the dry ingredients, mixing until a stiff dough forms.
- Fold in 1 cup chopped dried apricots and 3/4 cup sliced almonds until evenly distributed.
- Divide the dough in half and shape each portion into a 12-inch long log on the prepared baking sheet.
- Bake for 25 minutes at 350°F until the logs are golden and firm to the touch.
- Remove from oven and let cool for 15 minutes—this prevents crumbling when slicing.
- Cut the logs diagonally into 3/4-inch thick slices using a serrated knife with a gentle sawing motion.
- Arrange the slices cut-side down on the baking sheet and bake for 10 minutes at 325°F.
- Flip each biscotti and bake for another 10 minutes until dry and lightly toasted.
- Transfer to a wire rack to cool completely, about 1 hour.
Last weekend, I discovered these biscotti are even better when dipped in dark chocolate—the slight bitterness perfectly complements the sweet apricots. Their satisfying crunch gives way to chewy fruit pockets, making them ideal for dunking in coffee or simply enjoying as an afternoon pick-me-up.
Lemon Poppy Seed Cookies

Whenever I need a quick baking fix that feels both nostalgic and sophisticated, these lemon poppy seed cookies are my go-to. I first discovered this recipe during a rainy afternoon when I wanted something bright to combat the gloomy weather, and now they’re my signature treat for book club meetings. There’s something magical about how the zesty lemon and crunchy poppy seeds create such a delightful balance in a simple cookie.Ingredients
For the cookie dough:
– 2 cups all-purpose flour
– 1/2 teaspoon baking soda
– 1/4 teaspoon salt
– 1 cup unsalted butter, softened
– 3/4 cup granulated sugar
– 1 large egg
– 2 tablespoons fresh lemon juice
– 1 tablespoon lemon zest
– 2 tablespoons poppy seedsFor finishing:
– 1/4 cup powdered sugarInstructions
1. Preheat your oven to 350°F and line two baking sheets with parchment paper.
2. Whisk together 2 cups all-purpose flour, 1/2 teaspoon baking soda, and 1/4 teaspoon salt in a medium bowl.
3. Cream 1 cup softened unsalted butter with 3/4 cup granulated sugar in a large bowl using an electric mixer on medium speed for 2 minutes until light and fluffy.
4. Beat in 1 large egg until fully incorporated, about 30 seconds.
5. Mix in 2 tablespoons fresh lemon juice and 1 tablespoon lemon zest until combined.
6. Gradually add the flour mixture to the wet ingredients, mixing on low speed just until no dry streaks remain.
7. Fold in 2 tablespoons poppy seeds with a spatula until evenly distributed throughout the dough.
8. Scoop tablespoon-sized portions of dough and roll into balls, placing them 2 inches apart on prepared baking sheets.
9. Bake at 350°F for 10-12 minutes until the edges are lightly golden but centers still look slightly soft.
10. Cool cookies on baking sheets for 5 minutes before transferring to a wire rack.
11. Sift 1/4 cup powdered sugar over completely cooled cookies using a fine-mesh sieve.Perfectly chewy with crisp edges, these cookies deliver a burst of citrus that makes them impossible to eat just one. I love serving them alongside afternoon tea or crumbling them over vanilla ice cream for an extra special dessert—the lemon flavor really shines through when paired with something creamy.
Spring Spritz Cookies with Rainbow Sprinkles

Zesty spring baking always puts me in the best mood, especially when I can whip up these cheerful Spring Spritz Cookies with Rainbow Sprinkles. I started making these years ago when my daughter begged for “colorful cookies” for her spring recital, and now they’re my go-to treat for Easter gatherings and sunny afternoon tea parties. There’s something magical about how these simple butter cookies transform into vibrant little bites that make everyone smile.Ingredients
For the cookie dough:
– 1 cup unsalted butter, softened to room temperature
– 3/4 cup granulated sugar
– 1 large egg
– 1 teaspoon vanilla extract
– 2 1/4 cups all-purpose flour
– 1/4 teaspoon saltFor decorating:
– 1/4 cup rainbow sprinklesInstructions
1. Preheat your oven to 375°F and line two baking sheets with parchment paper.
2. In a large mixing bowl, cream together 1 cup softened unsalted butter and 3/4 cup granulated sugar using an electric mixer on medium speed for 2-3 minutes until light and fluffy.
3. Add 1 large egg and 1 teaspoon vanilla extract to the butter mixture, beating for 1 minute until fully incorporated.
4. In a separate bowl, whisk together 2 1/4 cups all-purpose flour and 1/4 teaspoon salt.
5. Gradually add the flour mixture to the wet ingredients, mixing on low speed just until the dough comes together.
6. Fill a cookie press with the dough and press cookies directly onto the prepared baking sheets, spacing them 2 inches apart.
7. Immediately sprinkle each cookie with rainbow sprinkles, pressing gently to help them adhere.
8. Bake for 8-10 minutes until the edges are just beginning to turn golden brown.
9. Let cookies cool on the baking sheets for 5 minutes before transferring to a wire rack to cool completely.Crisp yet tender with that classic buttery flavor, these cookies practically melt in your mouth while the rainbow sprinkles add the perfect festive crunch. I love serving them stacked high on a vintage cake stand for spring brunches or packaging them in clear cellophane bags tied with ribbon as edible party favors that always disappear faster than the spring flowers bloom.
Summary
Joyful baking awaits with these 20 delightful spring cookie recipes! Whether you’re celebrating Easter, Mother’s Day, or simply the season’s sweetness, there’s a perfect treat for every occasion. We’d love to hear which recipes become your favorites—leave a comment below and share this roundup on Pinterest to spread the spring baking joy!