Kick those dessert restrictions to the curb! We’ve gathered 20 decadent vegan and gluten-free treats that are so delicious, no one will guess they’re allergy-friendly. From rich chocolate cakes to creamy cheesecakes, these recipes prove that indulgence doesn’t require compromise. Get ready to satisfy your sweet tooth with desserts that everyone can enjoy—let’s dive into these irresistible creations!
Coconut Chia Pudding
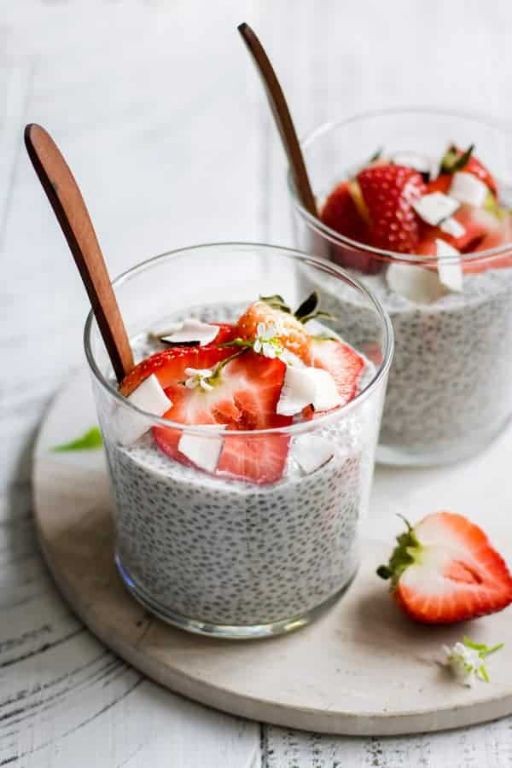
Yesterday’s rain left me craving something that would cradle the morning rather than rush it, something simple enough to make in the quiet of the evening and find waiting, transformed, by sunrise.
Ingredients
– 1/2 cup organic white chia seeds
– 2 cups full-fat coconut milk, well-shaken
– 3 tablespoons pure maple syrup, grade A
– 1 teaspoon pure vanilla extract
– 1/4 teaspoon fine sea salt
Instructions
1. Combine 1/2 cup organic white chia seeds and 2 cups full-fat coconut milk in a 1-quart glass jar with a tight-fitting lid.
2. Add 3 tablespoons pure maple syrup, 1 teaspoon pure vanilla extract, and 1/4 teaspoon fine sea salt to the jar.
3. Secure the lid tightly and shake the jar vigorously for 45 seconds until the maple syrup is fully incorporated and no clumps of chia seeds remain. Tip: Shaking, rather than stirring, prevents the chia seeds from clumping at the bottom.
4. Let the mixture rest on the counter for 10 minutes, then shake again for 15 seconds to break up any seeds that settled.
5. Refrigerate the pudding for a minimum of 6 hours, or preferably overnight, until the texture is uniformly thick and spoonable. Tip: The long, cold rest allows the chia seeds to fully hydrate and develop a creamy, gel-like consistency.
6. Before serving, stir the pudding thoroughly with a fork to lighten the texture and redistribute any settled seeds. Tip: A final stir introduces air, creating a fluffier, mousse-like mouthfeel.
Zestful and nourishing, the pudding emerges with a delicate, jelly-like texture that yields softly to the spoon, carrying the subtle sweetness of coconut and the warm, caramel notes of maple. Layer it in a glass with fresh mango and toasted coconut flakes for a tropical parfait, or spoon it over a bowl of ripe berries for a simple, elegant breakfast that feels both grounding and luxurious.
Raw Vegan Cheesecake
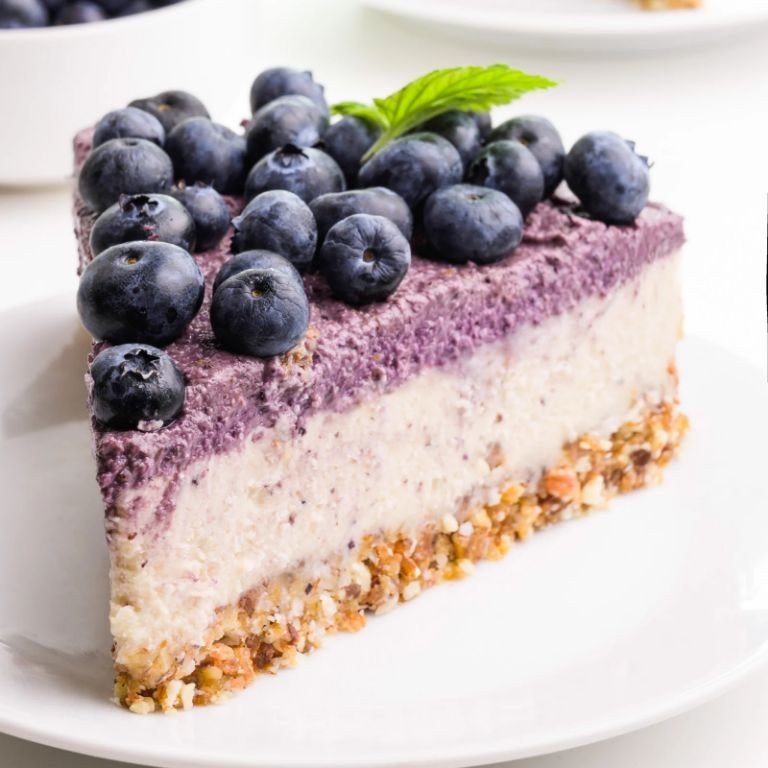
For a moment, let’s set aside the oven’s warmth and consider the quiet magic of transformation that happens in the cool dark of a refrigerator, where nuts become creamy and dates turn into caramel. This raw dessert feels less like a recipe and more like a gentle meditation on patience and texture, a sweet pause in a world that often moves too fast.
Ingredients
- 1 ½ cups raw cashews, soaked for 4 hours and drained
- 1 cup raw macadamia nuts
- 1 ¼ cups Medjool dates, pitted
- ¼ cup raw coconut oil, gently warmed to liquid state
- ⅓ cup pure maple syrup, grade A amber
- ¼ cup fresh lemon juice, freshly squeezed
- 1 teaspoon pure vanilla extract, alcohol-free
- ¼ teaspoon fine sea salt
- ½ cup filtered water, chilled
Instructions
- Place the raw macadamia nuts and pitted Medjool dates into the bowl of a food processor fitted with the ‘S’ blade.
- Process the mixture on high speed for exactly 45 seconds, or until the ingredients form a cohesive dough that holds together when pressed between your fingers.
- Firmly press this crust mixture into the bottom of a 7-inch springform pan, using the flat bottom of a measuring cup to create an even, compact layer.
- Combine the soaked cashews, liquid coconut oil, maple syrup, fresh lemon juice, vanilla extract, and fine sea salt in a high-speed blender.
- Add the chilled filtered water to the blender to help achieve a smoother consistency.
- Blend on high speed for 2 full minutes, scraping down the sides once with a flexible spatula halfway through, until completely smooth and silky.
- Pour the filling over the prepared crust, gently tapping the pan on the counter to release any air bubbles.
- Smooth the top with an offset spatula, creating a perfectly level surface.
- Cover the pan tightly with food-safe plastic wrap, ensuring it touches the surface of the filling to prevent condensation.
- Place the cheesecake in the refrigerator to set for a minimum of 8 hours, or preferably overnight for optimal texture development.
My favorite part is that first slice—the way the creamy filling yields without being heavy, carrying the bright lemon and rich vanilla in a cool, velvety embrace. Sometimes I’ll scatter edible flowers or crushed freeze-dried raspberries across the top, their tartness playing beautifully against the subtle sweetness.
Peanut Butter Energy Balls
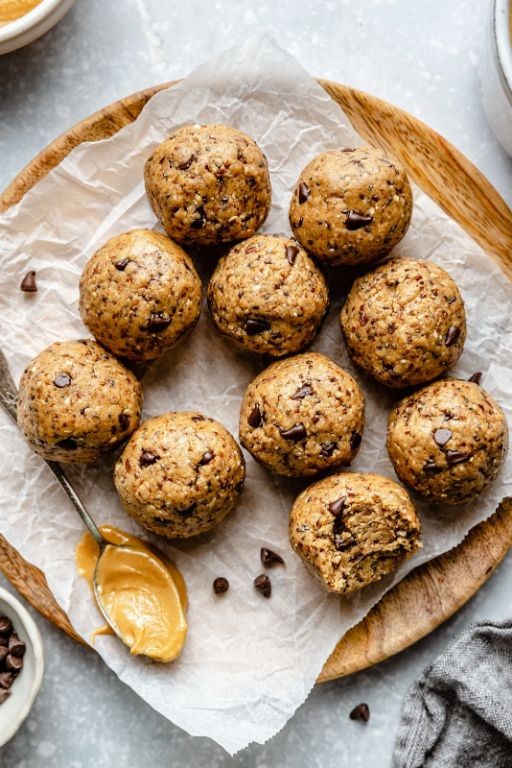
A quiet afternoon finds me craving something both nourishing and nostalgic, these peanut butter energy balls emerging as the perfect companion to moments of stillness. As I measure ingredients with deliberate hands, I’m reminded how simple elements can transform into something deeply satisfying.
Ingredients
– 1 cup creamy, unsalted natural peanut butter
– ½ cup raw, unfiltered honey
– 1 cup old-fashioned rolled oats
– ¼ cup ground flaxseed meal
– ¼ cup unsweetened shredded coconut
– ½ teaspoon Madagascar bourbon vanilla extract
– ¼ teaspoon fine sea salt
Instructions
1. Combine 1 cup creamy, unsalted natural peanut butter and ½ cup raw, unfiltered honey in a medium mixing bowl.
2. Whisk the mixture vigorously for exactly 2 minutes until it achieves a smooth, homogeneous consistency with no separation.
3. Add 1 cup old-fashioned rolled oats, ¼ cup ground flaxseed meal, and ¼ cup unsweetened shredded coconut to the wet ingredients.
4. Sprinkle ½ teaspoon Madagascar bourbon vanilla extract and ¼ teaspoon fine sea salt over the dry ingredients.
5. Fold all components together using a silicone spatula until the mixture forms a cohesive, slightly sticky dough.
6. Chill the dough in the refrigerator for precisely 15 minutes to firm the texture for easier handling.
7. Portion the chilled dough using a 1-tablespoon cookie scoop onto a parchment-lined baking sheet.
8. Roll each portion between your palms for exactly 10 seconds to form perfectly round spheres.
9. Arrange the balls in a single layer with ½-inch spacing to prevent sticking.
10. Refrigerate the energy balls for 30 minutes minimum until firm to the touch.
For these become wonderfully dense yet yielding, with the earthy sweetness of honey balancing the salty peanut richness. Freeze them for a chilled treat, or crumble over morning yogurt for unexpected texture.
Pumpkin Spice Mug Cake

Beneath the quiet hum of the afternoon, when the crisp air whispers of changing seasons and a sudden craving for warmth settles deep, there’s something profoundly comforting about stirring together a simple mug cake. This pumpkin spice version, with its gentle aroma of cinnamon and nutmeg, feels like a soft embrace in a cup—a small, solitary indulgence that requires little more than a few minutes and a willing heart.
Ingredients
- 1/4 cup all-purpose flour
- 2 tablespoons granulated cane sugar
- 1/4 teaspoon baking powder
- 1/4 teaspoon ground cinnamon
- 1/8 teaspoon freshly grated nutmeg
- Pinch of fine sea salt
- 3 tablespoons pure pumpkin purée
- 2 tablespoons whole milk, at room temperature
- 1 tablespoon unsalted clarified butter, melted
- 1/2 teaspoon pure vanilla extract
Instructions
- Select a 12-ounce microwave-safe ceramic mug and lightly grease the interior with a thin coating of clarified butter using a pastry brush.
- Whisk together 1/4 cup all-purpose flour, 2 tablespoons granulated cane sugar, 1/4 teaspoon baking powder, 1/4 teaspoon ground cinnamon, 1/8 teaspoon freshly grated nutmeg, and a pinch of fine sea salt in a small mixing bowl until fully incorporated.
- Add 3 tablespoons pure pumpkin purée, 2 tablespoons whole milk, 1 tablespoon melted unsalted clarified butter, and 1/2 teaspoon pure vanilla extract to the dry ingredients.
- Stir the mixture with a flexible spatula for exactly 45 seconds, scraping the bowl’s sides twice, until no dry streaks remain and the batter is smooth. Tip: Avoid overmixing to prevent a dense texture.
- Pour the batter into the prepared mug, tapping the base gently on the counter to release any large air bubbles.
- Microwave on high power for 90 seconds, watching for the cake to rise fully and the surface to appear dry with a few small steam holes. Tip: Microwave wattages vary; begin checking at 75 seconds if yours exceeds 1100W.
- Insert a toothpick into the center of the cake; it should emerge with a few moist crumbs clinging to it, indicating perfect doneness.
- Allow the mug cake to rest on a wire rack for 2 minutes to set the crumb. Tip: This brief cooling period helps the flavors meld and improves the texture.
Perhaps what makes this mug cake so special is its tender, moist crumb that melts on the tongue, carrying the earthy sweetness of pumpkin and the warm embrace of spices. Pair it with a dollop of bourbon-spiked whipped cream for an autumnal twist, or enjoy it plain, straight from the mug, while the steam still curls toward the ceiling.
Matcha Coconut Bliss Balls
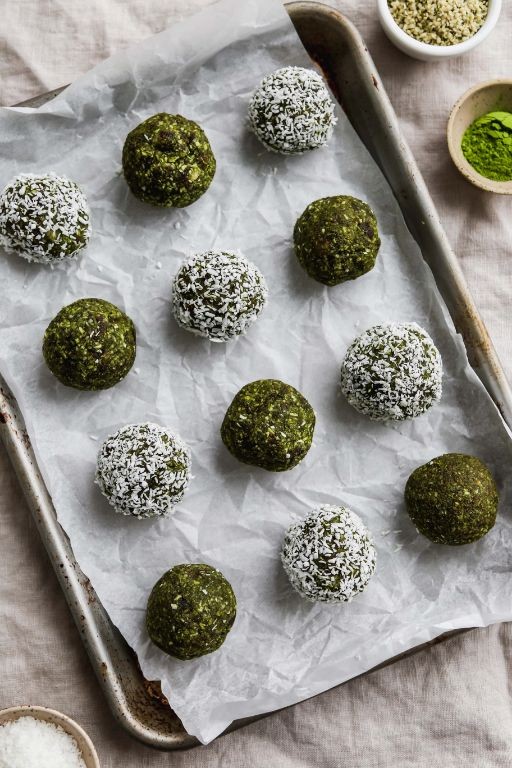
Gently, as autumn leaves begin their slow descent outside my window, I find myself craving these little spheres of quiet comfort—the earthy matcha and tropical coconut creating a moment of peaceful indulgence that feels both nourishing and deeply soothing.
Ingredients
– 1 cup raw cashews, soaked for 4 hours and drained
– ½ cup unsweetened shredded coconut, plus 2 tablespoons for coating
– 3 tablespoons pure maple syrup
– 2 tablespoons coconut oil, melted
– 1 tablespoon ceremonial-grade matcha powder
– 1 teaspoon pure vanilla extract
– ¼ teaspoon fine sea salt
Instructions
1. Combine the soaked cashews, ½ cup shredded coconut, maple syrup, melted coconut oil, matcha powder, vanilla extract, and sea salt in a food processor fitted with the S-blade attachment.
2. Process the mixture on high speed for 90 seconds, stopping to scrape down the sides with a rubber spatula halfway through, until a cohesive dough forms that holds together when pressed between your fingers.
3. Transfer the dough to a medium mixing bowl and refrigerate uncovered for 25 minutes to firm slightly, which makes rolling easier and prevents sticking to your hands.
4. Place the remaining 2 tablespoons of shredded coconut in a shallow dish for coating.
5. Using a 1-tablespoon cookie scoop, portion the chilled dough into 18 equal pieces, rolling each between your palms to form smooth, compact spheres.
6. Roll each ball in the reserved shredded coconut, pressing gently to ensure even adherence and create a textured exterior.
7. Arrange the coated balls in a single layer on a parchment-lined baking sheet, spacing them ½ inch apart to prevent sticking.
8. Refrigerate the bliss balls uncovered for 45 minutes to set completely, allowing the coconut oil to solidify and create the perfect firm-yet-yielding texture. The final result offers a delightful contrast between the crisp coconut coating and the dense, fudgy interior, with the matcha’s subtle bitterness beautifully balanced by the maple’s warmth. Try serving them alongside chilled green tea or crumbling one over coconut yogurt for an elegant breakfast treat.
Strawberry Quinoa Crumble
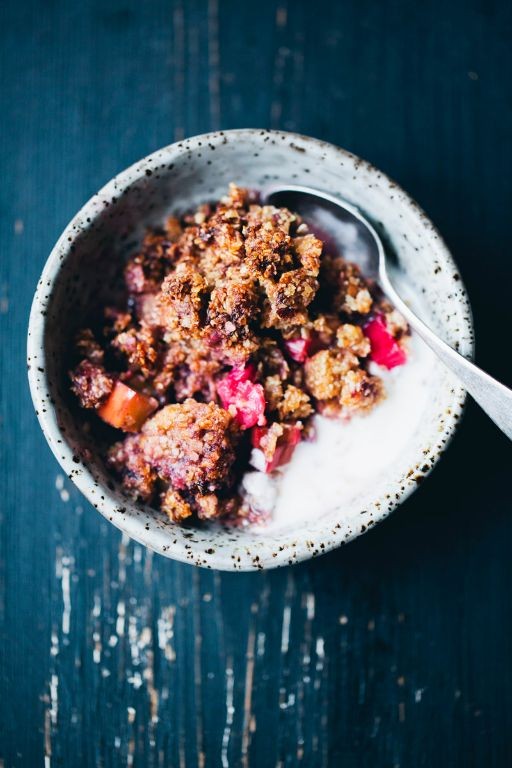
Holding this warm bowl feels like autumn’s gentle embrace, the sweet aroma of roasted strawberries mingling with nutty quinoa creating a comfort that settles deep in the soul. Sometimes the most nourishing meals emerge from simple ingredients transformed with care, each component given space to shine in harmonious balance. This crumble bridges dessert and breakfast with quiet elegance, offering both sustenance and sweetness in every spoonful.
Ingredients
– 1 cup organic tri-color quinoa, thoroughly rinsed
– 2 cups fresh strawberries, hulled and quartered
– ¼ cup pure maple syrup
– 1 teaspoon vanilla bean paste
– ½ teaspoon finely ground Ceylon cinnamon
– ¼ teaspoon freshly grated nutmeg
– ⅓ cup cold European-style butter, cubed
– ½ cup almond flour
– ¼ cup rolled oats
– 2 tablespoons turbinado sugar
– Pinch of Maldon sea salt
Instructions
1. Preheat your oven to 375°F and lightly butter a 9-inch ceramic baking dish.
2. Combine the rinsed quinoa with 2 cups water in a saucepan and bring to a rolling boil.
3. Reduce heat to low, cover tightly, and simmer for 15 minutes until quinoa has absorbed all liquid and appears translucent with visible germ rings.
4. Fluff the cooked quinoa with a fork and spread evenly across the prepared baking dish.
5. Toss the quartered strawberries with maple syrup, vanilla bean paste, cinnamon, and nutmeg in a mixing bowl until thoroughly coated.
6. Arrange the strawberry mixture over the quinoa layer in a single, even distribution.
7. Combine the cubed butter, almond flour, rolled oats, turbinado sugar, and sea salt in a separate bowl.
8. Use your fingertips to rub the butter into the dry ingredients until the mixture resembles coarse sand with pea-sized butter pieces remaining.
9. Sprinkle the crumble topping evenly over the strawberry layer, covering the surface completely.
10. Bake for 35-40 minutes until the topping is golden brown and strawberry juices bubble vigorously around the edges.
11. Remove from oven and rest for 15 minutes to allow the layers to set properly. Using cold butter ensures a flaky, textured crumble that won’t melt prematurely during baking. Allowing the cooked quinoa to cool slightly before adding strawberries prevents the fruit from becoming mushy. Resting the finished crumble before serving allows the flavors to meld and makes cleaner slices. Under the crisp, buttery topping lies a landscape of textures—the quinoa provides earthy substance while the strawberries collapse into jammy sweetness. Serve warm with a drizzle of cold heavy cream or alongside Greek yogurt for contrasting temperatures, or pack cooled portions for a thoughtful lunchbox treat that improves by midday.
Sweet Potato Chocolate Truffles
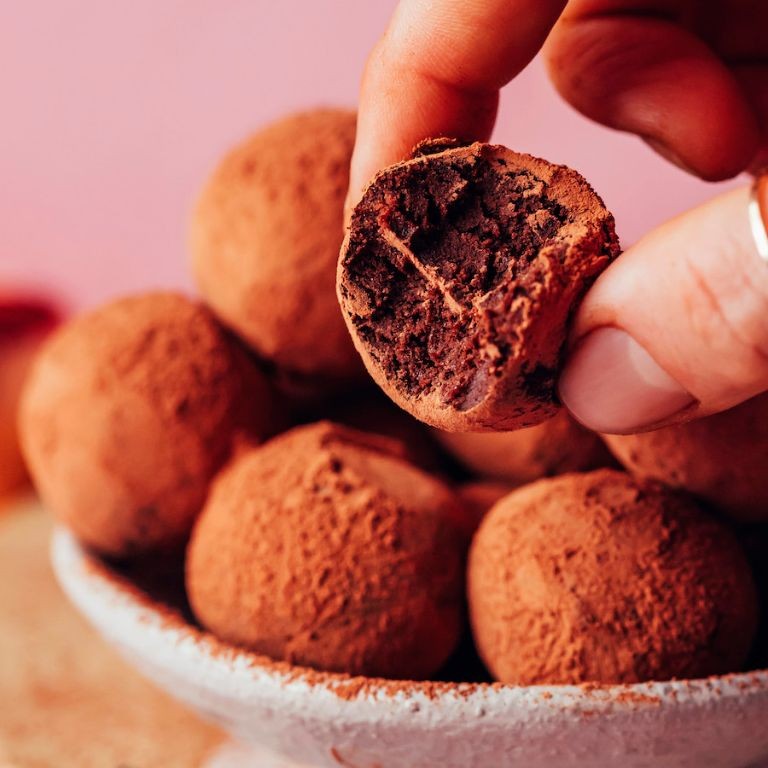
Sometimes, when the afternoon light slants just so through the kitchen window, I find myself craving something that feels both nourishing and deeply indulgent. Sweet potatoes, with their earthy sweetness, and dark chocolate, with its complex bitterness, seem to find a quiet harmony in these simple truffles. They are a gentle reminder that the most satisfying treats often come from the humblest of ingredients.
Ingredients
– 1 cup roasted sweet potato flesh, cooled to room temperature
– 1/2 cup high-quality Dutch-process cocoa powder, plus extra for dusting
– 1/4 cup pure maple syrup
– 1/4 cup creamy, unsalted almond butter
– 1/2 teaspoon Madagascar bourbon vanilla extract
– 1/4 teaspoon fine sea salt
– 4 ounces 70% cacao dark chocolate, finely chopped
Instructions
1. Place the roasted sweet potato flesh in a medium mixing bowl and mash it with a fork until completely smooth and free of lumps.
2. Add the 1/2 cup Dutch-process cocoa powder, pure maple syrup, creamy unsalted almond butter, Madagascar bourbon vanilla extract, and fine sea salt to the bowl.
3. Stir the mixture with a spatula until all ingredients are fully incorporated and a thick, uniform dough forms.
4. Cover the bowl with plastic wrap and refrigerate the dough for 30 minutes, or until it is firm enough to handle easily. *Tip: Chilling the dough prevents it from sticking to your hands during shaping.*
5. Using a 1-tablespoon cookie scoop or a measuring spoon, portion the chilled dough into 18 equal pieces.
6. Roll each portion of dough between your palms to form a smooth, round ball, placing them on a parchment-lined baking sheet as you work.
7. Place the baking sheet with the shaped truffles in the freezer for 15 minutes to set firmly. *Tip: A firm, cold truffle center will help the chocolate coating set with a satisfying snap.*
8. While the truffles are chilling, place the finely chopped 70% cacao dark chocolate in a heatproof bowl set over a saucepan of barely simmering water, ensuring the bottom of the bowl does not touch the water.
9. Stir the chocolate constantly with a silicone spatula until it is completely melted, smooth, and glossy, which should take 3-4 minutes.
10. Remove the bowl of melted chocolate from the heat and let it cool for 2 minutes.
11. Using a fork or dipping tool, dip one frozen truffle ball into the melted chocolate, rolling it to coat completely.
12. Lift the coated truffle from the chocolate, allowing any excess to drip back into the bowl.
13. Place the chocolate-coated truffle back onto the parchment-lined baking sheet.
14. Repeat the dipping process with the remaining truffles, working quickly before the chocolate begins to thicken. *Tip: If the chocolate becomes too thick, gently re-warm it over the simmering water for 30 seconds.*
15. If desired, lightly dust the truffles with additional Dutch-process cocoa powder for a finished look before the chocolate fully sets.
16. Let the truffles sit at room temperature for 20-25 minutes, or until the chocolate coating is completely set and firm to the touch.
Now, these truffles offer a delightful contrast between the crisp, bitter chocolate shell and the soft, fudgy center that melts on the tongue. Their flavor is a deep, earthy sweetness, punctuated by the bright notes of vanilla, making them a sophisticated finish to a simple meal. I love serving them alongside a small glass of chilled oat milk or crumbling one over a bowl of vanilla bean ice cream for an unexpected twist.
Carrot Cake Energy Bites
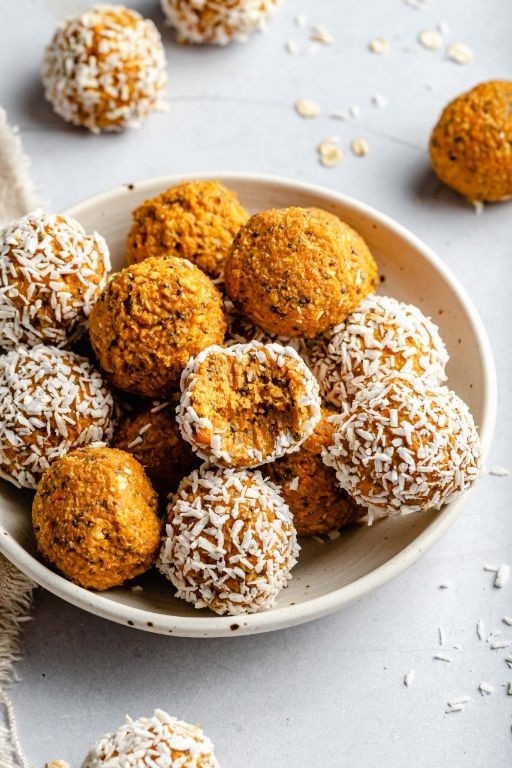
Floating through the afternoon, I find myself craving something that carries both comfort and vitality, a small edible meditation that bridges the gap between memory and nourishment. These carrot cake energy bites emerged from such a moment, a gentle fusion of spice and sweetness meant to be made slowly, with intention, and enjoyed in quiet pauses.
Ingredients
– 1 cup old-fashioned rolled oats
– ¾ cup finely grated organic carrots, moisture gently pressed out
– ½ cup creamy almond butter
– ⅓ cup pure maple syrup
– ¼ cup unsweetened shredded coconut
– 2 tablespoons cold-pressed coconut oil, gently melted
– 1 teaspoon Madagascar bourbon vanilla extract
– 1 teaspoon ground Ceylon cinnamon
– ¼ teaspoon freshly grated nutmeg
– ⅛ teaspoon fine sea salt
Instructions
1. Combine 1 cup old-fashioned rolled oats, ¾ cup finely grated organic carrots, ½ cup creamy almond butter, ⅓ cup pure maple syrup, ¼ cup unsweetened shredded coconut, 2 tablespoons cold-pressed coconut oil, 1 teaspoon Madagascar bourbon vanilla extract, 1 teaspoon ground Ceylon cinnamon, ¼ teaspoon freshly grated nutmeg, and ⅛ teaspoon fine sea salt in a medium mixing bowl.
2. Stir the mixture with a flexible spatula for 2–3 minutes until it becomes a cohesive, slightly sticky dough that holds together when pressed.
3. Cover the bowl with reusable beeswax wrap and refrigerate the dough for 30 minutes to firm slightly, which makes rolling easier and prevents crumbling.
4. Portion the chilled dough using a 1-tablespoon measuring spoon to ensure uniform size.
5. Roll each portion between your palms for 10–15 seconds until smooth and round, applying gentle, even pressure to avoid cracking.
6. Arrange the rolled bites on a parchment-lined baking sheet, spacing them ½ inch apart to prevent sticking.
7. Chill the baking sheet in the refrigerator for 1 hour to set the texture fully. Nowhere near as dense as traditional confections, these bites offer a tender, moist crumble that releases waves of warm cinnamon and nutmeg, with the carrot lending a subtle earthiness. I love tucking them into a small ceramic bowl beside a pot of Earl Grey tea or crumbling one over morning yogurt for a whispered reminder of comfort.
Dark Chocolate Covered Dates
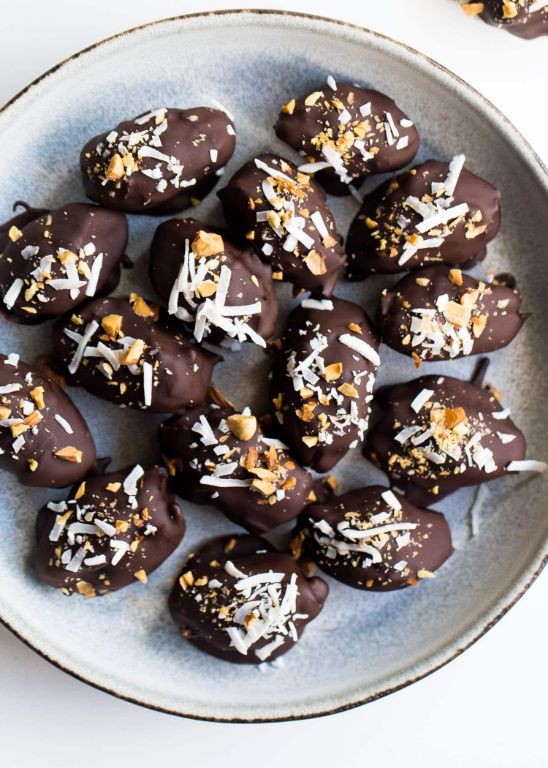
Cradling a small bowl of dark chocolate covered dates feels like holding autumn itself—each piece a perfect balance of earthy sweetness and sophisticated bitterness that melts slowly on the tongue, reminding me how simple ingredients can transform ordinary moments into quiet celebrations. These little gems require nothing more than quality components and gentle attention, making them ideal for both novice cooks and seasoned bakers seeking a moment of calm in the kitchen.
Ingredients
- 24 plump Medjool dates, pitted
- 8 ounces high-quality 70% dark chocolate couverture, finely chopped
- 1 tablespoon unrefined coconut oil
- 1/4 cup toasted pistachios, very finely chopped
- 1/4 teaspoon Maldon sea salt flakes
Instructions
- Line a large baking sheet with parchment paper and set it aside.
- Using a sharp paring knife, make a lengthwise slit in each Medjool date and carefully remove the pit while keeping the date intact.
- Place the finely chopped dark chocolate couverture and unrefined coconut oil in a heatproof bowl set over a saucepan of barely simmering water, ensuring the bottom of the bowl doesn’t touch the water.
- Stir the chocolate mixture gently with a silicone spatula until completely melted and glossy, about 4-5 minutes, then immediately remove from heat. Tip: The coconut oil creates a thinner coating that sets with a beautiful snap.
- Holding one pitted date by its stem end, dip it three-quarters of the way into the melted chocolate, allowing excess to drip back into the bowl for about 10 seconds.
- Place the chocolate-dipped date onto the prepared baking sheet and immediately sprinkle with a pinch of finely chopped toasted pistachios and a few Maldon sea salt flakes before the chocolate sets.
- Repeat the dipping and garnishing process with remaining dates, working quickly but carefully to maintain chocolate temperature.
- Transfer the baking sheet to the refrigerator and chill for exactly 25 minutes, or until the chocolate coating is completely firm and glossy. Tip: Avoid touching the chocolate during setting to prevent fingerprint marks.
- Arrange the finished dates in a single layer in an airtight container, separating layers with parchment paper if stacking. Tip: Store in a cool, dry place rather than refrigeration for optimal texture.
A finished date reveals its layers gradually—the crisp chocolate shell giving way to the chewy, caramel-like interior, with the pistachios adding crunch and the salt amplifying the cocoa’s complexity. Serve them alongside strong coffee for an afternoon pause, or arrange on a wooden board with dried figs and walnuts for an elegant dessert spread that feels both rustic and refined.
Peach Cobbler Smoothie Bowl
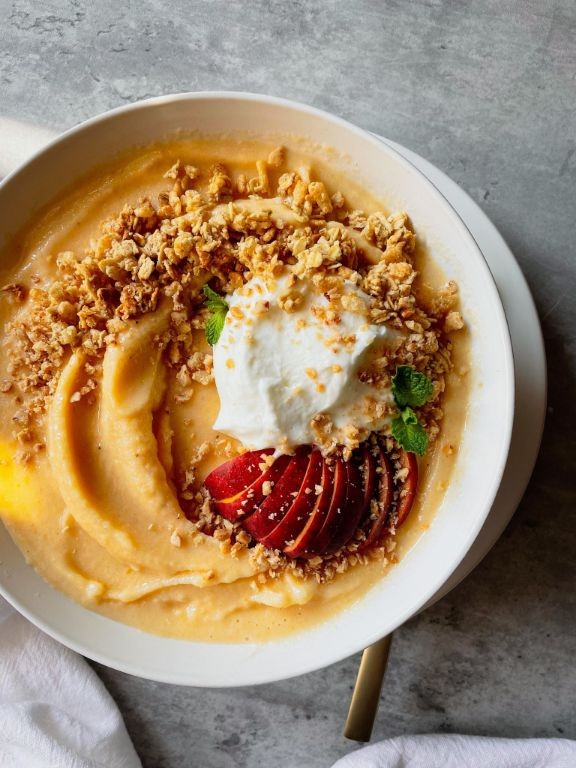
Evenings like this, when the light slants golden through the kitchen window, I find myself craving the simple comfort of summer, captured in a bowl. This smoothie is my quiet homage to those late-August afternoons, when peach juice would run down my chin and the world felt soft around the edges. It’s a way to hold onto that warmth, just for a little while longer.
Ingredients
– 1 cup frozen peach slices, preferably freestone variety
– 1/2 cup full-fat Greek yogurt
– 1/4 cup old-fashioned rolled oats
– 2 tablespoons pure maple syrup, grade A amber
– 1/4 teaspoon ground cinnamon, preferably Ceylon
– 1/8 teaspoon freshly grated nutmeg
– 2 tablespoons chopped pecans, lightly toasted
– 1 tablespoon cold-pressed coconut oil
Instructions
1. Combine 1 cup frozen peach slices, 1/2 cup full-fat Greek yogurt, 1/4 cup old-fashioned rolled oats, 2 tablespoons pure maple syrup, 1/4 teaspoon ground cinnamon, and 1/8 teaspoon freshly grated nutmeg in a high-speed blender pitcher.
2. Blend the mixture on high speed for exactly 45 seconds, using the tamper to press ingredients toward the blades, until a thick, spoonable consistency forms that holds its shape when scooped.
3. Transfer the blended base to a chilled serving bowl using a flexible spatula, creating gentle swirls on the surface for visual texture.
4. Heat a small skillet over medium-low heat for 2 minutes before adding 2 tablespoons chopped pecans, toasting them while shaking the pan constantly for 90 seconds until fragrant and lightly golden.
5. Drizzle 1 tablespoon cold-pressed coconut oil in a thin stream over the smoothie base, allowing it to pool in the natural valleys of the surface.
6. Sprinkle the toasted pecans evenly across the bowl, concentrating them toward the center for optimal crunch distribution.
Nothing compares to the way the creamy base yields to the spoon, releasing waves of spiced peach and maple. The toasted pecans provide a satisfying textural counterpoint to the velvety oats, while the coconut oil adds a subtle tropical richness that lingers on the palate. For a truly decadent twist, serve it alongside a warm, flaky biscuit for dipping into the remaining swirls at the bottom of the bowl.
Tahini Chocolate Banana Bread
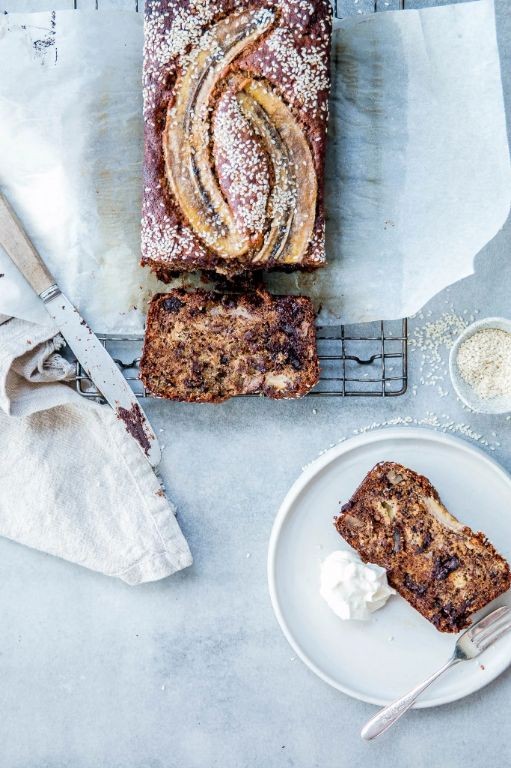
A quiet morning finds me contemplating the gentle alchemy of transforming simple ingredients into something deeply comforting. This tahini chocolate banana bread emerges from that reflective space, where overripe bananas meet rich sesame paste in a dance of bittersweet harmony. There’s something profoundly soothing about the way these flavors meld together, creating a loaf that feels both nostalgic and entirely new.
Ingredients
– 3 very ripe medium bananas, thoroughly mashed
– 1/2 cup high-quality tahini, well-stirred
– 1/3 cup pure maple syrup
– 2 pasture-raised eggs, lightly beaten
– 1 teaspoon pure vanilla extract
– 1 1/2 cups whole wheat pastry flour
– 1/2 cup Dutch-process cocoa powder
– 1 teaspoon baking soda
– 1/2 teaspoon fine sea salt
– 3/4 cup dark chocolate chunks (70% cacao)
Instructions
1. Preheat your oven to 350°F and generously grease a 9×5-inch loaf pan with coconut oil, ensuring all corners are thoroughly coated.
2. In a large mixing bowl, combine the thoroughly mashed bananas, well-stirred tahini, pure maple syrup, lightly beaten pasture-raised eggs, and pure vanilla extract, whisking until the mixture becomes smooth and fully emulsified.
3. In a separate bowl, sift together the whole wheat pastry flour, Dutch-process cocoa powder, baking soda, and fine sea salt to ensure even distribution and eliminate any lumps.
4. Gradually fold the dry ingredients into the wet mixture using a rubber spatula, mixing just until the flour disappears and no dry streaks remain—overmixing will result in a dense texture.
5. Gently incorporate the dark chocolate chunks into the batter, reserving two tablespoons to sprinkle over the top before baking for visual appeal.
6. Transfer the batter to the prepared loaf pan, smoothing the surface with your spatula and scattering the reserved chocolate chunks evenly across the top.
7. Bake for 50-55 minutes at 350°F, or until a wooden skewer inserted into the center comes out with just a few moist crumbs attached—the top should feel springy to the touch.
8. Cool the loaf in the pan on a wire rack for 15 minutes before carefully running a knife around the edges and transferring it directly to the rack to cool completely, which prevents steaming and ensures a crisp crust.
9. For clean slices, wrap the completely cooled loaf in plastic wrap and let it rest overnight at room temperature before serving.
Perhaps what I love most is how the tahini creates this subtle nuttiness that balances the deep chocolate bitterness, while the bananas keep everything impossibly moist. The texture lands somewhere between fudge and cake, with melty chocolate pockets that surprise you in every slice. Try it lightly toasted with a drizzle of extra tahini and flaky sea salt for breakfast, or simply enjoy a thick slice with your afternoon tea as the daylight fades.
Summary
Whether you’re vegan, gluten-free, or just craving something sweet, these 20 decadent desserts prove you don’t have to sacrifice flavor. From rich chocolate treats to fruity delights, there’s something here for every occasion. We’d love to hear which recipes become your favorites—drop a comment below and share your baking triumphs on Pinterest!