
Forget everything you thought about vegan food being boring or bland! Whether you’re hosting a dinner party or just want to elevate your weeknight meals, these elegant plant-based recipes will wow even the most skeptical guests. From stunning main courses to sophisticated desserts, get ready to discover dishes that prove vegan cooking can be both beautiful and delicious. Let’s dive into these impressive creations!
Creamy Mushroom and Leek Risotto

This creamy risotto delivers restaurant-quality comfort with minimal fuss. The earthy mushrooms and delicate leeks create a satisfying depth of flavor. You’ll achieve that perfect creamy texture without constant stirring.
Ingredients
– 1 tbsp olive oil
– 2 tbsp unsalted butter
– 2 medium leeks
– 8 oz cremini mushrooms
– 1 cup Arborio rice
– 1/2 cup dry white wine
– 4 cups chicken broth
– 1/2 cup grated Parmesan cheese
– 1/4 cup heavy cream
– 1 tsp salt
– 1/2 tsp black pepper
Instructions
1. Heat chicken broth in a separate saucepan until simmering, then reduce heat to low.
2. Heat olive oil and 1 tablespoon butter in a large skillet over medium heat.
3. Slice leeks thinly, using only the white and light green parts.
4. Cook leeks in skillet for 4 minutes until softened but not browned.
5. Slice mushrooms 1/4-inch thick.
6. Add mushrooms to skillet and cook for 6 minutes until golden brown.
7. Stir in Arborio rice and cook for 2 minutes until grains are lightly toasted.
8. Pour in white wine and cook until completely absorbed, about 2 minutes.
9. Add 1/2 cup warm broth and stir continuously until liquid is absorbed.
10. Continue adding broth 1/2 cup at a time, stirring after each addition until absorbed.
11. Cook rice for 18-20 minutes total until creamy with a slight bite at the center.
12. Remove skillet from heat and stir in remaining 1 tablespoon butter.
13. Stir in Parmesan cheese until melted and incorporated.
14. Stir in heavy cream until the risotto becomes luxuriously creamy.
15. Season with salt and black pepper, stirring to combine.
Your finished risotto should be loose enough to spread slightly on the plate. The Parmesan adds a salty sharpness that balances the earthy mushrooms perfectly. Try topping with crispy pancetta or serving alongside grilled chicken for a complete meal.
Roasted Beetroot and Walnut Tart
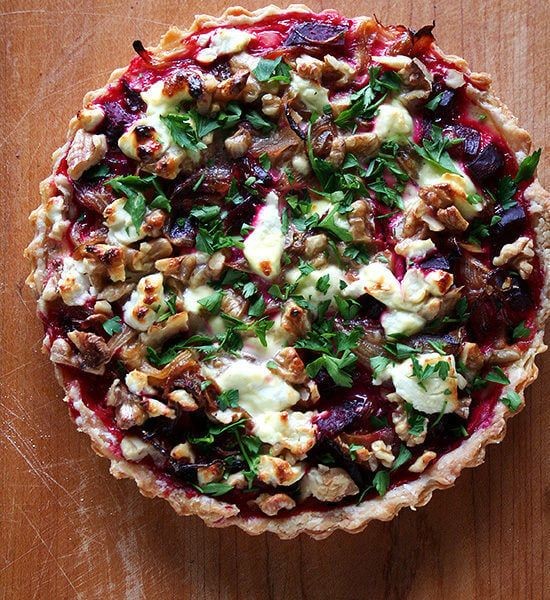
Bold flavors meet earthy elegance in this stunning savory tart. Roasted beets create a vibrant base while walnuts add satisfying crunch. This impressive dish comes together with surprisingly simple techniques.
Ingredients
– 1 ½ cups all-purpose flour
– ½ cup cold unsalted butter
– 3 tablespoons ice water
– 2 medium beetroots
– 1 tablespoon olive oil
– ½ teaspoon salt
– ¼ teaspoon black pepper
– ¾ cup chopped walnuts
– 4 ounces goat cheese
– 2 large eggs
– ½ cup heavy cream
– 1 teaspoon fresh thyme leaves
Instructions
1. Preheat your oven to 400°F.
2. Cut beetroots into ½-inch cubes and toss with olive oil, salt, and pepper.
3. Spread beet cubes in a single layer on a baking sheet and roast for 25 minutes until tender when pierced with a fork.
4. While beets roast, combine flour and cubed cold butter in a food processor, pulsing until mixture resembles coarse crumbs.
5. Add ice water one tablespoon at a time, pulsing just until dough comes together.
6. Press dough evenly into a 9-inch tart pan, ensuring sides are ¼-inch thick.
7. Prick the bottom of the crust all over with a fork and bake for 15 minutes until lightly golden.
8. Reduce oven temperature to 375°F.
9. Whisk together eggs, heavy cream, and thyme until fully combined.
10. Arrange roasted beets and chopped walnuts evenly across the pre-baked crust.
11. Crumble goat cheese over the beet and walnut layer.
12. Pour the egg mixture carefully over the filling, ensuring even distribution.
13. Bake for 30-35 minutes until the filling is set and the top is golden brown.
14. Let the tart cool for 15 minutes before slicing.
Perfect for brunch or light dinner, this tart offers creamy texture against the earthy beets and crunchy walnuts. Serve warm with a simple arugula salad for contrasting peppery notes. The vibrant magenta filling makes it as beautiful as it is delicious.
Cashew Cheese-Stuffed Portobello Mushrooms

Creamy cashew cheese transforms ordinary portobello mushrooms into a satisfying vegetarian main. These stuffed mushrooms bake to perfection with a golden, slightly crisp topping. They’re surprisingly simple to prepare for a weeknight dinner or impressive enough for guests.
Ingredients
– 4 large portobello mushroom caps
– 1 cup raw cashews, soaked
– 2 tbsp nutritional yeast
– 1 tbsp lemon juice
– 1 tsp garlic powder
– 1/2 tsp salt
– 1/4 tsp black pepper
– 2 tbsp olive oil
– 1 tbsp fresh parsley, chopped
Instructions
1. Preheat your oven to 375°F.
2. Gently wipe the portobello caps clean with a damp paper towel. (Tip: Avoid rinsing mushrooms under water—they absorb moisture and won’t brown properly.)
3. Use a spoon to carefully scrape out the gills from each mushroom cap.
4. Arrange the cleaned mushroom caps gill-side up on a baking sheet.
5. Drain the soaked cashews and add them to a food processor.
6. Add nutritional yeast, lemon juice, garlic powder, salt, and black pepper to the food processor.
7. Blend the mixture on high until completely smooth and creamy, about 2-3 minutes. (Tip: Scrape down the sides halfway through to ensure even blending.)
8. Spoon the cashew cheese mixture evenly into each prepared mushroom cap.
9. Drizzle olive oil over the stuffed mushrooms.
10. Bake at 375°F for 20-25 minutes, until the mushrooms are tender and the tops are lightly golden.
11. Remove from oven and sprinkle with fresh parsley.
Nutty cashew cheese creates a rich, creamy contrast against the meaty, juicy mushroom base. Next time, try serving these over a bed of quinoa or alongside roasted asparagus for a complete meal. The savory, umami-packed flavor makes these mushrooms a standout vegetarian option that even meat-lovers will enjoy.
Lentil and Sweet Potato Wellington
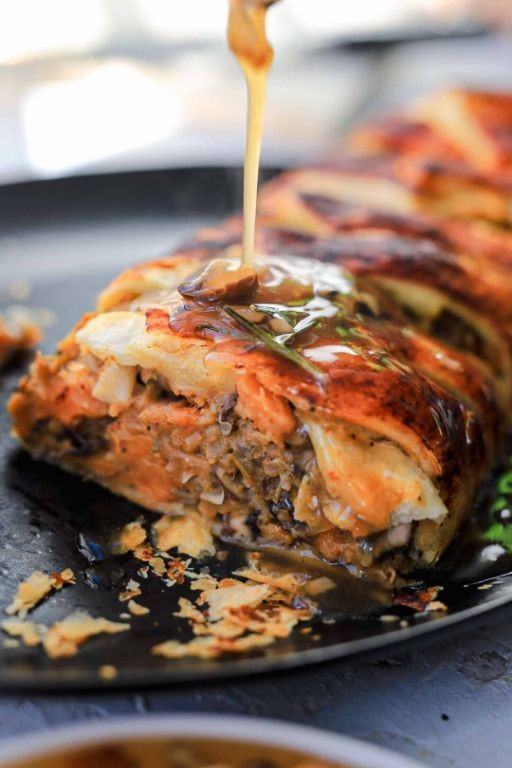
Vegan comfort food gets an elegant upgrade with this Lentil and Sweet Potato Wellington. Perfect for holiday meals or special occasions, this savory pastry package delivers impressive presentation with surprisingly simple preparation. The combination of earthy lentils and sweet potatoes creates a satisfying main dish that appeals to all dietary preferences.
Ingredients
– 2 medium sweet potatoes
– 1 cup brown lentils
– 1 sheet frozen puff pastry
– 1 yellow onion
– 2 cloves garlic
– 1 tbsp olive oil
– 1 tsp dried thyme
– 1/2 tsp smoked paprika
– 1/4 tsp black pepper
– 1/2 tsp salt
– 1 egg
Instructions
1. Preheat your oven to 400°F and line a baking sheet with parchment paper.
2. Pierce sweet potatoes with a fork and bake for 45 minutes until completely soft when squeezed.
3. While potatoes bake, rinse 1 cup brown lentils and combine with 3 cups water in a saucepan.
4. Bring lentils to a boil, then reduce heat and simmer for 25 minutes until tender but not mushy.
5. Drain any excess water from the cooked lentils and set aside to cool.
6. Dice 1 yellow onion and mince 2 cloves garlic.
7. Heat 1 tablespoon olive oil in a skillet over medium heat.
8. Sauté onion for 5 minutes until translucent, then add garlic and cook 1 minute more.
9. Combine cooked lentils, onion mixture, and peeled sweet potatoes in a large bowl.
10. Mash the mixture with 1 teaspoon dried thyme, 1/2 teaspoon smoked paprika, 1/4 teaspoon black pepper, and 1/2 teaspoon salt until well combined but still textured.
11. Thaw 1 sheet puff pastry according to package directions until pliable but still cold.
12. Roll pastry into a 12×14 inch rectangle on a lightly floured surface.
13. Spoon the lentil mixture lengthwise down the center third of the pastry, forming a compact log shape.
14. Beat 1 egg with 1 tablespoon water to create an egg wash.
15. Brush egg wash along the pastry edges to help seal the Wellington.
16. Fold the long sides of pastry over the filling, overlapping slightly in the center.
17. Fold and seal the short ends tightly, then carefully flip the Wellington seam-side down onto the prepared baking sheet.
18. Brush the entire surface with remaining egg wash for golden browning.
19. Use a sharp knife to score diagonal lines across the top for decorative steam vents.
20. Bake at 400°F for 30-35 minutes until the pastry is puffed and deep golden brown.
21. Let rest for 10 minutes before slicing to allow the filling to set.
Perfectly flaky pastry gives way to a hearty, savory filling that balances earthy lentils with sweet potato creaminess. The smoked paprika adds subtle depth that complements the thyme’s herbal notes beautifully. Serve thick slices alongside roasted vegetables or a simple green salad for a complete meal that feels both rustic and refined.
Thai Green Curry with Tofu and Coconut Milk

Many weeknights call for something vibrant yet simple. This Thai green curry delivers bold flavors with minimal effort. Make it once, and it’ll become your go-to comfort meal.
Ingredients
– 1 package firm tofu
– 2 tbsp vegetable oil
– 1 tbsp green curry paste
– 1 can coconut milk
– 1 cup vegetable broth
– 1 tbsp brown sugar
– 1 tbsp soy sauce
– 1 red bell pepper
– 1 cup broccoli florets
– 1/4 cup fresh basil leaves
– 2 cups cooked jasmine rice
Instructions
1. Press tofu between paper towels for 15 minutes to remove excess water, then cut into 1-inch cubes.
2. Heat 1 tablespoon vegetable oil in a large skillet over medium-high heat until shimmering.
3. Add tofu cubes and cook for 6-8 minutes, turning occasionally, until golden brown on all sides.
4. Remove tofu from skillet and set aside.
5. Reduce heat to medium and add remaining 1 tablespoon vegetable oil to the same skillet.
6. Add green curry paste and cook for 1 minute, stirring constantly, until fragrant.
7. Pour in coconut milk and whisk thoroughly to combine with curry paste.
8. Add vegetable broth, brown sugar, and soy sauce, stirring until sugar dissolves completely.
9. Bring mixture to a gentle simmer and cook for 5 minutes, stirring occasionally.
10. Cut red bell pepper into thin strips and add to the simmering curry.
11. Add broccoli florets and continue simmering for 4-5 minutes until vegetables are tender-crisp.
12. Return cooked tofu to the skillet and stir gently to coat with sauce.
13. Remove from heat and stir in fresh basil leaves just before serving.
14. Serve immediately over cooked jasmine rice.
Keep the tofu crispy by not overcrowding the pan during browning. The curry develops deeper flavor when you toast the paste before adding liquids. Fresh basil added at the end maintains its bright, aromatic quality. This dish balances creamy coconut milk with the sharp heat of green curry. The tofu absorbs the complex flavors while maintaining its firm texture. Try serving it with extra fresh basil and a squeeze of lime for added brightness.
Eggplant Parmesan with Vegan Mozzarella
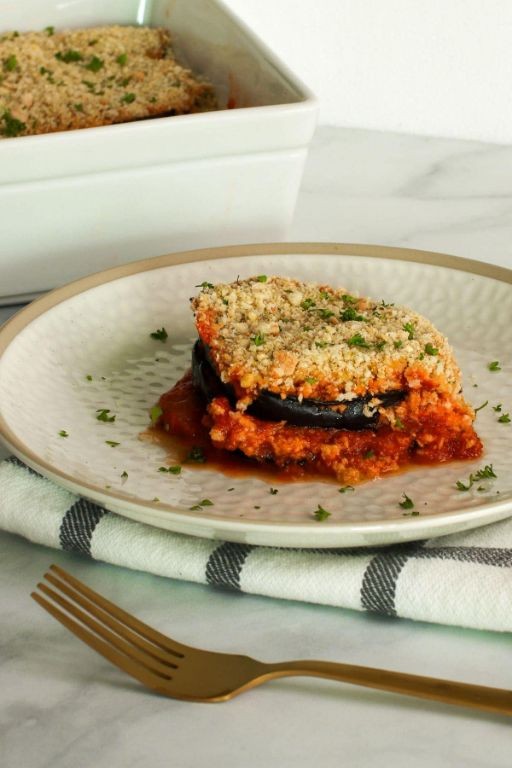
Satisfyingly crispy and cheesy, this vegan eggplant Parmesan delivers classic comfort without dairy. Thinly sliced eggplant gets perfectly breaded and baked until golden. Layers of marinara and melty vegan mozzarella create a hearty, crowd-pleasing dish.
Ingredients
– 2 large eggplants
– 1 cup all-purpose flour
– 1 cup unsweetened plant-based milk
– 2 cups breadcrumbs
– 1/2 cup nutritional yeast
– 2 tsp garlic powder
– 1 tsp salt
– 1/2 tsp black pepper
– 3 cups marinara sauce
– 2 cups vegan mozzarella shreds
– 1/4 cup olive oil
Instructions
1. Preheat oven to 400°F and line two baking sheets with parchment paper.
2. Slice eggplants into 1/4-inch thick rounds using a sharp knife.
3. Arrange eggplant slices in a single layer on paper towels and sprinkle with 1 tsp salt.
4. Let eggplant sit for 15 minutes to draw out excess moisture, then pat dry thoroughly.
5. Place flour in a shallow bowl and plant-based milk in another bowl.
6. Combine breadcrumbs, nutritional yeast, garlic powder, remaining salt, and pepper in a third bowl.
7. Dip each eggplant slice first in flour, shaking off excess, then in plant-based milk.
8. Press eggplant firmly into breadcrumb mixture, coating both sides completely.
9. Arrange breaded eggplant in a single layer on prepared baking sheets.
10. Drizzle olive oil evenly over breaded eggplant slices.
11. Bake for 20 minutes at 400°F until bottoms are golden brown.
12. Flip eggplant slices and bake for another 15 minutes until crispy and golden.
13. Spread 1 cup marinara sauce in the bottom of a 9×13 inch baking dish.
14. Arrange half the baked eggplant slices over the sauce in a single layer.
15. Top with 1 cup marinara sauce and 1 cup vegan mozzarella shreds.
16. Repeat layers with remaining eggplant, marinara, and mozzarella.
17. Bake at 375°F for 25 minutes until cheese is melted and bubbly.
18. Let rest for 10 minutes before serving to allow layers to set.
Rich, savory layers of crispy eggplant and melted vegan cheese make this dish deeply satisfying. The breading stays remarkably crisp despite the saucy layers. Serve over zucchini noodles for a lighter meal or with garlic bread to soak up every bit of sauce.
Chickpea and Spinach Stuffed Shells
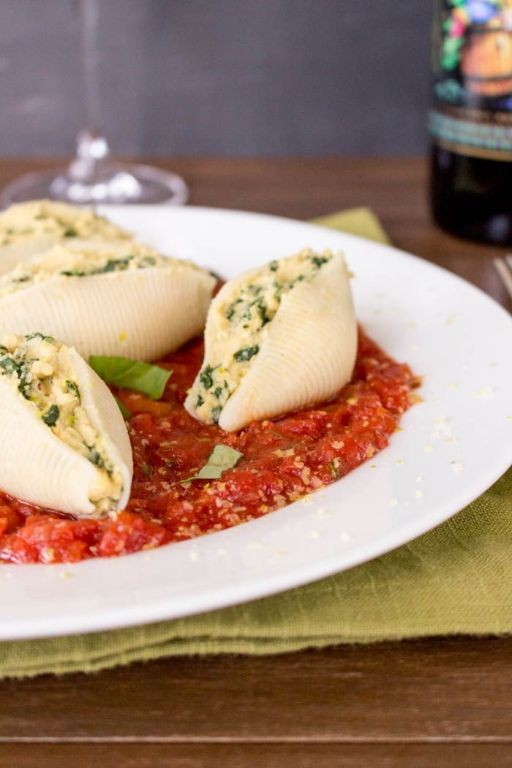
Bursting with plant-based protein and vibrant flavors, these stuffed shells offer a satisfying meatless meal that comes together surprisingly fast. The creamy chickpea and spinach filling bakes up beautifully inside tender pasta shells.
Ingredients
– 20 jumbo pasta shells
– 1 tbsp olive oil
– 1 medium yellow onion, diced
– 3 cloves garlic, minced
– 15 oz canned chickpeas, drained and rinsed
– 10 oz frozen spinach, thawed and squeezed dry
– 1 cup ricotta cheese
– 1/2 cup grated Parmesan cheese
– 1 large egg
– 24 oz jar marinara sauce
– 1 cup shredded mozzarella cheese
– 1/2 tsp salt
– 1/4 tsp black pepper
– 1/4 tsp red pepper flakes
Instructions
1. Preheat oven to 375°F.
2. Cook pasta shells in boiling salted water for 9 minutes until al dente.
3. Drain shells and arrange them in a single layer on a baking sheet to prevent sticking.
4. Heat olive oil in a large skillet over medium heat.
5. Sauté diced onion for 5 minutes until translucent.
6. Add minced garlic and cook for 1 minute until fragrant.
7. Mash chickpeas with a potato masher until roughly broken down.
8. Combine mashed chickpeas, spinach, ricotta, Parmesan, egg, salt, black pepper, and red pepper flakes in a large bowl.
9. Spread 1 cup marinara sauce evenly in a 9×13 inch baking dish.
10. Stuff each pasta shell with about 2 tablespoons of filling using a small spoon.
11. Arrange stuffed shells in a single layer over the sauce in the baking dish.
12. Pour remaining marinara sauce over the stuffed shells.
13. Sprinkle shredded mozzarella evenly over the top.
14. Cover dish tightly with aluminum foil.
15. Bake covered for 25 minutes at 375°F.
16. Remove foil and bake uncovered for 10 minutes until cheese is golden and bubbly.
17. Let rest for 5 minutes before serving to allow filling to set.
Zesty and satisfying, the creamy chickpea filling contrasts beautifully with the tender pasta shells and tangy tomato sauce. For a creative twist, serve individual portions in ramekins topped with fresh basil and a drizzle of balsamic glaze. The texture holds up well for next-day lunches, making it perfect for meal prep.
Caramelized Onion and Lentil Shepherd’s Pie

Getting cozy comfort food right means balancing rich flavors with satisfying textures. Caramelized onions and earthy lentils create a hearty base beneath creamy mashed potatoes. This vegetarian twist on shepherd’s pie delivers deep savory notes without the meat.
Ingredients
– 2 large yellow onions
– 2 tbsp olive oil
– 1 cup brown lentils
– 3 cups vegetable broth
– 2 lbs Yukon Gold potatoes
– 1/2 cup whole milk
– 4 tbsp unsalted butter
– 1 tsp salt
– 1/2 tsp black pepper
Instructions
1. Preheat oven to 375°F.
2. Peel and thinly slice 2 large yellow onions.
3. Heat 2 tbsp olive oil in a large skillet over medium-low heat.
4. Add sliced onions to the skillet and cook for 30 minutes, stirring every 5 minutes until deeply browned.
5. Rinse 1 cup brown lentils under cold water until water runs clear.
6. Add rinsed lentils and 3 cups vegetable broth to the caramelized onions.
7. Simmer the lentil mixture uncovered for 25 minutes until lentils are tender and liquid is absorbed.
8. While lentils cook, peel and quarter 2 lbs Yukon Gold potatoes.
9. Place potatoes in a large pot and cover with cold water by 1 inch.
10. Bring potatoes to a boil over high heat, then reduce to a simmer for 15 minutes until fork-tender.
11. Drain potatoes completely and return to the hot pot for 1 minute to evaporate excess moisture.
12. Mash potatoes with 1/2 cup whole milk, 4 tbsp unsalted butter, 1 tsp salt, and 1/2 tsp black pepper until smooth.
13. Spread the cooked lentil mixture evenly in a 9×13 inch baking dish.
14. Top evenly with mashed potatoes, creating swirls with a fork for crispy edges.
15. Bake at 375°F for 25 minutes until bubbling and golden brown on top.
16. Let rest for 10 minutes before serving. A golden, crispy potato crust gives way to the savory lentil filling beneath. The caramelized onions add a subtle sweetness that complements the earthy lentils perfectly. Serve with a simple green salad to cut through the richness.
Spicy Mango and Black Bean Tacos

Bold flavors collide in these vibrant tacos that balance sweet mango heat with earthy black beans. Perfect for quick weeknights yet impressive enough for gatherings. Ready in under 30 minutes from prep to plate.
Ingredients
– 1 tbsp olive oil
– 1 small yellow onion
– 2 cloves garlic
– 1 tbsp chili powder
– 1 tsp cumin
– 1/4 tsp cayenne pepper
– 15 oz can black beans
– 1 large ripe mango
– 8 small corn tortillas
– 1/4 cup chopped cilantro
– 1 lime
– 1/4 cup crumbled cotija cheese
Instructions
1. Dice 1 small yellow onion and mince 2 cloves garlic.
2. Heat 1 tbsp olive oil in a large skillet over medium-high heat until shimmering.
3. Add diced onion and cook for 4 minutes, stirring frequently until translucent.
4. Add minced garlic and cook for 1 minute until fragrant.
5. Stir in 1 tbsp chili powder, 1 tsp cumin, and 1/4 tsp cayenne pepper, toasting spices for 30 seconds.
6. Drain and rinse 15 oz can black beans, then add to skillet.
7. Cook bean mixture for 5 minutes, mashing lightly with spoon to create thicker texture.
8. Peel and dice 1 large ripe mango into 1/2-inch cubes while beans cook.
9. Warm 8 small corn tortillas in a dry skillet over medium heat for 30 seconds per side until pliable.
10. Chop 1/4 cup fresh cilantro leaves and cut 1 lime into wedges.
11. Assemble tacos by spooning black bean mixture onto warmed tortillas.
12. Top with diced mango, 1/4 cup crumbled cotija cheese, and chopped cilantro.
13. Squeeze fresh lime juice over each taco before serving.
A brilliant contrast emerges between the creamy black beans and juicy mango chunks. The spicy seasoning melds with sweet fruit, while cotija cheese adds salty crunch. Serve immediately with extra lime wedges for squeezing over the top.
Avocado and Edamame Sushi Rolls
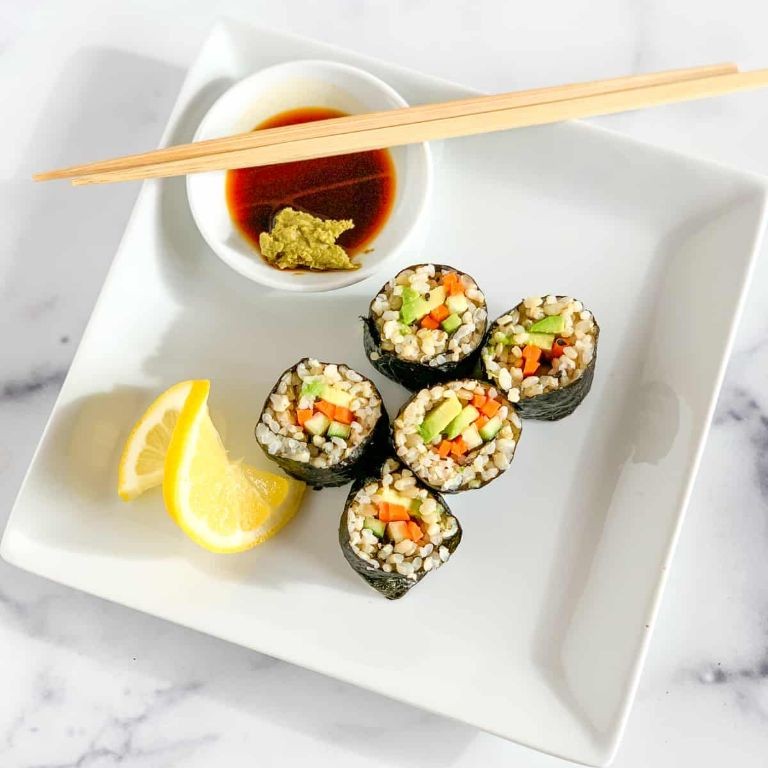
Eager for a fresh, protein-packed twist on sushi? These avocado and edamame rolls deliver vibrant flavor without raw fish. They’re surprisingly simple to assemble at home with just a few wholesome ingredients.
Ingredients
– 1 cup sushi rice
– 1 ¼ cups water
– 2 tablespoons rice vinegar
– 1 tablespoon sugar
– 1 teaspoon salt
– 4 sheets nori
– 1 ripe avocado
– 1 cup shelled edamame
– 2 tablespoons soy sauce
– 1 teaspoon sesame oil
Instructions
1. Rinse 1 cup sushi rice under cold water until water runs clear.
2. Combine rice and 1 ¼ cups water in a saucepan, bring to a boil over high heat.
3. Reduce heat to low, cover, and simmer for 18 minutes.
4. Remove from heat and let stand, covered, for 10 minutes.
5. Heat 2 tablespoons rice vinegar, 1 tablespoon sugar, and 1 teaspoon salt in a small saucepan over low heat until dissolved.
6. Fold vinegar mixture into cooked rice with a cutting motion to avoid crushing grains.
7. Spread rice evenly over nori sheets, leaving a 1-inch border at the top.
8. Thinly slice 1 ripe avocado and arrange in a horizontal line across the rice.
9. Boil 1 cup shelled edamame in salted water for 4 minutes, then drain and pat dry.
10. Sprinkle edamame over avocado.
11. Roll nori tightly away from you using a bamboo mat, pressing firmly as you go.
12. Moisten the nori border with water to seal the roll completely.
13. Slice each roll into 8 pieces with a sharp, wet knife to prevent sticking.
14. Whisk 2 tablespoons soy sauce and 1 teaspoon sesame oil for dipping.
15. Serve immediately or cover with damp cloth to prevent drying. They offer a satisfying chew from the rice, creamy richness from avocado, and a pop of texture from edamame. Try drizzling with spicy mayo or serving with pickled ginger for extra zing.
Roasted Cauliflower Steak with Chimichurri
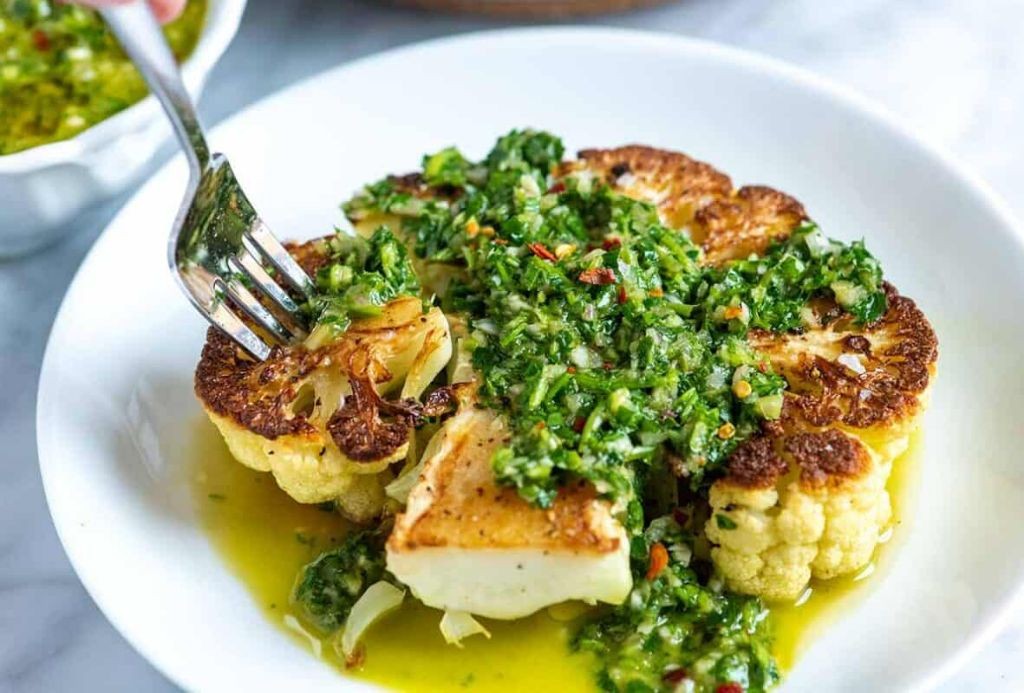
Yielding a satisfying main course from humble cauliflower requires just the right technique. Roasted cauliflower steaks develop deep caramelization while staying tender inside. The vibrant chimichurri adds fresh, herby brightness that cuts through the richness.
Ingredients
- 1 large head cauliflower
- 3 tablespoons olive oil
- 1 teaspoon kosher salt
- 1/2 teaspoon black pepper
- 1 cup fresh parsley leaves
- 1/4 cup fresh oregano leaves
- 3 cloves garlic
- 2 tablespoons red wine vinegar
- 1/4 cup olive oil
- 1/4 teaspoon red pepper flakes
Instructions
- Preheat oven to 425°F and line a baking sheet with parchment paper.
- Remove outer leaves from cauliflower and trim stem flush with bottom.
- Slice cauliflower vertically through the core into 1-inch thick steaks.
- Brush both sides of cauliflower steaks with 3 tablespoons olive oil.
- Sprinkle both sides evenly with kosher salt and black pepper.
- Arrange steaks in a single layer on prepared baking sheet.
- Roast for 25 minutes until bottoms are deeply browned.
- Flip steaks carefully using a thin spatula to maintain structure.
- Roast for another 15 minutes until tender when pierced with a fork.
- Combine parsley, oregano, and garlic in a food processor.
- Pulse until herbs are finely chopped but not pureed.
- Transfer herb mixture to a small bowl.
- Whisk in red wine vinegar, 1/4 cup olive oil, and red pepper flakes.
- Let chimichurri rest for 10 minutes to allow flavors to meld.
- Spoon chimichurri generously over roasted cauliflower steaks.
Juicy roasted cauliflower steaks offer meaty texture with crisp, caramelized edges. The chimichurri provides tangy contrast with herbal freshness. Serve alongside quinoa or over mixed greens for a complete vegetarian meal.
Vegan Chocolate Lava Cake with Raspberry Coulis
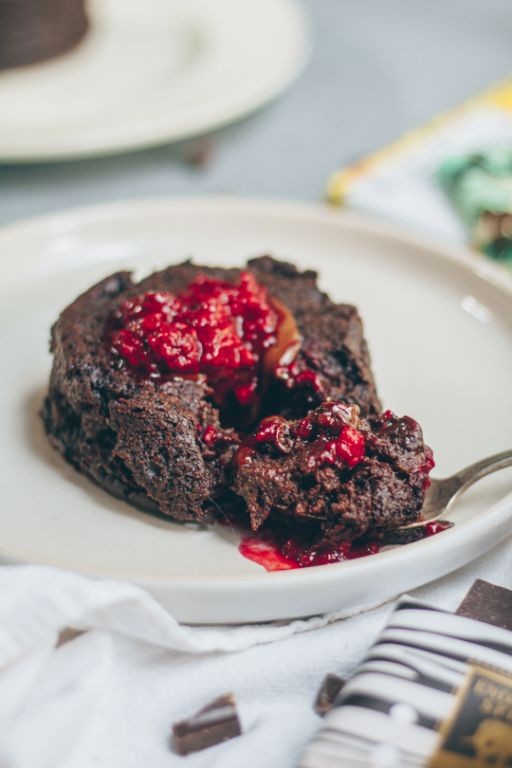
Just when you thought vegan desserts couldn’t get more decadent, this molten chocolate cake delivers rich flavor with a surprise liquid center. Juicy raspberry coulis cuts through the intensity for perfect balance. Follow these precise steps for restaurant-quality results at home.
Ingredients
– 1/2 cup all-purpose flour
– 1/2 cup granulated sugar
– 1/4 cup cocoa powder
– 1 tsp baking powder
– 1/4 tsp salt
– 1/2 cup almond milk
– 1/4 cup vegetable oil
– 1 tsp vanilla extract
– 6 oz vegan dark chocolate chips
– 2 cups fresh raspberries
– 2 tbsp maple syrup
Instructions
1. Preheat oven to 375°F and grease four 6-ounce ramekins.
2. Whisk together 1/2 cup flour, 1/2 cup sugar, 1/4 cup cocoa powder, 1 tsp baking powder, and 1/4 tsp salt in a medium bowl.
3. Pour 1/2 cup almond milk, 1/4 cup vegetable oil, and 1 tsp vanilla extract into dry ingredients.
4. Stir batter until no dry pockets remain, being careful not to overmix.
5. Fold 4 oz vegan chocolate chips into batter until evenly distributed.
6. Divide batter evenly among prepared ramekins, filling each 3/4 full.
7. Place remaining 2 oz chocolate chips in center of each portion, pressing gently below surface.
8. Bake at 375°F for 12 minutes until edges are set but centers still jiggle slightly.
9. Combine 2 cups raspberries and 2 tbsp maple syrup in saucepan over medium heat.
10. Cook raspberry mixture for 5 minutes until berries break down and release juices.
11. Strain coulis through fine-mesh sieve, pressing solids with spatula to extract all liquid.
12. Discard seeds and transfer smooth coulis to serving pitcher.
13. Remove cakes from oven and let rest 1 minute before inverting onto plates.
14. Drizzle warm coulis around cakes and serve immediately. For perfectly molten centers, use an oven thermometer to verify temperature accuracy. When straining coulis, twist rather than press the spatula for clearer sauce. Run knife around ramekin edges before unmolding for clean releases. Flowing chocolate contrasts beautifully with the tender cake crumb, while tart raspberry cuts the sweetness. Serve with vegan vanilla ice cream for temperature play, or garnish with fresh mint for color contrast.
Vegan Paella with Artichokes and Olives
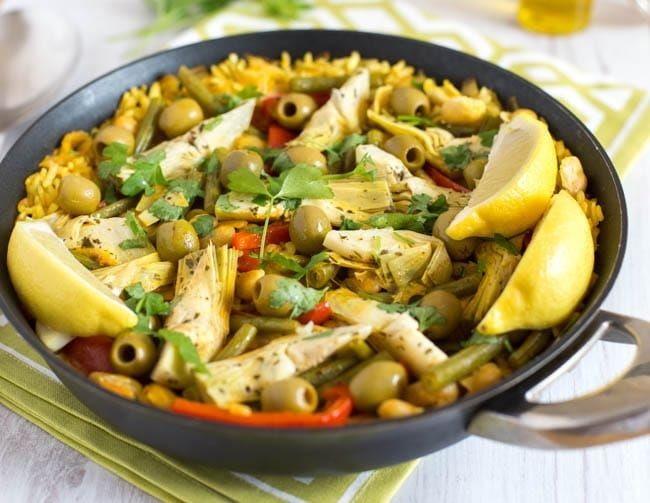
Ready for a plant-based twist on a Spanish classic? This vegan paella brings bold Mediterranean flavors without any animal products. Rustic artichokes and briny olives create depth in this one-pan wonder.
Ingredients
– 2 tbsp olive oil
– 1 medium yellow onion, diced
– 3 cloves garlic, minced
– 1 red bell pepper, sliced
– 1 ½ cups Arborio rice
– 4 cups vegetable broth
– 1 tsp smoked paprika
– ½ tsp saffron threads
– 1 cup canned artichoke hearts, quartered
– ½ cup green olives, pitted
– ¼ cup fresh parsley, chopped
– 1 lemon, cut into wedges
Instructions
1. Heat 2 tbsp olive oil in a large paella pan over medium-high heat until shimmering.
2. Add 1 diced yellow onion and cook for 4 minutes until translucent, stirring frequently.
3. Stir in 3 minced garlic cloves and cook for 1 minute until fragrant.
4. Add 1 sliced red bell pepper and cook for 3 minutes until slightly softened.
5. Tip: Use a wide, shallow pan to ensure proper rice cooking and socarrat formation.
6. Add 1 ½ cups Arborio rice and toast for 2 minutes, stirring constantly.
7. Pour in 4 cups vegetable broth, 1 tsp smoked paprika, and ½ tsp saffron threads.
8. Bring to a boil, then reduce heat to maintain a gentle simmer.
9. Arrange 1 cup quartered artichoke hearts and ½ cup pitted green olives evenly across the rice surface.
10. Simmer uncovered for 18 minutes without stirring to develop the crispy bottom layer.
11. Tip: Listen for a faint crackling sound to indicate proper socarrat is forming.
12. Remove from heat and let rest for 5 minutes to allow rice to absorb remaining liquid.
13. Tip: Cover with a clean kitchen towel during resting to steam the top layer perfectly.
14. Sprinkle with ¼ cup chopped fresh parsley and serve with lemon wedges.
Fresh from the pan, this paella delivers tender rice with a satisfying crispy bottom crust. The briny olives and earthy artichokes balance the smoky paprika beautifully. For a complete meal, serve with crusty bread to scoop up every flavorful bit.
Pumpkin and Sage Ravioli with Cashew Cream

Bold autumn flavors come together in this comforting pasta dish. Pumpkin and sage create a classic seasonal pairing, while cashew cream adds luxurious richness without dairy. This homemade ravioli delivers restaurant-quality results with straightforward techniques.
Ingredients
– 1 cup pumpkin puree
– 1/4 cup fresh sage leaves
– 1/2 cup raw cashews
– 2 cups all-purpose flour
– 3 large eggs
– 2 tbsp olive oil
– 1/4 tsp nutmeg
– 1/2 tsp salt
– 1/4 tsp black pepper
– 2 tbsp butter
Instructions
1. Soak cashews in hot water for 30 minutes to soften them for blending.
2. Combine flour and eggs in a large bowl, mixing until a shaggy dough forms.
3. Knead dough on a floured surface for 8 minutes until smooth and elastic.
4. Wrap dough in plastic and rest at room temperature for 30 minutes.
5. Drain cashews and blend with 1/2 cup water until completely smooth, about 2 minutes.
6. Mix pumpkin puree with nutmeg, salt, and pepper in a medium bowl.
7. Roll dough through pasta machine to thinnest setting, creating 12 sheets.
8. Place 1 tablespoon pumpkin filling in center of 6 dough sheets.
9. Brush edges with water and top with remaining sheets, pressing to seal.
10. Cut ravioli with pastry wheel, ensuring edges are completely sealed.
11. Heat butter in large skillet over medium heat until foaming subsides.
12. Fry sage leaves for 45 seconds until crisp, then remove and set aside.
13. Bring large pot of salted water to rolling boil at 212°F.
14. Cook ravioli for 3 minutes until they float to surface.
15. Warm cashew cream in saucepan over low heat for 2 minutes.
16. Plate ravioli and drizzle with cashew cream.
17. Garnish with fried sage leaves and serve immediately.
Golden ravioli pockets offer tender pasta contrasting with creamy pumpkin filling. The cashew cream provides velvety richness that complements earthy sage notes. For variation, top with toasted walnuts or serve alongside roasted Brussels sprouts.
Chocolate Avocado Mousse with Coconut Whipped Cream

Rich, creamy, and surprisingly healthy, this chocolate avocado mousse delivers decadent dessert satisfaction without guilt. Ready in just 15 minutes with minimal effort, it’s perfect for busy weeknights or last-minute entertaining. The coconut whipped cream adds luxurious texture while keeping things dairy-free.
Ingredients
- 2 ripe avocados
- 1/4 cup cocoa powder
- 1/4 cup maple syrup
- 1 tsp vanilla extract
- 1/4 tsp salt
- 1 can full-fat coconut milk (chilled overnight)
- 2 tbsp powdered sugar
Instructions
- Scoop avocado flesh into food processor, discarding pits and skins.
- Add cocoa powder, maple syrup, vanilla extract, and salt to processor.
- Blend on high speed for 2 minutes until completely smooth, scraping down sides once.
- Transfer mousse to serving bowls and refrigerate for 30 minutes to set.
- Open chilled coconut milk can and scoop solid cream into mixing bowl, reserving liquid.
- Whip coconut cream with electric mixer on medium speed for 1 minute.
- Add powdered sugar and continue whipping for 2 more minutes until stiff peaks form.
- Top chilled mousse with coconut whipped cream immediately before serving.
Amazingly silky texture comes from perfectly ripe avocados, while the coconut cream provides subtle tropical notes. For variation, layer with fresh berries or sprinkle with toasted coconut flakes. The mousse firms up beautifully when chilled overnight, making it ideal for preparing ahead.
Lemon and Lavender Vegan Cheesecake
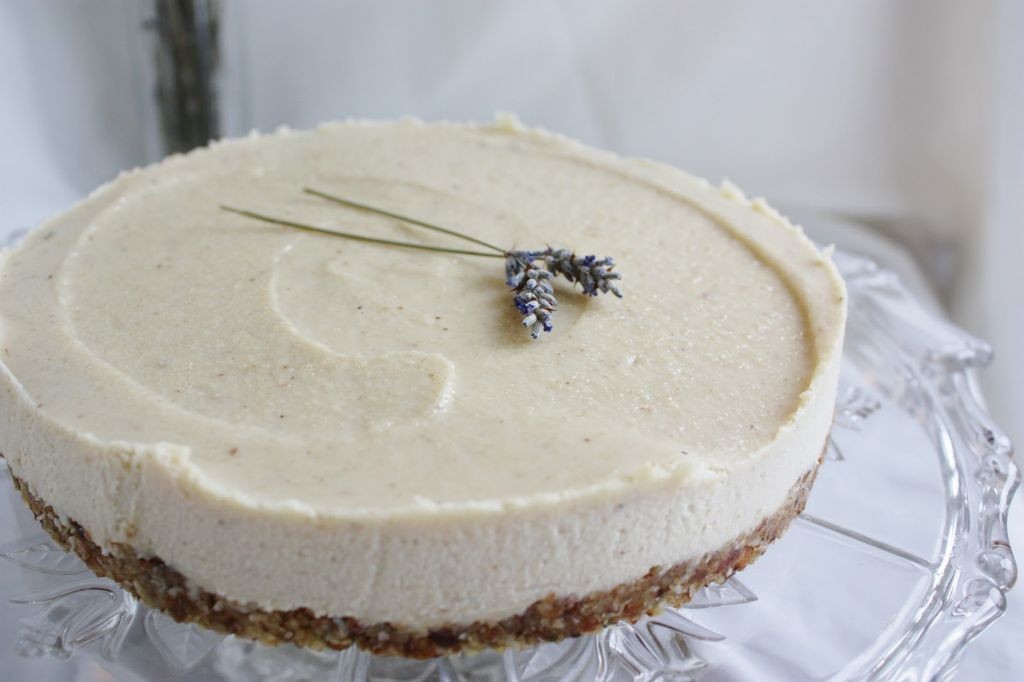
Whip up this elegant dessert that combines bright citrus with floral notes for a sophisticated vegan treat. The creamy texture and delicate flavors make it perfect for special occasions or when you want something uniquely refreshing. This no-bake cheesecake comes together with simple ingredients but delivers impressive results.
Ingredients
– 2 cups raw cashews
– 1/2 cup coconut oil
– 1/3 cup maple syrup
– 1/4 cup lemon juice
– 1 tbsp culinary lavender
– 1 tsp vanilla extract
– 1/4 tsp salt
– 1 1/2 cups graham cracker crumbs
– 6 tbsp vegan butter
Instructions
1. Soak 2 cups raw cashews in hot water for 1 hour to soften them for blending.
2. Melt 6 tbsp vegan butter in a microwave-safe bowl for 30 seconds.
3. Combine 1 1/2 cups graham cracker crumbs with melted vegan butter in a 9-inch springform pan.
4. Press the crumb mixture firmly into the bottom of the pan using a flat-bottomed cup.
5. Drain the soaked cashews and add them to a high-speed blender.
6. Add 1/2 cup coconut oil, 1/3 cup maple syrup, 1/4 cup lemon juice, 1 tbsp culinary lavender, 1 tsp vanilla extract, and 1/4 tsp salt to the blender.
7. Blend the mixture on high speed for 2 minutes until completely smooth and creamy.
8. Pour the filling over the prepared crust and smooth the top with a spatula.
9. Tap the pan gently on the counter to remove any air bubbles from the filling.
10. Refrigerate the cheesecake for at least 6 hours, or until completely set and firm.
11. Run a knife around the edge of the pan before releasing the springform sides.
12. Garnish with fresh lemon slices and additional lavender sprigs before serving.
Once chilled, this cheesecake develops a firm yet creamy texture that slices beautifully. The bright lemon flavor balances perfectly with the subtle floral notes from the lavender. For an elegant presentation, serve thin slices with fresh berries or a drizzle of raspberry coulis.
Summary
Whether you’re hosting a dinner party or simply want to elevate your weeknight meals, these elegant vegan recipes offer delicious inspiration for any occasion. We hope you find some new favorites to share with loved ones! Don’t forget to leave a comment telling us which recipe you tried first, and pin this article to your Pinterest boards to save these beautiful dishes for later.