Beat the summer heat with these frosty treats your furry friend will adore! Whether you’re looking for quick cooling solutions or nutritious snacks, these woof pupsicles are perfect for keeping your pup happy and hydrated. From fruity delights to protein-packed creations, you’ll find plenty of tail-wagging inspiration. Let’s dive into these 20 delicious recipes that will have your dog begging for more!
Peanut Butter Banana Woof Pupsicles
When my dog starts giving me those soulful eyes during summer afternoons, I know it’s time to whip up a batch of these frozen treats. I first created these pupsicles after realizing how much my golden retriever loves peanut butter, and now they’re our go-to cooling snack when temperatures rise.
Ingredients
- For the base mixture:
- 1 cup plain Greek yogurt
- 1/2 cup natural peanut butter (xylitol-free)
- 2 ripe bananas
- For assembly:
- 1/4 cup water
- Pupsicle molds or ice cube trays
Instructions
- Peel 2 ripe bananas and place them in a medium mixing bowl.
- Mash the bananas thoroughly with a fork until no large chunks remain. Tip: Ripe bananas with brown spots mash more easily and add natural sweetness.
- Add 1 cup plain Greek yogurt to the mashed bananas.
- Measure 1/2 cup natural peanut butter and add it to the bowl. Tip: Always check that your peanut butter doesn’t contain xylitol, which is toxic to dogs.
- Pour in 1/4 cup water to help with blending.
- Whisk all ingredients together until completely smooth and well combined.
- Place pupsicle molds or ice cube trays on a stable surface.
- Carefully pour the mixture into the molds, filling each cavity about 3/4 full to allow for expansion.
- Gently tap the molds on the counter to remove any air bubbles.
- Insert pupsicle sticks into the center of each mold if using stick-style molds.
- Place the filled molds in the freezer. Tip: Freeze for at least 6 hours or overnight for best results.
- Remove frozen pupsicles from molds by running warm water over the bottom for 10-15 seconds.
My dog goes absolutely wild for these creamy, peanut-buttery treats with just the right banana sweetness. They have a smooth, almost ice-cream-like texture that’s perfect for hot days, and I love watching him carefully carry his pupsicle to his favorite spot on the patio.
Chicken Broth and Carrot Woof Pupsicles
Just last week, my golden retriever Max was panting heavily after our afternoon walk, and I realized I needed a better way to keep him hydrated and happy during these warmer days—which is how these chicken broth and carrot pupsicles were born.
Ingredients
- For the broth base:
- 4 cups low-sodium chicken broth
- 1 cup shredded carrots
- For mixing:
- 1/2 cup plain Greek yogurt
Instructions
- Pour 4 cups of low-sodium chicken broth into a medium saucepan.
- Heat the broth over medium-high heat until it reaches a gentle simmer, which should take about 5–7 minutes.
- Add 1 cup of shredded carrots to the simmering broth.
- Cook the carrots in the broth for 8–10 minutes, or until they are tender when pierced with a fork.
- Remove the saucepan from the heat and let the mixture cool to room temperature, which typically takes 20–25 minutes.
- Stir in 1/2 cup of plain Greek yogurt until fully combined with the broth and carrots.
- Divide the mixture evenly into silicone paw-print molds or ice cube trays.
- Place the filled molds in the freezer for at least 4 hours, or until completely solid.
- Pop the frozen pupsicles out of the molds by briefly running warm water over the bottom.
Here’s the best part: these pupsicles have a creamy, slightly crunchy texture from the carrots, and the savory chicken flavor keeps dogs coming back for more. I love serving them in Max’s bowl as a cool treat after playtime, or even stuffing one into a hollow toy for a longer-lasting challenge.
Blueberry Yogurt Woof Pupsicles

Craving a frozen treat that’s both healthy for my furry friend and fun to make? I whipped up these Blueberry Yogurt Woof Pupsicles after my dog, Buster, kept eyeing my ice cream with those pleading puppy eyes—now he has his own special summer snack that I can feel good about giving him.
Ingredients
- For the pupsicle base:
- 1 cup plain Greek yogurt
- 1/2 cup fresh blueberries
- 2 tbsp creamy peanut butter (xylitol-free)
Instructions
- Rinse 1/2 cup fresh blueberries under cool water and pat them completely dry with a paper towel. Tip: Drying the berries prevents ice crystals from forming in the final pupsicles.
- Combine 1 cup plain Greek yogurt, the dried blueberries, and 2 tbsp xylitol-free peanut butter in a blender.
- Blend the mixture on medium speed for 45–60 seconds, until it’s completely smooth and no blueberry skins are visible. Tip: Scrape down the sides halfway through to ensure everything is fully incorporated.
- Pour the blended mixture into silicone paw-print molds, filling each cavity to just below the rim.
- Tap the molds firmly on the counter 5–6 times to release any air bubbles.
- Insert a small, dog-safe wooden stick into the center of each pupsicle.
- Freeze the molds for at least 6 hours, or until the pupsicles are solid and don’t give when pressed. Tip: For easy removal, run the bottom of the molds under warm water for 10 seconds before popping out the pupsicles.
Keep these stored in a freezer bag, and watch your pup enjoy the creamy, tangy yogurt paired with the subtle sweetness of blueberries—it’s a refreshing, tail-wagging reward that’s perfect for hot afternoons or training triumphs.
Pumpkin and Cinnamon Woof Pupsicles
Yesterday, as I was carving our family pumpkin, my golden retriever kept nudging my leg with those pleading eyes—you know the ones. That’s when inspiration struck for these seasonal frozen treats that combine pumpkin’s digestive benefits with cinnamon’s warming aroma. I’ve been making these woof pupsicles every fall since, and my pups go absolutely wild for them.
Ingredients
For the pumpkin base:
– 1 cup pure pumpkin puree (not pumpkin pie filling)
– 1/2 cup plain Greek yogurt
– 1/4 cup creamy peanut butter (xylitol-free)
– 1 tablespoon ground cinnamon
– 1/4 cup water
Instructions
1. Combine 1 cup pumpkin puree, 1/2 cup Greek yogurt, 1/4 cup peanut butter, 1 tablespoon cinnamon, and 1/4 cup water in a medium mixing bowl.
2. Whisk the mixture vigorously for 2 minutes until completely smooth and no peanut butter streaks remain.
3. Pour the blended mixture into silicone paw-print molds, filling each cavity to 1/4 inch below the rim.
4. Gently tap the filled molds on the counter 5-6 times to release any air bubbles trapped in the mixture.
5. Place the molds on a level surface in your freezer and freeze for 6-8 hours until completely solid.
6. Remove the frozen pupsicles from molds by briefly running warm water over the back of the molds for 10 seconds.
7. Store any remaining pupsicles in a freezer-safe bag or container for up to 3 months.
During our backyard play sessions, I love watching my dogs crunch through the frosty exterior to reach the creamy center. The pumpkin gives these a smooth, almost ice cream-like texture while the cinnamon adds just enough warmth to make them feel extra special. Sometimes I’ll pop one in a slow feeder bowl to turn treat time into a fun puzzle for my clever corgi.
Apple and Oatmeal Woof Pupsicles
Every time I bake these frozen treats for my golden retriever, he starts doing his happy dance around the kitchen island—it’s become our little weekend ritual. I love how simple these pupsicles are to whip up, and seeing his tail wag when I pull them from the freezer makes all the effort worth it.
Ingredients
- For the base mixture:
- 1 cup unsweetened applesauce
- 1/2 cup old-fashioned rolled oats
- 1 cup plain Greek yogurt
- 1/4 cup creamy peanut butter (xylitol-free)
- For assembly:
- 1 silicone paw-print mold tray
Instructions
- Combine 1 cup unsweetened applesauce, 1/2 cup old-fashioned rolled oats, 1 cup plain Greek yogurt, and 1/4 cup xylitol-free creamy peanut butter in a medium mixing bowl.
- Whisk the mixture vigorously for 2 minutes until fully blended and no peanut butter streaks remain. Tip: If the peanut butter is stiff, microwave it for 15 seconds to soften before mixing.
- Ladle the mixture evenly into each cavity of a silicone paw-print mold tray, filling them to just below the rim.
- Tap the mold firmly on the counter 5–6 times to release any air bubbles. Tip: This prevents icy pockets from forming in the final treats.
- Place the filled mold in the freezer and freeze for at least 6 hours or until completely solid.
- Pop the frozen pupsicles out of the mold by gently pressing on the back of each cavity. Tip: Run warm water over the mold’s underside for 10 seconds if they’re stubborn.
Chilled and creamy, these pupsicles have a subtle apple sweetness and a satisfying, slightly chewy texture from the oats. My pup adores them straight from the mold, but you can also crumble one over his kibble for a fun mealtime surprise.
Salmon and Sweet Potato Woof Pupsicles
Over the years of testing homemade dog treats, I’ve found that my golden retriever, Bailey, goes absolutely wild for anything with salmon—these pupsicles became our hot-weather staple after he kept stealing sweet potatoes from my grocery bag!
Ingredients
For the salmon mixture:
– 1 cup cooked salmon, flaked and skin removed
– 1/2 cup plain Greek yogurt
– 2 tablespoons olive oil
For the sweet potato layer:
– 1 medium sweet potato, peeled and cubed (about 1 cup mashed)
– 1/4 cup water
Instructions
1. Preheat your oven to 400°F and line a baking sheet with parchment paper.
2. Toss the cubed sweet potato with 1 tablespoon of olive oil on the baking sheet.
3. Roast the sweet potatoes for 25 minutes until they’re fork-tender and lightly caramelized at the edges.
4. Transfer the roasted sweet potatoes to a bowl and mash them thoroughly with 1/4 cup water until smooth.
5. In a separate bowl, combine the flaked salmon, Greek yogurt, and remaining 1 tablespoon olive oil.
6. Spoon the salmon mixture into silicone popsicle molds, filling each mold halfway.
7. Tap the molds gently on the counter to remove any air pockets—this prevents icy gaps.
8. Layer the mashed sweet potato over the salmon mixture, leaving 1/4 inch space at the top for expansion.
9. Insert popsicle sticks into the center of each mold, pushing through both layers.
10. Freeze the pupsicles for at least 6 hours or until completely solid.
11. To serve, run warm water over the outside of the molds for 10 seconds to release the pupsicles easily.
Dazzlingly creamy from the yogurt and sweet potato, these treats have a subtle savory depth from the salmon that dogs adore—I sometimes crumble one over Bailey’s kibble for a ‘special dinner’ effect, and the way the layers slowly melt keeps him engaged longer than store-bought versions.
Spinach and Parsley Woof Pupsicles
Just last week, my golden retriever was panting in the summer heat, and I realized store-bought frozen treats were full of questionable ingredients—so I whipped up these spinach and parsley woof pupsicles using what I had in the fridge. They’re so simple to make, and watching my pup happily lick away makes the five-minute prep totally worth it. I love that I can customize them with different dog-safe veggies depending on what’s seasonal.
Ingredients
- For the base mixture:
- 2 cups plain Greek yogurt
- 1 cup fresh spinach, packed
- 1/4 cup fresh parsley, chopped
- 1/2 cup low-sodium chicken broth
Instructions
- Wash the spinach and parsley thoroughly under cold running water to remove any dirt, then pat them dry with paper towels—this ensures no grit ends up in your pupsicles.
- Combine the spinach, parsley, Greek yogurt, and chicken broth in a blender.
- Blend the mixture on high speed for 45–60 seconds until it’s completely smooth with no leafy chunks, scraping down the sides halfway through if needed.
- Pour the blended mixture into silicone paw-print molds or ice cube trays, filling each cavity to about 1/4 inch from the top to allow for expansion.
- Tap the molds gently on the countertop to release any air bubbles that could create icy pockets.
- Place the filled molds in the freezer and freeze for at least 6 hours or overnight until solid—I usually make these in the evening so they’re ready by morning.
- Pop the frozen pupsicles out of the molds by briefly running warm water over the bottom for 5–10 seconds, then twisting gently to release.
- Serve one pupsicle immediately to your dog, storing the rest in a freezer bag to prevent freezer burn.
Velvety smooth and vibrantly green, these pupsicles have a creamy texture that melts perfectly for easy licking. The parsley gives a fresh, herbal note that balances the tangy yogurt, while the spinach adds a subtle earthiness—my dog goes wild for them served straight from the mold on a hot afternoon.
Coconut Milk and Berry Woof Pupsicles

Finally, after my dog Luna turned up her nose at another store-bought treat, I decided to create something special that would keep her cool and happy during our hot summer afternoons. These Coconut Milk and Berry Woof Pupsicles combine her favorite flavors into a frozen delight that’s both healthy and irresistible. Trust me, your furry friend will be doing happy dances just like Luna does when she hears the blender start up!
Ingredients
– For the base: 1 cup full-fat coconut milk, 1/4 cup plain Greek yogurt, 1 tablespoon honey
– For the berry swirl: 1/2 cup mixed frozen berries (blueberries, raspberries, strawberries), 2 tablespoons water
Instructions
1. Combine 1 cup coconut milk, 1/4 cup Greek yogurt, and 1 tablespoon honey in a blender.
2. Blend the mixture on medium speed for 30 seconds until completely smooth and well-combined.
3. Pour the blended coconut mixture into a pourable measuring cup and set aside.
4. Place 1/2 cup frozen berries and 2 tablespoons water in a small saucepan over medium heat.
5. Cook the berries for 5-7 minutes, stirring frequently, until they break down and form a thick sauce.
6. Press the cooked berry mixture through a fine-mesh strainer to remove seeds, using the back of a spoon to extract all the liquid.
7. Allow the berry sauce to cool completely to room temperature, about 15 minutes.
8. Pour the coconut milk mixture into silicone paw-print molds, filling each cavity halfway.
9. Drizzle 1 teaspoon of cooled berry sauce over each partially filled mold.
10. Top each mold with the remaining coconut milk mixture, leaving 1/4 inch of space at the top for expansion.
11. Use a toothpick to gently swirl the layers together in a figure-eight pattern.
12. Tap the molds firmly on the countertop 3-4 times to remove any air bubbles.
13. Freeze the pupsicles for at least 6 hours or until completely solid.
14. Remove frozen pupsicles from molds by running warm water over the bottom for 10 seconds.
15. Store any remaining pupsicles in a freezer-safe bag for up to 2 months.
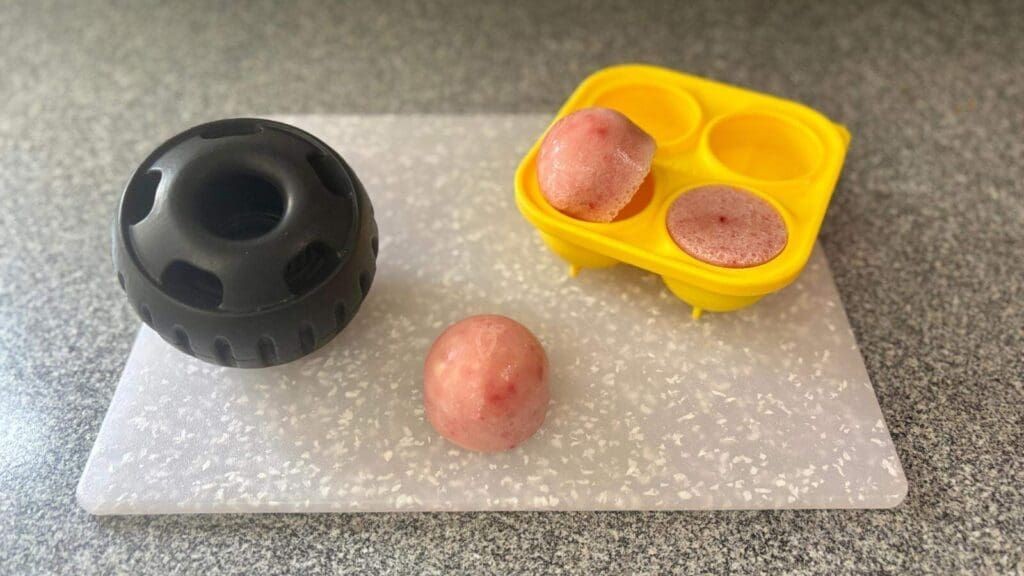
Outrageously creamy with vibrant berry swirls, these pupsicles have a texture that’s firm enough for enthusiastic licking but soft enough for sensitive doggy teeth. The coconut milk creates the most luxurious frozen treat that melts slowly, perfect for keeping your pup occupied on the porch. I love serving these to Luna in her special silicone bowl—it catches the drips and turns treat time into a fun, mess-free experience!
Beef Broth and Green Bean Woof Pupsicles
Crafting homemade dog treats has become my favorite Sunday ritual ever since my golden retriever, Bailey, turned up his nose at store-bought biscuits. These beef broth and green bean woof pupsicles are his absolute favorite—they’re nutritious, easy to make, and keep him cool and happy on warm afternoons. I love watching him wag his tail in anticipation when he hears the blender start up.
Ingredients
– For the broth base: 2 cups low-sodium beef broth, 1/2 cup plain Greek yogurt
– For the vegetable mix: 1 cup fresh green beans (trimmed and chopped), 1/4 cup shredded carrots
Instructions
1. Pour 2 cups of low-sodium beef broth into a medium saucepan.
2. Heat the broth over medium heat until it reaches a gentle simmer, about 5–7 minutes, stirring occasionally. (Tip: Using low-sodium broth ensures it’s safe for your pup—avoid any with added onions or garlic.)
3. Add 1 cup of trimmed and chopped fresh green beans to the simmering broth.
4. Cook the green beans for 8–10 minutes until they are tender but still bright green.
5. Remove the saucepan from the heat and let the mixture cool to room temperature, about 20–25 minutes.
6. Transfer the cooled broth and green beans to a blender.
7. Add 1/2 cup of plain Greek yogurt and 1/4 cup of shredded carrots to the blender.
8. Blend on medium speed for 1–2 minutes until the mixture is completely smooth with no chunks. (Tip: A high-speed blender works best here to create a creamy, uniform texture that’s easy for dogs to digest.)
9. Pour the blended mixture into silicone paw-print molds or ice cube trays, filling each cavity about 3/4 full.
10. Place the filled molds in the freezer for at least 4 hours or until fully frozen solid. (Tip: For easy removal, lightly tap the frozen molds on the counter—the pupsicles should pop right out.)
11. Store any leftovers in a freezer-safe bag for up to 2 months.
My furry taste tester goes wild for these frosty treats—they have a smooth, creamy texture from the yogurt and a savory beef flavor that masks the healthy green beans perfectly. I sometimes crumble one over his kibble for a special dinner, or simply hand it to him as a refreshing reward after our morning walks.
Turkey and Cranberry Woof Pupsicles
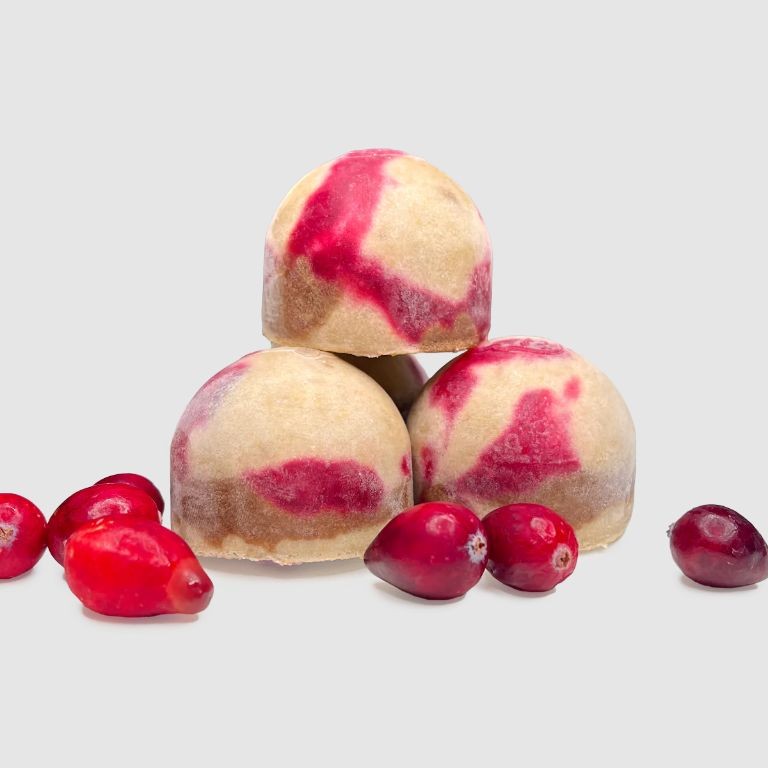
Keeping your furry friend cool and happy during the holiday season just got easier with these festive frozen treats. I started making these after my golden retriever, Buster, kept trying to sneak Thanksgiving turkey off the table—now he gets his own special version that’s safe and delicious. These pupsicles combine the classic holiday flavors he loves in a dog-friendly way that’s perfect for post-dinner rewards or hot afternoon snacks.
Ingredients
– For the turkey layer: 1 cup cooked plain turkey breast (shredded), 1/2 cup low-sodium chicken broth
– For the cranberry layer: 1/4 cup plain cranberries (fresh or frozen), 1/4 cup plain Greek yogurt, 1 tablespoon water
Instructions
1. Combine 1 cup shredded cooked turkey breast with 1/2 cup low-sodium chicken broth in a blender.
2. Blend the mixture on high speed for 30 seconds until completely smooth and pourable.
3. Pour the turkey mixture into silicone popsicle molds, filling each mold halfway.
4. Tip: Tap the molds gently on the counter to remove any air bubbles before freezing.
5. Freeze the turkey layer for 1 hour at 0°F until firm to the touch.
6. Combine 1/4 cup plain cranberries, 1/4 cup plain Greek yogurt, and 1 tablespoon water in the cleaned blender.
7. Blend the cranberry mixture on high speed for 45 seconds until smooth and vibrant red.
8. Tip: If your dog prefers milder flavors, strain the cranberry mixture through a fine mesh sieve to remove seeds and skins.
9. Pour the cranberry mixture over the frozen turkey layer, filling each mold to the top.
10. Insert dog-safe popsicle sticks into the center of each mold.
11. Freeze the completed pupsicles for 4 hours at 0°F until completely solid.
12. Tip: Run warm water over the outside of the molds for 10 seconds to easily release frozen pupsicles.
Just watch your dog’s tail start wagging when they taste that savory turkey layer followed by the tangy cranberry surprise. The creamy yogurt creates a smooth texture that contrasts beautifully with the shredded meat, making each lick an exciting flavor adventure. I love serving these on a small baking sheet during holiday gatherings—they keep dogs entertained while humans enjoy their own feast!
Cheesy Bacon Woof Pupsicles
After my golden retriever, Buddy, kept begging for bites of my bacon during breakfast, I knew I had to create a special frozen treat just for him. These Cheesy Bacon Woof Pupsicles combine his two favorite flavors in a dog-safe recipe that’s perfect for hot summer days or as a training reward.
Ingredients
- For the base:
- 2 cups plain Greek yogurt
- 1/2 cup low-sodium chicken broth
- For the mix-ins:
- 1/2 cup shredded cheddar cheese
- 1/4 cup cooked and crumbled bacon (no seasoning)
- 2 tbsp chopped fresh parsley
Instructions
- Combine 2 cups plain Greek yogurt and 1/2 cup low-sodium chicken broth in a medium bowl, whisking until completely smooth.
- Fold in 1/2 cup shredded cheddar cheese, 1/4 cup cooked and crumbled bacon, and 2 tbsp chopped fresh parsley until evenly distributed throughout the mixture.
- Pour the mixture into silicone paw print molds or ice cube trays, filling each cavity about 3/4 full to allow for expansion during freezing.
- Place the filled molds on a level surface in your freezer and freeze for at least 6 hours or until completely solid.
- Remove the frozen pupsicles from the molds by gently pressing on the bottom of each cavity or running warm water over the back of the mold for 5-10 seconds.
- Transfer the pupsicles to an airtight container or freezer bag, placing parchment paper between layers to prevent sticking, and store in the freezer for up to 3 months.
Here’s why Buddy goes crazy for these: the frozen yogurt creates a creamy, melt-resistant texture that keeps him engaged, while the salty bacon and sharp cheddar deliver bold flavor bursts in every lick. I love serving these on a lick mat to extend his enjoyment or crumbling one over his kibble for an extra special dinner surprise.
Carob and Peanut Butter Woof Pupsicles

Keeping my furry friend cool and happy during summer heatwaves inspired me to create these frozen treats—I swear my dog starts wagging his tail the moment he hears the blender whirring for these pupsicles!
Ingredients
For the carob mixture:
– 1 cup plain yogurt
– 2 tablespoons carob powder
– 1 tablespoon honey
For the peanut butter swirl:
– 1/2 cup creamy peanut butter
– 1/4 cup water
Instructions
1. Combine 1 cup plain yogurt, 2 tablespoons carob powder, and 1 tablespoon honey in a blender.
2. Blend the mixture on medium speed for 30 seconds until completely smooth and free of carob powder lumps.
3. In a separate microwave-safe bowl, combine 1/2 cup creamy peanut butter with 1/4 cup water.
4. Microwave the peanut butter mixture on high for 20 seconds to soften it for easier swirling.
5. Stir the warmed peanut butter mixture vigorously with a spoon until it reaches a smooth, pourable consistency.
6. Pour the carob-yogurt mixture into silicone popsicle molds, filling each mold three-quarters full.
7. Drizzle 1 teaspoon of the thinned peanut butter mixture over the carob base in each mold.
8. Use a toothpick to gently swirl the peanut butter through the carob mixture, creating visible marbled patterns.
9. Insert popsicle sticks into the center of each mold, ensuring they stand upright.
10. Freeze the filled molds for at least 6 hours or overnight until completely solid.
11. Remove frozen pupsicles from molds by running warm water over the outside for 10 seconds to loosen.
Heavenly creamy with a satisfying crunch when your dog bites into them, these pupsicles offer cool relief with rich carob notes and salty peanut butter ribbons—I love watching my pup enjoy his special treat while I sip my iced coffee on the patio!
Tuna and Parsley Woof Pupsicles
As a dog mom to two energetic golden retrievers, I’m always looking for healthy homemade treats that get those tails wagging. After countless store-bought options filled with questionable ingredients, I finally perfected these tuna and parsley pupsicles that have become the highlight of my pups’ hot summer days. They’re surprisingly simple to make and cost just a fraction of premium pet store treats.
Ingredients
For the mixture:
– 2 cans (5 oz each) of water-packed tuna, drained
– 1/4 cup fresh parsley, finely chopped
– 1/2 cup plain Greek yogurt
– 1/4 cup unsalted chicken broth
Instructions
1. Drain both 5 oz cans of tuna thoroughly using a fine mesh strainer, pressing out excess liquid with the back of a spoon.
2. Finely chop 1/4 cup of fresh parsley leaves, discarding the tough stems.
3. Combine the drained tuna, chopped parsley, 1/2 cup Greek yogurt, and 1/4 cup chicken broth in a medium mixing bowl.
4. Mix all ingredients thoroughly with a fork until you achieve a uniform, paste-like consistency.
5. Spoon the mixture into silicone ice cube trays or small popsicle molds, filling each cavity about 3/4 full to allow for expansion.
6. Place the filled trays in the freezer and freeze for at least 6 hours or until completely solid.
7. Remove frozen pupsicles from molds by running warm water over the bottom of the trays for 10-15 seconds.
8. Store the pupsicles in a freezer-safe container or zip-top bag for up to 3 months.
Very satisfying to watch your dog enjoy these frozen treats, with the tuna providing that irresistible fishy flavor dogs love while the parsley helps freshen their breath. The Greek yogurt creates a creamy, smooth texture that freezes perfectly, making these ideal for teething puppies or as cooling summer snacks—my dogs particularly love when I serve them stuffed inside a Kong toy for extended entertainment.
Pumpkin and Greek Yogurt Woof Pupsicles

Nothing says fall quite like pumpkin spice everything, but this year I decided to create something special for my furry family member after he kept eyeing my pumpkin latte. These frozen treats combine seasonal flavors with healthy ingredients that are safe and delicious for dogs.
Ingredients
- For the base mixture:
- 1 cup plain Greek yogurt
- 1/2 cup pure pumpkin puree
- 2 tablespoons creamy peanut butter (xylitol-free)
- For mixing:
- 1/4 cup water
Instructions
- Measure 1 cup plain Greek yogurt into a medium mixing bowl.
- Add 1/2 cup pure pumpkin puree to the same bowl.
- Spoon 2 tablespoons of xylitol-free peanut butter into the mixture.
- Pour 1/4 cup water into the bowl to help with blending.
- Whisk all ingredients together vigorously for 2 minutes until completely smooth and well combined.
- Tip: Make sure your peanut butter doesn’t contain xylitol, as this artificial sweetener is toxic to dogs.
- Ladle the mixture into silicone popsicle molds, filling each cavity to 3/4 full to allow for expansion.
- Tap the molds firmly on the counter 5-6 times to remove any air bubbles.
- Tip: If you don’t have popsicle molds, use an ice cube tray or small paper cups with wooden sticks.
- Place the filled molds in the freezer immediately.
- Freeze for at least 6 hours or until completely solid.
- Tip: For easier removal, run warm water over the outside of the molds for 10 seconds before popping out the pupsicles.
- Store frozen pupsicles in an airtight container or freezer bag for up to 3 months.
Looking at these creamy orange treats, you’ll notice they have a smooth, frosty texture that dogs love chewing on during warm days. The combination creates a subtle sweetness from the pumpkin with a tangy yogurt finish that keeps pups coming back for more. I often break these into smaller pieces for training rewards or serve them whole as a special cooling treat after our afternoon walks.
Chicken and Rice Woof Pupsicles
Unbelievably, my dog Luna started turning up her nose at regular kibble last summer, which led me to create these frozen treats that now have her doing happy dances by the freezer door. I wanted something nutritious that would also help keep her cool during our Arizona heatwaves, and these chicken and rice pupsicles became our go-to solution. They’re so easy to make that even on my busiest work-from-home days, I can whip up a batch while waiting for my coffee to brew.
Ingredients
- For the base mixture:
- 2 cups cooked chicken breast, shredded
- 1 cup cooked white rice
- 1 cup low-sodium chicken broth
- 1/2 cup plain Greek yogurt
- For freezing:
- 1 silicone ice cube tray
Instructions
- Combine 2 cups shredded cooked chicken breast, 1 cup cooked white rice, 1 cup low-sodium chicken broth, and 1/2 cup plain Greek yogurt in a large mixing bowl.
- Mix all ingredients thoroughly with a wooden spoon until the chicken and rice are evenly distributed throughout the broth and yogurt mixture.
- Tip: If the mixture seems too thick, add an additional 1/4 cup chicken broth to reach a pourable consistency—this helps create smoother pupsicles.
- Place your silicone ice cube tray on a baking sheet to prevent spills during transportation to the freezer.
- Carefully spoon the chicken and rice mixture into each cavity of the silicone ice cube tray, filling them to the top.
- Gently tap the filled tray on the countertop 3-4 times to remove any air bubbles and ensure the mixture settles evenly.
- Place the baking sheet with the filled tray in the freezer for exactly 6 hours at 0°F until completely solid.
- Tip: Freezing for the full 6 hours ensures the pupsicles pop out cleanly without breaking—I set a timer so I don’t forget them!
- Remove the frozen pupsicles from the freezer and let the tray sit at room temperature for 2 minutes to slightly loosen the treats.
- Pop each chicken and rice pupsicle out of the silicone tray by pushing from the bottom of each cavity.
- Tip: Store the pupsicles in a freezer-safe bag labeled with the date to maintain freshness for up to 3 months.
What makes these treats special is their slightly soft, grainy texture that melts perfectly in your dog’s mouth without being messy. The combination of savory chicken and mild rice creates a flavor profile that even picky eaters adore, while the Greek yogurt adds a subtle tanginess. I love serving these to Luna as a refreshing afternoon snack or stuffing them into her Kong toy for extended entertainment during my important Zoom calls.
Strawberry and Banana Woof Pupsicles
Yesterday, I was cleaning out my freezer and found some strawberries that were just begging to be used—and that’s when inspiration struck for these adorable frozen treats my dog absolutely adores. I’ve been making these Strawberry and Banana Woof Pupsicles for years, ever since my golden retriever, Buddy, turned his nose up at store-bought options, and they’re so simple, even my kids love helping out.
Ingredients
For the pupsicle base:
– 1 cup fresh strawberries, hulled and chopped
– 1 ripe banana, peeled
– 1/2 cup plain Greek yogurt
– 1/4 cup water
Instructions
1. Combine 1 cup chopped strawberries, 1 peeled banana, 1/2 cup Greek yogurt, and 1/4 cup water in a blender.
2. Blend the mixture on high speed for 45 seconds until completely smooth and no chunks remain.
3. Pour the blended mixture into silicone paw-print molds, filling each cavity to the top.
4. Tap the molds firmly on the counter 5–6 times to release any air bubbles trapped in the mixture.
5. Place the filled molds in the freezer and freeze for at least 6 hours or until solid.
6. Remove the molds from the freezer and let them sit at room temperature for 2 minutes to loosen.
7. Gently pop the frozen pupsicles out of the molds by pressing on the bottom of each cavity.
8. Serve one pupsicle immediately to your dog, storing the rest in a freezer bag for up to 3 months.
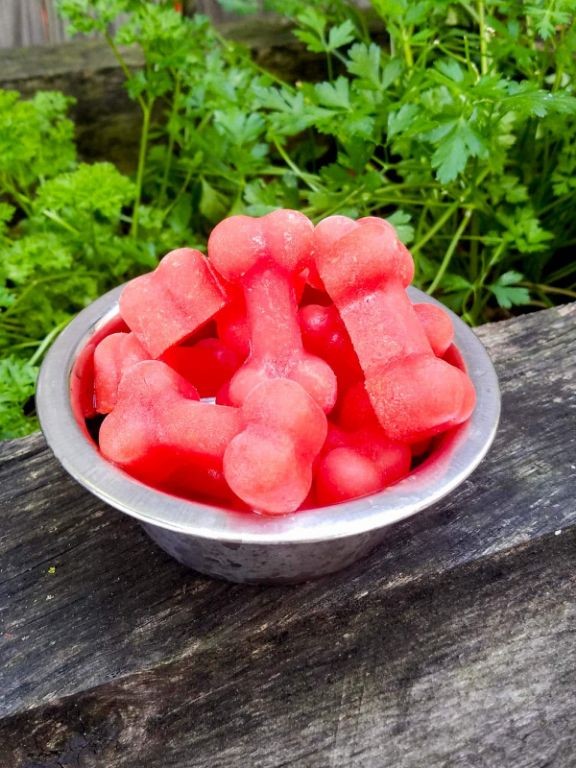
Perfect for hot summer days, these pupsicles have a creamy, ice-cream-like texture that dogs find irresistible, with the natural sweetness of banana balancing the tart strawberries. I love watching Buddy carefully lick his way through each one, and they make great training rewards broken into smaller pieces—just be prepared for some enthusiastic tail wagging!
Sweet Potato and Cinnamon Woof Pupsicles
After my golden retriever, Bailey, kept trying to sneak licks of my sweet potato casserole last Thanksgiving, I knew I had to create a dog-safe frozen treat that would satisfy his autumn cravings. These woof pupsicles combine the natural sweetness of sweet potatoes with a hint of cinnamon that dogs adore—plus they’re so easy to make, I often whip up a double batch to share with my neighbor’s pups too.
Ingredients
For the sweet potato base:
– 2 cups mashed sweet potatoes
– 1/2 cup plain Greek yogurt
– 1/4 cup unsalted chicken broth
– 1/2 teaspoon ground cinnamon
For freezing:
– 1 silicone paw print mold
Instructions
1. Preheat your oven to 400°F and pierce 2 large sweet potatoes several times with a fork.
2. Bake the sweet potatoes for 45-50 minutes until they feel completely soft when squeezed with oven mitts.
3. Let the sweet potatoes cool on a wire rack for 30 minutes until they’re safe to handle.
4. Scoop the sweet potato flesh into a medium bowl, discarding the skins.
5. Mash the sweet potatoes with a potato masher until no lumps remain.
6. Add 1/2 cup Greek yogurt to the mashed sweet potatoes.
7. Pour in 1/4 cup unsalted chicken broth.
8. Sprinkle 1/2 teaspoon cinnamon over the mixture.
9. Whisk all ingredients together until fully combined and smooth.
10. Spoon the mixture into a silicone paw print mold, filling each cavity to the top.
11. Tap the mold firmly on the counter 5-6 times to remove any air bubbles.
12. Freeze the pupsicles for at least 6 hours or until completely solid.
13. Pop the frozen pupsicles out of the mold by gently pressing on the bottom of each cavity.
Zesty cinnamon warmth shines through the creamy sweet potato base, creating a frozen texture that keeps dogs engaged while being gentle on their teeth. I love watching Bailey’s tail wag as he works his way through one of these orange-hued treats on a warm afternoon—they’re perfect for stuffing into a Kong toy for extended enjoyment.
Beef and Liver Woof Pupsicles

My dogs absolutely lose their minds when I pull these homemade pupsicles out of the freezer—they’re the perfect healthy treat for hot summer days or rewarding good behavior. I started making these after my vet recommended adding organ meat to my pups’ diet, and now they’re a weekly staple in our house. Making them is surprisingly simple, and I love knowing exactly what’s going into my dogs’ treats.
Ingredients
For the meat mixture:
- 1 pound ground beef (85% lean)
- 1/2 pound beef liver
- 1 cup low-sodium beef broth
- 1/4 cup plain yogurt
For binding and nutrition:
- 1/2 cup rolled oats
- 1 tablespoon coconut oil
Instructions
- Rinse the beef liver under cold running water for 30 seconds to remove any surface residue.
- Chop the beef liver into 1-inch cubes using a sharp knife and cutting board.
- Combine the ground beef and chopped liver in a medium mixing bowl.
- Heat 1 tablespoon coconut oil in a large skillet over medium-high heat (350°F) until shimmering.
- Cook the meat mixture in the skillet for 8-10 minutes, breaking it up with a spatula until no pink remains.
- Transfer the cooked meat to a food processor and let it cool for 5 minutes.
- Add 1 cup low-sodium beef broth and 1/4 cup plain yogurt to the food processor.
- Pulse the mixture 10-12 times until it reaches a coarse paste consistency.
- Stir in 1/2 cup rolled oats by hand until fully incorporated. Tip: The oats will absorb excess moisture as the mixture cools, helping the pupsicles hold their shape better.
- Spoon the mixture into silicone paw-print molds, pressing down firmly to eliminate air pockets. Tip: Using molds with distinct shapes makes it easier to pop out frozen treats later.
- Freeze the filled molds for at least 6 hours or until completely solid. Tip: Place molds on a flat baking sheet before freezing to prevent spills in your freezer.
- Remove frozen pupsicles from molds by gently pressing on the bottom of each cavity.
Keep these stored in an airtight container in the freezer—they’ll maintain their quality for up to 3 months. Knowing my dogs are getting nutrient-rich treats without any questionable ingredients makes the extra effort completely worthwhile.
Watermelon and Mint Woof Pupsicles
Kind of like that time my golden retriever, Buster, kept eyeing my watermelon salad with such longing, I knew I had to create a dog-safe version of his favorite summer fruit. These frozen treats combine his love for sweet watermelon with refreshing mint that helps keep his breath fresh after all those dog park adventures. Making these pupsicles has become our weekly ritual—Buster now parks himself by the freezer whenever I pull out the blender!
Ingredients
For the pupsicle mixture:
- 2 cups seedless watermelon chunks (about 1-inch pieces)
- 1/4 cup fresh mint leaves, packed
- 1/2 cup plain Greek yogurt
- 1/4 cup water
Instructions
- Remove all seeds and rind from the watermelon chunks, ensuring only the red flesh remains.
- Combine the seedless watermelon chunks, fresh mint leaves, plain Greek yogurt, and water in a blender.
- Blend the mixture on high speed for 45-60 seconds until completely smooth and no mint pieces remain visible.
- Pour the blended mixture into silicone paw-print molds or ice cube trays, filling each cavity to about 1/4 inch from the top.
- Place the filled molds on a level surface in your freezer and freeze for 6-8 hours until completely solid.
- Remove the frozen pupsicles from the molds by gently twisting each cavity or running warm water on the bottom of the mold for 5 seconds.
The frozen texture becomes delightfully creamy thanks to the Greek yogurt, while the watermelon provides natural sweetness that dogs adore without any added sugar. I love serving these to Buster on his special rubber mat during hot afternoons—he licks them slowly, making each one last while cooling down from our backyard play sessions. You could also crumble one over your dog’s regular kibble for a refreshing summer meal topper that’ll have them wagging with excitement!
Pineapple and Coconut Woof Pupsicles
Oh my goodness, these pineapple and coconut woof pupsicles have been a game-changer for keeping my golden retriever cool during our hot Arizona summers! I started making them last year when I noticed how much he loved the tropical flavors during our backyard barbecues, and now they’re a weekly treat he eagerly anticipates from the freezer. There’s something so satisfying about watching him happily crunch away on these frozen delights while I sip my iced tea nearby.
Ingredients
For the base mixture:
– 1 cup plain Greek yogurt
– 1/2 cup unsweetened coconut milk
– 1/4 cup pureed pineapple (fresh or canned in juice, not syrup)
For the optional mix-ins:
– 2 tablespoons unsweetened shredded coconut
– 1 tablespoon honey (optional for picky eaters)
Instructions
1. Combine 1 cup plain Greek yogurt, 1/2 cup unsweetened coconut milk, and 1/4 cup pureed pineapple in a medium mixing bowl.
2. Whisk the mixture vigorously for 2 minutes until completely smooth and well-combined.
3. Stir in 2 tablespoons unsweetened shredded coconut and 1 tablespoon honey (if using) until evenly distributed throughout the mixture.
4. Pour the completed mixture into silicone popsicle molds, filling each cavity to 1/4 inch below the rim.
5. Insert popsicle sticks into the center of each mold, ensuring they stand straight and are submerged about halfway.
6. Freeze the filled molds for at least 6 hours at 0°F until completely solid.
7. Remove the frozen pupsicles from the molds by running warm water over the outside for 15 seconds.
8. Serve immediately or store in an airtight freezer bag for up to 3 months.
My dog absolutely loves the creamy texture that melts perfectly in his mouth, with the tropical pineapple flavor shining through the subtle coconut background. These pupsicles develop the most satisfying crunch when partially thawed for about 5 minutes before serving, and I sometimes sprinkle a little extra shredded coconut on top for added texture that makes him extra excited.
Summary
Great homemade pupsicles are a wonderful way to keep your furry friend happy and cool! We hope these 20 delicious recipes inspire you to create some tail-wagging treats. Give them a try, then share your pup’s favorite in the comments below! Don’t forget to pin this article on Pinterest so other dog lovers can discover these fantastic frozen delights.