Zero sugar doesn’t mean zero fun when it comes to dessert! If you’re looking for sweet treats that satisfy without the guilt, you’ve come to the right place. These Cool Whip desserts are not only delicious but also incredibly easy to whip up. Get ready to discover 20 amazing recipes that will become your new go-to favorites for any occasion.
Strawberry Zero Sugar Cool Whip Parfait
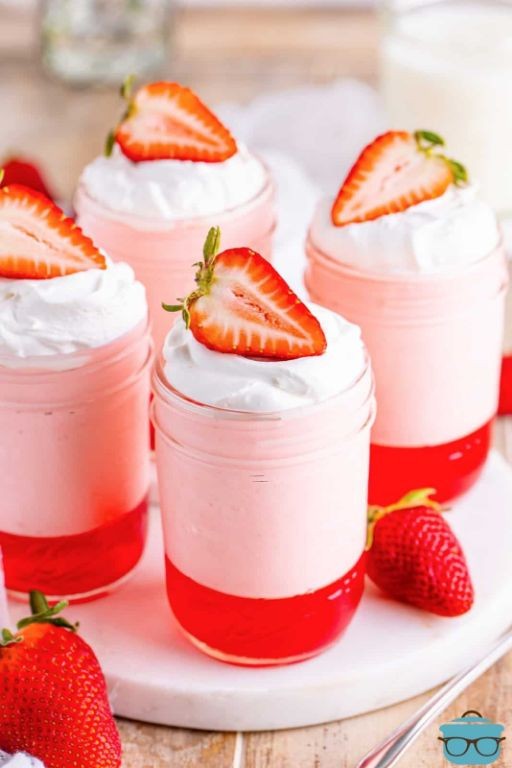
Whip up the ultimate guilt-free dessert that’s about to become your summer obsession. This layered masterpiece combines juicy berries with cloud-like cream for a treat that satisfies every sweet craving without the sugar crash. Get ready to impress with minimal effort and maximum flavor payoff.
Ingredients
– 2 cups fresh strawberries, hulled and quartered
– 8 oz sugar-free Cool Whip, thawed
– 1 cup plain Greek yogurt
– 1 tsp pure vanilla extract
– 1/4 cup sliced almonds, toasted
– 4 sprigs fresh mint for garnish
Instructions
1. Wash and thoroughly dry 2 cups of fresh strawberries using a salad spinner to prevent sogginess.
2. Hull each strawberry using a paring knife, then quarter them into uniform pieces for even distribution.
3. In a chilled mixing bowl, combine 8 oz thawed sugar-free Cool Whip with 1 cup plain Greek yogurt.
4. Fold in 1 tsp pure vanilla extract using a rubber spatula, maintaining the mixture’s airy texture.
5. Toast 1/4 cup sliced almonds in a dry skillet over medium heat for 3-4 minutes until fragrant and golden.
6. Begin assembly by placing a 2-tablespoon layer of the cream mixture in the bottom of each parfait glass.
7. Add a 1/4-cup layer of quartered strawberries, pressing gently to create even layers.
8. Repeat the layering process twice more, ending with a cream layer.
9. Chill the assembled parfaits in the refrigerator for at least 30 minutes to set the layers.
10. Garnish each parfait with toasted almonds and a fresh mint sprig before serving.
The creamy layers meld with the burst of fresh berries for a textural symphony that’s both light and satisfying. For an elegant twist, serve in champagne flutes or layer with sugar-free granola for added crunch.
Chocolate Zero Sugar Cool Whip Mousse
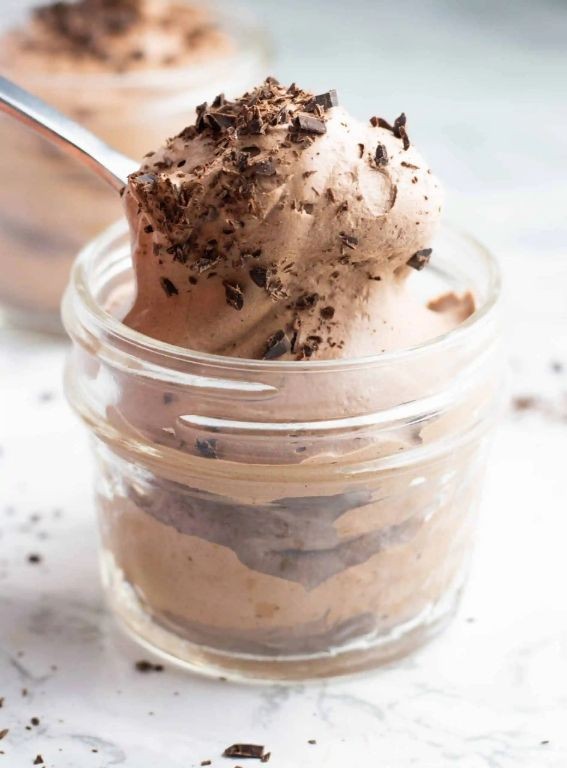
Brace yourself for the easiest dessert you’ll ever make. This chocolate mousse requires zero baking and comes together in minutes—perfect for when sugar cravings strike but you want to keep things light. Seriously, it’s so simple you could whip it up during a commercial break.
Ingredients
– 1 package (8 oz) cream cheese, softened (I always leave mine out for 30 minutes—it blends so much smoother)
– 1/4 cup unsweetened cocoa powder (Dutch-processed gives the richest chocolate flavor)
– 1/2 cup powdered erythritol (this is my favorite zero-calorie sweetener—no aftertaste!)
– 1 tsp pure vanilla extract (the real stuff makes all the difference)
– 1 tub (8 oz) sugar-free Cool Whip, thawed (don’t skip the thawing—frozen won’t incorporate properly)
– Pinch of salt (just a tiny bit to make the chocolate pop)
Instructions
1. Place softened cream cheese in a large mixing bowl.
2. Add cocoa powder, powdered erythritol, vanilla extract, and salt to the bowl.
3. Use an electric mixer on medium speed to beat the mixture for 2 minutes until completely smooth and no cream cheese lumps remain.
4. Scrape down the sides of the bowl with a spatula to ensure everything is incorporated.
5. Add the thawed sugar-free Cool Whip to the chocolate mixture.
6. Gently fold the Cool Whip into the chocolate base using a spatula, making sweeping motions from the bottom up until fully combined.
7. Divide the mousse evenly among 4 serving glasses or ramekins.
8. Refrigerate the mousse for at least 2 hours to set properly—this chilling time is crucial for the perfect texture.
Keep this mousse chilled until serving—it holds its shape beautifully for hours. The texture is impossibly light yet rich, like eating chocolate clouds that melt on your tongue. Try layering it with fresh raspberries or crumbling sugar-free cookies between layers for extra texture.
Lemon Zero Sugar Cool Whip Pie
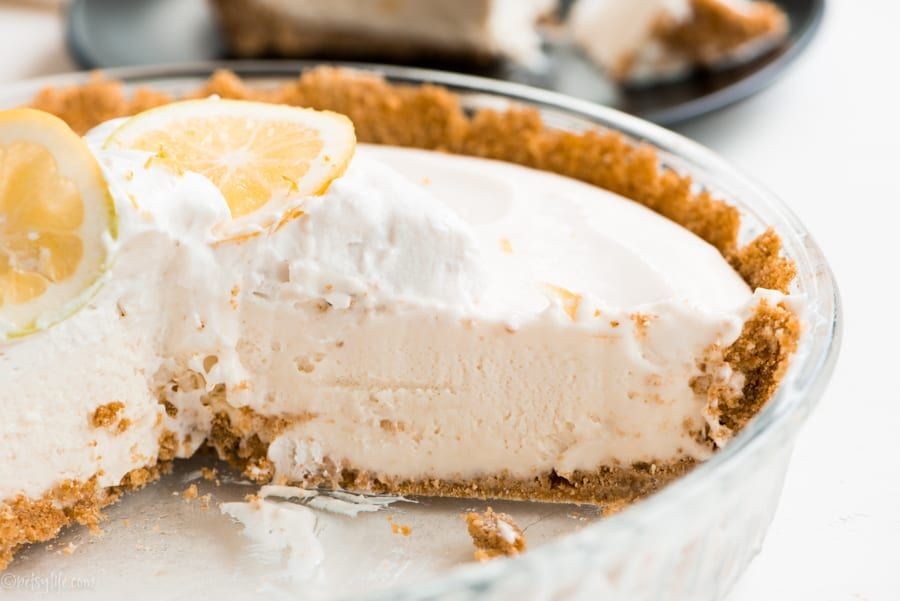
TikTok’s about to lose its mind over this no-bake wonder. This Lemon Zero Sugar Cool Whip Pie delivers insane citrus flavor without any added sugar—perfect for when you need a quick dessert fix that won’t wreck your wellness goals. Trust me, it’s the creamy, dreamy pie you’ll make on repeat all summer long.
Ingredients
– 1 pre-made graham cracker crust (I always grab the deep-dish version for extra filling)
– 8 oz package of cream cheese, softened to room temp (this prevents lumpy filling)
– 1 cup zero sugar lemonade drink mix powder (the kind that comes in those little canisters)
– 8 oz tub of zero sugar Cool Whip, thawed in the fridge overnight
– 1 tbsp fresh lemon zest (microplane it right over the bowl—no waste!)
– Optional: extra lemon slices for garnish
Instructions
1. Place the softened cream cheese in a large mixing bowl.
2. Use an electric mixer on medium speed to beat the cream cheese for 1 minute until completely smooth and no lumps remain.
3. Add the zero sugar lemonade powder to the bowl.
4. Beat the mixture on medium-high speed for 2 full minutes until fully incorporated and fluffy.
5. Scrape down the sides of the bowl with a spatula to ensure even mixing.
6. Add the thawed zero sugar Cool Whip to the bowl.
7. Gently fold the Cool Whip into the cream cheese mixture using a spatula until just combined—don’t overmix or you’ll deflate the airiness.
8. Stir in the fresh lemon zest until evenly distributed throughout the filling.
9. Spoon the filling into the graham cracker crust, spreading it evenly with the back of a spoon.
10. Smooth the top with an offset spatula for a clean, professional look.
11. Cover the pie loosely with plastic wrap.
12. Chill the pie in the refrigerator for at least 4 hours, or until firmly set—overnight is even better for maximum flavor development.
Zesty lemon flavor bursts through every creamy bite, with the graham cracker crust providing the perfect crunchy contrast. Serve chilled slices with extra lemon zest sprinkled on top, or get fancy with thin lemon slices fanned around each plate. This pie stays miraculously light while packing serious citrus punch—your guests will never guess it’s sugar-free.
Peanut Butter Zero Sugar Cool Whip Dip
Get ready to blow your snack game wide open. This creamy peanut butter dip whips up in minutes and disappears even faster—perfect for when sweet cravings strike hard.
Ingredients
– 1 cup creamy peanut butter (I always grab the natural kind—it mixes smoother)
– 8 oz container of zero sugar Cool Whip, thawed (let it sit out for 15 minutes—trust me, it blends better)
– 1 tsp vanilla extract (the real stuff makes all the difference)
– ¼ cup powdered erythritol (this is my favorite zero-calorie sweetener—no aftertaste!)
– Pinch of salt (just a tiny bit to make the peanut flavor pop)
Instructions
1. Scoop 1 cup of creamy peanut butter into a large mixing bowl.
2. Add ¼ cup powdered erythritol and a pinch of salt to the bowl.
3. Use an electric mixer on medium speed to combine the peanut butter, erythritol, and salt for 1 minute until smooth.
4. Pour in 1 tsp vanilla extract and mix for another 30 seconds to incorporate.
5. Add the entire 8 oz container of thawed Cool Whip to the bowl.
6. Switch to a spatula and gently fold the Cool Whip into the peanut butter mixture—this keeps it airy instead of deflating.
7. Continue folding for about 2 minutes until no white streaks remain and the dip is uniformly creamy.
8. Transfer the dip to a serving bowl and cover with plastic wrap.
9. Chill in the refrigerator for at least 30 minutes to let the flavors meld and the texture firm up slightly.
Ready to dive in? The dip is luxuriously smooth with a rich peanut butter kick that’s perfectly sweet without being heavy. Serve it with apple slices for crunch, spread it on rice cakes, or honestly just eat it by the spoonful—it’s that good.
Vanilla Zero Sugar Cool Whip Cheesecake
Ready to ditch the sugar without sacrificing dessert? This no-bake vanilla cheesecake delivers creamy perfection in under 30 minutes. Seriously—it’s so easy you’ll make it weekly.
Ingredients
– 2 cups graham cracker crumbs (I always use honey-flavored for extra sweetness)
– ½ cup melted salted butter (the salt balances the sweetness perfectly)
– 16 oz softened cream cheese (room temperature is non-negotiable for smooth blending)
– 1 tsp pure vanilla extract (splash in extra if you’re feeling fancy)
– 8 oz Zero Sugar Cool Whip (thawed overnight in the fridge works best)
Instructions
1. Combine graham cracker crumbs and melted butter in a medium bowl until the mixture resembles wet sand.
2. Press the crumb mixture firmly into a 9-inch springform pan, creating an even layer across the bottom and slightly up the sides.
3. Beat the softened cream cheese on medium speed for 2 minutes until completely smooth and free of lumps.
4. Mix in vanilla extract until fully incorporated, about 30 seconds.
5. Gently fold in the thawed Zero Sugar Cool Whip using a spatula, making sure not to deflate the mixture.
6. Spread the cream cheese mixture evenly over the prepared crust, smoothing the top with an offset spatula.
7. Refrigerate the cheesecake for at least 4 hours, or until firmly set—overnight chilling yields the best texture.
8. Release the springform pan sides carefully before slicing with a warm knife for clean edges.
Dreamy doesn’t begin to describe this cheesecake’s cloud-like texture that melts on your tongue. The vanilla-forward flavor pairs beautifully with fresh berries or a drizzle of sugar-free chocolate sauce. Honestly, nobody will guess it’s sugar-free when they taste that rich, creamy perfection.
Banana Zero Sugar Cool Whip Pudding
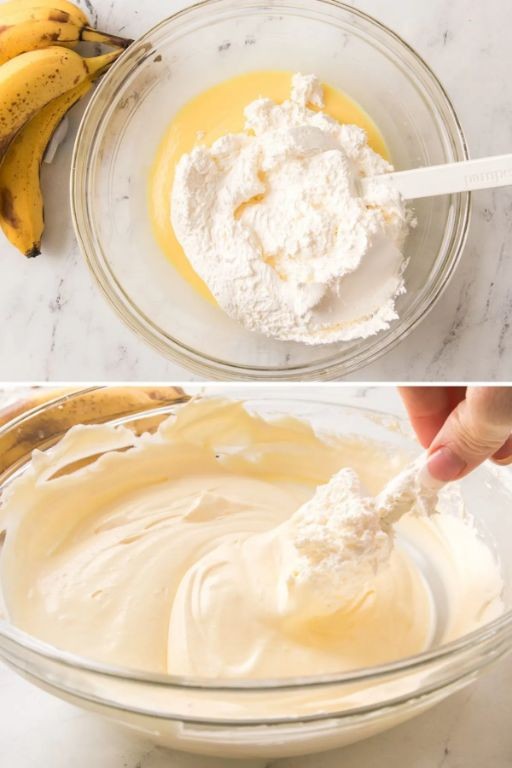
A dessert that’s secretly healthy? Absolutely. This Banana Zero Sugar Cool Whip Pudding whips up in minutes and tastes like pure indulgence without the guilt.
Ingredients
– 4 ripe bananas (the spottier, the sweeter—trust me)
– 1 (8 oz) tub of sugar-free Cool Whip (thawed in the fridge overnight for best fluffiness)
– 1 (3.4 oz) box of sugar-free instant vanilla pudding mix (I always keep a few boxes in the pantry for emergencies)
– 2 cups cold whole milk (skim works, but whole gives it a creamier finish)
– 1 tsp pure vanilla extract (the real stuff makes all the difference)
Instructions
1. Peel all 4 ripe bananas and place them in a large mixing bowl.
2. Mash the bananas thoroughly with a fork until no large chunks remain—this creates the pudding’s natural sweetness base.
3. Pour the 2 cups of cold whole milk into the bowl with the mashed bananas.
4. Add the entire box of sugar-free instant vanilla pudding mix to the banana-milk mixture.
5. Use a whisk to vigorously combine everything for exactly 2 minutes, scraping the sides to ensure no dry pockets remain—this activates the pudding’s thickening power.
6. Gently fold in the thawed sugar-free Cool Whip with a spatula using wide, sweeping motions to maintain airiness.
7. Stir in 1 tsp of pure vanilla extract until just incorporated.
8. Cover the bowl tightly with plastic wrap, pressing it directly onto the pudding surface to prevent a skin from forming.
9. Chill the pudding in the refrigerator for at least 4 hours, or until it’s fully set and firm to the touch.
But the magic is in the texture—creamy, cloud-like, and surprisingly rich. Layer it with crushed graham crackers for a faux-banana cream pie, or top with fresh berries for a bright contrast.
Pumpkin Zero Sugar Cool Whip Spice Cake
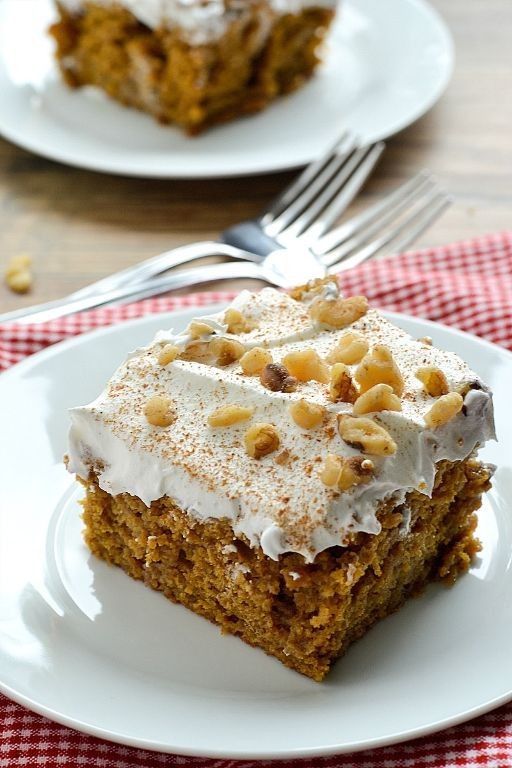
Ditch the sugar rush but keep all the cozy vibes with this magical pumpkin dessert. This fluffy spice cake gets its sweetness naturally from pumpkin puree and gets extra lift from zero sugar Cool Whip. You won’t believe it’s sugar-free!
Ingredients
- 1 (15 oz) can pure pumpkin puree (not pumpkin pie filling—I always double-check the label!)
- 1 (8 oz) tub zero sugar Cool Whip, thawed (let it sit out for 20 minutes—trust me)
- 2 cups all-purpose flour (I spoon and level for accuracy)
- 3 large eggs at room temperature (they incorporate so much better this way)
- 1/2 cup vegetable oil (a neutral oil keeps the pumpkin flavor front and center)
- 1 tbsp pumpkin pie spice (my homemade blend has extra cinnamon)
- 2 tsp baking powder
- 1 tsp vanilla extract
- 1/2 tsp salt
Instructions
- Preheat your oven to 350°F and grease a 9×13 inch baking pan thoroughly.
- Whisk together the flour, baking powder, pumpkin pie spice, and salt in a medium bowl until no streaks remain.
- In a large bowl, combine the pumpkin puree, eggs, vegetable oil, and vanilla extract, whisking for exactly 1 minute until smooth.
- Gradually fold the dry ingredients into the wet ingredients using a spatula, mixing just until combined—Tip: Overmixing creates a tough cake, so stop when you see the last flour disappear.
- Gently fold in the thawed zero sugar Cool Whip until just incorporated, keeping those air bubbles intact.
- Pour the batter into the prepared pan and spread it evenly into all corners.
- Bake for 28-32 minutes, or until a toothpick inserted into the center comes out completely clean. Tip: Rotate the pan halfway through baking for even browning.
- Let the cake cool in the pan on a wire rack for at least 1 hour before slicing. Tip: This patience pays off—the texture sets perfectly as it cools.
A cloud-like texture meets warm pumpkin spice in every bite. Serve slightly warm with a dollop of extra zero sugar Cool Whip, or cube it for a fun fall-themed trifle layered with sugar-free pudding.
Blueberry Zero Sugar Cool Whip Tart
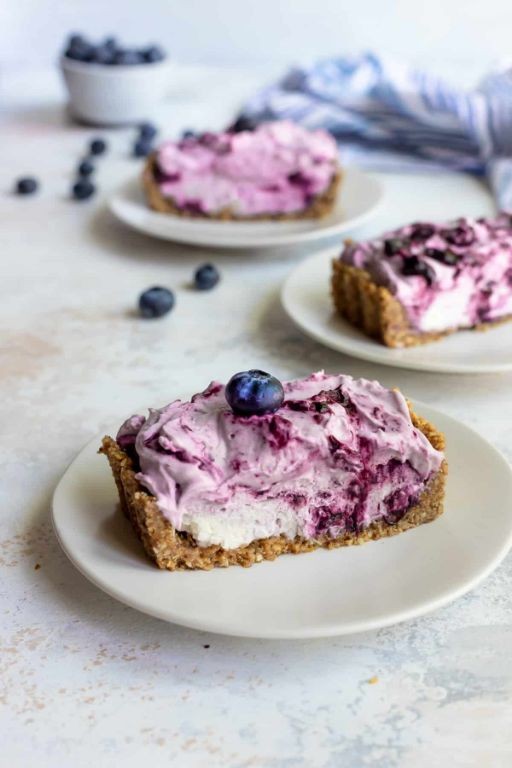
Zesty, refreshing, and guilt-free—this blueberry tart is your new summer obsession. Zero sugar doesn’t mean zero flavor when you layer juicy berries over cloud-like Cool Whip. Grab your tart pan and let’s make magic happen.
Ingredients
– 1 ½ cups graham cracker crumbs (I always crush mine fresh for maximum crunch)
– ½ cup melted unsalted butter (the good stuff makes all the difference)
– 8 oz block cream cheese, softened (room temp blends smoother, trust me)
– 8 oz Cool Whip, thawed (keep it cold until ready to use)
– 2 cups fresh blueberries (washed and patted completely dry)
– ¼ cup powdered erythritol (my favorite sugar-free sweetener)
– 1 tsp pure vanilla extract (skip the imitation stuff)
Instructions
1. Preheat your oven to 350°F and grab a 9-inch tart pan with removable bottom.
2. Combine graham cracker crumbs with melted butter in a medium bowl until mixture resembles wet sand.
3. Press crumb mixture firmly into the tart pan, working it up the sides to form an even crust.
4. Bake crust for exactly 8 minutes at 350°F until lightly golden and fragrant.
5. Let crust cool completely on a wire rack—this prevents the filling from melting.
6. Beat softened cream cheese with powdered erythritol in a large bowl until completely smooth.
7. Add vanilla extract and mix for 30 seconds until fully incorporated.
8. Gently fold in thawed Cool Whip with a spatula until no white streaks remain.
9. Spread cream cheese mixture evenly over the cooled crust with an offset spatula.
10. Arrange dry blueberries in a single layer over the filling, pressing lightly to adhere.
11. Chill the tart in the refrigerator for at least 4 hours, or until firm to the touch.
What emerges is pure bliss—the crisp graham cracker base contrasts beautifully with the pillowy filling, while bursting blueberries add natural sweetness. Serve chilled slices with extra berries scattered around the plate, or crumble leftover crust over individual portions for added texture. This tart holds its shape beautifully when sliced, making it perfect for summer gatherings where you want something impressive but effortless.
Coconut Zero Sugar Cool Whip Frosting
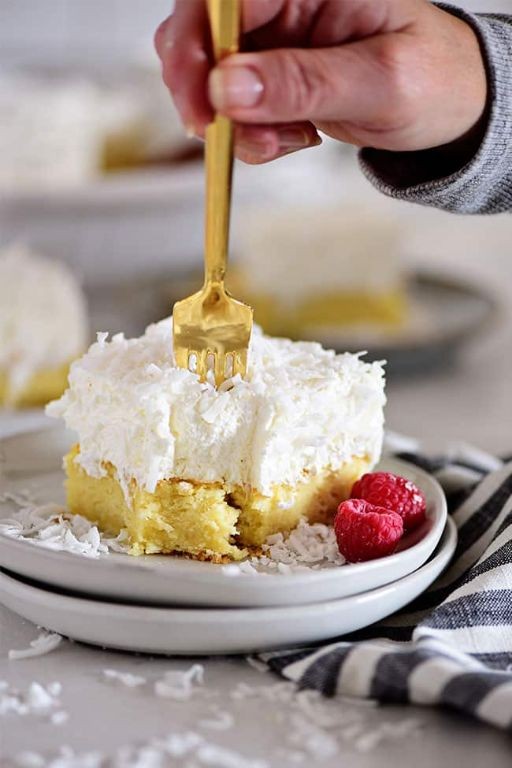
Tired of sugar-loaded frostings that leave you crashing? This coconut zero sugar cool whip frosting transforms desserts without the guilt. Whip up this dreamy topping in minutes—your cakes will thank you.
Ingredients
– 1 (8 oz) tub Zero Sugar Cool Whip, thawed in the fridge overnight—trust me, this prevents graininess
– 1/2 cup full-fat canned coconut cream, chilled and solids only (I always scoop from the top after refrigerating the can)
– 1 tsp pure vanilla extract, the good stuff makes all the difference
– 1/4 tsp coconut extract, optional but gives that tropical punch
Instructions
1. Chill a large metal mixing bowl and beaters in the freezer for 15 minutes—this helps the frosting hold peaks better.
2. Scoop the solidified coconut cream from the top of the chilled can into the cold bowl, leaving the watery liquid behind.
3. Beat the coconut cream on high speed with an electric mixer for 2 minutes until fluffy and slightly thickened.
4. Gently fold in the thawed Zero Sugar Cool Whip with a spatula using broad, sweeping motions to keep it airy.
5. Add the vanilla extract and coconut extract (if using), then fold for 30 seconds more until just combined—don’t overmix.
6. Spread the frosting immediately on cooled cakes or cupcakes, or refrigerate for up to 1 hour if firmer texture is desired.
Whip this frosting onto chocolate cupcakes for a tropical twist, or layer it between vanilla sponge cakes. The texture stays light and cloud-like, with a subtle coconut flavor that doesn’t overpower. Try piping rosettes for a stunning, sugar-free finish that’s ready to shine at any gathering.
Raspberry Zero Sugar Cool Whip Trifle
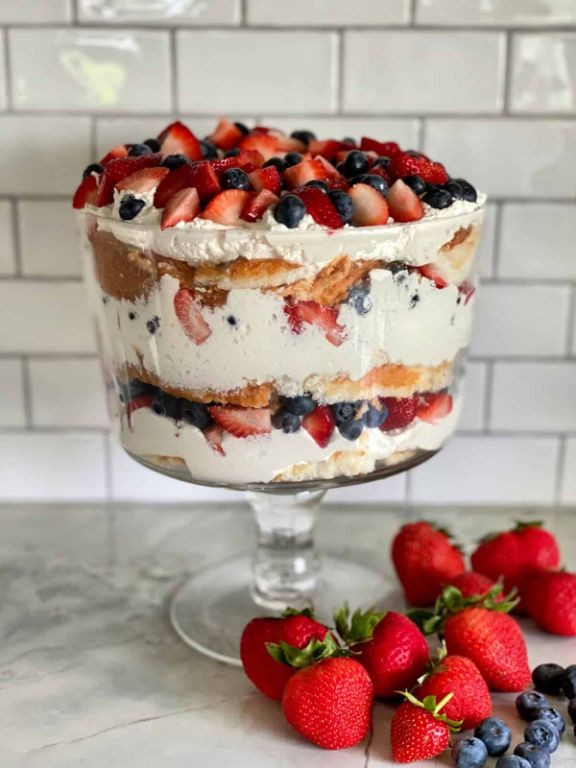
Perfect for when you need a showstopping dessert without the sugar crash. This raspberry trifle layers juicy berries with fluffy Cool Whip for a light, refreshing treat that comes together in minutes.
Ingredients
- 1 (8 oz) tub of Zero Sugar Cool Whip, thawed in the fridge overnight for maximum fluffiness
- 2 cups fresh raspberries, save a handful of the prettiest ones for garnish
- 1 (3.4 oz) box sugar-free vanilla instant pudding mix
- 2 cups cold whole milk, the higher fat content makes the pudding extra creamy
- 1 pre-made angel food cake, torn into bite-sized chunks—store-bought is totally fine here
Instructions
- Pour the 2 cups of cold whole milk into a large mixing bowl.
- Whisk the entire box of sugar-free vanilla instant pudding mix into the cold milk for exactly 2 minutes until it begins to thicken.
- Gently fold the thawed Zero Sugar Cool Whip into the pudding mixture using a spatula until no white streaks remain.
- Tear the angel food cake into 1-inch chunks directly into the bottom of a trifle bowl or large glass serving dish.
- Scatter half of the fresh raspberries evenly over the cake layer.
- Spread half of the Cool Whip and pudding mixture over the raspberries, reaching all the way to the edges of the bowl.
- Repeat the layers with the remaining cake chunks, raspberries, and Cool Whip mixture.
- Arrange the reserved handful of perfect raspberries on top for a beautiful finish.
- Cover the trifle with plastic wrap and refrigerate for at least 2 hours to let the flavors meld and the cake soften.
What you get is a dreamy, cloud-like dessert where the tart raspberries cut through the sweet vanilla cream. The angel food cake soaks up all the goodness, becoming impossibly soft. Try serving it in individual mason jars for a portable party treat that looks as incredible as it tastes.
Orange Zero Sugar Cool Whip Dream Bars
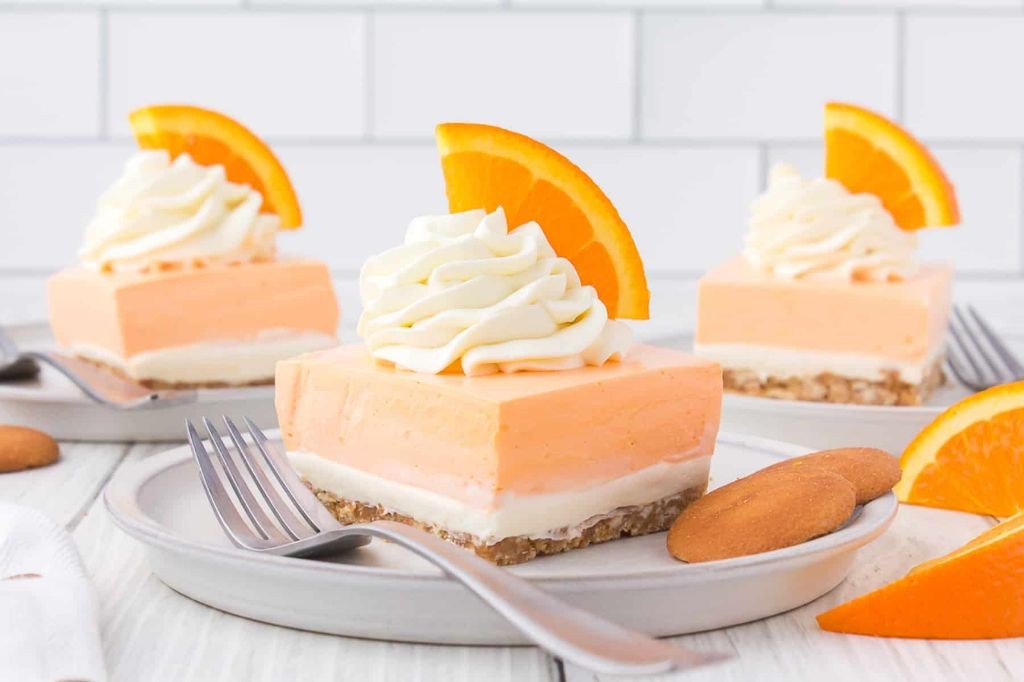
Melt-in-your-mouth magic happens when you combine zero-sugar orange gelatin with fluffy Cool Whip—these dream bars are the no-bake dessert you’ll crave all summer long. Seriously, they’re so refreshing and light, you won’t believe they’re sugar-free!
Ingredients
– 1 box (0.3 oz) sugar-free orange Jell-O—the vibrant color makes these pop!
– 1 cup boiling water (I always use my electric kettle for precision)
– 1/2 cup cold water (straight from the fridge works perfectly)
– 8 oz container of Cool Whip, thawed (don’t skip thawing—it blends so much smoother)
– 1 1/2 cups crushed graham crackers (about 10 full sheets—I love the honey kind for extra flavor)
– 1/3 cup melted butter (salted butter gives a nice contrast to the sweet filling)
Instructions
1. Combine crushed graham crackers and melted butter in a medium bowl.
2. Press the mixture firmly into the bottom of an 8×8 inch baking dish using the back of a measuring cup—this creates an even crust that won’t crumble.
3. Refrigerate the crust for 15 minutes to set while you prepare the filling.
4. Dissolve the sugar-free orange Jell-O powder in 1 cup of boiling water, stirring continuously for 2 minutes until no granules remain.
5. Stir in 1/2 cup cold water immediately to cool the mixture slightly.
6. Chill the Jell-O mixture in the refrigerator for 20 minutes until it thickens to a syrupy consistency—it should coat the back of a spoon but not be fully set.
7. Fold the thawed Cool Whip into the thickened Jell-O using a spatula, making gentle sweeping motions to maintain airiness.
8. Spread the orange filling evenly over the chilled crust.
9. Cover the dish with plastic wrap and refrigerate for at least 4 hours, or overnight for best results—the longer chill time makes cleaner slices.
10. Cut into 9 squares using a sharp knife dipped in warm water between cuts for neat edges.
Effortlessly elegant, these bars deliver a creamy, cloud-like texture with bright citrus notes that dance on your tongue. The buttery graham cracker base provides the perfect crunch contrast—try serving them topped with fresh orange segments or a sprinkle of citrus zest for an extra burst of flavor that’ll make your guests think you’re a pastry pro!
Almond Zero Sugar Cool Whip Icebox Cake
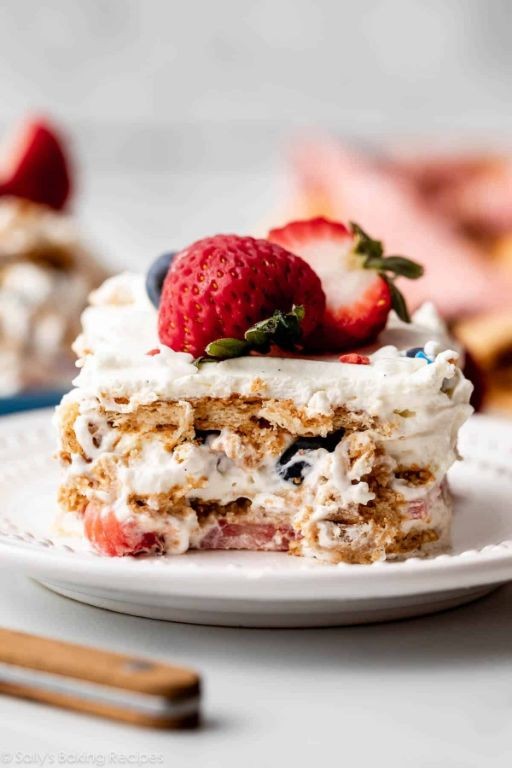
Let’s skip the sugar crash and dive straight into this creamy dream. Layer up this no-bake beauty that’s perfect for last-minute entertaining. Your future self will thank you for this genius dessert hack.
Ingredients
– 2 (8 oz) containers of sugar-free Cool Whip (thawed in the fridge overnight for best texture)
– 1 box almond flour vanilla wafers (I love the extra nutty flavor these bring)
– 1 cup unsweetened almond milk (chilled works best for quick assembly)
– 1 tsp pure almond extract (don’t skip this—it makes the flavor pop)
Instructions
1. Line an 8×8 inch baking dish with parchment paper, leaving overhang on two sides for easy removal.
2. Spread 1/2 cup of Cool Whip evenly across the bottom of the prepared dish.
3. Arrange a single layer of almond flour wafers over the Cool Whip, breaking some to fill gaps.
4. Brush the wafer layer lightly with 1/4 cup of chilled almond milk using a pastry brush—this softens them perfectly.
5. Dollop and spread another 1/2 cup of Cool Whip over the wafers using an offset spatula for smooth layers.
6. Repeat the layering process: wafers, almond milk brush, Cool Whip, until you’ve used all ingredients, ending with Cool Whip.
7. Cover the dish tightly with plastic wrap, pressing it directly onto the surface to prevent ice crystals.
8. Refrigerate for at least 6 hours, but overnight is ideal for the wafers to soften completely.
9. Use the parchment overhang to lift the cake from the dish before slicing.
Velvety layers melt together into the creamiest no-sugar dessert you’ll ever taste. The almond flavor shines through each spoonful, while the softened wafers create a cake-like texture that holds its shape beautifully. Try topping with fresh berries or shaved dark chocolate for an elegant finish that looks professionally crafted.
Key Lime Zero Sugar Cool Whip Pie
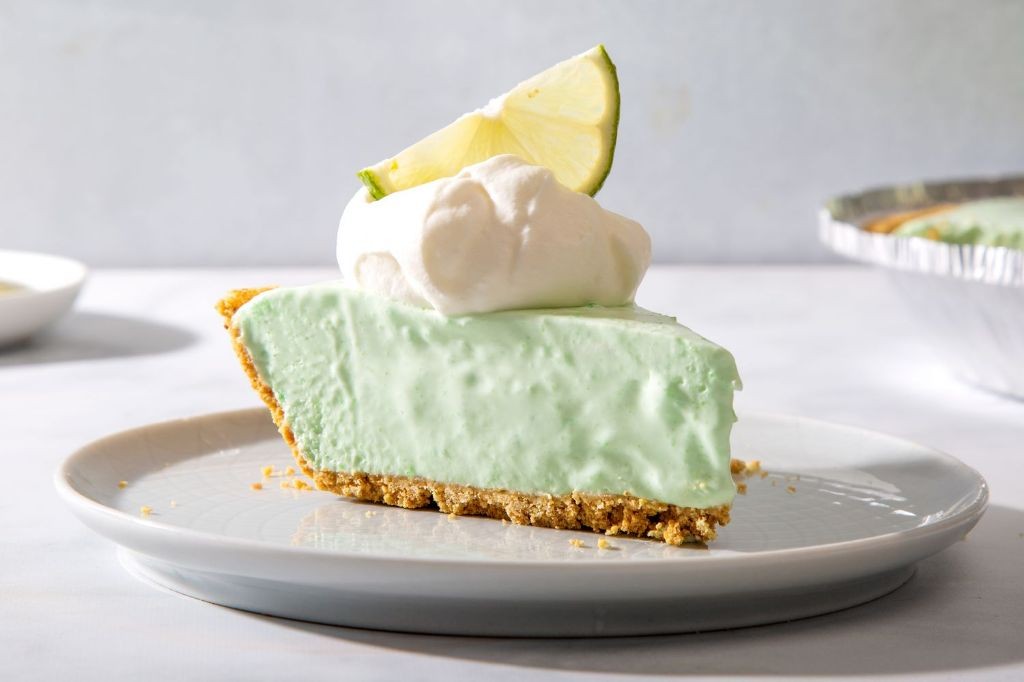
Satisfy your sweet tooth without the sugar crash! This creamy Key Lime Zero Sugar Cool Whip Pie delivers that perfect tangy-sweet balance in just minutes. Seriously, it’s so easy you’ll make it weekly.
Ingredients
– 1 pre-made graham cracker crust (I always grab the deep-dish version for extra filling)
– 8 oz brick of full-fat cream cheese, softened to room temperature for smooth blending
– 1 can (14 oz) sweetened condensed milk (the zero sugar version works perfectly here)
– ½ cup key lime juice, freshly squeezed if you’re feeling fancy
– 1 tub (8 oz) Zero Sugar Cool Whip, thawed in the fridge overnight
– Zest from 2 limes (don’t skip this—it adds that bright pop of flavor)
Instructions
1. Place the softened cream cheese in a large mixing bowl.
2. Beat the cream cheese with an electric mixer on medium speed for 1 minute until completely smooth and lump-free.
3. Pour in the entire can of sweetened condensed milk.
4. Mix on low speed for 30 seconds until fully incorporated—scrape the bowl sides to catch any stubborn bits.
5. Add the key lime juice and lime zest to the bowl.
6. Beat on medium-high speed for 2 minutes until the mixture thickens slightly and turns pale.
7. Gently fold in the thawed Zero Sugar Cool Whip using a spatula—be careful not to deflate the fluffiness.
8. Scoop the filling into the graham cracker crust.
9. Spread the filling evenly with the back of a spoon, creating decorative swirls on top.
10. Cover the pie tightly with plastic wrap.
11. Chill in the refrigerator for at least 4 hours, or overnight for the firmest slice.
Perfectly creamy with a zesty lime kick that’ll make you forget it’s sugar-free. The graham cracker crust adds that essential crunch against the cloud-like filling. Try topping with fresh berries or a sprinkle of coconut for your own twist!
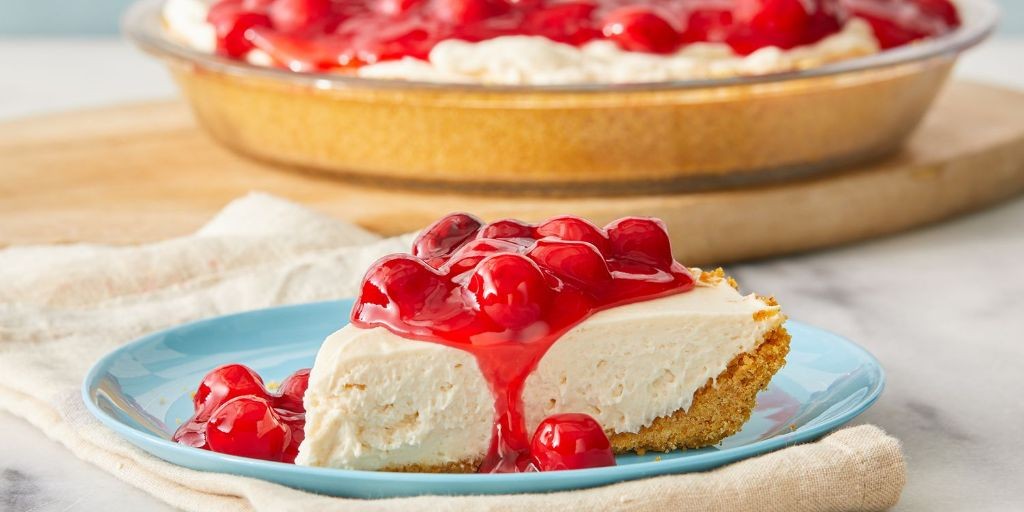
Cherry Zero Sugar Cool Whip Fluff
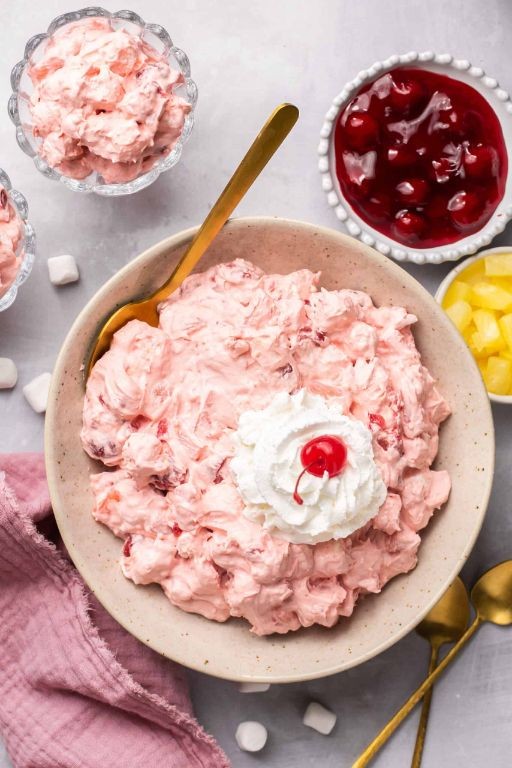
Heads up, dessert lovers! This Cherry Zero Sugar Cool Whip Fluff is your new five-minute obsession. Grab a bowl and get ready to whip up something magical that tastes like summer in a cloud.
Ingredients
– 1 package (8 oz) zero sugar cherry gelatin mix – I love the bold fruit flavor this brings
– 1 cup boiling water – essential for dissolving the gelatin completely
– 1 cup cold water – straight from the fridge works perfectly
– 1 tub (8 oz) zero sugar Cool Whip – make sure it’s thawed for easiest mixing
– 1 can (21 oz) zero sugar cherry pie filling – the star ingredient that makes it irresistible
Instructions
1. Pour the zero sugar cherry gelatin mix into a large mixing bowl.
2. Carefully measure 1 cup of boiling water and pour it over the gelatin powder.
3. Whisk continuously for 2 full minutes until the gelatin is completely dissolved and no granules remain.
4. Add 1 cup of cold water to the bowl and whisk until fully incorporated.
5. Place the bowl in the refrigerator for 15 minutes until the mixture thickens slightly but hasn’t set completely.
6. Remove the bowl from the refrigerator and add the thawed zero sugar Cool Whip.
7. Use a rubber spatula to gently fold the Cool Whip into the gelatin mixture until no white streaks remain.
8. Open the can of zero sugar cherry pie filling and add it to the bowl.
9. Fold the pie filling into the mixture just until evenly distributed, being careful not to overmix.
10. Cover the bowl with plastic wrap and refrigerate for at least 2 hours until fully set.
Gorgeous doesn’t begin to describe this fluffy creation! The texture is light as air with juicy cherry bursts in every spoonful. Try layering it with crushed graham crackers for an instant no-bake pie, or scoop it into fancy glasses for an elegant dinner party dessert that looks way more complicated than it actually is.
Tiramisu Zero Sugar Cool Whip Dessert
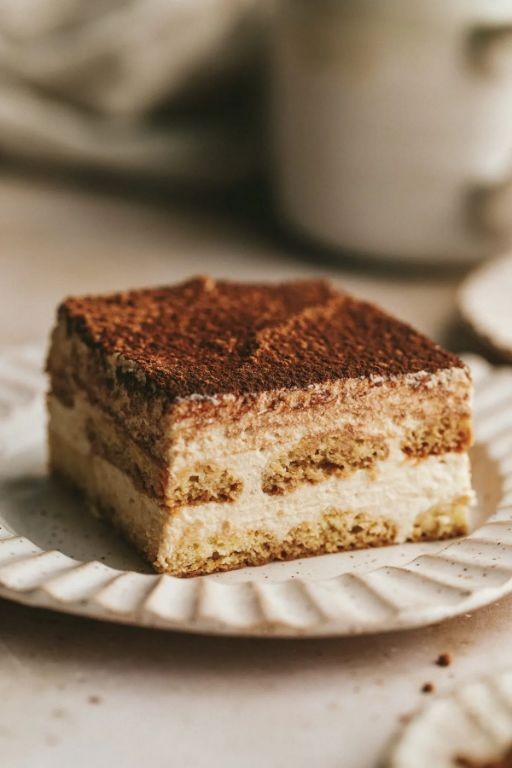
Just when you thought tiramisu couldn’t get easier—this zero-sugar version will blow your mind. Jolt your dessert game with layers of coffee-soaked goodness that come together in minutes.
Ingredients
- 1 package sugar-free ladyfinger cookies (I grab the crisp ones—they hold up better against the coffee)
- 1 cup strong brewed coffee, cooled to room temp (my morning cold brew works perfectly here)
- 8 oz cream cheese, softened (take it out 30 minutes early—trust me on this)
- 1 tub (8 oz) zero sugar Cool Whip, thawed (I always keep an extra in the freezer for emergencies)
- 2 tbsp unsweetened cocoa powder (the dark kind creates that beautiful contrast)
- 1 tsp vanilla extract (pure vanilla makes all the difference in flavor)
Instructions
- Arrange half of the sugar-free ladyfinger cookies in a single layer across the bottom of an 8×8 inch baking dish.
- Pour exactly 1/2 cup of cooled coffee evenly over the ladyfinger layer, making sure each cookie gets soaked but not saturated—they should still hold their shape when pressed lightly.
- Beat the softened cream cheese in a medium bowl using an electric mixer on medium speed for 90 seconds until completely smooth and free of lumps.
- Gently fold the thawed zero sugar Cool Whip into the cream cheese mixture using a spatula, making wide sweeping motions to maintain airiness—stop when no white streaks remain.
- Spread exactly half of the cream cheese mixture over the coffee-soaked ladyfinger layer, creating an even thickness across the entire surface.
- Repeat the layering process with remaining ladyfingers, using the final 1/2 cup of coffee for soaking.
- Top with the remaining cream cheese mixture, smoothing the surface with an offset spatula for that professional bakery look.
- Sift the unsweetened cocoa powder through a fine mesh strainer held 6 inches above the dessert, creating an even dusting that covers the entire top layer.
- Cover tightly with plastic wrap and refrigerate for at least 4 hours—the cookies need this time to soften properly and absorb the flavors.
Outrageously creamy meets delightfully light in every spoonful. The coffee-kissed layers melt against the cool, cloud-like filling—serve it in individual glasses for that coffee shop aesthetic or scoop it straight from the dish for maximum comfort.
Peach Zero Sugar Cool Whip Cobbler
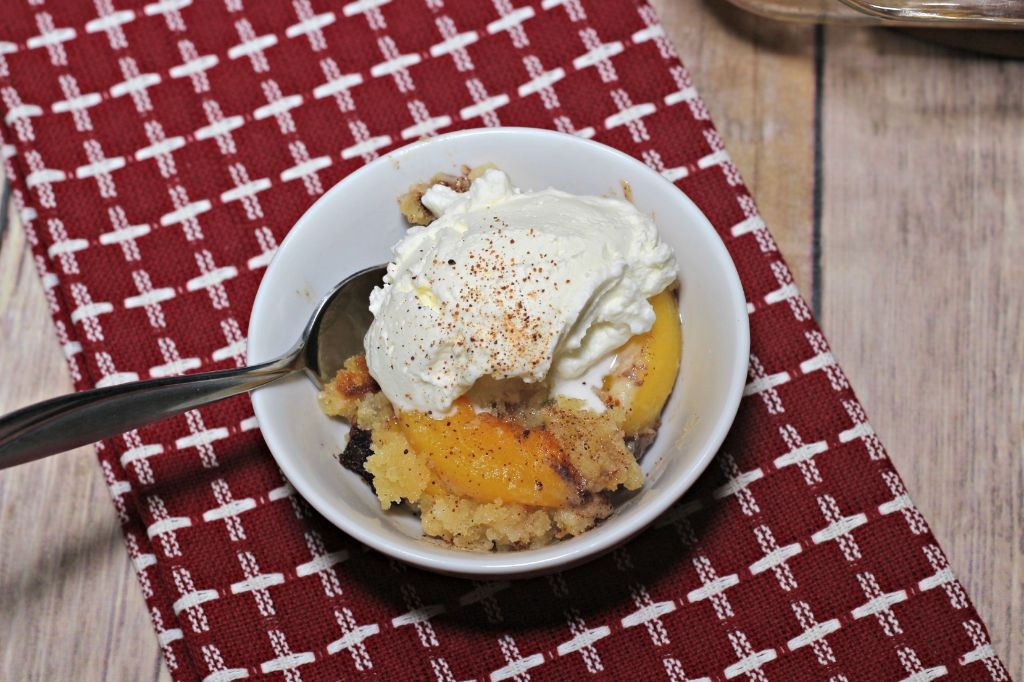
Y’all, this cobbler is about to become your summer obsession. Zero sugar doesn’t mean zero flavor—just pure peach perfection with that buttery biscuit topping we all crave. Seriously, it’s so good nobody will guess it’s sugar-free.
Ingredients
- 4 cups frozen peach slices (I keep these stocked year-round for emergencies)
- 1 container Sugar Free Cool Whip (thawed overnight in the fridge works best)
- 1 cup all-purpose flour (I always use unbleached for better texture)
- 1/2 cup unsalted butter (cold and cubed—don’t let it soften!)
- 1/4 cup almond milk (unsweetened vanilla adds nice flavor)
- 1 tsp baking powder (make sure it’s fresh for maximum rise)
- 1/2 tsp cinnamon (I add an extra pinch because I’m extra)
Instructions
- Preheat your oven to 375°F and grab an 8×8 baking dish.
- Spread frozen peach slices evenly across the bottom of the baking dish.
- Dollop the entire container of thawed Cool Whip over the peaches.
- In a medium bowl, whisk together flour, baking powder, and cinnamon.
- Cut cold butter into the flour mixture using a pastry cutter until it resembles coarse crumbs.
- Pour almond milk into the flour mixture and stir just until combined—don’t overmix!
- Drop spoonfuls of the biscuit dough evenly over the Cool Whip layer.
- Sprinkle remaining cinnamon lightly over the top of the dough.
- Bake for 35-40 minutes until the topping is golden brown and peaches are bubbling.
- Let cool for 15 minutes before serving—this helps the filling set properly.
Warm from the oven, this cobbler delivers that magical contrast of crisp topping against juicy, bubbling peaches. The Cool Whip creates this incredible creamy layer that melds perfectly with the fruit. Serve it straight from the dish with a scoop of sugar-free vanilla ice cream for the ultimate summer treat.
Mocha Zero Sugar Cool Whip Mousse

Kick your dessert game up with this ridiculously easy mousse that’s sugar-free but full of flavor. Whip it up in minutes for that perfect creamy texture everyone craves. Seriously, it’s so simple you’ll make it weekly.
Ingredients
– 1 cup heavy whipping cream (chilled straight from the fridge works best)
– 8 oz container sugar-free Cool Whip (thawed for about 15 minutes)
– 2 tbsp instant coffee granules (I use the extra dark roast for maximum flavor)
– 2 tbsp unsweetened cocoa powder (Dutch process gives it that rich chocolate depth)
– 1 tsp vanilla extract (pure vanilla makes all the difference here)
– Pinch of salt (just a tiny dash to balance the sweetness)
Instructions
1. Pour 1 cup chilled heavy whipping cream into a large mixing bowl.
2. Add 2 tbsp instant coffee granules and 2 tbsp unsweetened cocoa powder to the cream.
3. Whip the mixture on medium-high speed for 2-3 minutes until soft peaks form.
4. Gently fold in the thawed 8 oz sugar-free Cool Whip using a spatula.
5. Add 1 tsp vanilla extract and a pinch of salt to the mixture.
6. Continue folding for 1-2 minutes until fully combined and fluffy.
7. Divide the mousse evenly among 4 serving glasses.
8. Chill the glasses in the refrigerator for at least 30 minutes to set.
9. Serve chilled with optional cocoa powder dusting on top.
This mousse delivers an ultra-smooth texture that melts on your tongue with bold coffee and chocolate notes. Try layering it with crushed sugar-free cookies for a parfait effect, or top with fresh berries for a fruity contrast. The airy consistency makes it feel indulgent without any sugar crash.
Apple Cinnamon Zero Sugar Cool Whip Delight
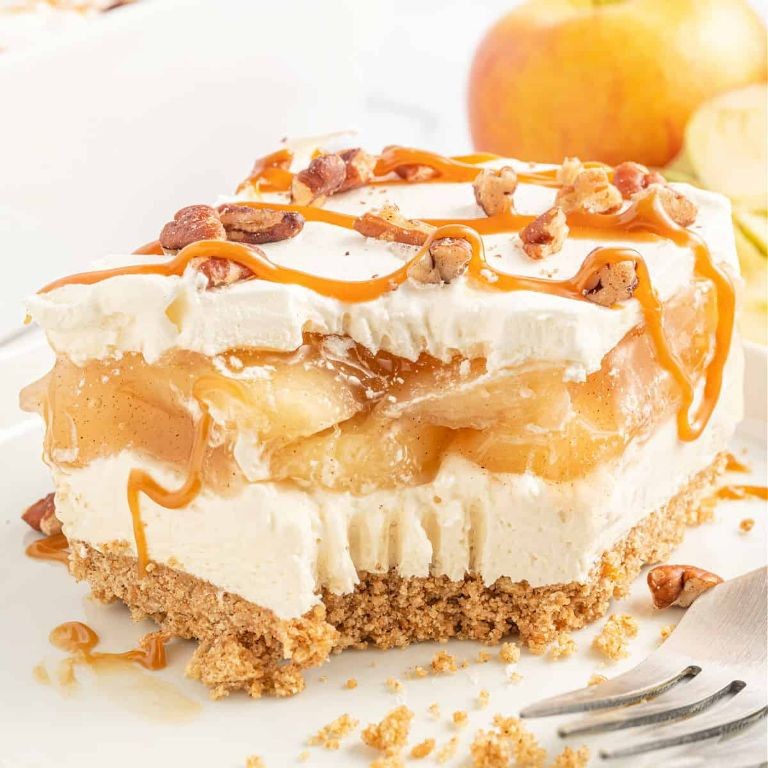
Hear me out—this zero-sugar dessert is about to become your fall obsession. Grab those apples and let’s whip up something seriously dreamy in minutes. No fancy skills needed, just pure, cozy vibes.
Ingredients
– 2 large Granny Smith apples, peeled and diced (tart ones hold their shape best)
– 1 tsp ground cinnamon (I always add an extra pinch for that warm hug)
– 1 tub (8 oz) zero sugar Cool Whip, thawed in the fridge overnight (cold = fluffier folds)
– 1/2 cup unsweetened almond milk (or any milk you love—oat milk works too)
– 1 tbsp lemon juice (squeeze it fresh to keep apples from browning)
Instructions
1. Peel and dice both apples into 1/2-inch cubes—uniform pieces ensure even softening.
2. Toss apple cubes with lemon juice in a medium bowl to coat completely; this prevents browning while you prep.
3. Sprinkle cinnamon over apples and stir gently until every piece is dusted with spice.
4. Pour almond milk into the bowl and mix until apples are lightly coated.
5. Let the apple mixture sit for 5 minutes to soften slightly and absorb flavors.
6. Gently fold in the thawed Cool Whip with a spatula, using wide strokes to keep it airy (overmixing deflates the fluff!).
7. Chill the mixture in the refrigerator for at least 20 minutes to let flavors meld and texture firm up.
8. Scoop into serving bowls or mini mason jars for a cute, portioned treat.
So creamy and light, this delight melts with spiced apple bits in every bite. Serve it layered with crushed graham crackers for crunch, or top with a cinnamon sprinkle for extra warmth. It’s the effortless sweet fix you’ll crave all season.
Mint Chocolate Zero Sugar Cool Whip Pie
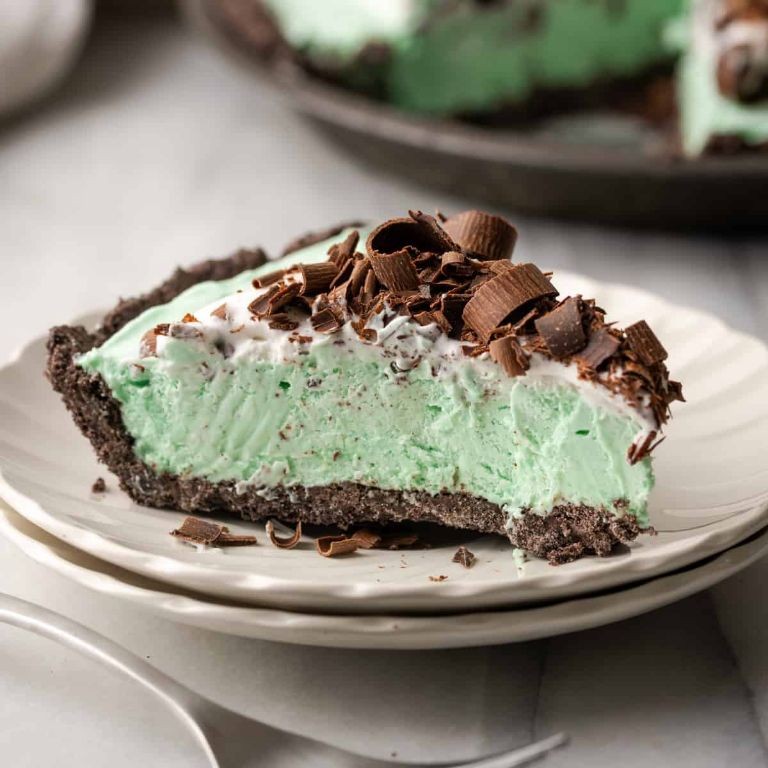
Brace yourself for the easiest, creamiest no-bake dessert that’ll become your summer obsession. This mint chocolate zero sugar pie delivers that cool, refreshing flavor without any guilt—perfect for when you need something sweet but smart. Seriously, it comes together in minutes and disappears even faster.
Ingredients
– 1 (9-inch) pre-made chocolate cookie pie crust (I grab the Keebler one—it’s consistently crisp)
– 1 (8 oz) tub zero sugar Cool Whip, thawed in the fridge overnight (cold is key for fluffiness)
– 1 (1 oz) box sugar-free instant chocolate pudding mix (Jell-O brand works perfectly here)
– 1 cup cold whole milk (don’t skimp—the fat makes it extra creamy)
– 1/2 tsp pure peppermint extract (I use McCormick for that authentic minty kick)
– 3 drops green food coloring (optional but fun for that festive look)
– Zero sugar chocolate shavings for garnish (I shave a Lily’s chocolate bar with a vegetable peeler)
Instructions
1. Place your pre-made chocolate cookie pie crust on a flat surface.
2. Pour 1 cup cold whole milk into a large mixing bowl.
3. Add 1 box sugar-free instant chocolate pudding mix to the milk.
4. Whisk vigorously for exactly 2 minutes until the pudding thickens and no dry spots remain.
5. Let the pudding mixture rest for 5 minutes to fully set.
6. Gently fold in 1/2 tsp pure peppermint extract using a spatula.
7. Add 3 drops green food coloring if using, and fold until evenly distributed.
8. Scoop the entire tub of thawed zero sugar Cool Whip into the pudding mixture.
9. Fold gently with a spatula until fully combined and no white streaks remain—don’t overmix.
10. Spoon the mint chocolate filling into the prepared pie crust.
11. Use an offset spatula to smooth the top into an even layer.
12. Sprinkle zero sugar chocolate shavings generously over the entire surface.
13. Cover the pie tightly with plastic wrap.
14. Chill in the refrigerator for at least 4 hours, or until firmly set.
Chill out with this creamy, dreamy pie that’s surprisingly light yet satisfyingly rich. The cool mint perfectly balances the deep chocolate notes, while the fluffy texture melts on your tongue. Serve it sliced straight from the fridge, or get fancy with fresh mint sprigs and extra chocolate curls for your next gathering.
Black Forest Zero Sugar Cool Whip Cake
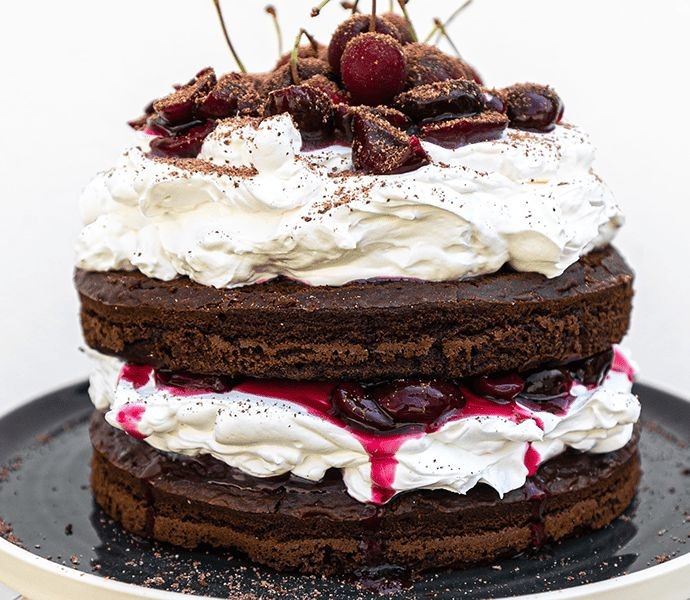
Perfect for when you’re craving decadent dessert without the sugar crash. This Black Forest beauty layers rich chocolate, tart cherries, and fluffy Cool Whip into a showstopper that’s secretly simple. Trust me—your guests will never guess it’s zero sugar.
Ingredients
- 1 box sugar-free devil’s food cake mix—I always grab the one with pudding in the mix for extra moisture.
- 3 large eggs at room temperature; they incorporate so much better into the batter.
- ½ cup vegetable oil; a neutral oil lets the chocolate flavor shine.
- 1 cup water; filtered if you’re fancy, tap works fine too.
- 2 cans (21 oz each) sugar-free cherry pie filling; look for ones packed in juice, not syrup.
- 1 tub (8 oz) zero sugar Cool Whip, thawed in the fridge overnight—don’t rush it or it’ll get watery.
- ½ cup sugar-free chocolate chips; I like dark chocolate for a bittersweet contrast.
Instructions
- Preheat your oven to 350°F and grease two 9-inch round cake pans with non-stick spray.
- In a large mixing bowl, combine the cake mix, eggs, oil, and water using an electric mixer on medium speed for 2 minutes until smooth.
- Divide the batter evenly between the prepared pans, tapping them gently on the counter to release air bubbles.
- Bake for 25–28 minutes, or until a toothpick inserted into the center comes out clean with no wet crumbs.
- Let the cakes cool in the pans for 10 minutes before transferring them to a wire rack to cool completely.
- Place one cake layer on a serving plate and spread half the cherry pie filling evenly over the top, leaving a ½-inch border.
- Top with half the Cool Whip, spreading gently to avoid mixing with the cherries.
- Repeat with the second cake layer, remaining cherries, and remaining Cool Whip.
- Sprinkle chocolate chips over the top, pressing lightly so they stick.
- Chill the cake in the refrigerator for at least 1 hour before slicing to let the layers set.
Decadent layers of moist chocolate cake, tart cherries, and airy Cool Whip create a dessert that’s rich but never heavy. Serve it chilled with extra cherries on the side for a dramatic drizzle, or slice it thick for a satisfying texture contrast. This cake holds up beautifully in the fridge overnight—if it lasts that long.
Summary
Versatile and delightful, these zero-sugar Cool Whip desserts prove that healthy eating can still be sweet and satisfying. We hope you’ve found some new favorites to try in your own kitchen! Don’t forget to leave a comment sharing which recipe you loved most, and pin this article on Pinterest to save these ideas for later. Happy baking!